Eldom Invest NHC-H34 Multi User manual

ELECTRONIC THERMOSTAT
for control of utility storage water heaters with electric heater/s up to 3 kW, 230 V~
(single phase connection)
ELEKTRONISCHER TEMPERATURREGLER
zur Steuerung von Warmwasserspeichern mit Elektroheizer bis 3 kW, 230 V~
(einphasige Kopplung), für den Hausgebrauch
TERMOREGULATEUR ÉLECTRONIQUE
pour le contrôle des chauffe-eau accumulateur domestique avec chauffage électrique
avec puissance jusqu'à 3 kW, 230 V ~ (connexion monophase)
ELEKTRONISCHE THERMOSTAAT
voor beheer van boilers voor huishoudelijk gebruik met elektrische verwarmer met
vermogen tot 3 kW, 230 V~ (éénfasige aansluiting)
Button F. This button completes various
functions depending of operation mode.
Increasing (▲) and decreasing (▼) buttons.
Used for settings.
Button (Г). Used to switch menus.
Taste F. Erfüllt unterschiedliche Funktionen, je
nach dem Betriebsmodus
Einstellungs-Tasten Hoch (▲) und Niedrig (▼).
Für die Einstellungen
Taste (Г). zwischen den Menüs wechseln
Touche F. Effectue diverses fonctions, selon le
mode de fonctionnement.
Touches d'augmenter (▲) et de diminuer (▼).
Utilisé lors de la configuration.
Touche (Г). Utilisé pour passer entre menus.
EN
DE
FR
NL
EN
FR
DE
Toets F. Voert verschillende functies uit,
afhankelijk van de werkmodus.
Toetsen voor verhogen (▲) of verminderen
(▼). Ze worden gebruikt bij het instellen.
Toets (Г). Wordt gebruikt om naar de menu’s te
schakelen.
NL
ЭЛЕКТРОННЫЙ ТЕРМОСТАТ
для управления бытовыми накопительными водонагревателями с электрическим
нагревательным элементом/элементами до 3 kW, 230 V~, однофазное соединение
RU
RO Butonul F. Îndeplineşte diverse funcţii, în funcţie
de modul de funcţionare.
Butoanele de majorare (▲) şi de reducere (▼).
Se folosesc la setare.
Butonul (Г). Se foloseşte pentru trecerea prin
meniuri.
NHC-H34v200714
ЕЛЕКТРОНЕН ТЕРМОРЕГУЛАТОР
за управление на битови акумулиращи водонагреватели с електрически
нагревател/и до 3 kW, 230 V~ (монофазно свързване)
BG
ELEKTRONISCHE THERMOSTAAT
pentru controlul încălzitoarelor de apă menajere cu un încălzitor electric de până la 3
kW, 230 V~ (legare în fază unică)
RO
RU Кнопка F. Выполняет разные функции в
зависимости от режима работы.
Кнопки увеличения (▲) и уменьшения (▼).
Используются для настройки.
Кнопка (Г). Используется для переключения
меню.
Бутон F. Изпълнява различни функции, в
зависимост от режима на работа.
Бутони за увеличаване (▲) и намаляване
(▼). Използват се при настройване.
Бутон (Г). Използва се за преминаване в
менютата.
BG
EN
DE
FR
NL
RO
CONTENT
English
Deutsche
Français
Nederlands
România
........................................................................................ 11
................................................................................... 19
.................................................................................... 27
............................................................................... 35
.................................................................................... 43
Eldominvest Ltd., Varna, Bulgaria
Tel.: +359 52 500349, Fax: +359 52 500347
www.eldominvest.com, [email protected]
Manufacturer:
BG Български .................................................................................. 3
RU Русский .................................................................................... 51

BG
ПРЕДУПРЕЖДЕНИЕ! Преди ползване на уреда, внимателно прочетете тази инструкция!
Тази инструкция е неделима част от общата инструкцията за монтиране и ползване на Вашия
водонагревател, която е приложена към уреда. Всички изисквания от общата инструкция за
монтирането и свързването на водонагревателя към водопроводната и електрическата мрежи са
безусловно в сила. Задължително е спазването и на изискванията, записани в останалите раздели
на общата инструкция.
Тази инструкция изяснява особеностите и начина на ползване на електронния блок за управление,
заместващ традиционните термостат и ключ светещ на обикновените водонагреватели.
ИНСТРУКЦИЯ ЗА ПОЛЗВАНЕ
Eлектронният терморегулатор (наричан също така и електронен блок) е предназначен за управление и
контрол на електрически водонагреватели от висок клас. Той е с 4 управляващи бутона, графичен LCD
дисплей, реле/релета за захранване на нагревателя/нагревателите, един или два температурни сензора.
Софтуерът е с алгоритъм за автоматично намаляване на разходите за електроенергия. Основните задачи
пред електронния блок са да управлява нагряването на Вашия водонагревател максимално ефективно и
да Ви освободи от всички грижи, и ангажименти с него.
ПРЕДУПРЕЖДЕНИЕ! Този уред може де се ползва от деца на възраст над 8 години и лица с
ограничени физически, сетивни или умствени способности, или с недостатъчен опит и познания, ако те
са наблюдавани или инструктирани относно безопасното ползване на уреда и разбират опасностите.
Децата не трябва да си играят с уреда. Забранено е деца да извършват почистване или обслужване на
уреда от ползвателя.
ПЪРВОНАЧАЛНИ НАСТРОЙКИ
Електронният терморегулатор е предназначени за широка гама водонагреватели, различаващи се по
вместимост, мощност на нагревателя и материал на водосъдържателя.
При производството на водонагревателите не се извършва персонализация на електронния
терморегулатор, поради което е необходимо след като монтирането на уреда да се въведе информацията
за обема му, мощността на нагревателя/нагревателите.
По подразбиране, в електронния блок на монофазните уреди са въведени параметрите за водонагревател
модел 72268E34/WV08039E (80 l, 3 kW, с емайлиран водосъдържател). Ако Вашият водонагревател е
такъв, не се налага допълнителна персонализация.
3

4
При първо подаване на електрозахранване към водонагревателя, той се включва в режим на
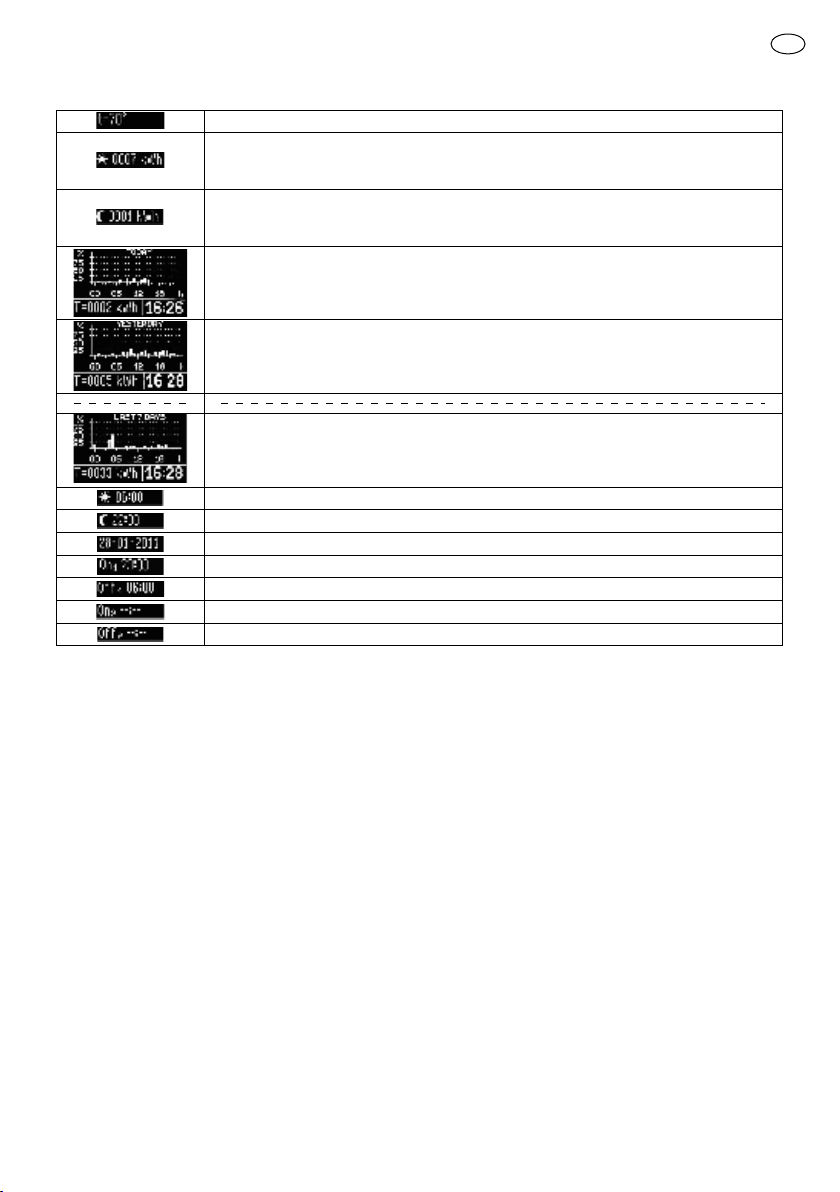
нагряване на водата (работен режим). На дисплея на електронния блок се извежда следната информация:
Първоначално изключване на водонагревателя от работен режим (изключено състояние)
Извършва се с натискане на бутона F. Дисплеят придобива следния вид:
Символ за включен нагревател
По линията се движи черна точка
Измерена температура на водата
във водосъдържателя
Текущо време
Първоначално не е настроено
Предварително зададена максимална
температура на затопляне на водата
Поле за съобщения
Цифрите в полетата за време и дата премигват, защото времето и датата не са настроени.
Настройване на текущите време и дата
Текущо време
Първоначално не е настроено
Текуща дата
Първоначално не е настроена
В режима за настройване се преминава с еднократно натискане и задържане за около 2-
3 секунди на бутон F. На дисплея се извежда надпис Set Time и времето. Цифрите за час
мигат. С бутоните ▲ и ▼ се настройва точния час. При натискане на бутона Г се
преминава към настройване на минутите – цифрите за минути започват да мигат.
След въвеждането на точните минути чрез бутоните ▲ и ▼ , с натискане на бутон F се
преминава към настройване на точната дата (на дисплея се извежда Set Date). Начинът
е както при настройване на времето. След това, с натискане на бутон F се потвърждава настройката и се
преминава в основния екран на изключено състояние на водонагревателя.
Настройване на характеристиките на водонагревателя, ако той се различава от фабрично
настроения за електронния терморегулатор
Влизането в режима е от изключено състояние на уреда, като се
натиснат и задържат Г и F едновременно за над 4 секунди. Първо
излиза екран с изписани версиите на хардуера и на софтуера.
Хардуерна версия
на терморегулатора
Версия на софтуера
на терморегулатора
Мощност на
нагревателя
При следващото натискане на бутон F излиза екран за настройване на характеристиките на
водонагревателя.
Характеристиката на уреда, която може да бъде променена, мига.
С бутоните ▲ и ▼ се избира стойност, съответстваща на
записаната в етикета със серийния номер на уреда (на 30-200 л
водонагреватели за стена се намира на капака на уреда, между
тръбите за студена и топла вода). С бутон Г се преминава към
Вместимост на
водонагревателя
следващата характеристика за настройване. След приключване на въвеждане на характеристиките на
уреда, с бутон F се запомнят направените настройки и се преминава към изключено състояние на
водонагревателя. На дисплея са изписани времето, датата и състоянието на анода.
ДИСПЛЕЙ – ОСНОВНИ ИЗГЛЕДИ
Дисплеят има три основни изгледа. Те онагледяват основните състояния:
џИзключен водонагревател
џВключен водонагревател
џНастройка на входните данни
BG

BG
1. Изглед I – Изключен водонагревател
На дисплея се извежда следната информация:
Поле за извеждане на съобщения
Време – час, минути
Дата – ден, месец, година
2. Изглед II – Включен водонагревател
Този изглед е в основния работен режим. Информацията, която се извежда, е разпределена в 6 полета:
Измерени или въведени параметри
Поле за извеждане на съобщения
Температура на водата
Време – час, минути
Режим на работа
2.1. Поле „Режим на работа“ – дава информация за наличие на специален ограничителен режим при
включване на нагревателя. Вариантите са:
џ Празно поле – нагревателят ще се включва или изключва само в зависимост от настроената
температура;
џ Наличие на време за включване (On) и изключване (Off) – нагревателят освен от температурата
ще зависи и от това, дали текущият час е в интервал, разрешаващ работата му;
џ Наличие на време за включване и дата – (режим отложен старт) нагревателят ще се включи при
настъпване на указаното време;
џНадпис Smart control – водонагревателят е включен в режим за интелигентно намаляване на
разходите за електроенергия.
2.2. Поле „Измерени или въведени параметри“ – дава полезна информация, свързана с настройка на
променливите параметри или текущата дата, и консумирана дневна, или нощна електрическа
енергия.
2.3. Поле „Час“ – показва текущото време. Когато часовникът не е настроен, това поле мига.
Терморегулаторът има батерия поддържаща отчитането на времето при краткотрайно спиране на
тока. Максималното време за поддръжка на часа е 18 часа, след което часовникът ще се самоизключи
и ще се наложи повторно сверяване.
2.4. Поле „Температура на водата“ – дава информация за текущата температура на водата във
водосъдържателя. Трябва да се има предвид, че измерването на температурата става в долния край
на водосъдържателя, а горещата вода се изкачва в горния край, от където и изтича към
водоопроводната инсталация в жилището. Поради тази причина е възможно, въпреки показаната
ниска температура от терморегулатора, действителната температура на водата да бъде много по-
висока. Това е ограничение на метода за измерване на температурата и е необходимо да се внимава
при използване на неразхладена гореща вода.
2.5. Поле „Съобщения“ – тук се извеждат всички съобщения за регистрирани проблеми. Възможните
съобщения са:
џFuse? – Изгорял предпазител на анодния протектор или прекъсване на веригата му към
терморегулатора. Друга възможна причина е водонагревателят да е останал без вода. Когато е
изведено това съобщение, нагревателят ще се изключи и повторното му включване ще е
възможно след изключване от външното устройство за разединяване (апартаментното табло).
5

џSensor E1 – Температурният датчик е прекъснат или изключен.
џSensor E2 – Температурният датчик е повреден или на късо.
џFrost – При включване на електрическото захранването на водонагревателя, е измерена
отрицателна температура на водата във водосъдържателя. Възможно е замръзване на водата!
В този случай нагревателят няма да се включи, докато уредът не се изключи от външното
устройство за разединяване (апартаментното табло). Трябва да се провери цялостта на
водосъдържателя и тръбопровода!
3. Изглед III – Настройка
Най-горният подчертан ред показва параметъра, който се настройва в момента, а в средата е неговата
стойност.
Стойност на настройвания параметър
РАБОТА С ЕЛЕКТРОННИЯ РЕГУЛАТОР
1. Включване нагряването на водата и промяна на режима на работа
Когато водонагревателят е изключен, дисплеят е във вид като „Изглед I“. При следващото натискане на
бутон F, водонагревателят минава във включено състояние, а дисплеят в „Изглед II“. Когато няма други
условия ограничаващи нагряването на водата, т.е. полето „Режим на работа“ е празно и ако зададената за
Настройван параметър
нагряване температура е по-голяма от температурата на водата показана в поле
„Температура на водата“, нагревателят се включва. Това се илюстрира с бягаща точка в
знака за включен нагревател в горният десен ъгъл на екрана. Показан е дисплея на уред
с водосъдържател от хром-никелова стомана (без анод), който е в работен режим.
Режимите на работа са 4. Превключването между тях, става става чрез последователно натискане на
бутон F. Редът им е както следва:
Изключен водонагревател
Режим “Нагряване”
Режим “Smart”
Режим “Нагряване с таймер”
Режим “Отложен старт”
След последния работен режим се преминава в изключено състояние. Тогава регулаторът ще извежда
върху дисплея час, дата и състояние на анодния протектор и няма да включва нагревателя, освен ако няма
опасност от замръзване на водата.
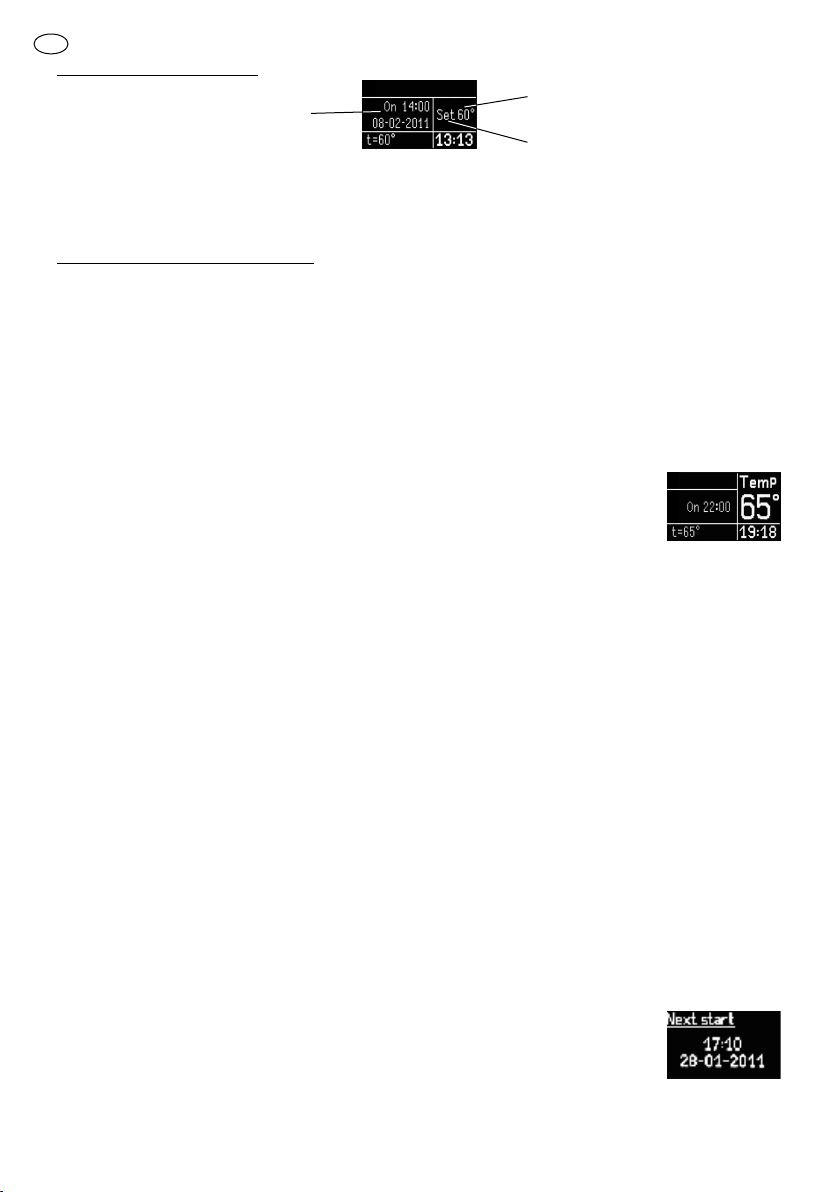
1.1. Режим „Нагряване“
При работа в този режим, нагревателят се включва когато температурата на водата в
областта на температурния сензор стане с 5 градуса по-ниска от настроената.
BG
6

BG
Изключването му става след достигане на настроената температура. Няма други условия, които да
управляват нагряването.
Зададена температура за нагряване на
водата или измерената температура,
когато нагревателят работи
Следва включване (On) или
изключване (Off) на нагревателя
Set - Зададена температура
Времето, когато това ще се случи
1.2. Режим Smart control
При този режим, нагряването се управлява чрез специално разработен енергоспестяващ
алгоритъм. Благодарение на него Вие ще се възползвате от удобството да имате топла
вода когато Ви потрябва и да плащате възможно най-ниската цена за нея. Препоръчваме
Ви използването на този режим, когато дневната Ви консумация на топла вода е повече от вместимостта на
Вашия водонагревател. Тогава загряването на водата само през нощта няма да е достатъчно и ще трябва
да оставите водонагревателя постоянно включен. При работа в режим Smart control водонагревателят
следи Вашата нужда от топла вода и не нагрява излишно водата, когато не се очаква да Ви трябва. Освен
това, ще се опитва да използва максимално нощната електроенергия, която, както знаем, е на доста по-
ниска цена. За да заработи ефективно този режим, водонагревателят трябва да бъде включен поне 2 дена
непрекъснато и да не се превключва към някой от другите режими.
При този режим настроената температура не се използва, защото регулаторът сам решава до
каква температура да нагрява. По тази причина бутони ▲ или ▼, не променят зададената
температура.
При първото включване на водонагревателя или ако той дълго време не е бил използван,
препоръчваме да включите първо режим „Нагряване“ до постигане на зададената температура и
след това да преминете към режим Smart control!
При прекалено малка консумация на електроенергия през деня, водонагревателят ще премине в
режим Намалена мощност и надписът Smart control на екрана ще се смени с Low power. От това
състояние ще се излезе автоматично при следващо включване на нагревателя или ако смените
режимите на работа с бутон F, до достигане повторно на Smart control.
При използване на режим Smart control, температурата на водата се поддържа по-ниска през деня,
за да няма излишна загуба на топлина. Ако в някои определени дни Ви се налага използване на повече
топла вода, можете да включите режима за принудително загряване Boost. Това става с натискане
и задържане на бутон ▲ за повече от 1.5 секунди. При влизане в този режим, водата ще се нагрее до
зададената температура за режим Нагряване, след което водонагревателят ще се върне отново
в режим Smart control.
* Ако температурата на водата е по-висока от зададената, няма да се
активира режим Boost!
* При активиране на принудителното загряване временно ще се влоши
енергийната ефективност на водонагревателя!
1.3. Режим Нагряване с таймер
В този режим Вие сами можете да зададете интервал от време, през който е разрешено нагряването на
водата. За целта трябва да настроите предварително двата таймера, като използвате меню Set On/Off
Time. След превключване към този режим, нагревателят ще се включи, ако текущото време е в някой от
двата интервала и температурата на водонагревателя е под настроената. Можете да използвате този
режим, ако например имате потребление на топла вода само сутрин и вечер, а цялото количество топла
вода свършва още сутринта. Тогава можете да настроите единия таймер в часови интервал през нощта, а
другия – преди да Ви потрябва водата през деня. Интервалът, в който ще разрешите включването на
нагревателя, трябва да бъде съобразен с възможността на водонагревателя да достигне зададената
температура за това време. Информация за времето за загряване на Вашия водонагревател може да
намерите от техническото описание на уреда.
7
Зададена температура за нагряване на
водата или измерената температура,
когато нагревателят работи
Час и дата на предстоящото
включване на нагревателя
Set - Зададена температура
1.4. Режим Отложен старт
Когато ще отсъствате дълго от дома си и искате когато се приберете веднага да имате топла вода, може да
използвате режим Отложен старт За да се включи този режим, предварително трябва да настроите
времето за включване чрез меню Next start и то да бъде след текущото време. Когато се достигне
настроеното време за отложения старт, водонагревателят ще мине в режим Нагряване.
1.5. Изключване на водонагревателя
Чрез последователно натискане на бутон F ще се стигне до изключване на водонагревателя. В това
състояние дисплеят има дизайн като „Изглед I“ и нагревателят не се включва.
Дори и в изключено състояние се запазва автоматичната функция Анти замръзване, която
предпазва водонагревателя от спадане на температурата на водата във водосъдържателя до
опасно ниски стойности. По тази причина когато има опасност от спадане на околната
температура, е препоръчително водонагревателят да не се изключва от захранващата мрежа!
2. Задаване на температурата.
Когато водонагревателят е във включено състояние и не е в режим Smart control, с
натискане на някой от бутоните ▲ или ▼ се преминава в режим Промяна на
зададената температура. Числото в поле „Температура на водата“ започва да мига и
там се извежда зададената температура. Над нея се изписва Temp. Със следващите
натискания на бутоните се променя заданието в желаната посока. Променената температура се запомня с
натискане на бутон Г или след изтичане на 5 секунди без да натискате бутон. Ако някой от бутоните ▲ или
▼ се задържи над 0,8 секунди, стойността на зададената температура започва автоматично да се
увеличава или намалява. Границите на регулиране на зададената температура са от 20 °C до 75 °C.
3. Влизане в режим „Настройки“
За влизане в режим Настройки, водонагревателят трябва да бъде във включено състояние (Изглед II).
Натиснете и задръжте бутон F за повече от 1.5 секунди Тогава се влиза последователно във всички
настройващи менюта. Общите принципи, които се спазват при всички настройки са следните:
џСтойността, която може да се променя, мига;
џС бутон Г се преминава към следващото поле на екрана, което може да се променя;
џУвеличаването и намаляването на стойността на избраното поле става с бутоните ▲ и ▼. Ако някой
от тези бутони се задържи за над 0.8 сек., стойността ще започне автоматично да се увеличава или
намалява. В този случай полето, което се променя, не мига, а само се променя стойността му.
џС бутон F се излиза от текущия екран за настройка. Ако има направени промени по някой от
параметрите на този екран, те се запазват и се излиза от режима за настройки. Ако не са правени
промени по текущия екран, с бутон F се преминава към следващия екран с настройки, ако има такъв.
џКогато показанията на часовника мигат, това означава, че той не е бил сверяван. В този случай е
възможно влизане в режим за настройка на часа и датата и от изключено състояние на
водонагревателя (Изглед I).
Настройки:
џNext start – Въвежда се часът и датата за включване нагряването на водата при
задействане на режим „Отложен старт“.
За да може да използвате този режим, трябва да се зададе времето за
отложения старт с тази настройка. Въведеното време трябва да е след
текущото, в противен случай, след потвърждаването му с F, ще се изведе
надпис за грешка Error.
BG
8

BG
Край на Таймер 1
Край на Таймер 2
Начало Таймер 1
Таймер 1 е активен
Таймер 2 не е активен
Начало дневна ел. енергия
Начало нощна ел. енергия
Фина настройка на
стратегията за икономия
Активиране на допълнителна
сезонна компенсация
џSet Time – Сверяване на системното време във формат ЧЧ:ММ
џSet Date – Сверяване на системната дата във формат ДД-ММ-ГГГГ
За правилното функциониране на водонагревателя, часът и датата
трябва да бъдат настроени!
џSet On/Off Time - Въвежда се време, ограничаващо интервала, през който е
разрешено нагряването на водата. Нагревателят може да се включва, ако
температурата на водата го изисква и текущият час е в интервала между
началото, зададено с левите цифри във формат ЧЧ:ММ и края, зададен с десните цифри ЧЧ:ММ.
Следващото условие за включване е, таймерът да бъде активен, като се потвърди квадратчето от
ляво.
Електронният блок допуска сложно образуване на интервалите, например когато началото на
Таймер 1 се приключва от края на таймер 2 и т.н.
џSet Time ☼/ – Въвежда се началото на дневната (☼) и нощна тарифа (). Това е необходимо за
пресмятането на консумираната електроенергия.
Правилната настройка на тези времена е изключително важна за работата на режим Smart
control. Според действащите правила на електроснабдителните компании в България, тези
времена се менят при минаване от зимно към лятно часово време и обратно.
џДопълнителна настройка на стратегията за икономия в режим Smart control. За удовлетворяване на
нуждите от топла вода има възможност за допълнителна настройка на работата на режим Smart
Control. Режимите, настройвани в ред Mode са Eco, Normal и Power. Най-икономичният от тях е
Eco, но ако осигурената топла вода в този режим не е достатъчна за Вашите нужди, може да
използвате някой от другите два. През зимния сезон на много места студената вода е с много по-
ниска температура. След смесването ѝ с водата от водонагревателя, общият обем топла вода ще се
намали. За да се компенсира това трябва да активирате ред Seasonal.
џContrast – Регулира контраста на дисплея.
џЕзик (Language) – С помощта на стрелките се избира системния език, а с бутон F се потвърждава
избора и се излиза от менюто.
Измерени или
въведени параметри
Обща консумация за деня
Диаграма с консумираната
енергия в % от максималната
възможна
4 Извеждане на информация за работата на
водонагревателя.
Когато водонагревателят е в някой от работните режими,
с натискане на бутон Г се извеждат последователно
всички измерени или отчетени данни, с които разполага
9
Зададена температура
Консумирана електроенергия по дневна тарифа. Това показание се нулира при натискане
и задържане на бутон Г за повече от 3 секунди, тогава старото показание започва да мига
и след третото мигане става 0000.
Консумирана електроенергия по нощна тарифа. Това показание се нулира при натискане
и задържане на бутон Г за повече от 3 секунди, тогава старото показание започва да мига
и след третото мигане става 0000.
Диаграма с консумираната електроенергия по часове за текущия ден. По хоризонтала са
часовете от 00 до 23, а по вертикала е процентната консумация на ел. енергия, от
максималната възможна за Вашия нагревател. Този екран се задържа 20 секунди.
Диаграма с консумираната електроенергия по часове за предходния ден. Този екран се
задържа 20 секунди.
Диаграма с консумираната електроенергия по часове, сумарно за последните 7 дни. Този
екран се задържа 20 секунди.
Начало на дневна тарифа. Този параметър трябва да се поддържа правилно настроен.
Начало на нощна тарифа. Този параметър трябва да се поддържа правилно настроен.
Текуща дата във формат ДД-ММ-ГГГГ
Начален час на Таймер1
Краен час на Таймер1
Начален час на Таймер2
Краен час на Таймер2
терморегулаторът. Това става в поле „Измерени или въведени параметри“ или поле „Диаграми“, когато се
извежда по часовата консумацията на електроенергия за някой от последните 7 дни.
Редът на извежданата информация с последователното натискане на Г е следният:
ДОПЪЛНИТЕЛНА ИНФОРМАЦИЯ
1. Използването на апартаментното табло за включване и изключване на водонагревателя не променя
зададените му температура и режим на работа, които са останали преди изключването му.
2. Ако температурата на водата падне под 3 градуса и водонагревателят е в изключено състояние само от
електронния терморегулатор (дисплеят е в Изглед I), нагревателят ще се включи автоматично с цел
предпазване на водата от замръзване.
3. Когато уредът е включен в работен режим, свети символът на нагревателя в горния десен ъгъл на
дисплея и водата трябва да се затопля, но електронният блок не регистрира повишаване на
температурата на водата в продължение на 30 минути, символът на нагревателя започва да премигва с
честота около цикъл/секунда. С подобна честота, електронният блок издава и кратковременни звуци.
Тази сигнализация се повтаря през период от 30 минути (време със сигнализация и време без
сигнализация), ако продължава да не се отчита повишаване на температурата на водата. Това е
предупреждение за възможна неизправност – прекъсване на съпротивителната спирала на нагревателя
или на електрическите връзки във веригата на нагревателя. Желателно е да изключите уреда от
работен режим и да се обадите в най-близката, оторизирана от производителя или продавача, сервизна
фирма.
BG
10

EN
The present instruction is an integral part of the general installation and operation instruction attached to
your water heater unit. All of the general instruction requirements concerning the water heater installation
and connection to the water supply and electricity networks are absolutely in force. It is compulsory to
follow the requirements listed in the general instruction other sections.
This manual explains the features and usage of the electronic control unit, which replaces the traditional thermostat
and LED switch of the ordinary water heaters.
WARNING! Read carefully this manual before using the device!
INSTRUCTION FOR USE
The electronic thermostat (hereinafter also the electronic unit) is designed for the management and control of high
class utility storage water electric heaters. It has a 4 control buttons, graphic color LCD display, relay / relays to
power the heater / heaters, temperature sensors. The software is provided with an algorithm to automatically
reduce electricity costs. The electronic unit main tasks are to control your water heater heating process as
efficiently as possible and to relieve you of all worries and concerns about it.
WARNING! This appliance may be used by children of age over eight years old and persons with reduced
physical, sensory or mental capabilities, or lack of experience and knowledge, where they are under
supervision or instructed about the safe use of the appliance and understand the dangers. Children must not
be allowed to play with the unit! It is absolutely forbidden that children undertake cleaning or servicing of this
appliance!
INITIAL SETTINGS
The electronic thermostat is designed for a wide range of water heaters, varying in capacity, power and heater
material inside the water tank.
During the production of water heaters individual settings of the electronic thermostat do not take place, therefore it
is necessary after the device installation to enter the information concerning its specific volume, power of heater /
heating elements.
By default, in the electronic block are introduced parameters for water heaters 72268E34/WV08039E (80 l, 3 kW,
enameled water tank). If your water heater has the same specifications you do not need additional customization.
With the first switch to power supply the water heater switches in water heating mode (operating mode). The
electronic unit screen displays the following information:
Symbol indicating switched on heater.
A back dot i moving on the line.
Water temperature measured in the
water tank
Current time. Initially not set
Maximum water heater temperature preset
Messages field
Initial switching off of the water heater (switched off condition)
Press the button F for initial switch off. The unit screen shall display the following information:
Current time. Initially not set
Current date. Initially not set.
The figures in the fields for date and time are flashing, it is because date and time are not set.
11
EN
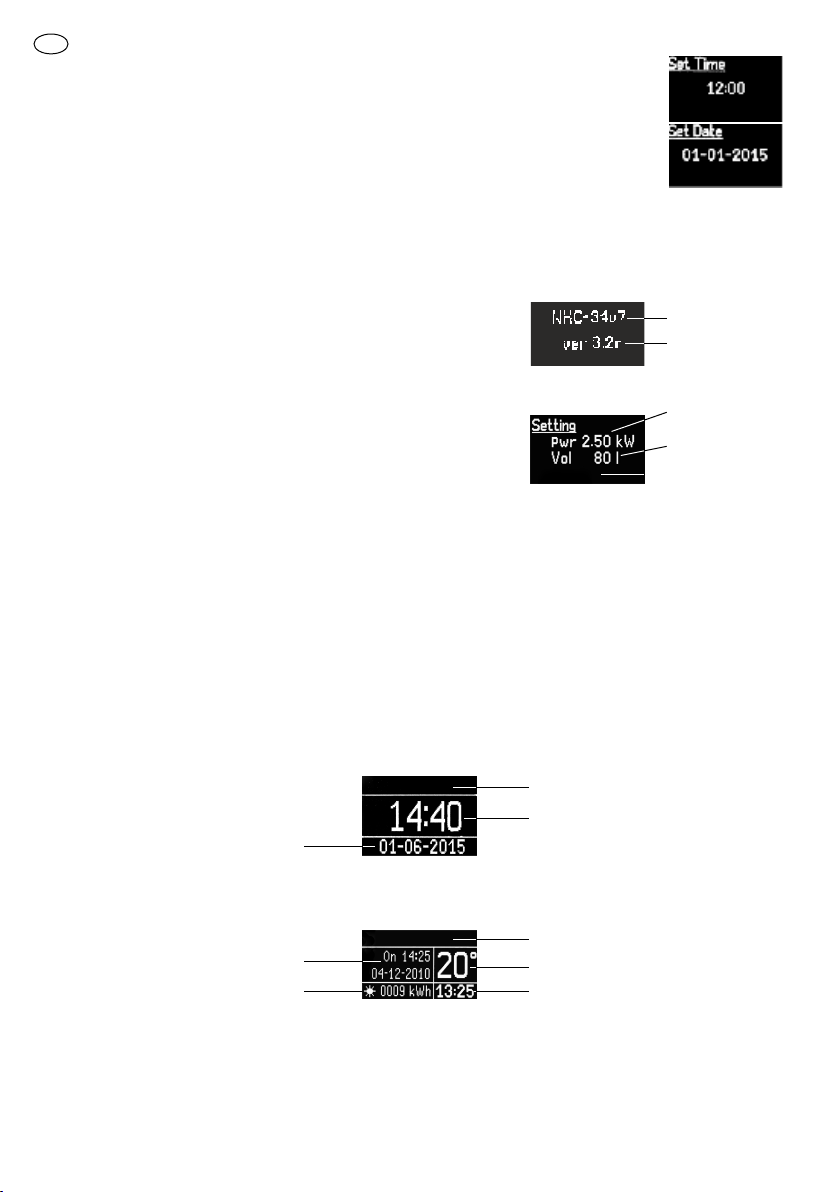
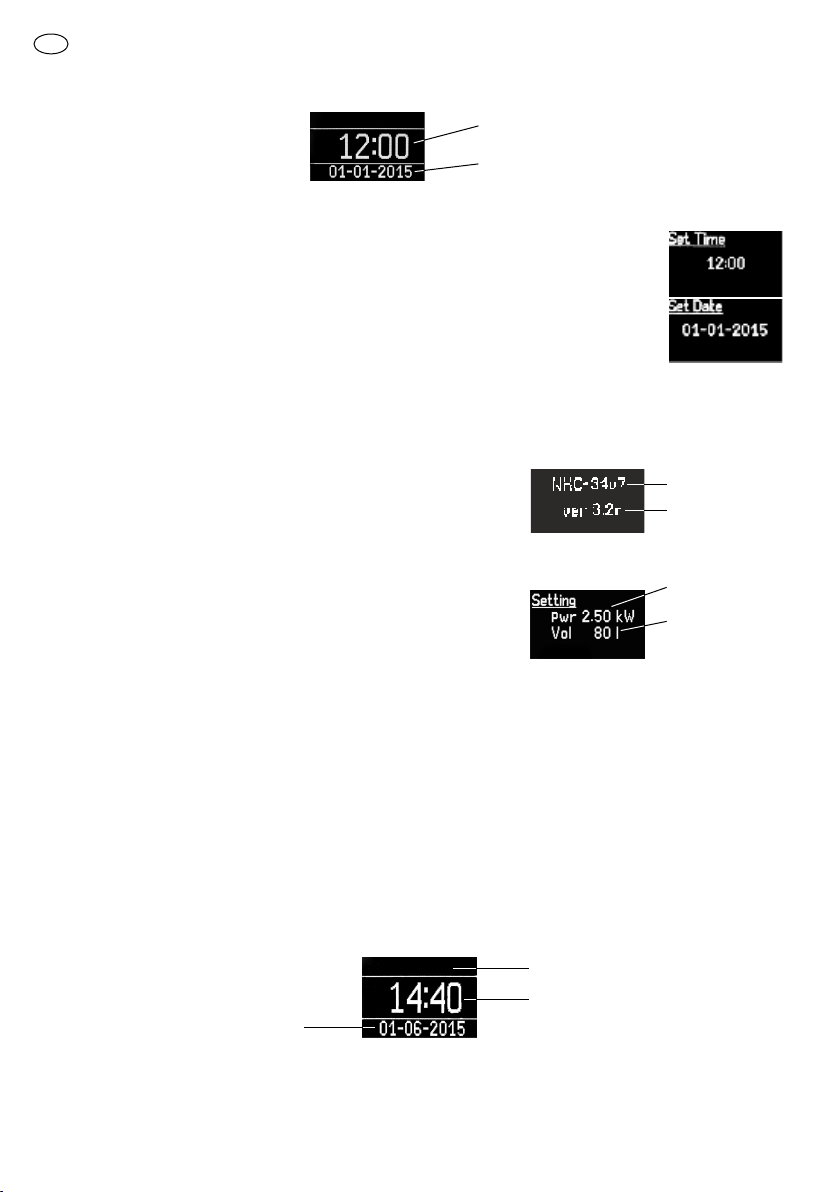
Setting the current time and date
You can access the Setup mode by pressing and holding for two to three seconds the F button.
The display shows the inscription Set Time and time. The figures for the hour flash. With the
buttons ▲ and ▼ adjust the exact time. By pressing the button Г you proceed to setting the
minutes - the figures for the minutes start flashing.
After entering the correct minutes with the buttons ▲ and ▼, by pressing again the F button
switch to set the exact date (the display Set Date). The date is set the same way as the procedure for time setting.
Then, by pressing the F button again you confirm your settings and proceed to the main screen with the water
heater still off.
How to set the water heater characteristics if it differs from the default factory settings for the electronic
thermostat.
Thermostat hardware
version
Thermostat software
version
Water heater power
Water heater volume
To enter in settings mode when the device is switched off press and hold
simultaneously the buttons Гand F for more than four seconds. At first
the screen displays the hardware and software versions.
When you press the F button next on the screen are displayed the water heater characteristics to adjust.
The unit value that may be set flashes. With the buttons ▲ and ▼ select
the value corresponding to the on the unit label with the serial number of
the device (for the 30-200 liters of wall mounted water heaters it is located
on the device lid between the pipes for hot and cold water). By pressing
the Г button proceed to the next feature to adjust. After completing the
feature characteristics of the device, press the F button to store the settings and pass to switch off state of the water
heater. You will see on the screen displayed the time, date, and status of the anode.
SCREEN – MAIN DISPLAYS
The screen has three main displays. They illustrate the device basic conditions.
џDisconnected water heater.
џSwitched on water heater.
џSetting of input data.
1. Display I – Disconnected water heater
The electronic unit screen displays the following information:
Messages field
Time – hour, minutes
Date – day, month, year
Measured or set up parameters
Messages field
Water temperature
Time – hour, minutes
Operation mode
2. Display II – Switched on water heater
This display is active in the main operation mode. The information displayed is divided in 5 fields:
2.1. Field „Operation mode“ – provides information about the presence of special restrictive regime when the
heater is switched on. The options are:
џEmpty field – the heater will be switched on or off only depending on the temperature preset;
џAvailable time for switching on (On) and off (Off) – apart from the preset water heating temperature it will
depend on whether the current time interval in the day is allowed for operation mode;
џAvailable time for switching on and dat – (delayed start mode) the water heater will turn on upon the
12

Parameter value settings.
Parameter setting up
occurrence of preset time;
џCaption Smart control – the water heater is switched in mode to intelligently reduce electricity costs.
2.2. Field „Measured or set up parameters“ – provides useful information about the adjustment of variable
parameters or the current date, and consumed daily, or nighttime electricity.
2.3. Field „Time“ – shows the current time. When the clock is not set, this field is flashing. The thermostat has a
battery that supports the timing of short-term power failure. The maximum time for time support is 18 hours,
then the clock shall turn off and shall need your re-verification.
2.4. Field „Water Temperature“ – provides information on the current water temperature in the water tank. It should
be borne in mind that the temperature measuring takes place at the bottom of the water tank while hot water
naturally moves on top from where and it runs within the housing water supply installation. It is therefore
possible, despite thermostat low temperature shown, the actual water temperature within the tank to be much
higher. This is a limitation of the method of temperature measurement and you need to be careful when using
unmixed hot water.
2.5. Field „Messages“ – it displays all messages for registered problems. The possible messages include:
џFuse? – Burnt out fuse anode protector or circuit breaker to the thermostat. Another possible reason is
that the within the water tank there is no water. When displayed, the water heater will shut down and
subsequent switching on shall be possible after disconnecting it from the external control device (the
apartment panel).
џSensor E1 – The temperature sensor is disconnected or turned off.
џSensor E2 – The temperature sensor is damaged or in short-circuit.
џFrost – During electric power supply of the boiler negative temperature of the water in the tank is
measured. It is possible that the water freezes water! In this case, the water heater will not turn on until
the unit is disconnected from the external control device (the apartment panel). You need to check the
integrity of the water tank and the pipeline!
3. Display III – Setting of input data
The top underlined row indicates the parameter which is set at the moment and in the middle - its value.
WORKING WITH THE ELECTRONIC THERMOSTAT
1. Switching on the water heating and alternating operation modes
When the heater is turned off, the screen looks as in Display I. When pressing next the button F, the water tank is
switched on and the screen looks as in Display II. When there are no other conditions limiting
the water heating, i.e. the Operation Mode field is empty and if the heating temperature preset is
higher than the water temperature shown in the field Water Temperature, the water heater turns
on. You may observe it by the moving black dot in the sign for switched on water heater in the
EN
13

screen upper right corner. The displayed as illustration device is with a tank chrome-nickel steel (without anode),
which is in operation mode.
The device controls four operation modes. You may switch between them by pressing the button F. The modes
order is as follows:
Water heater switched off
Heating mode
Smart Control mode
Heat Timer mode
Delayed Start mode
After the last operation mode the device passes in state off. Then the regulator will show on the display the hour,
date and the anode protector status and will not switch on the heating element unless there is danger of water
freezing.
1.1. Heating mode
When operating in this mode, the water heater turns on when the water temperature according
the temperature sensor falls five degrees lower than the preset one. It switches off when
reaching the temperature preset. There are no other conditions to control the heating process.
1.2. Smart Control mode
In this mode heating is controlled by a specially developed energy-saving algorithm. Thanks to
it you will enjoy the convenience of having hot water when you need it and pay the lowest
possible price for it. We recommend that you use this mode when your daily hot water
consumption is more than the capacity of your water heater. Then heating the water only at
night shall not be enough and you shall have to keep the unit on standby. In operation mode Smart control the unit
shall monitor your need for hot water and shall not heat excess water when you do not need it. Moreover, it will try to
make the most of nighttime electricity which is at much lower price. In order to work efficiently in this mode, the
water heater must be switched on at least 2 days continuously without being switched to one other mode.
In this mode the set temperature is not used because the thermostat is set to select to what temperature to heat
the water and when. This is the reason why pressing buttons ▲or ▼shall not change the temperature.
When you first turn on the device or if it has not been used for long time, it is recommended to switch it first in
mode Heating in order to achieve the temperature set and then switch it to mode Smart control.
In case of too small power consumption during the day, the water heater shall pass in Reduced power mode
and the wording Smart control on the display shall change to Low power. The unit shall come out
automatically from this state at next switch on of the water heater or if you change modes by pressing the
button F to initiate again Smart control mode.
When using Smart control mode the water temperature is maintained lower during daylight time in order to
avoid unnecessary losses of heat. If certain days you need to use more hot water, you can switch to forced
heating mode Boost. To do this press and hold the button ▲ or more than 1.5 seconds. Once in this mode the
water shall heat to the temperature set in mode Heating, then it shall turn back to Smart
Control mode.
* If the temperature of the tank water is higher than the temperature set, the Boost
mode shall not be activated!
* When forced heating mode is activated it shall temporarily impede the water heater energy efficiency!
1.3. Heat Timer mode
The temperature preset for heating water or
measured temperature when the heater works
Follows water heater switch on (On) or off (Off)
Set - Temperature preset
The time when it shall happen
EN
14

In this mode you can preset an interval of time during which to allow water heating. To do this you can preset the two
timers using the menu Set On / Off Time. When switching into this mode, the water heater shall turn on only if the
current time is within the range of one of the scheduled periods and the water temperature is below the temperature
set. You can use this mode for example if you use hot water only in the morning and the evening, and the entire
quantity of hot water ends in the morning. Then you can set a timer in a time interval during the night, and the other -
before you need water during the day. The interval, which will enable the water heater must be consistent with the
water tank ability to reach the temperature set for the period. You can find the information about the time needed for
water heating by your water heater in the device technical description.
1.4. Delayed Start mode
The temperature set for heating or the
temperature measured when the water heater
is operating
Hour and date of water heater future switch on
Set - Temperature set
When you are away from home for a long period and want when you get back to have immediately hot water, you
can use the Delayed Start mode to switch on the device, however you must preset the time for switching on in the
menu Next Start and it must be after the current date and time. When it reaches the preset time for Delayed Start,
the device shall activate the Heating mode.
1.5. Water heater switch off
By pressing subsequently the F button you will eventually switch off the water heater. In this status the screen looks
like Display I and the water heater is off.
Even in the off status the function Anti-freeze that protects the water tank from temperatures falling at
dangerously low levels is automatically saved. Therefore, when there is a danger of a drop in ambient
temperature, it is recommended that the water tank should not be disconnected from the mains!
2. Temperature setting
When the tank is in a switch on stratus and is in not in mode Smart Control, by pressing one of
the buttons ▲ or ▼ you can access the mode Change Temperature Set. The digit in the
Water Temperature flashes and the temperature set appears. Above it is marked Temp. With
the following keystrokes you may change the assignment in the desired direction. The altered
temperature is remembered by pressing Г or after 5 seconds without pressing a button. If any of the buttons ▲ or
▼ remains above 0.8 seconds, the value of the temperature set starts automatically to increase or decrease. The
temperature limits are set between 20°С and 75°С.
3. Access to „Settings“ mode
In order to access the Settings mode the water heater must be switched on (Display II). Press the F button for more
than 1.5 seconds and you shall have subsequent access to all settings menus. The general principles to observe
for all settings are the following:
џThe value to edit is the flashing one;
џButton Г serves for access to the display field to edit;
џTo increase or decrease the blinking field values press buttons ▲ and ▼. If one of these buttons is kept for
more than 0.8 sec. the value set shall start automatically to increase or decrease. In this case, the edited field
does not flashes, just changes its value.
џPressing the F button exits the current setup screen. If there are changes made in any of the screen
parameters these are stored and the unit exits the settings mode. If no changes are made in the current
screen pressing the F button commands the unit to proceed to the next screen settings, if any.
џWhen the clock readings are flashing, it means that it has not been collated. In this case it is possible to enter
the setup mode for time and date even if the water heater is in switched off mode (Display I).
Settings:
џNext start – enter the time and date to switch on water heating when operating mode
Delayed Start is activated.
EN
15

In order to use this mode, you can set the delayed start time in this setting. The time entered must be after the
current time, otherwise, after its confirmation with F on the screen shall appear the message Error.
џSet Time – setting the system time in the format HH: MM.
џSet Date – Set the system date in the format DD-MM-YYYY
Time and date must be correctly set for the proper functioning of the water heater!
џSet On/Off Time - enter the time limiting the interval when it shall be allowed to heat
water. The heater can be switched on if the temperature of the water required and the
current time is the interval between the beginning assigned with the leftist figures in the
format HH: MM and end specified by the right-wing figures HH: MM. The next condition
End of Timer 1
End of Timer 2
Start Timer 1
Timer 1 is active
Timer 2 is not active
for switching on the device is the timer to active, which you may confirm with the box on the left.
The electronic control module allows complex formation of time intervals, for example, when the start of the
Timer 1 is terminated at the end of Timer 2, and etc.
џSet Time ☼/ – Enter the start of daytime (☼) and nighttime (). tariff. This is necessary for the calculation of
consumed electricity.
Proper setting of these time intervals is critical for the correct operation of Smart Control mode. According to
the rules of the electricity supply companies in Bulgaria, these time intervals are changing when passing from
winter to summer time and vice versa.
џAdditional settings for energy-saving strategy in „Smart control“ mode. To meet your needs of hot water
there is a possibility for further performance tuning in Smart Control mode. The modes adjusted in this order
are Eco, Normal and Power. The most economic of these is Eco, but if the hot water provided in this mode is
not sufficient for your needs, you can use one of the other two. In many areas during the winter season the
cold water has much lower temperature. After mixing it with the water in the tank, the total volume of hot water
will be reduced. To compensate this loss you need to activate the line Seasonal. Activation of additional
seasonal compensation Fine-tuning of the saving strategy
Start of daytime electricity tariff
Start of nighttime electricity tariff
Fine-tuning of the saving strategy
Activation of additional
seasonal compensation
џContrast – adjusts the display contrast.
џThe system language is selected with the arrows, while button F confirms the selection and exits the menu.
4. Displaying information about the water heater operation.
When the water heater works in either operating mode, pressing
the button Г shall display subsequently all measured or reported
data available to the thermostat. Data shall be displayed in the field
Measured or Entered Parameters" or the field Diagrams when is
Measured or
set up parameters
Total daily consumption
Diagram with the energy
consumed in % of the
maximum possible
EN
16
displayed the electricity consumption by hour for one of the last seven days.
The order of displaying information by consistently pressing Г is the following:
Temperature set
Electricity consumed on daytime tariff. This indication shall reset by pressing and holding the
button Г for more than three seconds, then the old entry shall flash and after the third blink
shows 0000.
Electricity consumed on nighttime tariff. This indication shall reset by pressing and holding the
button Г for more than three seconds, then the old entry shall flash and after the third blink
shows 0000.
Diagram of electricity consumption in percentages by hours of the current day. On the horizontal
are listed the hours from 00 to 23, and on the vertical - the percentage of electricity consumption
in percentage from the maximum possible for your heater. This display shall be active for twenty
seconds.
Diagram of electricity consumption in percentages by hours of the previous day. This display shall
be active for twenty seconds.
Diagram of electricity consumption in percentages by hours of the previous seven days. This
display shall be active for twenty seconds.
Daytime tariff start. This parameter must be correctly adjusted.
Nighttime tariff start. This parameter must be correctly adjusted.
The current date is shown in format DD-MM-YYYY.
Initial time for Timer 1
End time for Timer 1
Initial time for Timer 2
End time for Timer 2
ADDITIONAL INFORMATION
1. Turning on and off the heater from the apartment electricity panel does not change the temperature set and its
mode of operation left before its last switch off.
2. If the water temperature drops below 3° C and water heater is switched off only from the electronic thermostat
(screen in Display I), the water heater shall automatically switch on to prevent the water from freezing.
3. When the unit is switched on working mode the heater symbol in the upper right corner of the display glows and
the water should be heated, but if the electronic unit does not register an increase in water temperature for 30
minutes, the heater symbol shall flash at a frequency of about a cycle per second. With such frequency the
electronic unit issues short sounds as well. The signal is repeated over a period of 30 minutes (time without
signal and with signaling), if still not taken into account for water temperature rise. This is a warning of a possible
fault - break in the resistance spiral of the heater or of the electrical connections in the heater circuit. You should
disconnect the unit from operating mode and call the nearest authorized by the manufacturer or vendor service
company.
EN
17

18

Diese Gebrauchsanleitung ist ein integrierter Bestandteil zu der mitgelieferten allgemeinen Montage- und
Gebrauchsanleitung für Ihren Elektro-Warmwasserspeicher. Alle dort angegebenen Anforderungen für
die Installation und den Anschluss des Warmwasserspeichers an die Wasserleitung und an das Netz sind
uneingeschränkt in Kraft. Es sind auch die in den anderen Abschnitten der allgemeinen Anleitung
beschriebenen Anforderungen unbedingt einzuhalten.
Dieses Handbuch erläutert die Besonderheiten und den Betrieb der elektronischen Steuereinheit, die die
herkömmlichen Thermostate und die leuchtenden Wippschalter der üblichen Warmwasserspeicher ersetzt.
WARNUNG! Lesen Sie diese Gebrauchsanleitung vor dem Gebrauch des Geräts sorgfältig durch!
GEBRAUCHSANLEITUNG
Der elektronische Temperaturregler (auch elektronische Steuereinheit genannt) dient zur Steuerung und Kontrolle
von hochwertigen elektrischen Warmwasserspeichern. Er besitzt 4 Steuertasten, ein grafisches LCD Display, ein
oder mehrere Versorgungsrelais für den/die Elektroheizer, ein oder mehrere Temperatursensor/en. Die Software
ist mit einem Algorithmus zur automatischen Reduzierung des Stromverbrauchs. Im Wesentlichen dient die
Steuereinheit dazu, die Heizung Ihres Elektro-Warmwasserspeichers so effizient wie möglich zu steuern und Sie
von allen Sorgen und Pflichten diesbezüglich zu entlasten.
WARNUNG! Dieses Gerät darf von Personen, einschließlich Kindern ab 8 Jahren mit eingeschränkten
körperlichen oder geistigen Fähigkeiten nur dann verwendet werden, wenn diese Personen unter der Aufsicht
einer für ihre Sicherheit verantwortlichen Person stehen oder von dieser Person in den Gebrauch des Geräts
eingewiesen wurden! Kinder müssen beaufsichtigt werden, damit sie in keinem Fall mit dem Gerät spielen. Es
ist verboten, dass Kinder das Gerät des Kunden reinigen oder bedienen.
ANFANGSEINSTELLUNGEN
Der elektronische Temperaturregler ist für eine umfangreiche Warmwasserspeicher-Palette mit unterschiedlichem
Inhalt, Leistung des Elektroheizers und Material des Wasserbehälters vorgesehen.
Bei der Produktionsphase der Warmwasserspeicher erfolgt keine Personalisierung des elektronischen
Temperaturreglers.
Standardmäßig sind in der Steuereinheit der einphasigen Geräte die Parameter des Warmwasserspeichers
Modell 72268E34/WV08039E (80 l, 3 kW, mit emailliertem Wasserbehälter) eingegeben. Falls Ihr
Warmwasserspeicher zu diesem Modell gehört, ist eine zusätzliche Personalisierung nicht notwendig.
Bei der ersten Stromversorgung des Warmwasserspeichers schaltet das Gerät in Heizmodus ein
(Betriebsmodus). Folgende Daten werden auf dem Display der elektronischen Steuereinheit angezeigt:
Symbol für eingeschaltetes Heizgerät. Ein
schwarzer Punkt bewegt sich entlang der Linie
Gemessene Wassertemperatur
in dem Wasserseicher
Aktuelle Zeit – nicht voreingestellt
Voreingestellte Höchsttemperatur
zum Erwärmen des Wassers
Textfeld für Meldungen
DE
19
Erstes Ausschalten des Warmwasserspeichers aus Betriebsmodus (ausgeschalteter Zustand)
Dazu die F Taste drücken. Aussehen der Anzeige:
Aktuelle Zeit. Nicht voreingestellt
Aktuelles Datum. Nicht voreingestellt
Die Ziffern in den Datum- und Uhrzeit-Feldern blinken, weil Datum und Uhrzeit nicht eingestellt sind.
Aktuelle Uhrzeit und Datum einstellen
Zur Einstellung von Datum und Uhrzeit müssen Sie die F Taste im Einstellungsmodus drücken
und ca. 2-3 Sek. gedrückt halten. Set time und die Uhrzeit erscheinen auf dem Display. Die
Ziffern für die Uhrzeit blinken. Mit den ▲ und ▼ Tasten die genaue Uhrzeit einstellen. Durch
Drücken der Г Taste gehen Sie zum Eingabefeld für Minuten – die Minuten-Ziffern blinken.
Nach Eingabe der genauen Minuten durch die ▲ und ▼ Tasten die F Taste Drücken, um das
genaue Datum einzustellen (Set date erschein auf dem Display. Um das Datum einzustellen,
die zur Einstellung der Zeit beschriebenen Schritte wiederholen. Anschließend F Taste drücken, um die Eingabe zu
bestätigen und zu Hauptanzeige im ausgeschalteten Zustand des Warmwasserspeichers zurückzukehren.
Parameter des Warmwasserspeichers einstellen, wenn er sich von den Werkeinstellungen für den
elektronischen Temperaturregler unterscheidet
Hardwareversion des
Temperaturreglers
Softwareversion des
Temperaturreglers
Leistung des Heizers
Inhalt des Warm-
wasserspeichers
Der Übergang in den Modus erfolgt bei ausgeschaltetem Gerät, indem
man die Г und F Tasten gleichzeitig drückt und mehr als 4 Sekunden
gedrückt hält. Zuerst erscheint eine Anzeige mit den Hardware- und
Softwareversionen.
Durch erneutes Drücken der F taste erscheint eine Anzeige für die Einstellung der Parameter des Warmwasserspeichers.
Das einzustellende Eingabefeld blinkt. Durch die ▲ und ▼ Tasten kann
man den Wert wählen, der dem Wert auf dem Firmenschild mit der
Seriennummer des Gerätes (bei den 30-200 l Warmwasserspeichern für
wandhängende Montage befindet sich das Firmenschild auf dem Deckel
des Gerätes, zwischen den Kalt- und Warmwasserrohren) entspricht. Mit
der Г Taste schalten Sie zum nächsten Eingabefeld. Nachdem alle Parameter des Warmwasserspeichers
eingegeben sind, die Parameter mit der F Taste speichern und zum ausgeschalteten Zustand des Gerätes
schalten. Das Datum, die Uhrzeit und der Zustand der Anode erscheinen auf dem Display.
DISPLAY– HAUPTANSICHTEN
Das Display hat drei Hauptansichten zur Veranschaulichung folgender Hauptzustände:
џAusgeschalteter Warmwasserspeicher
џEingeschalteter Warmwasserspeicher
џEinstellung der Eingabedaten
1. Ansicht I – ausgeschalteter Warmwasserspeicher
Folgende Daten erscheinen auf dem Display:
Textfeld für Meldungen
Uhrzeit – Stunde, Minuten
Datum – Tag, Monat, Jahr
2. Ansicht II – eingeschalteter Warmwasserspeicher
Diese Ansicht ist die Ansicht des Hauptbetriebsmodus. Die Angaben, die auf dem Display erscheinen, sind in
folgenden 5 Feldern aufgeteilt:
DE
20
Table of contents
Languages:
Other Eldom Invest Thermostat manuals


