Elecfreaks TOOCA Laser 1 User manual

TOOCA Laser 1 快速使用指南
TOOCA Laser 1 User Manual
V1.0
深圳市恩孚电子科技有限公司
SHENZHEN EF TECHNOLOGY CO., LIMITED

Rendering Picture
Dear Consumers:
Thank you for choosing our products. For the best experience, please read the instructions before operating the machine.
Our teams are always ready to render you the best services. Please contact us via the phone number or e-mail address
provided at the end when you have any problem.
For a better experience in using our products, you can also learn how to use the engraving machine in the following ways:
View the accompanied instructions and videos in the TF card.
Visit the wiki of TOOCA Laser 1 via https://www.elecfreaks.com/learn-en/tooca-laser-1 to find relevant software/hardware
information, contact details, operation and maintenance instructions.

Firmware Upgrade
Please go to the wiki page via https://www.elecfreaks.com/learn-en/tooca-laser-1, select the updating methods to
download the latest firmware. Save it to TF card and it can be automatically updated after powering on.
For the purpose of engraving or cutting with a laser engraving machine, allow the workpiece to be exposed to the
high-density laser beam emitted by the laser engraving machine. The workpiece may be subject to gasification without
combustion as it is pretty hot on the surface. On the other hand, most workpieces are essentially combustible, which may
be ignited, leading to an open flames and consequently to the machine breakdown and environmental contamination.
1. It is prohibited to store the machine in areas close to combustible and explosive substances, volatile solvents or source of
heat. Instead, store it in a well-ventilated, cool and dust-free place;
2. Make sure that only the specific attached power cord rather than other similar power cords are used during installation;
3. Clean the tripod and laser module with a dry cloth regularly when the power is off;
4. Ensure to run the laser at 0°C-35°C. Operation at sub-zero temperature is prohibited; it is prohibited to run the machine
under wet environment or in thunderstorm weather;
5. Switch off the machine if it is offline for an extended period of time, and unplug the power cord;
6. It is prohibited to come in contact with electronic areas with hands or other tools when the machine is connected to
power supply;
7. Touching any moving parts and laser module while the machine is running is prohibited;
8. Before engraving, place a flat object that cannot be penetrated by the laser, such as an aluminum alloy or stainless steel
plate on the workbench, and then place processing material;
9. Wear goggles to prevent vision damage arising from exposure to the laser spot during laser engraving operation;
10. It is advisable to run the machine under well ventilated condition as laser engraving may generate small amount of
fume or gas;
11. Children under 10 years old are not allowed to run the machine without adult presence, which otherwise may lead to
personal injury;
12. Put in place fire extinguishers in case of use, which shall be regularly checked. It is prohibited to keep the machine
unattended while it is running;
13. Users should comply with the laws and regulations of the corresponding countries and regions where the equipment is
located (used), abide by professional ethics, pay attention to safety obligations, and strictly prohibit the use of our products
or equipment for any illegal purposes. ELECFREAKS will not be responsible for any violators' legal liability under any
circumstances.
User Notice

Model
Machine size
Net weight
Operation system
Input
Output
Range of operating temperature
Safety certification
Engraving size
Laser source
Laser wave length
Laser power
Safety class
Laser engraving software
Format files
Type of supporting materials
TOOCA Laser 1
568*632*198mm
3.2kg
Windows /MacOS
100-240V~ 50-60Hz
DC 24.0V 3.0A
0℃-35℃
IEC60825, FDA, CE, RoHS, FCC, UKCA, UL and PSE
400mm*415mm
Semiconductor laser unit
455±5nm
5W/10W
Class IV(FDA classification standard)
LaserGRBL, LightBurn
jpeg, jpg, png, bmp, svg and dxf
Cardboard, wood, bamboo, rubber, leather, fabric, acrylic,
plastic, etc
Parameters

Equipment Intro(5W)
X-axis assembly
Control box assembly
Rear X-axis profile
Tripod
Tripod
Tripod
Right Y-axis assembly
Left Y-axis assembly
Laser module(5W)
Front X-axis profile
Power interface
Type-C interface
TF Card Slot

Equipment Intro(10W)
X-axis assembly
Control box assembly
Rear X-axis profile
Tripod
Tripod
Tripod
Right Y-axis assembly
Left Y-axis assembly
Laser module(10W)
Front X-axis profile
Multi-level fixed focus bar
Power interface
Type-C interface
TF Card Slot

Parts List
1. X-axis assembly & Control box assembly
2. Front X-axis profile*1
3. Rear X-axis profile*1
4. Left Y-axis assembly*1
5. Right Y-axis assembly*1
6. Tripods*3
7. Laser module*1
8. Power adaptor*1
9. Power cord*1
10. Linden plywoods*2
11. M5*20 screws*18
12. T-shaped nuts*6
5W 10W
or
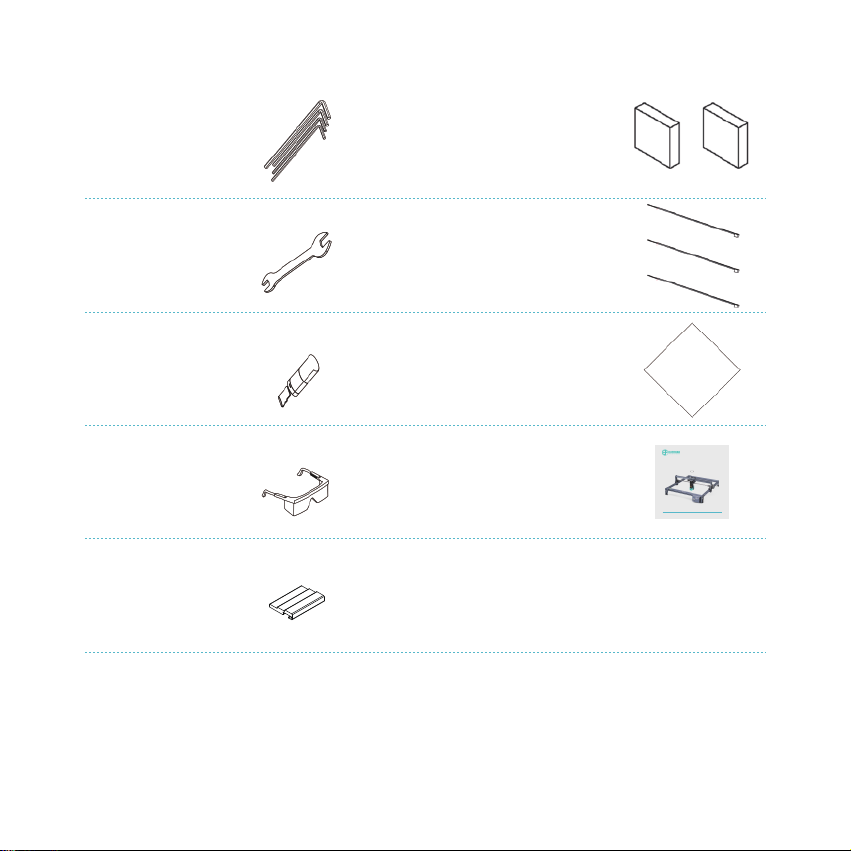
14. Open wrench*1
15. TF card & card reader *1
16. Goggle*1
18. Black cable ties*3
19. Dustless cloth*1
20. Instruction manual*1
13. M1.5/M2/M2.5/M3 Allen keys
21. Multi-level fixed focus bars
Only for 10W laser module
Only for 5W laser module
17. Activated carbon smoke absorption cottons*2
TOOCA Laser 1 快速使用指南
TOOCA Laser 1 User Manual
V1.0
深圳市恩孚电子科技有限公司
SHENZHEN EF TECHNOLOGY CO., LIMITED

1. Assemble the left Y-axis assembly: Pass the left Y-axis assembly (with the belt up) through the X-axis assembly and put on
the belt in the direction shown in the figure:
2. Assemble the right Y-axis assembly and it is the same as above.
Assemble Directions
T-shaped nuts
T-shaped nuts
Tighten the belt, and insert two T-shaped nuts into the
left Y-axis assembly. Then lock the belt with hexagon
screw.
Not to lock too tightly to
prevent the belt from
perforating.
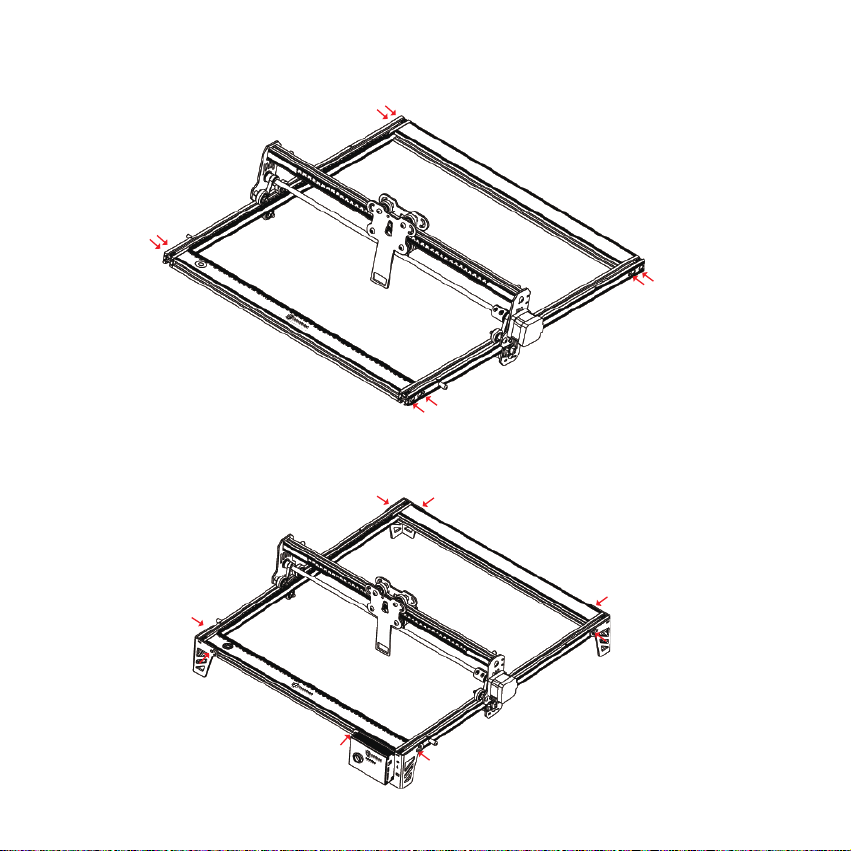
3. Assemble rear X-axis profile and front X-axis profile: Lock with eight M5*20 screws.
4. Assemble three tripods and control box assembly: Lock with eight screws.
M5*20
M5*20
M5*20
M5*20
M5*20
M5*20
M5*20
M5*20

5.1. Assemble 5W laser module: Assemble it into the fixing
plate and the fixed focus bar should contact with the
surface of the processed material when it is naturally
vertical downward. Then lock it with two hand screws on
the right and turn the fixed focus bar clockwise until it is
attracted by the magnet. Finally plug in the laser module
cord.
5.2. Assemble 10W laser module: Please place the
multi-level fixed focus bar between the laser module and
the processed material. Follow the tips and make the
bottom of the laser module contact with the correspond-
ing surface of the multi-level fixed focus bar. Finally lock it
with two hand screws on the right. For example, if you
engrave or cut a 2mm basswood:
Software Installation and Usage Guide
The TF card that comes with the machine contains the tutorials of LightBurn and LaserGRBL. You can get the relevant
information from the TF card.
Laser module cord
Laser module cord
Fixed focus bar
Multi-level fixed focus bar
2mm Basswood
2mm Basswood
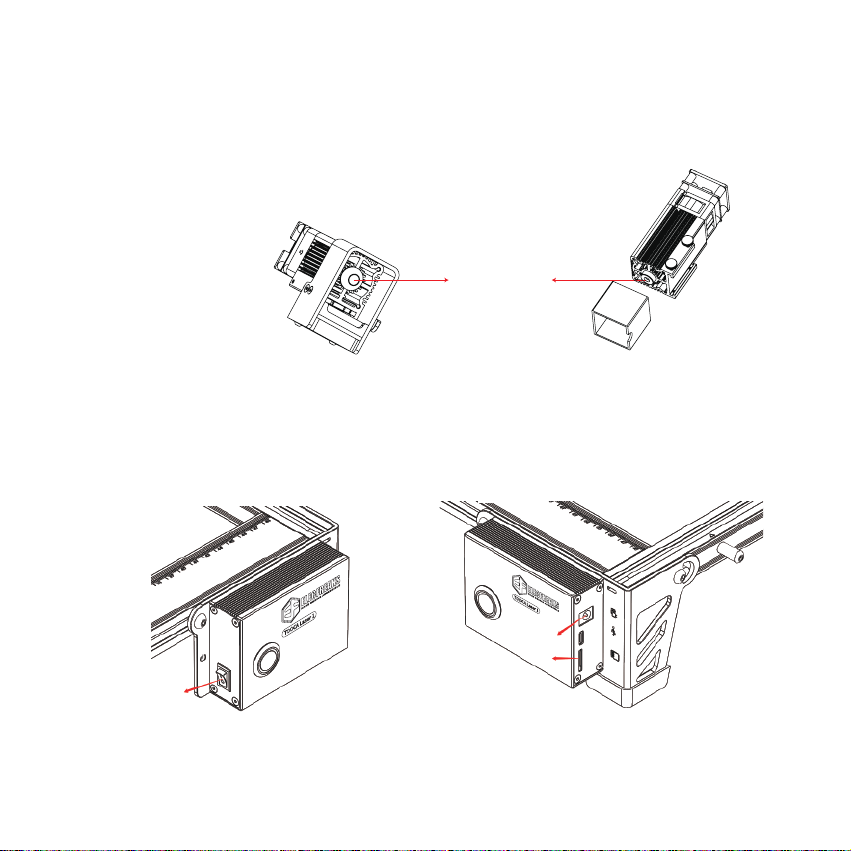
The laser module must be installed and removed only when the power is off.
Start Engraving
Offline Working
1. Insert the TF card with .gcode file(The machine reads the latest .gcode file in TF card by default. It is recommended to delete
other .gcode files before engraving) into the machine before powering on, insert one side of the power adapter into the power
socket that can be remotely switched on, and the other side into the power connector on the right side of the control box.
Lastly, turn on the red switch on the left side of the control box.
The machine supports real-time working by Type-C or offline working by TF card. Please follow the
assembly directions to focus correctly and wipe the protective lens of the laser module with dustless
cloth and alcohol to ensure the best engraving effect.
After powering on, it will "beep" once and reset. After the reset is completed, it will "beep" twice and enter standby mode.
Power switch
Protective lens
TF card socket
Power supply interface
5W 10W

Real-time Working
In preview mode, press microswitch again, it
enters engraving mode. At this time, the laser head
will emit strong light, the machine will start
engraving with indicator light on.
Pause engraving: press the microswitch (or click
"Pause" button in the software). At this time, the
indicator light turns into breathing light. Press the
microswitch again to continue engraving.
Cancel engraving: Please press and hold the
microswitch for 3 seconds (or click "Cancel"
button in the software), it will "beep" once, start to
reset, and "beep" twice after reset is completed.
Enter standby mode, the indicator light turns into
breathing light.
3. After engraving is completed, it will "beep" three times and reset. After reset is completed, it will "beep" twice and enter
standby mode, and the indicator light turns into breathing light.
For real-time working by Type-C, please refer to the tutorial in the TF card.
2. Press the microswitch, it enters preview mode from standby mode, the laser head will emit weak light, and repeat
movement around the largest X, Y edge of the processed picture with indicator lighting on. At this time, adjust the material
to a suitable position.
Microswitch

Indicator Status
1. Light off: The machine is in a power-off state, or the power is abnormal.
2. Breathing light: The machine is in standby mode, you can press the microswitch to enter preview mode or engraving
mode.
3. Light flashes: the machine is in upgrade mode or abnormal mode, and the buzzer beeps rapidly, and it will automatically
enter standby mode after the upgrade is completed or the abnormality is cleared.
4. Light always on: the machine is in preview mode or engraving mode. The laser head is working, please pay attention to
safety.
Exception Handling
In preview mode and engraving mode, if the machine turns on its side or moves, it will turn off the laser. Motor stops
moving, indicator light starts flashing, and buzzer emits alarm.
Solution: Please move the machine to its original position and press microswitch on the machine control box to continue
previewing or engraving after clearing abnormality.

Start
Place engraving material
Adjust the focal length
of the laser module
Place engraving material
Prepare engraving file and save
it to TF card
Power on
Machine resets
Wait for the machine to
complete resetting
Press microswitch to
enter previewing mode
Press microswitch again to
start engraving
Continue engraving Pause engraving Stop engraving
End
Press microswitch,
Yes or No
In pausing mode,
Yes or No
User Operation Guide
Short Press
Long Press
YES NO

渲染图

使用须知
激光雕刻机在雕刻或切割材料时使用高密度激光束照射材料,使材料表面产生高温,目的是在不燃烧的情况下使材料气化。但大
多数材料本质上是易燃的,可能被点燃并形成明火,明火可能烧毁机器及其周围环境。
请遵循以下操作原则:
1. 请勿将本产品放置在易燃易爆物品、挥发性溶剂或高热源附近,请将本产品放置在通风、阴凉、少尘的环境内。
2. 请勿在安装过程中使用其他产品电源线代替,请使用本产品附带的电源线。
3. 定期在断电的情况下,用干布清洁机身及激光模组。
4. 激光工作环境温度在 0°C-35°C,严禁在零下温度运行,避免在潮湿环境下使用本产品,切勿在雷雨天气下使用本产品。
5. 如长时间不使用本产品,请关闭本产品,并断开电源线。
6. 本产品已连接电源时,请勿用手或其他工具触碰电子相关区域。
7. 本产品运行时,请勿触碰正在运动的机械机构及激光模组。
8. 雕刻前在工作平面上放置激光无法穿透的平面物体如铝合金或不锈钢板,然后再放置加工材料。
9. 激光雕刻过程中,请务必佩戴护目镜,避免直视激光光斑带来的视力损伤。
10. 激光雕刻过程中可能会产生少许烟雾或气味,建议在通风良好的环境下操作。
11. 年龄在 10 岁以下的儿童,请勿在没有成人监督的情况下使用本产品,以免造成人身伤害。
固件升级
登录 wiki 页面 (https://www.elecfreaks.com/learn-en/tooca-laser-1),点击“固件更新方式”下载最新固件,保存至 TF 卡并
插入机器,上电可自动更新。
尊敬的用户:
感谢您选择恩孚科技的产品。为了您使用方便,请您在使用之前仔细阅读本快速使用指南,并严格按照快速使用指南的指示进行
操作。
恩孚科技团队时刻准备为您提供优质的服务。在使用过程中无论遇到什么问题,请按照快速使用指南结尾所提供的电话、邮箱与
我们进行联系。为了您能够更好地体验我们的产品,您还可以从以下方式获取设备操作知识:
随机使用说明:您可以在 TF 卡内找到相关使用说明及视频。
您还可以登陆 TOOCA Laser 1 的 wiki 页面 (https://www.elecfreaks.com/learn-en/tooca-laser-1) 寻找相关软硬件、联系方
式、设备操作、案例及素材等信息。

TOOCA Laser 1
568*632*198mm
3.2kg
Windows /MacOS
100-240V 50-60Hz
DC 24.0V 3.0A
0℃-35℃
IEC60825, FDA, CE, ROHS, FCC, UKCA, UL, PSE
400mm*415mm
半导体激光器
455±5nm
5W/10W
Class IV(FDA 分类标准 )
LaserGRBL, LightBurn
jpeg, jpg, png, bmp, svg, dxf
纸板、木板、竹板、橡胶板、皮革、织物、亚克力、漆面金属、塑料等
产品型号
产品尺寸
产品净量
操作系统
输入电压
输出电压
工作温度范围
安规认证
雕刻尺寸
激光源
激光波长
光功率
安全等级
激光雕刻软件
文件格式
支持材料类型
产品参数

设备简介(5W)
电源接口
Type-C 接口
TF 卡槽
X轴组件
控制盒组件
后X轴型材
脚架
脚架
脚架
右Y轴组件
左Y轴组件
激光模组(5W)
前X轴型材

设备简介(10W)
X轴组件
控制盒组件
后X轴型材
脚架
脚架
脚架
右Y轴组件
左Y轴组件
激光模组(10W)
前X轴型材
多级定焦条
电源接口
Type-C 接口
TF 卡槽
Table of contents
Popular Measuring Instrument manuals by other brands

Vitrek
Vitrek 4700 Operating and maintenance manual

WAGO
WAGO 4PS user manual

Honeywell
Honeywell Themis alpha EI2 Operating instructions for operators and installers

Delsy
Delsy MG Digitalarcmeter quick start

Emerson
Emerson Rosemount Clarity II T56 quick start guide

Liqua-Tech
Liqua-Tech LPM-102 Operation & maintenance manual


PCE Instruments
PCE Instruments KREBS PCE-RVI 5 manual

SGM LEKTRA
SGM LEKTRA FLOWMETER manual

Emerson
Emerson Sensi Predict installation guide

PCB Piezotronics
PCB Piezotronics ICP HT352A25 Installation and operating manual

TFT
TFT SHO-FLOW 1 Instructions for installation, operation and maintenance

zatech
zatech ZMCE 1.1AD manual