electrifly HomeStation Level 2 User manual

500 Sansome Street San Francisco California 94111 Tel 415 707.1111 Fax 415 707.1100
Project Mgr:
Copy Editor:
Studio:
Producer:
Copy Writer:
Karli Renken
Bill Randt
Cindy Peterson
Mary Pestell
None
Date:
Client:
Job Number:
Ad Code:
File Name:
Description:
Insertion Date(s):
Release Date(s):
1-19-2021 8:56 AM
EAM
20-EAM-0166
20-EAM-0166_1929
20-EAM-0166_1929_297x210_Manual_1.0.4_m1.9.indd
Owner's Manual
None
None
©2021 Eleven LLC. eleveninc.com All Rights Reserved.
Client Confidential
Eleven
Inks:
Notes: Flat trim: 594mm x 210mm
Finished: 297mm x 210mm
Updated Images
None
Fonts: Omnes Pro (Semibold, ExtraLight, Regular, Medium)
Date Initials OK Mechanical
Version:
4
Designer:
ACD:
Creative Dir:
Account Mgr:
Account Supe:
Date Initials OK
Adriana del Mar
None
None
None
Jenny Hardin
Pubs:
Bleed:
Trim:
Live:
Gutter:
Scale:
Print Scale: None
Cyan
Magenta
Yellow
Black
PMS 2758 C
303.35 mm x 216.35 mm
297 mm x 210 mm
None
None
25.4 mm = 25.4 mm
20-EAM-0166_1929_297x210_MAnuAl_1.0.4_M1.9
HomeStation
Level 2 Charger
Version: 1.0.4
Issue Dte: Februr 16, 2021
INSTALLATION AND OPERATION MANUAL
T:297 mm
T:210 mm
B:303.35 mm
B:216.35 mm

500 Sansome Street San Francisco California 94111 Tel 415 707.1111 Fax 415 707.1100
Project Mgr:
Copy Editor:
Studio:
Producer:
Copy Writer:
Karli Renken
Bill Randt
Cindy Peterson
Mary Pestell
None
Date:
Client:
Job Number:
Ad Code:
File Name:
Description:
Insertion Date(s):
Release Date(s):
1-19-2021 8:56 AM
EAM
20-EAM-0166
20-EAM-0166_1929
20-EAM-0166_1929_297x210_Manual_1.0.4_m1.9.indd
Owner's Manual
None
None
Client Confidential
Eleven
Date Initials OK
Designer:
ACD:
Creative Dir:
Account Mgr:
Account Supe:
Date Initials OK
Bleed:
Trim:
Live:
Gutter:
Scale:
Print Scale: None
303.35 mm x 216.35 mm
297 mm x 210 mm
None
None
25.4 mm = 25.4 mm
20-EAM-0166_1929_297x210_MAnuAl_1.0.4_M1.9
e l e c t r i f y h o m e .c o m
Customer Support: (833) 532-2778
T:594 mm
B:600.35 mm

500 Sansome Street San Francisco California 94111 Tel 415 707.1111 Fax 415 707.1100
Karli Renken
Bill Randt
Cindy Peterson
Mary Pestell
None
1-19-2021 8:56 AM
EAM
20-EAM-0166
20-EAM-0166_1929
20-EAM-0166_1929_297x210_Manual_1.0.4_m1.9.indd
Owner's Manual
None
None
©2021 Eleven LLC. eleveninc.com All Rights Reserved.
Inks:
Notes: Flat trim: 594mm x 210mm
Finished: 297mm x 210mm
Updated Images
None
Fonts: Omnes Pro (Semibold, Thin, Regular, Medium), Minion Pro (Regular)
Mechanical
Version:
4
Designer:
ACD:
Creative Dir:
Account Mgr:
Account Supe:
Date Initials OK
Adriana del Mar
None
None
None
Jenny Hardin
Pubs:
Bleed:
Trim:
Live:
Gutter:
Scale:
Print Scale: None
Cyan
Yellow
Black
303.35 mm x 216.35 mm
297 mm x 210 mm
None
None
25.4 mm = 25.4 mm
20-EAM-0166_1929_297x210_MAnuAl_1.0.4_M1.9
Contents
Informtion 04
1Copriht 04
2About This Document 04
3Intended Use 04
4Chrer—Intended Use 04
5Importnt Sfet Instructions 04
6EMC Complince Sttement:
FCC Prt 15, Subprt B, Clss B
05
Product Overview 06
1Included Components List 07
2Recommended Tools 07
Instlltion Instructions 08
1Before Instllin 08
2Instlltion Steps 09
3Instlltion with Hrdwirin 10
Opertin Instructions 12
Chrer Sttus 14
1Sttus Indictor 14
2Indictor Definition 14
3Understndin Sttus
Indictor Ptterns
15
4Fults 15
Troubleshootin 16
Specifictions 17
Movin, Trnsporttion,
nd Store
18
Clenin 18
Wrrnt 18
Disposl 18
10
11
T:594 mm
T:210 mm
B:600.35 mm
B:216.35 mm
500 Sansome Street San Francisco California 94111 Tel 415 707.1111 Fax 415 707.1100
Project Mgr:
Copy Editor:
Studio:
Producer:
Copy Writer:
Karli Renken
Bill Randt
Cindy Peterson
Mary Pestell
None
Date:
Client:
Job Number:
Ad Code:
File Name:
Description:
Insertion Date(s):
Release Date(s):
1-19-2021 8:56 AM
EAM
20-EAM-0166
20-EAM-0166_1929
20-EAM-0166_1929_297x210_Manual_1.0.4_m1.9.indd
Owner's Manual
None
None
Client Confidential
Eleven
Date Initials OK
Designer:
ACD:
Creative Dir:
Account Mgr:
Account Supe:
Date Initials OK
Bleed:
Trim:
Live:
Gutter:
Scale:
Print Scale: None
303.35 mm x 216.35 mm
297 mm x 210 mm
None
None
25.4 mm = 25.4 mm
20-EAM-0166_1929_297x210_MAnuAl_1.0.4_M1.9
04 |HOMESTATION LEVEL 2 CHARGER
Information
Copriht
Copriht © 2021 Electrif Americ, LLC. All rihts reserved. This document
is copriht protected. It m not be chned, reproduced, or distributed
without prior reement issued in writin b Electrif Americ.
About This Document
These instructions describe how to operte nd cre for the chrer properl.
Additionl instructions re provided in the Electrif Americ pp, nd we
recommend ou view the pp before usin the chrer. For our personl
sfet, follow the opertin instructions exctl. We recommend tht
certified electricin perform ll in-home instlltions, nd this chrer
should not be instlled in n circumstnces without first consultin with
n electricin fmilir with our home, its electricl pnel nd wirin.
Onl qulified, certified electricins should hrdwire this chrer.
Intended Use
These instructions ppl to the chrer nd its use in the USA. Follow ll federl,
stte, nd locl lws, reultions, ordinnces, codes nd sfet stndrds.
Chrer—Intended Use
1. This device is intended for indoor nd outdoor use. Do not obscure the lbel
on the chrer. All persons usin the chrer must first red nd understnd
these instructions.
2. This device is intended exclusivel for the chrin of electric vehicles fitted
with Tpe 1 plu (SAE J1772) nd chrin current control vi the pilot sinl
(IEC 61851-1). Do not use the chrer to chre or suppl other devices. Follow
ll federl, stte, nd locl lws, reultions, ordinnces, nd sfet
stndrds rerdin use of this device.
Importnt Sfet Instructions
READ ALL THE INSTRUCTIONS BEFORE INSTALLIN, OPERATIN,
MAINTAININ, OR USIN THIS PRODUCT. SAVE THESE
INSTRUCTIONS. THE MUST BE PROVIDED TO EACH NEW OWNER.
DANER: RISK OF ELECTRICAL SHOCK.
INSTRUCTIONS PERTAININ TO A RISK OF FIRE OR ELECTRICAL SHOCK.
1. Do not use n dpters, converters, extension cords, or extension cbles
to increse the lenth of the chrin cble or power suppl cord.
2. Do not instll this chrer on FCI circuit breker.
3. Supervise children when device is in use. Children under 16 should not operte
this device. Also, smll prts re dnerous for children. Do not instll in the
presence of children.
4. Do not put finers into the electric vehicle connector.
5. Do not use this product if the power suppl cord or the electric vehicle cble
is fred, hs broken insultion, or shows n other sins of dme.
6. Do not use this product if the enclosure or the electric vehicle connector is
broken, crcked, open, or shows n other indiction of dme.
7. The mbient opertin temperture rne for this device is -22°F (-30°C)
to +122°F (+50°C). Do not operte the chrer outside this opertin rne.
8. Electrif Americ is not responsible for phsicl injur or dme to propert
or equipment cused b the instlltion, use, repir, or mintennce of
this product.
9. These instructions describe the use of the chrer in most commonl used
instlltion nd mountin scenrios. If situtions rise in which it is not possible
to perform n opertion followin the procedures provided in this document,
T:594 mm
B:600.35 mm

500 Sansome Street San Francisco California 94111 Tel 415 707.1111 Fax 415 707.1100
Karli Renken
Bill Randt
Cindy Peterson
Mary Pestell
None
1-19-2021 8:56 AM
EAM
20-EAM-0166
20-EAM-0166_1929
20-EAM-0166_1929_297x210_Manual_1.0.4_m1.9.indd
Owner's Manual
None
None
©2021 Eleven LLC. eleveninc.com All Rights Reserved.
Inks:
Notes: Flat trim: 594mm x 210mm
Finished: 297mm x 210mm
Updated Images
None
Fonts: Omnes Pro (Semibold, Regular, Thin, Medium, Medium Italic)
Mechanical
Version:
4
Designer:
ACD:
Creative Dir:
Account Mgr:
Account Supe:
Date Initials OK
Adriana del Mar
None
None
None
Jenny Hardin
Pubs:
Bleed:
Trim:
Live:
Gutter:
Scale:
Print Scale: None
Cyan
Magenta
Yellow
Black
303.35 mm x 216.35 mm
297 mm x 210 mm
None
None
25.4 mm = 25.4 mm
20-EAM-0166_1929_297x210_MAnuAl_1.0.4_M1.9
INSTALLATION AND OPERATION MANUAL |05
Importnt Sfet Instructions (continued)
contct Electrif Americ. Electrif Americ is not responsible for n
dmes tht m occur resultin from custom instlltions or opertions
tht re not described in this document.
10. Personl protection equipment: Use of proper personl protection equipment
(includin, but not limited to, ee protection, shock protection, loves, nd
other pproprite protection) is recommended when instllin or servicin n
electricl equipment. To reduce the risk of fire, onl connect this equipment to
mximum 50 mperes overcurrent protection device in ccordnce with the
Ntionl Electricl Code, ANSI/NFPA.
11. Do not use this equipment in n re with hzrdous or flmmble mterils
or vpors.
12. Arcin component in contctor: The chrer includes contctors tht, when
opened or closed, will cuse short durtion rc. The contctor is enclosed
in n pproprite electricl enclosure, but cution is required if this rc occurs
in the presence of flmmble vpors—s the vpors could inite, cretin n
explosion. Store hzrdous nd flmmble vpors nd mterils w from
ll electricl equipment. If hzrdous or flmmble sources re present, llow
sufficient time for ventiltion before opertin the chrer.
13. Do not open the chrer t n time durin instlltion or opertion!
Onl trined personnel should open the chrer.
14. Hndlin live components incorrectl m cuse rievous injuries or deth.
15. If the electricit service to the chrer is dmed, immeditel shut down
the power to the chrer b switchin off the circuit breker nd contct
licensed electricin.
16. Turn off circuit before remountin or replcin the chrer.
17. To reduce the risk of fire, connect onl to circuit provided with the proper
mximum brnch circuit overcurrent protection in ccordnce with the
Ntionl Electricl Code nd locl lws, reultions, codes, nd stndrds.
18. Ensure tht ll components re dr throuhout the instlltion.
19. Product subject to modifiction without prior notice. This document miht not
contin the ltest chnes to the product’s specifictions or processes described
herein. For the most up-to-dte informtion, plese visit electrifyhome.com.
EMC Complince Sttement:
FCC Prt 15, Subprt B, Clss B
FCC ID: 2AX8SEA2R040JPA1000
1. Rdiofrequenc (RF) exposure wrnin: This equipment must be instlled
nd operted in ccordnce with the provided instructions, nd the ntenn(s)
used for this trnsmitter must be instlled to provide seprtion distnce
of t lest 20 cm from ll persons nd must not be co-locted or operted
in conjunction with n other ntenn or trnsmitter. End users nd instllers
must be provided with ntenn instlltion instructions nd trnsmitter
opertin conditions for stisfin RF exposure complince.
2. Federl Communictions Commission (FCC) Interference Sttement: This
equipment hs been tested nd found to compl with the limits for Clss B
diitl device, pursunt to prt 15 of the FCC Rules. These limits re desined to
provide resonble protection inst hrmful interference in residentil
instlltion. This equipment enertes, uses nd cn rdite rdio frequenc
ener nd, if not instlled nd used in ccordnce with the instructions, m
cuse hrmful interference to rdio communictions. However, there is no
urntee tht interference will not occur in prticulr instlltion. If this
equipment does cuse hrmful interference to rdio or television reception,
which cn be determined b turnin the equipment off nd on, the user is
encoured to tr to correct the interference b one or more of the followin
mesures:
1. Reorient or relocte the receivin ntenn.
2. Increse the seprtion between the equipment nd receiver.
3. Connect the equipment to n outlet on circuit different from tht to
which the receiver is connected.
4. Consult the deler or n experienced rdio/TV technicin for help.
CAUTION: An chnes or modifictions not expressl pproved
b the urntee of this device could void the user’s uthorit to operte
the equipment.
T:594 mm
T:210 mm
B:600.35 mm
B:216.35 mm

500 Sansome Street San Francisco California 94111 Tel 415 707.1111 Fax 415 707.1100
Project Mgr:
Copy Editor:
Studio:
Producer:
Copy Writer:
Karli Renken
Bill Randt
Cindy Peterson
Mary Pestell
None
Date:
Client:
Job Number:
Ad Code:
File Name:
Description:
Insertion Date(s):
Release Date(s):
1-19-2021 8:56 AM
EAM
20-EAM-0166
20-EAM-0166_1929
20-EAM-0166_1929_297x210_Manual_1.0.4_m1.9.indd
Owner's Manual
None
None
Client Confidential
Eleven
Date Initials OK
Designer:
ACD:
Creative Dir:
Account Mgr:
Account Supe:
Date Initials OK
Bleed:
Trim:
Live:
Gutter:
Scale:
Print Scale: None
303.35 mm x 216.35 mm
297 mm x 210 mm
None
None
25.4 mm = 25.4 mm
20-EAM-0166_1929_297x210_MAnuAl_1.0.4_M1.9
06 |HOMESTATION LEVEL 2 CHARGER
Product Overview
NO. ITEM NO. ITEM
1LED Rin 5Cble Holster
2Cosmetic Cover 6Vehicle Connector
3Plu 7Mountin Brcket
4Middle Cover 8 Bod
T:594 mm
B:600.35 mm
500 Sansome Street San Francisco California 94111 Tel 415 707.1111 Fax 415 707.1100
Karli Renken
Bill Randt
Cindy Peterson
Mary Pestell
None
1-19-2021 8:56 AM
EAM
20-EAM-0166
20-EAM-0166_1929
20-EAM-0166_1929_297x210_Manual_1.0.4_m1.9.indd
Owner's Manual
None
None
©2021 Eleven LLC. eleveninc.com All Rights Reserved.
Inks:
Notes: Flat trim: 594mm x 210mm
Finished: 297mm x 210mm
Updated Images
None
Fonts: Omnes Pro (Semibold, Regular, Thin, Medium)
Mechanical
Version:
4
Designer:
ACD:
Creative Dir:
Account Mgr:
Account Supe:
Date Initials OK
Adriana del Mar
None
None
None
Jenny Hardin
Pubs:
Bleed:
Trim:
Live:
Gutter:
Scale:
Print Scale: None
Cyan
Magenta
Yellow
Black
303.35 mm x 216.35 mm
297 mm x 210 mm
None
None
25.4 mm = 25.4 mm
20-EAM-0166_1929_297x210_MAnuAl_1.0.4_M1.9
INSTALLATION AND OPERATION MANUAL |07
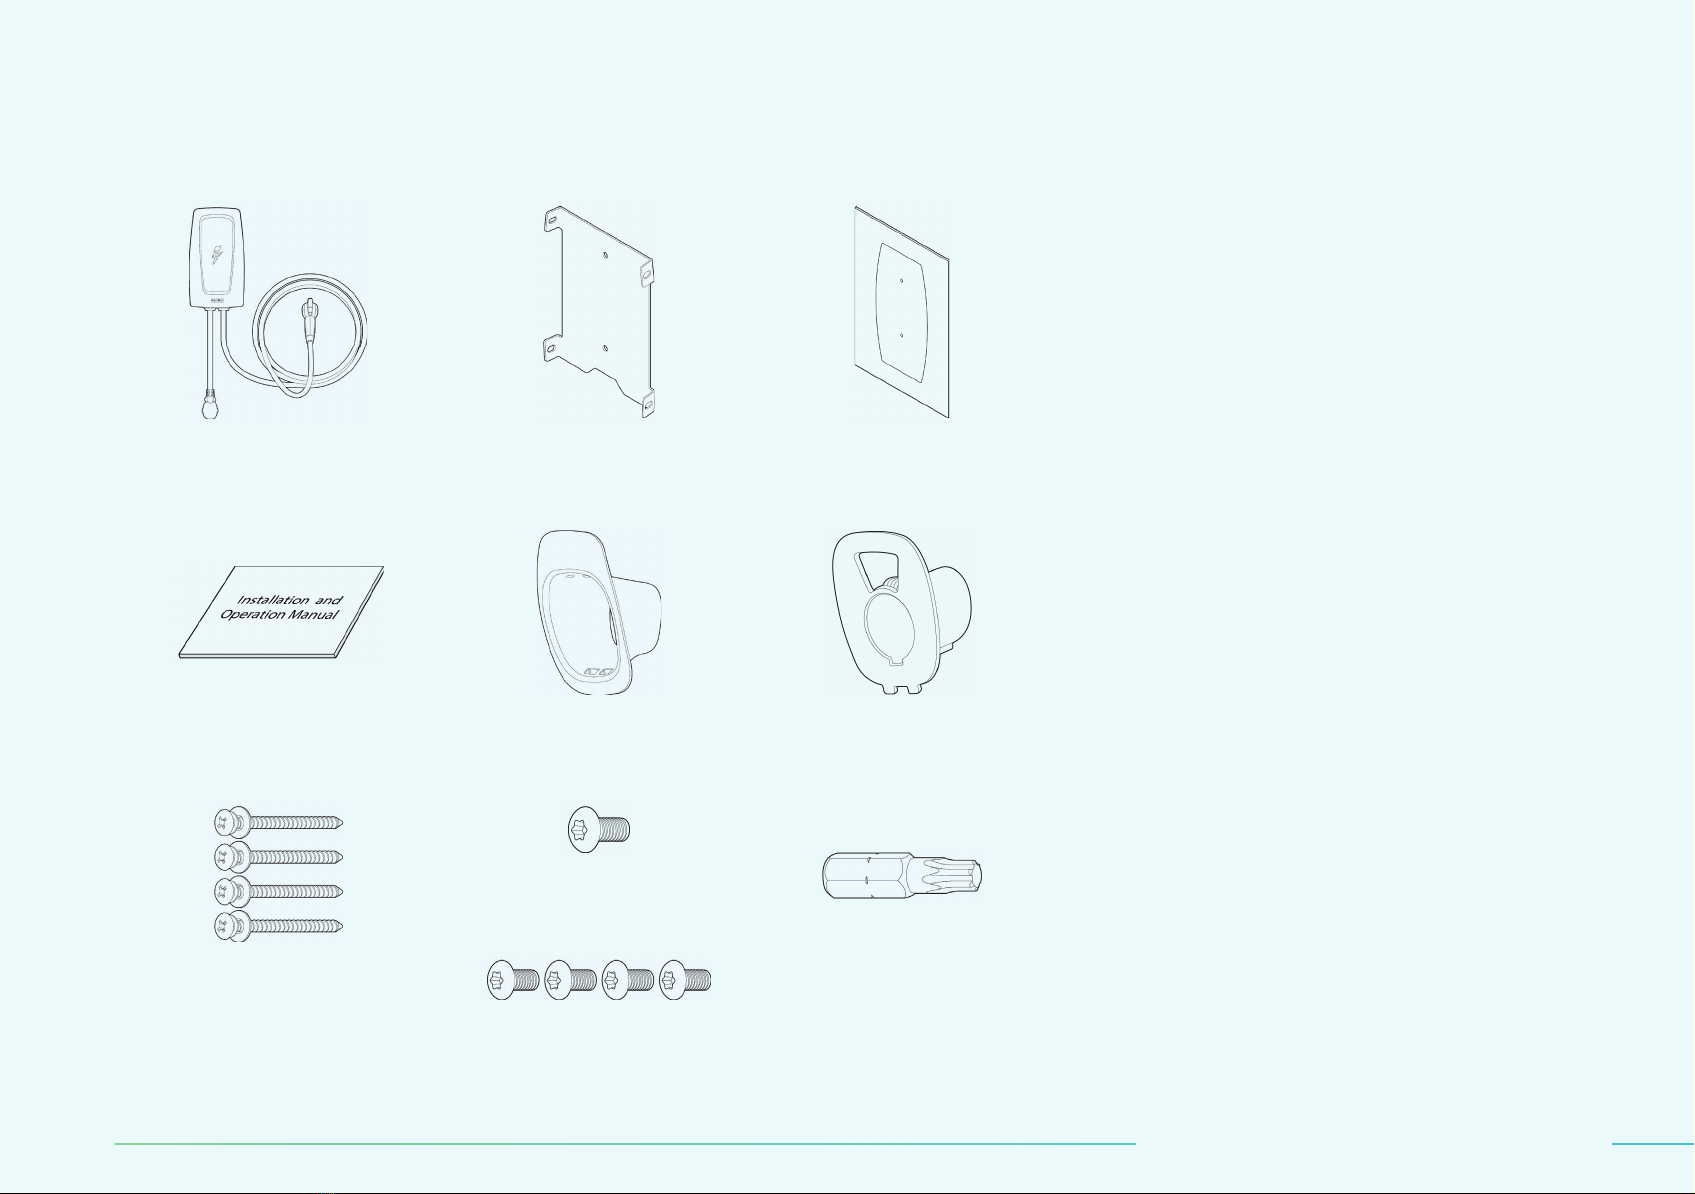
Included Components List Recommended Tools
TOOLS FOR PLU-IN INSTALLATION
1. Level
2. Pencil
3. Electric Drill
4.Phillips-Hed Screwdriver
TOOLS FOR HARDWIRED INSTALLATION
1. Level
2. Pencil
3. Electric Drill
4.Phillips-Hed Screwdriver
5. Dionl Cutter
6.Needle-Nose Pliers
7. Wire Stripper
8. Ferrule Crimpin Tool
Chrer
User mnul x 1
No. 8 wood screws x 4
(2 for brcket, 2 for holster)
Holster cse x 1
T20 Torx screw x 1
(for holster ssembl)
T30 Torx screws x 4
(for brcket ssembl)
Holster inlet x 1
T20 Torx bit x 1
T30 Torx bit x 1
Mountin brcket x 1 Mountin templte x 1
T:594 mm
T:210 mm
B:600.35 mm
B:216.35 mm

500 Sansome Street San Francisco California 94111 Tel 415 707.1111 Fax 415 707.1100
Project Mgr:
Copy Editor:
Studio:
Producer:
Copy Writer:
Karli Renken
Bill Randt
Cindy Peterson
Mary Pestell
None
Date:
Client:
Job Number:
Ad Code:
File Name:
Description:
Insertion Date(s):
Release Date(s):
1-19-2021 8:56 AM
EAM
20-EAM-0166
20-EAM-0166_1929
20-EAM-0166_1929_297x210_Manual_1.0.4_m1.9.indd
Owner's Manual
None
None
Client Confidential
Eleven
Date Initials OK
Designer:
ACD:
Creative Dir:
Account Mgr:
Account Supe:
Date Initials OK
Bleed:
Trim:
Live:
Gutter:
Scale:
Print Scale: None
303.35 mm x 216.35 mm
297 mm x 210 mm
None
None
25.4 mm = 25.4 mm
20-EAM-0166_1929_297x210_MAnuAl_1.0.4_M1.9
08 |HOMESTATION LEVEL 2 CHARGER
Installation Instructions
Before Instllin
We recommend tht certified electricin perform ll in-home instlltions,
nd this chrer should not be instlled in n circumstnces without first
consultin with n electricin fmilir with our home, its electricl pnel nd
wirin. Onl qulified, certified electricins should hrdwire this chrer.
These instructions describe how to operte nd cre for the chrer properl.
Additionl instructions re provided in the Electrif Americ pp, nd we recom-
mend ou view the pp before usin the chrer. For our personl sfet, follow
the opertin instructions exctl.
Mke sure to follow ll locl codes nd reultions for sfet nd ccessibilit.
When considerin instlltion loctions, there re few thins to keep in mind:
DETERMINE OUR POWER RATIN
1. Prior to instllin our chrer, work with our electricin to determine the
mpere settin tht best fits our home’s electricl cpcit. This m
determine which tpe of instlltion ou will need nd the best loction for
the chrer.
PICK OUR LOCATION
1. Instll the mountin brcket for the chrer—mesured from the bottom of the
brcket between 31.5 (80 cm) nd 47.2" (120 cm) bove the round.
Confiurtion Instlltion Tpe
16A Hrdwire Onl
32A Plu-In or Hrdwire
40A Plu-In or Hrdwire
1. Instll the holster—mesured from the
bottom between 31.5" (80 cm) nd
43.3" (110 cm) bove the round.
2. To llow for proper irflow nd workin room, the chrer should be locted
12" (30.5 cm) from n other equipment, wlls, or other obstructions.
3. The brcket must be mounted on flt surfce so tht it does not deform
when properl secured.
4. Plu-In Instlltion Note: Prior to mountin the chrer, turn off the circuit
breker for the desired outlet nd plu in the chrer. This will llow for
proper plcement of the chrer.
5. When selectin loction to instll the chrer, mke sure tht the chre
cble cn esil connect to the vehicle when it is prked. Keep in mind where
the vehicle’s chrin port is locted (it vries from vehicle to vehicle) nd
how the vehicle will usull be prked.
6. The best instlltion loctions hve enouh spce to esil store the cble
round the chrer itself (or the holster provided with the chrer), nd will not
interfere with pthws or other items in the re or drivew.
TIP: Be sure the power cord hs
entle curve but is not stretched.
T:594 mm
B:600.35 mm

500 Sansome Street San Francisco California 94111 Tel 415 707.1111 Fax 415 707.1100
Karli Renken
Bill Randt
Cindy Peterson
Mary Pestell
None
1-19-2021 8:56 AM
EAM
20-EAM-0166
20-EAM-0166_1929
20-EAM-0166_1929_297x210_Manual_1.0.4_m1.9.indd
Owner's Manual
None
None
©2021 Eleven LLC. eleveninc.com All Rights Reserved.
Inks:
Notes: Flat trim: 594mm x 210mm
Finished: 297mm x 210mm
Updated Images
None
Fonts: Omnes Pro (Semibold, Regular, Thin, Medium)
Mechanical
Version:
4
Designer:
ACD:
Creative Dir:
Account Mgr:
Account Supe:
Date Initials OK
Adriana del Mar
None
None
None
Jenny Hardin
Pubs:
Bleed:
Trim:
Live:
Gutter:
Scale:
Print Scale: None
Cyan
Magenta
Yellow
Black
303.35 mm x 216.35 mm
297 mm x 210 mm
None
None
25.4 mm = 25.4 mm
20-EAM-0166_1929_297x210_MAnuAl_1.0.4_M1.9
INSTALLATION AND OPERATION MANUAL |09
Instlltion Steps
This product must hve proper electricl round connection. Proper electricl
roundin reduces the risk of electric shock. This product is equipped with
power suppl cble tht includes n equipment roundin conductor. The power
suppl cble must be plued into comptible outlet tht is properl instlled
nd rounded in ccordnce with ll locl codes nd ordinnces.
WARNIN: Improper connection of the power suppl cble cn result in
risk of electric shock. Check with qulified electricin to ensure the
product is properl rounded. Do not modif the power suppl cble provided
with the product. Ensure the proper outlet is instlled b licensed nd
qulified electricin.
INSTALL THE MOUNTIN BRACKET AND CHARER
1. The product is sttionr piece of equipment tht is desined to be
mounted on wll. The mountin templte, included with the product, shows
the proper loction to drill pilot holes for the mountin brcket screws.
2. Usin level, plce the mountin templte in the loction where ou would
like to mount the chrer.
3. Tpe the templte in plce nd mesure the heiht to ensure the chrer is
between 31.5" (80 cm) nd 47.2" (120 cm) bove the round.
NOTE: The brcket must be mounted on flt surfce so tht the brcket
does not deform when properl secured.
4. Instll the mountin brcket securel to the wll,
linin the holes in the brcket with those mrked
on the wll, nd secure the mountin brcket usin
the provided screws or other fsteners tht best
suit our specific instlltion needs.
5. Once the mountin brcket is instlled, plce the chrer into the brcket
nd secure the chrer to the brcket usin the 4 supplied T30 Torx screws.
INSTALL THE HOLSTER
The cble holster is optionl. Instll the holster—mesured from the bottom
between 31.5" (80 cm) nd 43.3" (110 cm) bove the round. Plese select
the proper mountin hrdwre for our prticulr instlltion.
PLU-IN INSTALLATION USIN THE ATTACHED SUPPL POWER PLU
Insert the power plu into the power outlet (NEMA 14-50 receptcle).
AMPERAE CONFIURATION WITH THE ELECTRIF AMERICA APP
1. Downlod nd instll the Electrif Americ pp on our smrtphone
(vilble for iOS nd Android).
2. Ensure tht our phone’s Wi-Fi is turned on. It is not required to be
connected to network.
3. Follow the instructions in the pp to connect to our chrer nd confiure
our mpere settin.
T:594 mm
T:210 mm
B:600.35 mm
B:216.35 mm
500 Sansome Street San Francisco California 94111 Tel 415 707.1111 Fax 415 707.1100
Project Mgr:
Copy Editor:
Studio:
Producer:
Copy Writer:
Karli Renken
Bill Randt
Cindy Peterson
Mary Pestell
None
Date:
Client:
Job Number:
Ad Code:
File Name:
Description:
Insertion Date(s):
Release Date(s):
1-19-2021 8:56 AM
EAM
20-EAM-0166
20-EAM-0166_1929
20-EAM-0166_1929_297x210_Manual_1.0.4_m1.9.indd
Owner's Manual
None
None
Client Confidential
Eleven
Date Initials OK
Designer:
ACD:
Creative Dir:
Account Mgr:
Account Supe:
Date Initials OK
Bleed:
Trim:
Live:
Gutter:
Scale:
Print Scale: None
303.35 mm x 216.35 mm
297 mm x 210 mm
None
None
25.4 mm = 25.4 mm
20-EAM-0166_1929_297x210_MAnuAl_1.0.4_M1.9
10 |HOMESTATION LEVEL 2 CHARGER
Instlltion with Hrdwirin
These instlltion instructions re intended for certified electricins. Onl
qulified, certified electricins should hrdwire the chrer. In ddition
to the chrer instlltion instructions, follow ll federl, provincil, nd locl
lws, reultions, ordinnces, codes, nd sfet stndrds.
This product must be properl rounded—either to rounded, metl,
permnent wirin sstem or n equipment-roundin conductor run with
the suppl power circuit conductors nd connected to the roundin
terminl on the product.
CAUTION: To reduce the risk of fire, connect onl to circuit provided with 50
mperes mximum brnch circuit overcurrent protection (in ccordnce with
the Ntionl Electricl Code, ANSI/NFPA 70).
REMOVE THE COSMETIC AND MIDDLE COVERS
1. Remove the screw locted t the bottom of cosmetic cover b usin the
T20 Torx bit.
2. Tilt the cosmetic cover upwrd nd seprte it from the middle cover.
3. Remove the screws usin the T20 Torx bit.
4. Plce the middle cover on the bod of the chrer b hnin the two hooks
on the bck of the middle cover to the ledes t the bottom of the bod.
5. Once the cover hs been removed, open the cble mnement clip on
the riht-hnd side of the enclosure to relese the LED cble ttched to the
cover. This will llow the cover to be hun on the bottom of the enclosure.
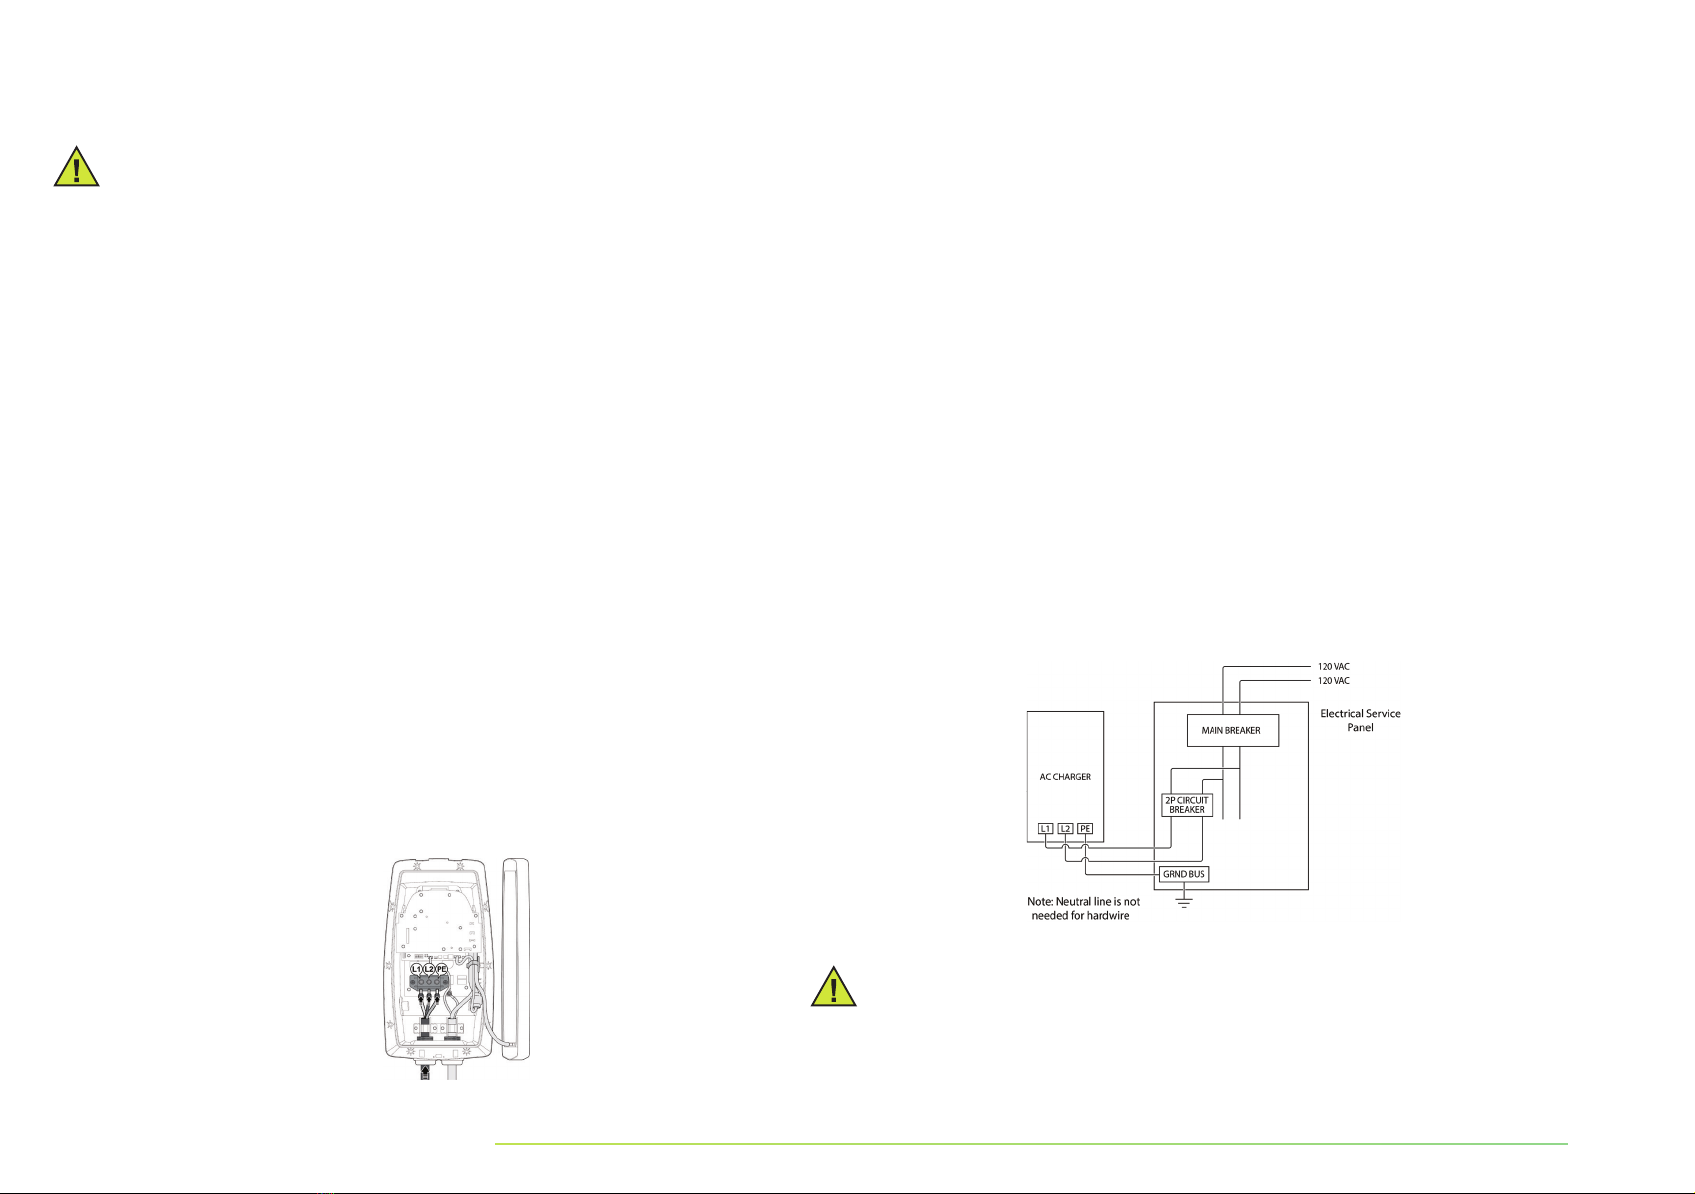
REMOVE THE PLU CABLE
1. Remove the plu cble b loosenin the 3 center screws (shown s L1, L2, nd
PE) in the terminl block. Do not loosen the screws securin the terminl block
to the bod.
2. This product hs two mens of strin relief: metl brcket on the interior
of the bod nd blck nut on the outside of the bod.
3. Loosen the left strin relief nut on the outside of the bod.
4. Remove the left strin relief strp from the inside of the bod.
5. Pull the cble down throuh the cble lnd nd remove the strin
relief nut from the plu cble.
FLIP THE COSMETIC COVER UPWARD TO SEPARATE IT FROM THE BOD
1. Insert the new cble throuh the cble lnd nut, then into the bod
of the chrer.
NOTE: The conductor size m be no less thn 6 AW.
Durin instlltion, be sure to use proper personl protective equipment
nd do not touch wirin terminls with our finers.
NOTE: The circuit breker must be rted for 125% of the chosen
opertin current.
T:594 mm
B:600.35 mm
500 Sansome Street San Francisco California 94111 Tel 415 707.1111 Fax 415 707.1100
Karli Renken
Bill Randt
Cindy Peterson
Mary Pestell
None
1-19-2021 8:56 AM
EAM
20-EAM-0166
20-EAM-0166_1929
20-EAM-0166_1929_297x210_Manual_1.0.4_m1.9.indd
Owner's Manual
None
None
©2021 Eleven LLC. eleveninc.com All Rights Reserved.
Inks:
Notes: Flat trim: 594mm x 210mm
Finished: 297mm x 210mm
Updated Images
None
Fonts: Omnes Pro (Semibold, Regular, Thin, Medium)
Mechanical
Version:
4
Designer:
ACD:
Creative Dir:
Account Mgr:
Account Supe:
Date Initials OK
Adriana del Mar
None
None
None
Jenny Hardin
Pubs:
Bleed:
Trim:
Live:
Gutter:
Scale:
Print Scale: None
Cyan
Magenta
Yellow
Black
303.35 mm x 216.35 mm
297 mm x 210 mm
None
None
25.4 mm = 25.4 mm
20-EAM-0166_1929_297x210_MAnuAl_1.0.4_M1.9
INSTALLATION AND OPERATION MANUAL |11
2. Crimp insulted wire ferrules onto ech suppl power wire, includin round.
Follow the ferrule mnufcturer’s instructions for crimpin the ferrules onto
ech wire.
3. Insert ech ferrule terminl wire in the terminl block, ensurin the wires re
locted properl.
4. Tihten terminl block screws to 33–40 in-lb (3.73-4.5 N-M) of torque.
5. Reinstll nd tihten the strin relief strp, ensurin the wires re
not strined between the strin relief strp nd the terminl block.
6. Tihten the strin relief nut to the cble lnd.
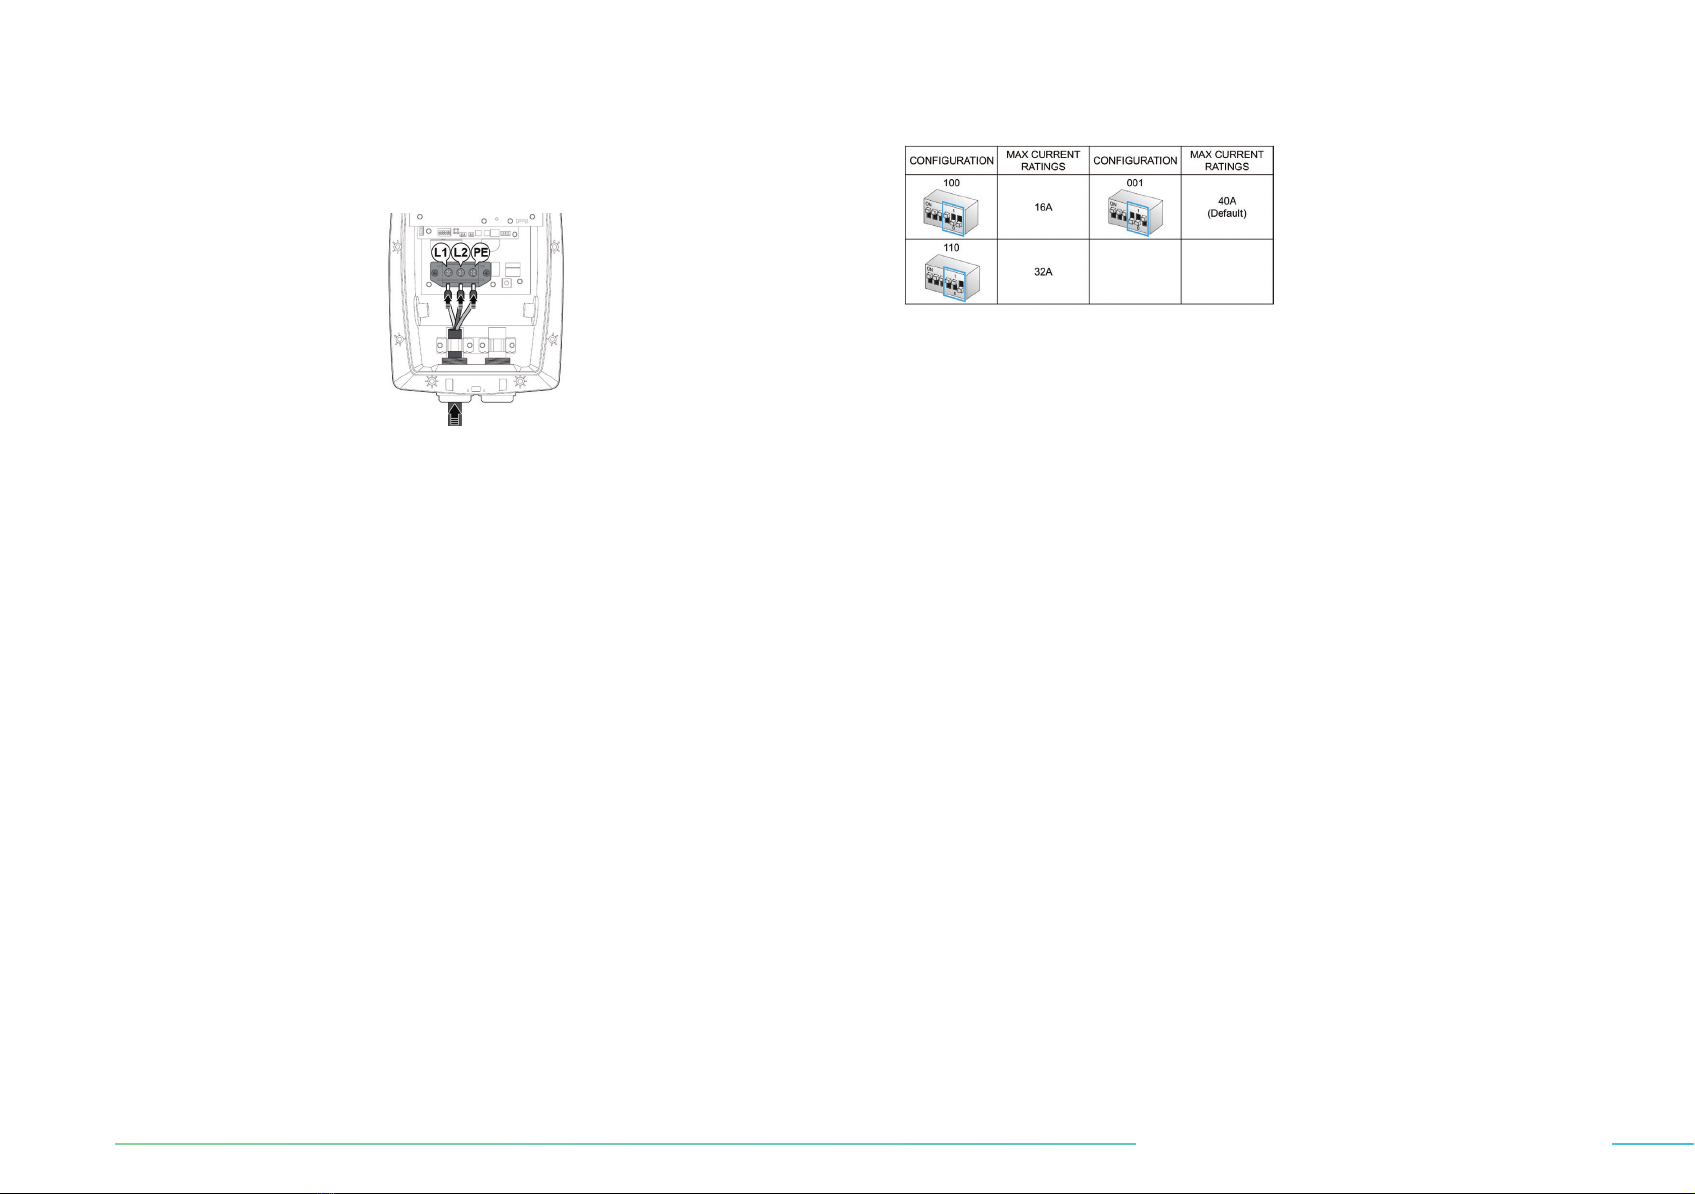
MANUAL AMPERAE CONFIURATION (OPTIONAL)
Use this method onl if required b locl code; otherwise, use the Electrif
Americ pp to set the mpere confiurtion.
1. The mpere of the chrer cn be mnull set b confiurin the DIP
switches s shown t riht. It is lws preferble to confiure the mpere
vi the Electrif Americ pp.
NOTE: When there is difference between the DIP switch settins nd the
settin in the Electrif Americ pp, the chrer will issue chre t the
lowest mpere settin.
REATTACH THE COVER
1. Secure the middle cover with the screws removed (s in the previous steps).
2. Attch the cosmetic cover b plcin the top ede of the cosmetic cover over
the middle cover nd entl pushin the cosmetic cover into plce. Loosen the
left strin relief nut on the outside of the bod. Secure the cover with the T20
Torx screws.
AMPERAE CONFIURATION WITH THE ELECTRIF AMERICA APP
1. Downlod nd instll the Electrif Americ pp on our smrtphone (vilble
for iOS nd Android).
2. Ensure tht our phone’s Wi-Fi is turned on. It is not required to be connected to
network.
3. Follow the instructions in the pp to connect to our chrer nd
confiure our mpere settin.
WI-FI SETUP (PLU-IN OR HARDWIRED INSTALLATION)
1. To connect the chrer to Wi-Fi network, downlod nd instll the Electrif
Americ pp on our smrtphone (vilble for iOS nd Android).
2. Follow the instructions in the pp to set up with Wi-Fi connection.
T:594 mm
T:210 mm
B:600.35 mm
B:216.35 mm

500 Sansome Street San Francisco California 94111 Tel 415 707.1111 Fax 415 707.1100
Project Mgr:
Copy Editor:
Studio:
Producer:
Copy Writer:
Karli Renken
Bill Randt
Cindy Peterson
Mary Pestell
None
Date:
Client:
Job Number:
Ad Code:
File Name:
Description:
Insertion Date(s):
Release Date(s):
1-19-2021 8:56 AM
EAM
20-EAM-0166
20-EAM-0166_1929
20-EAM-0166_1929_297x210_Manual_1.0.4_m1.9.indd
Owner's Manual
None
None
Client Confidential
Eleven
Date Initials OK
Designer:
ACD:
Creative Dir:
Account Mgr:
Account Supe:
Date Initials OK
Bleed:
Trim:
Live:
Gutter:
Scale:
Print Scale: None
303.35 mm x 216.35 mm
297 mm x 210 mm
None
None
25.4 mm = 25.4 mm
20-EAM-0166_1929_297x210_MAnuAl_1.0.4_M1.9
12 |HOMESTATION LEVEL 2 CHARGER
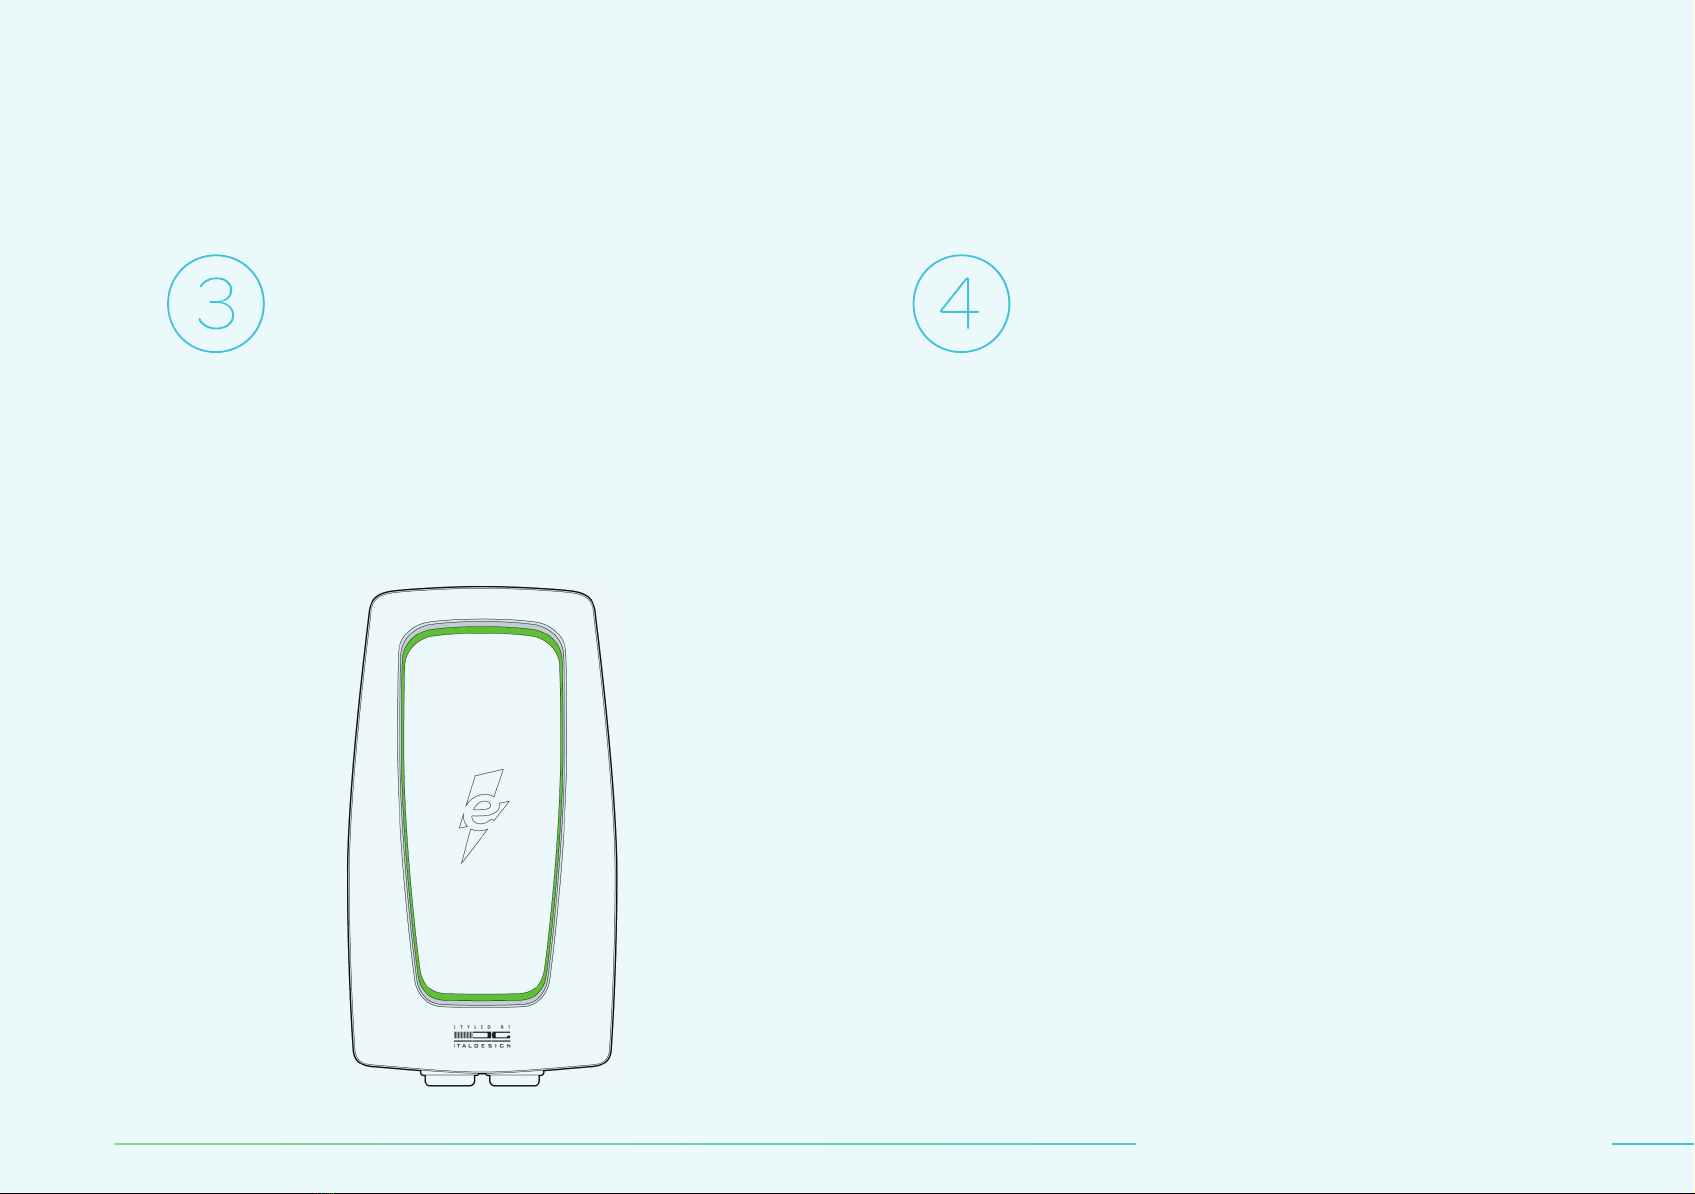
Insert the vehicle connector into the charging
port on your electric vehicle. The charger will
light up green when a connection is detected.
Once the charger is plugged into the vehicle, the
charger will begin flashing blue as it links with
the vehicle. When the charger is flashing solid blue,
the vehicle is charging.
Operating Instructions
The charger light will dim on the front and remain
blue on the bottom for the entire charging session.
T:594 mm
B:600.35 mm
500 Sansome Street San Francisco California 94111 Tel 415 707.1111 Fax 415 707.1100
Karli Renken
Bill Randt
Cindy Peterson
Mary Pestell
None
1-19-2021 8:56 AM
EAM
20-EAM-0166
20-EAM-0166_1929
20-EAM-0166_1929_297x210_Manual_1.0.4_m1.9.indd
Owner's Manual
None
None
©2021 Eleven LLC. eleveninc.com All Rights Reserved.
Inks:
Notes: Flat trim: 594mm x 210mm
Finished: 297mm x 210mm
Updated Images
None
Fonts: Omnes Pro (Semibold, Regular, Light, Thin)
Mechanical
Version:
4
Designer:
ACD:
Creative Dir:
Account Mgr:
Account Supe:
Date Initials OK
Adriana del Mar
None
None
None
Jenny Hardin
Pubs:
Bleed:
Trim:
Live:
Gutter:
Scale:
Print Scale: None
Cyan
Magenta
Yellow
Black
303.35 mm x 216.35 mm
297 mm x 210 mm
None
None
25.4 mm = 25.4 mm
20-EAM-0166_1929_297x210_MAnuAl_1.0.4_M1.9
INSTALLATION AND OPERATION MANUAL |13
Charging is complete when the charger turns
green once more.
Press the thumb lever on the vehicle connector
to disconnect from the vehicle.
T:594 mm
T:210 mm
B:600.35 mm
B:216.35 mm
500 Sansome Street San Francisco California 94111 Tel 415 707.1111 Fax 415 707.1100
Project Mgr:
Copy Editor:
Studio:
Producer:
Copy Writer:
Karli Renken
Bill Randt
Cindy Peterson
Mary Pestell
None
Date:
Client:
Job Number:
Ad Code:
File Name:
Description:
Insertion Date(s):
Release Date(s):
1-19-2021 8:56 AM
EAM
20-EAM-0166
20-EAM-0166_1929
20-EAM-0166_1929_297x210_Manual_1.0.4_m1.9.indd
Owner's Manual
None
None
Client Confidential
Eleven
Date Initials OK
Designer:
ACD:
Creative Dir:
Account Mgr:
Account Supe:
Date Initials OK
Bleed:
Trim:
Live:
Gutter:
Scale:
Print Scale: None
303.35 mm x 216.35 mm
297 mm x 210 mm
None
None
25.4 mm = 25.4 mm
20-EAM-0166_1929_297x210_MAnuAl_1.0.4_M1.9
14 |HOMESTATION LEVEL 2 CHARGER
Charger Status
If ou re experiencin difficult chrin, fult indictor liht, or n other
issue usin the chrer, plese see the Troubleshootin section for ssistnce.
If the issue persists, plese contct Electrif Americ Customer Support t
(833) 532-2778.
Sttus Indictor
The chrer is equipped with n interted LED rin to llow for cler
communiction of the chrer’s sttus. For ener efficienc, onl the
bottom section of the LED rin will remin illuminted (for pproximtel
two minutes) since the lst user interction.
Indictor Definition
LED PATTERN DEFINITION
S l o w fl s h i n 2 seconds between flshes.
Fst flshin Less thn 1 second between flshes.
1 fl s h
1 second on, 5 seconds off.
2 fl s h e s
1 second on, 1 second off; 1 second on, 5 seconds off.
3 + fl s h e s Follows the sme flshin pttern s
directl bove.
REEN
Stndb
BLUE
Chrin
RED
Fult
ELLOW
Wi-Fi Setup
T:594 mm
B:600.35 mm
500 Sansome Street San Francisco California 94111 Tel 415 707.1111 Fax 415 707.1100
Karli Renken
Bill Randt
Cindy Peterson
Mary Pestell
None
1-19-2021 8:56 AM
EAM
20-EAM-0166
20-EAM-0166_1929
20-EAM-0166_1929_297x210_Manual_1.0.4_m1.9.indd
Owner's Manual
None
None
©2021 Eleven LLC. eleveninc.com All Rights Reserved.
Inks:
Notes: Flat trim: 594mm x 210mm
Finished: 297mm x 210mm
Updated Images
None
Fonts: Omnes Pro (Semibold, Regular, Thin, Medium)
Mechanical
Version:
4
Designer:
ACD:
Creative Dir:
Account Mgr:
Account Supe:
Date Initials OK
Adriana del Mar
None
None
None
Jenny Hardin
Pubs:
Bleed:
Trim:
Live:
Gutter:
Scale:
Print Scale: None
Cyan
Magenta
Yellow
Black
303.35 mm x 216.35 mm
297 mm x 210 mm
None
None
25.4 mm = 25.4 mm
20-EAM-0166_1929_297x210_MAnuAl_1.0.4_M1.9
INSTALLATION AND OPERATION MANUAL |15
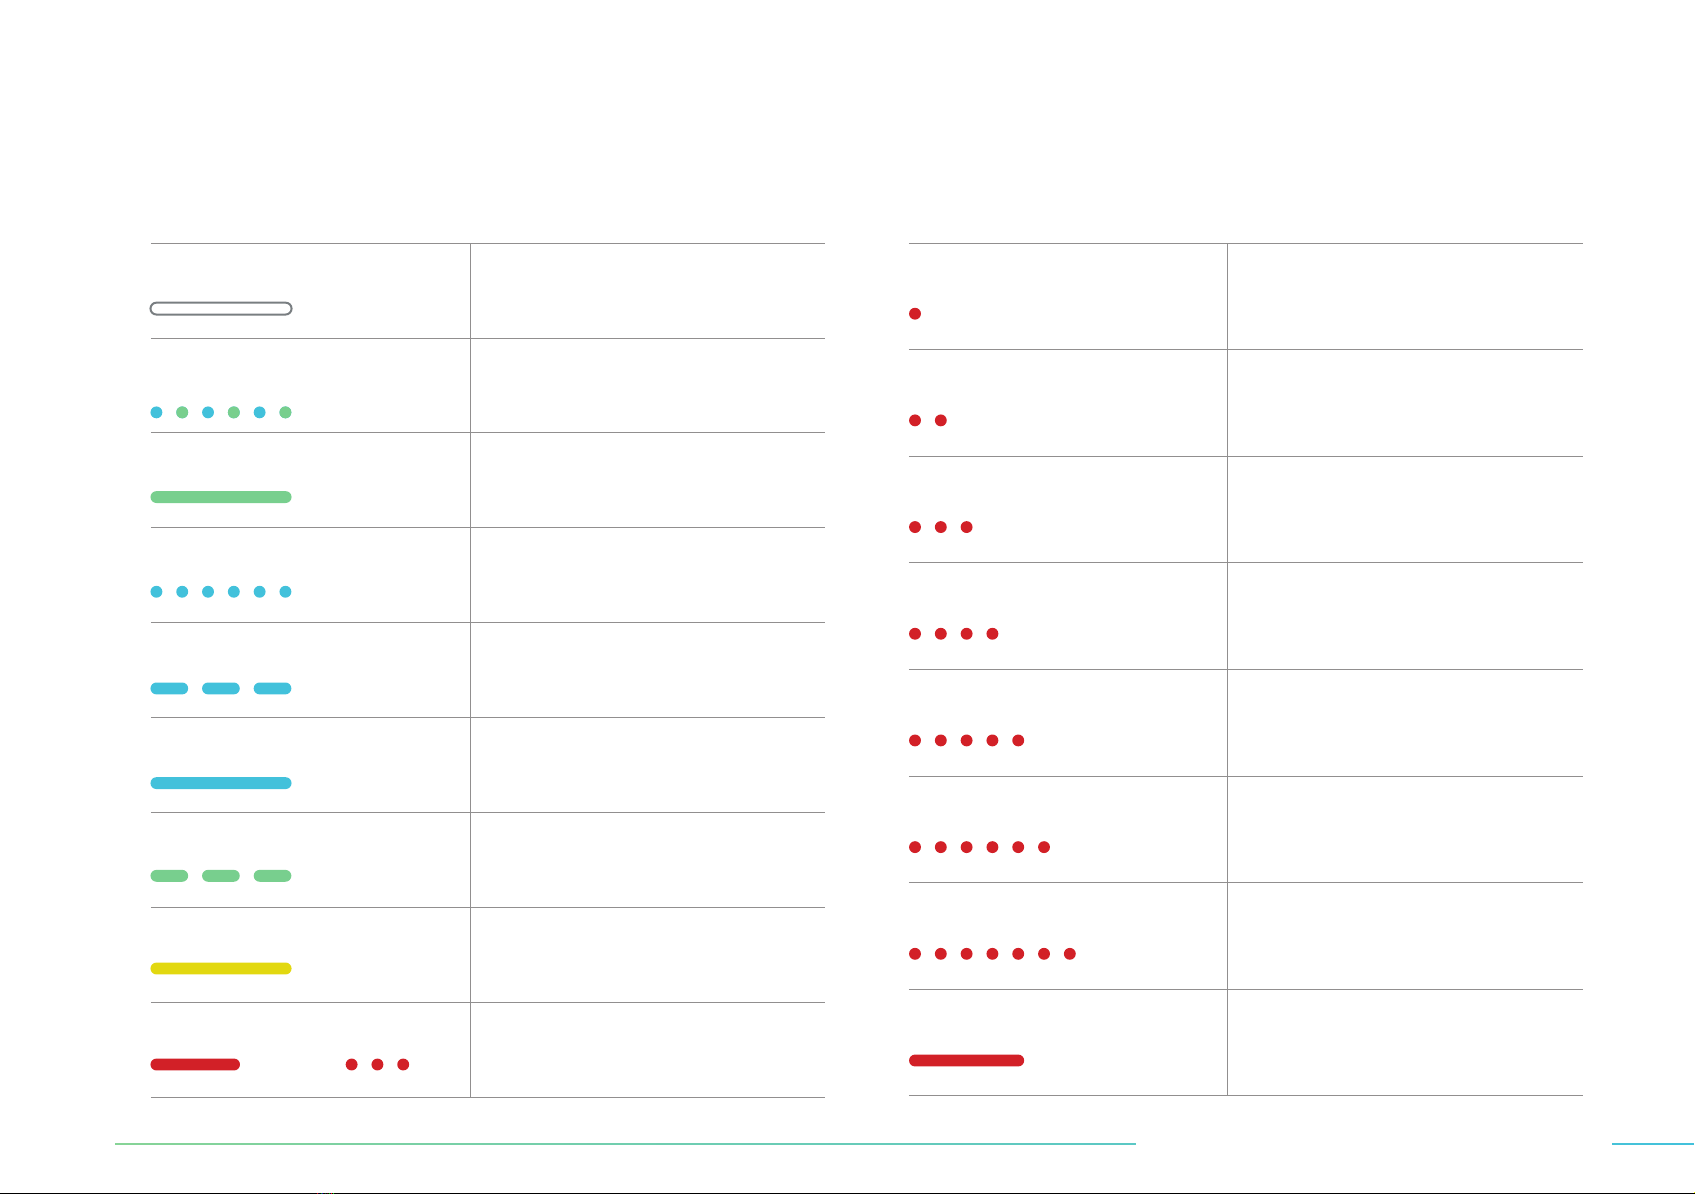
Understndin Sttus Indictor Ptterns
LED COLOR INDICATOR DESCRIPTION
No color Power off.
Blue & reen,
lterntin nd fst flshin Initil nd self-test.
reen, solid Stndb.
Blue, fst flshin EV connected.
Blue, slow flshin Preprin to chre.
Blue, solid Chrin.
reen, slow flshin Chrin finished or stopped b user.
ellow, solid First successful connection to Wi-Fi.
Red, constnt nd/or flshin Fult indictor.
See the Troubleshootin section.
Fults
LED INDICATOR DESCRIPTION
Red, 1 flsh Hih or low input volte detected.
Red, 2 flshes round fult detected.
Red, 3 flshes round connection error.
Red, 4 flshes Hih input current detected.
Red, 5 flshes Opertin temperture limit exceeded.
Disconnect the unit from power.
Red, 6 flshes Instlltion error.
Line nd neutrl re swpped.
Red, 7 flshes Vehicle communiction error.
Red, solid Self-test error or enerl error. Disconnect the
chrer from power source nd reconnect it
fter 10 seconds to power ccle the chrer.
T:594 mm
T:210 mm
B:600.35 mm
B:216.35 mm

500 Sansome Street San Francisco California 94111 Tel 415 707.1111 Fax 415 707.1100
Project Mgr:
Copy Editor:
Studio:
Producer:
Copy Writer:
Karli Renken
Bill Randt
Cindy Peterson
Mary Pestell
None
Date:
Client:
Job Number:
Ad Code:
File Name:
Description:
Insertion Date(s):
Release Date(s):
1-19-2021 8:56 AM
EAM
20-EAM-0166
20-EAM-0166_1929
20-EAM-0166_1929_297x210_Manual_1.0.4_m1.9.indd
Owner's Manual
None
None
Client Confidential
Eleven
Date Initials OK
Designer:
ACD:
Creative Dir:
Account Mgr:
Account Supe:
Date Initials OK
Bleed:
Trim:
Live:
Gutter:
Scale:
Print Scale: None
303.35 mm x 216.35 mm
297 mm x 210 mm
None
None
25.4 mm = 25.4 mm
20-EAM-0166_1929_297x210_MAnuAl_1.0.4_M1.9
16 |HOMESTATION LEVEL 2 CHARGER
Troubleshooting
SITUATION CAUSE ACTION
Sttus indictor does
not illuminte. Chrer is not receivin power.
Ask certified electricin to check tht the power input is connected correctl
nd the power is within opertin rne of the unit.
Disconnect the chrer from power source nd reconnect fter 10 seconds to power
ccle the chrer.
If the problem persists, contct Customer Support t (833) 532-2778.
Indictor does not flsh blue fter
pluin in the vehicle connector.
Vehicle btter is full chred.
Plu is not properl connected.
Check if the EV btter is fulll chred.
Check if the vehicle connector is full inserted to the EV.
If the problem persists, contct Customer Support t (833) 532-2778.
Indictor strts to flsh red
while chrin.
Chrer hs detected n error.
Chrer hs encountered fult.
Wit until the temporr error is resolved nd the chrer returns to norml condition,
tpicll less thn 10 seconds.
Disconnect the chrer from the vehicle, wit for the error to cler, nd reconnect the
chrer to the vehicle.
If the error persists, disconnect the chrer from power source nd reconnect fter
10 seconds to power ccle the chrer.
If the error is not resolved, contct Customer Support t (833) 532-2778.
Indictor illumintes red. Chrer hs detected fult.
Disconnect the chrer from the vehicle, wit for the error to cler, nd reconnect
the chrer to the vehicle.
If the error persists, disconnect the chrer from power source nd reconnect fter
10 seconds to power ccle the chrer.
If the error is not resolved, contct Customer Support t (833) 532-2778.
T:594 mm
B:600.35 mm

500 Sansome Street San Francisco California 94111 Tel 415 707.1111 Fax 415 707.1100
Karli Renken
Bill Randt
Cindy Peterson
Mary Pestell
None
1-19-2021 8:56 AM
EAM
20-EAM-0166
20-EAM-0166_1929
20-EAM-0166_1929_297x210_Manual_1.0.4_m1.9.indd
Owner's Manual
None
None
©2021 Eleven LLC. eleveninc.com All Rights Reserved.
Inks:
Notes: Flat trim: 594mm x 210mm
Finished: 297mm x 210mm
Updated Images
None
Fonts: Omnes Pro (Semibold, Regular, Thin, Medium)
Mechanical
Version:
4
Designer:
ACD:
Creative Dir:
Account Mgr:
Account Supe:
Date Initials OK
Adriana del Mar
None
None
None
Jenny Hardin
Pubs:
Bleed:
Trim:
Live:
Gutter:
Scale:
Print Scale: None
Cyan
Yellow
Black
303.35 mm x 216.35 mm
297 mm x 210 mm
None
None
25.4 mm = 25.4 mm
20-EAM-0166_1929_297x210_MAnuAl_1.0.4_M1.9
INSTALLATION AND OPERATION MANUAL |17
Specifications
Model EA2R040JPA10-00
Mesurements (H x W x D) 15.75" x 8.66" x 6.75" (pprox.)
Cble Lenth 24 Feet
Instlltion Tpe Fixed Wll Mounted
Weiht 19.85 lbs. (pprox.)
Enclosure Rtin NEMA Tpe 3R
Input Power 208V-240V AC Split Phse
(3-Wire – L1, L2, round)
AC Plu-In Cord NEMA 14-50
Mx. Current Rtin 40 Amps
Output Power Up to 9.6kW (240V AC @ 40A)
Power Meterin Accurc +/- 1% t Full Scle
Chre Connector SAE J1772
Chrin Protocol SAE J1772
Vehicle-to-rid Protocol ISO 15118
User Interfce/HMI LED Liht Rin
Wireless WLAN with 2.4Hz b//n with WPA2
Communiction Protocol OCPP 1.6+ JSON Complint
AC Fult Monitor FCI Interted (20mA CCID for AC)
Short Circuit/
Overlod Protection
50A Circuit Breker (not provided with
unit, no FCI) for 40 A Output (Refer to
locl codes for proper breker sizin)
Plu nd Chre ISO 15118 Red
Vehicle Communiction Pilot Sinl (IEC 61851-1:2017)
nd ISO 15118
Certifictions UL2594, UL2231-1&2, FCC Prt 15,
Clss B
Opertin Temperture
-22°F to +122°F (-30°C to +50°C)
Full Lod Therml Overlod
Protection: Output power reduced
t hiher tempertures.
Store Temperture -40°F to +176°F (-40°C to +80°C)
Humidit 5%—95% (Non-Condensin)
T:594 mm
T:210 mm
B:600.35 mm
B:216.35 mm

500 Sansome Street San Francisco California 94111 Tel 415 707.1111 Fax 415 707.1100
Project Mgr:
Copy Editor:
Studio:
Producer:
Copy Writer:
Karli Renken
Bill Randt
Cindy Peterson
Mary Pestell
None
Date:
Client:
Job Number:
Ad Code:
File Name:
Description:
Insertion Date(s):
Release Date(s):
1-19-2021 8:56 AM
EAM
20-EAM-0166
20-EAM-0166_1929
20-EAM-0166_1929_297x210_Manual_1.0.4_m1.9.indd
Owner's Manual
None
None
Client Confidential
Eleven
Date Initials OK
Designer:
ACD:
Creative Dir:
Account Mgr:
Account Supe:
Date Initials OK
Bleed:
Trim:
Live:
Gutter:
Scale:
Print Scale: None
303.35 mm x 216.35 mm
297 mm x 210 mm
None
None
25.4 mm = 25.4 mm
20-EAM-0166_1929_297x210_MAnuAl_1.0.4_M1.9
18 |HOMESTATION LEVEL 2 CHARGER
Moving, Transportation,
and Storage
WARNIN: Improper movin or store of this device m result in
risk of fire or electric shock.
Do not lift or crr the chrer b the cords. Do not llow the connector
cble to dr or touch the round when movin the chrer. This device
should be stored in dr loction tht’s between -40°F nd +176°F.
Cleaning
The chrer m onl be clened with wter; the use of lukewrm wter
is recommended. Do not use clenin ents continin solvents. Dr the
chrer with clen pper towel or soft cloth prior to use.
Do not use this product if the power cord or the electric vehicle cble is fred,
hs broken insultion, or shows n other sins of dme. Do not use this
productif the enclosure or the electric vehicle connector is broken, crcked,
open, or shows n other indiction of dme.
For further ssistnce, contct us t (833) 532–2778.
Warranty
Customer Support cn provide more informtion on the terms of the
wrrnt. However, the followin cses re not covered b the wrrnt:
A. Defects or dme cused b n filure to instll, operte, or cre for
this product s specified in this Instlltion nd Opertion Mnul nd
the Electrif Americ pp.
B. Costs nd dme cused b repir work which hs not been mde
b n Electrif Americ–pproved uthorized specilist or electricin.
Disposal
The chrer is n electricl device. Follow ll federl, stte, nd
locl lws, reultions, ordinnces, nd sfet stndrds rerdin
disposl of this device.
T:594 mm
B:600.35 mm

500 Sansome Street San Francisco California 94111 Tel 415 707.1111 Fax 415 707.1100
Karli Renken
Bill Randt
Cindy Peterson
Mary Pestell
None
1-19-2021 8:56 AM
EAM
20-EAM-0166
20-EAM-0166_1929
20-EAM-0166_1929_297x210_Manual_1.0.4_m1.9.indd
Owner's Manual
None
None
©2021 Eleven LLC. eleveninc.com All Rights Reserved.
Inks:
Notes: Flat trim: 594mm x 210mm
Finished: 297mm x 210mm
Updated Images
None
Fonts: Omnes Pro (Semibold, Regular, Medium, Thin)
Mechanical
Version:
4
Designer:
ACD:
Creative Dir:
Account Mgr:
Account Supe:
Date Initials OK
Adriana del Mar
None
None
None
Jenny Hardin
Pubs:
Bleed:
Trim:
Live:
Gutter:
Scale:
Print Scale: None
Cyan
Yellow
Black
303.35 mm x 216.35 mm
297 mm x 210 mm
None
None
25.4 mm = 25.4 mm
20-EAM-0166_1929_297x210_MAnuAl_1.0.4_M1.9
e l e c t r i f y h o m e .c o m
Customer Support: (833) 532-2778
T:594 mm
T:210 mm
B:600.35 mm
B:216.35 mm

500 Sansome Street San Francisco California 94111 Tel 415 707.1111 Fax 415 707.1100
Project Mgr:
Copy Editor:
Studio:
Producer:
Copy Writer:
Karli Renken
Bill Randt
Cindy Peterson
Mary Pestell
None
Date:
Client:
Job Number:
Ad Code:
File Name:
Description:
Insertion Date(s):
Release Date(s):
1-19-2021 8:56 AM
EAM
20-EAM-0166
20-EAM-0166_1929
20-EAM-0166_1929_297x210_Manual_1.0.4_m1.9.indd
Owner's Manual
None
None
©2021 Eleven LLC. eleveninc.com All Rights Reserved.
Client Confidential
Eleven
Inks:
Notes: Flat trim: 594mm x 210mm
Finished: 297mm x 210mm
Updated Images
None
Fonts: Omnes Pro (Semibold, Regular)
Date Initials OK Mechanical
Version:
4
Designer:
ACD:
Creative Dir:
Account Mgr:
Account Supe:
Date Initials OK
Adriana del Mar
None
None
None
Jenny Hardin
Pubs:
Bleed:
Trim:
Live:
Gutter:
Scale:
Print Scale: None
Cyan
Magenta
Yellow
Black
PMS 2758 C
303.35 mm x 216.35 mm
297 mm x 210 mm
None
None
25.4 mm = 25.4 mm
20-EAM-0166_1929_297x210_MAnuAl_1.0.4_M1.9
Version: 1.0.4
Issue Dte: Februr 16, 2021
T:297 mm
T:210 mm
B:303.35 mm
B:216.35 mm
This manual suits for next models
1
Table of contents
Popular Batteries Charger manuals by other brands

Circontrol
Circontrol Post eVolve Series installation manual

LEAB
LEAB Champ 1207 user manual

VOLTCRAFT
VOLTCRAFT V-CHARGE ECO Quad Lipo operating instructions

Gloria
Gloria AL 1830 CV user manual

Berner
Berner 57546 Instruction manual/safety instructions

TOOLCRAFT
TOOLCRAFT TCSL 20 V-LI 2,2 Original operating instructions


