manuals.online logo
Brands
  1. Home
  2. •
  3. Brands
  4. •
  5. ElectrIQ
  6. •
  7. Blender
  8. •
  9. ElectrIQ iQ Sports Blender User manual

ElectrIQ iQ Sports Blender User manual

Other ElectrIQ Blender manuals

ElectrIQ iQMix User manual

ElectrIQ

ElectrIQ iQMix User manual

ElectrIQ NutriMagIQ User manual

ElectrIQ

ElectrIQ NutriMagIQ User manual

Popular Blender manuals by other brands

Ninja Nutri  QB3000 series quick start guide

Ninja

Ninja Nutri QB3000 series quick start guide

Hamilton Beach HBH550 Operation manual

Hamilton Beach

Hamilton Beach HBH550 Operation manual

Bradex Shake n Take Use & care manual

Bradex

Bradex Shake n Take Use & care manual

Marta MT-1591 user manual

Marta

Marta MT-1591 user manual

BIMG METVISA LARL.1.5 Slim instruction manual

BIMG

BIMG METVISA LARL.1.5 Slim instruction manual

TECHWOOD TBL-751 instruction manual

TECHWOOD

TECHWOOD TBL-751 instruction manual

Philips HR7627 user manual

Philips

Philips HR7627 user manual

Skymsen ls-04 instruction manual

Skymsen

Skymsen ls-04 instruction manual

ROTOR 1125.201 instruction manual

ROTOR

ROTOR 1125.201 instruction manual

Braun Multiquick 5 Vario series User instructions

Braun

Braun Multiquick 5 Vario series User instructions

ARENDO MIRA 305424 user manual

ARENDO

ARENDO MIRA 305424 user manual

Viconte VC-4406 instruction manual

Viconte

Viconte VC-4406 instruction manual

HOFFEN MC-3005 instruction manual

HOFFEN

HOFFEN MC-3005 instruction manual

Nesco BL-90 instruction manual

Nesco

Nesco BL-90 instruction manual

Proline HB300S operating instructions

Proline

Proline HB300S operating instructions

Black & Decker BL8000 user manual

Black & Decker

Black & Decker BL8000 user manual

Duronic BL530 manual

Duronic

Duronic BL530 manual

Exquisit MS 3002 wes instruction manual

Exquisit

Exquisit MS 3002 wes instruction manual

manuals.online logo
manuals.online logoBrands
  • About & Mission
  • Contact us
  • Privacy Policy
  • Terms and Conditions

Copyright 2025 Manuals.Online. All Rights Reserved.

Visit our page .electriQ.co.uk for our entire ra
iQ Sports Blender
Single serving smoothie / sports nutrition drinks maker
USER MANUAL
Thank you for choosing ElectriQ.
Please read this user manual before using this blender
and keep it safe for future reference.
nge of Intelligent Electricals
2
Contents
Features 3
Safety Instructions 3
Package content and parts 6
Quick reference guide 7
Assembly 8
Operation tips 11
Ingredients preparation 12
Fruits and Vegetables Nutrition Tables 13
Cleaning and Maintenance 16
Troubleshooting 18
Recipes 19
3
FEATURES
The IQ Sports Blender is great for making nutritious fruit smoothies, breakfast and
protein shakes, sports nutrition drinks or iced hole fibre juices. Easy to use ith
one-touch pulse blending action and strong, specially designed for improved
performance stainless steel blades.
This personal blender comes ith t o portable BPA-free Eastman Tritan copolyester
blender bottles in t o sizes: 600 and 300 ml.
The blending bottles are easy-clean. The blades are detachable, dish asher-safe.
They are light and ith lockable anti-leak design featuring a ide easy to drink spout
specially designed for smoothies or protein drinks. No you can take your IQ Sports
Blender bottles ith you hile you are on the run, at the office or the gym or keep
them close hile exercising or relaxing at home.
The strong 350 Watts motors can even crush ice effortlessly.
Note: Due to continuous product development, products may not exactly
correspond to the illustrations in this manual.
SAFETY INSTRUCTIONS
Important
• Carefully read the instructions before operating the unit
• This blender has been tested and is safe to use. Ho ever, as ith any electrical
appliances - use it ith care.
• This appliance is for indoor and domestic use only.
• Rating: This unit must be only connected to a 220-240 V / 50 Hz earthed outlet.
Al ays check the rating label against your electrical supply. Do not use ith an extension
lead or overload the socket
• If you are in any doubt about the suitability of your electrical supply have it checked
and, if necessary, retested by a qualified electrician.
• Do not let po er cord hang over edge of table or counter or in contact ith hot
surface, including stoves or hobs.
• Disconnect the po er plug from socket before dismantling, assembling or cleaning.
• Do not clean the base unit by spraying it or immersing it in ater.
• Never operate this appliance if the cord or plug is damaged. Ensure the po er cord
is not stretched or exposed to sharp object/edges.
• Do not pull the mains cable to disconnect the mains plug from the socket.
• Do not use the appliance if any part or any accessory is damaged or defective.
• A damaged supply cord or plug should be replaced by the manufacturer or a
qualified electrician in order to avoid a hazard.
• Avoid touching any moving parts of the appliance. Keep utensils out of bottles
hile blending to reduce the risk of severe injury to persons or damage to the blender.
• This appliance is not intended for use by persons (including children) ith reduced
4
physical, sensory or mental capabilities. It is also not intended for use by those ith a lack
of experience and kno ledge, unless they have been given supervision or instruction
concerning the use of the appliance by a person responsible for their safety. Do not leave
children unsupervised ith this appliance.
• Any service other than regular cleaning should be only performed by an authorized
service representative. Failure to comply could result in a voided arranty.
• Do not use the appliance for any other purposes than its intended use.
• Al ays place the unit on a dry, hard, flat and stable surface. Do not use on carpet
or soft table cloth as this could impede the dispersal of heat. Do not shake the base hile
is in use.
• Do not use the appliance in places ith high humidity (>80%RH)
• Do not immerse the appliance in ater or other liquids. If the appliance is
immersed in ater or other liquids by mistake, do not touch the appliance ith your
hands. Immediately remove the mains plug from the all socket. If the appliance is
immersed in ater or other liquids, discard it.
Unit Safety Protection an Performance Tips
• Never s itch on the unit before you intend to use it.
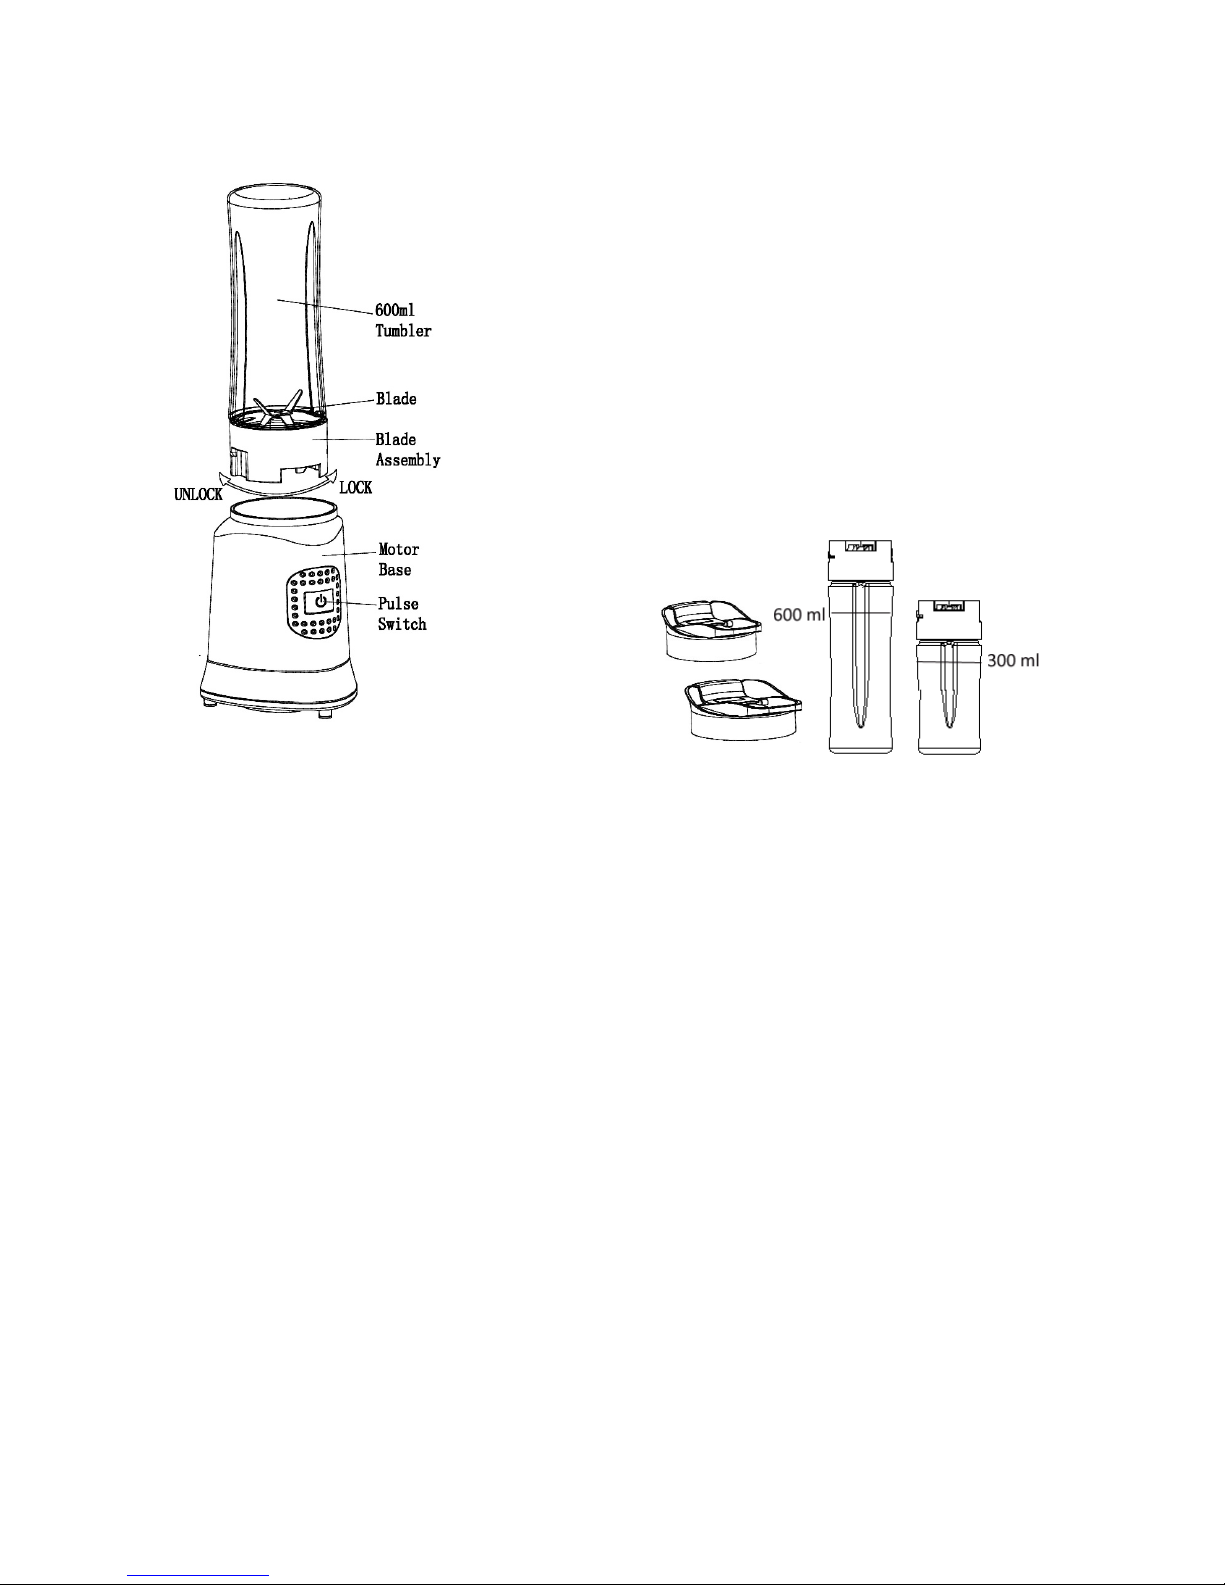
• Make sure the bottle and the blade assembly is correctly mounted and placed on
the appliance body.
• Do not remove the bottle before the motor completely stops.
• Do not run it empty or fill more than the maximum advised level as this could cause
damage to the appliance.
• Do not run the unit for more than 3 minutes continuously. Stop for at least 5
minutes bet een sessions
• If blending hot liquids only fill 3/4 or the bottle. When removing the blade assembly
or lid after blending hot liquids do not lean over and keep hands and other exposed skin
a ay from the lid opening to prevent possible burns.
• Never attempt to operate ith damaged blades. Replace the blades assembly.
• Do not over fill, use hard ingredients or very large pieces. Don not use ice cubes if
they are not covered ith ater or liquid. Use maximum 3-4 ice cubes hile blending.
This appliance is not intended to crush ice ithout liquid.
• Al ays clean the bottles immediately after use. Use ater for most efficiently and
safe ay of cleaning.
• When assembling and disassembling the unit please make sure the silicon seals in
the blade assembly or bottle lids are in place and not missing. Do not use the unit or the
sport bottles ithout the silicon seals and contact the service centre for replacement.
Do not place the silicon seals in dish asher as this could damage them.
• Leave clear space beneath and around the base of the appliance to permit proper
air circulation. Vents and openings on the bottom of the product are designed for
ventilation ensuring reliable motor operation and over-heating. Clean the unit regularly
and store covered to prevent dust entering inside of the unit. Never obstruct and keep
a ay from kitchen to ers, ne spapers, napkins, place mats etc.
5
IMPORTANT:
This product is a class 2 double insulated appliance and
therefore an earth connection is not needed. Do not
replace the po er cord or plug. Only a qualified
electrician or the service centre can perform this
operation.
CAUTION: DO NOT CONNECT EITHER WIRE TO THE
EARTH TERMINAL IN THE PLUG WHICH IS MARKED E OR
WITH THE EARTH SYMBOL OR COLOURED GREEN OR
GREEN AND YELLOW.
The appliance ill stop hen
the pulse / on button is
released. Wait until the motor
completely stops before
removing the bottle and the
blade assembly from the
appliance.
Only fill the jug to maximum indicator. When making
hot soup or using hot liquid only use 3/4 of the cup
capacity as hot liquids expand during processing.
Before starting the
appliance check if is
correctly assembled
and the silicon seal
around the blade
assembly rim is not
missing.
Make sure the blade
assembly is fixed in
place, t ist it to lock
in.
6
This product has over current
protection. If the motor overheats
due to overload the appliance may
stop. Unplug the machine and let
it rest for fe minutes.
Do not leave the plugged appliance unattended
at anytime. Keep unsupervised children a ay
from the appliance.
Allo at least 20 cm gap around the unit hile in
operation to allo free air flo around the air inlet and
outlet.
After use, unplug from po er socket and store
the unit in a dry place.
PACKAGE CONTENTS
1x 600 ml / 1 x 300 ml bottles
2 x Lockable lids
1 x Blade assembly
1x Base / Motor body
1x User Manual
Account for all parts before disposing packing. Safely dispose of all plastic bags and other
packaging components. They may be potentially dangerous to children.
7
Quick Reference Gui e
iQ Sports Blen er
Bottles (x2)
Lids (x2)
Blade and Blade assembly
Body / Motor base
ON / Pulse s itch
Initial Use
Preparation
• Clean the appliance and accessories before first use
• Wash the bottles before use. Also refer to the section "Cleaning an
maintenance"
Assembly an Operation
Before assembly or disassembly, s itch off the appliance, remove the mains plug
from the all socket and ait until the appliance has cooled do n.
This appliance has a built-in safety lock; this ensures that you can only s itch on
the appliance if you installed the bottle and the blade assembly correctly on the
motor base. When assembled correctly, the built-in safety lock ill be unlocked.
8
Assembling the blen er
Before you assemble the appliance, ensure that the po er cord is unplugged.
Place the motor base on a flat dry surface such as a countertop. Leave at least 20
cm space around the unit
Fill the bottle ith ingredients and place the blade assembly (1) ith the blade
facing do n (4) on top the bottle. Ensure that silicon seal is in place on the blade
assembly rim before assembling the bottle.
Turn the bottle (3) upside do n engaging the gear (5). T ist the bottle until it
locks in to the base (6).
No you can start blending. Plug the unit on to a main socket and turn the socket
on. When blending is finished reverse the process and remove the bottle from the
top of the base. Rest the bottle on the orktop and remove the blade assembly
and replace it ith the drinking lid (2).
Once your drink as prepared and your bottle assembled you can open the lid to
drink. You can leave space in the bottle and add 1-2 cubes of ice at the top before
you assemble the lid to keep you drink cool. Your bottle is BPA free so is safe to
store the drink during the day. Rinse the cup hen empty and follo thorough
cleaning procedure before you refill.
Notes: Please never place a bottle on the motor base before properly assembling
the blade and ensuring there is no leakage. Only remove the bottle from the
blender base hen the motor fully stopped. Never lift the blender hile holding
9
it from the bottle base. Your appliance is supplied ith BPA free bottles and is able
to perform et blending e.g. hole fibre juice and smoothie making, soup
making, sauces, pesto.
Do not grind grains, cereals, coffee or other dry hard ingredients also ensure the
solid ingredients including ice are ell covered ith ater. This is a et blender
only.
To isassemble reverse the assembly operation. See Cleaning and Maintenance
section of this user manual.
ON/OFF Switch:
Push do n the s itch and the unit is turned ON
Release the s itch again and the unit is turned OFF
Function Description
Whole
Fibre Juice
When juicing your juicer ill extract the juice from the
fruits or
vegetables leaving a lot of pulp behind. While juicing ill give
you a quick release of energy and the ingredients are passed
much quicker into your blood stream being more soluble, all the
good fibre is asted.
The hole fibre juice produced by the IQ sports blender is the
best of the both. The hole fruit juice is palatable and has more
dietary fibre and vitamins. 2-3 minutes of blending should
suffice.
Recipe: 1-2 ice cubes, ¼ celery stick, un axed lime slice ith
rind, small piece of peeled ginger, 1 peeled medium orange, a
handful of raspberries, ½ glass of ater
Add the ingredients in the above order. Almost cover the
ingredients ith ater. Work the blender for 2-3 minutes or less
until smooth enough for your taste. Reduce the quantities for
the 300 ml bottle to half.
Smoothies
This function
setting for smoothies and shakes. The machine
needs to ork for 1-2 minutes to make delicious smoothie
drinks. Depending on the ice cubes size and the hardness of
fruit you may use the tamper to stir.
Recipe: 1 peeled banana, ½ large peach and vanilla from ½ pod,
2 ice cubes, ater or milk to cover the ingredients.
Work the blender for 1-2 minutes or until smooth enough for
your taste
.
Reduce the quantities for the 300 ml bottle to half.
10
Soups
Your
Sport blender can make
vegetables
soups.
You can boil
your vegetables for about 5-7 minutes leave them to cool do n
for 2-3 minutes than blend. Recipe: Season and roast (optional)
2 tomatoes, 1 medium pepper, 1 clove of garlic for about 4
minutes in top grill tray. Add a small carrot, 1/2 chopped celery
stick, spring onion and parsley and 1 and ½ glass of ater and
boil on a small pan for 5-7 minutes. Add a cube of stock or ½
teaspoon of salt.
Place the boiled ingredients in the large blender bottle. Make
sure they are covered ith stock liquid. Blend for 3 minutes. If
you ant chunky soups add extra ingredients at the end and
only re-blend for 10-20 seconds. Release some of the liquid
before adding more ingredients. Never fill the bottles more
than ¾ hen blending hot liquids.
Hot
Chocolate
Drink
Your i
ll do smooth hot chocolate ith your sport blender
.
Blend 1 ½ glasses of hot milk, 2 tablespoons of cocoa po der, 2
teaspoons of sugar, agave or maple syrup for 2-3 minutes until
smooth. Can replace the milk ith nut milk and/ or cocoa
po der ith shaved dark chocolate. Never fill the bottles more
than ¾ hen blending hot liquids.
Protein
Shakes
You
sport blender
can easily blend meal replacement shakes.
Oatmeal, bananas, avocado are all good bases for your protein
shake. You can follo the recipes provided by your protein
manufacturer or be creative.
Recipe: 1 scoop of chocolate protein, 1 banana, 2 table spoons
of oatmeal, 3 ice cubes, 1 1/2 cups or skimmed milk, ½
tablespoon of vanilla paste. Add the ingredients to the bottle in
this order and blend for 1-2 minutes until smooth. Can replace
the vanilla paste ith other flavours (e.g. fresh mint)
Clean
After fi
nish
ing
the food processing you can clean easily the
bottles if you fill them ith hot or tepid ater and blend for 1-
2 minutes. Empty the ater and repeat the operation until they
are clean. You can ash them and the blade assembly on the
top rack of the dish asher but silicon seal must be removed.
You can also ash the bottles by adding lemon juice or mild
vinegar to ater and not using cleaning products. Once
cleaned, empty the bottles and turn it upside do n on a kitchen
to el or cloth together ith the blade assembly.
If any residue is left on the all of the bottles place under the
running ater and rinse into the sink
.