Electron ASA101A User manual

Copyright © 2018-2021 Electron Plus Design Limited. All Rights Reserved.
ASA101A User Manual -
work in progress

ASA101A User Manual - work in progress
2
/
17
Table of contents
Notices ............................................................................................................. 3
Copyright
...................................................................................................... 3
Part Number .................................................................................................. 3
Issue
............................................................................................................ 3
Location ........................................................................................................ 3
Published by .................................................................................................. 3
Trademark acknowledgement .......................................................................... 3
Notes ............................................................................................................ 3
Purpose of manual ......................................................................................... 3
Safety Warnings ............................................................................................. 4
Getting Started .................................................................................................. 5
System requirements ...................................................................................... 6
Getting help .................................................................................................. 7
Introduction
...................................................................................................... 8
Welcome ....................................................................................................... 8
Before you Start ............................................................................................. 9
New in EPIC
................................................................................................
10
Installation Sequence ....................................................................................
11
Installing the Software ..................................................................................
12
Installing the USB driver ...............................................................................
13
Operation
........................................................................................................
14
Selecting Instrument .....................................................................................
14
Connecting Instrument .................................................................................
15
Check for Updates ........................................................................................
16
Earthing for function and safety .....................................................................
17

ASA101A User Manual - work in progress
3
/
17
Notices
Copyright
© Electron Plus Design Limited 2018-2021
This manual (or part thereof) may not be reproduced by any means (electronic or
photographic, including translation into a foreign language) without prior written
consent and agreement from Electron Plus Design Limited as set-out in United
Kingdom and international copyright laws.
Part Number
ASA101A User Manual
Issue
1.111
,
November
2021
Location
The latest version of this document can be found on our website:
www.electron.plus
Published by
Electron Plus Design Limited
Unit 8 Manor Farm Business Centre
Manor Lane
Stutton
Suffolk
IP9 2TD
UK
Trademark acknowledgement
Electron Plus fully recognises and acknowledges any trademark(s) of the respective trademark holder.
WindowsTM is a trademark of Microsoft Corporation.
Notes
We are likely to update this manual frequently as new features and improvements become available,
please ensure that you check our website for an updated version of this document, especially if
updating your Electron Plus software.
We make every effort to ensure the accuracy of this manual’s contents. If you find any errors, have
suggestions for expanding on a feature, or feel that we can improve it’s contents then please
Copying or reproducing this document or any part of this document without written permission of
Electron Plus is strictly prohibited.
Purpose of manual
The purpose of this manual is to enable you to safely setup, configure and operate your Electron
Plus instrument, associated software and/or accessories. Please pay particular attention to any
section with a warning symbol.

ASA101A User Manual - work in progress
4
/
17
Safety Warnings
Warnings, cautions and notes are colour coded through-out this manual. These are divided into several
categories and are described below:
WARNING - Pay special attention to anything written here - this is for
your safety and continued protection and is critical information!
CAUTION - Damage may occur to your equipment or any DUT (device
under test).
NOTE - General text, with useful information or tips.

ASA101A User Manual - work in progress
5
/
17
Getting Started

ASA101A User Manual - work in progress
6
/
17
System requirements
We recommend at least Windows 7 and a 64 bit machine (however, we know of Windows
XP and 32 bit machines working well with EPIC).
1x USB 2.0 type A (common) for connection to the instrument, at 0.5A.
Screen resolution of at least 1440(W) x 900(H), it will work with others, but you risk some of
the CONTROL RIBBON items not being visible.
EPIC uses the PC sound card for various alerts, although it will operate correctly without
sound.
Technical Note
We test EPIC builds mainly on Windows 10/64 bit machines.

ASA101A User Manual - work in progress
7
/
17
Getting help
Help is available by email (preferably) or via telephone.
email:
from UK:
01473 327100
international telephone:
+44 1473 327 100
If you are experiencing an issue with EPIC, please email a copy of the following files (see
below) found in the EPIC installation folder along with a description of the problem.
log.txt
bugreport.txt
This will help us understand your problem and provide a quicker fix.

ASA101A User Manual - work in progress
8
/
17
Introduction
Welcome
Congratulations and thank you for purchasing an Electron Plus product.
Please take a few minutes to read the
‘Before You Start
’ section of this manual, especially as misusing this
product can result in damage to it, your device-under-test or potentially place you in-danger.

ASA101A User Manual - work in progress
9
/
17
Before you Start
The metal spike is SHARP. When you have finished using the ASA101A, unscrew the spike, turn it round
and screw it lightly back into the ASA101A.
Ensure that all DUT* capacitors and energy storage devices are fully discharged before using the ASA101A.
The SIGNAL connection is protected by a large 'Transzorb' style device, but damage WILL occur if the
ASA101A is placed across a fully charged DCLINK capacitor.
Before connecting your device, please ensure you have installed the USB driver.
DUT* - device under test

ASA101A User Manual - work in progress
10
/
17
New in EPIC
EPIC covers most Electron Plus instruments and not all instruments are updated between versions.
V1.11
Bug fixes
CTL503 - Vgs vs Id (at fixed Vds) mode
V1.10
Bug fixes
Addition of version compiled for 32 bit systems
Addition of CTL503 to EPIC
ASA200/240 - addition of SIGNAL/COMMON to EDIT page
V1.09
Bug fixes
Addition of SPA100 to EPIC
Addition of REF50X to EPIC
V1.08
Bug fixes

ASA101A User Manual - work in progress
11
/
17
Installation Sequence
Please install the EPIC software and the associated USB driver software BEFORE connecting your device
to a computer.
You do not need to remove a previous copy of EPIC, the new copy will overwrite the necessary existing
file(s). The "settings.txt" file will only be created if it is not present.
When EPIC is first started, it will build a number of files (unless they are already there from a previous
installation) in the installation directory.
If upgrading from EPIC V1.09 or earlier please be aware that the new
program EXE is called either EPIC32.EXE or EPIC64.EXE and that
previous shortcuts might not work or will link to previous EPIC.EXE

ASA101A User Manual - work in progress
12
/
17
Installing the Software
Electron Plus products require a USB connection to a PC running EPIC (our proprietary software) in order to
function.
EPIC now comes in two compiled versions (since version 21.010):
EPIC64 - for 64 bit Windows installations & PC's (we recommend this).
EPIC32 - for 32 bit legacy Windows machines.
You can download the latest copy of EPIC for free from our website (www.electron.plus/software
), EPIC is
being constantly revised with new features, updates and bug fixes.
1. Select which variant you wish to use go ahead and download it (typically by double-clicking on the ZIP file
named something like: Install_EPIC21010_64.ZIP)
2. Open the downloaded file (typically Windows will recognise the ZIP format and open the file and display
the contents like a folder), double click the EXE file - typically called
Install_EPIC21010_64.exe)
3. Follow the on screen instructions to complete the installation.
Before starting EPIC, we recommend installing any USB drivers, see next section for details.
This manual MAY NOT represent the most up-to-date features and screen-shots, if something is unclear,
and we will promptly try to assist you.

ASA101A User Manual - work in progress
13
/
17
Installing the USB driver
The product covered in this document communicates with the host PC via USB using an FTDI FT230X
bridge IC.
A copy of the official FTDI device driver is available from the SOFTWARE section of our website
(www.electron.plus/software), device drivers can also be downloaded directly from FTDI’s website
(
www.ftdichip.com/drivers
).
Download the FTDI driver (CDM21228_Setup), open the ZIP file and run CDM21228_Setup.EXE, this will
install the D2XX drivers necessary.
It is possible that you already have this FTDI device driver installed, however we still recommend following
this procedure.
ASA101A User Manual - work in progress
14
/
17
Operation
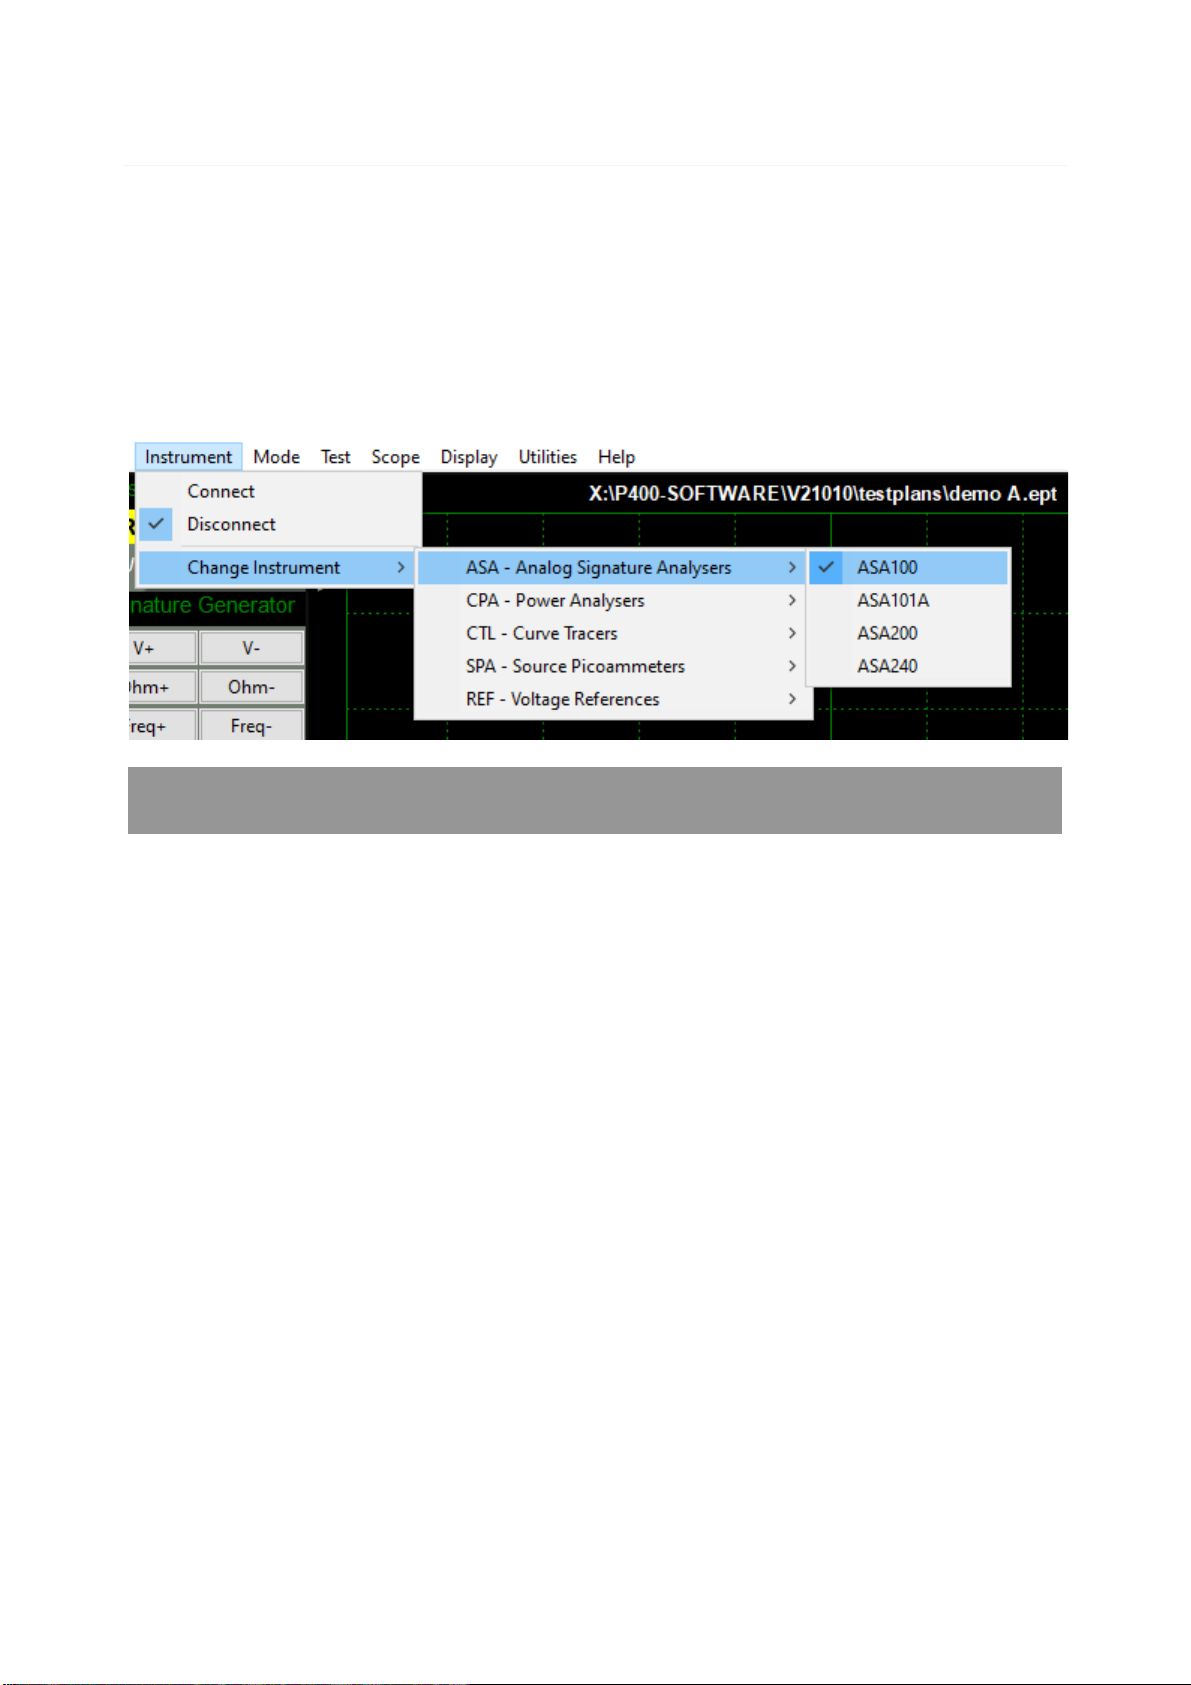
Selecting Instrument
When EPIC is first installed it will initially start in ASA100 mode.
To change this:
INSTRUMENT > CHANGE INSTRUMENT
and select the actual instrument you wish to use, you will then
have to close and reopen EPIC for this to take effect.
Technical Note
Variable used in settings.txt: ActiveInstrument=ASA100

ASA101A User Manual - work in progress
15
/
17
Connecting Instrument
To connect to the instrument you can use the options in the MENU or the button on the CONTROL
RIBBON.
INSTRUMENT > CONNECT
to connect, or
DISCONNECT
to disconnect.
or
Before the instrument connects it will check the identification in the FTDI USB bridge IC, an error message
will be shown if the instrument selected is not the same as the instrument connected.
Technical Note
Upon successful connection, EPIC will download the calibration
coefficients file from the USB bridge IC. These are then stored in the
EPIC folder as "ASA_cal.txt"

ASA101A User Manual - work in progress
16
/
17
Check for Updates
Once per day EPIC will check if there is a newer version available. This feature maybe disabled or re-
enabled here:
UTILITIES > DAILY UPDATE CHECK
Tick will enable EPIC to perform the daily update check, unticking will prevent EPIC from performing the
daily update check.
Technical Note
In "settings.txt": CheckWebsiteForUpdate=1 or 0 determines if this
function is enabled/disabled. DateOfLastUpdateCheck=04/11/2021 is
self-explanatory.
If function is enabled and date <> today a small file called
"version.txt" is downloaded from "http://www.electron.plus/wp-
content/". This contains the current revision of EPIC also the current
revision for each product where a change/update has been made.

ASA101A User Manual - work in progress
17
/
17
Earthing for function and safety
For functional and/or safety reasons you may wish to EARTH the casing of your Electron Plus instrument.
This is not necessary under most normal operating conditions.
In this case, we recommend loosening (and re-tightening) the M3 stainless steel chassis screw (2mm HEX
drive) and fitting an earthing wire using either ring terminal or spade terminal.
If in doubt please contact Electron Plus for further details.
Note
USB 0V, rear panel, front panel, casing and any external power supply
are all the same potential and connected via low impedances. Avoid
creating 'ground loops' with your setup.
Table of contents
Other Electron Paint Sprayer manuals

Popular Paint Sprayer manuals by other brands


new brunswick
new brunswick Innova 43 Operation guide

WALTHER PILOT
WALTHER PILOT wa200 operating instructions

Central Pneumatic
Central Pneumatic 43760 Assembly and operating instructions

sunjoe
sunjoe SPX-FC26 ASSEMBLY QUICK GUIDE

F5
F5 Paint Shaker Installation and instruction manual

Fimco
Fimco 3PT-65-12V-7 owner's manual