Sames Mach-Jet User manual

Index revision : H 1 6336
User manual
SAMES Technologies.
13 Chemin de Malacher 38243 Meylan Cedex
Tel. 33 (0)4 76 41 60 60 - Fax. 33 (0)4 76 41 60 90 - www.sames.com
Mach-Jet Spray Gun
and
CRN 457 control module
ES02538 DES02539

Index revision : H 2 6336
All communication or reproduction of this document, in any form whatsoever and all use or
communication of its contents are forbidden without express written authorisation from
SAMES Technologies.
The descriptions and characteristics contained in this document may be modified without prior warning
and do not bind SAMES Technologies in any way whatsoever.
© SAMES Technologies 2004
WARNING : Sames Technologies is registered with the Department of Labour as a training
institution.
Training courses are held throughout the year to enable users to acquire the know-
how essential for operating and maintaining the equipment.
A catalogue is available on request. Thus, from the range of training programmes
proposed, you can choose the type of apprenticeship or skill that corresponds to
your requirements and production objectives.
These training courses may be held on your company premises or at the training
centre at our head office in Meylan.
Training department:
Tel.: 33 (0)4 76 41 60 04
E-mail: [email protected]

Index revision : 3
Mach-Jet Spray Gun
and
CRN 457 control module
1. Regulations, Safety Regulations and Guarantee - - - - - - - - - - - - - - - 5
1.1. Regulations . . . . . . . . . . . . . . . . . . . . . . . . . . . . . . . . . . . . . . . . 5
1.2. Safety Regulations . . . . . . . . . . . . . . . . . . . . . . . . . . . . . . . . . . 5
1.3. Guarantee . . . . . . . . . . . . . . . . . . . . . . . . . . . . . . . . . . . . . . . . . 6
2. Presentation - - - - - - - - - - - - - - - - - - - - - - - - - - - - - - - - - - - - - - - - - 7
3. Characteristics - - - - - - - - - - - - - - - - - - - - - - - - - - - - - - - - - - - - - - - 8
3.1. General characteristics . . . . . . . . . . . . . . . . . . . . . . . . . . . . . . . 8
3.2. Compressed air quality . . . . . . . . . . . . . . . . . . . . . . . . . . . . . . . 9
4. Operation - - - - - - - - - - - - - - - - - - - - - - - - - - - - - - - - - - - - - - - - - - 10
4.1. Back of “CRN 457” control module . . . . . . . . . . . . . . . . . . . . . 12
4.1.1. Module connections. . . . . . . . . . . . . . . . . . . . . . . . . . . . . . . . . . 12
4.1.2. Module identification plate . . . . . . . . . . . . . . . . . . . . . . . . . . . . . 12
5. Description of spray gun and control module - - - - - - - - - - - - - - - - - 13
5.1. Functions available from spray gun . . . . . . . . . . . . . . . . . . . . . 13
5.2. Functions available from control module . . . . . . . . . . . . . . . . . 15
5.3. Summary . . . . . . . . . . . . . . . . . . . . . . . . . . . . . . . . . . . . . . . . . 16
6. Use of the different control module menus- - - - - - - - - - - - - - - - - - - 17
6.1. CRN 457 initialisation screen . . . . . . . . . . . . . . . . . . . . . . . . . 17
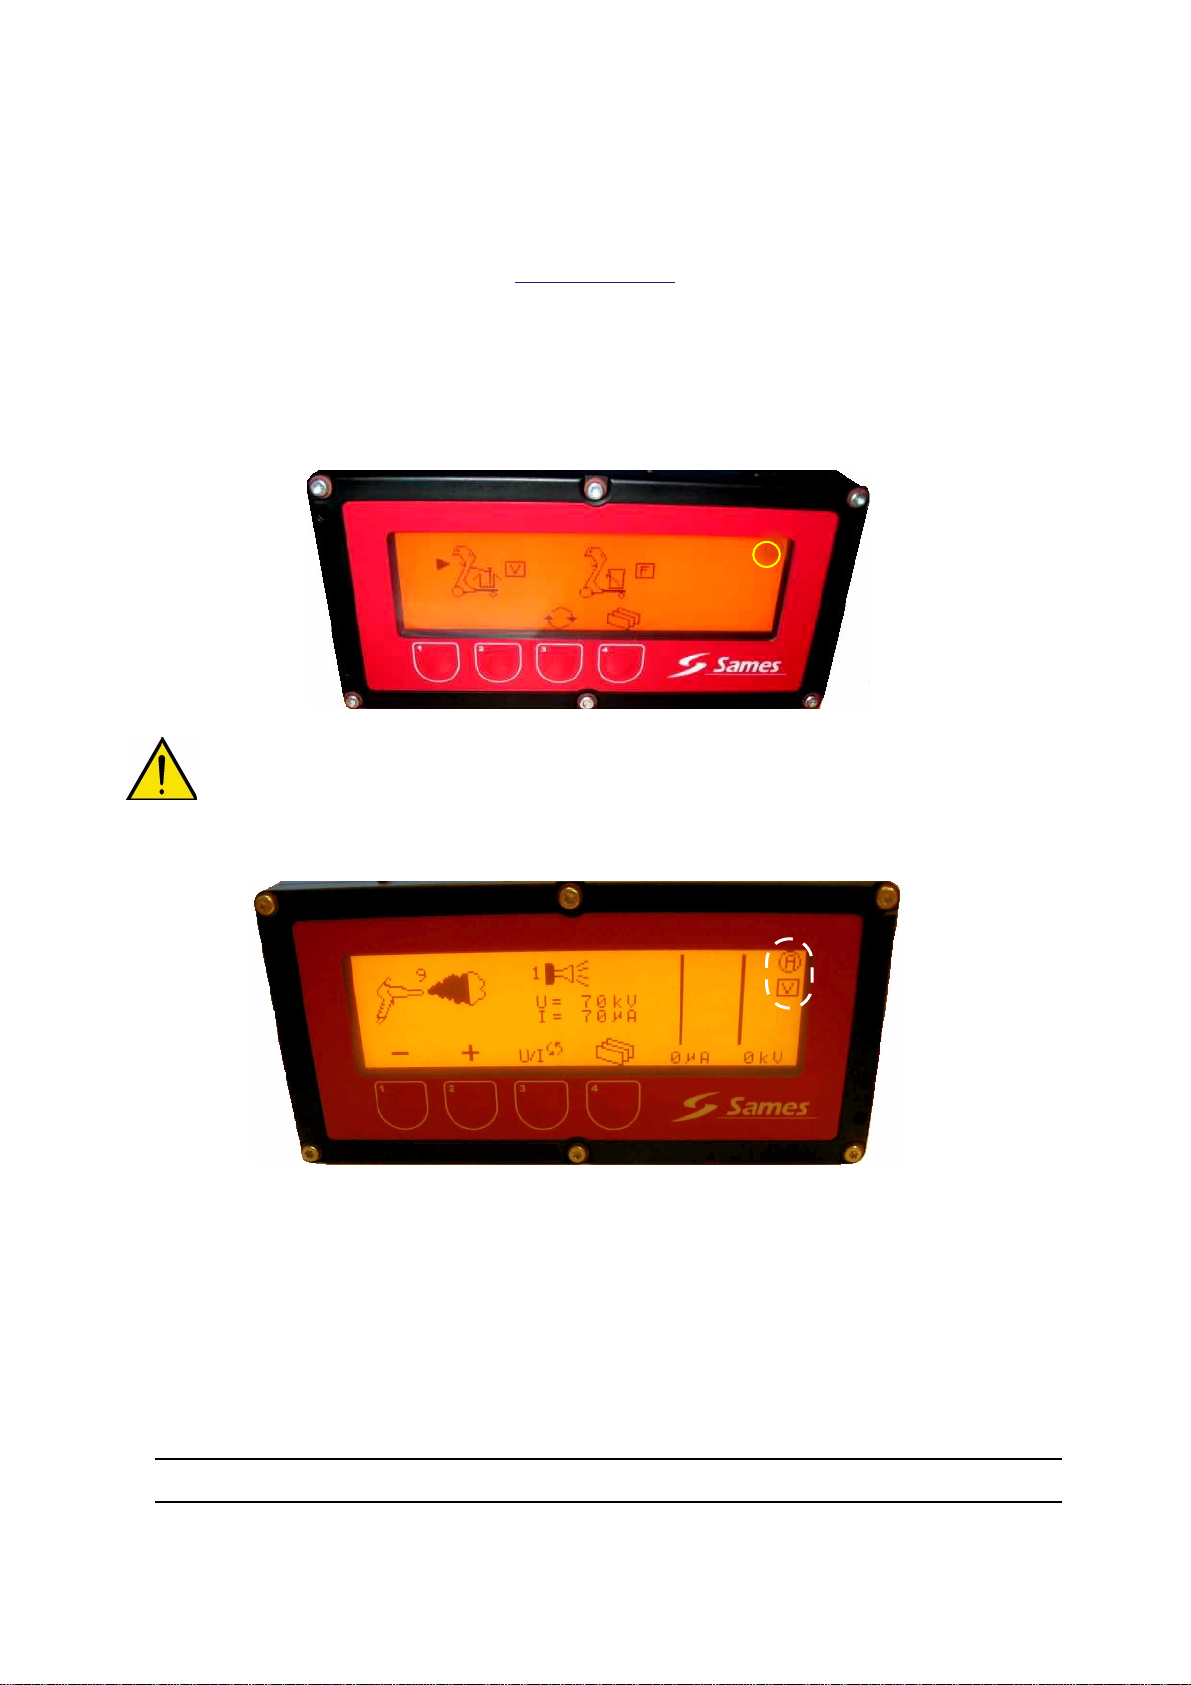
6.2. Start-up screen . . . . . . . . . . . . . . . . . . . . . . . . . . . . . . . . . . . . 17
6.2.1. Manual unit without PLC connection . . . . . . . . . . . . . . . . . . . . . 17
6.2.2. Manual unit with PLC connection. . . . . . . . . . . . . . . . . . . . . . . . 17
6.3. Cleaning screen (only with a carriage) . . . . . . . . . . . . . . . . . . 18
6.4. Standby screen (only with a communication with a PLC) . . . . 18
6.5. Main screen “A” . . . . . . . . . . . . . . . . . . . . . . . . . . . . . . . . . . . . 19
6.6. Screen “B” . . . . . . . . . . . . . . . . . . . . . . . . . . . . . . . . . . . . . . . . 21
6.7. Screen “C” . . . . . . . . . . . . . . . . . . . . . . . . . . . . . . . . . . . . . . . . 22
6.8. Screen “D” . . . . . . . . . . . . . . . . . . . . . . . . . . . . . . . . . . . . . . . . 23
6.8.1. Fault list . . . . . . . . . . . . . . . . . . . . . . . . . . . . . . . . . . . . . . . . . . . 24
6.9. Screen “E” . . . . . . . . . . . . . . . . . . . . . . . . . . . . . . . . . . . . . . . . 26
6.10. Screen “F” . . . . . . . . . . . . . . . . . . . . . . . . . . . . . . . . . . . . . . . 27
6.11. Screen “G” . . . . . . . . . . . . . . . . . . . . . . . . . . . . . . . . . . . . . . . 28
6.12. Screen ”H” . . . . . . . . . . . . . . . . . . . . . . . . . . . . . . . . . . . . . . . 29
7. Maintenance- - - - - - - - - - - - - - - - - - - - - - - - - - - - - - - - - - - - - - - - 30
7.1. Deflector and nozzle . . . . . . . . . . . . . . . . . . . . . . . . . . . . . . . . 30
7.1.1. Disassembly. . . . . . . . . . . . . . . . . . . . . . . . . . . . . . . . . . . . . . . . 30
7.1.2. Assembly . . . . . . . . . . . . . . . . . . . . . . . . . . . . . . . . . . . . . . . . . . 30
7.2. Vertical powder pipe . . . . . . . . . . . . . . . . . . . . . . . . . . . . . . . . 30
7.2.1. Disassembly. . . . . . . . . . . . . . . . . . . . . . . . . . . . . . . . . . . . . . . . 30
7.2.2. Assembly . . . . . . . . . . . . . . . . . . . . . . . . . . . . . . . . . . . . . . . . . . 30

Index revision : 4
7.3. Powder elbow and horizontal pipe . . . . . . . . . . . . . . . . . . . . . . 31
7.3.1. Disassembly. . . . . . . . . . . . . . . . . . . . . . . . . . . . . . . . . . . . . . . . 31
7.3.2. Assembly . . . . . . . . . . . . . . . . . . . . . . . . . . . . . . . . . . . . . . . . . . 31
7.4. Handle assembly . . . . . . . . . . . . . . . . . . . . . . . . . . . . . . . . . . . 32
7.4.1. Disassembly. . . . . . . . . . . . . . . . . . . . . . . . . . . . . . . . . . . . . . . . 32
7.4.2. Assembly . . . . . . . . . . . . . . . . . . . . . . . . . . . . . . . . . . . . . . . . . . 32
7.5. Trigger . . . . . . . . . . . . . . . . . . . . . . . . . . . . . . . . . . . . . . . . . . 33
7.5.1. Disassembly. . . . . . . . . . . . . . . . . . . . . . . . . . . . . . . . . . . . . . . . 33
7.5.2. Assembly . . . . . . . . . . . . . . . . . . . . . . . . . . . . . . . . . . . . . . . . . . 33
7.6. Hand-rest . . . . . . . . . . . . . . . . . . . . . . . . . . . . . . . . . . . . . . . . . 34
7.6.1. Disassembly. . . . . . . . . . . . . . . . . . . . . . . . . . . . . . . . . . . . . . . . 34
7.6.2. Reassembly . . . . . . . . . . . . . . . . . . . . . . . . . . . . . . . . . . . . . . . . 34
7.7. Gun . . . . . . . . . . . . . . . . . . . . . . . . . . . . . . . . . . . . . . . . . . . . . 35
7.7.1. Disassembly. . . . . . . . . . . . . . . . . . . . . . . . . . . . . . . . . . . . . . . . 35
7.7.2. Assembly . . . . . . . . . . . . . . . . . . . . . . . . . . . . . . . . . . . . . . . . . . 35
7.8. Cable assembly . . . . . . . . . . . . . . . . . . . . . . . . . . . . . . . . . . . . 36
7.8.1. Disassembly. . . . . . . . . . . . . . . . . . . . . . . . . . . . . . . . . . . . . . . . 36
7.8.2. Assembly . . . . . . . . . . . . . . . . . . . . . . . . . . . . . . . . . . . . . . . . . . 36
8. Cleaning/Maintenance- - - - - - - - - - - - - - - - - - - - - - - - - - - - - - - - - 37
9. Troubleshooting - - - - - - - - - - - - - - - - - - - - - - - - - - - - - - - - - - - - - 38
10. Spare parts list - - - - - - - - - - - - - - - - - - - - - - - - - - - - - - - - - - - - - 39
10.1. Mach-Jet Spray Gun - Ref.: 1524463 . . . . . . . . . . . . . . . . . . 39
10.2. Gun assembly - Ref.: 1524464 . . . . . . . . . . . . . . . . . . . . . . . 41
10.3. Handle assembly - Ref.: 1525908 . . . . . . . . . . . . . . . . . . . . . 42
10.4. Vertical powder pipe assembly - Ref.: 1525793 . . . . . . . . . . 43
10.5. Nozzles . . . . . . . . . . . . . . . . . . . . . . . . . . . . . . . . . . . . . . . . . 44
10.5.1. Fan spray nozzle . . . . . . . . . . . . . . . . . . . . . . . . . . . . . . . . . . . 44
10.5.2. Round spray nozzle. . . . . . . . . . . . . . . . . . . . . . . . . . . . . . . . . 44
10.5.3. Extended nozzles. . . . . . . . . . . . . . . . . . . . . . . . . . . . . . . . . . . 45
10.6. Equipment . . . . . . . . . . . . . . . . . . . . . . . . . . . . . . . . . . . . . . . 46
11. ”FM approved” Configurations - - - - - - - - - - - - - - - - - - - - - - - - - - 47

Index revision : H 5 6336
1. Regulations, Safety Regulations and Guarantee
1.1. Regulations
The “Mach-Jet” spray gun is in conformity with standard EN50050/2001. A file is open with a notified
body to obtain the standard CE test certificate (Compliance with directive 94/9/CE)
Spray gun marking and CRN 457 control module marking
:
1.2. Safety Regulations
This equipment may be dangerous if it is not used in compliance with the security regulations specified
in this manual.
• The CRN 457 electro-pneumatic control module must never be installed where there is a risk of
explosion.
• The electrostatic paint spraying equipment must only be used by qualified personnel fully informed
of rules no.° 1 to 12 as follows:
1 A warning notice written in a language understood by the operator, summarising safety regulations
nos.° 2 to ° 9, section 1.1 of this manual, must be placed in a clearly visible position close to the
powder-spraying booth.
2 Shoes intended for operator use must be anti-static and comply with the ISO 2251 publication. If
gloves are used, only anti-static gloves or gloves ensuring grounding of the operator may be worn.
3 The floor in the area in which the operator works must be anti-static (ordinary bare concrete floors
are anti-static).
4 Powder spraying must be carried out in front of a ventilated booth designed for the purpose. Start-
up of the CRN 457 must be interlocked with operation of the ventilation system.
5 Skin-contact with or inhalation of products used with this equipment may be dangerous for
personnel (cf. Safety sheets for products used).
6 All conducting structures such as floors, walls of powder-spraying booths, ceilings, barriers, parts
to be painted, powder distribution tank, etc. that are inside or near the work station
and the earth
terminal
on the electro-pneumatic control module
must be electrically connected to the ground
system protecting the electrical power supply.
7 Parts to be painted must have a resistance in relation to the ground system that is less than or
equal to 1 M
Ω
.
ISSeP04ATEX119
EEx 2 mJ Meylan France
P/N 1524463
II 2 D0080 MACH-JET GUN
APPROVED
according to # 800000045
For Electro. Fin. Appl. CL. II, Spray Matl.
When configured
DES02727
FM

Index revision : H 6 6336
8 Powder-spraying equipment must be maintained regularly according to the manufacturer’s
instructions. Repairs must be carried out in strict compliance with these instructions.
9 Before cleaning the spray gun or carrying out any other work in the spraying area, the high-voltage
power supply must be switched off in such a way that it can not be switched back on by pressing
the spray gun “trigger.”
10 Only SAMES original spare parts guarantee operating safety of the equipment.
11 Ambient temperature must not exceed 40°C.
12 Switch off the electrical supply of the CRN 457 module before connecting the spray gun.
Before disconnecting the spray gun/ the atomizer, extinguish, switch off the power supply of the
CRN 457 (if not, a malfunction can occur).
WARNING : This equipment is intended for spraying powder paint only.
1.3. Guarantee
During the CRN 457 control module guarantee period, it is strictly forbidden to remove, attempt to
remove or cut the label (located under module) on pain of loss of guarantee.
Guarantee label

Index revision : H 7 6336
2. Presentation
The “
Mach-Jet
”spray gun is a manual spray gun intended for powder spraying. It is connected to a
“
CRN 457
”control module that controls both the high-voltage and the powder flow rate of the spray gun
to which it is connected. These two indissociable elements constitute a manual powder-coating device.
This new spray gun integrates powder flow rate management and pre-programmed voltage and current
settings, which are adjustable from the control module.
DES02501
DES02521

Index revision : H 8 6336
3. Characteristics
3.1. General characteristics
Mach-Jet Spray Gun
Temperature-range for use 0°to 40˚C
Maximum output voltage 80 kV (+5kV, - 9kV)
Maximum output current 110
µ
A (+ or - 10
µΑ)
Supply pressure 7 bar +/- 1 bar
Maximum powder flow rate 24 kg/h
CRN 457 control module
Power-supply voltage 90 to 270V AC
Frequency 50 - 60 Hz
Maximum power 60 VA
Maximum output voltage 40V effective (rms)
Maximum output current 110 mA effective (rms)
Maximum air flow rate (injection and dilution) 6 m
03
/h
Maximum air flow rate for auxiliary pneumatic output 12 m
03
/h
7010 30 110
40
65
80
20
70
(kV)
U
I (µA)
Characteristics of spray gun output voltage and current
Elbow
Example of performance curve
Pre-programmed value characteristics
“Envelope”curve

Index revision : H 9 6336
3.2. Compressed air quality
Required characteristics for compressed-air supply according to standard NF ISO 8573-1:
*: Values are given for a temperature of 0˚ C (32˚ F) at an atmospheric pressure of 1,013 mbar.
WARNING : Non-compliance with these characteristics may result in incorrect operation of the
“CRN 457” control module.
WARNING : A 5µµ
µµ
filter must be installed upstream of the “CRN 457” control module compressed-
air supply system. The size of this filter depends on the size of the installation.
Sames Technologies advises to use a filter like the one indicated in section
(see § 10.6 page 46).
If any damage on the equipment happens because of a polluted air, the warranty could be not
applied.
Maximum dew point at 6 bar (90 psi) Class 4, i.e.+3˚C (38˚F)
Maximum particle-size of solid pollutants Class 3, i.e.5
µ
m
Maximum oil concentration Class 1, i.e.0.01 mg/m
03
*
Maximum concentration of solid pollutants Class 3, i.e.5 mg/m
03
*

Index revision : H 10 6336
4. Operation
The
Mach-Jet
spray gun is connected to the
CRN 457
control module via a serial link embedded in the
electrical connection cable. This link enables recognition of the spray gun and the exchange of data
necessary for operation.
Methods for modifying or adjusting settings are described in the following chapters. It is possible to return
to the original “factory”settings at any time (see §6.1 page 17).
In the case of a manual unit not connected to an industrial PLC
:
The first time the control module is started up, the operator selects the operating mode for powder feed;
two possibilities are proposed:
•Use of a vibrating table (factory parameter).
•Use of a round fluidisation tank.
WARNING : This use parameter can then be modified at any time in the “F” menu displayed on
the control module.
F
1

Index revision : H 11 6336
In the case of a manual unit connected to an industrial PLC:
In this case, the spray gun is connected to the PLC via the “PLC plug.”The following parameters must
be entered on start-up.
The communication speed is selected from the following list: 1,200, 2,400, 4,800, 9,600, 14,400,
18,200 and 38,400 baud.
Parameters Factory value Minimum Maximum
Remote mode - Slave index
1
199
Remote mode - Communication speed
9,600 baud
1,200 baud 38,400 baud
Auxiliary EV action synchronised with the
trigger
0
01
G
Front of CRN 457 module
manual unit with PLC connection

Index revision : H 12 6336
4.1. Back of “CRN 457” control module
4.1.1. Module connections
4.1.2. Module identification plate
Start/stop
switch
Pneumatic output (auxiliary)
Vibrating table/tank
Pneumatic output
“Dilution”
General power supply
Base plate A
“Spray gun plug”
Ground
terminal
Mains
cable
Pneumatic output
“Injection”
Base plate B
“PLC plug”
Module serial
number
Module program version
2005 - S48 00445
Wrk 2.07 - S37

Index revision : H 13 6336
5. Description of spray gun and control module
The function of the manual spray gun is to spray powder electrically charged by a high-voltage unit built
into the spray gun that delivers up to 80 kV and 110
µ
A.
Only pressure on the trigger enables start-up of the power supply and electrical charging of the powder.
5.1. Functions available from spray gun
Area 1
: The red
LED under each icon corresponds to the selected voltage/current characteristic in
progress. Selection of a different characteristic is only possible if the trigger is released.
Simultaneous flashing of all LEDs indicates a communication fault with the control module (see
§ 6.8.1 page 24).
Area 2
: Powder flow rate can be adjusted here.
•It can be reduced by pressing the button
•or increased by pressing the button
There are thirteen powder flow rate setting levels, one of which is zero. The operator can display the
powder flow rate on the “CRN 457”control module. A powder cloud fills up with an index varying from 0
to 12 (there is no corresponding display on the spray gun). On start-up of the spray gun, the powder flow
rate value is 0 (zero flow rate). It is possible to select the flow rate without having to press the trigger.
Factory settings
Round spray nozzle mode application icon U = 70kV and I = 70
µ
A
Fan spray nozzle mode application icon U = 80kV and I = 30
µ
A
“Over-powder-coating”mode application icon U = 65kV and I = 10
µ
A
Metallic powder mode application icon.
(The three LEDs are lit for this choice). U = 40kV and I = 110
µ
A
1
3
2
DES02502

Index revision : H 14 6336
Area 3
: This area is used for selecting pre-programmed voltage/current characteristics.
On start-up, a red LED lights up below the “round spray nozzle”icon and pressing the “U/I”button ena-
bles selection of one of the four characteristics.
WARNING : For guns sold in 2006, it will be then possible to display the " cleaning screen " by
pressing onto U/I key for 2 seconds. The output of this screen is similar to the input one.
If E screen mentions : “Mach-Jet V > or = 1”this function is available; if E screen mentions
“Mach-Jet V = 0”, the gun is not equipped with this function.

Index revision : H 15 6336
5.2. Functions available from control module
The control module displays use parameters and their settings, which can be changed using the four
buttons on the front panel.
The operator has access to menus from A to H and to a cleaning screen.
•
A
: Powder flow rate adjustment and selection of pre-set characteristics (U/I).
•
B
: Dilution air adjustment and selection of pre-set characteristics (U/I).
•
C
: Manual adjustment (voltage/current).
•
D
: History of faults encountered (accessible only if a fault is recorded).
•E: Screen adjustment (contrast, etc.) and indication of Mach Jet version.
•F: Unit configuration; either vibrating table or fluidisation tank (only in the case of using a carriage).
•G: Configuration with computer link (only in the case of a manual unit connected to an industrial
PLC).
•H: Choice for the type of the characteristics U/I 1 or U/I 2.
•Cleaning screen / Standby screen.
Area 1: The front panel of the module has four buttons.
A graphic icon located above each button indicates the button’s purpose.
Area 2: This display area indicates parameter status.
For example: For screen A, the powder flow rate is set at 9. The cloud at the spray gun outlet is partially
filled (9/12) and the pre-programmed characteristic is that of the round spray nozzle.
Area 3: The bar graph located in this area shows the instant voltage and current values in graphic and
digital form.
Area 4: A screen entitled “Main”appears on start-up. It is identified by an icon located at the top right-
hand side of the screen. .
Without PLC: The graphic icon [V])appears under the menu index. This description corresponds to
the type of powder supply; two are possible:
•[V]: Use of vibrating table (parameter indicated by default, factory setting).
•[F]: Use of fluidisation tank.
(This choice can be made at any time by going to the “F”menu).
If this logo appears under [V], it indicates that the generator has shut down because of a fault
(see §6.8.1 page 24).
When the trigger is pressed, this logo flashes (the arrow indicates presence of high voltage at the
bottom of area 4).
CRN 457 control module front panel
2
2
1
1
3
3
4
4
1

Index revision : H 16 6336
5.3. Summary
•Selection of U and I pre-programmed characteristics (from spray gun or control module) is only
possible if the operator is not painting.
•Powder flow rate is adjustable (high voltage activated or not):
•From the control module.
•From the spray gun.
•It is possible to powder-coat regardless of the menu in progress with the exception of the
“Cleaning”menu.
•The operator may return to the factory parameters at any time (see §6.1 page 17).
•The operator may switch to a cleaning screen by pressing button 4 (regardless of the screen
displayed) for more than two seconds.

Index revision : H 17 6336
6. Use of the different control module menus
6.1. CRN 457 initialisation screen
This is the first screen displayed on start-up of CRN 457.
Pressing buttons 1 and 2 simultaneously (until appearance of the logo at the top left-hand side) enables
the device to restart with factory parameters. The operator is thus in a first start-up situation.
6.2. Start-up screen
6.2.1. Manual unit without PLC connection
This screen enables selection of “vibrating table”or “fluidisation tank”.
When the “vibrating table”is used, the “auxiliary”pneumatic outlet is activated while the trigger is
pressed. When the fluidisation tank is used, activation occurs 30 minutes after the last pressure on the
trigger.
6.2.2. Manual unit with PLC connection
2. 07
F
G

Index revision : H 18 6336
6.3. Cleaning screen (only with a carriage)
6.4. Standby screen (only with a communication with a PLC)
[
[1
1]
]:This button starts up or stops the
cleaning mode.
Pressing the 0/1 button puts the system in
cleaning mode; a computer animation
appears on the screen (flashing).
Cleaning mode must be stopped before pro-
ceeding with the next operation.
The spray gun commands are disabled.
[
[2
2]
]:This button enables
switching to the following
menu
Pressing the button is forbid-
den when the installation is in
cleaning mode.
[
[1
1]
]: Pressing this button quits ”Standby
mode”.
Pressing this button quits ”Standby”mode
and triggers an automatic return to screen A.
Spray gun commands are disabled in this
screen.
1
12
2
1
1

Index revision : H 19 6336
6.5. Main screen “A”
This screen enables selection of work parameters and display of spray gun operation. From the
keyboard, the operator can select the powder flow rate and a pre-set characteristic (U/I).
[
[1
1]
]: Powder flow rate can be adjusted in
this area. Less
powder.
More
powder.
There are 13 different flow rates (from 0 to 12)
(0 corresponds to a zero flow rate).
[
[3
3]
]:This button enables
switching to the following
menu or positioning on the
cleaning screen by pressing
the button for more than two
seconds.
Pressing the button validates the parameters,
the U/I characteristic remains unchanged and
the operator has access to the next menu, “B.”
[
[2
2]
]:This button enables
selection of a pre-set character-
istic (U/I).
Pressing this button
gives a looped display
of the following logos.
Use of a round spray nozzle.
Use of a fan spray nozzle.
“Over-powder-coating”applica-
tion.
Metallic powder application.
1
12
23
3
1
11
DES02511
UA
V
I
UA
V
I
UA
V
I
UA
V
I

Index revision : H 20 6336
The selected flow and U/I characteristic are memorized after:
•1 seconds without modification of flow parameters or U/I characteristics.
•Change of screen.
•Trigger pressed.
Recommended settings
Use of a round spray nozzle
Application using a round spray nozzle improves charging of particles. It gives a better wraparound effect
and has better transfer efficiency. The spray is very homogenous both on complex and simple parts.
Use of fan spray nozzles
Application using a fan spray nozzle gives better covering and very high performance on flat parts.
Powder-covering of cavities is facilitated. The spray is very penetrating and homogenous both on
complex and simple parts.
Use of a current in excess of 30 µA may result in reduced transfer efficiency and electrode soiling.
Application in “over-powder-covering”mode adapted with round or fan spray nozzles
This application may require an adjustment of settings in the case of a very thick
first coat of powder with appearance of “eyes”and large craters. The current may be progressively
reduced (see voltage/current adjustments) until correct application is obtained (5µA minimum).
It is used for applying thick coats (> 100 µm) and for parts with low conductivity (glass, wood, etc.).
Metallic powder application adapted with round or fan spray nozzle
This application can be optimised if the powder is “coated,”the voltage can be increased to improve
application performance.
To optimize the aspect of the part (tight, crater), the operator may have to increase the voltage up to
50kV and to decrease the current down to 5µA.
This manual suits for next models
1
Table of contents
Other Sames Paint Sprayer manuals