Electronic Solutions ABMHZ Assembly instructions

ABMHZ Version 1+1
Advanced User Manual
20 November 2007 Rev. B ©2007, Electronic Solutions, Inc. page 1 of 5
1355 Horizon Avenue, Lafayette, CO 80026-9304 USA
voice: +1.303.469.9322 fax: +1.303.469.5129 www.elec-solutions.com
Electronic
Solutions, Inc.
1. Introduction
This document is for the advanced user who has knowledge of the Z-Wave™
Command Classes and is able to initiate Z-Wave commands programmatically.
When the ABMHZ sends a Node Info Report, it reports itself as a Basic Slave
device with generic support for Multilevel switch, specifically supporting the Multi-
position motor class. In addition to the mandatory command classes, it also
supports Manufacturer Specific, Version, All Switch, Configuration, and Power level
command classes (details and examples on how to utilize these classes below).
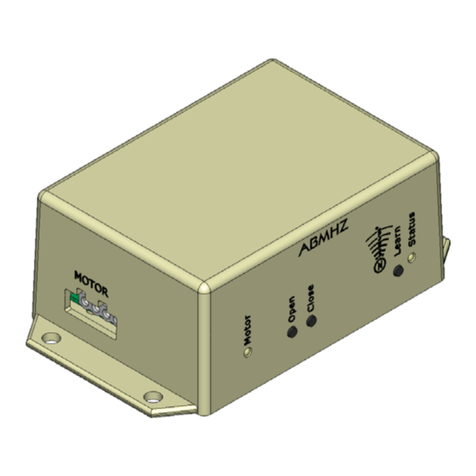
2. Status LED
On power-up, LED blinks GREEN once indicating Z-Wave processor Version 1.
This LED will blink green on reception of a valid Z-Wave command.
This LED will blink red if an error has occurred.
3. Motor LED
On power-up, this LED will blink RED once indicating motor processor Version 1.
This LED will stay red after power-up if the unit is not calibrated.
This LED will be green when ready for calibration (please see Calibration section).
4. COMMAND_CLASS_CONFIGURATION Commands
There are 3 configuration parameters accessible via the
COMMAND_CLASS_CONFIGURATION. Each parameter is a single byte, and can
only contain the value of 1 or 0.
Sample commands:
To check unit calibration state, send CONFIGURATION_GET, 1. Return is a 0 or 1.
To check unit motor direction state, send CONFIGURATION_GET, 2. Return is a 0
or 1.
To check unit tilt feature state, send CONFIGURATION_GET, 3. Return is a 0 or 1.
To initiate calibration sequence, send CONFIGURATION_SET, 1, 1, 1.
To set motor direction to reversed and calibrate, send CONFIGURATION_SET, 2, 1,
1 (if already reversed, then no action).
To return all settings to factory default, send CONFIGURATION_SET, 1, 129, 1.

ABMHZ Version 1+1
Advanced User Manual
20 November 2007 Rev. B ©2007, Electronic Solutions, Inc. page 2 of 5
Configuration
parameter #
Length
(bytes)
Read values
Write values
Description
1
1
0 = Not calibrated
1 = Calibrated
0 = No Action
1 = Begin calibration
sequence
Unit calibration state.
2
1
0 = Motor direction
normal
1 = Reversed motor
direction
0 = Set direction to
“normal” and begin
calibration sequence
1 = Set direction to
reverse and begin
calibration sequence
Unit calibrated for normal
or reversed motor
direction.
3
1
0 = Tilt feature not
enabled
1 = Tilt feature
enabled
0 = Disable tilt
1 = Enable tilt
Allows precision
positioning of wood blinds.
1,2, or 3
129
n/a
0 or 1 = Return to factory
defaults
Unit uncalibrated, motor
direction normal, tilt
disabled
5. COMMAND_CLASS_BASIC Commands
A BASIC_GET will return a motor position value between 0 and 99, or 255. A
value of 255 means the motor is not calibrated, and cannot report a valid position.
(The Motor LED will also be red)
A BASIC_SET 0 will move the shade of a properly calibrated motor to the fully
closed position. A BASIC_SET 99 or 255 will move the shade to the fully open
position. Sending BASIC_SET 255 to an un-calibrated motor will also cause it to
move to a limit. Sending a BASIC_SET X (where X is 1 to 99) command to an
uncalibrated motor will result in no motion. The Status LED will blink red to
indicate an error condition.
Sample commands:
To move shade to 50%, send BASIC_SET 50.
To check current shade position, send BASIC_GET. The return value is 0 to 99.

ABMHZ Version 1+1
Advanced User Manual
20 November 2007 Rev. B ©2007, Electronic Solutions, Inc. page 3 of 5
6. COMMAND_CLASS_SWITCH_MULTILEVEL Commands
A MULTILEVEL_SWITCH_GET will return a motor position value between 0 and 99,
or 255. A value of 255 means the motor is not calibrated, and cannot report a
valid position. (The Motor LED will also be red)
A MULTILEVEL_SWITCH_SET 0 will move the shade of a properly calibrated motor
to the fully closed position. A MULTILEVEL_SWITCH_SET 99 or 255 will move the
shade to the fully open position. Sending MULTILEVEL_SWITCH_SET 255 to an
uncalibrated motor will also cause it to move to a limit.
Sending a MULTILEVEL_SWITCH_START_LEVEL_CHANGE with parameter 1, bit 6
clear, causes the position value to increase and the shade opens regardless of the
calibration status.
Sending a MULTILEVEL_SWITCH_START_LEVEL_CHANGE with parameter 1, bit 6
set, causes the position value to decrease and the shade closes regardless of the
calibration status.
The values of the Ignore Start Level bit (parameter 1, bit 5) and the Start Level
parameter (parameter 2) are ignored. However, for compatibility with other Z-
Wave devices, the Ignore Start Level bit should be set to 1.
Sending a MULTILEVEL_SWITCH_STOP_LEVEL_CHANGE at any time will stop the
motor.
Sample commands:
To move shade to 50%, send MULTILEVEL_SWITCH_SET 50.
To check current shade position, send MULTILEVEL_SWITCH_GET. The return
value is 0 to 99.
To force a shade open (regardless of whether the motor control is calibrated),
send
MULTILEVEL_SWITCH_START_LEVEL_CHANGE 32.
To force a shade closed (regardless of whether the motor control is calibrated),
send MULTILEVEL_SWITCH_START_LEVEL_CHANGE 96.
7. COMMAND_CLASS_SWITCH_ALL Commands
The Factory default setting for SWITCH_ALL is ALL_ON and ALL_OFF commands
disabled.
Send SWITCH_ALL_GET to get the SWITCH_ALL_ON and SWITCH_ALL_OFF
status.

ABMHZ Version 1+1
Advanced User Manual
20 November 2007 Rev. B ©2007, Electronic Solutions, Inc. page 4 of 5
Send SWITCH_ALL_SET 0 to disable SWITCH_ALL_ON and SWITCH_ALL_OFF
commands.
Send SWITCH_ALL_SET 1 to enable SWITCH_ALL_OFF commands only.
Send SWITCH_ALL_SET 2 to enable SWITCH_ALL_ON commands only.
Send SWITCH_ALL_SET 255 to enable both SWITCH_ALL_ON and
SWITCH_ALL_OFF commands.
8. COMMAND_CLASS_POWERLEVEL Commands
Send POWERLEVEL_TEST_NODE_SET, 2, 0, 0, 100 to have this node send 100
test frames at maximum signal strength to node 2. When the test completes,
node 2 sends a POWERLEVEL_TEST_NODE_REPORT back. If a single message is
acknowledged, the test passes. The last 2 parameters represent the number of
test frames acknowledged.
It is also possible to query for the results of the last test by sending a
POWERLEVEL_TEST_NODE_GET.
Send POWERLEVEL_SET, 5, 60 to set node to power level 5 (mid-level power) for
60 seconds.
9. COMMAND_CLASS_MANUFACTURER_SPECIFIC Command
Send MANUFACTURER_SPECIFIC_GET. The return message should be 0x00,
0x33, 0x52, 0x50, 0x30, 0x31 This shows the ESI product data as Manufacturer
ID: 0033, Product Type ID: “RP”, and Product ID: “01”.
10. COMMAND_CLASS_VERSION Commands
Send VERSION_GET.
The returned message is 0x04, 0x02, 0x06, 0x01, 0x01, 0x5A.
This represents Library type 4 for basic slave device
Protocol Version 2
Protocol Sub Version 6
Application Version is the Z-Wave™ processor code version (currently 1)
Application Sub Version is the motor processor code version (currently 1)
11. Manual Buttons
The two small push-button located on the side of the unit are labeled “OPEN” and
“CLOSE”.
Pressing the OPEN button should open the shade.

ABMHZ Version 1+1
Advanced User Manual
20 November 2007 Rev. B ©2007, Electronic Solutions, Inc. page 5 of 5
If the OPEN button closes the shade instead of opening it, the motor direction
must be reversed using one of the following:
1. Use the reverse direction & calibrate button sequence
2. Set Configuration Parameter #2 to a 1
3. Swap motor directional wires on the motor connector.
Pressing the CLOSE button should close the shade. (If it does not, fix this as
described above)
A press of either button while the shade is moving will cause the shade to stop.
12. Calibration
Calibration is required before SET and GET will work correctly. Calibration is
accessed by pressing and holding down both the OPEN and CLOSE buttons
simultaneously for approximately 10 seconds, until the Motor LED turns green.
While the Motor LED is green (within 10 seconds):
Press the CLOSE button to start a calibration sequence.
- or -
Press the OPEN button to reverse the motor direction and start a calibration
sequence.
A calibration sequence consists of the shade moving between the upper and lower
limits and stopping at the fully closed position.
After the calibration sequence completes, the Motor LED turns off.
NOTE: The ABMHZ is a Z-Wave enabled device and is fully compatible with any Z-Wave enabled network. Z-Wave
enabled devices displaying the Z-Wave logo can also be used with ESI Z-Wave enabled motor controllers such as
ABMHZ regardless of the manufacturer. ESI Z-Wave enabled motor controllers can also be used in other
manufacturer’s Z-Wave enabled networks and all listening devices act as repeaters, regardless of vendor.
Other Electronic Solutions Controllers manuals

