elektraLite Mini Stingray Variable White User manual

Mini Stingray
Variable White
USER MANUAL
Elektralite (a division of Group One),
70, Sea Lane, Farmingdale, NY11735, U.S.A.
T. +1 (631)-396-0184. F. +1 (631)-396-0190
WWW.MYELEKTRALITE.COM

1. Unpacking
Thank you for choosing the Elektralite Variable White Mini Stingray fixture. For your own safety, please read this manual before
installing the fixture. This manual covers important information on installation and applications. Please keep this manual for future
reference.
To keep this simple, we are going to refer to the fixture as the Elektralite VW Mini Stingray throughout the manual.
The Elektralite VW Mini Stingray fixture uses a single COB led with a balanced array of elements giving incredible output.
Please unpack it carefully and check whether it was damaged in shipping.
The following items should be in the box with the fixture:-
Power cable with Edison connector
Jumper cable to extend DMX module away from the fixture yoke.
2. Safety Instructions.
This device has left the factory in perfect condition. In order to maintain this condition and to ensure a safe operation, it is
absolutely necessary for the user to follow the safety instructions and warning notes written in this user manual. The Elektralite
VW Mini Stingray is a high voltage fixture. Be careful when dealing with high voltages.
Please read this manual. If you do not read this manual and damages occur to the Elektralite VW Mini Stingray, then it
could void the warranty.
During shipping, Elektralite VW Mini Stingray may have been exposed to high temperature changes or humidity changes. So,
as a precaution, do not switch Elektralite VW Mini Stingray on immediately. Condensation can damage Elektralite VW Mini
Stingray so leave it switched off, until it has reached room temperature.
The electric connection must be carry out by a qualified person.
Always disconnect the Elektralite VW Mini Stingray from the power source, when the device is not in use or before cleaning it.
Only unplug Elektralite VW Mini Stingray from the power cord. Never pull out the plug out by pulling on the power cord.
Please keep the Elektralite VW Mini Stingray away from children and the general public. Please be intelligent and use common
sense when operating the Elektralite VW Mini Stingray.
3. General Guidelines.
The Elektralite VW Mini Stingray is a lighting fixture for professional use on stages, in churches, theatres, etc.
The Elektralite VW Mini Stingray should only be operated at 120 volts and only indoors.
The Elektralite VW Mini Stingray should not be operated 24/7 (24 hours a day; 7 days a week). The Elektralite VW Mini
Stingray needs operation breaks to ensure that it will work for a long time without problems. Please do not shake the Elektralite
VW Mini Stingray and avoid using brute force when installing or operating it.
When choosing the location to install the Elektralite VW Mini Stingray, please make sure that it is not exposed to extreme heat,
moisture or dust. The minimum distance between the Elektralite VW Mini Stingray and the illuminated surface must be more
than 3 feet.
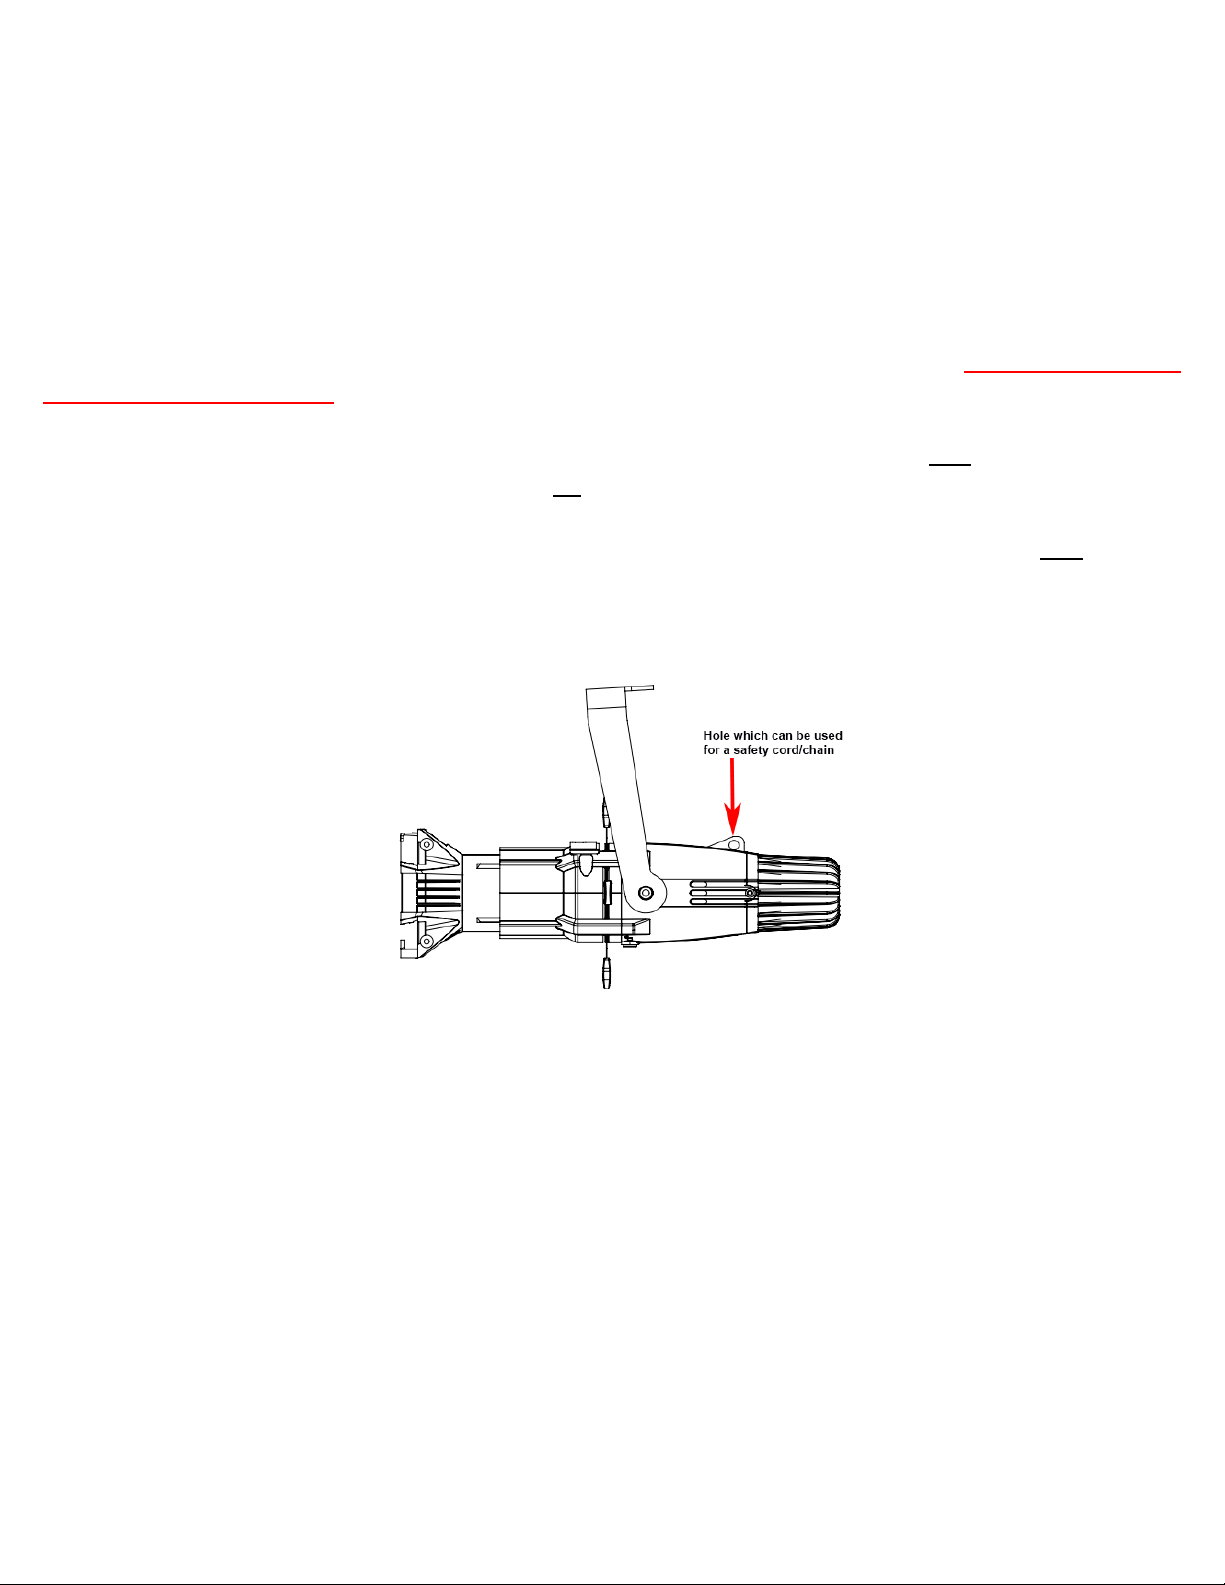
Always mount the Elektralite VW Mini Stingray with an appropriate safety cable/chain.
Operate the Elektralite VW Mini Stingray only when you are familiar with the features on the fixture. Do not permit operation by
persons not qualified to operate it.
All modifications to the Elektralite VW Mini Stingray will invalidate the warranty. There are absolutely no exceptions.
If Elektralite VW Mini Stingray is operated in any way different to the one described in this manual, the Elektralite VW Mini
Stingray maybe damaged and the guarantee will be void.

4. Main Features.
• 1*20W COB LED (2in1 Warm white + Cool white)
• Color Rendering Index (CRI): Ra≥90
• Optimized high definition optical system for improved photometric performance and field uniformity
• Projector-quality, high contrast aspheric lens
• Glass reflector that removes greater than 90% infrared radiation (heat) and reflects greater than 95% of visible light
• Power Max: 20W
• Housing made utilizing rugged, die-casting aluminum
• Flat even field giving a spot image
• Smooth manual focus system
• Beam edge continually adjustable hard-to-soft
• Thermally insulated rear handle
• Thermally insulated knobs and single aluminum handle for installing
• Metal gobo slot (for use with gobo holder : sold separately. Diameter of hole is 25.4mm = 1”).
• Color/Gel frame slot (for use with color/gel frame : sold separately. Frames are square 70mm = 2.755”).
• 4 Metal shutter blades
• 0-100% Smooth and precise linear dimmer
• 25T/sec high speed shutter/strobe effect with variable speed
• 2 personality profiles for operation as either 2 channel or 5 channel DMX.
• DMX512, master-slave, and sound control or auto operation
• 4-Button digital display
• 5-Pin XLR connectors IN and THRU
• Fanless cooling system
• -30~40°C Max ambient temperature
• IP20 protection rating
All measurements are in MM. I inch is equal to 25.4mm.

4. Changing Lenses.
The Elektralite VW Mini Stingray can accept a variety of different lenses. When replacing the lens remove the thumb screw but
be careful that the lens does not fall out of the body of the fixture.
5. Installation
Please ensure that the Elektralite VW Mini Stingray is hung using the appropriate "C" clamp or half cheeseboro. A safety chain
or cable should also be used as a secondary point of holding the fixture in case the clamp comes loose. Never hang the fixture
without a safety chain or cable. If a Color/Gel frame (Color/Gel holder) has been purchased separately please ensure that it is
clipped into position correctly and cannot come loose.
If you are not qualified or have any doubts about hanging the Elektralite VW Mini Stingray then do NOT hang it.
Do not clamp the cable to the U bracket or clamp. That is not a secondary safety point.
A secondary safety point is any point that will adequately hold the Elektralite VW Mini Stingray if the "C" clamp or half
cheesboro fails. Then the safety cable would be the backup and stop the fixture from falling to the ground. So do NOT fix the
safety to the same place that the "C"clamp is attached.
Installation during construction.
Many times fixtures are installed during the construction phase of a building. It is imperative that the fixture is protected during this
phase. A lot of dust is usually created. This dust can adversely affect the fixture. Specifically, of course, in coating the lenses and
therefore reducing the output. It can also damage electronics which can lead to the fixture failing immediately or prematurely in its
life cycle. If covering the fixture is determined to be the best solution, MAKE SURE THE FIXTURE IS DISCONNECTED FROM
ALL ELECTRICAL POWER. The fixture does generate heat and it can burn items that are brought within close proximity. So do
not have power to the fixture.

6. DMX-512 Control and Power input Connections
Connect an XLR cable (not provided) to the female 5-pin XLR output of the DMX controller The other end should be connected to
the male 5-pin XLR input of the Elektralite VW Mini Stingray . Then daisy-chain out of the first Elektralite VW Mini Stingray
and into the next Elektralite VW Mini Stingray or other dmx device. Never “Y” split the DMX connection.
If you need more cable, then it should be two core, screened cable fitted with a 5 pin XLR input and output connector. Please refer
to the diagram below.
1
2
3
4
5
DMX-512 connection with DMX terminator
For installations where the DMX cable has to run a long distance or is in an electrically “noisy” environment, it is recommended
that a DMX terminator is used. This helps prevent corruption of the digital control signal. The DMX terminator is simply a 5 pin
XLR plug (male) with a 120 Ω resistor connected between pins 2 and 3. It is then plugged into the output XLR socket of the last
Elektralite VW Mini Stingray or other dmx device in the chain. Please see illustration below.
1
2
3
4
5
Ω
120

The DMX module and integral power supply

7. Menus in the fixture.
Press the MENU button to change the menu
On the Screen Description Operation
Advanced DMX Use the ↑ or ↓ buttons to choose
the DMX starter address. Press
the ENTER button to save.
“A” uses the 5 channel dmx
profile for the fixture
dMX
“d” uses the 2 channel dmx
profile for the fixture.
SLAve
The profile will be the same
as “d001”
In slave mode :-
1、Make sure there is only one master fixture
2、The slave fixture(s) will copy exactly the signal sent to the master.
Color Fade Use the ↑ or ↓ buttons to choose
Note that the speed can be varied
from 1~50. Press the ENTER
button to save. (for clarification
Color is actually color temperature
of the white).
gradual change
Color Jump
Jump change
Color Pulse
Pulse change
Static Use the ↑ or ↓ buttons to choose
the output level (brightness) for
the cool white leds and then the
warm white leds.
Change color
Strobe Use the ↑ or ↓ buttons to choose
the speed of the strobe from 1 to
50. Press ENTER to save.
Strobe
Sound a “clap” or loud noise will turn the
led output “on” or “off”.
There is a “Sub Menu” to the Sound root menu. See following page.

8. Sound Sub menus.
When the screen displays the word “Sound” if the “enter button is pressed and held down for several seconds, then a new
Sub Menu is activated with the following parameters.
On the
Screen
Description Operation Description
LED time “on” Use the ↑ or ↓ buttons to
choose the screen “on” time
0 = screen is always “on”
Screen protect time
High Power Use the ↑ or ↓ buttons to
choose led maximum output or
run the led at max 33.3% output
On = 100%
off = 33.3%
Power choose
dMX-controller delay Use the ↑ or ↓ buttons to
choose to use controller delay
or not
controller delay
Synchronization Use the ↑ or ↓ buttons to
choose use multi-light
synchronization or not
Multi-light
synchronization
LoAd Hold down the ENTER button
until the display reads “LdEd”
i.e. loaded.
reset
rEturn Press ENTER to save the data
and get back to the main menu.
Back to function menu

9. Fixture Personality.
There are just two fixture personalities or profiles and they are as follows
.
Channel Data Function
1 0~255 Master Dimmer
2 0~255 Cool white
3 0~255 Warm White
4 0~5 No function
6~255 Strobe: 6 is slowest, 255 is fastest
5 0~25 Turn on “delay by controller”
26~100 Turn off “delay by controller”
101~150 Cool white will fade up & then down followed by warm white fading up and
down. 101 is slowest, 150 is fastest.
151~200 Cool white then “snap” to warm white then “snap” to black out then repeat.
151 is slowest, 200 is fastest.
201~250 Cool white then Xfade to warm white then back to cool white. 201 is
slowest, 250 is fastest.
251~255 Sound mode: the changing of the light depends on the MIC of each light
Channel Data Function
1 0~255 Cool white
2 0~255 Warm white

10. Cleaning and maintenance.
Now ignoring maintenance and cleaning is very good way of creating problems "down the road" and many companies and
installations do just that. However the net result is, no matter what the fixture, premature failure!
Changing the oil in a car most people do on a regular basis.
So with the fixtures, regular maintenance is an excellent practice, if you want the fixtures to last.
So what is the maintenance for the fixture? Keep it clean. Dust and dirt accumulation can stop the body’s heat sink from
adequately keeping the COB led cool. Heat can destroy the led, the lens and other components. So just keep it clean.
The lenses should also be cleaned so the light output is maintained. Use only a moist lint-free cloth. Never use alcohol or solvents
to clean the fixture.
11. Technical Specification.
Operating voltage 100 – 240v
Frequency 50 – 60 Hertz
36 x 5 watt leds
Fan cooled
269.75mm x 122mm x 122mm
11" x 5" x 5"
2.0 kgs
4.4 pounds
Elektralite is a division of Group One. Group One and its divisions are constantly improving their product range and we
reserve the right to make changes without prior notice.

Other Products.
ElektraLED has other great products that are manufactured under the Elektralite product line.
Go check out the website at www.myelektralite.com
A preview of the products include:-
Elektralite Elektrabar with glare shield for perfect cuts
Utilizing homogenized 6-in-1 leds. RGBWAI where the I is indigo (not UV) ; this way perfect pastels
like Lee 170 Lavender are flawlessly achieved.
The Elektralite 1018
Using 18 high powered 12 watt leds, the Elektralite 1018 is available using 4-in-1 or 6-in-1 leds.
Each led can produce any combination of colors as each led is either an RGBW or RGBWAI device

Elektralite ML902
The ML902 utilizes a 120 watt Led and is brighter than a 250 discharge light source.
Features include:- Color wheel, two gobo wheels, rotating gobos, rotating 3 facet prism, focus,
dimmer, strobe and 16 bit pan and tilt.
Elektralite Stingray Ellipsoidal
The Elektralite Stingray is a 300 watt LED ellipsoidal with the output of
a conventional 750 watt fixture. Different LED types are available including Warm White,
Daylight (5600K) and RGBL

Elektralite SLA
The SLA is the perfect compact IP65 fixture for accent lighting everything from
trees and walls to product high lighting. Even though it is compact it packs a massive
punch with its 15 watt Cree RGBW leds.
Table of contents
Other elektraLite Floodlight manuals
Popular Floodlight manuals by other brands

Ritos
Ritos P1H10D4-1 Installation and operating instructions

Beamz
Beamz 152.780 instruction manual

Lumineux
Lumineux Carsington Plus installation instructions

ANSMANN
ANSMANN WFL800S manual

Cooper Lighting Solutions
Cooper Lighting Solutions Halo RSQ4 instructions

Philips
Philips BVP150 Mounting instructions

Robus
Robus RCM10030-04 quick start guide

CRX
CRX CRX3308A instruction manual

Home Zone Security
Home Zone Security ES00942G user manual

Chauvet
Chauvet JAM Pack Emerald user manual

Light Emotion
Light Emotion P645QUADO User instruction manual

Verde Energy Group
Verde Energy Group VER-CF4-30-750 Product instructions