Elektron Octatrack DPS-1 User manual

FCC compliance statement
This device complies with part 15 of the FCC rules. Operation is subject to the following two conditions: (1 This device
may not cause harmful interference, and (2 this device must accept any interference received, including interference
that may cause undesired operation.
NOTE: This equipment has been tested and found to comply with the limits for a Class B digital device, pursuant to
Part 15 of the FCC Rules. These limits are designed to provide reasonable protection against harmful interference in
a residential installation. This equipment generates, uses and can radiate radio frequency energy and, if not installed
and used in accordance with the instructions, may cause harmful interference to radio communications. However,
there is no guarantee that interference will not occur in a particular installation. If this equipment does cause harmful
interference to radio or television reception, which can be determined by turning the equipment off and on, the user
is encouraged to try to correct the interference by one or more of the following measures:
• Reorient or relocate the receiving antenna.
• Increase the separation between the equipment and receiver.
• Connect the equipment into an outlet on a circuit different from that to which the receiver is connected.
• Consult the dealer or an experienced radio/TV technician for help.
European Union regulation compliance statement
This product has been tested to comply with the Low Voltage Directive 2006/95/EC and the Electromagnetic Com-
patibility Directive 2004/108/EC.
This symbol indicates that your product must be disposed of properly according to local laws and regu-
lations.
The included switched-mode power supply is CEC Level IV compliant.
The device contains a non rechargable lithium perchlorate battery cell that may need to be recycled separately de-
pending on local environmental laws. If the battery needs replacing, please contact Elektron or a local professional
technician for servicing.

Important Safety Information for the Octatrack DPS-1
Carefully read these instructions and save them for future reference.
Do not expose the apparatus to direct sunlight, nor use it in ambient temperatures exceed-
ing 50°C as this can lead to malfunction.
The apparatus can, thru the head phones output or via an amplifier generate high sound
levels! High sound levels may damage your hearing, protect your hearing by lowering the
sound level.
A itional instructions for the power a apter Elektron PSU-2
Connect the adapter to an easily accessible electrical outlet close to the apparatus.
The adapter is in standby mode when the power cord is connected, the primary circuit is
always active as long as the cord is connected to the power outlet. Pull out the power cord
to completely disconnect the adapter.
Only use CE approved power cords.
Warning
To reduce the risk of fire, electrical shock or product damage:
•Do not expose the apparatus to rain, moisture, dripping or splashing and also avoid
placing objects filled with liquid, such as vases, on the apparatus.
•Only use accessories recommended by the manufacturer.
•Do not unmount the enclosure. There are no user repairable parts inside. Leave
service and repairs to trained service personnel only.
Warning
•The adapter is not safety grounded and may only be used indoors.
•To ensure good ventilation for the adapter, do not place it in tight spaces. To pre-
vent risk of electric shock and fire because of overheating, ensure that curtains and
other objects do not prevent the adapter ventilation.


1 of 6
INTRODUCTION...........................................................................................................1-1
CONVENTIONS IN THIS MANUAL..................................................................................................... 1-1
THE BACKGROUND OF THE OCTATRACK ..............................................................1-2
SUGGESTED APPLICATIONS OF THE OCTATRACK....................................................................... 1-2
LOOPER DEVICE .......................................................................................................................... 1-2
RADICAL SOUND PROCESSOR .................................................................................................. 1-2
BACKING TRACK MACHINE......................................................................................................... 1-3
LIVE SETUP HUB .......................................................................................................................... 1-3
REMIX TOOL.................................................................................................................................. 1-3
EFFECTS UNIT EXTRAORDINAIRE ............................................................................................. 1-3
PANEL LAYOUT AND CONNECTORS........................................................................1-4
FRONT PANEL .................................................................................................................................... 1-4
REAR CONNECTORS ........................................................................................................................ 1-6
RACK MOUNT KIT (ACCESSORY .................................................................................................... 1-6
RACK MOUNT KIT ASSEMBLY..................................................................................................... 1-6
THE COMPACT FLASH CARD READER ........................................................................................... 1-7
COMPACT FLASH CARD SPECIFICATIONS................................................................................ 1-7
CONNECTING THE UNIT ................................................................................................................... 1-7
CARE INSTRUCTIONS ....................................................................................................................... 1-7
OVERVIEW OF THE OCTATRACK STRUCTURE ......................................................1-9
OCTATRACK HIERARCHY ................................................................................................................. 1-9
SETS .............................................................................................................................................. 1-9
AUDIO POOL ............................................................................................................................... 1-10
PROJECTS................................................................................................................................... 1-10
FLEX AND STATIC SAMPLE SLOT LISTS .................................................................................. 1-10
BANKS.......................................................................................................................................... 1-10
PATTERNS ................................................................................................................................... 1-10
PARTS .......................................................................................................................................... 1-10
SCENES ....................................................................................................................................... 1-10
ARRANGEMENTS ....................................................................................................................... 1-10
TRACKS ....................................................................................................................................... 1-10
MACHINES................................................................................................................................... 1-11
HOW INFORMATION IS HANDLED.................................................................................................. 1-11
THE USER INTERFACE.............................................................................................1-12
LAYER EDIT AND WINDOWS .......................................................................................................... 1-12
PARAMETER EDITING ..................................................................................................................... 1-13
QUICK PARAMETER EDITING.................................................................................................... 1-13
PARAMETER VALUE SKIP.......................................................................................................... 1-13
QUICK SCROLLING.......................................................................................................................... 1-13
COPY, CLEAR AND PASTE .............................................................................................................. 1-13
HI-SCORE NAMING.......................................................................................................................... 1-14
QUICK START ............................................................................................................1-15
DEMO MODE .................................................................................................................................... 1-15
PLAYING THE DEMO PATTERNS............................................................................................... 1-15
ADJUSTING PARAMETERS........................................................................................................ 1-15
RECORDING A PATTERN USING GRID RECORDING.............................................................. 1-15
RECORDING A PATTERN USING LIVE RECORDING ............................................................... 1-16
PARAMETER LOCKS .................................................................................................................. 1-16
MOUNTING A SET AND LOADING A PROJECT ............................................................................. 1-16
MOUNTING A SET....................................................................................................................... 1-16
LOADING A PROJECT ................................................................................................................ 1-17

2 of 6
LOADING SAMPLES......................................................................................................................... 1-17
ASSIGNING A MACHINE TO A TRACK ...................................................................................... 1-18
ASSIGNING A SAMPLE TO A MACHINE .................................................................................... 1-18
SETS...........................................................................................................................1-20
SET MOUNTING SCENARIOS ......................................................................................................... 1-20
NO MOUNTED SET ..................................................................................................................... 1-20
SWITCHING COMPACT FLASH CARDS .................................................................................... 1-20
SETS CONTAINING NO PROJECTS........................................................................................... 1-20
CHANGING BETWEEN SETS ..................................................................................................... 1-21
CREATING AND MOUNTING A SET ................................................................................................ 1-21
AUDIO POOL..................................................................................................................................... 1-22
ADDING CONTENT TO THE AUDIO POOL ................................................................................ 1-22
AUDIO FILE COMPATIBILITY ...................................................................................................... 1-22
PROJECTS.................................................................................................................1-23
PROJECTS AND RAM MEMORY ..................................................................................................... 1-23
LOADING AND CREATING A PROJECT.......................................................................................... 1-23
LOADING SAMPLES TO THE SAMPLE SLOTS .............................................................................. 1-24
LOADING TO THE SAMPLE SLOTS IN THE QUICK ASSIGN MENU........................................ 1-24
LOADING TO THE SAMPLE SLOTS IN THE PLAYBACK SETUP MENU .................................. 1-25
FILE BROWSER........................................................................................................................... 1-26
THE PROJECT MENU ...................................................................................................................... 1-26
FILE .............................................................................................................................................. 1-27
SYSTEM ....................................................................................................................................... 1-28
AUDIO........................................................................................................................................... 1-28
MIDI .............................................................................................................................................. 1-28
MIXER MENU .................................................................................................................................... 1-30
TEMPO MENU................................................................................................................................... 1-31
TAP TEMPO ................................................................................................................................. 1-32
TEMPO NUDGE ........................................................................................................................... 1-32
TRACK RECORDERS ....................................................................................................................... 1-32
RECORDER SETUP MENU......................................................................................................... 1-33
TRACK RECORDER SAMPLING METHODS................................................................................... 1-35
MANUAL SAMPLING ................................................................................................................... 1-35
SAMPLING USING RECORDER TRIGS ..................................................................................... 1-35
PLAYBACK OF CAPTURED RECORDER SAMPLES ................................................................. 1-36
BANKS, PARTS AND SCENES.................................................................................1-38
BANKS............................................................................................................................................... 1-38
PARTS ............................................................................................................................................... 1-38
PART QUICK SELECT ................................................................................................................. 1-39
PARTS EDIT ................................................................................................................................. 1-39
PART RELOAD............................................................................................................................. 1-39
SCENES ............................................................................................................................................ 1-39
ASSIGNING AND ADJUSTING SCENES .................................................................................... 1-40
SCENE VOLUME LOCKING ........................................................................................................ 1-40
THE CROSSFADER IN CONJUNCTION WITH SCENES ........................................................... 1-41
SCENE MUTE .............................................................................................................................. 1-41
TRACKS .....................................................................................................................1-42
ASSIGNING MACHINES TO TRACKS.............................................................................................. 1-42
ASSIGNING MACHINES IN THE QUICK ASSIGN MENU........................................................... 1-42
ASSIGNING MACHINES IN THE PLAYBACK SETUP MENU..................................................... 1-43
ASSIGNING FLEX AND STATIC SAMPLES TO MACHINES ........................................................... 1-43
ASSIGNING SAMPLES IN THE QUICK ASSIGN MENU............................................................. 1-43

3 of 6
ASSIGNING SAMPLES IN THE PLAYBACK SETUP MENU....................................................... 1-44
TRACK PARAMETER PAGES .......................................................................................................... 1-44
TRACK MAIN LEVEL ................................................................................................................... 1-44
TRACK CUE LEVEL..................................................................................................................... 1-44
PLAYBACK MAIN ......................................................................................................................... 1-45
PLAYBACK SETUP ...................................................................................................................... 1-45
AMP MAIN .................................................................................................................................... 1-45
AMP SETUP ................................................................................................................................. 1-46
LFO MAIN..................................................................................................................................... 1-47
LFO SETUP.................................................................................................................................. 1-47
LFO DESIGNER ........................................................................................................................... 1-48
EFFECT 1 AND EFFECT 2 .......................................................................................................... 1-49
DIRECT TRACK MUTING ................................................................................................................. 1-50
MAIN AND CUE OUTPUTS ROUTING ............................................................................................. 1-51
MAIN OUTPUT ROUTING ........................................................................................................... 1-51
CUE OUTPUT ROUTING............................................................................................................. 1-51
PARAMETERS AFFECTING MAIN AND CUE LEVELS .............................................................. 1-51
ROUTING EXAMPLES................................................................................................................. 1-51
PATTERNS..................................................................................................................1-55
TRIG LED INDICATIONS .................................................................................................................. 1-55
BASIC PATTERN OPERATIONS....................................................................................................... 1-55
SELECTING A PATTERN............................................................................................................. 1-55
PATTERN CHAINING ................................................................................................................... 1-56
TRIG TYPES ..................................................................................................................................... 1-56
NOTE TRIGS................................................................................................................................ 1-56
SWING TRIGS.............................................................................................................................. 1-56
SLIDE TRIGS ............................................................................................................................... 1-56
RECORDER TRIGS ..................................................................................................................... 1-56
RECORDING MODES....................................................................................................................... 1-56
GRID RECORDING MODE .......................................................................................................... 1-56
LIVE RECORDING MODE ........................................................................................................... 1-57
PARAMETER LOCKS........................................................................................................................ 1-57
NOTE TRIG PARAMETER LOCKS.............................................................................................. 1-57
TRIGLESS TRIGS ........................................................................................................................ 1-57
SAMPLE LOCKS ............................................................................................................................... 1-58
MACHINE AND TRACK TRIGGING.................................................................................................. 1-58
MACHINE TRIGGING .................................................................................................................. 1-58
TRACK TRIGGING....................................................................................................................... 1-58
SEQUENCER COPY, PASTE AND CLEAR OPERATIONS .............................................................. 1-58
PATTERN COPY .......................................................................................................................... 1-59
PATTERN CLEAR......................................................................................................................... 1-59
TRACK COPY .............................................................................................................................. 1-59
TRACK CLEAR............................................................................................................................. 1-59
TRACK PAGE COPY.................................................................................................................... 1-60
TRACK PAGE CLEAR.................................................................................................................. 1-60
NOTE TRIG COPY ....................................................................................................................... 1-60
NOTE TRIG CLEAR ..................................................................................................................... 1-60
SCENE COPY .............................................................................................................................. 1-60
SCENE CLEAR ............................................................................................................................ 1-61
TRACK TRIG EDIT MENU ................................................................................................................ 1-61
TRIGS........................................................................................................................................... 1-61
SLIDE ........................................................................................................................................... 1-61
SWING.......................................................................................................................................... 1-62

4 of 6
RECORDER TRIGS ..................................................................................................................... 1-62
PATTERN SETTINGS MENU ............................................................................................................ 1-63
PATTERN...................................................................................................................................... 1-63
TRACK 1....................................................................................................................................... 1-64
MICRO TIMING ................................................................................................................................. 1-64
SCALE SETUP .................................................................................................................................. 1-65
NORMAL....................................................................................................................................... 1-65
PER TRACK ................................................................................................................................. 1-66
THE AUDIO EDITOR..................................................................................................1-67
ACCESSING THE AUDIO EDITOR................................................................................................... 1-67
ACCESS FROM THE QUICK ASSIGN MENU............................................................................. 1-67
ACCESS USING SHORTCUTS ................................................................................................... 1-67
AUDIO EDITOR FUNCTIONALITY.................................................................................................... 1-67
TRIM ............................................................................................................................................. 1-67
SLICE............................................................................................................................................ 1-69
ATTRIBUTES................................................................................................................................ 1-70
OPERATIONS............................................................................................................................... 1-71
THE ARRANGER .......................................................................................................1-73
THE ARRANGER MENU................................................................................................................... 1-73
EDIT.............................................................................................................................................. 1-74
RENAME....................................................................................................................................... 1-75
CHANGE....................................................................................................................................... 1-75
CHAIN........................................................................................................................................... 1-75
CLEAR .......................................................................................................................................... 1-76
STORE.......................................................................................................................................... 1-76
RESTORE..................................................................................................................................... 1-76
EARLY STARTUP MENU ...........................................................................................1-77
TEST MODE ...................................................................................................................................... 1-77
EMPTY RESET.................................................................................................................................. 1-77
MIDI UPGRADE................................................................................................................................. 1-77
SEND UPGRADE .............................................................................................................................. 1-78
TECHNICAL INFORMATION .....................................................................................1-79
SPECIFICATIONS ............................................................................................................................. 1-79
CREDITS ....................................................................................................................1-80
PRODUCT DESIGN AND DEVELOPMENT...................................................................................... 1-80
ADDITIONAL DESIGN....................................................................................................................... 1-80
FACTORY DEFAULT SOUND DESIGN ............................................................................................ 1-80
USER’S MANUAL .............................................................................................................................. 1-80
CONTACT INFORMATION.........................................................................................1-80
ELEKTRON WEBSITE ...................................................................................................................... 1-80
DELIVERY ADDRESS ....................................................................................................................... 1-80
TELEPHONE ..................................................................................................................................... 1-80
APPENDIX A: MACHINE REFERENCE
THRU MACHINE .................................................................................................................................A-1
THRU MAIN ....................................................................................................................................A-1
THRU SETUP .................................................................................................................................A-1
FLEX MACHINE ..................................................................................................................................A-2
FLEX MAIN .....................................................................................................................................A-2
FLEX SETUP ..................................................................................................................................A-2
STATIC MACHINE ...............................................................................................................................A-3

5 of 6
STATIC MAIN..................................................................................................................................A-3
STATIC SETUP...............................................................................................................................A-3
NEIGHBOR MACHINE ........................................................................................................................A-4
NEIGHBOR MAIN...........................................................................................................................A-4
NEIGHBOR SETUP........................................................................................................................A-4
APPENDIX B: EFFECTS REFERENCE
NONE ..................................................................................................................................................B-1
NONE MAIN ...................................................................................................................................B-1
NONE SETUP ................................................................................................................................B-1
12/24DB MULTI MODE FILTER ..........................................................................................................B-2
MULTI MODE FILTER MAIN ..........................................................................................................B-2
MULTI MODE FILTER SETUP ......................................................................................................B-2
2-BAND PARAMETRIC EQ .................................................................................................................B-3
PARAMETRIC EQ MAIN ................................................................................................................B-3
PARAMETRIC EQ SETUP .............................................................................................................B-3
DJ STYLE KILL EQ .............................................................................................................................B-4
DJ EQ MAIN ...................................................................................................................................B-4
DJ EQ SETUP ................................................................................................................................B-4
2-10 STAGE PHASER .........................................................................................................................B-5
PHASER MAIN ...............................................................................................................................B-5
PHASER SETUP ............................................................................................................................B-5
FLANGER ............................................................................................................................................B-6
FLANGER MAIN.............................................................................................................................B-6
FLANGER SETUP..........................................................................................................................B-6
2-10 TAP CHORUS .............................................................................................................................B-7
CHORUS MAIN ..............................................................................................................................B-7
CHORUS SETUP ...........................................................................................................................B-7
DYNAMIX COMPRESSOR..................................................................................................................B-8
COMPRESSOR MAIN....................................................................................................................B-8
COMPRESSOR SETUP.................................................................................................................B-8
LO-FI COLLECTION............................................................................................................................B-9
LO-FI MAIN.....................................................................................................................................B-9
LO-FI SETUP..................................................................................................................................B-9
ECHO FREEZE DELAY.....................................................................................................................B-10
DELAY MAIN ................................................................................................................................B-10
DELAY SETUP .............................................................................................................................B-10
GATEBOX PLATE REVERB.............................................................................................................. B-11
REVERB MAIN ............................................................................................................................. B-11
REVERB SETUP .......................................................................................................................... B-11
APPENDIX C: MIDI CONTROL REFERENCE
NOTE MAPPINGS..........................................................................................................................C-1
CTRL-CHANGE MAPPINGS..........................................................................................................C-2
INDEX

6 of 6

INTRODUCTION
1
INTRODUCTION
Thank you for choosing the Octatrack DPS-1. The Octatrack is a dynamic performance
sampler ideal for real-time sampling, remixing and audio content manipulaton. It features
the improved Elektron step sequencer which makes it easy to bend and process samples
in new and unique ways. To make the most of the machine, we would recommend you to
carefully read this manual.
CONVENTIONS IN THIS MANUAL
In this manual we have used certain conventions. They are listed below:
Buttons are written in upper case with bold style, enclosed in brackets. For instance, the
button “function” on the main panel is written [FUNCTION].
Menu names are written in upper case. The PLAYBACK SETUP menu is an example of
that.
Parameter names and certain menus where settings can be made are written in bold,
upper case, style. HEADPHONES MIX for example.
Upper case style is used for parameter setting alternatives for example ONE, and for cer-
tain menu settings, like EXTERNAL.
Messages visible on the screen will be written in upper case with quotation marks. Like
this, “CHOOSE BANK”.
Knobs are written in upper case with bold, italic style. For instance, the knob “level” is writ-
ten LEVEL.
LED indicators like the record light are written <RECORD>.
The following symbols are used throughout the manual:
This symbol indicates information that you need to pay attention to.
This symbol indicates a tip that might make it easier interacting with the Octatrack.
This symbol is not used, but it shows a nice ear.

THE BACKGROUND OF THE OCTATRACK
2
THE BACKGROUND OF THE OCTATRACK
The first relatively affordable samplers were released in the 1980’s and made a huge
impact on the music scene of that time. Suddenly producers could incorporate sonic ele-
ments, taken from completely new sources, in their compositions. This resulted in the birth
and evolution of several genres, for example hip hop. The concept of the sampler has
since then branched off in several directions. Software based samplers are today capable
of handling enormously large, multi-sampled, sample librares. Hardware samplers aren’t
really suited for those tasks. Instead, they come to their best when conceived as dedicated
devices focusing on new and radical approaches to sampling.
When we developed the Machinedrum UW, one of the goals was to allow for a creative use
of samples. Once the machine was released it became apparent that especially the RAM
machines, which made it possible to record sounds in real-time and instantly play them
back, were utilized in ways we originally couldn’t even imagine. Users around the world
used them to incorporate live sampled shortwave radio sounds in their compositions, make
instant remixes of 12” records and in general produce totally new sounds. It was obvious
that the RAM machine concept harbored a tremendous potential. This was the starting
point of the Octatrack. We wanted to create a machine that would regard recorded material
not as inflexible sounds, but rather as something highly malleable. This is one of the rea-
sons why the Octatrack exists.
The other one is because of the stage. The computer laptop has quickly established itself
as a common instrument in live setups. It is a powerful and highly customizable tool, how-
ever, the multi functionality is at the same time a disadvantage. When it comes to audio
related tasks a laptop is still a jack of all trades but master of none. The Octatrack on the
other hand is designed to be a streamlined, reliable and straight forward machine allowing
live performers to really add something extra to their sets. It can act as a backing track
machine, a second turntable, a source of experimental soundscapes or simply as an instru-
ment encouraging improvisation and fun.
These two reasons converge and form the ultimate raison d’être of the Octatrack: its capa-
bility to re-establish sampling as an art form. We hope it will be a trusty companion during
your musical endeavours.
SUGGESTED APPLICATIONS OF THE OCTATRACK
The flexibility of the Octatrack makes it a very powerful device suited to a wide range of
tasks. Here a few of them are presented.
LOOPER DEVICE
The Octatrack is ideal for DJ’s and live performers. You will be able to quickly sample a
turntable or other sound sources present on the stage and instantly play back and affect
the recorded loop. Add pre-recorded loops and sounds to take your performance to a com-
pletely new level. The real-time timestretch will make sure everything stays in sync.
RADICAL SOUND PROCESSOR
The combined power of the sampling engine, the sequencer and the FX blocks makes the
Octatrack a very powerful audio mangler. This functionality is great when working in the
studio and wanting to obtain unique sounds and textures.

THE BACKGROUND OF THE OCTATRACK
3
BACKING TRACK MACHINE
Each of the eight stereo tracks can stream gigabyte-large samples. Despite the large size
of the samples they can still be subject to timestretch. Change the tempo of the Octatrack
and the backing track samples can be timestretched accordingly. On top of this you can
treat the samples with the Octatrack effects and sequencer tricks.
LIVE SETUP HUB
The two input pairs of the Octatrack can make it function as a mixer. Connect for example a
Machinedrum and a Monomachine to the inputs and enjoy a complete live setup with
extreme possibilities.
REMIX TOOL
It is easy to change the pitch of different sections of a vocal sample without changing the
overall tempo of the sample. Chopping up and rearranging samples and loops is extremely
easy thanks to features like the LFO designer and slice points. The Octatrack lets you
break down audio content and restructure it in new and interesting ways.
EFFECTS UNIT EXTRAORDINAIRE
Chained FX blocks paired with automated real time sampling can warble and twist incom-
ing audio in ways previously unachievable by a single machine. Up to four external and
four internal sound sources can be affected at the same time.
OCTATRACK DPS-1 USER’S MANUAL for operating system version 0.998b. This manual is copyright © 2011
Elektron Music Machines MAV AB. All reproduction without written authorization is strictly prohibited. The informa-
tion in this manual may change without notice. Elektron’s product names, logotypes, titles, words or phrases may
be registered and protected by Swedish and international law. All other brand or product names are trademarks or
registered trademarks of their respective holders.
PANEL LAYOUT AND CONNECTORS
4
PANEL LAYOUT AND CONNECTORS
FRONT PANEL
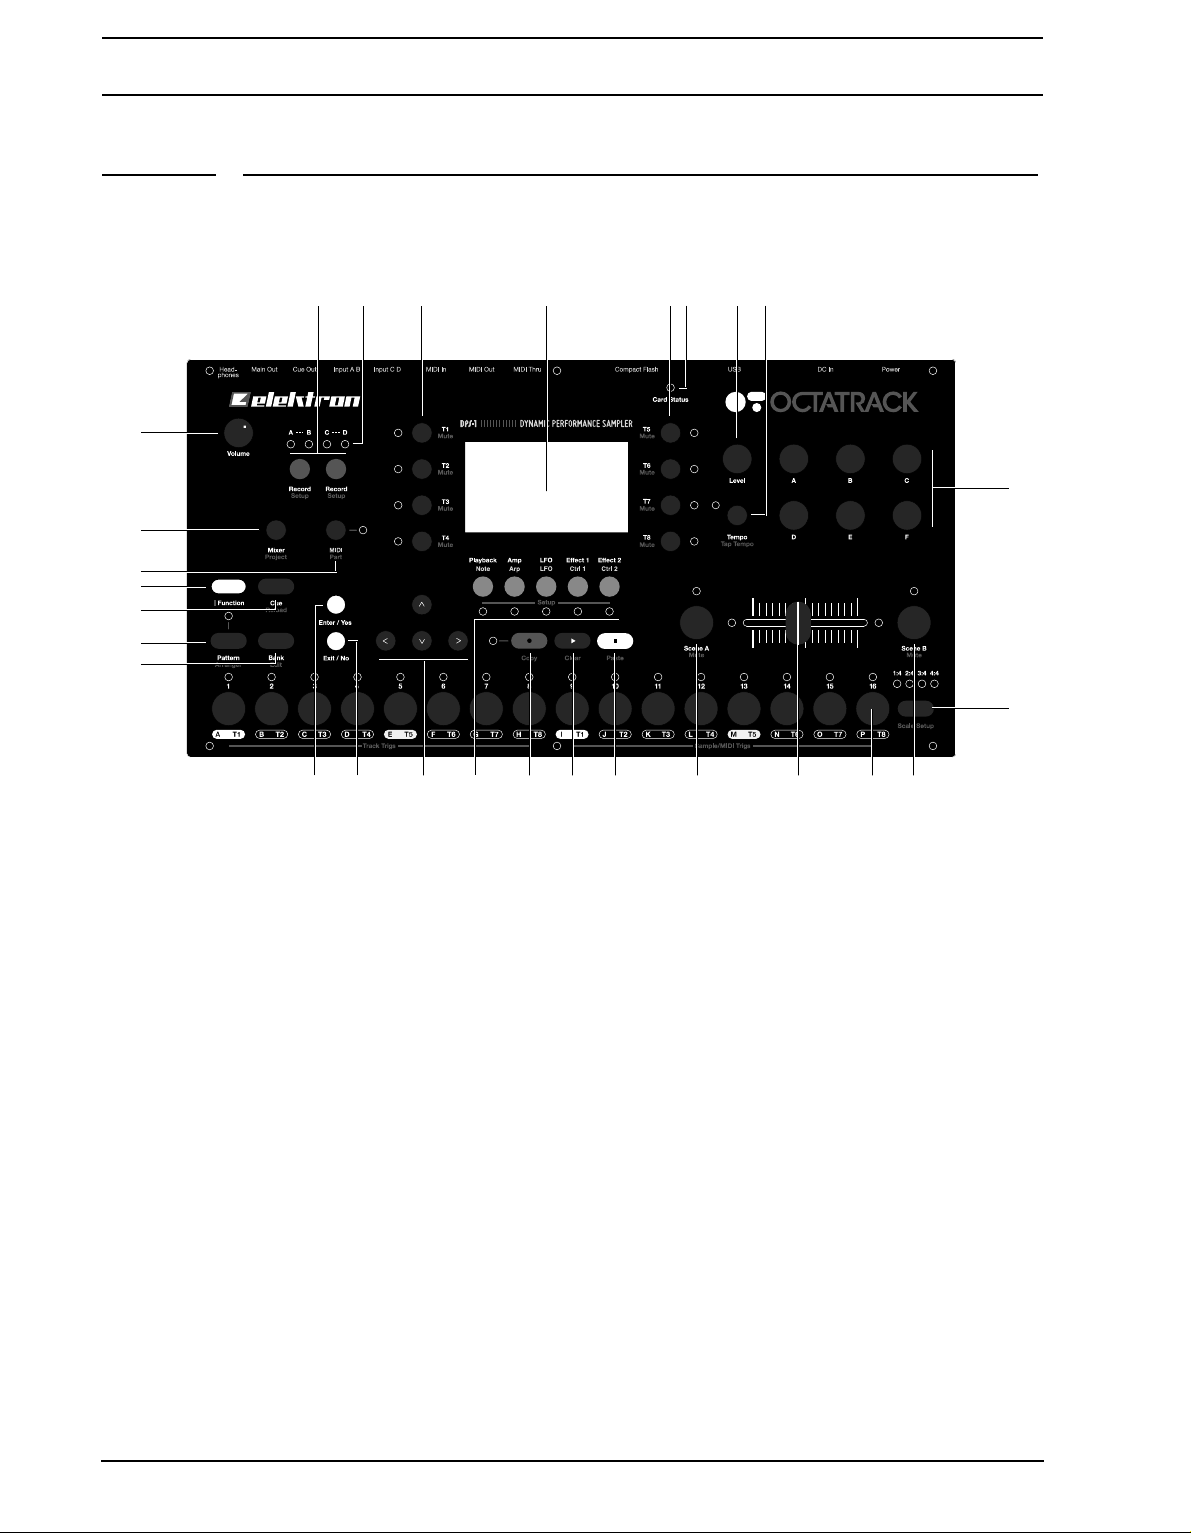
The Octatrack front panel:
1. HEADPHONES VOLUME CONTROL sets the volume for the stereo headphones jack.
2. [AUDIO RECORD] buttons are used for real-time sampling through the external inputs.
There is one [AUDIO RECORD] button per audio input pair.
3. The <AUDIO RECORD> LEDs indicate the strength of the signal sent to the external
inputs. When in the RECORD SETUP menu these LEDs also indicate the source selec-
tion for recorder trigs.
4. [TRACK] buttons. Press a button to activate the corresponding track. Pressing a
[TRACK] button + an [AUDIO RECORD] button will record audio to the recorder of the
selected track. [FUNCTION] + [TRACK] will mute the selected track. [CUE] + [TRACK]
will cue the selected track. The <TRACK> LED’s indicate which track is active as well
as the mute and cue status of the tracks.
5. The LCD graphical interface.
6. <CARD STATUS> LED, indicating the activity of the Compact Flash card.
7. The LEVEL encoder sets the overall volume level of the active track.
8. [TEMPO] key. Brings up the tempo menu. The current tempo is always indicated by the
speed the <TEMPO> LED is flashing. Tapping in the BPM manually is done by holding
[FUNCTION] and then repeatedly tapping [TEMPO].
9. DATA ENTRY knobs. Used for tweaking parameters.
10.[MIXER] opens up a menu where settings for the in- and outputs can be made. Tracks
can also be muted and solo:ed here. Pressing [FUNCTION] + [MIXER] opens the
PROJECT menu.
1
10
12
14
11
13
15
9
26
2
16 17 20 21 22 23 24 25 2318 19
3 4 45 6 87

PANEL LAYOUT AND CONNECTORS
5
11.Pressing the [MIDI] button activates the MIDI sequencer mode of the Octatrack. [FUNC-
TION] + [MIDI] opens up the PARTS menu. A lit <MIDI> LED indicates the MIDI
sequencer is active. When in the RECORD SETUP menu this LED indicates the signal
of the internal sample source and the internal source selection for recorder trigs.
12.[FUNCTION] key. Press and hold it for accessing the secondary function of another key.
13. Pressing [CUE] + a [TRACK] key will cue the track. The audio of the track will then be
routed to the cue outputs. [FUNCTION] + [CUE] will reload the parameter settings of
the selected part.
14.Pressing [PATTERN] + a [TRIG] key selects the active pattern within a bank. The
ARRANGER menu is called by pressing [FUNCTION] + [PATTERN].
15.[BANK] + a [TRIG] key selects the active bank within a project. Pressing [FUNCTION]
+ [BANK] opens various context based menus.
16.[ENTER/YES] key. Used for entering sub-menus and for confirming choices.
17.[EXIT/NO] key. Used for exiting the active menu and for deselecting options.
18.The [ARROW] keys. Used for menu navigation. They are called [UP], [DOWN], [LEFT]
and [RIGHT]. Pressing [RIGHT]/[LEFT] will nudge the BPM up or down.
19.The [TRACK PARAMETER] keys switches between the TRACK PARAMETER menus
of the active track. Pressing [FUNCTION] + a [TRACK PARAMETER] key will open the
SETUP menu of the selected TRACK PARAMETER menu. In MIDI SEQUENCER
mode the TRACK PARAMETER menus reflect the MIDI functionality of the tracks.
20.[REC] key. Toggles GRID RECORDING mode on/off. Starts LIVE RECORDING mode if
held while pressing [PLAY]. In GRID RECORDING mode, the <RECORD> LED gives a
steady light, while in LIVE RECORDING mode it flashes. Pressing [FUNCTION] +
[REC] performs a copy command.
21.[PLAY] key. Starts playback of a pattern or arrangement. Pressing [PLAY] a second
time pauses playback. [FUNCTION] + [PLAY] performs a clear command.
22.[STOP] key. Stops the playback of a pattern or arrangement. [FUNCTION] + [STOP]
performs a paste command.
•Copy, clear an paste functions are available in many menus. The implementation
is escribe in the relevant sections of this manual.
23.[SCENE A]/[SCENE B] + [TRIG] assigns one of 16 scenes to the A and B scene
slots.[SCENE A]/[SCENE B] + a DATA ENTRY knob will assign the chosen parameter
value to the scene. [FUNCTION] + [SCENE A]/[SCENE B] mutes the scene.
24. The crossfader interpolates between the parameter values of scene A and scene B.
25.[TRIG] keys 1 to 16. Used for trigging either the machine of a track or a complete track.
Also used for placing trigs in GRID RECORDING mode. When pressed in combination
with the [PATTERN] and [BANK] buttons they select patterns and banks. Above each
[TRIG] key is a <TRIG> LED indicating the position of placed trigs.
26.[PATTERN PAGE] selects the active pattern page of up to four pattern pages. Above the
[PATTERN PAGE] key the four <PATTERN PAGE> LEDs are found. They are used for
indicating the trig page currently being played or edited. If for example 64 steps, or four
pattern pages, are used in a pattern, all four LEDs will be lit. For scale lengths up to 16
steps, the <1:4> LED will stay lit and pressing [PATTERN PAGE] will have no effect.
[FUNCTION] + [PATTERN PAGE] calls the SCALE SETUP menu where track lengths
and pattern tempo multiplier settings are made.
PANEL LAYOUT AND CONNECTORS
6
REAR CONNECTORS
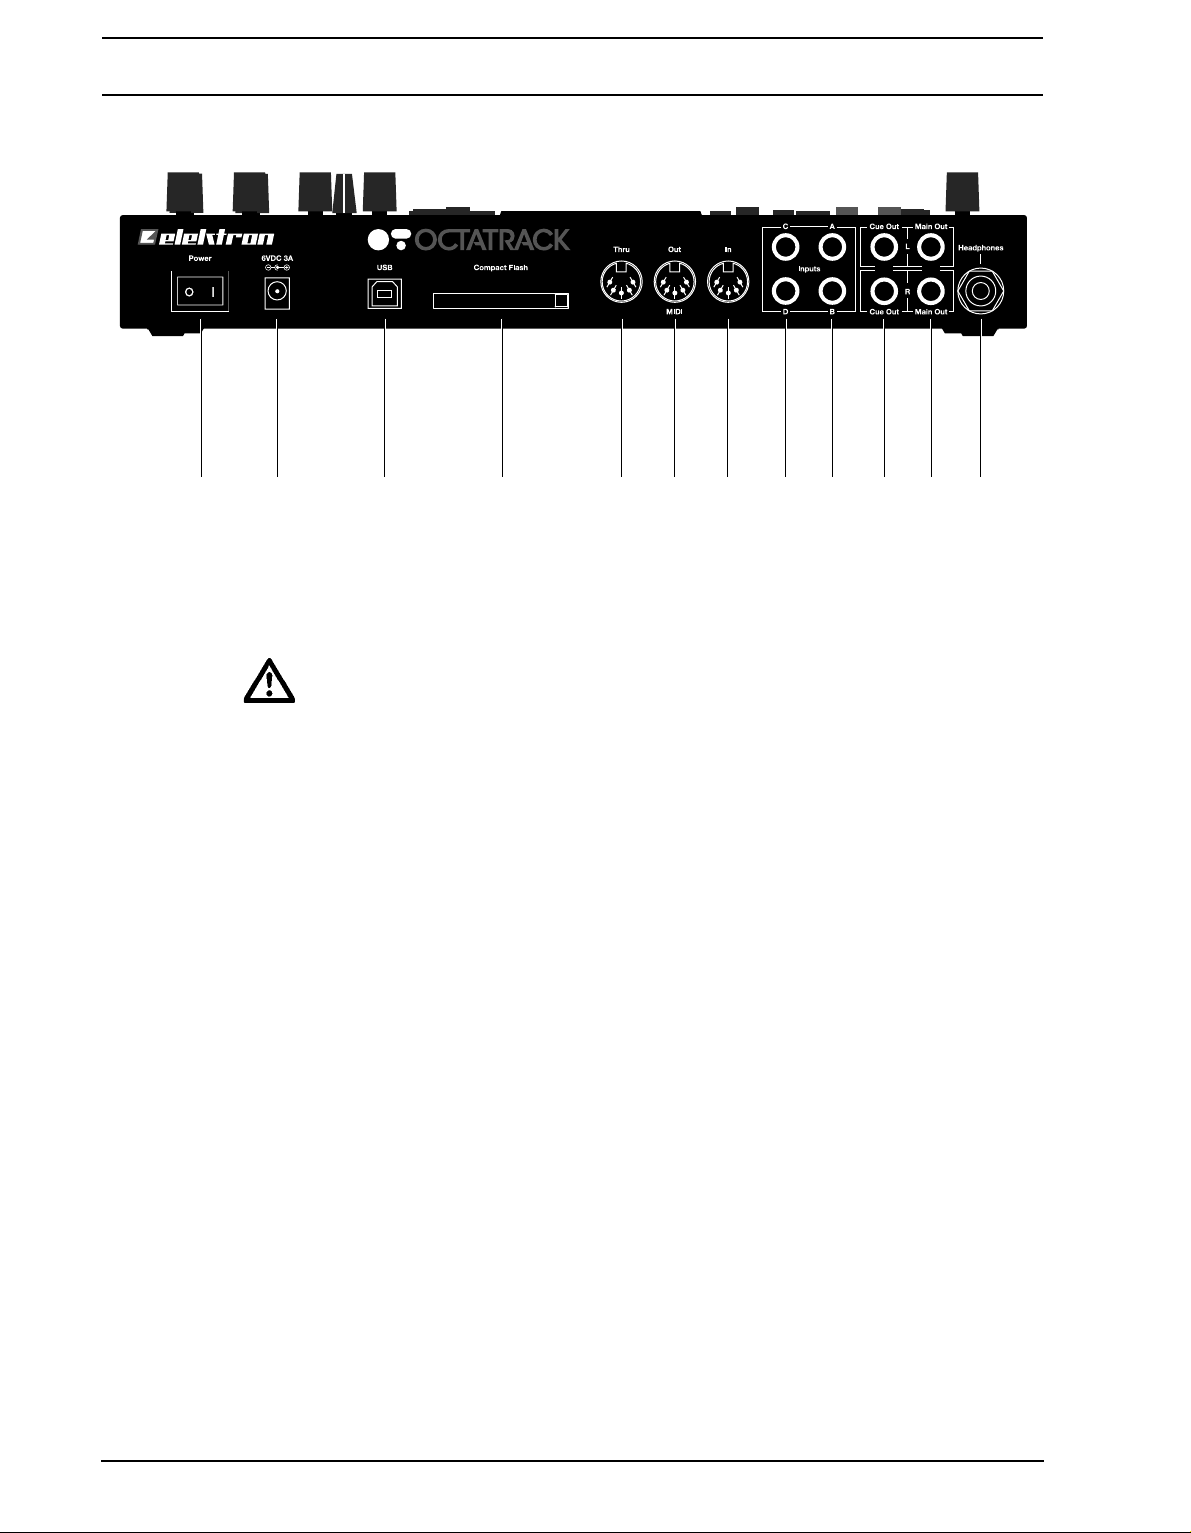
The Octatrack rear connectors:
1. Power on/off switch.
2. 6V DC power in.
•Caution! Use only the bun le PSU-2 with your Octatrack. It can be use all over
the globe without the nee of voltage converters using an appropriate power
cor . Using the wrong type of a apter may amage your unit. Damage cause by
the use of incorrect power supply is not covere by warranty. Please see
“TECHNICAL INFORMATION” on page 79 for etails about the Octatrack power
supply.
3. Hi Speed USB 2.0 connection.
4. Compact Flash card reader.
5. MIDI Thru.
6. MIDI Out.
7. MIDI In.
8. Input C/D.
9. Input A/B.
10. Cue out L/R.
11. Main out L/R.
12. Headphones output.
RACK MOUNT KIT (ACCESSORY)
The Octatrack can be rack mounted in a standard 19” rack, using the Elektron rack mount
kit which can be ordered separately. When rack mounted, the Octatrack occupies four
standard height units plus additional space, usually about 1 HE, needed to accommodate
for cables plugged into the unit.
RACK MOUNT KIT ASSEMBLY
Make sure that you have a Philips screwdriver which is in good condition and of the right
size. Use the included M3x6mm size screws to secure the rack mount consoles on each
1 2 3 4 5 6 7 8 9 10 11 12

PANEL LAYOUT AND CONNECTORS
7
side of the Octatrack. Make sure that all screws are fastened for secure operation of the
unit.
THE COMPACT FLASH CARD READER
The <CARD STATUS> LED lights up when a Compact Flash card is inserted. A blinking
green LED light means the card is being read, a red LED light means the card is being writ-
ten to.
Eject the Compact Flash card by pressing the button located to the right of the reader. After
being pressed the button will protrude a few millimeters. Press it again to eject the Com-
pact Flash card.
COMPACT FLASH CARD SPECIFICATIONS
Cards supporting UDMA and at least 133x (~20MB/s for both reads and writes. Cards
must be FAT16 or FAT32 formatted, preferably FAT32.
Cards adhering to this specification should work just fine, but we leave you no guarantee.
We strongly recommend you to use a Compact Flash card tested and recommended by
Elektron, such as the one bundled with the Octatrack.
•Never remove the car while ata is being rea or written to it. Doing so might cor-
rupt files an ata.
CONNECTING THE UNIT
Before you start connecting the Octatrack to other units, make sure that everything is
switched off.
1. Plug the supplied DC adapter to a wall socket and connect the small plug to the 6 V DC
connector of the Octatrack unit.
2. Connect the main out L/R from the Octatrack to your mixer or amplifier.
3. If MIDI control is desired, connect MIDI OUT from the Octatrack to the device that you
wish to send data to. Connect the MIDI IN to the device that you wish to receive data
from. The MIDI THRU port “echoes” the data arriving at the MIDI IN port, so it can be
used for chaining MIDI units together.
4. Switch on all units.
•The USB connection may inject computer noise in the outputs of the Octatrack.
Shoul this occur, use balance cables or use a battery operate computer. Do
not remove the safety groun ing of your computer. It is there to protect from elec-
tric shocks.
CARE INSTRUCTIONS
To ensure many years of trouble free operation, please follow the advice below:
•Never use any aggressive cleaners on the casing or the LCD overlay. Remove
ust, irt an fingerprints with a soft ry cloth. More persistent irt can be
remove with a slightly amp cloth using only water.

PANEL LAYOUT AND CONNECTORS
8
•Never use sharp objects near the isplay to avoi scratches or amage. Also
avoi applying any pressure to the isplay itself.
•When transporting the Octatrack, preferably use the box an pa ing the unit
originally shippe with, or comparable packaging.
•Make sure you place the unit on a stable surface before use. If you mount the unit
in a rack, be sure to tighten all four screws in the rack mount holes.
•The memory use for storing patterns an parts is powere by a battery insi e the
unit. It will hol ata at least 6 years before nee ing replacement. If the battery
nee s replacement, the “BATTERY LOW” message will appear in the isplay. Con-
tact Elektron support or your nearest repair center.
•Turn off the machine when it is not in use. Use the power switch.

OVERVIEW OF THE OCTATRACK STRUCTURE
9
OVERVIEW OF THE OCTATRACK STRUCTURE
The Octatrack handles information by using layers that are dependant on each other. To
make the most of the possibilities at hand it is important to understand the relation of the
components that form the structure of the Octatrack.
OCTATRACK HIERARCHY
The Octatrack is organized in a hierarchical way, starting with the set as the top level struc-
ture. The image above outlines the structure of the Octatrack.
SETS
A set is the top level structure of the Octatrack. It can contain a near unlimited amount of
projects plus one audio pool. The amount of samples in the audio pool is limited only by the
size of the Compact Flash card. The samples in the audio pool are available to all projects
of the set. Sets are saved on the Compact Flash card. Since a set can contain many
projects, some users might find that one set is all they need. Read more about sets on
page 20.

OVERVIEW OF THE OCTATRACK STRUCTURE
10
AUDIO POOL
Each set contains one audio pool which is stored on the Compact Flash card. The audio
pool contains the samples that can be loaded to the Flex and Static sample slot lists of the
projects of a set. Read more about how to fill the audio pool with samples on page 22.
PROJECTS
A project can be regarded as a collection of compositions. A project contains 16 banks, 8
arrangements, 8 track recorders and their recorder buffers, 128 sample slots dedicated to
Flex machines, 128 slots dedicated to Static machines and the BPM setting for all the pat-
terns of the project. The samples used to fill the Flex and Static sample slots are fetched
from the audio pool of the set. Please see section “PROJECTS” on page 23 for more infor-
mation.
FLEX AND STATIC SAMPLE SLOT LISTS
For samples to be available to Flex and Static machines they first need to be loaded from
the audio pool to the Flex or Static sample slot lists. When samples are present in these
lists they can be assigned to, and thus processed by, Flex and Static machines assigned to
the internal tracks. Read how to load audio pool samples to the sample slot lists in the sec-
tion “LOADING SAMPLES TO THE SAMPLE SLOTS” on page 24. Read how to assign
samples to a machine in the section “ASSIGNING FLEX AND STATIC SAMPLES TO
MACHINES” on page 43.
BANKS
Each project hosts 16 banks and each bank can host 16 patterns and 4 parts. This makes
a bank suited for hosting a complete composition as the available patterns and parts allow
a large number of song variations. Switching between banks is seamless. More information
about banks is found on page 38.
PATTERNS
For each bank 16 patterns are available, meaning 256 patterns are always at hand. A pat-
tern consists of sequencer data like note trigs, parameter locks, track lengths and time sig-
natures for the eight internal tracks. See section “PATTERNS” on page 55 for more
information.
PARTS
4 parts are available to each bank. A part contains machine assignments and their associ-
ated samples, track parameter settings, FX assignments as well as 16 scenes. A part is
always linked to a pattern or patterns of a bank. Changing parts will let the new assign-
ments be controlled by the active pattern data. Read more about parts on page 38.
SCENES
Scenes are assigned to the scene A and scene B slots. They decide the parameters the
crossfader will affect. The section “SCENES” on page 39 gives more in-depth information
about this functionality.
ARRANGEMENTS
The eight arrangements each project contains are used to structure the playback of pat-
terns. It is a great tool when using several patterns to form a longer sequence. More infor-
mation is found in the section “THE ARRANGER” on page 73.
TRACKS
An Octatrack pattern handles eight internal tracks. Each internal track hosts a machine.
Any machine type can be assigned to any of the eight internal tracks. More information
about tracks are found in the section “TRACKS” on page 42.
Other manuals for Octatrack DPS-1
1
Table of contents
Other Elektron Recording Equipment manuals

Elektron
Elektron Analog heat User manual

Elektron
Elektron Analog Heat MKII User manual

Elektron
Elektron Analog Heat +FX User manual

Elektron
Elektron MonoMachine SFX-6 Installation and operating instructions

Elektron
Elektron Octatrack User manual

Elektron
Elektron Analog Heat MKII User manual

Elektron
Elektron analog drive User manual

Elektron
Elektron Analog Heat +FX User manual


