Elenberg MC-3010D User manual

Owner’s Manual
MICROWAVE OVEN
Model: MC-3010D

Please read these instructions carefully before installing and operating the oven.
Record in the space below the SERIAL NO. found on the nameplate on your oven
and retain this information for future reference.
SERIAL NO.
PRECAUTIONS TO AVOID POSSIBLE EXPOSURE TO
EXCESSIVE MICROWAVE ENERGY
1. Do not attempt to operate this oven with the door open since open door operation
can result in harmful exposure to microwave energy. It is important not to
defeat or tamper with the safety interlocks.
2. Do not place any object between the oven front face and the door or allow soil
or cleaner residue to accumulate on sealing surfaces.
3. Do not operate the oven if it is damaged. It is particularly important that the
oven door close properly and that there is no damage to the
a. Door (bent),
b. Hinges and latches (broken or loosened),
c. Door seals and sealing surfaces.
4. The oven should not be adjusted or repaired by anyone except properly
qualified service personnel.

CONTENTS
PRECAUTIONS TO AVOID POSSIBLE EXPOSURE TO EXCESSIVE
MICROWAVE ENERGY ................................................................................... 2
SPECIFICATIONS .......................................................................................... 4
BEFORE YOU CALL FOR SERVICE ................................................................ 4
INSTALLATION ............................................................................................... 4
GROUNDING INSTRUCTIONS ....................................................................... 5
RADIO INTERFERENCE ................................................................................. 5
IMPORTANT SAFETY INSTRUCTIONS .......................................................... 5
MICROWAVE COOKING PRINCIPLES ........................................................... 6
UTENSILS GUIDE .......................................................................................... 7
PART NAMES ................................................................................................ 7
CONTROL PANEL .......................................................................................... 8
HOW TO SET THE OVEN CONTROLS ........................................................... 9
SETTING THE CLOCK ................................................................................... 9
MICROWAVE COOKING ................................................................................ 9
GRILL ............................................................................................................. 9
CONVECTION.............................................................................................. 10
ROAST ........................................................................................................ 10
SPECIAL FEATURES ................................................................................... 11
POPCORN .................................................................................................. 11
REHEAT ....................................................................................................... 11
POTATO ....................................................................................................... 11
COMPU DEFROST ...................................................................................... 11
COMPU COOK ........................................................................................... 12
COMPU PIZZA ............................................................................................. 12
COMPU GRILL ............................................................................................ 12
COMPU ROAST .......................................................................................... 12
COMPU BAKE ............................................................................................. 12
OTHER CONVENIENT FEATURES ............................................................... 13
CLEANING AND CARE ................................................................................. 13

SPECIFICATIONS
Power Consumption: 220-230V, 50Hz, 1500W (Microwave)
220-230V, 1400W (Convection)
220-230V, 1000W (Heater)
Rated Microwave Output: 1000W
Operation Frequency: 2450MHz
Outside Dimensions: 305mm(H) x 525mm(W) x 490mm(D)
Oven Cavity Dimensions: 219mm(H) x 350mm(W) x 355mm(D)
Cooking Uniformity: Turntable System {314mm}
Net Weight: Approx. 22kg
If the oven fails to operate:
1. Check to ensure that the oven is
plugged in securely. If it is not,
remove the plug from the outlet, wait
10 seconds, and plug it in again
securely.
2. Check for a blown circuit fuse or a
tripped main circuit breaker. If these
seem to be operating properly, test
the outlet with another appliance.
3. Check to ensure that the control panel
is programmed correctly and the
timer is set.
4. Check to ensure that the door is
securely closed engaging the door
safety lock system. Otherwise, the
microwave energy will not flow into
the oven.
IF NONE OF THE ABOVE RECTIFY THE
SITUATION, THEN CONTACT A
QUALIFIED TECHNICIAN. DO NOT TRY
TO ADJUST OR REPAIR THE OVEN
YOURSELF.
INSTALLATION
1. 1. Make sure that all the packing
materials are removed from the
inside of the door.
2. Warning: Check the oven for any
damage, such as misaligned or bent
door, damaged door seals and sealing
surface, broken or loose door hinges
and latches and dents inside the
cavity or on the door. If there is any
damage, do not operate the oven and
contact qualified service personnel.
3. This microwave oven must be
placed on a flat, stable surface to hold
its weight and the heaviest food
likely to be cooked in the oven.
4. Do not place the oven where heat,
moisture, or high humidity are generated,
or near combustible materials.
5. For correct operation, the oven must
have sufficient airflow. Allow 20cm
of space above the oven, 10cm at
back and 5cm at both sides. Do not
cover or block any openings on the
appliance. Do not remove feet.
6. Do not operate the oven without
glass tray, roller support, and shaft
in their proper positions.
7. Make sure that the power supply
cord is undamaged and does not run
under the oven or over any hot or
sharp surface.
8. The socket must be readily
accessible so that it can be easily
unplugged in an emergency.
9. Do not use the oven outdoors.
BEFORE YOU CALL FOR SERVICE

GROUNDING INSTRUCTIONS
This appliance must be grounded. This
oven is equipped with a cord having a
grounding wire with a grounding plug.
It must be plugged into a wall receptacle
that is properly installed and grounded.
In the event of an electrical short circuit,
grounding reduces risk of electric shock
by providing an escape wire for the
electric current. It is recommended that
a separate circuit serving only the oven
be provided. Using a high voltage is
dangerous and may result in a fire or
other accident causing oven damage.
Warning: Improper use of the
grounding plug can result in a risk of
electric shock.
Note
1. If you have any questions about the
grounding or electrical instructions,
consult a qualified electrician or
service person.
2. Neither the manufacturer nor the
dealer can accept any liability for
damage to the oven or personal injury
resulting from failure to observe the
electrical connection procedures.
The wires in this cable main are colored
in accordance with the following code:
Green and Yellow = EARTH
Blue = NEUTRAL
Brown = LIVE
Operation of the microwave oven can
cause interference to your radio, TV, or
similar equipment.
When there is interference, it may be
reduced or eliminated by taking the
following measures:
1. Clean door and sealing surface of
the oven.
2. Reorient the receiving antenna of
radio or television.
RADIO INTERFERENCE
3. Relocate the microwave oven with
respect to the receiver.
4. Move the microwave oven away
from the receiver.
5. Plug the microwave oven into a
different outlet so that microwave
oven and receiver are on different
branch circuits.
IMPORTANT SAFETY INSTRUCTIONS
When using electrical appliance basic
safety precautions should be followed,
including the following:
Warning: To reduce the risk of burns,
electric shock, fire, injury to persons or
exposure to excessive microwave
energy:
1. Read all instructions before using
the appliance.
2. Use this appliance only for its
intended use as described in this
manual. Do not use corrosive
chemicals or vapors in this
appliance. This type of oven is
specifically designed to heat, cook or
dry food. It is not designed for
industrial or laboratory use.
3. Do not operate the oven when empty.
4. Do not operate this appliance if it has
a damaged cord or plug, if it is not
working properly or if it has been
damaged or dropped. If the supply
cord is damaged, it must be replaced
by the manufacturer or its service
agent or a similarly qualified person
in order to avoid a hazard.

5. Warning: Only allow children to
use the oven without supervision
when adequate instructions have
been given so that the child is able
to use the oven in a safe way and
understands the hazards of
improper use.
6. To reduce the risk of fire in the
oven cavity:
a. When heating food in plastic or paper
container, keep an eye on the oven
due to the possibility of ignition;
b. Remove wire twist-ties from paper
or plastic bags before placing bag
in oven.
c. If smoke is observed, switch off or
unplug the appliance and keep the
door closed in order to stifle any
flames.
d. Do not use the cavity for storage
purposes. Do not leave paper
products, cooking utensils or food
in the cavity when not in use.
7. Warning: Liquid or other food must
not be heated in sealed containers
since they are liable to explode.
8. Microwave heating of beverage can
result in delayed eruptive boiling,
therefore care has to be taken when
handling the container.
9. Do not fry food in the oven. Hot oil
can damage oven parts and utensils
and even result in skin burns.
10. Eggs in their shell and whole hard-
boiled eggs should not be heated in
microwave ovens since they may
explode even after microwave
heating has ended.
11. Pierce foods with heavy skins such
as potatoes, whole squashes, apples
and chestnuts before cooking.
12. The contents of feeding bottles and
baby jars should be stirred or shaken
and the temperature should be
checked before serving in order to
avoid burns.
13. Cooking utensils may become hot
because of heat transferred from the
heated food. Potholders may be
needed to handle the utensil.
14. Utensils should be checked to
ensure that they are suitable for use
in microwave oven.
15. Warning: It is hazardous for
anyone other than a trained person
to carry out any service or repair
operation which involves the
removal of any cover which gives
protection against exposure to
microwave energy.
MICROWAVE COOKING PRINCIPLES
1. Arrange food carefully. Place
thickest areas towards outside of
dish.
2. Watch cooking time. Cook for the
shortest amount of time indicated
and add more as needed. Food
severely overcooked can smoke or
ignite.
3. Cover foods while cooking. Covers
prevent spattering and help foods to
cook evenly.
4. Turn foods over once during
microwaving to speed cooking of
such foods as chicken and
hamburgers. Large items like roasts
must be turned over at least once.
5. Rearrange foods such as meatballs
halfway through cooking both from
top to bottom and from the center of
the dish to the outside.

UTENSILS GUIDE
1. The ideal material for a microwave
utensil is transparent to microwave,
it allows energy to pass through the
container and heat the food. Only
use a temperature probe
recommended for this oven.
2. Microwave can not penetrate metal,
so metal utensils or dishes with
metallic trim should not be used.
3. Do not use recycled paper products
when microwave cooking, as they
may contain small metal
fragments which may cause
sparks and/or fires.
4. Round /oval dishes rather than
square/oblong ones are
recommend, as food in corners tends
to overcook.
5. Narrow strips of aluminum foil may
be used to prevent overcooking of
exposed areas. But be careful don’t
use too much and keep a distance of
1 inch (2.54cm) between foil and
cavity.
The list below is a general guide to help
you select the correct utensils.
Cookware Microwave Grill Convection Combination*
Heat–Resistant Glass Yes Yes Yes Yes
Non Heat–Resistant Glass No No No No
Heat–Resistant Ceramics Yes Yes Yes Yes
Microwave–Safe Plastic Dish Yes No No No
Kitchen Paper Yes No No No
Metal Tray No Yes Yes No
Metal Rack No Yes Yes No
Aluminum Foil & Foil Container No Yes Yes No
* Combination: applicable for both «microwave+grill», and «microwave+convection» cooking.
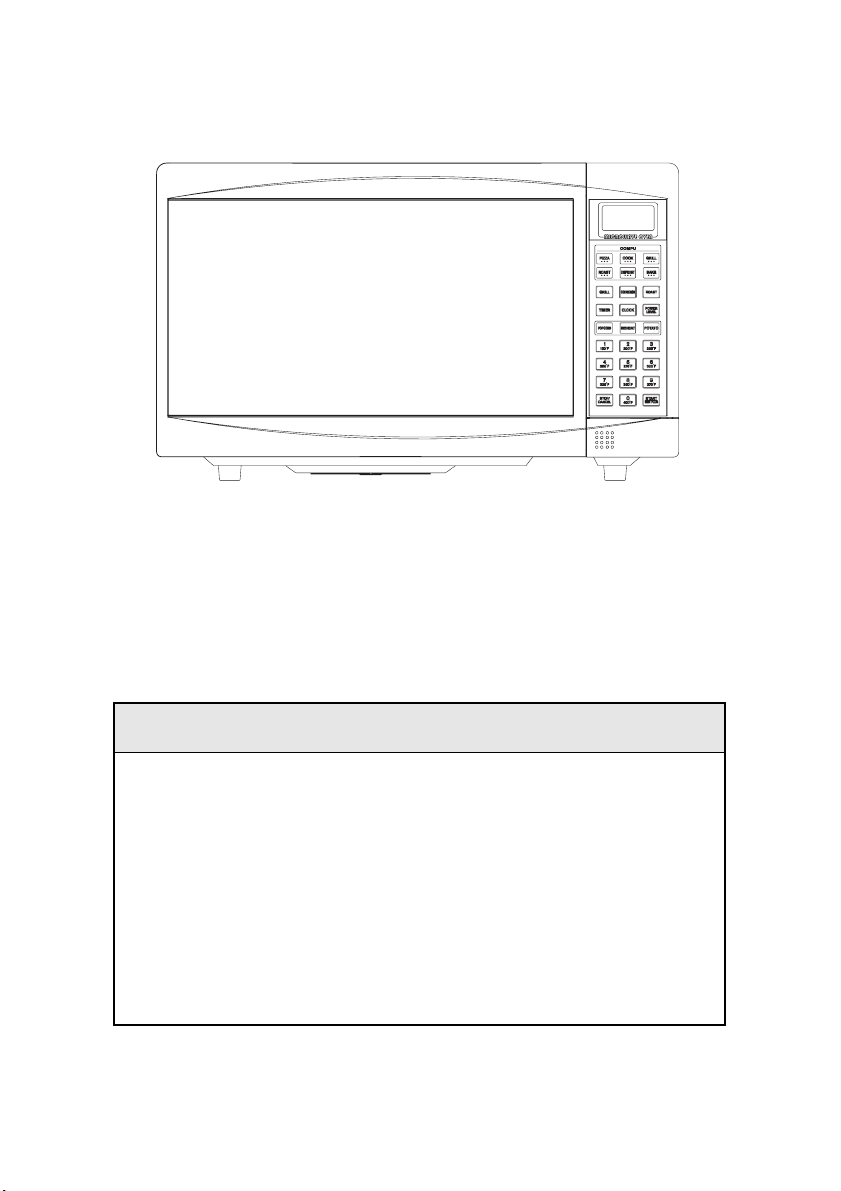
PART NAMES
1. Door Safety Lock System
2. Oven Window
3. Oven Air Vent
4. Shaft
5. Roller Ring
6. Glass Tray
7. Control Panel
8. Grill Heater
9. Baking plate

CONTROL PANEL
DISPLAY SCREEN
Cooking time, power, indicators
and
present time are displayed.
COMPU COOKING
Easy settings to cook/defrost
popular
food.
POWER LEVEL
Touch POWER LEVEL and then
use
number pads to set cooking
power level.
GRILL
Press to set a grill-cooking
program.
CONVECTION
Press to program convection
cooking.
ROAST
Touch to roast food
CLOCK
Use to set the clock
TIMER
Use to set the oven timer
QUICK COOK BUTTONS:
POPCORN REHEAT POTATO
START/1MIN PLUS
Press to start cooking or add to
cooking
time.
STOP/CANCEL
Touch to stop cooking program
or clear
all previous settings before
cooking
starts
NUMBER PADS/CONVECTION
TEMPERATURE ENTRY
Touch to set cooking time, enter
weight
or number of servings, or
program
convection temperature.
(Please also see the following pages for more detail)

HOW TO SET THE OVEN CONTROLS
BEEPS DURING OVEN SETTINGS
•ONE BEEP: Oven accepts the entry.
•TWO BEEPS: Oven does not accept
the entry. Please check and try again.
SETTING THE CLOCK
The clock works in 12-hour cycle. When
the oven is first plugged in, the display
will briefly show “ENTER CLOCK
TIME”, you can set the clock time now
or later. To set the clock time later,
1. Press CLOCK button.
2. Use the numeric pads (in the
natural sequence of time) to enter
clock time
3. Press CLOCK to confirm.
MICROWAVE COOKING
Microwave cooking allows you to
customize cooking power and time.
First, you select a power level by pressing
the POWER LEVEL button a number of
times (see the table below). Then you
set the cooking time (maximum 99
min. plus 99 sec. ) using the numeric
pads, before pushing the START button.
Press POWER button to select
cooking power
Press Power Description
once 100%(P-100) High
twice 90%(P-90)
3 times 80%(P-80)
4 times 70%(P-70) Medium
High
5 times 60%(P-60)
6 times 50%(P-50) Medium
7 times 40%(P-40)
8 times 30%(P-30) Med.
Low/Defrost
9 times 20%(P-20)
10 times 10%(P-10) Low
11 times 0%(P-00)
Suppose you want to cook for 5 minute
at 60% power level.
1. Press POWER LEVEL button 5 times
2. Press number pads to enter cooking
time until the correct cooking time
(5:00) is displayed.
3. Press START button.
Note:
1. If you want to temporarily stop a
cooking session, press the STOP/
CANCEL pad once and then you can
start the cooking again by press
START; or press the STOP/
CANCEL twice to cancel the cooking
program altogether.
2. After the cooking time ends, the
system will beep four times and
END is displayed. Before starting
another cooking session, press
STOP/CANCEL pad to clear the
display and reset the system.
GRILL
Grill cooking is particularly useful for
thin slices of meat, steaks, chops,
kebabs, sausages and pieces of chicken.
It is also suitable for hot sandwiches
and au gratin dishes.
Suppose you want to program grill
cooking for 12 minutes.
1. Make sure the system is reset by
pressing the STOP/CANCEL pad
once.
2. Press GRILL button.
3. Use the number pads to enter
cooking time.
4. Press START button.
Note:
Grill cooking power is set at full power
level by the system. Maximum cooking
time for grill is 99:99.

4. Open the door and place container of
food at the center of the turntable.
5. Use the number pads to enter
cooking time.
6. Press START button.
ROAST
This oven has four pre-programmed
settings that make it easy to cook with
both convection heat and microwave
whereby meats can be made juicy and
tender with just the right amount of
browning and crispness.
Press ROAST button and then use the
number pads 1-4 to program convection
temperature:
Program Press number Temp.
pad (0)
COMB1 1150
COMB2 2180
COMB3 3200
COMB4 4230
Suppose you want to roast for 24
minutes on COMB3.
1. Press ROAST button
2. Use the number pads 1-4 to enter
convection temperature. In this case,
press number pad 3.
3. Use the number pads to enter
cooking time. In this case, press
number pads 2,4,0,0.
4. Press START button to start.
Note:
The maximum cooking time is 99 min.,
99 sec. After time has elapsed four beeps
sound and END appears in display.
Press STOP/CANCEL button or open
door to clear END before starting another
cooking function. You can check the
convection temperature while cooking is
in progress by pressing the ROAST
button.
CONVECTION
During convection cooking, hot air is
circulated throughout the oven cavity to
brown and make crisp foods quickly and
evenly. This oven can be programmed
for ten different cooking temperatures.
To Cook with Convection
To cook with convection, press
CONVECTION button once and then
press the number pads to enter the
desired convection temperature.
Suppose you want to cook at 3250for 40
minutes.
1. Press CONVECTION button.
2. Press number pad 7.
3. Press number pads 4,0,0,0 to enter
cooking time.
4. Press START button.
Note:
1. The maximum convection cooking
time is 99 min. 99 sec. After time
has elapsed four beeps sound and
END appears in display. Press
STOP/CANCEL button or open door
to clear END before starting another
cooking function.
2. You can check the convection
temperature while cooking is in
progress by pressing the
CONVECTION button.
To Preheat and Cook with
Convection
Your oven can be programmed to
combine preheating and convection
cooking operations.
Suppose you want to preheat to 1600and
then cook 35 minutes.
1. Press CONVECTION.
2. Press number pad 2 to indicate
convection temperature 900
3. Press START button. Beeps will
sound when the designated
temperature is reached.

SPECIAL FEATURES
In this special feature section, you can
find easy settings to cooking popular
food.
POPCORN
This feature allows a regular sized bag
of popcorn to be popped.
1. Press POPCORN once, the display
will show code and cooking time
2. Press START button.
NOTE:
To reset POPCORN time: Press
POPCORN twice, and use the number
pads to enter the new popcorn time, and
then press START button to verify. The
new popcorn time will remain whenever
you use the POPCORN function until
you reset it.
REHEAT
Touch the reheat pad will allow the
reheating of a chilled dinner plate.
1. Press REHEAT pad once, the
display will show code and cooking
time.
2. Press START button.
POTATO
1. Touch POTATO pad once or twice
for potato 4-6 oz or 5-7 oz per serving.
2. Use the number pads 1-4 to select
the number of servings.
3. Press START button.
Please refer to the following charts for
cooking guide:
1. Press POTATO pad once and use
the number pads 1-4 to select
number of servings (100-180 g)
Press Press Cooking
POTATO number pad time
1 1 3 min 50 sec
1 2 7 min 10 sec.
1 3 11 min
1 4 14 min
2. Press POTATO pad twice and use
the number pads 1-4 to select
number of servings (150-210 g)
Press Press number Cooking
BEVERAGE pad time
2 1 5 min 40 sec
2 2 10 min
2 3 15 min
2 4 19 min
Note:
After the cooking program have finished,
let food stand in the oven for 5~10 minutes.
The cooking time quoted here is for
reference only. Please always take
the cooking timings actually show
on the screen of your oven as the
correct settings.
COMPU DEFROST
Compudefrost automatically defrost
foods to the weight you entered.
To defrost 2.0 pound of chicken pieces,
do the following:
1. touch DEFROST pad up to 5 times
to select the type of food to be defrosted,
in this case, touch it 3 times.
2. Use the number pads to enter
weight, in this case, touch 2,0.
3. Touch START pad.
Defrost chart
Press Food Amount
DEFROST
Once 1. Ground meat 0.2~1.40lb
Twice 2.Steaks, chops, fish 0.2~1.80lb
3 times 3.Chicken pieces 0.2~1.50lb
4 times 4.Roast 0.8~1.80lb
5 times 5. Casserole 2~6 cups
1. If you happen to enter weight above or
below the weights allowed, the screen
will clear to 0.0 allowing you reenter.
2. To defrost other food, use 30% power
and program defrosting time.

COMPU COOK
Compu cook and the following Compu
settings leave you no more to do with
cooking than selecting the food to be
cooked and entering its weight or
number of servings, before pushing the
START button.
For example, to cook 1.5 lb of fish
1. Indicating the type of food placed into
the oven by pressing COOK pad 5
times.
2. Use the number pads to enter
weight within the range indicated
in the charts below, in this case,
touch 1 and 5.
3. push START button.
Press SETTING Food Amount
COOK
Once 1. baked potato 1~4
medium
Twice 2. fresh vegetable 1~4 cups
3 times 3.frozen vegetables 1~4 cups
4 times 4.ground meat 0.1~1.0lb
5 times 5.seafood, fish 0.1~1.0lb
COMPU PIZZA
For items 1~4, you just need to indicate
what kind of a pizza you want it to come
out of the oven and push the START
pad. Step 2 is skipped.
Press SETTING Food Quantity
PIZZA
Once 1. bake frozen pizza
regular crust 1
Twice 2. bake frozen pizza
rising crust 1
3 times 3. bake refrig pizza 1
4 times 4. Microwave pizza 1
5 times 5. Casserole 1~6 slices
COMPU GRILL
Press SETTING Food Quantity
Grill
Once 1.hamburgers 1-7(0.1lb
each)
Twice 2. steaks 0.2~0.9lb
3 times 3.fish steaks 0.2~0.9lb
4 times 4.boneless poultry 0.2~0.9 lb
5 times 5.chicken pieces 0.2~1.4 lb
COMPU ROAST
Press SETTING Food Quantity
ROAST
Once 1.Chicken, turkey 1.1~3.2
(whole)
Twice 2. Pork loin 0.9~1.6
3 times 3.turkey breast 1.4~1.6
4 times 4.beef eye of round 0.9~1.6
5 times 5. Cornish hens 0.2~1.4
COMPU BAKE
Press SETTING Food Quantity
BAKE
Once 1. French fries 0.1~0.4
Twice 2. Frozen snack 0.9~1.6
3 times 3. Brownies 10x10x5
4 times 4.Snack cake 10x10x5
5 times 5. biscuits 8~10 (1 package of
convenience
biscuits)

OTHER CONVENIENT FEATURES
MINUTE TIMER
The timer works independently as a
reminder and the time countdown ends
in beeps sounding.
1. Press TIMER.
2.Use the numeric pads to enter the
time to be counted down.
3. Press START.
CHILD PROOF LOCK
The child proof lock prevents
unsupervised operation by little children.
To set the child proof lock: Press STOP/
CANCEL button for 3 seconds, then a
beep will sound and the indicator light
will come on. In the lock state, all buttons
are disabled.
To cancel the child proof lock: Press
STOP/CANCEL button for three
seconds, then a beep will sound and the
indicator light will come off.
TO STOP THE OVEN WHILE THE
OVEN IS OPERATING
1. Press STOP/CANCEL button.
You can restart the oven by pressing
START pad.
Touch STOP/CANCEL to erase all
instructions.
2. Open the door.
You can restart the oven by closing
the door and pressing START pad.
Note:
Oven stops operating when door is
opened.

CLEANING AND CARE
1. Turn off the oven and remove the power plug from the wall socket before
cleaning.
2. Keep the inside of the oven clean. When food splatters or spilled liquids adhere
to oven walls, wipe with a damp cloth. Mild detergent may be used if the oven
gets very dirty. Avoid the use of spray and other harsh cleaners as they may
stain, streak or dull the door surface.
3. The outside surfaces should be cleaned with a damp cloth. To prevent damage
to the operating parts inside the oven, water should not be allowed to seep into
the ventilation openings.
4. Wipe the door and window on both sides, the door seals and adjacent parts
frequently with a damp cloth to remove any spills or spatters. Do not use
abrasive cleaner.
5. Do not allow the control panel to become wet. Clean with a soft, damp cloth.
When cleaning the control panel, leave oven door open to prevent oven from
accidentally turning on.
6. If steam accumulates inside or around the outside of the oven door, wipe with
a soft cloth. This may occur when the microwave oven is operated under high
humidity condition. And it is normal.
7. It is occasionally necessary to remove the glass tray for cleaning. Wash the
tray in warm sudsy water or in a dishwasher.
8. The roller ring and oven floor should be cleaned regularly to avoid excessive
noise. Simply wipe the bottom surface of the oven with mild detergent. The
roller ring may be washed in mild sudsy water or dishwasher. When removing
the roller ring from cavity floor for cleaning, be sure to replace in the proper
position.
9. Remove odors from your oven by combining a cup of water with the juice and
skin of one lemon in a deep microwaveable bowl, microwave for 5 minutes.
Wipe thoroughly and dry with a soft cloth.
10. When it becomes necessary to replace the oven light, please consult a dealer to
have it replaced.


Galanz Enterprises Corporation of Guandong
Address: 25 Ronggui Nan Rd. Ronggui, Shunde,
Guangdong, China.
MADE IN CHINA

Ðóêîâîäñòâî ïîëüçîâàòåëÿ
ÊÎÍÂÅÊÖÈÎÍÍÀß
ÌÈÊÐÎÂÎËÍÎÂÀß ÏÅ×Ü
Ìîäåëü: MC-3010D
18
Ïåðåä óñòàíîâêîé è èñïîëüçîâàíèåì ïå÷è âíèìàòåëüíî ïðî÷òèòå ýòè èíñò-
ðóêöèè.
Çàïèøèòå íèæå ñåðèéíûé íîìåð, êîòîðûé âû ìîæåòå íàéòè íà òàáëè÷êå íà
âàøåé ïå÷è, è ñîõðàíèòå ýòó èíôîðìàöèþ äëÿ äàëüíåéøåãî èñïîëüçîâàíèÿ.
ÑÅÐÈÉÍÛÉ ¹
ÌÅÐÛ ÏÐÅÄÎÑÒÎÐÎÆÍÎÑÒÈ ÂÎ ÈÇÁÅÆÀÍÈÅ
ÂÎÇÌÎÆÍÎÃÎ ÂÎÇÄÅÉÑÒÂÈß ÌÈÊÐÎÂÎËÍ
1. Íå ïûòàéòåñü èñïîëüçîâàòü ýòó ïå÷ü ñ îòêðûòîé äâåðüþ, ýòî ìîæåò ïðè-
âåñòè ê îïàñíîìó âîçäåéñòâèþ ìèêðîâîëí. Íå íàðóøàéòå ôóíêöèè çà-
ùèòíîé áëîêèðîâêè.
2. Íå ïîìåùàéòå íèêàêèõ ïðåäìåòîâ ìåæäó ïåðåäíåé ïàíåëüþ ïå÷è è
äâåðüþ, è íå äîïóñêàéòå ñêîïëåíèÿ ãðÿçè èëè îñàäêà îò ÷èñòÿùèõ
ñðåäñòâ íà óïëîòíÿþùèõ ïîâåðõíîñòÿõ.
3. Íå èñïîëüçóéòå ïå÷ü, åñëè îíà ïîâðåæäåíà. Îñîáåííî âàæíî, ÷òîáû äâåðü
ïå÷è çàêðûâàëàñü äîëæíûì îáðàçîì è íå áûëî ïîâðåæäåíèé
a. Äâåðè (èñêðèâëåíèå),
b. Ïåòåëü è çàùåëîê (ïîëîìêà èëè îòâèí÷èâàíèå),
c. Óïëîòíåíèé è óïëîòíÿþùèõ ïîâåðõíîñòåé äâåðè.
4. Ïå÷ü äîëæíà ðåãóëèðîâàòüñÿ èëè ðåìîíòèðîâàòüñÿ òîëüêî êâàëèôèöè-
ðîâàííûì îáñëóæèâàþùèì ïåðñîíàëîì.

19
ÑÎÄÅÐÆÀÍÈÅ
ÌÅÐÛ ÏÐÅÄÎÑÒÎÐÎÆÍÎÑÒÈ ÂÎ ÈÇÁÅÆÀÍÈÅ ÂÎÇÌÎÆÍÎÃÎ
ÂÎÇÄÅÉÑÒÂÈß ÌÈÊÐÎÂÎËÍ .................................................................... 2
ÒÅÕÍÈ×ÅÑÊÈÅ ÕÀÐÀÊÒÅÐÈÑÒÈÊÈ ............................................................ 4
ÏÅÐÅÄ ÂÛÇÎÂÎÌ ÎÁÑËÓÆÈÂÀÞÙÅÃÎ ÏÅÐÑÎÍÀËÀ ............................ 4
ÓÑÒÀÍÎÂÊÀ ................................................................................................. 4
ÈÍÑÒÐÓÊÖÈÈ ÏÎ ÇÀÇÅÌËÅÍÈÞ .............................................................. 5
ÐÀÄÈÎÏÎÌÅÕÈ ........................................................................................... 5
ÂÀÆÍÛÅ ÈÍÑÒÐÓÊÖÈÈ ÏÎ ÁÅÇÎÏÀÑÍÎÑÒÈ ........................................... 5
ÏÐÀÂÈËÀ ÌÈÊÐÎÂÎËÍÎÂÎÃÎ ÏÐÈÃÎÒÎÂËÅÍÈß ÏÈÙÈ ...................... 6
ÐÅÊÎÌÅÍÄÀÖÈÈ ÏÎ ÈÑÏÎËÜÇÎÂÀÍÈÞ ÏÎÑÓÄÛ ................................. 7
ÍÀÈÌÅÍÎÂÀÍÈß ÊÎÌÏÎÍÅÍÒÎÂ ............................................................ 7
ÏÀÍÅËÜ ÓÏÐÀÂËÅÍÈß ................................................................................ 8
ÓÑÒÀÍÎÂÊÀ ÝËÅÌÅÍÒΠÓÏÐÀÂËÅÍÈß ÏÅ×È ....................................... 9
ÓÑÒÀÍÎÂÊÀ ×ÀÑΠ.................................................................................... 9
ÌÈÊÐÎÂÎËÍÎÂÎÅ ÏÐÈÃÎÒÎÂËÅÍÈÅ ..................................................... 9
ÃÐÈËÜ........................................................................................................... 9
ÊÎÍÂÅÊÖÈÎÍÍÎÅ ÏÐÈÃÎÒÎÂËÅÍÈÅ ..................................................... 10
ÆÀÐÊÎÅ...................................................................................................... 10
ÎÑÎÁÛÅ ÂÎÇÌÎÆÍÎÑÒÈ ....................................................................... 11
ÏÎÏÊÎÐÍ (ÂÎÇÄÓØÍÀß ÊÓÊÓÐÓÇÀ) ...................................................... 11
ÐÀÇÎÃÐÅÂÀÍÈÅ ........................................................................................ 11
ÊÀÐÒÎÔÅËÜ ............................................................................................... 11
ÊÎÌÏÜÞÒÅÐÈÇÈÐÎÂÀÍÎÅ ÎÒÒÀÈÂÀÍÈÅ ............................................. 11
ÊÎÌÏÜÞÒÅÐÍÀß ÃÎÒÎÂÊÀ ..................................................................... 12
ÊÎÌÏÜÞÒÅÐÈÇÈÐÎÂÀÍÍÀß ÏÈÖÖÀ ...................................................... 12
ÊÎÌÏÜÞÒÅÐÈÇÈÐÎÂÀÍÍÛÉ ÃÐÈËÜ ..................................................... 13
ÊÎÌÏÜÞÒÅÐÈÇÈÐÎÂÀÍÍÎÅ ÆÀÐÊÎÅ ................................................... 13
ÊÎÌÏÜÞÒÅÐÈÇÈÐÎÂÀÍÍÀß ÇÀÏÅÊÀÍÊÀ.............................................. 13
ÄÐÓÃÈÅ ÓÄÎÁÍÛÅ ÔÓÍÊÖÈÈ ................................................................... 14
Î×ÈÑÒÊÀ È ÓÕÎÄ ...................................................................................... 15

20
ÒÅÕÍÈ×ÅÑÊÈÅ ÕÀÐÀÊÒÅÐÈÑÒÈÊÈ
Ïîòðåáëÿåìàÿ ìîùíîñòü: 220-230 Â, 50 Ãö, 1500 Â (Ìèêðîâîëíîâàÿ)
220-230 Â, 1400 Âò (Êîíâåêöèîííàÿ)
220-230 Â, 1000 Âò (Íàãðåâàòåëü)
Íîìèíàëüíàÿ ìèêðîâîëíîâàÿ
âûõîäíàÿ ìîùíîñòü: 1000 Âò
Ðàáî÷àÿ ÷àñòîòà: 2450 ÌÃö
Íàðóæíûå ðàçìåðû: 305 ìì(Â)õ 525 ìì(Ø) õ 490 ìì(Ã)
Ðàçìåðû ïîëîñòè ïå÷è: 219 ìì(Â) õ 350 ìì(Ø) õ 355 ìì(Ã)
Åìêîñòü ïå÷è: 30 ë
Ðàâíîìåðíîñòü ïðèãîòîâëåíèÿ: Ñèñòåìà ïîâîðîòíîãî êðóãà {314 ìì}
Ìàññà íåòòî: Îêîëî 22 êã
ÏÅÐÅÄ ÂÛÇÎÂÎÌ ÎÁÑËÓÆÈÂÀÞÙÅÃÎ ÏÅÐÑÎÍÀËÀ
Åñëè ïå÷ü íå ðàáîòàåò:
1. Ïðîâåðüòå ïðàâèëüíîñòü ïîäêëþ-
÷åíèÿ ïå÷è.  ñëó÷àå íåïðàâèëü-
íîãî ïîäêëþ÷åíèÿ èçâëåêèòå âèë-
êó èç ðîçåòêè, ïîäîæäèòå 10 ñåêóíä
è ñíîâà ïîäêëþ÷èòå åå ê ðîçåòêå.
2. Ïðîâåðüòå ïðåäîõðàíèòåëü è
âûêëþ÷àòåëü. Åñëè îíè ðàáîòàþò
íîðìàëüíî, ïðîâåðüòå ðîçåòêó ñ
äðóãèì ïðèáîðîì.
3. Óáåäèòåñü, ÷òî ïàíåëü óïðàâëå-
íèÿ ïðàâèëüíî çàïðîãðàììèðî-
âàíà è òàéìåð óñòàíîâëåí.
4. Óáåäèòåñü, ÷òî äâåðü ïëîòíî çàê-
ðûâàåòñÿ ñ çàäåéñòâîâàíèåì ñèñ-
òåìû çàùèòíîé áëîêèðîâêè äâå-
ðè.  ïðîòèâíîì ñëó÷àå ìèêðîâîë-
íîâàÿ ýíåðãèÿ íå áóäåò ïîñòóïàòü
â ïå÷ü. Åñëè íè îäíà èç âûøåóêà-
çàííûõ ïðîöåäóð íå ïðîÿñíèëà
ñèòóàöèþ, ñâÿæèòåñü ñ êâàëèôè-
öèðîâàííûì òåõíèêîì. Íå ïûòàé-
òåñü ðåãóëèðîâàòü èëè ðåìîíòèðî-
âàòü ïå÷ü ñàìîñòîÿòåëüíî.
ÓÑÒÀÍÎÂÊÀ
1. Óáåäèòåñü, ÷òî èç äâåðè èçâëå÷å-
íû âñå óïàêîâî÷íûå ìàòåðèàëû.
2. Ïðåäóïðåæäåíèå: Ïðîâåðüòå ïå÷ü íà
íàëè÷èå ïîâðåæäåíèé, íàïðèìåð,
íå èñêðèâëåíà ëè äâåðü, íå ïîâðåæ-
äåíû ëè óïëîòíåíèÿ è óïëîòíÿþ-
ùèå ïîâåðõíîñòè äâåðè, íå ñëîìà-
íû ëè èëè íå îòâèíòèëèñü ëè ïåò-
ëè è çàùåëêè è íåò ëè âìÿòèí âíóò-
ðè ïå÷è èëè íà äâåðè. Åñëè âû îá-
íàðóæèëè ïîâðåæäåíèÿ, íå èñïîëü-
çóéòå ïå÷ü è îáðàòèòåñü çà êâàëè-
ôèöèðîâàííûì îáñëóæèâàíèåì.
3. Ýòà ìèêðîâîëíîâàÿ ïå÷ü äîëæíà
áûòü óñòàíîâëåíà íà ðîâíîé, óñ-
òîé÷èâîé ïîâåðõíîñòè, ñïîñîáíîé
âûäåðæèâàòü åå âåñ è âåñ ñàìûõ
òÿæåëûõ áëþä, êîòîðûå ìîãóò
ïðèãîòàâëèâàòüñÿ â ïå÷è.
4. Íå óñòàíàâëèâàéòå ïå÷ü â ìåñ-
òàõ ïîâûøåííîãî âûäåëåíèÿ
òåïëà, âëàãè èëè îòíîñèòåëüíîé
âëàæíîñòè èëè âáëèçè ëåãêî âîñ-
ïëàìåíÿþùèõñÿ ìàòåðèàëîâ.
5. Äëÿ ïðàâèëüíîé ðàáîòû ïå÷è
äîëæåí áûòü îáåñïå÷åí äîñòàòî÷-
íûé ïîòîê âîçäóõà. Ïðè óñòàíîâ-
êå îñòàâüòå 20 ñì ñâîáîäíîãî ïðî-
ñòðàíñòâà íàä ïå÷üþ, 10 ñì ñçà-
äè è ïî 5 ñì ïî áîêàì. Íå íàêðû-
âàéòå è íå áëîêèðóéòå îòâåðñòèÿ
íà ïå÷è. Íå óäàëÿéòå íîæêè.
6. Íå èñïîëüçóéòå ïå÷ü, åñëè ñòåêëÿí-
íûé ëîòîê, ðîëèêîâàÿ îïîðà è âàë íà-
õîäÿòñÿ â íåïðàâèëüíîì ïîëîæåíèè.
7. Óáåäèòåñü, ÷òî øíóð ïèòàíèÿ íå
ïîâðåæäåí è íå ïðîòÿíóò ïîä ïå-
÷üþ èëè ïîâåðõ ëþáîé ãîðÿ÷åé
èëè îñòðîé ïîâåðõíîñòè.
8. Ðîçåòêà äîëæíà áûòü ëåãêî äîñ-
òóïíà, ÷òîáû ïå÷ü ìîæíî áûëî
ëåãêî îòêëþ÷èòü îò ñåòè â ñëó÷àå
íåîáõîäèìîñòè.
9. Íå èñïîëüçóéòå ïå÷ü âíå ïîìåùåíèÿ.
Table of contents
Other Elenberg Microwave Oven manuals

Elenberg
Elenberg MS-2005 M User manual

Elenberg
Elenberg MG-2035 D User manual

Elenberg
Elenberg MG-2525M User manual

Elenberg
Elenberg MG-2540D User manual

Elenberg
Elenberg MC-3015 D User manual

Elenberg
Elenberg MS-2003 M User manual

Elenberg
Elenberg MS-2001M User manual

Elenberg
Elenberg MS-2015 D User manual

Elenberg
Elenberg MS-2006M User manual


