Eletech DP-501 eHold User manual

DP-501 eHold Player
User’s Guide

User’s Notice
No part of this manual, including the products and software described in it, may be
reproduced, transmitted, transcribed, stored in a retrieval system, or translated into
any language in any form or by any means, except documentation kept by the
purchaser for backup purposes, without the express written permission of Eletech.
Eletech provides this manual “as is” without warranty of any kind, either express or
implied, including but not limited to the implied warranties or conditions of mer-
chantability or fitness for a particular purpose. In no event shall Eletech, its director,
officers, employees or agents be liable for any indirect, special, incidental, or conse-
quential damages (including damages for loss of profits, loss of business, loss of use
or data, interruption of business and the like), even if Eletech has been advised of
the possibility of such damages arising from any defect or error in this manual or
product.
Product warranty or service will not be extended if the product is repaired, modified
or altered, unless such repair, modification or alteration is authorized in writing by
Eletech.
Products and corporate names appearing in this manual may or may not be regis-
tered trademarks or copyrights of their respective companies, and are used only for
identification or explanation and to the owners’ benefit, without intent to infringe.
Specifications and information contained in this manual are furnished for informa-
tional use only, and are subject to change at any time without notice, and should
not be construed as a commitment by Eletech. Eletech assumes no responsibility or
liability for any errors or inaccuracies that may appear in this manual, including the
products and software described in it.
FCC and CE Statement
This device complies with Part 15 of the FCC Rules. Operation is subject to the
following two conditions: (1) this device may not cause harmful interference, and
(2) this device must accept any interference received, including interference that
may cause undesired operation.
Copyright (c) 2008-2020 Eletech Enterprise Co. Ltd. All Rights Reserved.
Product Name: DP-501 eHold Player
Manual Revision: 2.0
Release Date: May 22, 2020
Software Version: 1.2.0924.0
Table of Contents
Package Contents .............................................................................................. 2
Hardware Descriptions ..................................................................................... 2
Hardware Installation ....................................................................................... 3
IP Address Configuration .................................................................................. 3
Device Configuration ........................................................................................ 4
Site Installation ................................................................................................. 6
Phone System Connection ................................................................................ 7
The Server Program .......................................................................................... 8
Software Installation ......................................................................................... 8
The Main Menu ................................................................................................ 9
The Accounts Command ............................................................................... 10
The Tasks Command ...................................................................................... 12
The View Command ....................................................................................... 14
The File Command .......................................................................................... 15
- 1 -

Package Contents
1 x Audio player
1 x System USB drive
1 x Ethernet cable
2 x Audio cables
1 x Power adaptor
1 x This user guide
Hardware Descriptions
Specifications
Memory Capacity: 1 GB (1/2 used for audio file, 1/2 used as download buffer)
Max. Number of Sound Files: 1
Sound File Format: MP3, CBR/VBR up to 320 kbps, sample rate up to 44.1 KHz
* Stereo files are played in mono with both channels mixed together.
Ethernet Interface: RJ-45, 10/100 Mbps
* Static IP address is required for the player.
Audio Outputs:
- 8 Ohm single ended with 1/8” phone jack (for most applications)
- 600 Ohm balanced with RJ-11 jack
* Both outputs provide the same audio content.
Indicator Lights
System: This light flashes slowly during normal operation.
Play: This light is normally on but turned off during file transfer.
LAN: This light is on if the LAN connection is good, and flashes during network
activities such as file transfer.
Volume Control
There are two levels of volume control: hardware and software. The hardware
control (via the volume dial on the player) sets the maximum output level. The
software control (via the server program) allows you to remotely adjust the volume
within the range set by the hardware control.
Hardware Reset Button
To reset the hardware configurations (such as IP address and passwords) to factory
default, use a sharp object to press this button down and then turn on the power.
Keep holding the button down for 5 more seconds and that’s it. If you should
somehow forget the passwords, use this button to reset the passwords to blank
(no password) so that you can access the player again. Remember to re-configure
the player because all the settings will be restore back to factory default.
Software Compatibility
Windows 7 ~ Windows 10 (all versions including both 32- and 64-bit)
- 2 - - 3 -
Hardware Installation
IP Address Configuration
To access the player via the Internet, you’ll need both a public static IP address
(obtained from your ISP provider) and a private static IP address (obtained from
your network administrator.) To access the player via private LAN only, then only
the private static IP address is needed.
Make necessary adjustments to your network security settings in order to accom-
modate the player which operates as a server. Consult with your network adminis-
trator if necessary.
The player has a default IP address of 10.10.10.10. It needs to be changed to the
private static IP address that you obtained from your network administrator. To
make the change, first connect the player to your LAN. The LAN indicator light on
the player should be on and blinking occasionally. If not, check your router and
cable connections.
Next, plug the System USB drive into your PC and run Etm_setup in the ETM folder.
After the “ETM 4” program is installed, run it to find/display the player’s IP address
as demonstrated below:
Select Config > IP Address and change the IP address to the private static IP ad-
dress. In the rare event that the player will be connected to the Internet directly
without a router, enter the public static IP address instead. In a few seconds the
screen will automatically display the new IP address. Exit the program and you have
now completed the IP address configuration.
Note that ETM may not be able to find the player because of firewall and anti-virus
issues. Most routers have firewall, and operating systems may also have firewall.
You may need to re-configure the firewalls and the anti-virus software in order for
- 4 -
ETM to work properly. Please consult with your network administrator on these
issues, as there are simply too many different routers, operating systems and anti-
virus softwares for this manual to cover.
The IP address configuration does not need to be done at the installation site. It can
be done anywhere as long as you set the IP address to the one that will actually be
used in the final installation. For example, a dealer may configure the player in his
office first, then take it to his client’s office for final installation. Of course, the
dealer must learn the static IP address from his client first.
Device Configuration
Device configuration is very important as it allows you to set new passwords in
order to keep the hackers out. There are two passwords, the Setup password and
the Access password. The Setup password is what you use to enter the player’s
Setup page. The Access password is what the server program uses to access the
player and upload files. Both passwords are set to blank (no password) at the fac-
tory. It is recommended that they be set up before the player is put into service.
If you should lose one or both of the passwords in the future, you may reset them
to the default value (blank) by pressing the hardware reset button down for 5
seconds while the player powers up. All configurations will be reset to factory de-
fault and you must re-configure every setting.
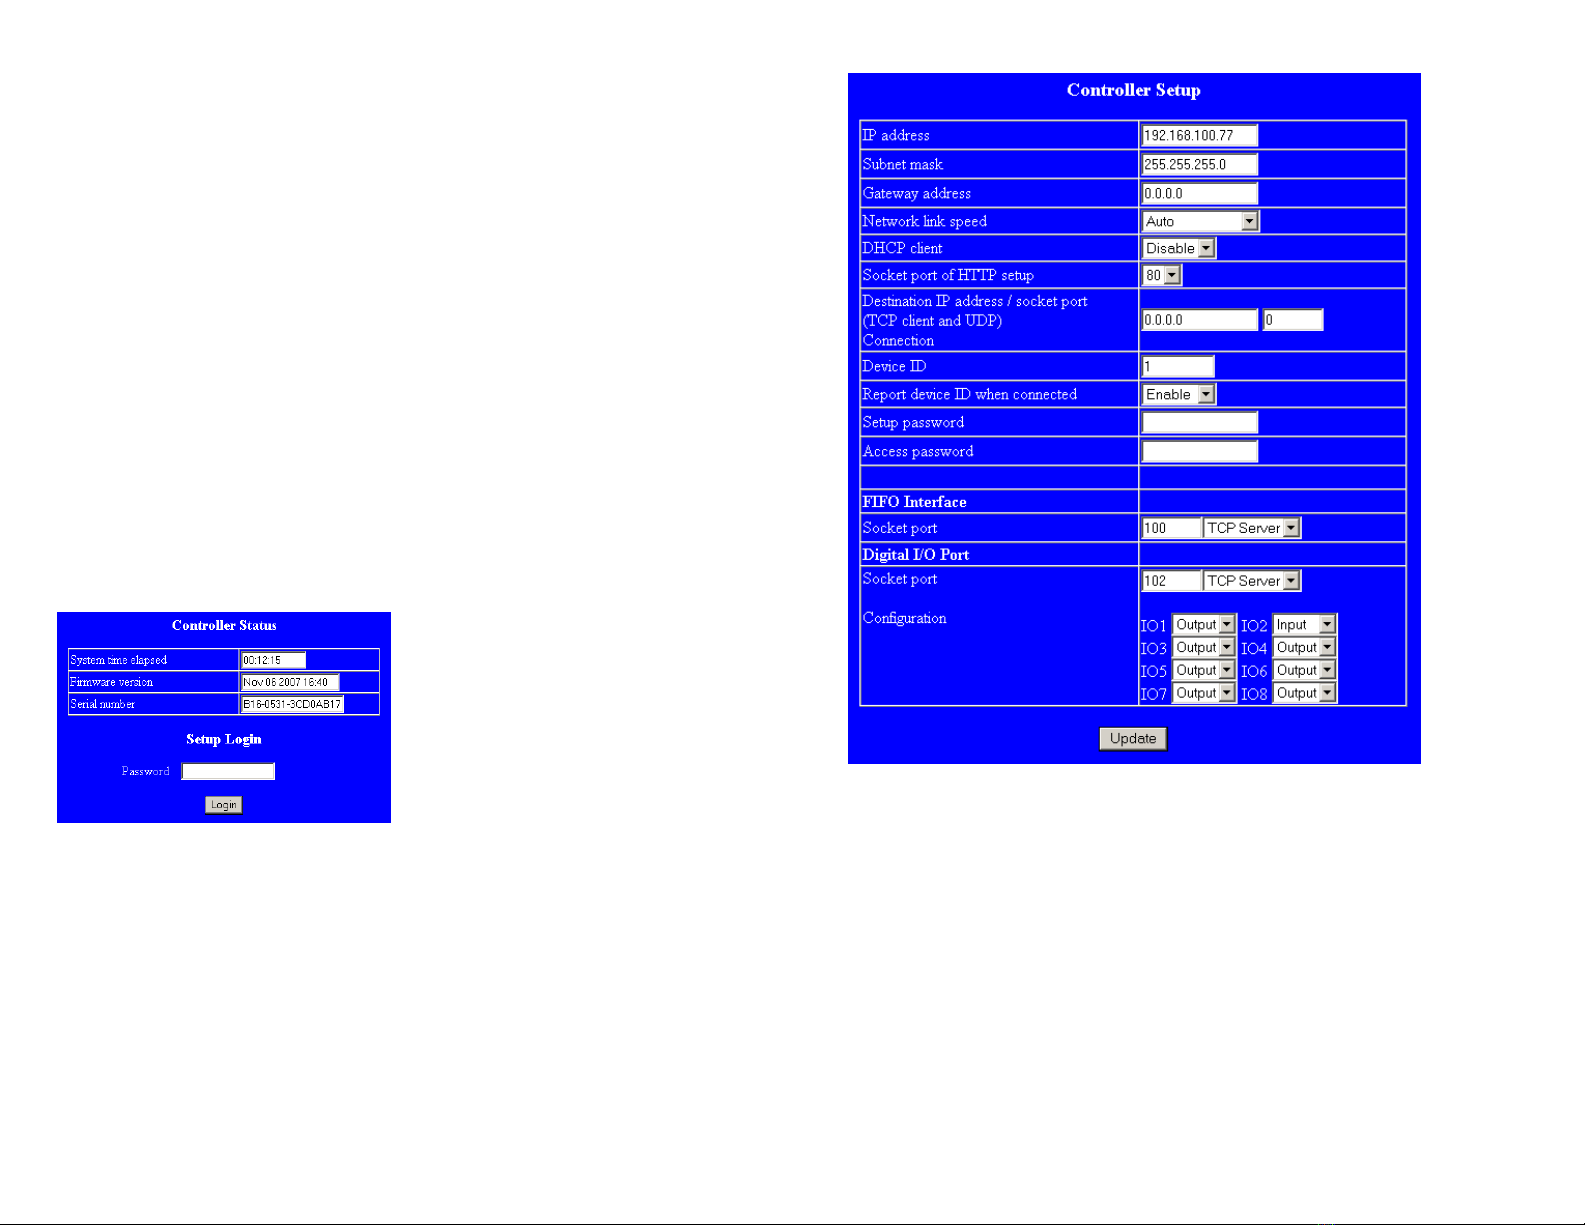
From Etm.exe, select Config > Device Settings to enter the setup login page:
Click the Login button without entering any password because a brand new player
has no login password. Your web browser will open a web page similar to the one
shown below:
- 5 -
IP address: should have been set up previously.
Subnet mask: default value (255.255.255.0) recommended.
Gateway address: don’t care.
Network link speed: default value (Auto) recommended.
DHCP client: don’t change - must use default value (Disable).
Socket port of HTTP setup: default value (80) recommended.
Destination IP address / socket port connection: don’t care.
Device ID: don’t care.
Report device ID when connected: don’t care.
Setup password & Access password: keep a record of them in a safe place.
FIFO Interface: default value (100) recommended.
Digital I/O Port / Socket port: default value (102) recommended.
Digital I/O Port / Configuration: don’t change - must use default value.
- 6 -
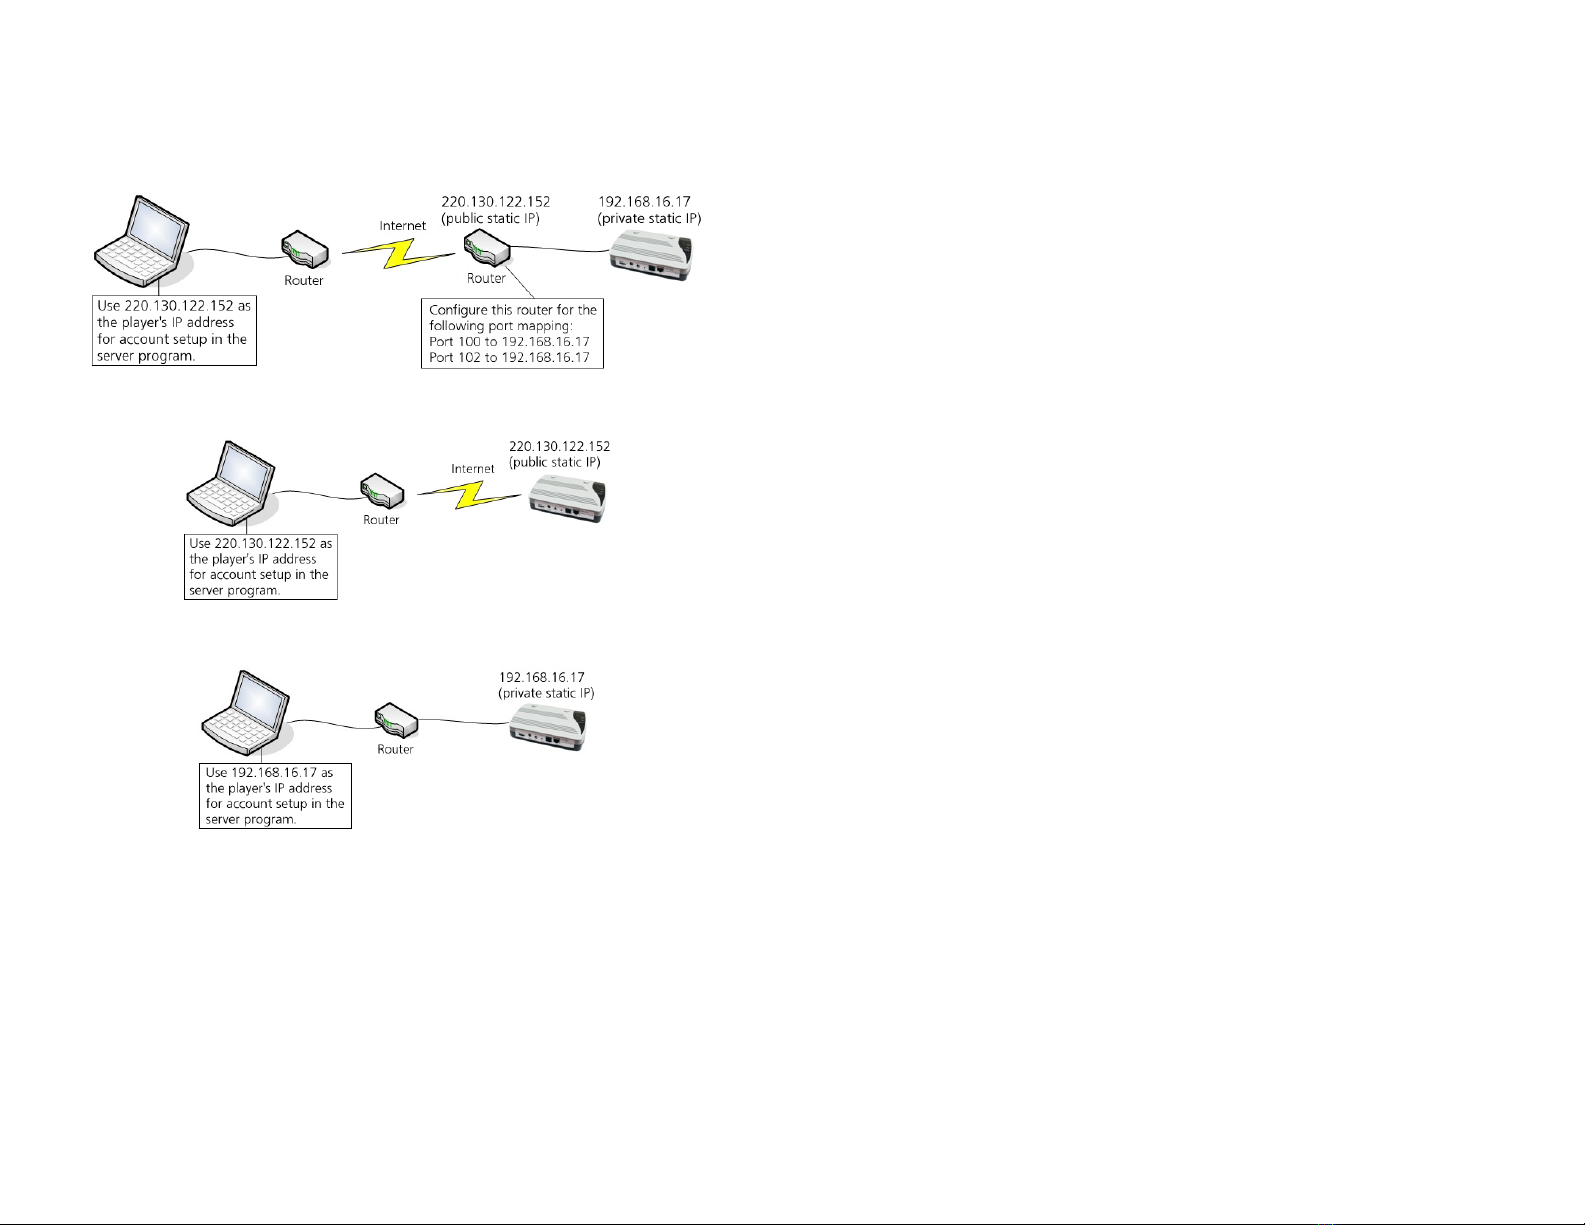
Site Installation
There are three possible connection schemes for site installation. IP addresses in the
following illustrations are for example only.
Player connected to Internet via a router:
Player connected to Internet directly:
Player connected to internal LAN only:
- 7 -
Phone System Connection
Connect the player’s audio output to the music input on the phone system. The
player has two audio outputs and only one needs to be used. The 8 Ohm output
should be used in most cases. The 600 Ohm output should be used only if the
phone system has a RJ-11 connector for music input. Do not worry if the phone
system has a 600 Ohm input with a non RJ-11 jack - it will work fine with the
player’s 8 Ohm output.
The player comes preloaded with some demo music. Press and lock down the Moni-
tor button to turn on the internal speaker, and you should be able to hear the
music. Adjust the volume if necessary - both the speaker and the audio output will
be affected. The speaker can be turned off by pressing the Monitor button again.
The speaker may be turned on or off during normal operation.
- 8 -
The Server Program
The server program is compatible with Windows 7 ~ 10, all versions including both
32- and 64-bit. It allows you to set up a database of accounts and upload new audio
files to the players immediately or at a later time. You can also remotely adjust the
audio volume. Each account contains contact information such as name, address,
phone number and email address. It also contains the player information such as IP
address and password. Each account may have only one player associated with it.
For a client with multiple locations, each location should be considered as a sepa-
rate account.
Software Installation
First, open Windows Control Panel - search for “control panel” if you don’t know
where to find it. Navigate to “Programs > Turn Windows features on or off”. Check
the “.NET Framework 3.5” box and click OK. It will take a few minutes for Windows
to install this component.
Next, run eHold_setup.exe on the System USB drive and install the eHold Server
program. If an older version was previously installed, it must be uninstalled first.
When the new version installs, the program will ask if you want to replace the old
database file “Accounts.sdf”. Answer “no” if you want to keep the accounts you
previously set up. You will not be asked this question if the program has never been
installed on the PC before.
The server program allows you to set up tasks (file transfers) for immediate or
future execution. However, the server program needs to be running at the time
when the scheduled tasks are supposed to be executed. If the server program is not
running at the time, the scheduled tasks will not be executed until the next time the
server program runs. Therefore by default a shortcut to the server program is added
to the Startup folder. This causes the server program to be launched every time the
software’s owner logs in. This shortcut in the Startup folder can be deleted if this
behavior is not desired.
For some Windows versions it may be necessary to run the server program as the
system Administrator.
The first time the server program is run the event log is created. After that server
activity will be written to the event log.
Make sure firewalls and anti-virus software are correctly configured to allow the
server program to access the players.
- 9 -
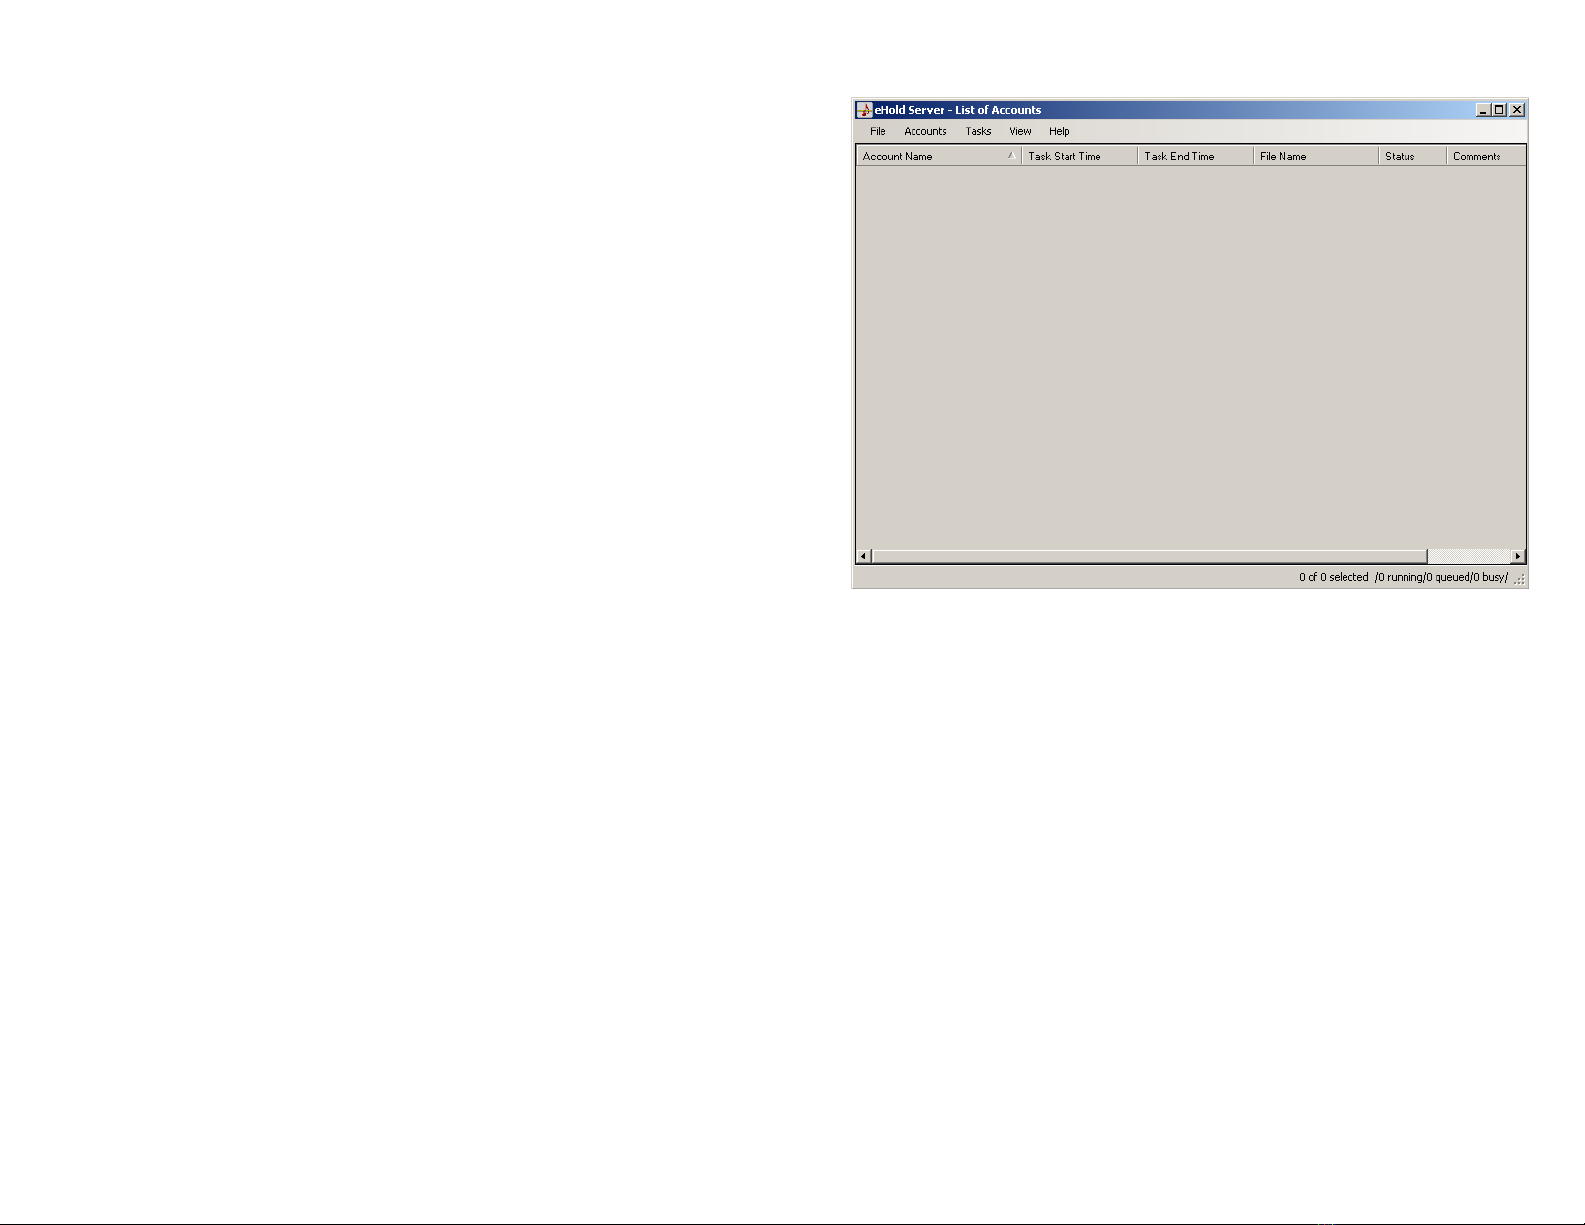
The Main Menu
1.
The main menu displays mainly a list of accounts. The view can be customized with
the View|Select Columns command.
Some of the commands allow you to act upon one or more accounts. Select one
account by simply clicking on it. Select multiple accounts by shift-clicking (range)
and/or control-clicking (individual).
The accounts can be sorted by clicking on a column header. Column order can be
changed by dragging column headers to different positions.
If you plan to update a group of accounts with the same program on a regular
basis, you should give these accounts similar names such as “ABC Corp. - CA”, “ABC
Corp. - NY” and etc. You can then use the View|Filter command to call them out.
The program is very easy to use. All you need to do is setting up accounts and tasks.
The tasks are displayed on the screen with such details as start time, end time, file
name and status (result). If a task failed for some reason, the entry will be in red
until you clear the task. You may sort on the Status column so that all failed ac-
counts are listed together for you to examine.

- 11 -
The Reset button in this dialog box, not to be confused with the hardware reset
button, issues a software reset command to the player when it locks up for some
reason. If the player cannot be restored by a software reset, recycle its power.
Values of the HTTP Port, the FIFO Port and the Digital IO Port should usually be left
unchanged. If there are multiple players (accounts) using the same public static IP
address behind the same router, then these software ports need to be changed to
unique values for each players. For example,
1st Player: HTTP = 80, FIFO = 100, Digital IO = 102
2nd Player: HTTP = 5000, FIFO = 5001, Digital IO = 5002 (changed from default)
The above software ports are used by the server program to access each player. On
the other hand, each player has the same set of hardware ports with the following
default values (changable in the device configuration page):
HTTP = 80, FIFO = 100, Digital IO = 102
Therefore, the port forwarding (if firewall is enabled in the router) should be:
1st Player: (public IP) 80 to (private IP) 80, 100 to 100, 102 to 102
2nd Player: (public IP) 5000 to (private IP) 80, 5001 to 100, 5002 to 102
Each player should have a unique private IP address - see IP Address Configuration
under Hardware Installation.
Note the HTTP port is used to access the device configuration page only. Do not
forward the HTTP port unless you want to access the device configuration page via
the Internet.
If you plan to send the same file to a group of accounts on a regular basis, you
should give them similar names such as “ABC #1”, “ABC #2” and etc. You will then
be able to quickly select these accounts using the View/Filter command.
Edit Accounts
You may select one or more accounts for editing. Select multiple accounts by shift-
clicking (range) and/or control-clicking (individual).
Duplicate Accounts
This command helps to create multiple accounts with similar data. After setting up
the first account manually, you may duplicate it and edit the duplicate to create a
new account. All fields will be duplicated except the IP address. Remember to change
the account name so that it’s unique.
Delete Accounts
You may select one or more accounts for deletion. Select multiple accounts by shift-
clicking (range) and/or control-clicking (individual).
- 10 -
The Accounts Command
Add Accounts
In the Contact area, all fields are optional except the Account Name which must be
unique. In the eHold Player area, fill in the IP Address (see illustrations on the next
page) but leave the IO Port and the Digital IO Port fields unchanged.
The player has no default password. If you want to set up the password (recom-
mended), click the “Config” button after filling out the IP Address. When the Con-
troller Status web page opens, click the “Login” button. There are two passwords in
the next page. The Setup password is what you use to log in this page - the default
is blank and that’s why you were able to log in without the password previously.
The Access password is what the server program uses to access the player (the
Password in the eHold Player area.) If someday you lose the passwords, you may
reset the player to the default (blank for both passwords) by pressing down the
player’s hardware reset button for 5 seconds while turning on the power.
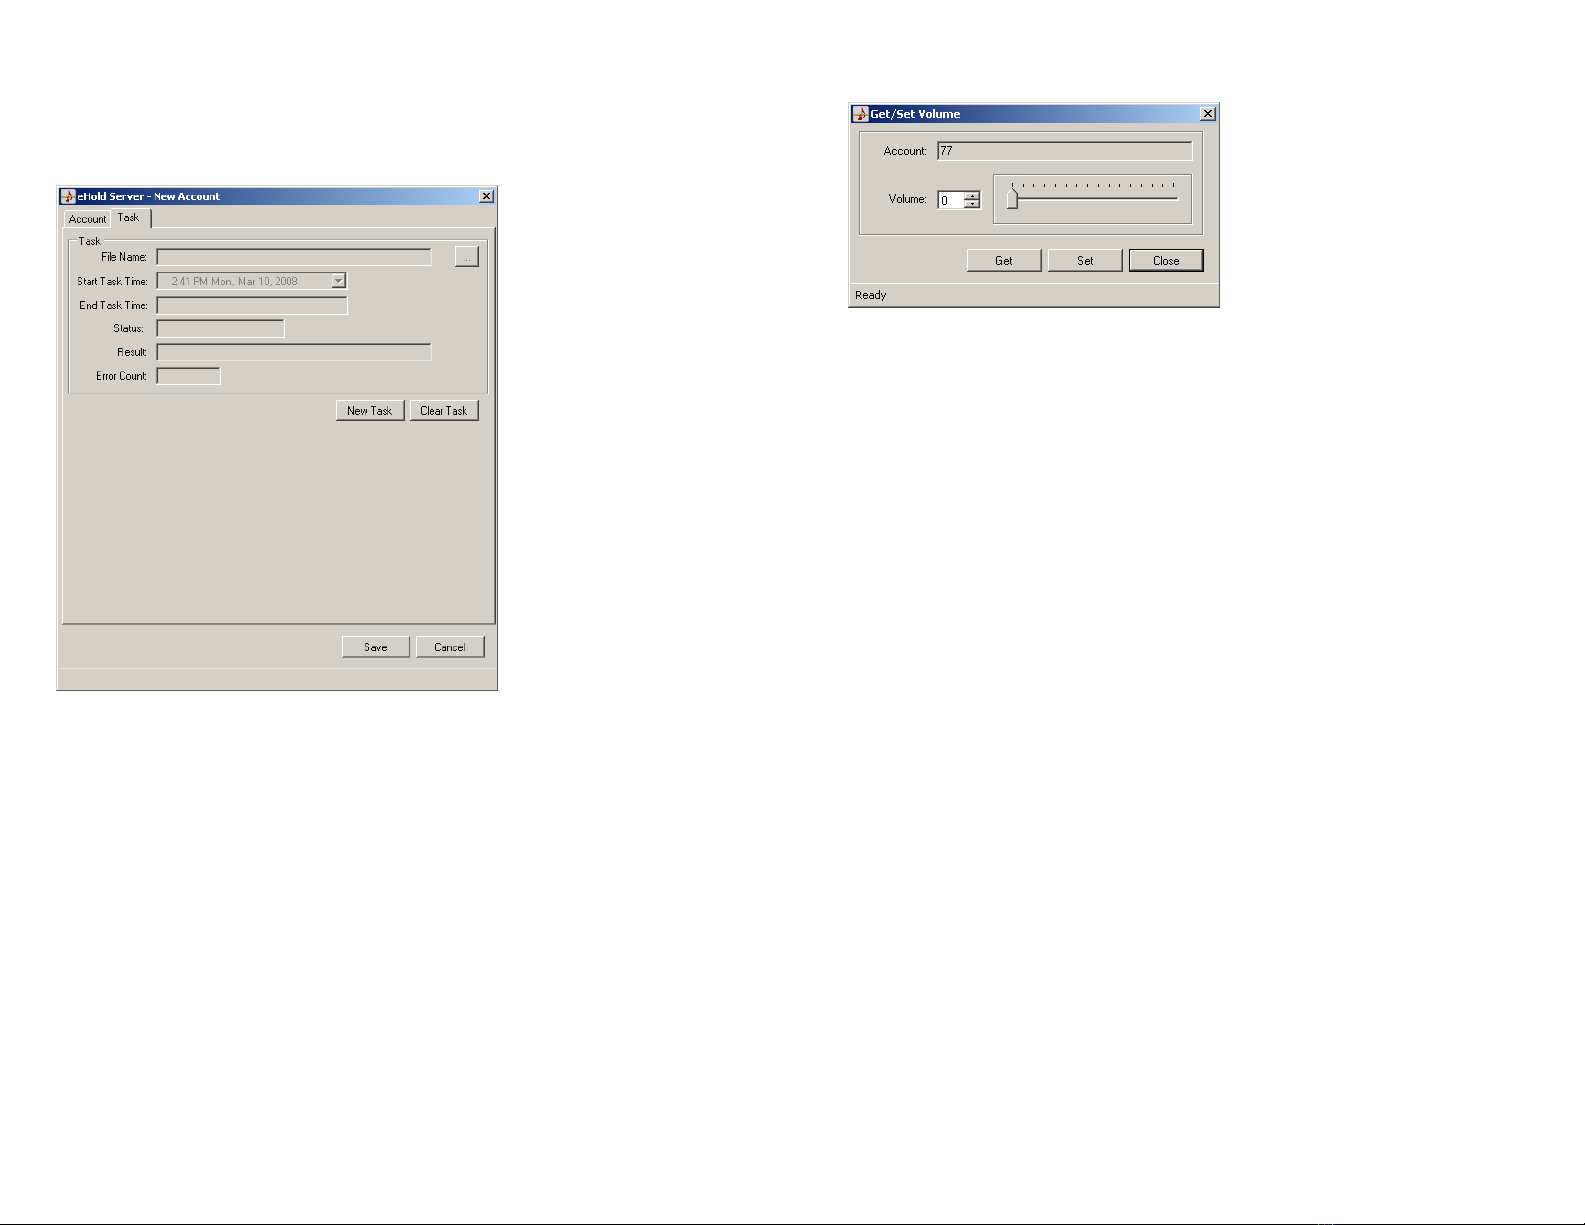
Get/Set Volume
Click the Get button to obtain the current volume. Move the slide to the desired
value and click the Set button to set the volume. This command works on one or
more accounts. Select multiple accounts by shift-clicking (range) and/or control-
clicking (individual).
Note that there are two levels of volume control: hardware and software. The
hardware control (via the volume dial on the player) sets the maximum output level.
The software control (this command) allows you to remotely adjust the volume
within the range set by the hardware control.
Start Transfer Now
Use this command to immediately start the task(s) of the selected account(s). If the
task has been executed before, it will be executed again.
Abort Queued Tasks
A task will be queued if its time has come but the system is busy executing another
task. Use this command to abort queued tasks if any. These queued tasks do not
need to be selected. The task status will become “Aborted”.
Abort Running Tasks
Use this command to abort the task that’s currently being executed. The running
task does not need to be selected. The task status will become “Aborted”.
- 13 -
The Tasks Command
Edit/Clear Tasks
Use this command to create or clear tasks for one or more accounts. Select multiple
accounts by shift-clicking (range) and/or control-clicking (individual).
To create a new task, click the New Task button. Next, select the file and the time to
upload, and then click the Save button. When you click the New Task button, the
Start Task Time will automatically be set to the current time. If you want to start the
task immediately, leave it unchanged. Date and time values can easily be incremented
and decremented by selecting the value and using the up and down arrows.
When a task is scheduled for future execution, its Status field in the Main Menu
becomes “Ready”. After a task is executed, its Status field shows the result.
The Clear button is used to clear the status of the previous task, or to delete a task
that’s scheduled for future execution. You can also use the Tasks > Clear command.
If a task is not executed successfully for any reason, it will be retried automatically at
a later time. The retry schedule has a default setting of 100 retries at 1 hour inter-
vals. It can be changed by using the File > Admin Preferences command.
- 12 -
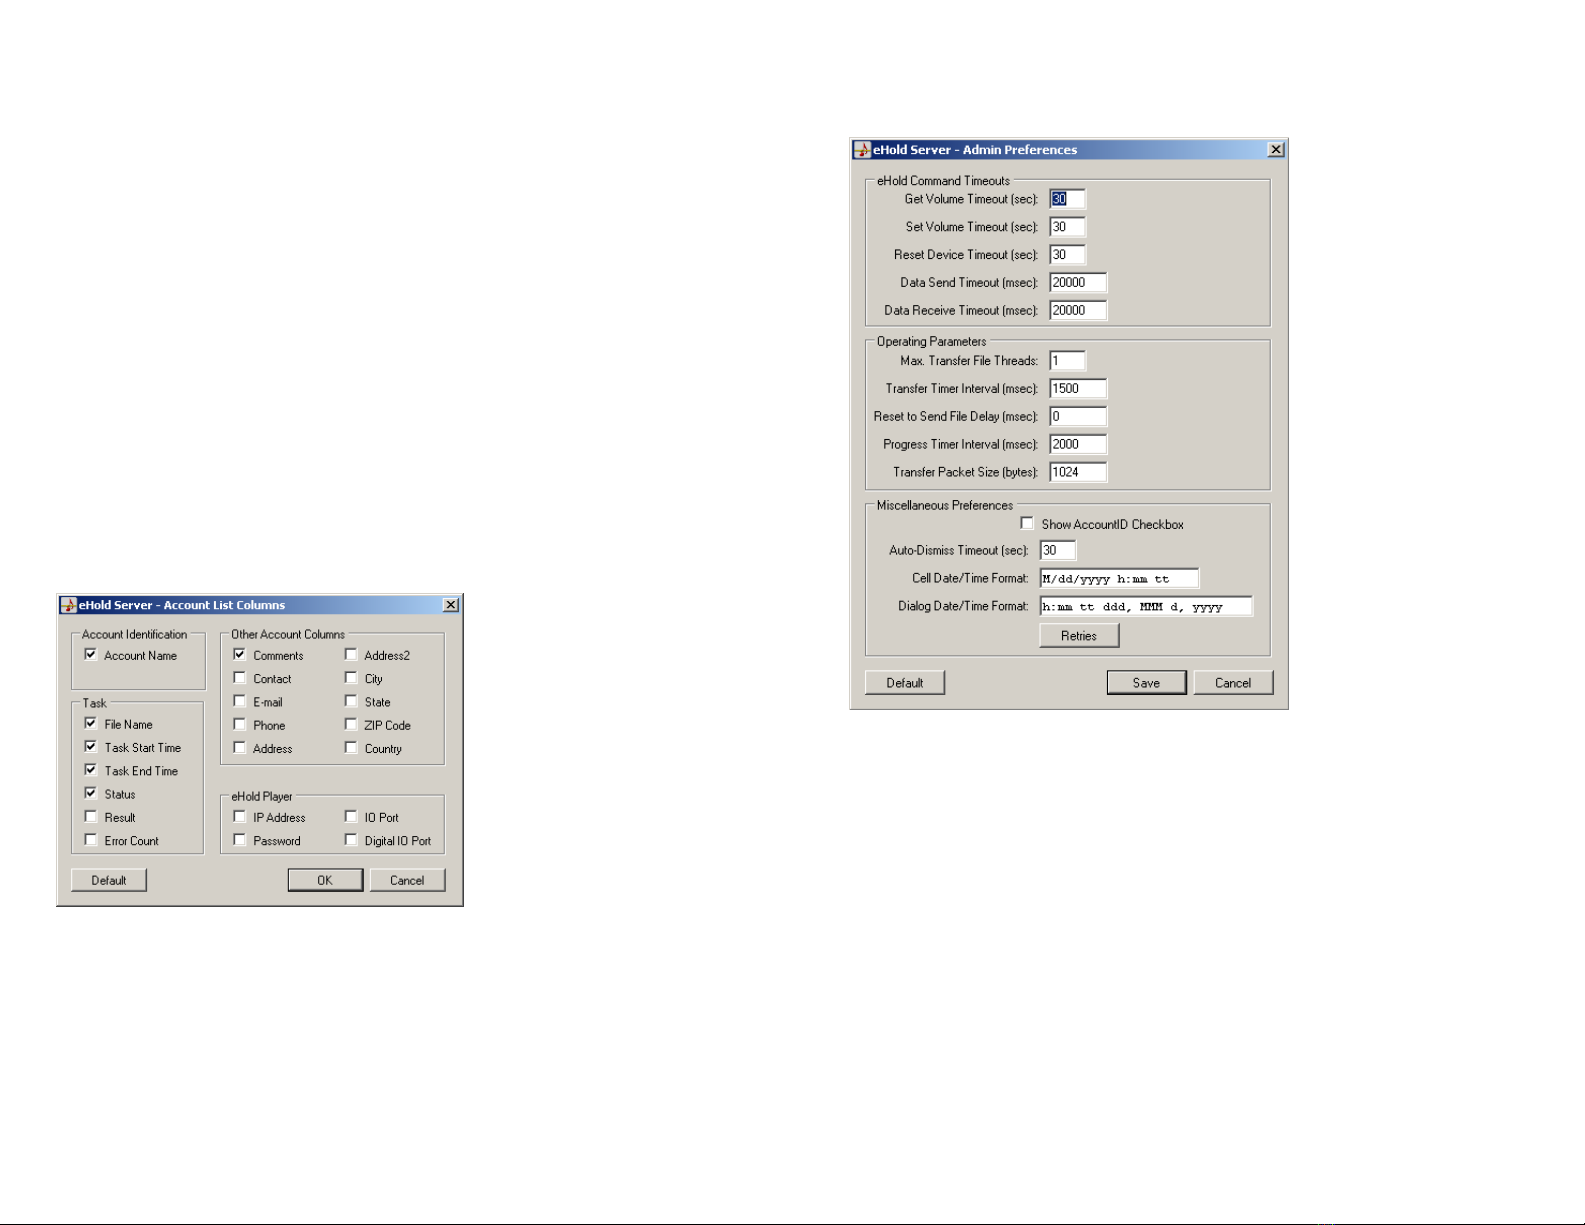
The File Command
Admin Preferences
Get Volume Timeout
The Get Volume command can take no longer than the value of this timeout. This
timeout value must be greater than Data Send and Data Receive Timeout values.
Set Volume Timeout
The Set Volume command can take no longer than the value of this timeout. This
timeout value must be greater than Data Send and Data Receive Timeout values.
Reset Device Timeout
The Reset command can take no longer than the value of this timeout. This timeout
value must be greater than Data Send and Data Receive Timeout values.
Data Send Timeout
eHold Server socket send data timeout is initialized to this value.
Data Receive Timeout
eHold Server socket receive data timeout is initialized to this value.
- 15 -
The View Command
Plain Text Password
If this box is checked, the account password will be displayed in plain text. Other-
wise, it will be displayed as “xxxxxxxx”.
Show Tool Tips
If this box is checked, tool tips will be displayed when the mouse is moved on
certain command buttons.
Filter...
Use this command to view accounts with a common word in the account name. It
allows you to quickly narrow in (and subsequently select) a group of accounts from
a list of potentially hundreds of accounts. You may view accounts that contains,
start with, or end with the common word. Note that accounts without the common
word will be hidden but not deleted.
Remove Filter
Remove the filter and view all accounts.
Select All
Use this command to select all accounts.
Select Columns
Select the columns to display in the Main Menu.
- 14 -
Max. Transfer File Threads
This is the maximum number of concurrent transfers. By setting this value greater
than 1, multiple transfers should complete faster because more than one will be
done at once.
Transfer Timer Interval
The interval at which system queries are services. The eHold Server checks for trans-
fers that are ready to be queued at this interval. Status messages and transitions
from queued to running are also performed at this interval.
Reset to Send File Delay
When this value is non-zero, it specifies the delay between issuing a reset and
beginning a file transfer. The default value is 0, which means that a reset is not sent
prior to beginning a transfer.
Progress Timer Interval
When a transfer is in progress, the percent completion messages are updated at
this interval.
Transfer Packet Size
When transferring a file to an eHold Player, data is written to the player ‘Transfer
Packet Size’ bytes at a time.
Show AccountID Checkbox
Each account has an AccountID. This is a unique number that is automatically gen-
erated. Accounts that have been saved to the database have positive AccountID
numbers whereas newly created accounts have negative AccountIDs. Some of the
event log entries identify the account using its AccountID. Check this check box to
enable the AccountID column check box to be displayed in the Select Columns
dialog box.
Auto-Dismiss Timeout
Messages that are displayed during a transfer are automatically dismissed after the
Auto-Dismiss Timeout has elapsed. In this way pending transfers will not be prohib-
ited from running should an error occur. Note that Auto-Dismiss can be disabled by
setting this value to zero (0).
Cell Date/Time Format
This string specifies how the Data/Time is displayed in the Task Start and Task End
columns of the List of Accounts display. Details for modifying the format string can
be found in Microsoft’s Standard Date and Time Format Strings topic in the .NET
Framework Developer’s Guide.
Dialog Date/Time Format
This string specifies how the Data/Time is displayed in the Task Edit dialog. Details
for modifying the format string can be found in Microsoft’s Standard Date and
Time Format Strings topic in the .NET Framework Developer’s Guide.
- 16 -
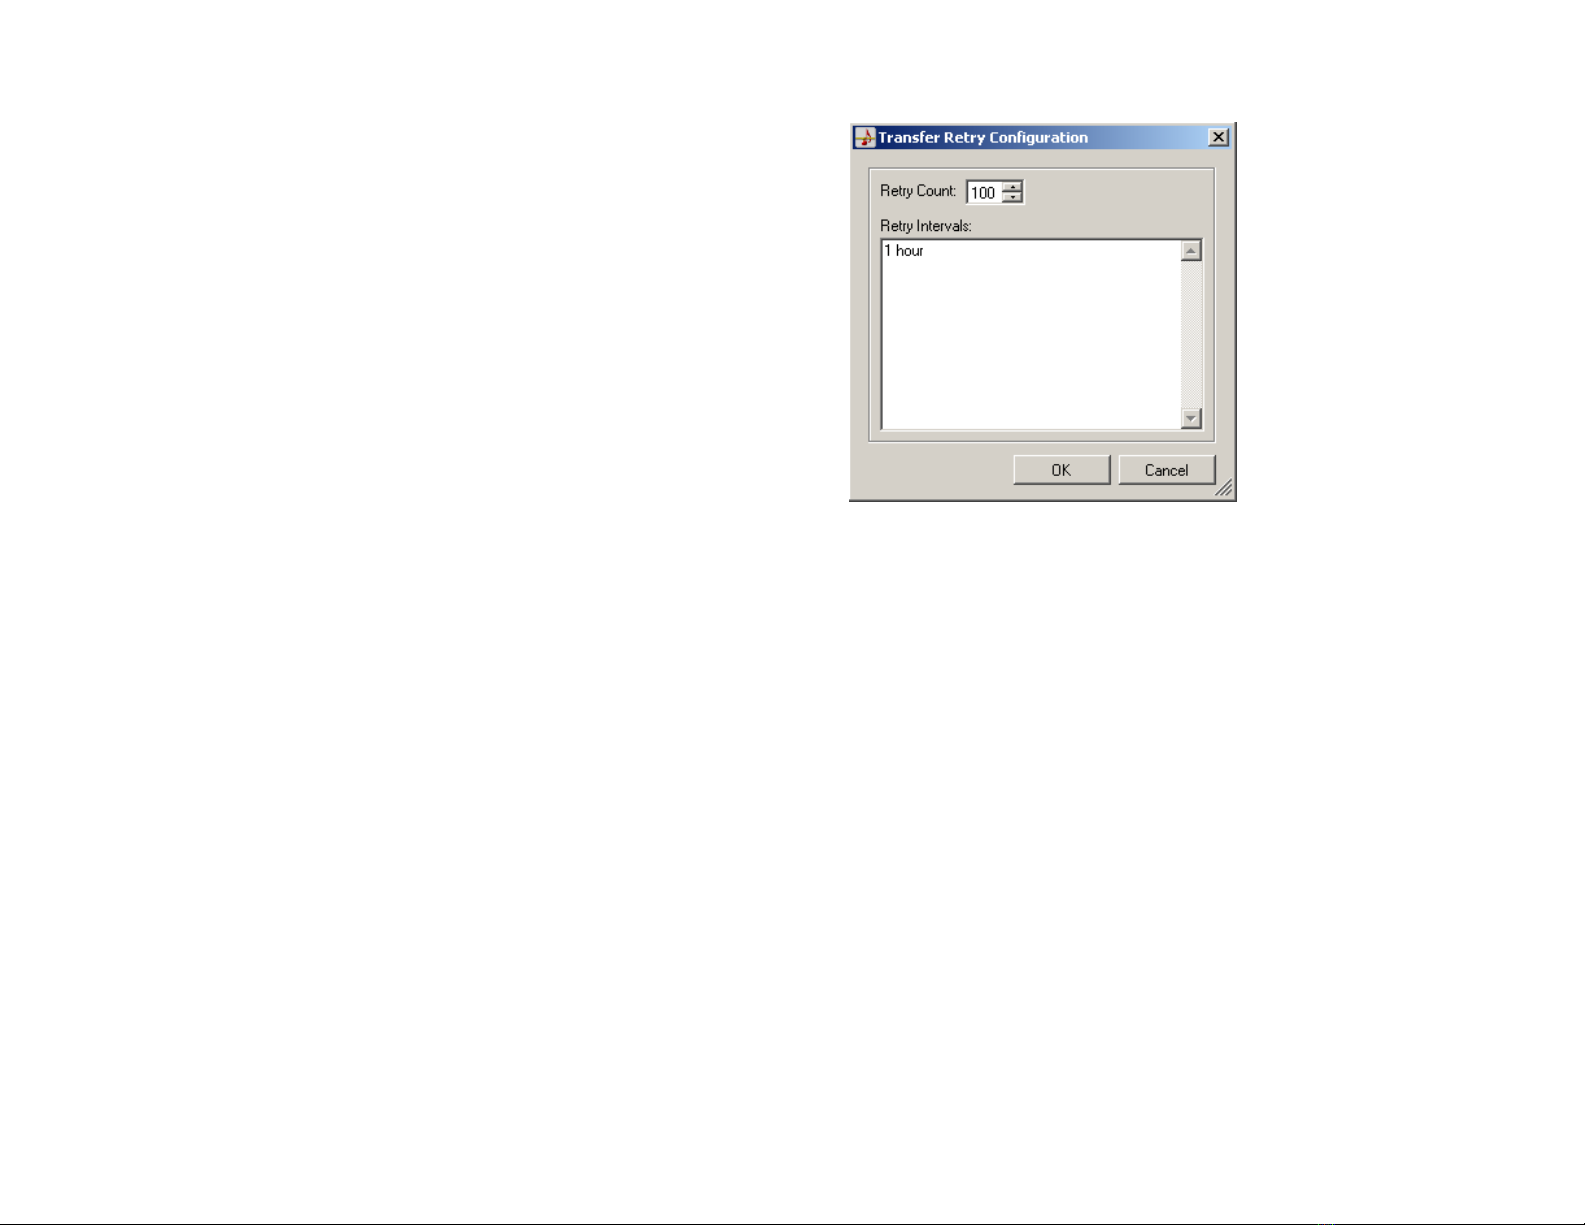
Retries
The following image shows the Transfer Retry Configuration dialog box.
Retry Count
The retry count is the maximum number of transfer retries that are attempted
before failing a transfer task. The retry count can be set to zero to disable transfer
retries through a maximum value of 9999.
Retry Intervals
A retry interval is the delay between a transfer error and the next retry. Retry inter-
vals are entered one per line. Note that blank lines are not allowed.
Retry intervals have the following format.
<n> <unit>
Where nis an integer and unit can be minute or minutes, hour or hours, or day or
days. The integer and the unit must be separated by a space.
If retry count is greater than the number of retry intervals, the last retry interval
entry is used. If there are no retry intervals, the default value of one hour is used.
Click on the OK button to save changes. Note that the Save button on the Admin
Preferences dialog must also be clicked for retry changes to be saved.
- 17 -
Other manuals for DP-501 eHold
1
Table of contents
Other Eletech Media Player manuals


