EN
Remote must be paired to the player via Bluetooth before use:
1. Direct remote to the player and press any button on the remote. The remote and the player will pair automatically.
2. If the remote was already paired before, or in case of any problems: press and hold the "ENTER" and "V+" buttons on the remote for 3 seconds to put the remote into
pairing mode. Use "Setup" / "System" / "Remotes & accessories" menu to unpair and pair the remote again.
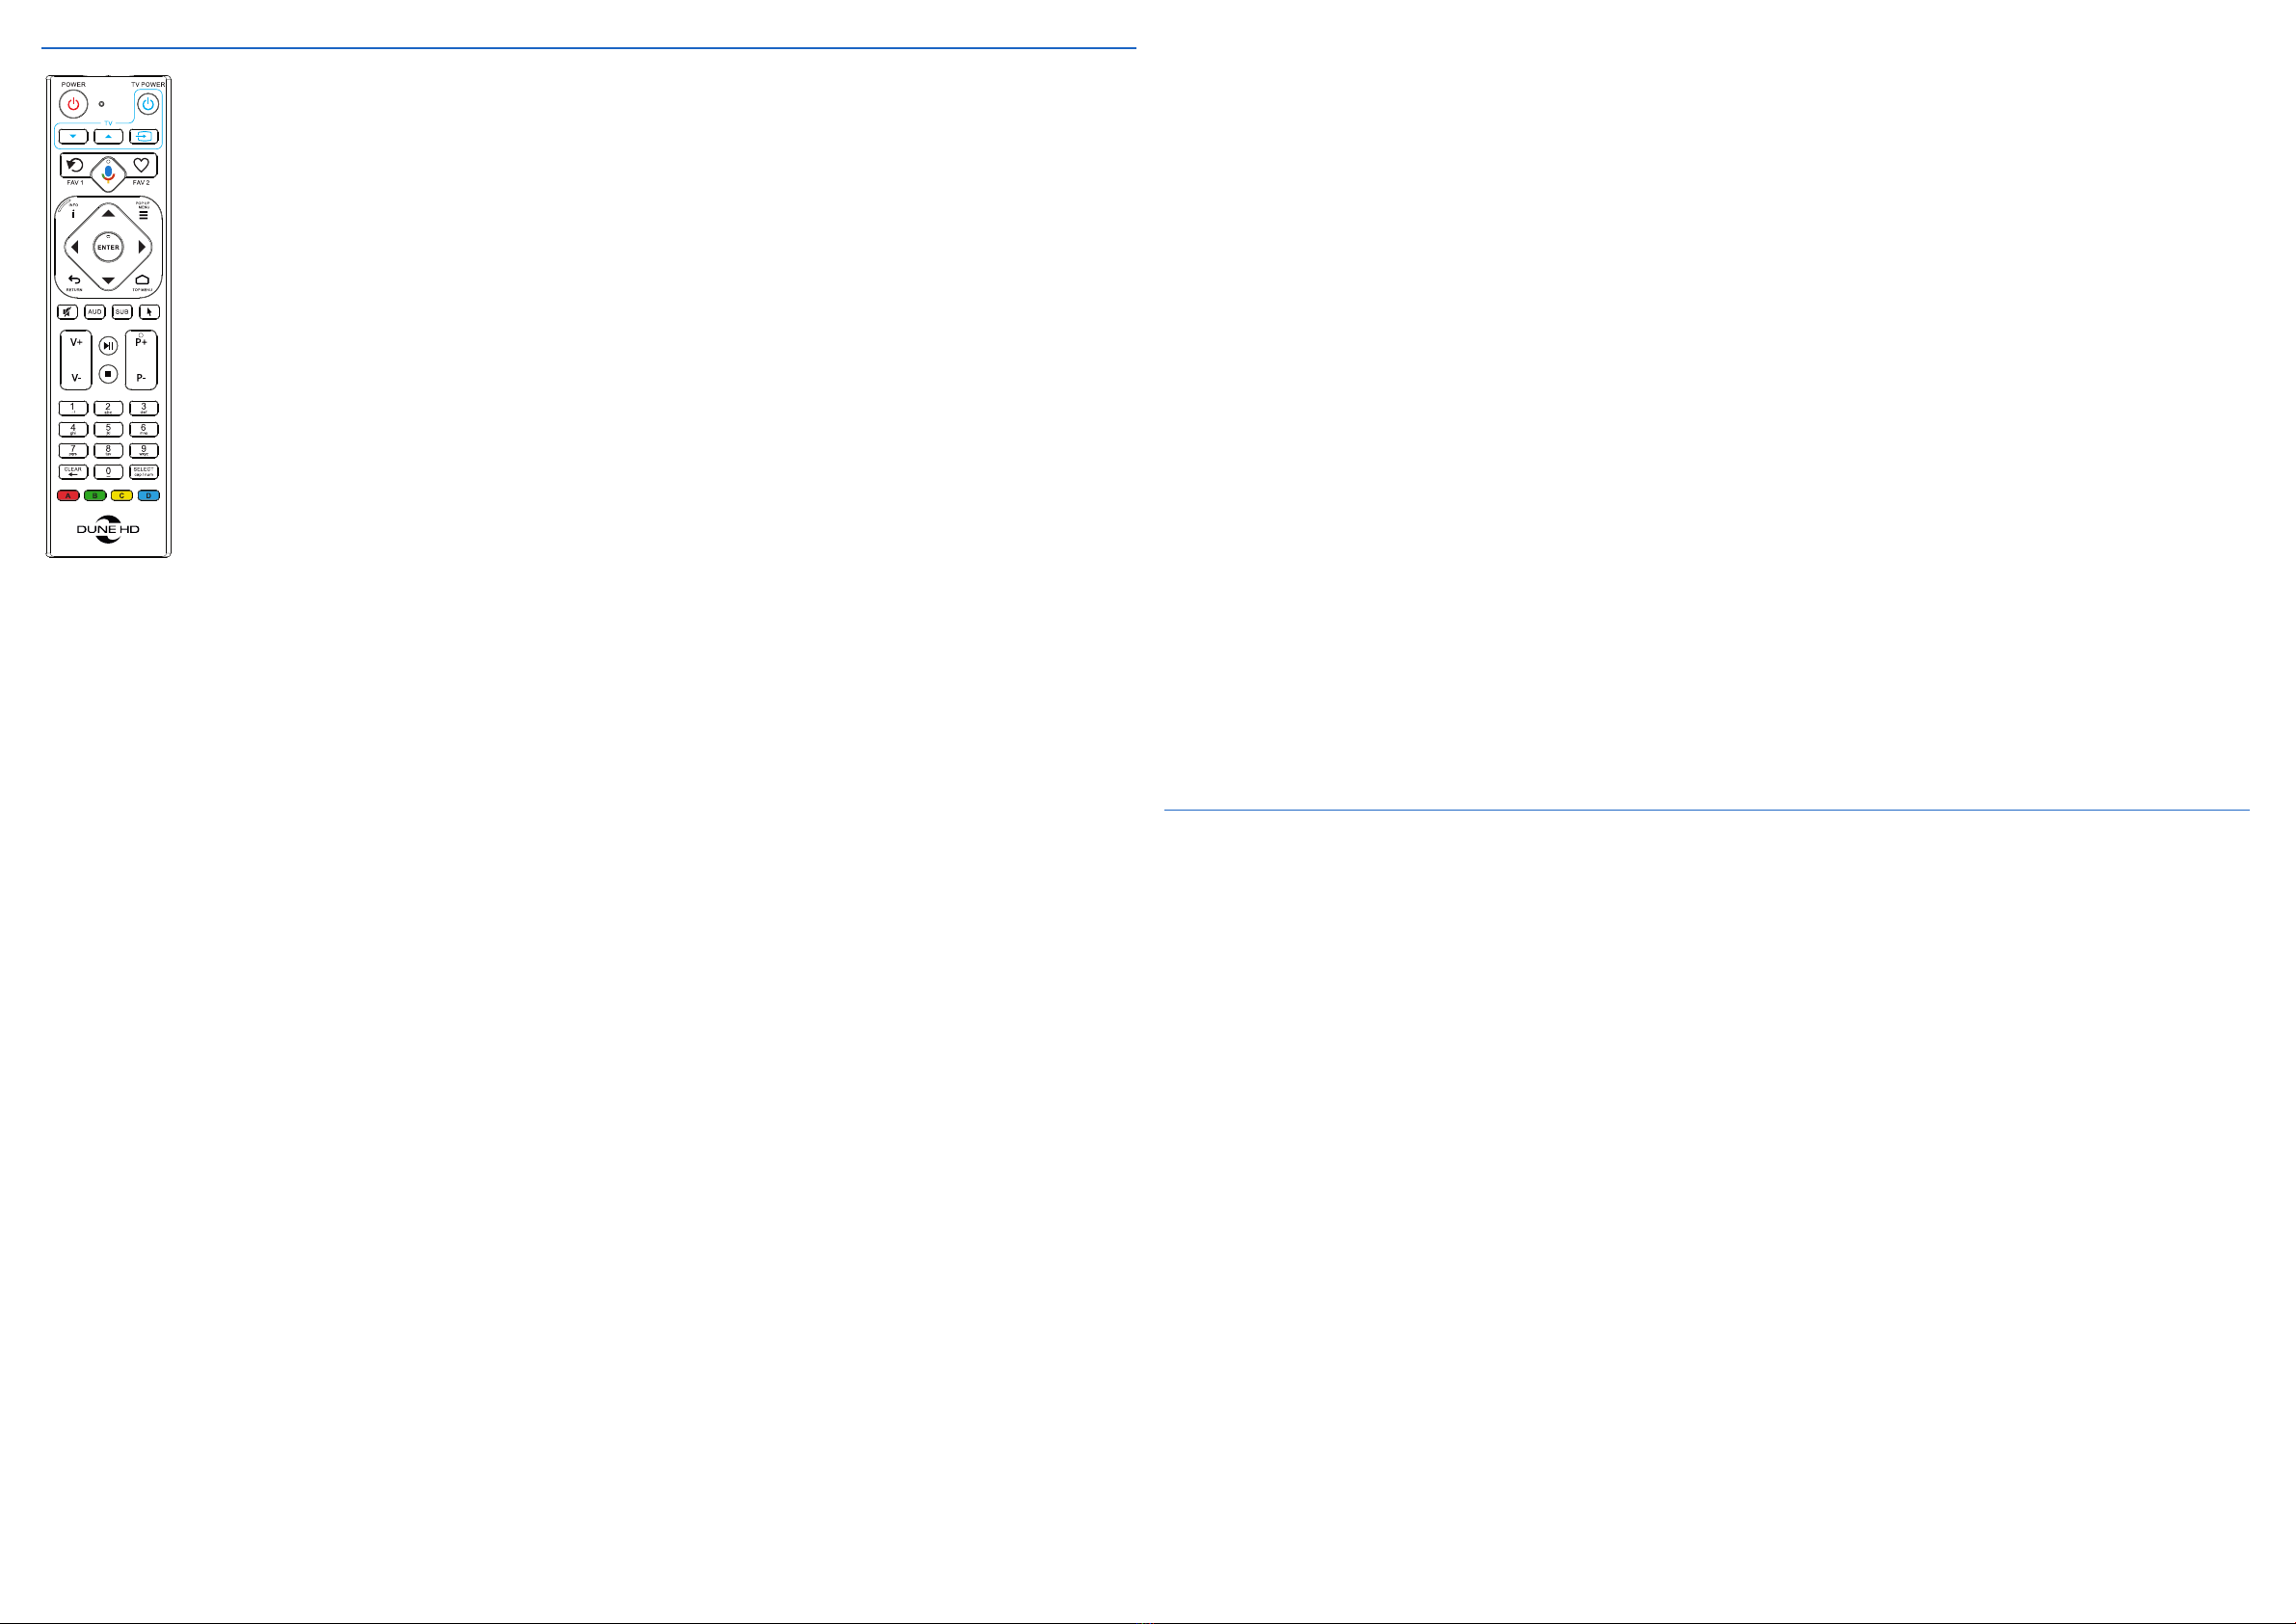
џ POWER — turn the player on/off.
џ TV section (TV DOWN, TV UP, TV INPUT, TV POWER) — learnable buttons to control TV or other equipment (see "Using Remote to Control TV" section).
џ FAV1 — "Recent" menu or user-defined function.
џ FAV2 — "Favorites" menu or user-defined function.
џ MIC — microphone / search.
џ Arrows (◄▲►▼), ENTER, RETURN, TOP MENU, POP UP MENU, INFO — main buttons for controlling the player (navigate across the items on the screen, open/use the currently
selected item, go back to the previous screen, go to the main menu, show/hide popup menu with actions for the currently selected item or the current player state, show/hide information
about the currently selected item or the current player state, control some other player functions).
џ MUTE — turn the sound on/off.
џ AUDIO (AUD), SUBTITLE (SUB) — toggle audio tracks and subtitle tracks.
џ MOUSE — toggle mouse mode (air mouse).
џ ►PLAY/ | | PAUSE , STOP — control the playback and some other player functions.
џ V+/V- (volume up / volume down) — adjust the volume.
џ P+/P- (page up / page down) — scroll up and down in various lists, switch to the next/previous TV channel, control some other player functions.
џ 0–9 — enter numbers and text; control some other player functions.
џ CLEAR — delete the last entered character, delete the currently selected item, control some other player functions.
џ SELECT — switch text input mode, add the item to the selection list, control some other player functions.
џ A (Red), B (Green), C (Yellow), D (Blue) — control various player functions.
NOTE: Button support and functions depend on particular applications. Not all apps support all buttons.
DE
Die Fernbedienung muss vor der Verwendung über Bluetooth mit dem Player gekoppelt werden:
1. Richten Sie die Fernbedienung auf den Player und drücken Sie eine beliebige Taste auf der Fernbedienung. Die Fernbedienung und der Player werden automatisch
gekoppelt.
2. Wenn die Fernbedienung bereits zuvor gekoppelt war oder bei Problemen: Halten Sie die Tasten „ENTER“ und „V+“ auf der Fernbedienung 3 Sekunden lang gedrückt,
um die Fernbedienung in den Kopplungsmodus zu versetzen.
Verwenden Sie das Menü „Setup“ / „System“ / „Fernbedienungen & Zubehör“, um die Fernbedienung zu entkoppeln und erneut zu koppeln.
џ POWER — Schaltet den Player ein/aus.
џ TV section (TV DOWN, TV UP, TV INPUT, TV POWER) – lernbare Tasten zur Steuerung des Fernsehers oder anderer Geräte (siehe Abschnitt „Verwendung der
Fernbedienung zur Steuerung des Fernsehers“).
SP
Puede programar 4 botones programables (ubicados en la sección "TV": "TV DOWN", "TV UP", "TV INPUT", "TV POWER") para controlar su televisor u otro equipo:
1. Mantenga presionados los botones "TV UP" y "TV DOWN" en el control remoto durante 3 segundos.
2. Presione uno de los 4 botones programables en el control remoto.
3. Coloque su control remoto y el otro control remoto sobre una mesa de modo que los emisores IR de ambos controles estén dirigidos uno hacia el otro y a una distancia de aproximadamente 1 cm.
4. Mantenga presionado un botón en el otro control remoto hasta que el indicador LED de su control remoto deje de parpadear. Esto significa que el aprendizaje del botón está completo.
5. Aprenda otros botones de la misma manera si es necesario (repita los pasos 1-4).
IT
È possibile programmare 4 pulsanti acquisibili (situati nella sezione "TV DOWN", "TV UP", "TV INPUT", "TV POWER") per controllare la TV o altre apparecchiature:
1. Tenere premuti i pulsanti "TV DOWN" e "TV UP" sul telecomando per 3 secondi.
2. Premere uno dei 4 pulsanti di apprendimento sul telecomando.
3. Posizionare il telecomando e l'altro telecomando su un tavolo in modo che gli emettitori IR di entrambi i telecomandi siano diretti l'uno verso l'altro e si trovino a una distanza di circa 1 cm.
4. Tenere premuto un pulsante sull'altro telecomando finché l'indicatore LED sul telecomando non smette di lampeggiare. Ciò significa che l'apprendimento del pulsante è completo.
5. Imparare altri pulsanti allo stesso modo, se necessario (ripetere i passaggi 1-4).
Ripristina il telecomando alle impostazioni di fabbrica: Tenere premuti i pulsanti "ENTER" e "TOP MENU" sul telecomando per 3 secondi.
RU
Вы можете запрограммировать 4 обучаемые кнопки (расположенные в разделе "TV": "TV DOWN", "TV UP", "TV INPUT", "TV POWER") для управления вашим ТВ или другим оборудованием:
1. Нажмите и удерживайте кнопки "TV UP" и "TV DOWN" на пульте в течение 3 секунд. Индикатор возле кнопки “POWER” начнет постоянно светиться .
2. Нажмите одну из 4 обучаемых кнопок на пульте. Индикатор начнет медленно мигать .
3. Расположите ваш пульт и другой пульт на столе так, чтобы ИК-излучатели пультов были направлены навстречу друг другу и находились на расстоянии около 1 см.
4. Нажмите и удерживайте кнопку на другом пульте, пока индикатор на вашем пульте не перестанет мигать. Это означает, что обучение кнопки завершено.
5. При необходимости обучите другие кнопки таким же образом (повторите шаги 1–4).
Сброс пульта к заводским настройкам: нажмите и удерживайте кнопки "ENTER" и "TOP MENU" на пульте в течение 3 секунд.
EN
You can program 4 learnable buttons (located in "TV" section: "TV DOWN", "TV UP", "TV INPUT", "TV POWER") to control your TV or other equipment:
1. Press and hold the "TV UP" and "TV DOWN" buttons on the remote for 3 seconds.
2. Press one of 4 learnable buttons on the remote.
3. Place your remote and the other remote on a table so that the IR emitters of both remotes are directed towards each other and are at a distance of about 1 cm.
4. Press and hold a button on the other remote until the LED indicator on your remote stops blinking. This means that the button learning is complete.
5. Learn other buttons the same way if needed (repeat steps 1-4).
Reset Remote to Factory Defaults: Press and hold "ENTER" and "TOP MENU" buttons on the remote for 3 seconds.
DE
Sie können 4 lernbare Tasten programmieren (im Bereich „TV“: „TV DOWN“, „TV UP“, „TV INPUT“, „TV POWER“), um Ihren Fernseher oder andere Geräte zu steuern:
1. Halten Sie die Tasten „TV UP“ und „TV DOWN“ auf der Fernbedienung 3 Sekunden lang gedrückt.
2. Drücken Sie eine der 4 lernbaren Tasten auf der Fernbedienung.
3. Legen Sie Ihre Fernbedienung und die andere Fernbedienung so auf einen Tisch, dass die IR-Strahler beider Fernbedienungen aufeinander gerichtet sind und einen Abstand von etwa 1 cm
haben.
4. Halten Sie eine Taste auf der anderen Fernbedienung gedrückt, bis die LED-Anzeige auf Ihrer Fernbedienung aufhört zu blinken. Damit ist das Tastenlernen abgeschlossen.
5. Lernen Sie bei Bedarf andere Tasten auf die gleiche Weise (wiederholen Sie die Schritte 1-4).
Fernbedienung auf die Werkseinstellungen zurücksetzen: Halten Sie die Tasten „ENTER“ und „TOP MENU“ auf der Fernbedienung 3 Sekunden lang gedrückt.
FR
Vous pouvez programmer 4 boutons programmables (situés dans la section "TV": "TV DOWN", "TV UP", "TV INPUT", "TV POWER") pour contrôler votre téléviseur ou un autre équipement :
1. Appuyez et maintenez enfoncés les boutons "TV UP" et "TV DOWN" de la télécommande pendant 3 secondes.
2. Appuyez sur l'un des 4 boutons programmables de la télécommande.
3. Placez votre télécommande et l'autre télécommande sur une table de manière à ce que les émetteurs IR des deux télécommandes soient dirigés l'un vers l'autre et à une distance d'environ 1 cm.
4. Appuyez sur un bouton de l'autre télécommande et maintenez-le enfoncé jusqu'à ce que le voyant DEL de votre télécommande cesse de clignoter. Cela signifie que l'apprentissage du bouton est
terminé.
5. Apprenez les autres boutons de la même manière si nécessaire (répétez les étapes 1 à 4).
џ V+/V- — управление громкостью.
џ►PLAY/ | | PAUSE, STOP - управление воспроизведением и некоторыми другими функциями.
џ P+/P- — прокрутка списков вверх и вниз; управление некоторыми другими функциями.
џ 0–9 — ввод цифр и текста; управление некоторыми другими функциями.
џ CLEAR — удалить последний введенный символ, удалить выбранный элемент, управление некоторыми другими функциями.
џ SELECT — режим ввода текста, добавить пункт к списку, управление некоторыми другими функциями.
џ A (красная), B (зеленая), C (желтая), D (синяя) — управление различными функциями.
Примечание: Поддержка кнопок и их функции зависят от конкретных приложений. Не все приложения поддерживают все кнопки.
IT
Il telecomando deve essere accoppiato al lettore tramite Bluetooth prima dell'uso:
џ1. Dirigere il telecomando verso il lettore e premere un pulsante qualsiasi sul telecomando. Il telecomando e il lettore si accoppieranno automaticamente.
џ2. Se il telecomando era già stato accoppiato in precedenza o in caso di problemi: tenere premuto pulsanti "ENTER" e "V+" sul telecomando per 3 secondi per mettere il telecomando in modalità
di associazione.
Utilizzare il menu "Configurazione" / "Sistema" / "Telecomandi e accessori" per annullare l'abbinamento e riassociare il telecomando.
џ POWER — accende/spegne il lettore.
џ Sezione TV (TV DOWN, TV UP, TV INPUT, TV POWER) — pulsanti di apprendimento per controllare la TV o altre apparecchiature (consultare la sezione "Utilizzo del telecomando per controllare
la TV").
џ FAV1 — Menu "Recenti" o funzione definita dall'utente.
џ FAV2 — Menu "Preferiti" o funzione definita dall'utente.
џ MIC — microfono/ricerca.
џ◄▲►▼), ENTER, RETURN, TOP MENU, POP UP MENU, INFO — pulsanti principali per controllare il lettore (navigare tra gli elementi sullo schermo, aprire/utilizzare l'elemento Frecce (
attualmente selezionato, tornare alla schermata precedente, andare al menu principale, mostrare/nascondere il popup menu con azioni per l'elemento attualmente selezionato o lo stato attuale
del giocatore, mostra/nasconde informazioni sull'elemento attualmente selezionato o sullo stato attuale del giocatore, controlla alcune altre funzioni del lettore).
џ MUTE — attiva/disattiva l'audio.
џ AUDIO (AUD), SUBTITLE (SUB) — alterna le tracce audio e le tracce dei sottotitoli.
џ MOUSE — attiva/disattiva la modalità mouse (air mouse).
џ►PLAY/ | | PAUSE, STOP — controlla la riproduzione e alcune altre funzioni del lettore.
џ V+/V- (volume su/volume giù) — regola il volume.
џ P+/P- (pagina su / pagina giù) — scorrere su e giù in vari elenchi, passare al canale TV successivo/precedente, controlla alcune altre funzioni del lettore.
џ 0–9 — inserire numeri e testo; controlla alcune altre funzioni del lettore.
џ CLEAR — cancella l'ultimo personaggio inserito, cancella l'oggetto attualmente selezionato, controlla alcune altre funzioni del lettore.
џ SELECT — cambia la modalità di immissione del testo, aggiunge l'elemento all'elenco di selezione, controlla alcune altre funzioni del lettore.
џ A (rosso), B (verde), C (giallo), D (blu) — controlla varie funzioni del lettore.
NOTA: il supporto dei pulsanti e le funzioni dipendono da applicazioni particolari. Non tutte le app supportano tutti i pulsanti.
RU
Перед использованием пульт должен быть сопряжен с плеером через Bluetooth:
1. Направьте пульт на плеер и нажмите любую кнопку на пульте. Сопряжение пульта и плеера произойдет автоматически.
2. Если пульт уже был сопряжен ранее, или в случае каких-либо проблем: нажмите и удерживайте кнопки "ENTER" и "V+" на пульте в течение 3 секунд, чтобы перевести пульт в режим сопряжения.
Используйте меню «Настройки»/«Системные»/«Пульты и аксессуары», чтобы удалить и заново выполнить сопряжение пульта.
џ POWER — выключение и включение плеера.
џ Секция TV (TV DOWN, TV UP, TV INPUT, TV POWER) — обучаемые кнопки для управления ТВ или другим оборудованием (см. раздел "Использование пульта для управления ТВ").
џ FAV1 - меню "Последнее" или назначенная пользователем функция.
џ FAV2 - меню "Избранное" или назначенная пользователем функция.
џ MIC — микрофон / поиск.
џ Стрелки (◄▲►▼),ENTER, RETURN, TOP MENU, POP UP MENU, INFO — основные кнопки управления (навигация по элементам на экране, открыть/использовать выбранный элемент, возврат к
предыдущему экрану, переход к главному меню, показать/скрыть всплывающее меню с действиями, показать/скрыть информацию, управление некоторыми другими функциями).
џ MUTE — выключение и включение звука.
џ AUDIO (AUD), SUBTITLE (SUB) - переключение звука и субтитров.
џ MOUSE — режим мыши (аэромышь).
P+/P- (page vers le haut / page vers le bas) — faites défiler vers le haut et vers le bas dans les différentes listes, passez à la chaîne de télévision suivante/précédente, contrôler certaines autres
fonctions du lecteur.
0–9 — saisir des chiffres et du texte ; contrôler certaines autres fonctions du lecteur.
CLEAR — supprimer le dernier caractère saisi, supprimer l'élément actuellement sélectionné, contrôler certaines autres fonctions du lecteur.
SELECT — changer le mode de saisie de texte, ajouter l'élément à la liste de sélection, contrôler certaines autres fonctions du lecteur.
A (Rouge), B (Vert), C (Jaune), D (Bleu) — contrôler diverses fonctions du lecteur.
REMARQUE: La prise en charge et les fonctions des boutons dépendent des applications particulières. Toutes les applications ne prennent pas en charge tous les boutons.
SP
El control remoto debe estar emparejado con el reproductor a través de Bluetooth antes de usarlo:
1. Dirija el control remoto al reproductor y presione cualquier botón en el control remoto. El control remoto y el reproductor se emparejarán automáticamente.
2. Si el control remoto ya se emparejó antes, o en caso de algún problema: mantenga presionada la tecla "ENTER" y "V+" en el control remoto durante 3 segundos para poner el control remoto en
modo de emparejamiento.
Use el menú "Configuración" / "Sistema" / "Controles remotos y accesorios" para desvincular y vincular el control remoto nuevamente.
POWER - enciende y apaga el reproductor.
TV section (TV DOWN, TV UP, TV INPUT, TV POWER) - botones que se pueden aprender para controlar el televisor u otros equipos (consulte la sección "Uso del control remoto para controlar el
televisor").
FAV1 — Menú "Reciente" o función definida por el usuario.
FAV2 - menú "Favoritos" o función definida por el usuario.
MIC — micrófono/búsqueda.
Flechas (◄▲►▼), ENTER, RETURN, TOP MENU, POP UP MENU, INFO - botones principales para controlar el reproductor (navegar por los elementos de la pantalla, abrir/usar el elemento
seleccionado actualmente, volver a la pantalla anterior, ir al menú principal, mostrar/ocultar ventana emergente menú con acciones para el elemento actualmente seleccionado o el estado actual
del reproductor, mostrar/ocultar información sobre el elemento actualmente seleccionado o el estado actual del reproductor, controlar algunas otras funciones del reproductor).
MUTE — enciende o apaga el sonido.
AUDIO (AUD), SUBTÍTULO (SUB) - alterna entre pistas de audio y pistas de subtítulos.
MOUSE - cambia el modo de ratón (ratón de aire).
► PLAY/ | | PAUSE, STOP — controla la reproducción y algunas otras funciones del reproductor.
V+/V- (subir volumen/bajar volumen) — ajusta el volumen.
P+/P- (página arriba/página abajo) — desplazarse hacia arriba y hacia abajo en varias listas, cambiar al canal de TV siguiente/anterior, controlar algunas otras funciones del reproductor.
0–9 - ingrese números y texto; controlar algunas otras funciones del reproductor.
CLEAR - elimina el último carácter ingresado, elimina el elemento seleccionado actualmente, controlar algunas otras funciones del reproductor.
SELECT - cambie el modo de entrada de texto, agregue el elemento a la lista de selección, controlar algunas otras funciones del reproductor.
A (Rojo), B (Verde), C (Amarillo), D (Azul) — controlar varias funciones del reproductor.
NOTA: El soporte y las funciones de los botones dependen de aplicaciones particulares. No todas las aplicaciones admiten todos los botones.
џ FAV1 — Menü „Letzte“ oder benutzerdefinierte Funktion.
џ FAV2 — Menü „Favoriten“ oder benutzerdefinierte Funktion.
џ MIC — Mikrofon / Suche.
џ Pfeile (◄▲►▼), ENTER, RETURN, TOP MENU, POP UP MENU, INFO – Haupttasten zur Steuerung des Players (navigieren Sie durch die Elemente auf dem Bildschirm, öffnen/verwenden Sie
das aktuell ausgewählte Element, gehen Sie zurück zum vorherigen Bildschirm, gehen Sie zum Hauptmenü, zeigen/verbergen Sie das Popup Menü mit Aktionen für das aktuell ausgewählte
Element oder den aktuellen Player-Status, Informationen über das aktuell ausgewählte Element oder den aktuellen Player-Status ein-/ausblenden, einige andere Player-Funktionen steuern).
џ MUTE — schaltet den Ton ein/aus.
џ AUDIO (AUD), SUBTITLE (SUB) — schaltet zwischen Audiospuren und Untertitelspuren um.
џ MOUSE — Umschalten des Mausmodus (Luftmaus).
џ ►PLAY/ | | PAUSE ( ), STOP — steuern die Wiedergabe und einiger anderer Player-Funktionen.
џ V+/V- (lauter/leiser) — stellt die Lautstärke ein.
џ P+/P- (Seite nach oben / Seite nach unten) — In verschiedenen Listen nach oben und unten blättern, zum nächsten/vorherigen TV-Kanal wechseln, Steuern einiger anderer Player-Funktionen.
џ 0–9 — Zahlen und Text eingeben; Steuern einiger anderer Player-Funktionen.
џ CLEAR — Löscht das zuletzt eingegebene Zeichen, löscht das aktuell ausgewählte Element, Steuern einiger anderer Player-Funktionen.
џ SELECT — Umschalten des Texteingabemodus, Hinzufügen des Elements zur Auswahlliste, Steuern einiger anderer Player-Funktionen.
џ A (Rot), B (Grün), C (Gelb), D (Blau) – steuern verschiedene Player-Funktionen.
HINWEIS: Tastenunterstützung und -funktionen hängen von bestimmten Anwendungen ab. Nicht alle Apps unterstützen alle Tasten.
FR
La télécommande doit être couplée au lecteur via Bluetooth avant utilisation:
1. Dirigez la télécommande vers le lecteur et appuyez sur n'importe quel bouton de la télécommande. La télécommande et le lecteur s'apparieront automatiquement.
2. Si la télécommande a déjà été appairée auparavant, ou en cas de problème : appuyez longuement sur la touche les boutons "ENTER" et "V+" de la télécommande pendant 3 secondes pour
mettre la télécommande en mode d'appairage.
Utilisez le menu « Configuration » / « Système » / « Télécommandes et accessoires » pour dissocier et associer à nouveau la télécommande.
POWER — allume/éteint le lecteur.
Section TV (TV DOWN, TV UP, TV INPUT, TV POWER) — boutons programmables pour contrôler le téléviseur ou un autre équipement (voir la section "Utilisation de la télécommande pour
contrôler le téléviseur").
FAV1 — Menu "Récent" ou fonction définie par l'utilisateur.
FAV2 — Menu "Favoris" ou fonction définie par l'utilisateur.
MIC — microphone / recherche.
Flèches (◄▲►▼), ENTER, RETURN, TOP MENU, POP UP MENU, INFO — boutons principaux pour contrôler le lecteur (naviguer parmi les éléments à l'écran, ouvrir/utiliser l'élément
actuellement sélectionné, revenir à l'écran précédent, aller au menu principal, afficher/masquer la fenêtre contextuelle menu avec des actions pour l'élément actuellement sélectionné ou l'état
actuel du lecteur, afficher/masquer les informations sur l'élément actuellement sélectionné ou l'état actuel du lecteur, contrôler certaines autres fonctions du lecteur).
MUTE — active/désactive le son.
AUDIO (AUD), SUBTITLE (SUB) — bascule entre les pistes audio et les pistes de sous-titres.
MOUSE — bascule en mode souris (air mouse).
► PLAY/ | | PAUSE, STOP — contrôlent la lecture et certaines autres fonctions du lecteur.
V+/V- (augmentation du volume/diminution du volume) — règle le volume.
Remote
Using remote to control TV
More information on functions of the remote: Dune-HD.com/support/rcu


