Laser MVP User manual

Version: 1.7 Page1 9/15/2006
USERGUIDE
ForLaser MVP
Multimedia Video Player

Version: 1.7 Page2 9/15/2006
Contents
1UniqueFeatures…………………………………….……………….3
2Locatingthe Controls……………………………….………………4
3BasicOperation…………………………………….……………….5
4Operatingbuttons………………………………….………………..7
5PlayMusic………………………………………….………………..7
6Moviemode……………………………………….…………………9
7RecordingVoice……………………………………………………..9
8PlayRecordedFiles……………….……………………………….10
9OperateFMRadio……………..…………………………………..12
10 UseTelBook………………………..………………………………13
11 E-Bookfunction………………….………………..………………13
12 JPEGAlbum……………..……………………….………………14
13 GameFunction…….……………………………………………..16
14 SystemSetting…………………………………………………….16
15.UseUSBDisk…………………….………………………………..18
16.Firmware Upgrade…………………….…………………………..19
17.Otherssetting………………………………………………………21
18.AMVConverter Tool operation …………………….……………30

Version: 1.7 Page3 9/15/2006
Laser MVPisabrand-newgenerationofdigitalportabledevice,supportingMP3/WAVmusicformat,digital
recording,FMstereoradio,AMVformatplayback,JPEGphotographbrowseandE-booktextreading.Itsperfect
soundquality,greatreliabilityandexquisiteappearance makeit amasterpiece.
1UniqueFeatures
●ExquisiteAppearance
Uniqueultraslimdesign
●Multi-videoPlayer
e.g.:MP1, MP2, MP3, WMA,WMV,ASF and WAVMusicformat
●FirmwareUpgrade
Providingthelatestupdatedfeaturesviafirmwareupgradefromthewebsite
●FMFunction
You mayeasilylistentoFMstationsandsetyourfavoritestationsby using AutosearchorManualSearch.The
playercansave40 (20 foreachBand)localstations.
●DriverFree DiskManagement
You maymanageyourfilesdirectlythrough “PortableDisk”in “MyComputer”on Winows2000 Operating
Systemorabovewithoutdriverinstallation.
●“PrivateSpace”DiskMode
Theflashmemorycanbedividedintotwopartsby usingtheaccessorytoolsandoneisencryptedtohidethe
contents(topreventviewingbyothers)
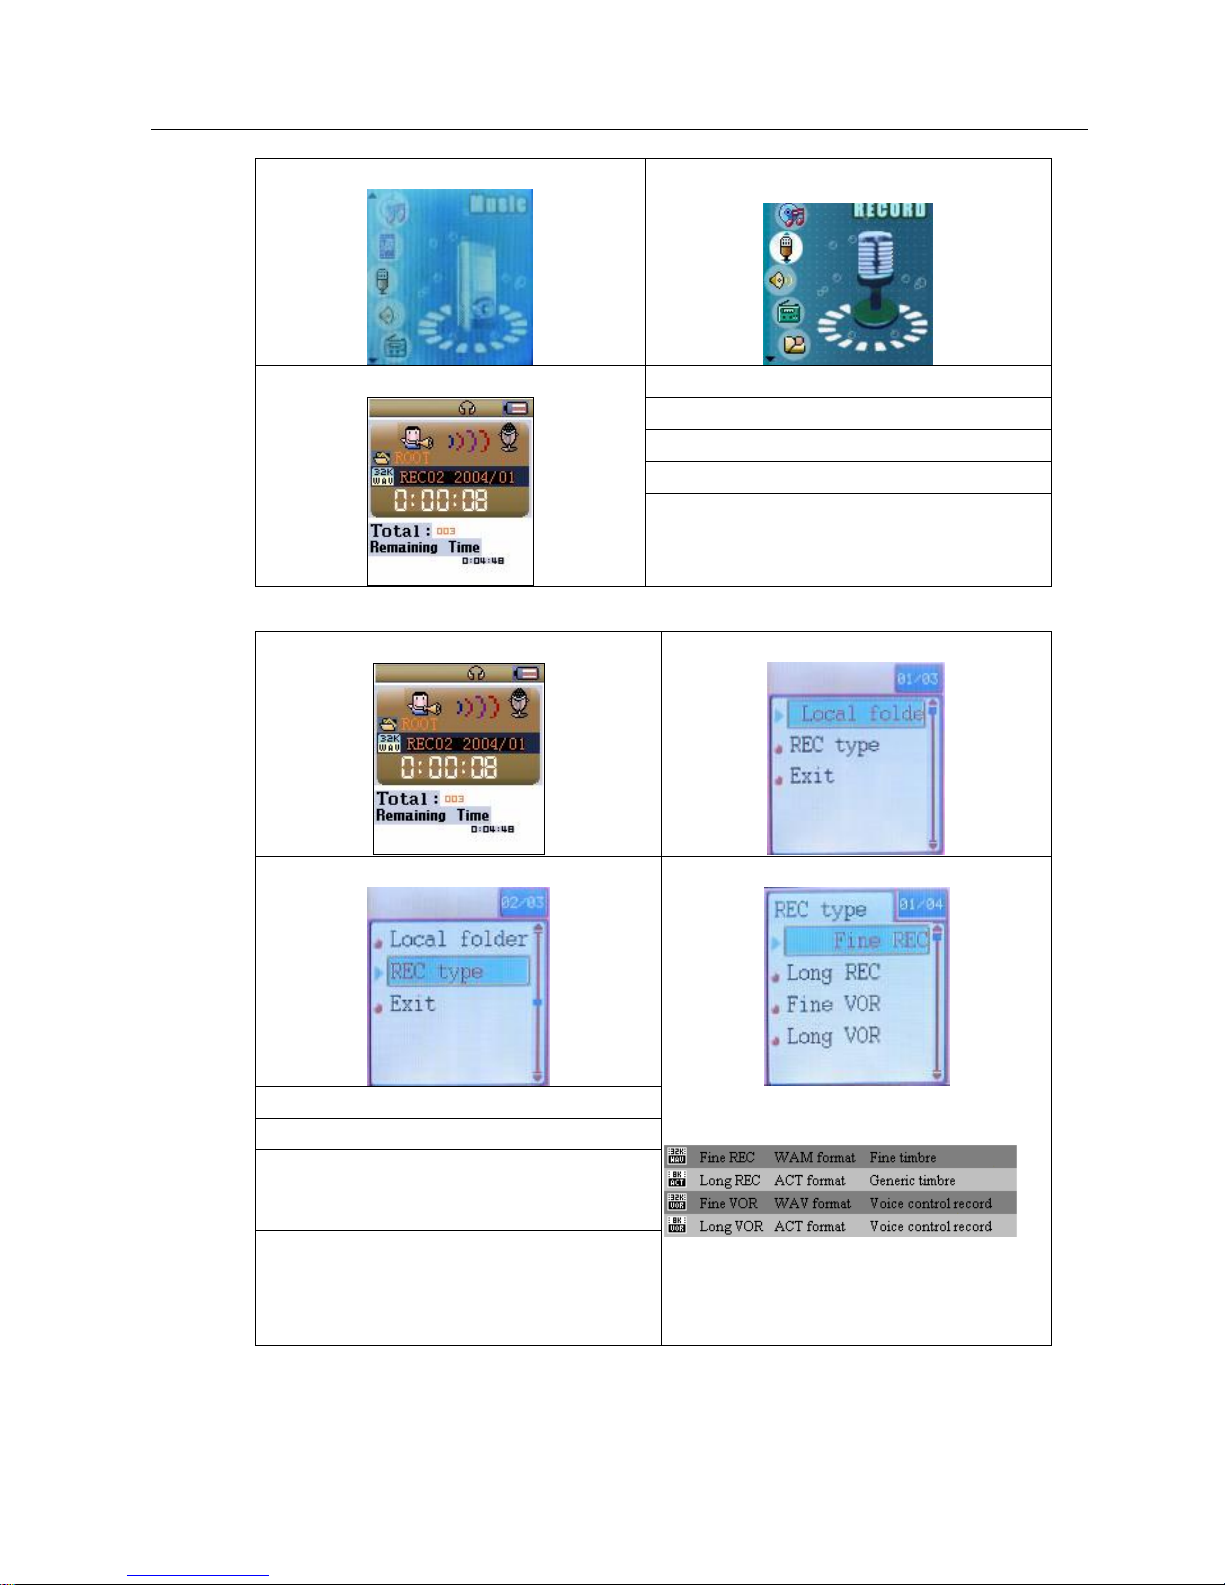
●Record/Replay
Theplayersupportsrecordingthroughbuilt-inmicrophoneandsavesasWAVandACTformats.Meanwhileit
supportsrealdigitalA-Breplayorcomparisonreplay.
●7PresetEQ
Normal, Rock, Pop, Classic, Soft, Jazzand DBB
●Multi-playMode

Version: 1.7 Page4 9/15/2006
Normal, RepeatOne, Folder, RepeatFolder, RepeatAll, Random,Intro.
●PowerOff
ProgrammableSleepTimerandPowerOff mode.
●GUI(GraphicUserInterface)MENU
AnimatedMENUswithcorrespondingcharactersmakeit easytooperate.
Declaration
¯Thankyouforyourpurchase.
¯Pleasereadthismanualcarefullybeforeusingyournewplayer.
¯Contentsinthismanualmaychangepossiblyforbetterservice.
¯Wehavetherighttomakechangestothismanualwithoutnotice.
¯Thepicturesanddiagramsusedinthismanualareaguideonlyandmaynotcorrespond totheactual
product.
¯If theactualoperationsofyourplayerisnotthesameastheinstructioninthismanual,pleasevisit our
Websiteforlatestproductinformation –www.laserco.net
2Locatingthe Controls
lAppearance &Keys

Version: 1.7 Page5 9/15/2006
lLCD Window
lBattery
The playerisinmultilevellevelbatterymonitoringsystem.
Indicatesthattheinternalbatteryisfullycharged.v
Indicateslowbatterypowerand batteryshouldbe charged up.
3. BasicOperation
lEnteringMENU System
Pressing MENU button will enterthemenusystem, includingmainMENU(pressandhold MENU button at Stopstate),
submenu atPlaystate(press MENU button toenter)andsubmenuat stopstate(press MENU button toenter).
lBrowsing
Browsingmusicfilesor menu options:
Press :/9button
Fastforwardorfastbackwardwhenplaying:
Press andhold :/9button
S/N
Description S/N Description
1 Menu button6 Play/Stop/turnon/offbutton
2 Next track/Forward(:) 7 Previoustrack/Rewind (9)
3 volumecontrolbutton(VOL) 8 Powerswitch
4 Earphonejack 9 LCD display
5 USB port
S/N Description S/N Description
1 S/Nof Current music/voicefile 8 ID3information
2 Lyricicon 9 Songname
3 Quantityofmusic/voicefilesincurrent folder 10 Folder name
4 EQmode 11 Volumelevelindication
5 Batteryindication 12 Fileformat
6 Lengthof timewithcurrentmusic 13 Replaymode
7 Playbacktime 14 Bitrate

Version: 1.7 Page6 9/15/2006
lEnteringDifferentModes
You mayenterdifferentmodesfromthemainMENU.
Music mode:Recordmode:
Voice mode:FMmode:
BrowsingPictures:SystemSetting:
USB Modewhenconnecting toPC:
lVolumeControl
Atthemusicmode, voice modeandFMmode,press VOL buttonstoenterthevolumecontrol
interface andthenpress the :/9buttontoadjustvolume
lPowerOn/Off
1.Turnonautomatically
wAfterpushingthe Power button (OFF ON) , theplayerwill turnonautomaticallyandenter
poweredonstate:
w
wWhenconnectingtheUSBcabletoPC, theplayerwill turnonautomaticallyandenterUSBmode:
Remark:
Press MENUbutton toreturntothemainMENUatthemodes.WhenconnectingtheUSBcableto
PC. Press and holdPLAYbuttonthenwill gobacktoUSBmode.

Version: 1.7 Page7 9/15/2006
2.Turntheunit ON/OFF manually
♦Whentheplayerinswitchedoff, press andhold Play buttontoturntheuniton
♦Whentheplayerisswitchedon,press andhold Play buttontoturntheunitoff
lPlay&Stop(Pausewhenrecording)
Press the PLAY button
4.Operatingbuttons
lMusicmodeandVoice mode
Buttons
Operation
StopStatus PlayStatus PlaySubmenu StopSubmenu
press and
hold Turnoff Turnoff Turnoff Turnoff
PLAY
Press Play Stop Exit fromMENU Exit fromMENU
Press and
hold Entermain MENU Entermain MENU Entermain MENU Entermain MENU
MENU
Press EnterStop-submenu
EnterPlaying-submenu
Confirmcurrentoption
orenternext submenu
Confirmcurrentoption
orenternext submenu
Press next song Playnext song Switchsubmenu Switchsubmenu
: Press on Continuousforward
browse Fast forward Continuousforward Continuousforward
Press Previoussong Playprevioussong Switchsubmenu Switchsubmenu
9 Press on
Continuousbackward
browse Fastbackward Continuousbackward Continuousbackward
Press and
hold EntervoiceREC
state Enterrepeatstate X X
VOL Press Entervolumecontrol
state Entervolumecontrol
state X X
lRecordMode
Operation
Action StopStatus RecordStatus
press andhold
turnoff stop recording
PLAY press startrecording pauserecording
press andhold
entermainMENU X
MENU press enterRecordsubmenu X
lFMMode
Operation
Action
FMStatus FMSubmenu
press and
hold turnoff turnoff
Play press X quit fromMENU
press and
hold entermainMENU entermainMENU
MENU press Entersubmenu confirmcurrentoptionorenternextsubmenu
push increase100KHzgraduallyorstopsearch
switchsubmenu
: press on Increase100KHzsearchcontinuously continuousforward
push decrease100KHzgraduallyorstop search switchsubmenu
9 Pushon decrease100KHzsearchcontinuously continuousbackward
Vol press Entervolumecontrol interface.X
5.PlayMusic
lBasicOperation
1. Connecttheearphonetotheplayer2. Push POWERàON

Version: 1.7 Page8 9/15/2006
EQoptionslist:
3.Pressand hold PLAY button topoweron
the
player,andthenenterthe mainMENU:
4.press MENU button toentertheMusicmode:
5. Pressthe PLAY button toplaymusic
6. Choosemusic
9button tochooseprevioustrack.
:button tochoosenext track.
7. Volumecontrol
PresstheVOLbuttontoentervolumecontrol
interfaceandthe pressthe:/9buttontoadjust
volume.
lEQUALIZERMode
1.Whenplayingmusic 2.Press the MENU button toenterPlaySubmenu
3. Press:buttontochooseEqualizeroption
4. Press the MENU buttontoenterEQ
selection
MENU.
5.Press :buttontoswitch, andpress MENU button toconfirm
lLyricDisplay
Thisplayersupports “*.LRC”lyricfiles(usercandownloadfrominternetorusethelyricseditortoedit
it. ), and lyricsmaybesynchronousdisplayedwhileplayingmusic.
ŸHowtouselyricfiles?
Savethelyricfilewiththesamenameasthatofthecorresponding musicfile.
Forexample.:Musicfilename:GiGi-Sky.mp3
Lyricfilename:GiGi-Sky.LRC.
ŸHowtoknowwhetherthelyricsexist?
If thecurrentsonghasmatchinglyricfiles, thelyric sign will bedisplayedatthetopofmusicmode.

Version: 1.7 Page9 9/15/2006
1. Currentsonghasmatching lyricfiles
2.Pressandhold MODE
toentertheLyricInterface
when playing.
2. Press MENU button to
returntoMusicplay
mode.
4.Browselyricsmanually.
Press VOL tobrowselyrics.
6. Moviemode
1. EnterthemainMENUand press the :buttontoselect “AMV”mode.
2. Press MENUtoenter.
3. Press PLAYtostartplayingAMVfiles
4. Choosemovie
9button tochoosepreviousfile.
:button tochoosenextfile.
5. Volumecontrol
PresstheVOLbuttontoentervolumecontrolinterfaceandthepressthe:/9buttontoadjustvolume.
7.RecordVoice
Makesurethatthebatteryisnotinthestatusof “lowbattery”.
The playermaysave99 recordingfilesundereachdirectory.

Version: 1.7 Page10 9/15/2006
lRecordinginRecordMode
1. AtthemainMENU.
2. Press :button tochooserecordingmode.
4. Press Play buttontostartrecording.
5. Press Play buttonagaintopauserecording.
6.Press Play button tocontinue recording.
7.Press andhold Play buttontostoprecording.
3. Press MENU button toenterRecordmode
lSelectRECtype
1. Attherecordmodestopinterface
2. Press MENU button toenterrecordsubmenu
3. Press :button toselect “RECtype”option
5. Press :button toselectdesiredrecording type
6. Press MENU toconfirmthetypeselected
7. Press PLAY buttontostartrecording
Note:Voicecontrolwill automaticallypausethe
recording when nosoundispresent.
4. Press MENU button enterthisoption
8.PlayRecorded Files
ŸRECtype:

Version: 1.7 Page11 9/15/2006
1.EnterthemainMENU
2. Press :button tochoose “Voicemode”
4. Press PLAY buttontostartplaying.
8. Choosemusic
9button tochoosepreviousrecordfile
:button tochoosenext recordfile.
3.Press MENU buttontoenterVoicemode
interface
9. Volumecontrol
PresstheVOLbuttontoentervolumecontrol
interfaceandthe pressthe:/9buttontoadjust
volume.
uConvertACTformatfilestoWAVformatfiles
TheACTformat filescanbeconvertedtoWAVformat filesthroughtheaccessoryinstallationtools.
1. Run “Sound Convert Tool”program, andclick “Open”button.
2. ChoosetheACTformat filesneedconversion

Version: 1.7 Page12 9/15/2006
¯
Besidestheconversion fromACTtoWAV, theaccessorytoolcan also playWAVand MP3 files.
3. Clickthe “Convert”button,theconversionstarts
9.Operate FMRadio
1. EnterthemainMENU
2.Press :switchtoselectFMMode.
3. Press MENU button toenterFMmode
4. Press MENU button toenterFMsubmenu,
Submenu optionsintroduction:
AutoSearch
At FMmodepress thebutton tostart searchstations automatically, thentheplayercanautoscanany
frequencybetween87.5MHZand 108MHZ
Manualsearch
Press 9/:button=forwardorbackwardsinglestep100KHZtomanuallysearchforastation;Press
the 9/:buttonforabout2seconds,andthe playerscansforwardorbackwardandstopsat the scanned
station. Ifyouwant tostopscanning, press 9/:switchtostop.
Savethemanualsearched stations
EnterFMsubmenuandsearch “Save”option, and then Againpress MENU button tosavecurrentstation.
Listen tothe saved stations
If thereexist morethanonestation, press PLAY button tolisten tothestation insequence.
FMRecord
PressMENU button toenterFMsubmenu,and thenpress (buttontochoose “MP3 Record”or
“FineREC”or “LongREC”options, andthenpress MENUbuttontoenterFMRecordinterface
and startrecording;
(Otheroperationsaresameasthesectionof “RecordVoice”)。

Version: 1.7 Page13 9/15/2006
Lookover theTelephone Bookinformation, whichstoresinformation includingname, mobiletelephone number, telephone number, E-mail, IM
and FAXnumbers.Detailed operationisasfollows:
Note:
sTheplayersupportsUSBand(FM87 -108MHz)and JapanBand(FM76-90MHz), suitablefordifferentareas.
ForOceania, pleasechoosetheUSband.(Press MENUbuttontoenterFMsubmenu, andpress :buttonto
selectdesired frequencychannel.)
sIfthecurrent station isinSTEREOstatus,anicon “”will bedisplayedonthe LCD.
sTodeletesavedstationspleaserefertothefiledeletionsection
10.UsingtheTelephone Book
lBrowse TelephoneBookinformation
lImportTelephoneBookinformation
lExportTelephoneBookinformation
1. Enter themainMENU 2. Pressthe :button toselect TelBook”3. Pressthe MENU button toconfirmand
enter。
4. –Pressthe PLAY button toselect
the Browsefile”;Pressthe MENU
button toimportTelfileand exportTel
filefunction.
5. Pressthe:button toselect name, which
will be needed tobrowseobject.And press
the MENU buttontoenter.
6. PressthePLAYbutton toreturn to
select objectinterface.
Remark:The Tel_save.binfilemustbe imported
before enteringthisMENU,otherwisetheLCD
will display empty”
Usethisfunctiontoimport newTelBookinformationtothisplayer. Detailoperatingstepsisasfollows:
1. Usethetelephone directoryprocessingtoolcreated Tel_save.binfile.
2. Afterconnectingthe player toPC,theTel_save.binfileneedstobecopiedtothe root directoryofthe player .
3. Enter theTelBookMENU, andthenselect and enter importTelfile”option, afterturningon the player。
4. Confirmtoimport Tel_save.bin file to the player.
UsethisfunctiontoexportTelBookinformation,whichbe saved tothisplayer and generateafilethatcanbe editedthroughthe telephone
directoryprocessingtoolinaccessoryCD onPC. Detailed operatingstepsisasfollows:
1. Enter theTelBookmode,and thenselectand enter exportTelfile”
2. ConfirmtoexportTelBookdata.
3. Afterconnectthe player toPC,usercan findTel_Expt.binfileatthe root of thedisk.

Version: 1.7 Page14 9/15/2006
11.E-Bookfunction
Thisfunctionsupportsall TXTfile.
1. EnterthemainMENU.
2. Press :button tochoose “E-Book”
3. press MENU
button toenterTXTfile
selectionMENU (ifnotextfile
sare
presentthedisplaywill read“Nofiles” )
4. Press :
buttontoselectdesiredtextfileto
read,andthen press Play
buttontoenter
text interface
5. Press :/9buttontoturnthe pagesinsequence.(onlysuitablefor
Manualplay
)
lPlay set
1. Atthetext fileselection MENU
2. Press MENU button toentersubmenu
3.Press :button tochoose“playset”
option:
4. Press MENU button toenterthisoption:
5. Press :button tochoose “Manualplay”
or “autoplay”options,andthenpress
MENU buttontoconfirm.
7. Press (/(buttontoadjust “autoplay”
speed,press MENUbuttontoconfirm.
Remark:WhenreadingE-
BOOK, press and
holdMENUbuttontofastexit frompicture
interface andreturntothemainmenu;
press PLAYbuttontoexitfromE-BOOK
also。
6.Whenchosethe “autoplay”optionsandthen
enterthisinterfaceasfollows:

Version: 1.7 Page15 9/15/2006
12. JPEGAlbum
Thisfunctionsupportingall JPEGformatpictureinnetwork.
1. AtthemainMENU
2.Press :
button tochoose “JPEGAlbum”
option:
3.press MENU button
toenterpicture
selection(ifnopicturesarepresent
,the
displaywill read“Nofiles)
4.Press :buttontochoosedesiredpicture,an
d
thenpress Play button toview
5. Press :/9buttontobrowsepictureinsequence..(onlysuitablefor
Manualplay
)。。
lPlay set
1. AtthepictureselectionMENU:
2. Press MENU button toenterpicturesubmenu
3. Press :button toselectthe “playset ”
option:
4. Press MENU button toentertheinterfaceas
follows

Version: 1.7 Page16 9/15/2006
5. Press :button tochoose “Manualplay”
or“autoplay”options,thenpress MENU
button toconfirm.
7. Press :/9buttontoadjust “autoplay”
speed,pressMENU buttontoconfirm.
Remark when viewing pictures,pressand
holdMENUbutton to
exitfrompictureinterface
and returntothe mainmenu;press
PLAYbutton toexit frompictureinterfacealso。
6.Whenchose “Auto
play”optionsandthen
pressMENU thisinterfaceasfollows:
13. Game
ThereareanumberofgamespreloadedintheLaserMVP.Wehavesuppliedtheinstructionsforoneofthegames
thatmaybeontheunit.
The objectofMinesweepingistolocatealltheminesasquicklyaspossiblewithout uncoveringanyofthem.Ifyou uncover amine,youlosethe game.
Gameview:
14.SystemSettings
Systemparameterscanbesethereandeveryoptionvariesaccordingtofirmwareupgrading
AttheMENU,press :toselectthe “SETUP”:
Press MENU buttontoentersystemsettings:
Remark:Youcan uncover asquare byclickingit. Ifyou uncover amine,youlosethe game.
If anumber appearsonasquare, itindicateshowmanyminesare inthe eight squaresthat
surround the numbered one. Tomarkasquare yoususpectcontainsamine, pleasepress
the PLAYbuttontoinsetred flag.
Button explain:
MENU button: enter game/uncover asquare
:Button: right e
9Button: left
VOL+: down
VOL-: up
PLAY button: insetred flag (digmine).

Version: 1.7 Page17 9/15/2006
lParameters
Clock Setthedateandtimewhenrecordedfilesaresaved
LCD set Settheperiodoftime(seconds)whenBacklightstayson withoutanyoperation
Language Set differentlanguage
Poweroff Set afixedtimeafterwhichtheplayerwillturnpoweroffautomatically
Replaymode Set workingstatesonReplaymode
OnlineMode Anoptionspeciallydesignedfor PrivateSpace”function
Memoryinfo. Showmemorycapacityandpercentagethat hasbeenused
FirmwareVersion Showfirmwareversion
FirmwareUpgrading
Onlyusedforfirmwareupgrading
Exit Exitfromcurrentinterface
lInstruction
○“Clock”set
1. SystemSettingInterface
2. Press MENU toenterRecordTimeInterface.
3. Press PLAY tosettimeinsequenceof
“YY-MM-DD”
4. Push :/9buttontoadjustnumbers
5. PressMENU toconfirmand exit.
○“LCD set”setting
Operatingstepsisasfollows:
1.AtSystemSetting interface,
2. Press :keytoselect “LCD set”option,

Version: 1.7 Page18 9/15/2006
3.Press MENU buttontoenter “LCD set
”
submenu:
4.Press :button tochoose,and press
MENU
button toconfirm andenteradjustinterfaceas
follows(e.g.: Black):
5. Press :/9buttontoadjusttime(Unit second), andpress MENU toconfirmand exit.
brightness
Set light andshadecontrastofOLCDscreen
Darklemode
Setfixedperiod oftime(unit:second),beforethe playerwill turnoffthescreendarkautomatically.If
“0”isselected,functionisinvalid.
Black mode
Setfixedperiod oftime(unit:second),beforethe playerwill turnthescreenoffautomatically.If “0”is
selected,functionisinvalid.
○“Language”setting
1. At Systemsettinginterface, press :/(button
toselect “Language”icon: 2. Press MENUbuttontoenter “Language”
settinginterface:
3.Press (/(buttontoselectdesiredlanguage. 4.Press MENUtoconfirmtoexit.
○PowerOff
OperatingstepsrefertoLanguagesetting.
OffTimermoderefersthatafterafixedperiodoftime(unit: second)whennooperationofkeysat
Stop mode,theplayerwill turnoffautomaticallytosavepower.If “0”isselected,powersavingfunctionis
invalid.
SleepTimerletsyouselectafixedperiodoftime(unit: minute)fortheplayertoturnoff automatically
whenno keysarepressedno matterwhichmodetheplayerisin.Thisfunctionisspeciallydesigned
forlistening tomusicbeforesleep. Note: SettingofSleepTimerisvalidonlyonceandthesettime
will beclearedafterpoweroff.
○Replay Mode
OperatingstepsrefertoEqualizerSetting
ManualReplaymeansthatatA-BReplayModetheendpointBcanbesetmanuallyonly.
AutoReplaymeansthatatA-BReplayModetheendpointBcanbesetautomatically.(Especiallyfor
EnglishReading fileswithoutmusic)

Version: 1.7 Page19 9/15/2006
1.Waiting state:
Creating newfolders
Theplayercanidentifythe99 folderssetupin
theU-disk.
2. Downloadingstate: 3.Uploading state:
○OnlineMode
OperatingstepsreferstoEqualizersetting.
Someoperatingsystems(underWindows2KSP4)cannotsupporttwo driverletters inoneUSBdisk.
Thus,if “PrivateSpace”functionison,choosewhichdiskyouaregoingtouse,i.e., “singleordinarydisk”
or “singleencrypteddisk”, inorderforcorrectdisplayofselecteddiskafterconnectingtoPC.
○Memory Info.
Thenumberdisplayedrepresentstotalmemorycapacityandthepercentagerefersthecapacityused.
○FirmwareVersion
FirmwareVersioninformationtheplayerusescanbeobtainedhere.
○FirmwareUpgrade
ItisspeciallydesignedforFirmwareUpgrade.
15. UseUSBDisk
TheplayersupportsstandardUSBdiskfunctionunderWindows 98 (driverneeded),Windows 2000 and
above(driverfree), MacOS10.3 and above,Linux 2.4.2 and above.
TheplayersupportspowersupplythroughUSB.AtwaitingMode,press MENU toexit tomainMENU,then
selecttoenterdesiredmode.
TheplayeralsosupportsSuspendMode.
HowtoconnecttoPC?PowerontheplayerandplugtheUSBcabletoenterthefollowingMode1.
TheplayermaydisplaythefollowingmodeafterconnectingtoPC:
16.Firmware Upgrade
Theplayersupportsfirmwareupgradingormaintenance throughinstallingspecialtoolsonPC.

Version: 1.7 Page20 9/15/2006
1. EnterthemainMENU.
2. Press :button toselect “SETUP”
3. Press MENU button toenterSystemSetting.
4. Press :
button tochoose “Firmwareupgrade”option
5. PressMENU buttontoenter “firmwareupgrade”interface
5. Connect the playertoPC
7. Runthe “MP3 PlayerUpdate”programinupgradingtoolsonPC, thenclick “Selectnewfirmwarefile”
button. theUIisasfollows:
8.
Table of contents
Other Laser Media Player manuals

Laser
Laser C50 User manual

Laser
Laser MMC-B15 Owner's manual

Laser
Laser DVBT-7TOUCH User manual

Laser
Laser MP4-M7T User manual

Laser
Laser MP4-Q13 User manual

Laser
Laser STB-7000 User manual

Laser
Laser STB-8000-026 User manual

Laser
Laser MMC-B18 Owner's manual

Laser
Laser Video 2 Go MP4-P13 User manual

Laser
Laser P20 User manual