Teac WAP-8600 User manual

WAP-8600
SCHNELLANLEITUNG............................................................................................3
QUICK INSTALLATION GUIDE ............................................................................10
BREVES INSTRUCTIONS.....................................................................................17
GUIDA RAPIDA......................................................................................................24
INSTRUCCIONES RÁPIDAS.................................................................................31
SNELLE HANDLEIDING........................................................................................38
SZYBKI PRZE ODNIK INSTALACYJNY ...........................................................45
PRŮVODCE RYCHLOU INSTALACÍ ZAŘÍZENÍ .................................................52
SNABB BRUKSANVISNING..................................................................................59

2

A = DC Anschluss für Netzteil
B = Ethernet Anschluss (RJ-45)
C = RESET Taste
D = Line-Ausgang links (RCA)
E = Line-Ausgang rechts (RCA)
F = S/PDIF optischer Digitalausgang
G = Antenne
H = Kopfhörerausgang (Klinke)
I = USB Anschluss 2
J = USB Anschluss 1
K = Ein/Aus Schalter
L = LED LAN Verbindung
M = LED USB Gerät angeschlossen
N = LED Power (blau)/ Standby (rot)
O = BRC Verbindung
P = LED LAN Verbindung
DEUTSCH
WAP-8600
SCHNELLANLEITUNG
Bitte lesen Sie die ausfüh liche Bedienungsanleitung
(PDF Fo mat) auf de Installations-CD!
Bedienelemente und Anschlüsse
Bidirektionale Fernbedienung (BRC)
Streaming Media Receiver (SMR)
3
1 = Touchscreen LC-Display
2 = Muting / Standby/Config
3 = Lautstärke verringern (-)
4 = Lautstärke erhöhen (+)
5 = Akku-Ladeanschlüsse
(Unterseite)
6 = Akkufach (Rückseite)

DEUTSCH
Aufbau
Standby ein/aus sowie Lautstärke werden mit den Tasten auf der Oberseite der
BRC gesteuert, alle anderen Funktionen Ihres AP steuern Sie mit dem
Touchscreen der BRC. Das LC-Display der Fernbedienung zeigt dabei nicht nur
die ausgeführten Befehle, sondern erhält vom SMR die Daten des gewählten
Musikstückes zur komfortablen Anzeige direkt in der bidirektionalen
Fernbedienung!
Dank seines Touchscreens können Anzeigeinhalte des AP-8600 direkt durch
Berühren der Anzeigenfläche ausgewählt und in Listen gescrollt werden.
Separate ständig verfügbare Tasten gibt es an der Geräteoberseite nur für Ein
und Muting (kurzer Druck), Standby/Config-Menü (langer Druck >2 sec) und
Lautstärkeeinstellung.
Der Anschluss des AP-8600 ist sehr einfach durchzuführen.
Bitte verbinden Sie die Komponenten nur im ausgeschalteten Zustand.
●Verbinden Sie den SMR über die rückseitigen Audioanschlüsse mit
Ihrem Audiosystem - oder schließen Sie Ihren Kopfhörer direkt an
den Kopfhöreranschluss auf der linken Seite des SMR an.
●Nehmen Sie, falls erforderlich, Ihr PC-Netzwerk in Betrieb.
●Verbinden Sie den SMR mit dem SMR Netzteil (DC Anschluss).
●Verbinden Sie die BRC Ladestation mit dem BRC Netzteil und stellen
Sie die BRC in die Ladestation wie im Bild auf Seite 1 gezeigt.
●Vor dem Netzanschluss bitte prüfen, ob das Netzteil des AP-8600
für die bei Ihnen vorhandene Netzspannung geeignet ist.
●Anschluss der Netzteile an die Stromversorgung.
●Schalten Sie den SMR mit dem Hauptschalter (K) auf der rechten
Seite des SMR ein.
●Schalten Sie die BRC durch kurzen Druck auf die Power-Taste (2)
ein.
●Durch langen Druck auf die PO ER Taste (2) schaltet das
AP-8600 System (BRC und SMR) auf Standby (ein kurzer Druck
auf PO ER wechselt die MUTE-Funktion zwischen ein und aus)
Da AP-8600 Audio vom LAN, LAN, Internetradio und angeschlossenen USB
Speichergeräten wiedergeben kann, sind einige Einstellungen möglich. Lesen
Sie bitte die entsprechenden Sektionen der Anleitung um Ihren AP-8600
korrekt einzustellen und so die optimale Leistung mit allen Quellen zu erreichen.
4

DEUTSCH
BRC Ladestation und Akkuladung
Die BRC enthält einen leistungsfähigen wiederaufladbaren Lithium-Ion Akku, der
viele Stunden kabellosen Betriebs des AP-8600 Systems - dank seiner hohen
Akkukapazität und des integrierten Stromsparmanagements der BRC - erlaubt.
Vor dem ersten kabellosen Einsatz der BRC ist eine Aufladung des Akkus
erforderlich.
Verbinden Sie dazu das BRC-Netzteil mit dem Rückseitenanschluss der BRC-
Ladestation und der Netzspannung.
Die BRC wird einfach senkrecht auf die Ladestation gestellt. Dabei berühren die
Kontakte in der Ladeschale die Kontaktflächen im Boden der BRC und sorgen so
für die Aufladung des integrierten Akkus.
Die Fernbedienung kann vollständig verwendet werden, während sie sich auf der
Ladestation befindet.
Hinweis: bei angeschlossener Stromversorgung stehen alle Funktionen auch
während des Ladevorganges zur Verfügung. Die Ladekontrolle funktioniert selbst
bei ausgeschalteter BRC!
Einstellungen zu Inbet iebnahme
Mit den folgenden Ersteinstellungen verbinden sich BRC und SMR miteinander
und mit Ihrem Netzwerk und einige Grundeinstellungen werden vorgenommen.
Bitte führen Sie die nachfolgenden
Schritte durch, um BRC und SMR
einzustellen:
● Schalten Sie den SMR ein. Der SMR
startet den Bootvorgang und zeigt nach
ca. 1 Minute durch die blau blinkende
Power-LED an, dass er sich im
Konfigu ations-Modus befindet und
weitere Einstellungen erwartet.
● Schalten Sie die BRC ein. "Language
Setting" fordert Sie auf, die gewünschte
Systemsprache auszuwählen. Folgen Sie
den Anweisungen des Bildschirms. Nach diesem Schritt heißt Sie die BRC in der
gewählten Sprache illkommen.
● Als nächstes erscheint die
Zeitzonenauswahl. ählen Sie Ihre
Zeitzone und bestätigen Sie ob die
Sommerzeit aktiviert werden soll.
● Der Assistent geleitet Sie nun zum
Menü “SMR Suche”, das alle für die
Grundeinstellungen verfügbaren SMRs
anzeigt.
5

DEUTSCH
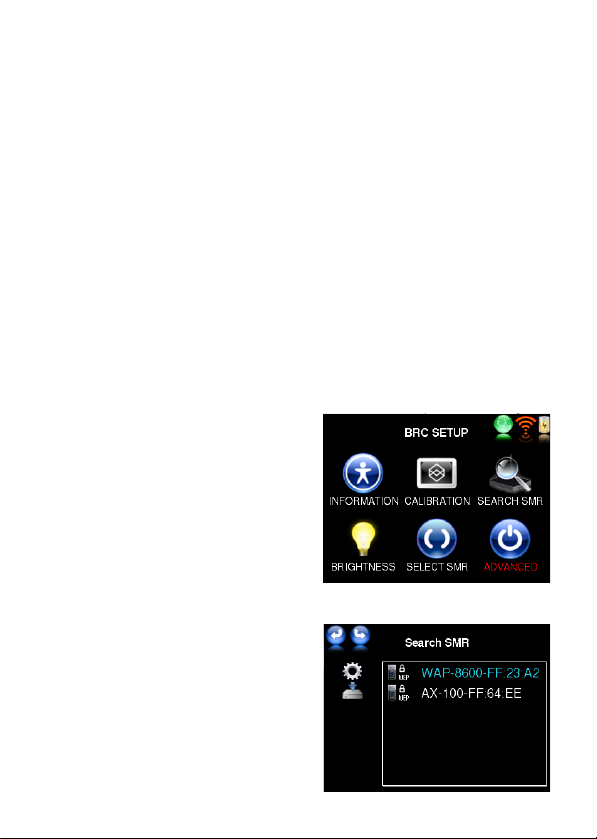
Um die Identifizierung bei mehreren SMRs zu erleichtern ,enthält der SMR-Name
ab erk die letzten 6 Stellen der individuellen MAC Nummer. Die MAC Nummer
des SMR finden Sie auf seinem Typenschild.
● ählen Sie den SMR zu dem Sie die BRC verbinden möchten.
● Als Nächstes haben Sie Gelegenheit, dem SMR einen neuen Namen zu
geben, z.B. entsprechend seinem Standort “ ohnzimmer”.
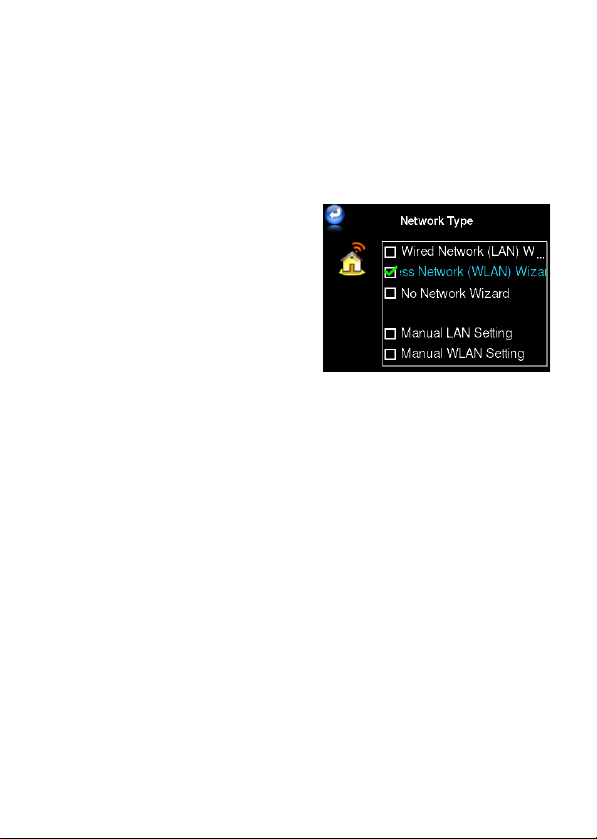
● Jetzt erscheint das Netzwe k Typ Menü.
Das Netzwe k Typ Menü bietet drei
Assistenten und zwei manuelle Punkte
zur Auswahl für eine einfache Einstellung
des AP. ählen Sie den Assistenten
gemäß des bei Ihnen verfügbaren
Netzwerkes:
1. LAN Assistent (für Ethernet-Kabel
Netzwerkanschluss): enn der SMR
mittels Ethernetkabelan das LAN
angeschlossen ist (DHCP), steuert die
BRC den SMR über eine direkte LAN-
Verbindung (ad-hoc Modus).
2. LAN Assistent (kabelloser Anschluss): SMR und BRC werden beide
kabellos über einen LAN-Netzwerk-Router oder -Access-Point verbunden. Bei
Auswahl dieser Option sehen Sie das “AP Auswahl” Menü worin Sie Ihr LAN
(DHCP) zur Verbindung auswählen, sowie dann noch ihr LAN Sicherheits-
Paßwort eingeben können.
3. Ohne Netzwerk - Assistent: ird der SMR nicht an ein Netzwerk
angeschlossen steuert die BRC den SMR über eine direkte LAN-Verbindung
(ad-hoc Modus). Der Betrieb ohne Netzwerk erlaubt allerdings nur die
iedergabe von USB Speichergeräten.
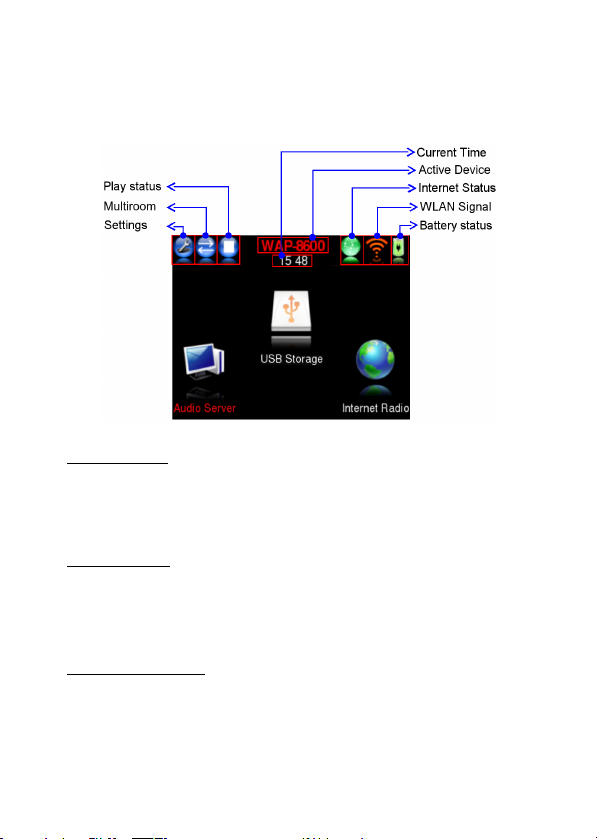
● Nach dem Abschluss obiger Netzwerk Typ Einstellungen ist die BRC mit dem
SMR verbunden und das AP Hauptmenü wird auf der BRC angezeigt. Die
Power-LED des SMR leuchtet nun blau ohne zu blinken und rechts daneben
bestätigt die ebenfalls blau leuchtende BRC-LED die Verbindung zwischen BRC
und SMR.
Achtung: falls die Verbindung nicht zustande kommt (SMR LED blinkt weiterhin
blau) wiederholen Sie die obigen Schritte, indem Sie mit der “Zurück”-Taste oben
links im Bildschirm zurückgehen und bei “SMR suchen” den Konfigurations-
vorgang neu durchführen.
Hinweis: Beachten Sie bitte, dass direkt nach dem Einschalten des SMR der
SMR während des Bootvorgangs nicht durch die BRC gefunden werden kann!!
Bitte warten Sie, bis der Bootvorgang abgeschlossen ist.
6

DEUTSCH
Anwendung
Das Hauptmenü des AP-8600 zeigt zwei Anzeigebereiche:
1. Statuszeile oben, mit Softwa etasten (links) und Statusanzeigen (rechts).
2. Anwendungsbe eich.
● Softwaretasten – diese Tasten ändern ihre Funktion abhängig vom aktuellen
Betrieb! Im Hauptmenü:
Settings: Einstellungen für Display, Datum/Zeit, Netzwerk und Aktualisierung.
Multi oom: Öffnet die Geräteliste zur Auswahl des zu steuernden SMRs.
Auswahl zwischen mehreren verfügbaren SMRs
Wiede gabefunktion: Stop/Play/Pause abhängig von der aktuellen iedergabe.
● Statusanzeigen – zeigen verschiedene Systeminformationen:
Name des aktiven Hauptgerätes
Uhrzeit
Netzwerk Status (verbunden=grün, unterbrochen=rot)
LAN Verbindungsqualität
Batteriestatus (laden=blinkt, niedrig=rot, mittel=gelb, voll=grün)
● Anwendungsbereich – Hauptfunktionen sind:
1. Audio Se ve : Browsen und iedergabeauswahl im Media Server.
2. USB Sto age: um auf einem angeschlossenem USB Speichergerät zu
browsen und Stücke zur iedergabe auszuwählen. Um Playlisten und Internet-
Radio-Playlist-Dateien (vom PC) aufzurufen, Internetradio-Aufnahmen sowie die
Geräteeinstellungen und Playlisten, die AP-8600 erstellt hat, zu speichern.
3. Inte net Radio zur Auswahl von Radiostationen im Internet.
7

DEUTSCH
Funktionen
Audio Se ve Bet ieb
Zum Durchsuchen der Media Server Inhalte und zur iedergabeanwahl.
Hinweis: Stellen Sie sicher dass Ihr Media Server auf Ihrem Netzwerk-PC/NAS
läuft und auch Ihr AP-8600 auf Ihr Netzwerk eingestellt worden ist.
USB Speiche ge äte
USB Speichergeräte durchsuchen und Musikstücke daraus wiedergeben.
Hinweis: der USB-Anschluss hat eine Auto-Detektion. Nach Anschluss eines
USB-Speichergerätes bitte warten, bis das USB-Symbol im Hauptmenü einen
grünen Verbindungspunkt zeigt! Dann steht der Zugriff auf das USB-Medium
bereit.
Inte net Radio
Bietet vTuner Service und Favoriten-Stations-Management.
Hinweis: Stellen Sie sicher dass Ihr AP-8600 auf das Internet zugreifen kann!
Zur iedergabe erscheint das iedergabemenü:
Beim Durchsuchen der Inhalte bringt das “Step Back” Icon bringt Sie zurück auf
den vorherigen Bildschirm bzw. in die vorherige Liste.
8

DEUTSCH
Settings (Einstellungen)
Hier nehmen Sie alle Systemeinstellungen vor.
Media Se ve Softwa e Installation
Der Media Server ist zum durchsuchen und wiedergeben von Audio-Dateien die
auf Ihrem an das Netzwerk angeschlossenen Computer gespeichert sind
erforderlich. Im AP-8600 Paket befindet sich die Media Server Software auf
der Installations-CD.
Detaillie te Hinweise zu den Netzwe k- und Ge äte-Einstellungen
und de Bedienung Ih es WAP-8600 entnehmen Sie bitte de
ausfüh lichen Bedienungsanleitung auf de Installations-CD.
9

A = DC connector for power supply
B = Ethernet connector (RJ-45)
C = RESET switch
D = Line output left (RCA)
E = Line output right (RCA)
F = S/PDIF digital optical output
G = Antenna
H = Headphones output (mini phono)
I = USB connector 2
J = USB connector 1
K = On/off power switch
L = LED LAN connection
M = LED USB storage connected
N = LED Power (blue)/ Standby (red)
O = BRC connection to SMR
P = LED LAN connection
ENGLISH
WAP-8600
QUICK INSTALLATION GUIDE
Please ead the detailed inst uction manual
(PDF fo mat) p ovided on the installation CD!
Cont ols and connecto s
Bidirectional Remote Control (BRC)
Streaming Media Receiver (SMR)
10
1 = Touchscreen LC-Display
2 = Muting / Standby/Config
3 = Volume down (-)
4 = Volume up (+)
5 = Charge connectors (bottom side)
6 = Battery compartment (back)

ENGLISH
Assembly
Switching standby on/off as well as volume can be done by the buttons on top of
the BRC. All other functions will be controlled by the touchscreen of the BRC.
The LC display in the BRC does not only display the received commands but it
can also receive contents from SMR such as music track playback data, cover
pictures etc, all displayed in the remote control right in your hand!
Thanks to the touchscreen, display contents of AP-8600 can be selected or
you can scroll in the lists by a simple touch of your fingertips.
There are few separate keys at the top of the control just for On and Muting
(short push) / Standby/Config menu (long push >2 sec) and volume control.
Basic assembly of this system is very easy to do.
Please connect all components only when they are switched off.
●Connect the SMR from backside audio outputs to your audio system
by the supplied audio cable - or connect your headphone to the
appropriate outputs at the left side of the SMR.
●Setup and connect your computer network, if required.
●Connect the SMR to the SMR power supply (DC connector).
●Connect the BRC charger stand to the BRC power supply (DC
connector) and place the BRC on the charge stand as shown on
page 1.
●Before connections, check your mains power system to be
appropriate to the AP-8600 power supply.
●Connect the power adaptors to mains supply.
●The main power switch (K) you will find at the right side of the SMR.
●To switch on the BRC, shortly press the PO ER button (2) on top of
it.
●By a long push on the PO ER button (2), the whole AP-8600
system (BRC and SMR) can be switched into standby (a short push
on PO ER toggles the MUTE function between on and off)
Since AP-8600 can playback audio files from LAN, LAN, Internet Radio and
connected USB storages, there are various settings possible. Please read the
related chapters to setup your AP-8600 correctly for best performance with all
sources.
11

ENGLISH
BRC stand and batte y cha ge
The BRC contains a powerful rechargable Lithium Ion battery, which allows
many hours of wireless operation for the AP-8600 system, due to high battery
capacity and the integrated power saving management of the BRC.
Befo e fi st wi eless BRC usage, the batte y equi es echa ging.
Connect the BRC power supply to the backside connector of the stand.
Place the BRC upright onto the charging dock stand. hile standing there, the
charging bay connectors get in contact to the charging contacts at the BRC
bottom side and allow recharge of the rechargeable battery in the BRC.
The BRC can be ope ated while placed in the stand.
You can operate all functions while charging. Charging control even works when
switched to Standby!
Initial System Setup
By the following initial system setup, you will connect the BRC and the SMR to
each other and to your network and also do basic settings to prepare the
operation.
Please follow the below mentioned steps for connecting BRC and SMR:
● Power ON the SMR. The SMR will
boot and after apprx. 1 Minute it shows
flashing blue power indicator. This means
the SMR is in config mode and awaiting
the following settings.
● Power on the BRC. "Language
Setting" will be displayed. Select your
preferred language and follow the screen
instructions. After this procedure, the
BRC root screen welcomes you in your
selected language.
● Next, the time zone screen appears.
Select your time zone and confirm the
required daylight saving option for your
area.
● The wizard leads you to the “Sea ch
SMR” screen, showing all SMRs that are
available for setup. To help identify the
SMR device, the default SMR name
contains the last 6 digits of its individual
MAC number. The MAC number of the
SMR you can find on its bottom label.
12

ENGLISH
● Select the SMR you like to connect to.
● Next, you have the possibility to rename the SMR according to its place in the
system, e.g. “Livingroom”.
● Now, the Netwo k Type screen
appears.
The Network Type screen offers you 3
wizards and two manual choices to easily
setup AP. Select the connection wizard
according to your available network:
1. ired Network (LAN) izard: If the
SMR is connected to a LAN network
(DHCP), the BRC directly controls the
SMR by LAN connection (ad-hoc
mode).
2. ireless Network ( LAN) izard: SMR and BRC are each connected to a
LAN Network Router or Access-Point. If you chose this option, you will see the
“select AP” screen where you can chose the LAN (DHCP) to connect to, and
also you will be prompted to input your LAN security password.
3. No Network izard: The SMR is NOT connected to any network, the BRC
controls the SMR by a direct LAN connection. Operation without network
connection just allows to use the USB playback function.
● After above Network Type setting is finished, BRC and SMR are connected
and the main screen will be displayed. The power LED on the SMR lights static.
Right from the power LED, another blue LED appears, which confirms the
connection between BRC and SMR.
Attention:
If connection failed (SMR LED keeps flashing blue), you simply press on the
“BACK” arrow top left on the BRC screen, go to “Search SMR” and repeat the
above procedure.
Note:
Just after power on the SMR, it may take some waiting period to boot up and
recognize the device by BRC, until it is available in the SMR listing.
13

ENGLISH
Ope ation
The main menu of AP-8600 has two areas:
1. Status topline, with soft-keys (left) and status indications (right).
2. Ope ation a ea.
● Soft-keys – these three buttons change their function dependant from actual
screen. In main menue:
Settings: screen, date, time, network settings and system upgrade.
Multi oom: Directly opens the device list for selecting the SMR device to control.
Choice from multiple SMRs if available.
Play function (Stop/Play)
● Status area - displays various system informations:
Time
Active Device
Networking status (connected/=green, disconnected=red)
LAN connection quality
Battery status (flash for charging, condition: low=red, medium=yellow, full=green)
● Operation area – main functions are:
1. Audio Se ve : to browse media server and choose tracks to listen.
2. USB Sto age: to browse USB disk content and choose tracks to listen, to call
up previously stored playlists and Internet-Radio-playlists from PC, to store
Internet Radio recordings as well as device settings and playlists created by
AP-8600.
3. Inte net Radio browsing and “My Favorite Station” management
14

ENGLISH
Functions
Audio Se ve
For browsing media server content and to choose tracks to play.
Note: Make sure the media server on your networking PC is up and running and
your AP-8600 is well connected to your network.
Inte net Radio
Provide vTuner service and My Favorite Stations management.
Note: Make sure your AP-8600 is well connected to your network.
USB Sto age
USB disk content browsing and tracks playback.
Note: USB input has disk insertion auto-detection. Please wait until you find the
green dot on the USB icon in the BRC main screen, before using this function.
hen you play a track, the Now Playing screen appears:
The “Step Back” key will go back to previous folder or screen while browsing any
contents.
15

ENGLISH
Settings
This item provides all system settings.
Media Se ve Softwa e Installation
To browse and playback the audio files stored on your computer (connected to
your network), a media server software is required. ith AP-8600, the Media
Server software is provided on the installation CD.
Mo e detailed setting options and inst uctions fo the netwo k
installation as well as the ope ation of you WAP-8600, you can
find in the Inst uction Manual on the installation CD.
16

A = prise d’alimentation de courant
continu pour adaptateur secteur
B = connexion Ethernet (RJ-45)
C = Touche RESET
D = sortie de ligne à gauche (RCA)
E = sortie de ligne à droite (RCA)
F = S/PDIF sortie numérique optique
G = antenne
H = sortie casque (Jack)
I = connexion USB 2
J = connexion USB 1
K = commutateur pour allumer/éteindre
L = connexion par LED au LAN
M = LED pour appareil USB connecté
N = LED en fonctionnement (bleue) /
en veille (rouge)
O = connexion BRC
P = LED de connexion au LAN
FRANÇAIS
WAP-8600
BREVES INSTRUCTIONS
Veuillez li e le mode d’emploi détaillé (fo mat PDF)
su le CD d’installation !
Eléments de commande et po ts/connexions
Télécommande bidirectionnelle (BRC)
Récepteur SMR (St eaming Media Receive )
17
1 = Afficheur à cristaux liquides (LCD) à
effleurement
2 = Muting / Veille / Config
3 = Diminuer le volume sonore (-)
4 = Augmenter le volume sonore (+)
5 = Prises du chargeur d’accus (face
inférieure)
6 = Compartiment d’accus (face arrière)

FRANÇAIS
Composition
La commande de l’allumage et de l’extinction de la veille ainsi que des haut-
parleurs s’effectue à l’aide des touches situées sur la face supérieure de la BRC,
l’écran tactile de la BRC permet de commander toutes les autres fonctions de
votre AP. L’écran à CL de la télécommande affiche à cette fin non seulement
les commandes effectuées, mais reçoit du SMR les données du morceau
musical sélectionné pour un affichage aisé directement sur la télécommande
bidirectionnelle !
Grâce à son écran tactile, des contenus d'affichage du AP-8600 peuvent être
sélectionnés et déroulés sous forme de listes en touchant la surface d’affichage.
Des touches séparées, à disposition constante, se trouvent sur la face
supérieure de l’appareil uniquement pour allumer, utiliser la fonction mute
(silence) (pression brève >2 sec.), veille/menu config. (pression longue >2 sec.)
et régler le volume sonore.
Le branchement du AP-8600 s’effectue très facilement.
Merci de brancher les composants seulement quand ils sont éteints.
●Connectez le SMR, via les branchements audio situés à l’arrière,
avec son système audio ou reliez votre casque directement au
branchement du casque situé sur le côté gauche du SMR.
●Mettez en service, si nécessaire, votre réseau d’ordinateur.
●Connectez le SMR avec l’adaptateur secteur du SMR (prise de
courant pour courant continu).
●Branchez la station de recharge de la BRC à l’adaptateur secteur de
la BRC et placez la BRC sur la base de recharge comme le montre
l’image de la page 1.
●Merci de vérifier avant de brancher sur le réseau si l’adaptateur
secteur du AP-8600 convient à la tension de réseau que vous avez
chez vous.
●Branchement de l’adaptateur secteur à l’alimentation électrique.
●Allumez le SMR à l’aide du commutateur principal (K) situé sur le
côté droit du SMR.
●Allumez la BRC en appuyant brièvement sur la touche Power (2).
●En appuyant longuement sur la touche PO ER (2), le système
AP-8600 (BRC et SMR) se met en veille (en appuyant brièvement
sur PO ER, la fonction MUTE passe entre l’état éteint et allumé).
Quelques réglages sont possibles car le AP-8600 peut reproduire l’audio du
LAN, du LAN, de la radio Internet et des appareils de mémorisation USB
connectés. Veuillez lire les paragraphes correspondants de la notice
d’instructions pour ajuster votre AP-8600 correctement et obtenir ainsi la
puissance optimale avec toutes les sources.
18

FRANÇAIS
Station de echa ge de la BRC et echa ge des accus
La BRC contient un accu aux ions de lithium puissant rechargeable qui permet
de faire fonctionner le système AP-8600 sans câble et pendant de
nombreuses heures – grâce à sa haute capacité d’accu et à la gestion
d’économie de courant intégrée de la BRC.
Une recharge de l’accu est nécessaire avant la première utilisation sans câble de
la BRC.
Pour cela, reliez le bloc d’alimentation de la BRC à la prise sur la face arrière de
la station de recharge de la BRC et à la tension du réseau secteur.
La BRC est posée simplement à la verticale sur la station de recharge. Les
contacts dans la coque de recharge touchent alors les surfaces de contact dans
le fond de la BRC et assurent ainsi la recharge de l’accu intégré.
La télécommande peut être utilisée au complet pendant qu’elle se trouve sur la
station de recharge.
Rema que : si l’alimentation en courant est connectée, toutes les fonctions sont
également disponibles pendant l’opération de recharge. Le contrôle de charge
fonctionne même si la BRC est déconnectée !
Réglages pou mett e en ma che
À l’aide des premiers réglages suivants, la BRC et le SMR se connectent l’un à l’autre
et à votre réseau et il est nécessaire d’entreprendre quelques réglages de base.
Merci de procéder selon les étapes
suivantes pour régler la BRC et le SMR :
● allumez le SMR. Le SMR lance le
processus d’initialisation et par le LED, qui
clignote en bleu, il affiche après env. 1
min. qu’il se trouve en mode
configu ation et qu’il attend d’autres
paramétrages..
● allumez la BRC. « Language Setting »
vous demande de sélectionner la langue
du système désirée. Suivez les indications
figurant à l’écran. Après cette étape, la
BRC vous accueille dans la langue désirée.
● ensuite, la sélection des fuseaux
horaires apparaît. Sélectionnez votre
fuseau horaire et confirmez si l’heure d’été
doit être activée.
● l’assistant vous dirige à présent vers le
menu « Reche che du SMR » qui affiche
tous les SMR disponibles pour les réglages
de base.
19

FRANÇAIS
Pour faciliter l’identification parmi plusieurs SMR, le nom du SMR donné en
usine contient les six dernières décimales du numéro MAC individuel. Vous
trouverez le numéro MAC du SMR sur sa plaque signalétique.
● sélectionnez le SMR auquel vous désirez connecter la BRC.
● ensuite, vous avez l’occasion de donner un nouveau nom au SMR, par ex.
« Salon » selon son emplacement.
● le menu Type de éseau apparaît à
présent.
Le menu Type de réseau propose trois
assistants et deux points manuels de
sélection pour régler simplement le AP.
Sélectionnez les assistants conformément
à celui du réseau disponible chez vous :
1.
Assistant LAN (pour branchement filaire
sur réseau Ethernet) : si le SMR est
branché à l’aide d’un câble Ethernet au LAN
(DHCP),
la BRC commande le SMR via une connexion LAN directe (mode ad-hoc).
2. Assistant LAN (branchement sans fil) : le SMR et la BRC sont tous les deux
connectés sans fil via un routeur de réseau LAN ou un Access Point LAN.
En choisissant cette option, vous voyez le menu « Sélection de l’AP » où vous
sélectionnez votre LAN (DHCP) pour vous connecter et puis vous pouvez
aussi saisir votre mot de passe de sécurité pour le LAN.
3. Sans assistant réseau : si le SMR n’est pas branché à un réseau, la BRC
commande le SMR via une connexion LAN directe (mode ad-hoc). Le
fonctionnement sans réseau ne permet en fait que de lire des appareils de
mémoire USB.
● Après avoir terminé les réglages ci-dessus du type de réseau, la BRC est
connectée au SMR et le menu principal AP s’affiche sur la BRC. La LED
Power du SMR s’allume à présent en bleu sans clignoter et à côté à droite, la
LED de la BRC, qui clignote également en bleu, confirme la connexion entre la
BRC et le SMR.
Attention : au cas où la connexion n’a pas lieu (LED du SMR clignotent
constamment en bleu), répétez les étapes ci-dessus en revenant en arrière à
l'aide de la touche « Retour » située en haut à gauche de l’écran et effectuez à
nouveau le processus de configuration pour la « Recherche de SMR ».
Rema ques : directement après l’allumage du SMR, veuillez faire attention au
fait que la BRC ne peut pas trouver le SMR pendant le processus d’initialisation.
Veuillez alors attendre jusqu’à la fin du processus d’initialisation.
20
Table of contents
Languages:
Other Teac Media Player manuals

Teac
Teac MP-8000 User manual

Teac
Teac WAP-V6000 User manual

Teac
Teac NS-X1 User manual

Teac
Teac NT-503 Installation and maintenance instructions

Teac
Teac ITV-D500 User manual

Teac
Teac NT-505 User manual

Teac
Teac UR-Stream User manual

Teac
Teac WAP-4500 User manual

Teac
Teac NT-503 User manual

Teac
Teac NP-H750 User manual

Teac
Teac HA-P90SD Installation and operating instructions

Teac
Teac MP-10 User manual

Teac
Teac ShowMe User manual

Teac
Teac NT-503DAB User manual

Teac
Teac MP-4000 User manual

Teac
Teac NP-H750 User manual

Teac
Teac NT-505-X User manual

Teac
Teac NT-505 User manual

Teac
Teac MP-470 User manual

Teac
Teac NT-503 Installation and maintenance instructions