elink EK142CAM User manual

1
SLIMLINE
DASH CAM
Audio & Video Recorder

2
EK142CAM INSTRUCTION MANUAL
PLEASE READ ALL INSTRUCTIONS CAREFULLY AND RETAIN FOR
FUTURE USE
Getting Started
Remove the Car Digital Video Recorder from the box.
Remove any packaging from the product.
Please retain all packaging until you have checked and counted all the parts and the contents
against the parts list.
Package Contents
Car Digital Video Recorder
Car Charger
Suction Car Mount
USB Charge & Sync Cable
Instruction Manual
Key Features
1080P (1920x1080)/720P (1280x720)/VGA (640x480) pixels recording resolution
100 degree wide angle lens
2.4 inch TFT LCD screen
Loop recording
Auto ignition start
Video record / camera mode
6 LED lights
Built-in rechargeable battery
Built-in Micro SD card slot supports max. up to 32GB (Micro SD card is not included.)
Suction Car Mount for convenient installation
SAFETY INSTRUCTIONS
Keep the unit away from heat sources, direct sunlight, humidity, water and any other liquids.
Do not operate the unit if it has been exposed to water, moisture or any other liquids to prevent
against electric shock, explosion and/or injury to yourself and damage to the unit.
Do not use the unit if it has been dropped or damaged in any way.
Repairs to electrical equipment should only be performed by a qualified electrician. Improper
repairs may place the user at serious risk.
Do not use the unit with wet hands.
Do not put objects into any of the openings.
Keep the unit free from dust, lint etc.
Do not use this unit for anything other than its intended use.
Keep the unit out of reach of children.
This appliance is not a toy.
Batteries (battery pack or batteries installed) shall not be exposed to excessive heat place, such
as sunshine, fire or the like.
3
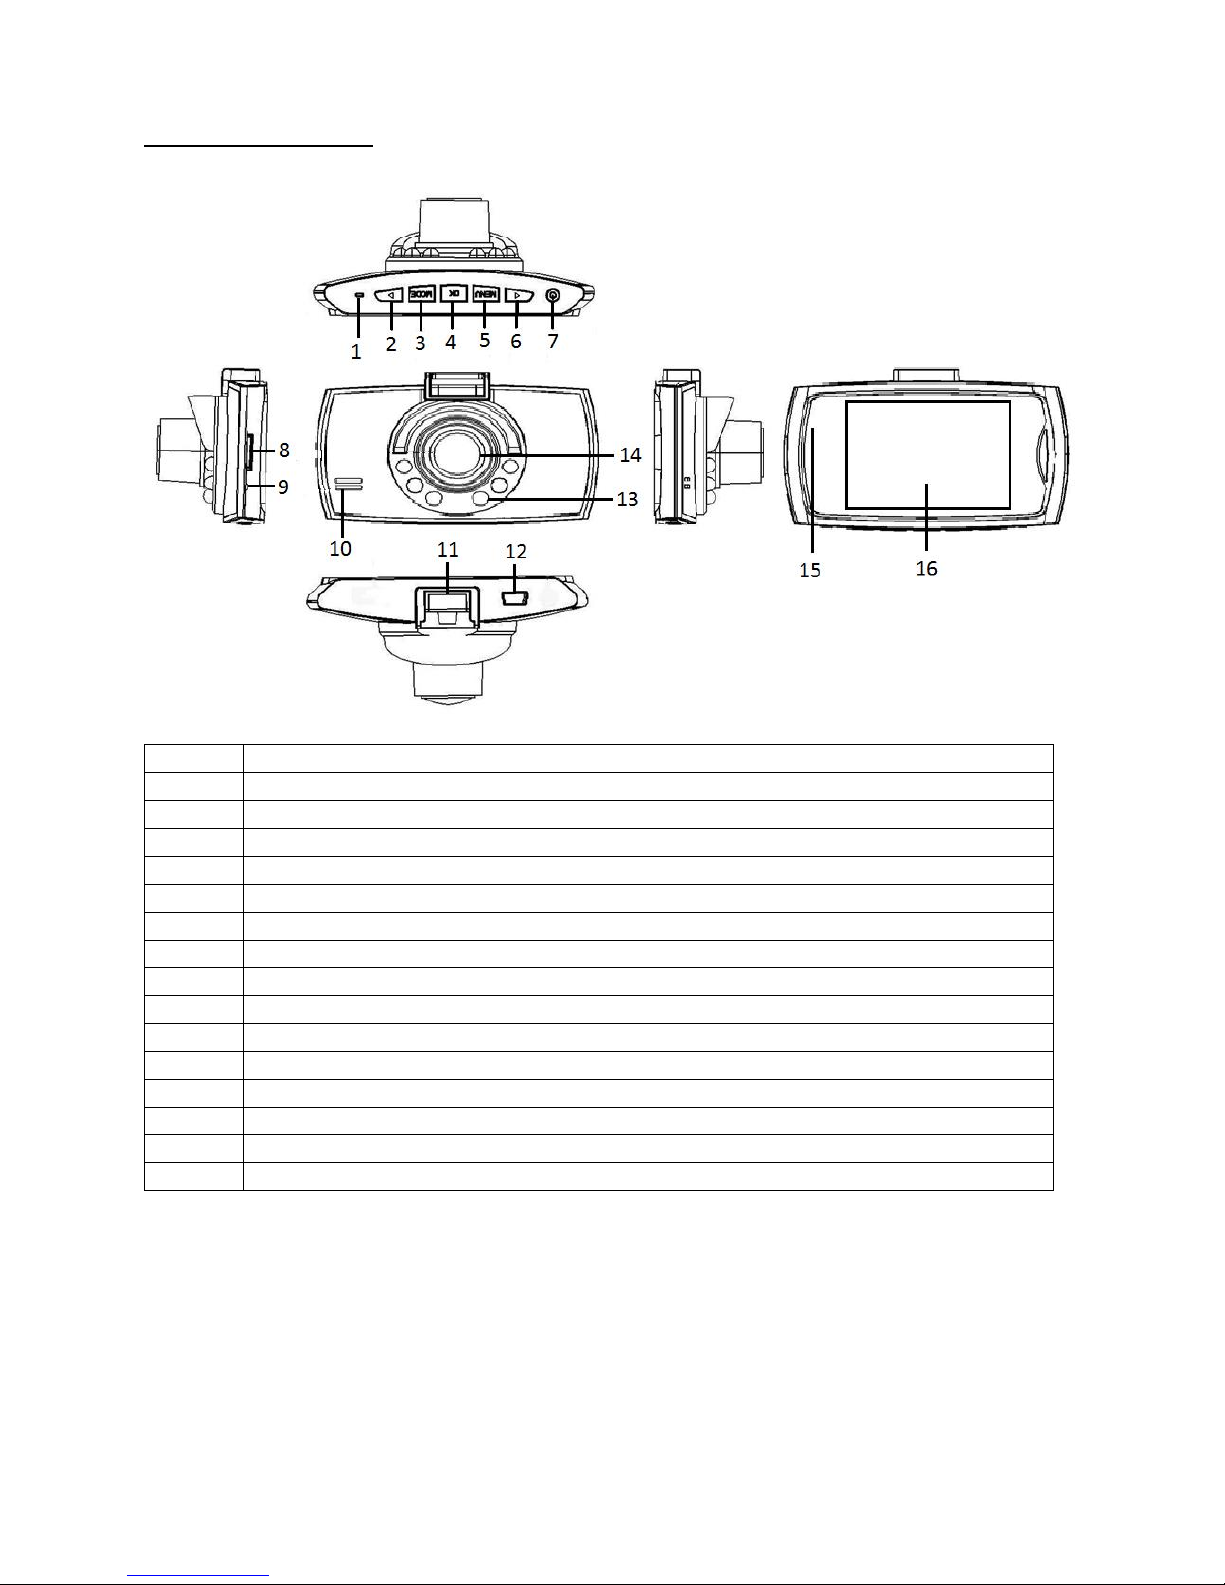
Description of Parts
1
Reset Button
2
Down Button
3
Mode Button
4
OK Button
5
Menu Button
6
Up Button
7
ON/OFF Power Button –Long press for ON/OFF, short press to open or close the IR LED
8
Micro SD card slot
9
Mic
10
Speaker
11
Bracket port
12
Mini USB Port (Charging & Syncing)
13
IR LED
14
Lens
15
LED light indicator
16
Screen
INSTRUCTIONS FOR USE
Two power options:
1. Use built-in Li-ion battery
The Digital Video Recorder (DVR) can be turned ON/OFF after it has been placed on the vehicle
by pressing the ON/OFF Power Button for 3 seconds.

4
Charging the built-in Li-ion battery: Connect the Car Charger (included) with Mini USB Port, or
connect the DVR with USB power source (excluding from computer) by USB Charge & Sync cable
(included). It can charge even when it’s switched off. While charging, the indicator light turns
red. Once battery is fully charged, red light turns off.
2. Connect with the Car Charger
DVR will record automatically when the car starts, turn off and save the last file when the car
stops.
Insert / Eject Micro SD Card
1. Insert the Micro SD card (not included) into the card slot correctly and then gently push it in
until you hear a click-secure sound.
2. Push the Micro SD Card gently, and it will pop up automatically. At this time, you can take out
the card.
Attention:
i. Please pay attention to the insert direction of the card. If it is in the wrong side, it may damage
the device and Micro SD card.
ii. When you insert the Micro SD card into the device, the device will set it as default storage
channel.
iii. If Micro SD card is incompatible with the device, please eject and insert another card.
iv. Device supports Micro SD card of up to 32GB.
Recording
DVR will enter into defaulted recording mode when turn it on, Blue LED light indicator and Red dot on
the screen blink and indicate it is recording. The recording file is saved in the Micro SD card. To stop,
press OK Button or ending when car stops, the Red dot will disappear.
Camera mode
Turn on the DVR and press Mode Button to enter into Camera mode. Take photo by pressing OK
Button, and the screen flashes once.
Preview and delete
Turn on the DVR and press Mode Button several times to enter into Preview mode. Press Up or Down
Button to select the previewed file. If it is video file, it can play or stop by pressing OK Button. If you
want to delete it, press Menu Button to enter into delete mode, and then, select One or All and confirm
to delete the file by press OK Button. Also, it can select Thumbnail mode and Volume (from 0 to 6)
under the Preview mode.
Setting the functions
Turn on the DVR and press Menu Button under Video mode or Camera mode to enter into setting
interface. Confirm by OK Button and select by Up/Down Button for the following setting. Press Menu
Button again to exit after finished.

5
A. Video mode
1. Size: Select 1080P/720P/VGA
2. Time Stamp: Select Off/On
3. Motion Detect: Select Off/On
Note: In “Motion Detect”mode, it will begin recording automatically on detecting motion
and will stop recording when there’s no movement around.
4. Video Time: Select Off/1 Min/3 Min/5 Min/10 Min to determine length of each run that
should be stored.
5. Voice Record: Select On/Off
B. Camera mode
1. Size: 3M/2M/1.3M/VGA
C. Setting Mode:
Whenever under Video mode or capture mode, press Menu Button twice to enter into Setup
interface.
1. Format: Select it if you want to format the Micro SD card
2. Language: Select English/Traditional Chinese/Simplified
Chinese/Japanese/Francais/Deutsch/…/Italiano/Portuguese/…/Espanol/…etc (12 languages)
3. Auto Off: select Off/1 Min/3 Min/5 Min
4. System Reset: Select Cancel/Execute system reset
5. Light Frequency: Set 50/60Hz
6. Date Input: Set correct recording Date and time by OK Button and Up/Down Button
7. USB: PC Cam/Disk Drive
8. version
USB Mode
Connect DVR to computer by USB Charge & Sync cable, [My computer] will occur removable disk, the
file is stored at Removable Disk/DCIM/100MEDIA. At the moment, the file of the DVR can be
downloaded to the computer.
Note: 1. Please insert the Micro SD card before recording.
2. This DVR records in cycles of 1 Min/3 Min/5 Min/10 Min. When the storage medium is full, it
will record from the beginning again and erase the previously recorded material
automatically. It will have 3 seconds pause time, and the contents during those 3 seconds
will not record.
3. When the lithium battery is low, the DVR screen will display “good-bye” and the unit will
turn off in 1-2 seconds.
4. Because the DVR requires DC 5V input, please use the included car charger. It has adaptor
12V/24V transfers to 5V already.
Technical Specifications
1. Video resolution: 1920x1080/1280x720/640x480 pixels
2. Video format: AVI
3. Repeat storage by section: 1 Min/3 Min/5 Min/10 Min
4. Photo resolution: 3M/2M/1.3M/VGA

6
5. Photo format: JPG
6. Power source: Built-in rechargeable Li-ion battery 3.7V 200mAh or 12V/24V Car Charger –
output 5V 1A
7. Supports Micro SD card (up to 32GB)
8. Microphone: can record sound
9. 2.4 inch TFT LCD screen
10. System Windows: 2000/XP/Windows 7 and later
Care and maintenance
Read the following recommendations before using the device. Following these you will be able to enjoy
the product for many years.
The device needs very little maintenance, however the casing may become slightly dirty. To clean,
use a damp soft clean cloth and for stubborn stains, a small amount of detergent may be used on
the case.
It is recommended that a commercial lens cleaner is used to prevent damage to the lens surface.
This unit is best stored in a cool dry environment away from bright light and dust.
Remove all media when storing the device.
Replace in packaging when dry and store in a cool dry place away from children.
FCC Instructions
Changes or modifications not expressly approved by the party responsible for compliance could void the
user’s authority to operate the product.
NOTE: This product has been tested and found to comply with the limits for a Class B digital device,
pursuant to Part 15 of the FCC Rules. These limits are designed to provide reasonable protection against
harmful interference in a residential installation. This product generates, uses and can radiate radio
frequency energy and, if not installed and used in accordance with the instructions, may cause harmful
interference to radio communications. However, there is no guarantee that interference will not occur
in a particular installation. If the product does cause harmful interference to radio or television
reception, which can be determined by turning the equipment off and on, the user is encouraged to try
to correct the interference by one or more of the following measures :
-Reorient or relocate the receiving antenna.
-Increase the separation between the product and receiver.
-Connect the product into an outlet on a circuit different from that to which the receiver is connected.
-Consult the dealer or an experienced radio/TV technician for help.
This device complies with part 15 of the FCC Rules. Operation is subject to the following two conditions:
(1) This device may not cause harmful interference, and (2) this device must accept any interference
received, including interference that may cause undesired operation.
Table of contents


