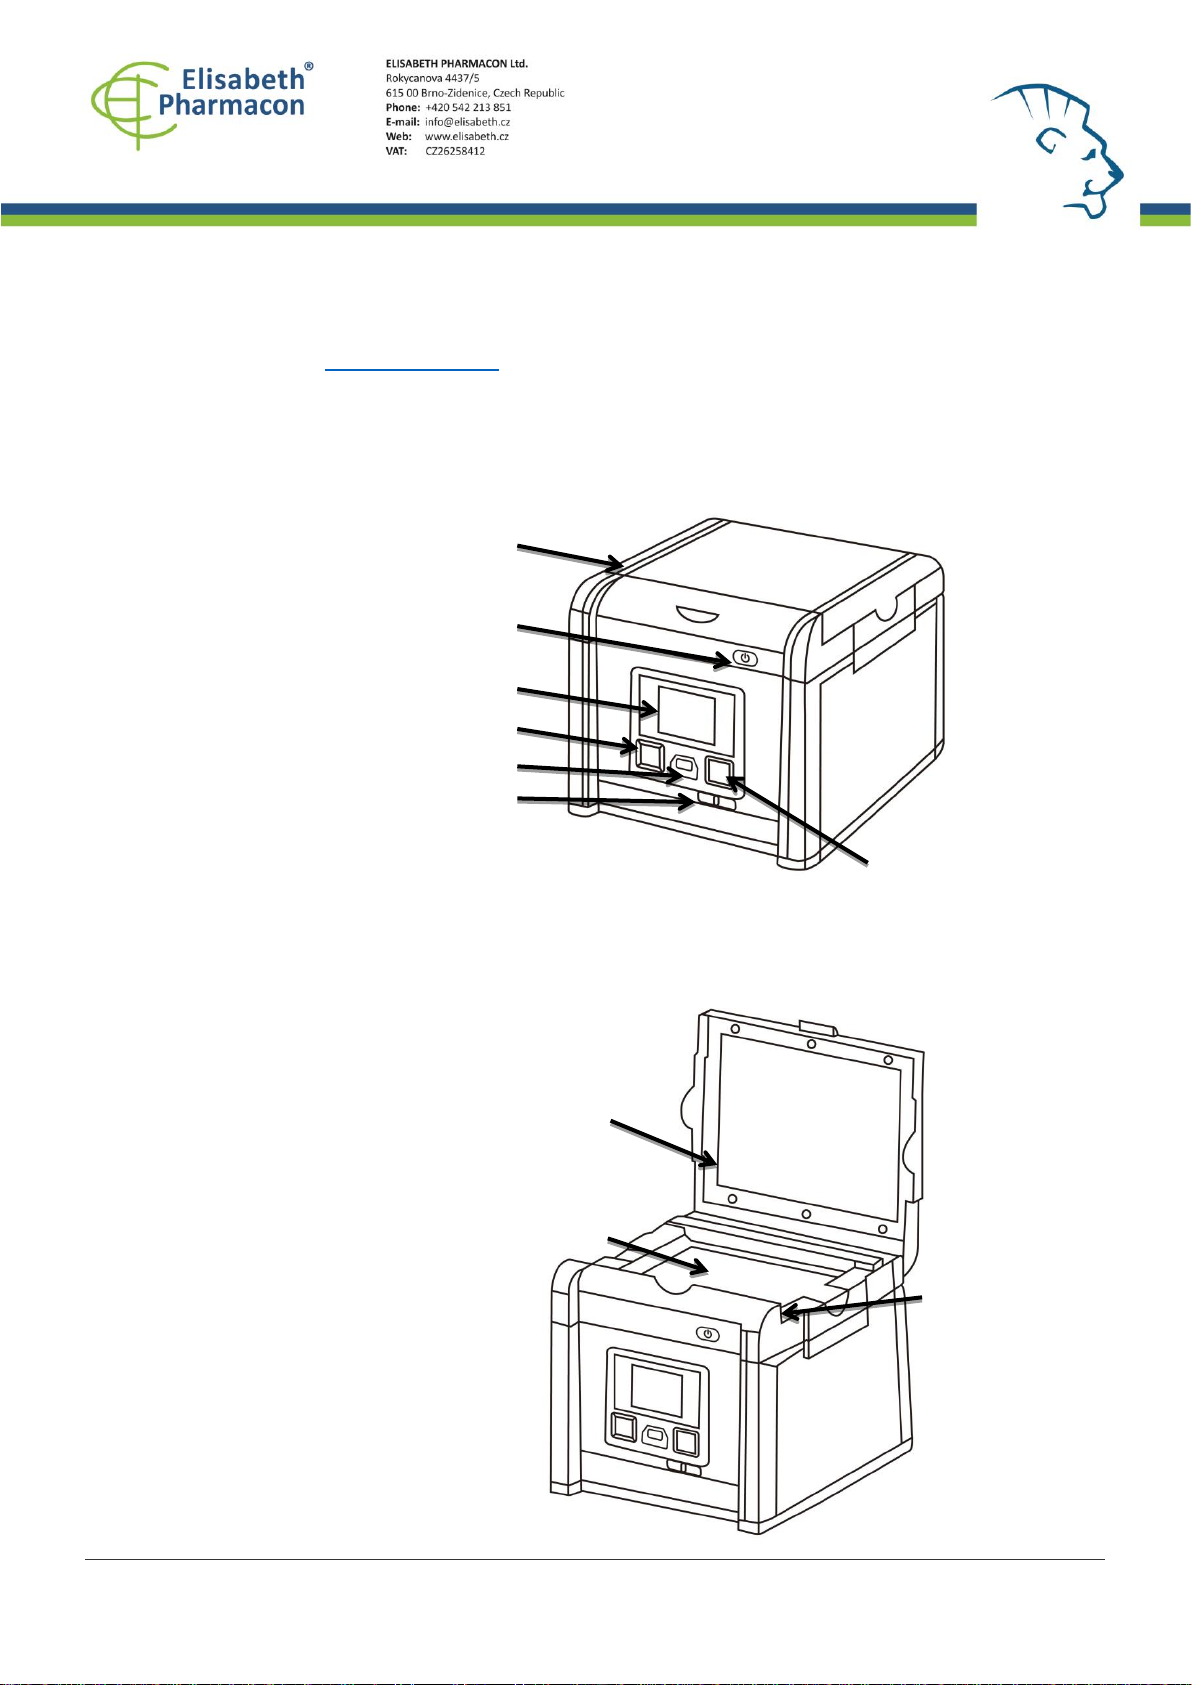
Elisabeth Pharmacon ZEPHYRUS GelCube Illuminator Series User manual

1
ZEPHYRUS® GelCube Illuminator
Instructions for Use
Ref. No.: Z-DOC-505-B –LED bluewhite
Z-DOC-505-C –LED CyanW
Created by: VIJU Instruction Manual ZEPHYRUS® Gel Cube Illuminator
Source: https://www.elisabeth.cz/en/product-zephyrus-gel-cube-cyanw-transilluminator.html
This file is owned by ELISABETH PHARMACON, spol. s r. o., It is issued for publication. Version: 180220-01
Downloaded: 02.03.2020 09:17 online user Page 1 of 16

2
Content
Introduction .....................................................................................................................................3
Warnings ..........................................................................................................................................3
Unpacking.........................................................................................................................................3
Product description..........................................................................................................................4
Setup ................................................................................................................................................5
Technical specification.....................................................................................................................6
Scanning gel .....................................................................................................................................7
Scanning Western blot/colorimetric stained gel .............................................................................8
Browse scanned images/delete scanned images ............................................................................8
Installation of amber filter board.....................................................................................................9
Menu..............................................................................................................................................10
Warranty ......................................................................................................................................165
Created by: VIJU Instruction Manual ZEPHYRUS® Gel Cube Illuminator
Source: https://www.elisabeth.cz/en/product-zephyrus-gel-cube-cyanw-transilluminator.html
This file is owned by ELISABETH PHARMACON, spol. s r. o., It is issued for publication. Version: 180220-01
Downloaded: 02.03.2020 09:17 online user Page 2 of 16

3
Introduction
Thank you for purchasing ZEPHYRUS® GelCube LED Imager. This compact instrument is designed
to provide high performance in sensitivity for the detection of blue light-excitable fluorescent
stained DNA/RNA gels without exposure to dangerous UV light. The white light is suitable for
imagining Western blots.
An orange photo filter is included with the system. This filter is designed to absorb (block) blue
excitation light from a blue light source, allowing through only the fluorescing sample light for
capturing gel images.
Warnings
Read this manual in its entirety before operating the ZEPHYRUS® GelCube LED Imager and keep
the manual for future reference.
CAUTION: When using blue light transilluminators: Although blue light does not pose
the same hazards as UV light, the emitted blue light is very bright. It is not
recommended to look directly at the blue light illumination surface.
CAUTION: When working in a laboratory environment, it is always important to
properly handle all reagents and chemicals. Use proper and common laboratory
safety practices when working with reagents and gels stained with DNA dye. Always
wear gloves.
Unpacking
NOTE: Always handle the ZEPHYRUS® GelCube LED Imager and parts with care.
Carefully remove the system and all accessories from the carton and remove any protective
pieces. Check for any shipping damage. In the event of shipping damage, a claim must be filed with
the carrier. Check the contents of the package to make sure you have received all of the parts
ordered:
•Imaging box
•Extending adapter
•Amber photo filter
•Black plastic board
•QIG
•Gel cutting knife
•Gel shovel
•Flash Drive (16G) USB. 3.0
Created by: VIJU Instruction Manual ZEPHYRUS® Gel Cube Illuminator
Source: https://www.elisabeth.cz/en/product-zephyrus-gel-cube-cyanw-transilluminator.html
This file is owned by ELISABETH PHARMACON, spol. s r. o., It is issued for publication. Version: 180220-01
Downloaded: 02.03.2020 09:17 online user Page 3 of 16

4
•User’s manual
If any parts are damaged or missing, please immediately contact Elisabeth Pharmacon Ltd. at +420
IMPORTANT: Save the carton and packing materials for storing and transporting ZEPHYRUS®
GelCube LED Imager or returning it for any required servicing.
Product description
Front
Up/Down, Left/Right menu button
USB 2.0 Port
Scan button
Cyan Light/White Light selection switch
Power Button
LCD display
Upper lid
Figure 1
SCANNER COMPONENTS
Front (Figure 1):
-Up/Down, Left/Right menu button
-USB 2.0 Port
-Scan button
-Blue Light/White Light selection switch
-Power On/Off Button
-LCD display
-Upper lid
Figure 2
Upper lid
Lighting area
Lid Sensor
Created by: VIJU Instruction Manual ZEPHYRUS® Gel Cube Illuminator
Source: https://www.elisabeth.cz/en/product-zephyrus-gel-cube-cyanw-transilluminator.html
This file is owned by ELISABETH PHARMACON, spol. s r. o., It is issued for publication. Version: 180220-01
Downloaded: 02.03.2020 09:17 online user Page 4 of 16

5
Setup
Place gel to the centre of the
Inside (Figure 2):
-Upper lid
-Lighting area
-Lid Sensor
Figure 3
USB 2.0 port
DC power
VGA Our Port
Back (Figure 3):
-DC power
-USB 2.0 port
-VGA port
1. Remove all tapes used to hold items in place for shipping.
2. Place ZEPHYRUS®GelCube LED Imager on flat surface.
3. Connect power source –connect AC adapter to back of unit then plug into electrical outlet.
4. Push power button.
5. Insert USB flash drive.
6. The Menu Mode icon will be displayed on the top left side of the display (Figure 4).
7. Place gel directly on the surface of the Lighting area (Figure 5).
8. Adjust the image condition and scan.
Figure 5
Place the gel directly
Menu mode icon
Figure 4
Created by: VIJU Instruction Manual ZEPHYRUS® Gel Cube Illuminator
Source: https://www.elisabeth.cz/en/product-zephyrus-gel-cube-cyanw-transilluminator.html
This file is owned by ELISABETH PHARMACON, spol. s r. o., It is issued for publication. Version: 180220-01
Downloaded: 02.03.2020 09:17 online user Page 5 of 16

6
lighting area.
Technical specification
Image capturing unit
Sensor
CMOS Sensor
Resolution
9M Pixels
Exposure Time
0.1~2 sec
Image Storage
USB Flash Drive
View Area
16 x 10.5 cm (Fixed Lense)
Lens and Filter
Filter Turret
Manual-Driven
Emisson filter
Amber filter
Lighting
Z-DOC-505-B
blue LED light - bluewhite
Z-DOC-505-C
cyan LED light - greenwhite
Epi White Light
LED White Light
White Back Light
White Light Panel
Interface
Display Panel
Build-in 2.7” Touch TFT LCD
Output
1. USB 2.0 x2 (Thermal printer and USB flash drive )
2. VGA out ( 800x600, 1024x768)
General Info
Power
AC Adaptor, 12V/4.6A
Dimensions (WxHxD)
230x230x254mm
Gel Tools
Shovel, Amber View Shield
Weight
3.2 kg
Certification
CE
Figure 6
Created by: VIJU Instruction Manual ZEPHYRUS® Gel Cube Illuminator
Source: https://www.elisabeth.cz/en/product-zephyrus-gel-cube-cyanw-transilluminator.html
This file is owned by ELISABETH PHARMACON, spol. s r. o., It is issued for publication. Version: 180220-01
Downloaded: 02.03.2020 09:17 online user Page 6 of 16

7
Scanning gel
1. Slide the Light Selection Switch on the
front side of the scanner to select the
white light source for stained gel scanning.
2. In “Scanning Mode”, lift the lid to
open the scanner.
3. Slide the black plastic board into the
groove of the white backlight to block the
white light on the lid* (Figure 7).
4. Place the imaging subject to the center of
the lighting area.
5. Close the scanner lid.
6. Slide the Light Selection Switch on the
front side of the scanner to choose green
light source for scanning stained gel.
7. Set and adjust the desired image quality
through the Functional Menu if necessary
(Please check “Functional Descriptions”
section for the details of all functions).
8. Press SCAN button, green LED will flash
and “CAPTURING”will be displayed on the
screen. If thermal printer had been
connected with ZEPHYRUS®GelCube LED
Imager, “Printing Yes/No”will be displayed
on the screen. The scanned image will
automatically save to USB flash drive.
Scanning of the gel sample is now complete.
Figure 7
Slide the black plastic board to avoid the background
light for fluorescent stained gel scanning.
Black plastic board
White backlight
(* It is suggested to slide the black plastic board to block the white backlight on
the lid for fluorescent stained gel scanning.)
Created by: VIJU Instruction Manual ZEPHYRUS® Gel Cube Illuminator
Source: https://www.elisabeth.cz/en/product-zephyrus-gel-cube-cyanw-transilluminator.html
This file is owned by ELISABETH PHARMACON, spol. s r. o., It is issued for publication. Version: 180220-01
Downloaded: 02.03.2020 09:17 online user Page 7 of 16

8
Scanning Western blot/colorimetric stained gel
Browse scanned images/delete scanned images
1. Slide the Light Selection Switch on the front side of the scanner to select the white light
source for stained gel scanning.
2. In “Scanning Mode”, lift the lid to open scanner.
3. Make sure there is no black plastic sheet blocked in front of the white back light.
4. Place the imaging subject to the center of the lighting area.
5. Close the scanner lid.
6. Set “White Epi”or “White Back Light”* item through Function Menu (Please check “LED
Lighting”in “Function Menu Options”section for turning on “White Epi”or “White Back
Light”options).
7. Adjust the desired image quality through the Functions Menu if necessary (Please check
“Function Menu Options”section for the details of all functions).
8. Press SCAN button, green LED will flash and “CAPTURING”will be displayed on the screen
(If thermal printer has been connected to the scanner, “Printing Yes/No”will be displayed
on the screen.).
9. The scanned image will automatically be saved to USB flash drive.
Scanning of the blot is now complete.
* “White Back Light”mode is to scan the gel such as SDS-PAGE stained with coomassie blue and
further in a transparent background preservation.
Examine Scanned Images
a. When icon displays on top left corner of the screen, press “OK”to get into
functional options.
b. When “Scan Mode”icon is highlighted , press “OK”again to get into “Play Mode”.
c. The “Play Mode”icon will display on top left corner of screen. Then, the captured
images can be reviewed one by one by pressing right arrow button.
d. Press up/down arrow button, the image can be zoomed in/out and be moved upward/downward
and leftward/rightward.
Delete Scanned Images
a. When viewing the image that needs to be deleted, press “OK”to get into
Function Descriptions II.
b. Press right arrow button to choose “Edit Mode”.
c. Press up/down arrow button to choose “Delete”. Press right arrow button to select (yes/no)
to delete the file.
Created by: VIJU Instruction Manual ZEPHYRUS® Gel Cube Illuminator
Source: https://www.elisabeth.cz/en/product-zephyrus-gel-cube-cyanw-transilluminator.html
This file is owned by ELISABETH PHARMACON, spol. s r. o., It is issued for publication. Version: 180220-01
Downloaded: 02.03.2020 09:17 online user Page 8 of 16

9
Installation of amber filter board
ZEPHYRUS®GelCube LED Imager is equipped with an
amber filter board for green light protection and gel
cutting purposes. Open the lid and install the filter
board so the gel cutting task may be conducted.
1. Open the lid, cyan light will auto turn off
2. Lift the lid to its maximum open angle
3. Position the amber filter board with the hole
for hanging on lid in front (Figure 8).
4. Place the amber filter board onto the filter
board hanging tab so the filter board may hang
as shown in (Figure 9).
5. When hanging on the lid, make sure the two
small pins on the filter board are placed closely
against the lid.
6. The installation is completed. One may turn
on cyan LEDs by “Scan button”for further gel
cutting purpose by using the provided gel
cutting knife.
Figure 8
Filter board
hanging tab
Small pin
Amber Filter
Board
Figure 9
DISPLAY SCANS ON Monitor or Projector
The display from the scanner can be displayed on a television rather than the built in
scanner preview screen using the VGA port.
1. Set the television to VGA mode (see monitor documentation for details).
2. Connect the included VGA cable to the video port on the monitor.
3. Connect the other end of the cable to the VGA port on the back of the scanner.
4. Video output from the scanner can now be seen on the connected monitor including
the full menu interface.
Created by: VIJU Instruction Manual ZEPHYRUS® Gel Cube Illuminator
Source: https://www.elisabeth.cz/en/product-zephyrus-gel-cube-cyanw-transilluminator.html
This file is owned by ELISABETH PHARMACON, spol. s r. o., It is issued for publication. Version: 180220-01
Downloaded: 02.03.2020 09:17 online user Page 9 of 16

10
Menu
Functional Menu: When image display on screen in yellow border, press “OK”button so the
functional icon will show on the left upper corner.
A. Function Descriptions I:
Scan Mode: The object is able to be scanned in this mode.
Transmitted/Epi image scan, respectively (Note: this mode is available only
when white light application is selected.)
Exposure Mode: To adjust the exposure time frame in this mode.
G/W Switch Mode: To scan/display the image in monochrome and
normal/invert mode. Default setting: monochrome (black & white)
Set Up Mode: To set up the following parameters:
a. LCD: Dark, Normal, Bright
b. Display: LCD, VGA
c. Video Output: 800x600, 1024x768
d. Save Format: TIF, JPG, BMP, (“JPG” is default setting)
e. Quick View: 1 sec, 2sec, 3 sec, off (“2sec” is default setting)
f. Slide Show Interval: 2 sec, 3sec, 5 sec, 10 sec (“3sec” is default setting)
g. Power Save: 1 min, 3 min, 5 min, 10 min (“1 min” is default setting)
h. Language: english, japanese
i. Date: setup date yyyy/mm/dd
j. Time: setup time hh/mm/ss
k. Reset: Yes, No. (Reset all current settings back to factory default)
l. Reset: Yes, No. (If “YES”, reset all current settings back to factory default)
m. About: Unit Name, S/W version, F/W version, Update, CWD information
Created by: VIJU Instruction Manual ZEPHYRUS® Gel Cube Illuminator
Source: https://www.elisabeth.cz/en/product-zephyrus-gel-cube-cyanw-transilluminator.html
This file is owned by ELISABETH PHARMACON, spol. s r. o., It is issued for publication. Version: 180220-01
Downloaded: 02.03.2020 09:17 online user Page 10 of 16

11
Functional Menu:
B. Function Descriptions II:
Play Mode: To play the captured images. To examine the captured image.
Move/Zoom Mode: Zoom in/out captured images by pressing
buttons. By pressing up/down arrow button and left/right arrow button, the
image can be moved upward/downward and leftward/rightward.
Press to exit the Move/Zoom Mode.
Auto Play Mode: To automatically play the captured images one by one.
Edit Mode: To edit the captured images (such as to rotate or to delete the
captured image, etc…)
Preview Mode: To preview the captured images in a multi-image thumbnail
panel.
Set Up Mode: Same as the “Set Up Mode”functions in Function Descriptions I.
C. Function Descriptions I:
“Scan Mode”
When icon displays on top left corner of the screen, the object is ready to be scanned.
“LED Lighting Mode”*
a. When in “Scan Mode”, press “OK”to get into functional option list.
b. Press right arrow button to choose “LED Lighting Mode”.
c. Press up or down arrow button to choose light source (Transmitted & Epi1).
d. Press “OK”to save the setting.
*: “LED Lighting Mode”Is only available when switching to white light application.
1: “White Back Light”mode is to scan gels, such as SDS-PAGE gels stained with coomassie blue,
preserved in a transparent manner.
Created by: VIJU Instruction Manual ZEPHYRUS® Gel Cube Illuminator
Source: https://www.elisabeth.cz/en/product-zephyrus-gel-cube-cyanw-transilluminator.html
This file is owned by ELISABETH PHARMACON, spol. s r. o., It is issued for publication. Version: 180220-01
Downloaded: 02.03.2020 09:17 online user Page 11 of 16

12
“Exposure Mode”
a. When icon displays on top left corner of the screen, press “OK”to get into
functional option list.
b. Press right arrow button to choose “Exposure Mode”.
c. Press up or down arrow button to choose the desired exposure level.
d. When the desired exposure level is selected, press “OK”to get back to “Scan mode”.
“Target Type Mode”
a. When icon displays on top left corner of the screen, press “OK”to get into
functional option list.
b. Press right arrow button to choose “G/W Switch Mode”.
c. Press up or down arrow button to choose to select the desired display mode (G & W;
color invert or G & W invert).
d. Press “OK”again to return to “Scan Mode”.
*: The default setting of the scanner is Black & White in normal condition.
1 : “Color/Color Invert”option only occurs when in white light application.
“Set Up Mode”
a. When icon displays on top left corner of the screen, press “OK” to get into functional
option list.
b. Press right arrow button to choose “Set Up Mode” .
C. Press down arrow button to get into “Setup Menu” and select the desired setting item.
d. Press right arrow button to get into setting mode. Then press up and down arrow button
to select the desired setting. Press “OK” to save the setting.
e. Press down arrow button to select other setting mode; or press “OK” again to return to
“Scan Mode”.
Created by: VIJU Instruction Manual ZEPHYRUS® Gel Cube Illuminator
Source: https://www.elisabeth.cz/en/product-zephyrus-gel-cube-cyanw-transilluminator.html
This file is owned by ELISABETH PHARMACON, spol. s r. o., It is issued for publication. Version: 180220-01
Downloaded: 02.03.2020 09:17 online user Page 12 of 16

13
Created by: VIJU Instruction Manual ZEPHYRUS® Gel Cube Illuminator
Source: https://www.elisabeth.cz/en/product-zephyrus-gel-cube-cyanw-transilluminator.html
This file is owned by ELISABETH PHARMACON, spol. s r. o., It is issued for publication. Version: 180220-01
Downloaded: 02.03.2020 09:17 online user Page 13 of 16

14
Setup Menu and related setting items:
a. LCD: Dark, Normal, Bright
b. Display: LCD, VGA
c. Video Output: 800x600, 1024x768
d. Filename: Edit scanned file name (6 characters maximum)
e. Save Format: TIFF, JPG, BMP
f. Quick View: 1 sec, 2 sec, 3sec, off
g. Slide Show Interval: 2 sec, 3sec, 5 sec, 10 sec
h. Power Save: 1 min, 3 min, 5 min, 10 min
i. Language: english, japanese
j. Date: yyyy/mm/dd
k. Time: hh/mm/ss
l. Reset: Yes, No. (If “YES”, reset all current settings back to factory default)
m. About: Unit Name, S/W version, F/W version, Update, CWD information
D. Function Descriptions II:
“Play Mode”
a. When icon displays on top left corner of the screen, press “OK”to get into
functional options.
b. When “Scan Mode”icon is highlighted , press “OK”again to get into “Play Mode”.
c. The “Play Mode”icon will display on top left corner of screen. The captured
images can then be reviewed one by one by pressing right arrow button.
d. Press “OK”twice to get back to “Scan Mode”(It will take few seconds to complete
the process.)
Move/Zoom Mode
e. Move/Zoom Mode: Zoom in/out captured images by pressing buttons. By pressing
up/down arrow button and left/right arrow button, the image can be moved
upward/downward and leftward/rightward.
Press to exit the Move/Zoom Mode.
Created by: VIJU Instruction Manual ZEPHYRUS® Gel Cube Illuminator
Source: https://www.elisabeth.cz/en/product-zephyrus-gel-cube-cyanw-transilluminator.html
This file is owned by ELISABETH PHARMACON, spol. s r. o., It is issued for publication. Version: 180220-01
Downloaded: 02.03.2020 09:17 online user Page 14 of 16

15
“Edit Mode”
a. When in “Play Mode”, press “OK”to get into functional option list.
b. Press right arrow button to choose “Edit Mode”.
c. Press down arrow button to get into “Edit Menu”(Rotate/Delete) and select the
desired setting item.
d. Press right arrow button to get into setting mode:
Rotate: Right 90°Delete: No
Left 90°Yes
180°
Flip horizontally
Flip vertically
e. Press up and down arrow button to select the desired setting. Press “OK”to save the
setting.
f. Repeat step e. for “delete mode”setting or press “OK”again to return to “Play Mode”.
“Preview Mode”
a. When in “Play Mode”, press “OK”to get into functional option list .
b. Press right arrow button to choose “Preview Mode”.
c. Press down arrow button to get into “Preview Menu”(1 X 1, 2 X 2, 3 X 3) and select the
desired setting item.
Preview Mode: 1 X 1 Display 1 image at a time
2 X 2 Display 4 images at a time
3 X 3 Display 9 images at a time
d. Press “OK”button to save the setting.
e. The captured images will display on the screen based on the selected preview format setting.
“Set Up Mode”
Same as the “Set Up Mode”described in “Function Descriptions I”on page 10.
“Auto Play Mode”
a. When in “Play Mode”, press “OK”to get into functional option list.
b. Press right arrow button to choose “Auto Play Mode”, then press “OK”.
c. The captured image will automatically display on LCD screen one by one.
Created by: VIJU Instruction Manual ZEPHYRUS® Gel Cube Illuminator
Source: https://www.elisabeth.cz/en/product-zephyrus-gel-cube-cyanw-transilluminator.html
This file is owned by ELISABETH PHARMACON, spol. s r. o., It is issued for publication. Version: 180220-01
Downloaded: 02.03.2020 09:17 online user Page 15 of 16

16
Warranty
The ZEPHYRUS® GelCube LED Imager is warranted against defects in materials, workmanship and
normal use for 1 year. If any defects occur in the instrument or accessories during this warranty
period, Elisabeth Pharmacon Ltd. will repair/replace the defective parts/replace the instrument at
its discretion without charge. Warranty is excluded in the case of following:
-unauthorized repair
-use of spare parts by anyone other than Elisabeth Pharmacon Ltd.
-used in the manner not described in this manual
-damage caused by accident, neglect, misuse, improper service, natural forces or other
causes not arising from defects in original material or workmanship
Manufacturer:
ELISABETH PHARMACON Ltd.
Rokycanova 4437/5, Brno-Židenice 615 00
Created by: VIJU Instruction Manual ZEPHYRUS® Gel Cube Illuminator
Source: https://www.elisabeth.cz/en/product-zephyrus-gel-cube-cyanw-transilluminator.html
This file is owned by ELISABETH PHARMACON, spol. s r. o., It is issued for publication. Version: 180220-01
Downloaded: 02.03.2020 09:17 online user Page 16 of 16
This manual suits for next models
4
Table of contents
Other Elisabeth Pharmacon Laboratory Equipment manuals
Popular Laboratory Equipment manuals by other brands

TP-Link
TP-Link TL-POE10R installation guide

FuturaSun
FuturaSun Silk Plus Duetto Series Safety and installation manual

nuVita
nuVita Stericompact 1082 instruction manual

socorex
socorex acura 865 manual

Agilent Technologies
Agilent Technologies 1100 Series Reference manual

SCHOTT
SCHOTT KL 1500 HAL/H user manual