Elite Massage Chairs Triumph User manual
Triumph

01-02
03
04
05
06
07
08-11
12
13
14
15-21
22
23
Safety Precaution
Proper Use of the Chair
Maintenance of the Chair
Grounding and Surge Protection
Cautions for the Heat/ Warmer Function
Components and Accessories
Assembly
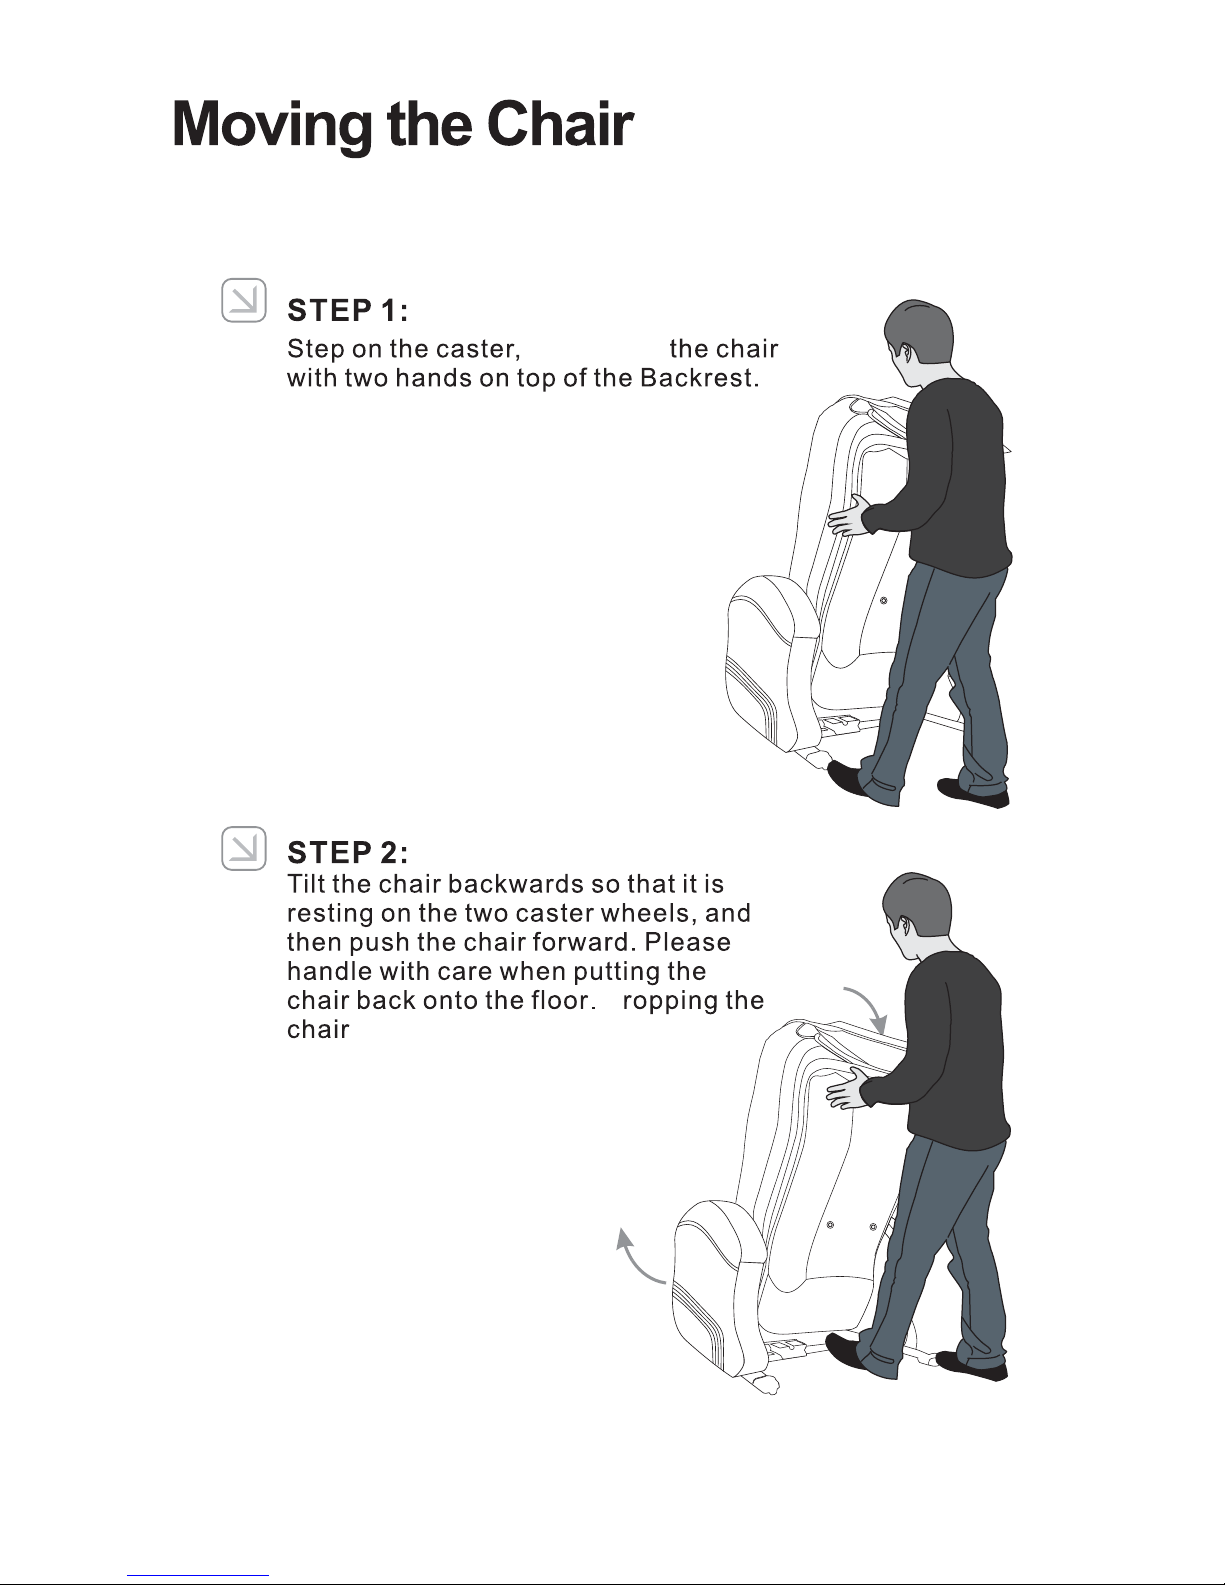
Moving the Chair
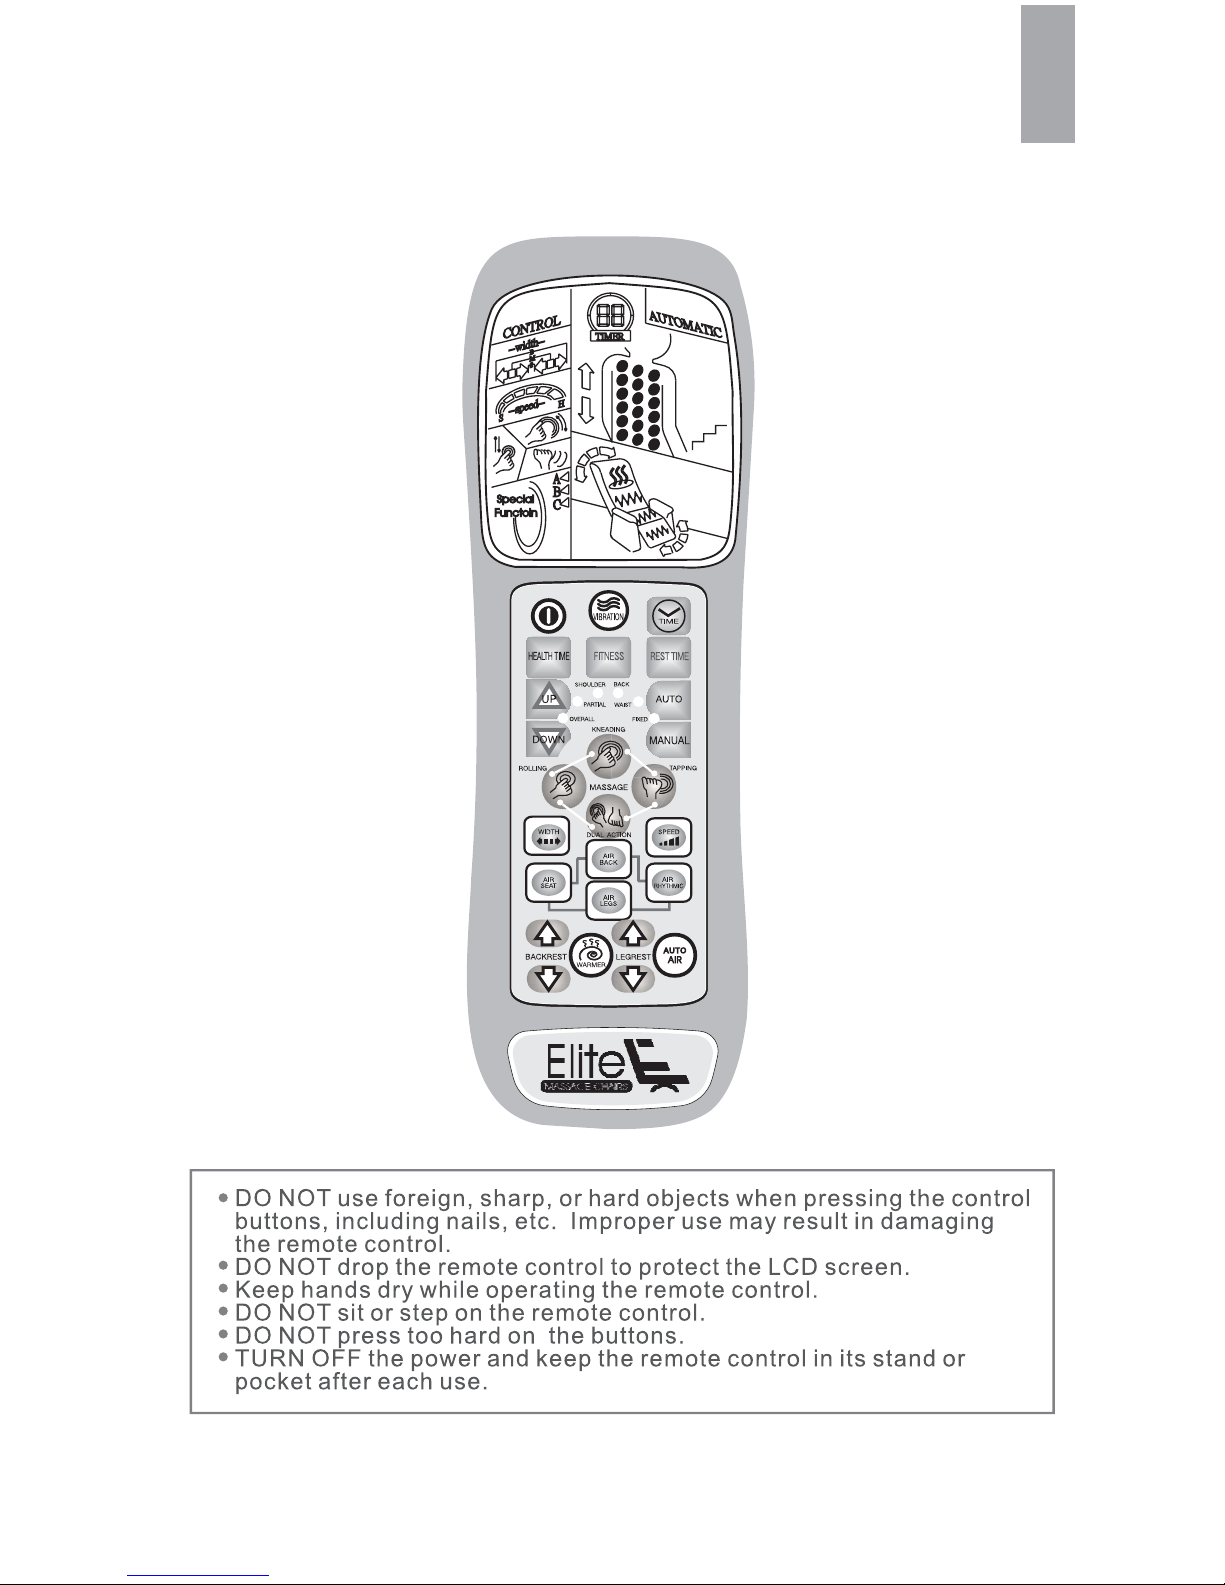
Remote Control
LCD Icons and Display
Function Descriptions
Footrest Extension
Product Specifications

01
People
1. To prevent injuries, children and pets should be
restricted from playing around the chair.
Call
our customer support department.
4. Keep hands and feet away from all mechanisms.
pre approved

02
Towel
11.Do not use the chair if the back pad is flipped over.
is exposing
03
please follow the instructions below.
the
2. For your protection the suggested time of use of the chair is
30 minutes or less. Users should begin an additional use of
the chair for a minimum of their previous utilization period of
time. Example: if you use the chair for 20 minutes, wait to
use it again for 20 minutes.
3. Some functions need 2~3 seconds to activate after pressing
buttons, some need 5 seconds, especially when switching
from auto to manual programs.
4. DO NOT place heavy objects on the armrest, footrest or
backrest, as it may result in damage.
5. If the chair is stored below 40F° for an extended period,
place the chair at room temperature for one day prior to use.
6. We recommend drinking a minimum of 8 ounces of water
after utilizing as this may assist with improved circulation.

04
3. Remote Control
Damage
in a dry
ƔUse only a dry cloth to wipe the Remote Control to avoid damaging
the components.
ƔDO NOT pull, or stretch the Remote Wire. The remote control must
be used with care. DO NOT drop or allow the LCD to fall between
cushions as the panel could be damaged and will not be covered
by the warranty.
05
Grounded
Outlet Box
Grounded
Outlet
Grounding
Pi
AA200
<A>
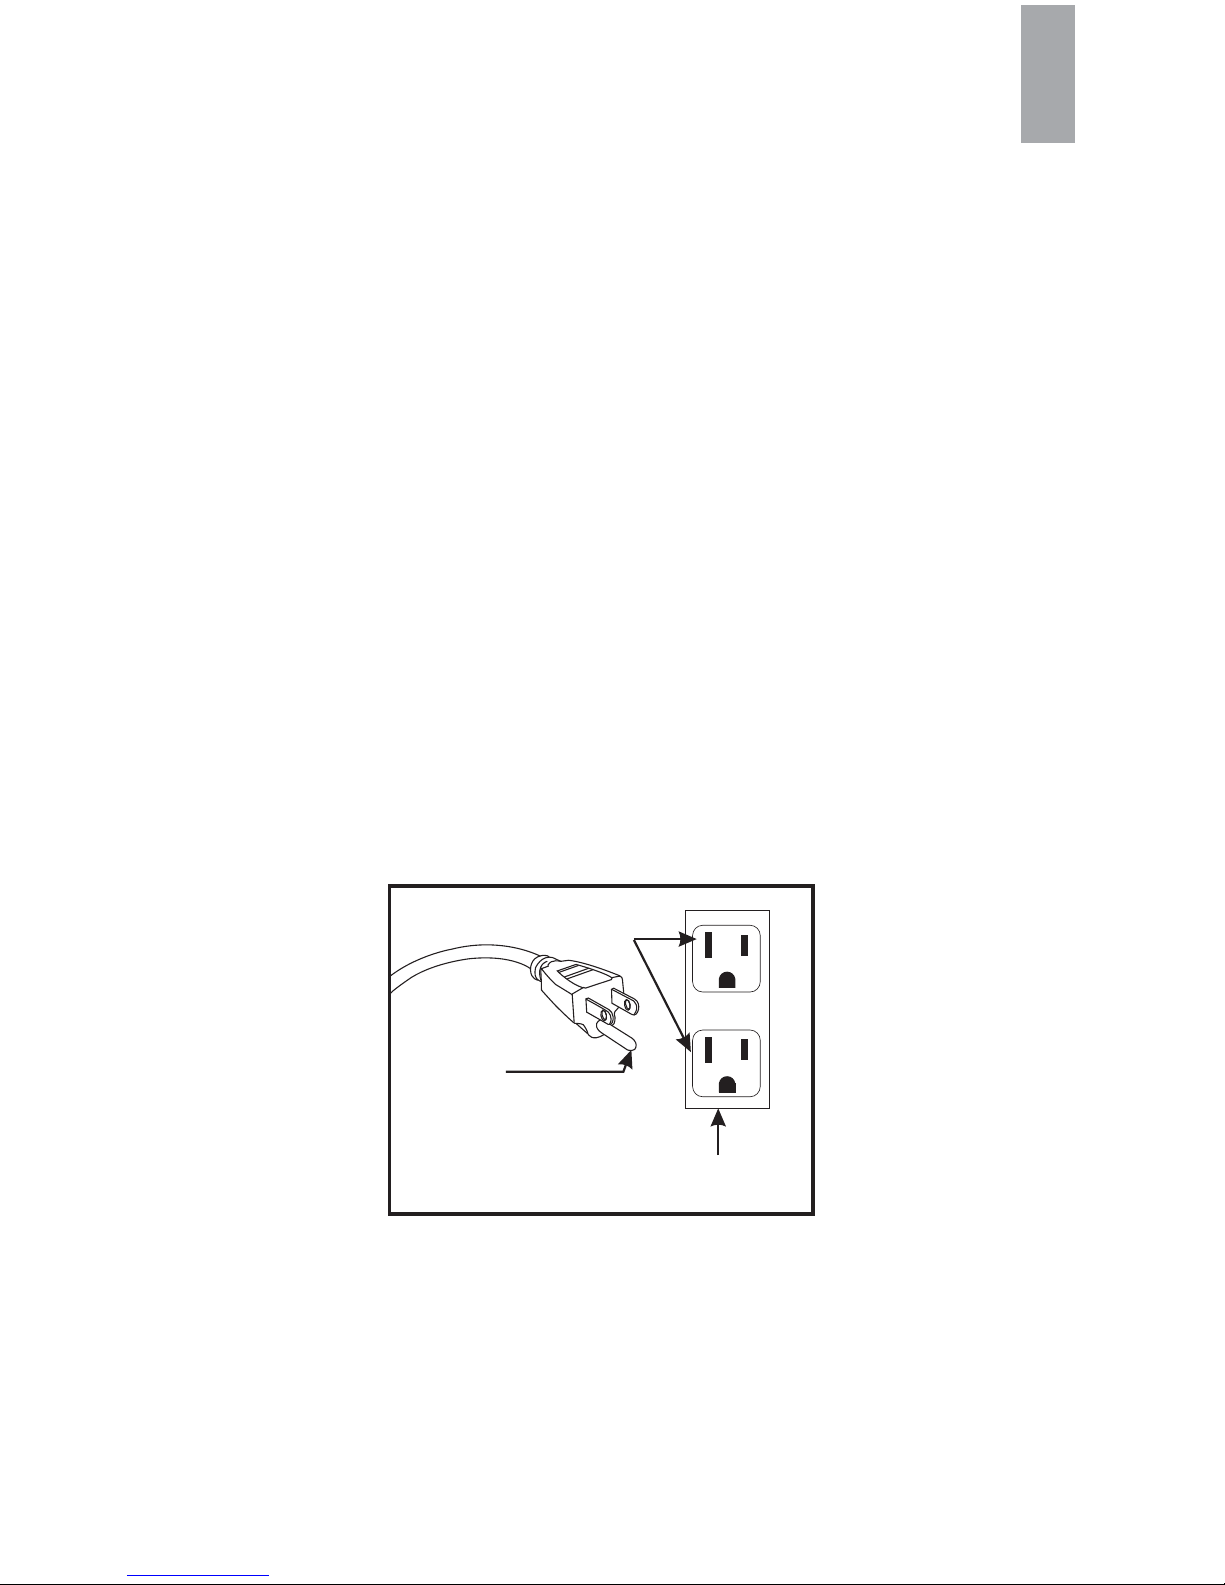
Grounding and Surge Protection
This product must be grounded. If it should malfunction or breakdown,
grounding provides a path of least resistance for electric current to
reduce the risk of electric SHOCK. This product is equipped with a
cord having an equipment-grounding conductor and a grounding plug.
The plug must be plugged into an appropriate outlet that is properly
installed and grounded in accordance with all local codes and
ordinances.
DANGER - Improper connection of the equipment-grounding
conductor can result in a risk of electric shock. Check with a qualified
electrician if you are in doubt as to whether the product is properly
grounded. Do not modify the plug provided with the product - if it will
not FIT IN THE outlet, have a proper outlet installed by a qualified
electrician.
This product is for use on a nominal 110-volt circuit and has a
grounding plug that looks like the plug illustrated in sketch A in the
figure below. Make sure that the product is connected to an outlet
having the same configuration as the plug. No adapter should be
used with this product.
Surge Protection
A high quality surge protector is strongly recommended for the chair.
Damage to the electronics of the chair caused by unstable or power
surges are not covered by the warranty.

06
legrest
MUST
07
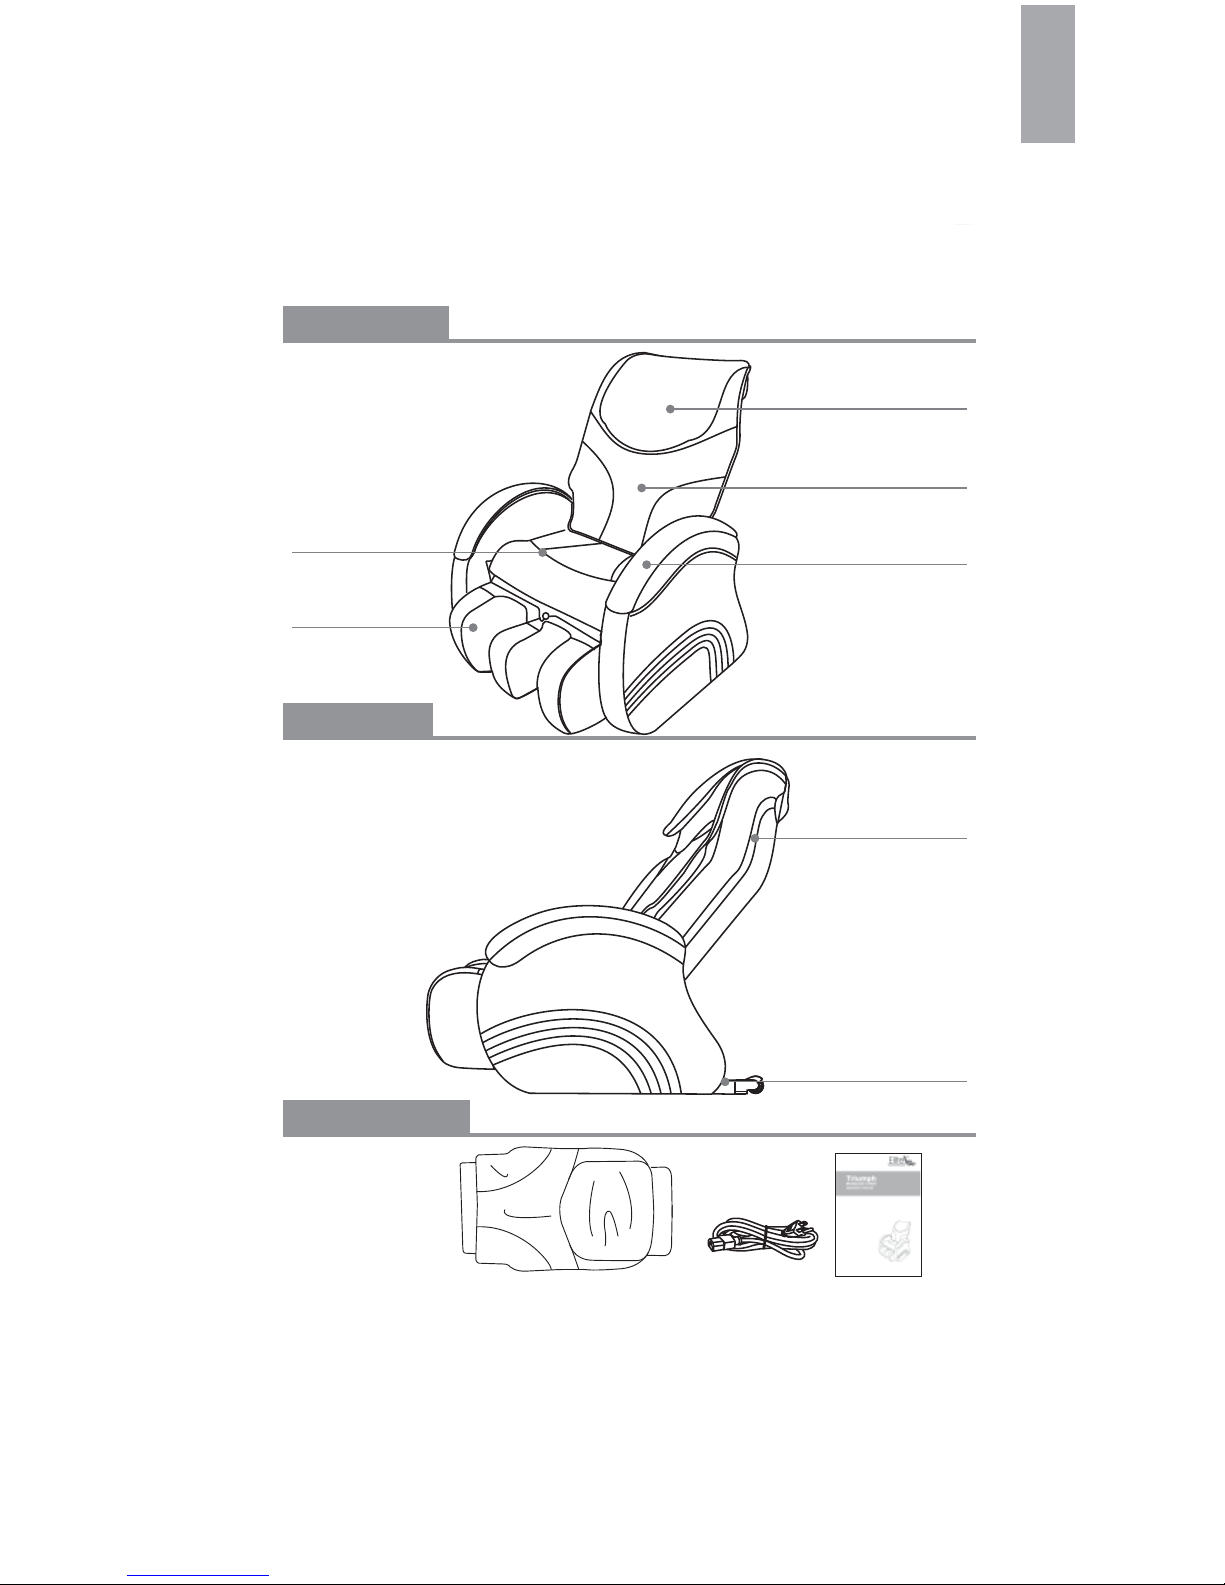
Armrest
Accessories
Front View
Side View
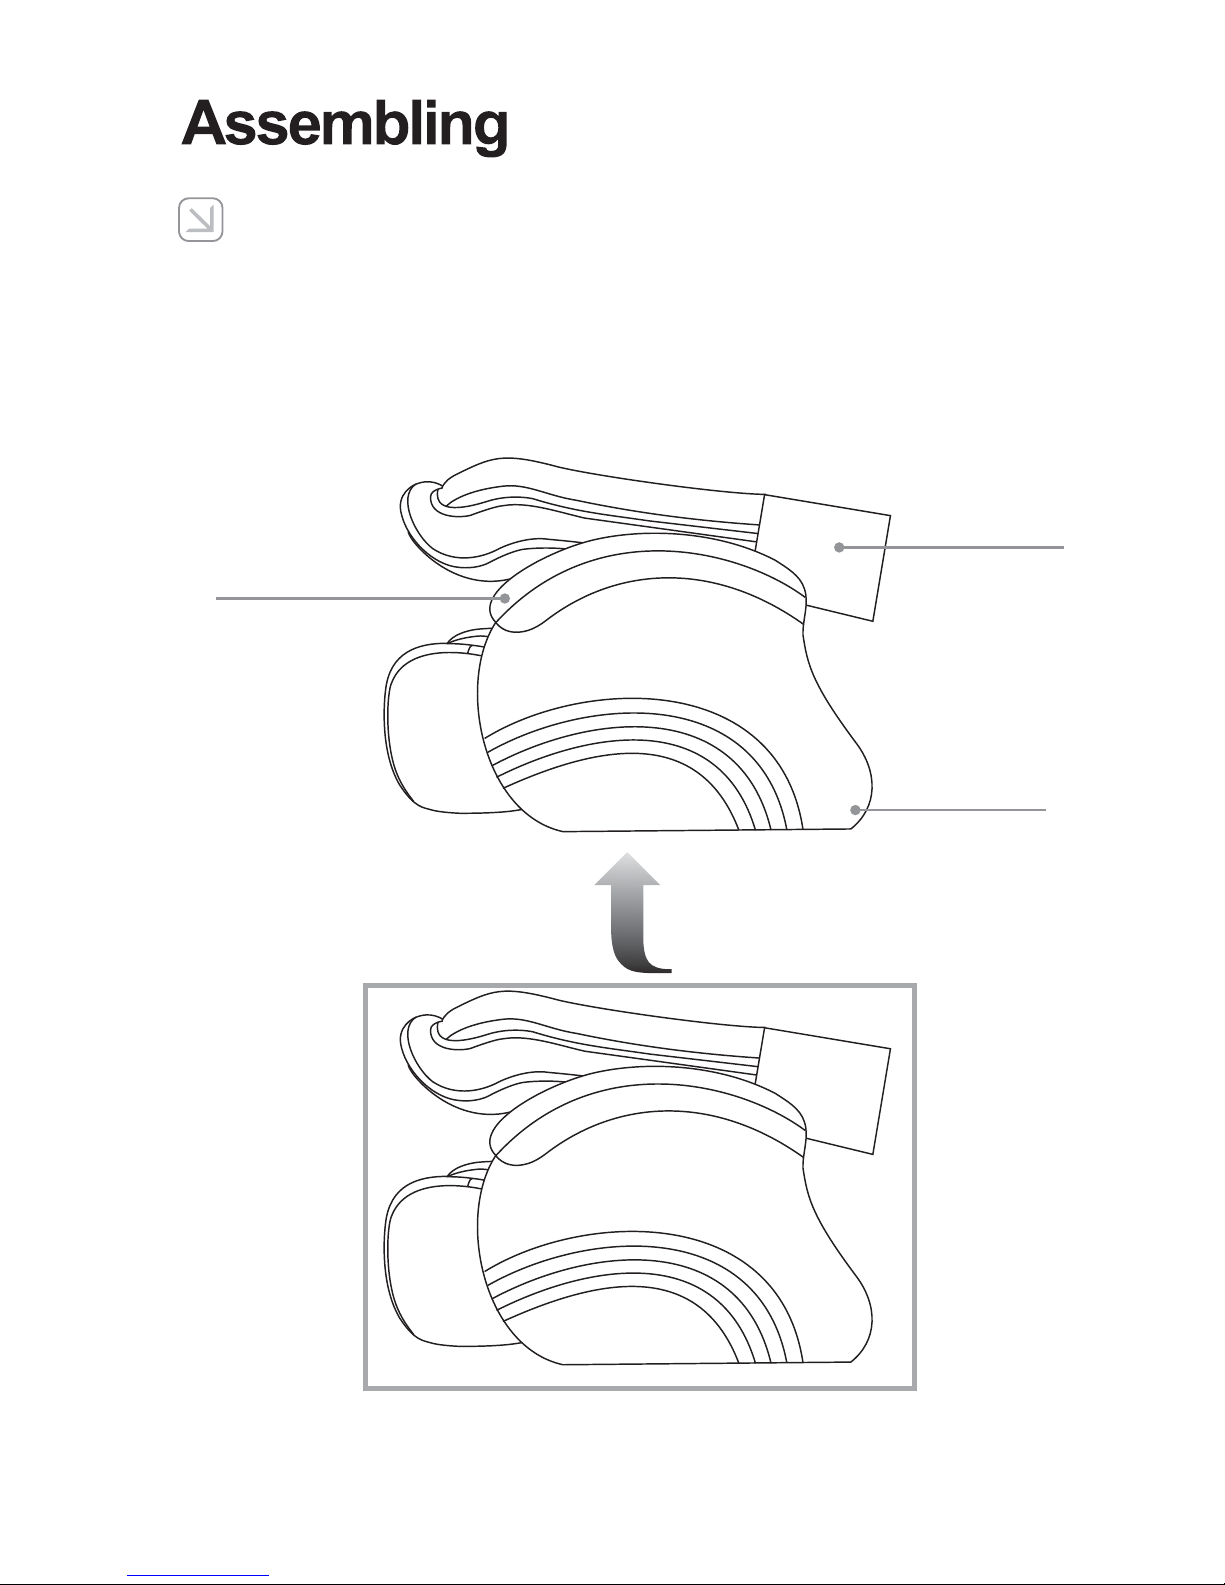
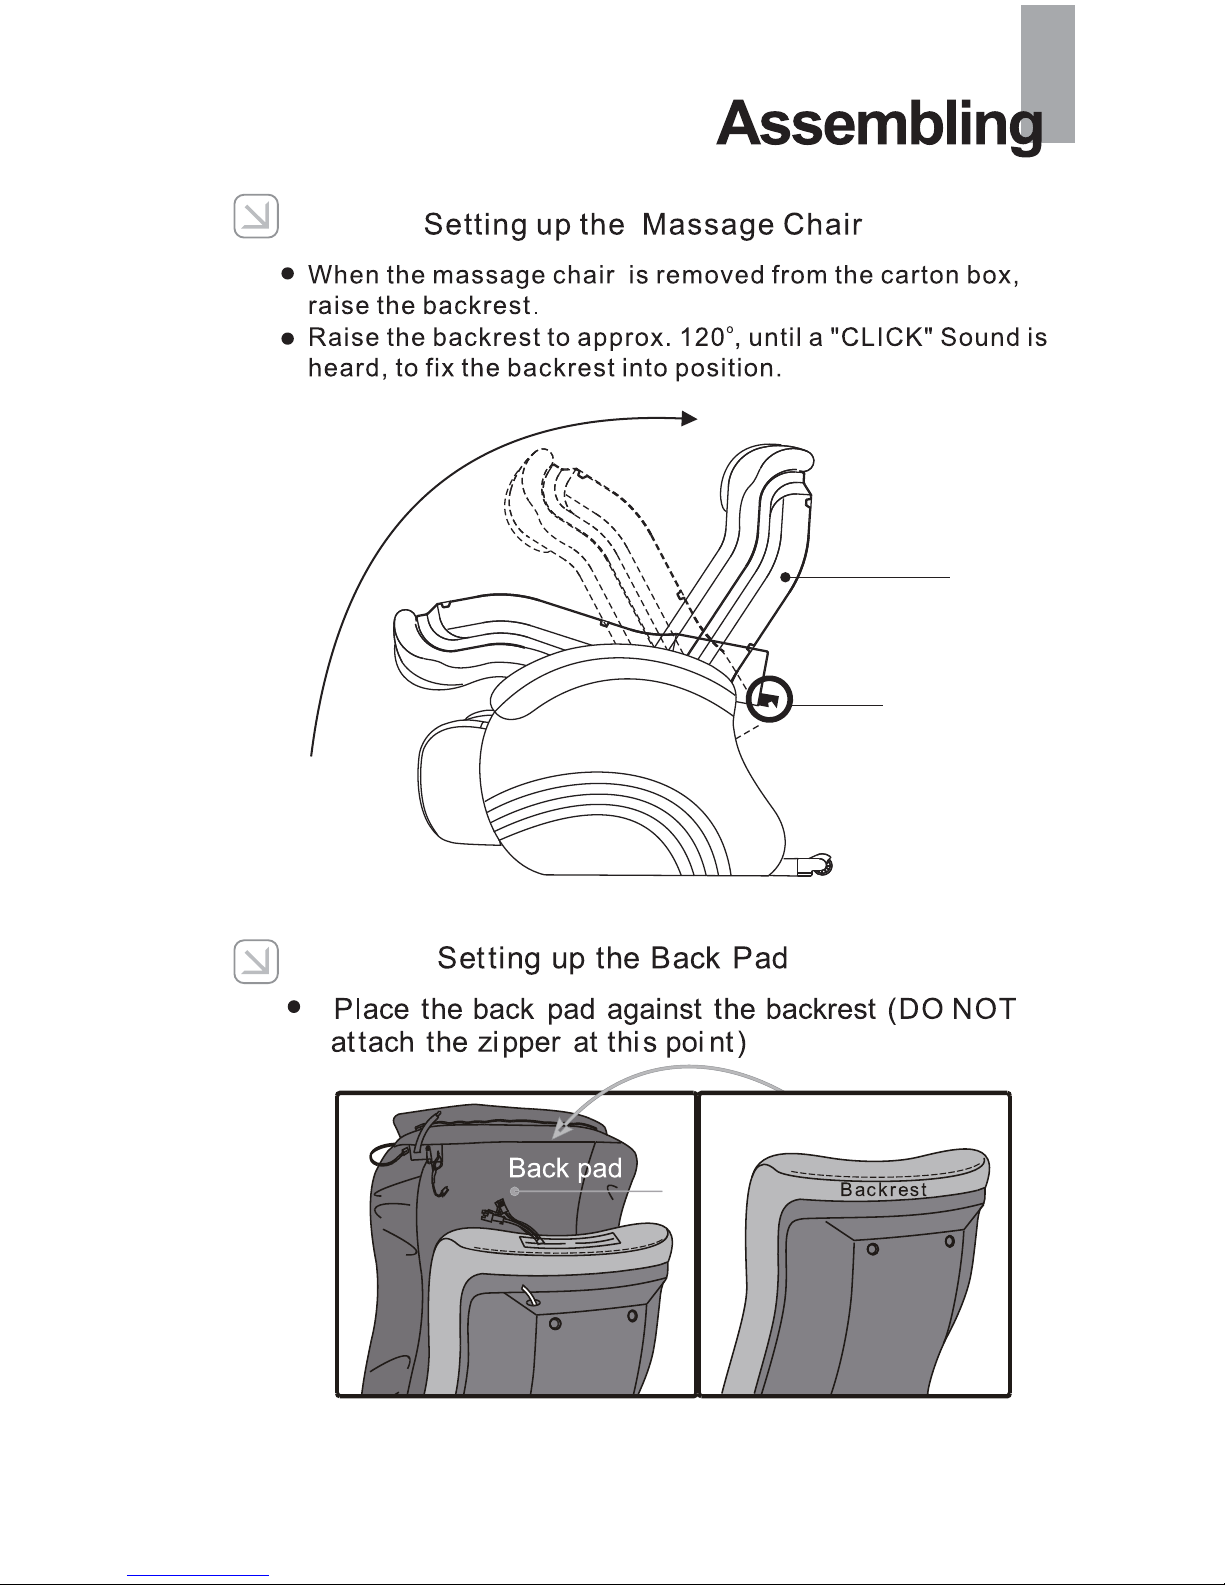
Back Pad
Seat Pad
Back Cover
Wheel Caster
Pillow
Power Cord
Instruction
Manual
Footrest
Pillow
Components and Accessories
08
Holding area
(on both tops
of the armrests)
Holding area
(both sides of the
back cover)
Holding area
( both sides
of the rear armrest)
•Remove the chair from the box.
•2 People are needed to lift up the chair, use the holding areas
as indicated below.
STEP 1: Removing the chair
09
STEP 2:
STEP 3:
Lock
Backrest
10
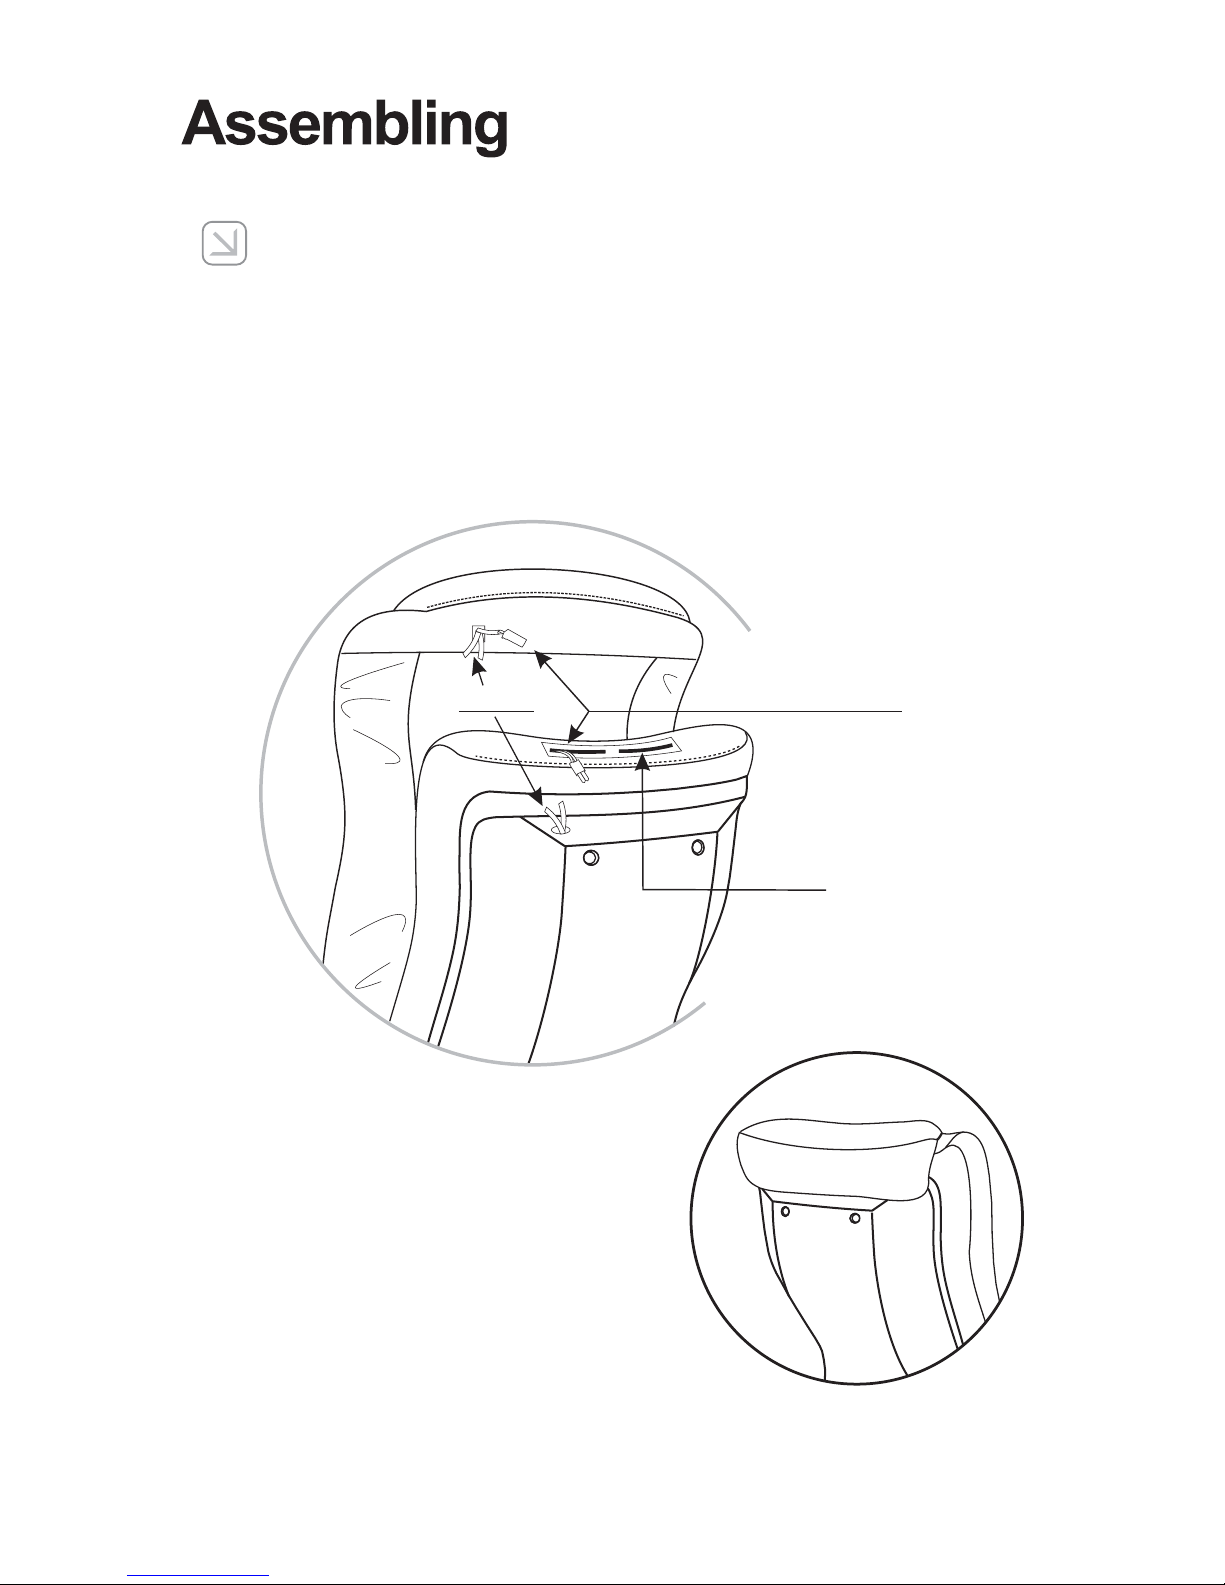
air pipe
Gap
wire for warmer
Finished
STEP 4:Setting up the Back warmer & Back Air Pipe
•Attach the wire from the back pad〈Male end〉to the one from
the backrest〈Female end〉.
•Insert the spare length of wire into the gap on the top of backrest,
and zip up the zipper.
11
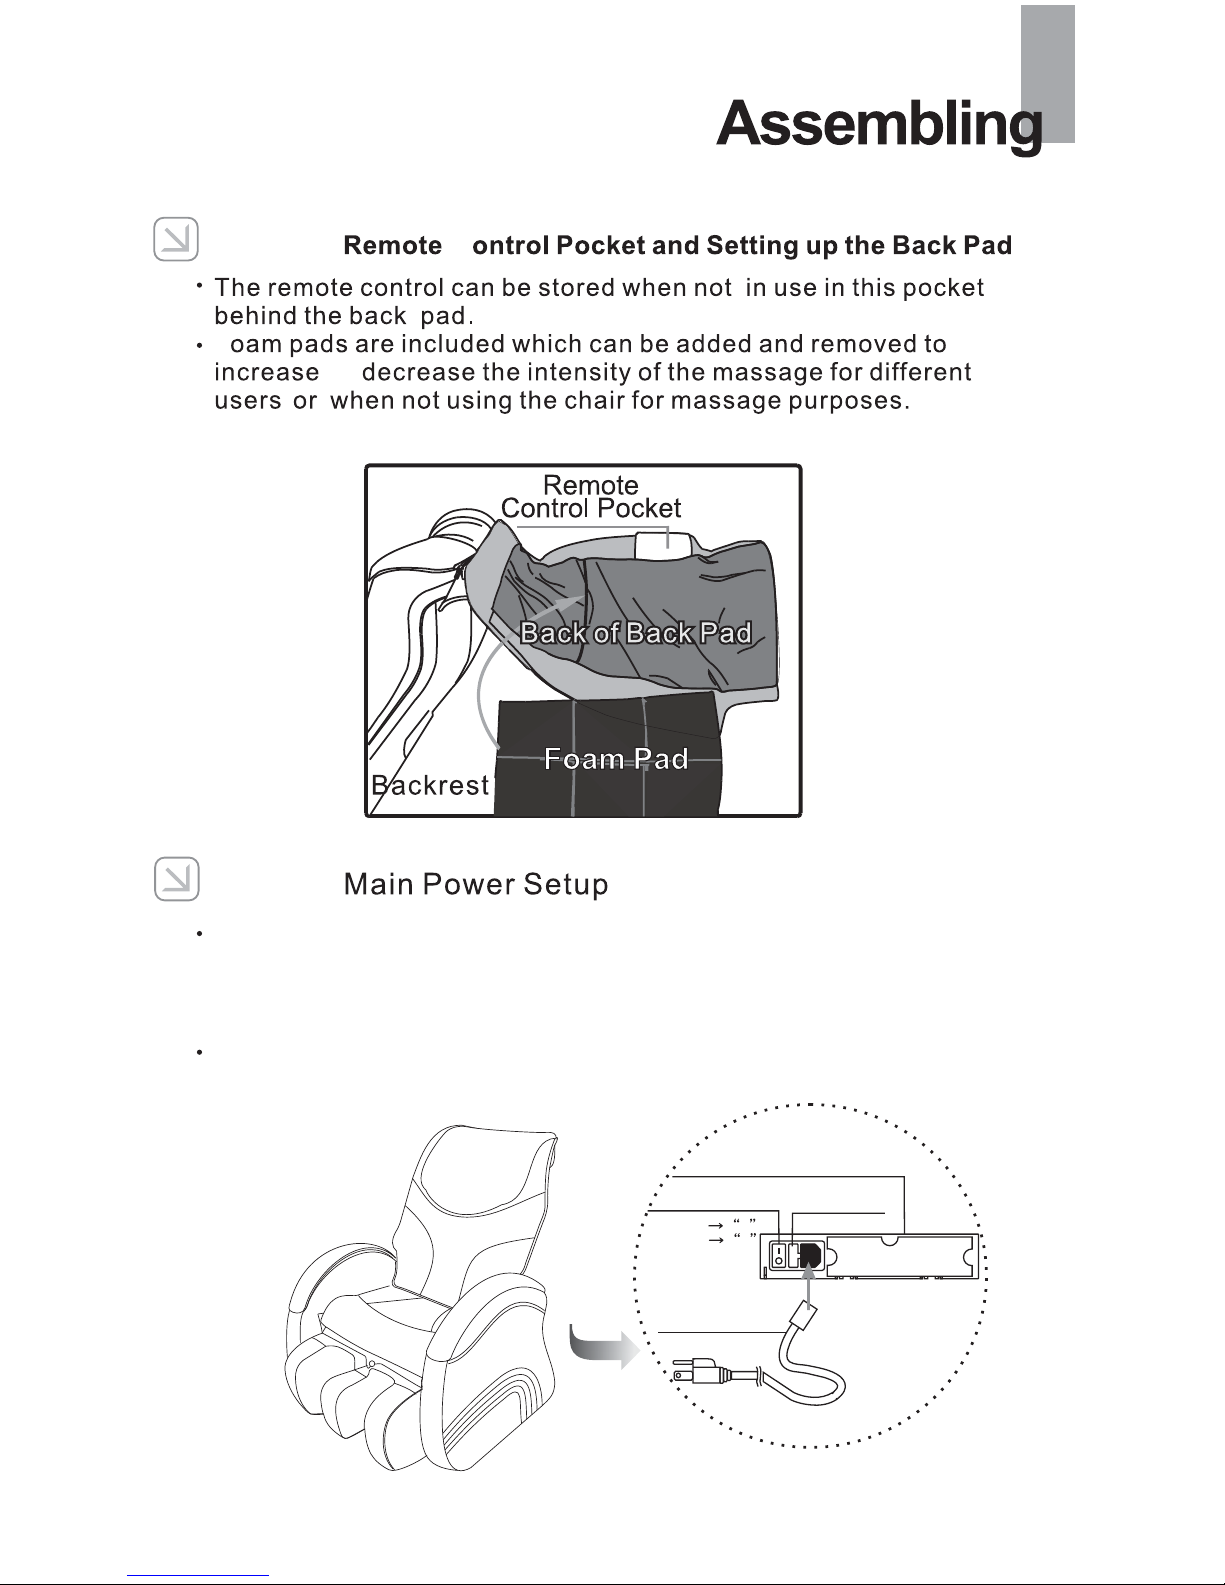
STEP 5:
STEP 6:
F
Power
AC Power Cord
Main Power Switch Box
Turn on I
Turn off 0
Fuse/spare
Plug the female end
into the hole
C
or
Insert the power cord per the diagram below:
(Put in the upper portion of the switch labeled I to turn on the power)
(Push in the lower half of the switch labeled O to turn off the power)
Ensure that there are no obstacles or obstructions to the backrest and
the footrest prior to adjusting their position.
12
then grasp
D
from this position could
cause damage to the chair.
13
Special
Functoin
L
M
H
AUTO
AIR
Remote Control
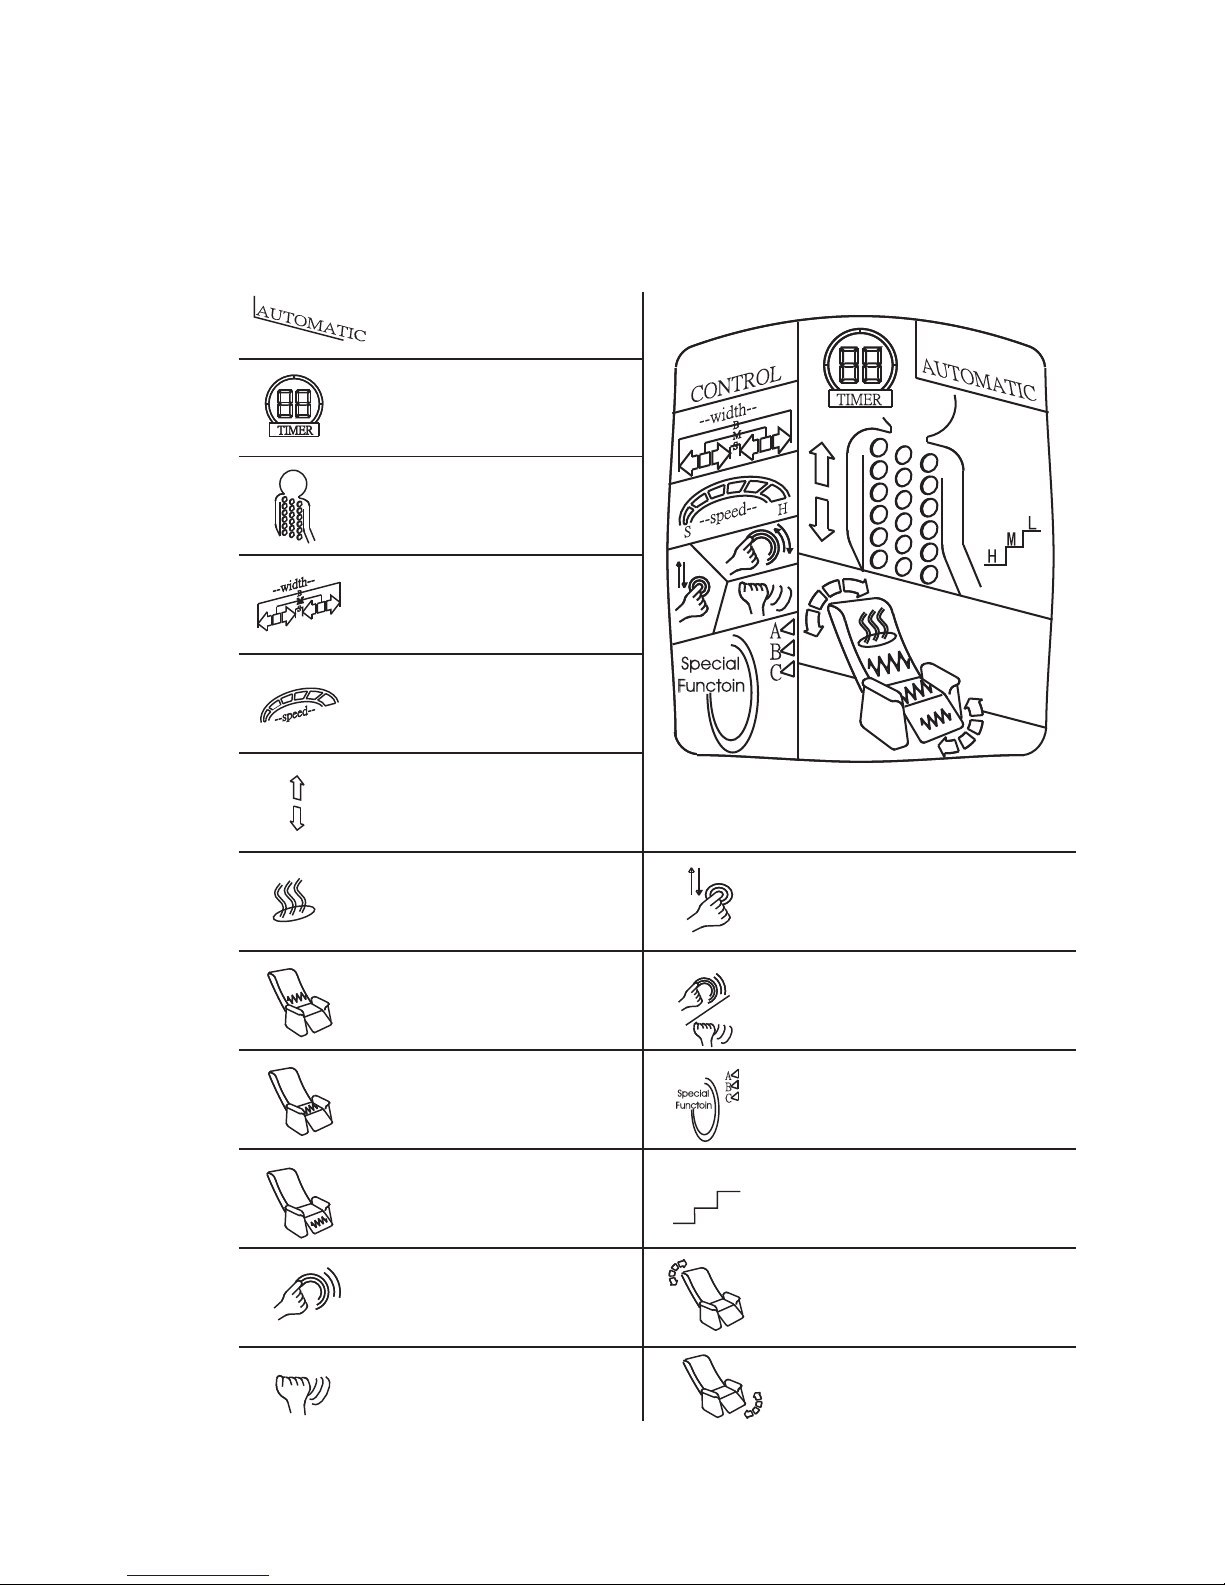
14
Tapping
Back/leg Warmer
Backrest Recline
Kneading
Legrest Recline
Special Function
Dual Action
Rolling
Direction of
Massage Rollers
Speed Adjustment
Rollers' Width
Adjustment
Positions of
Massage Rollers
Timer/
Speed Display
Automatic
LCD Display Screen
L
M
HFoot Air Massage
Level
Legs Air Massage
Seat Air Massage
Back Air Massage
LCD Icons and Display
15
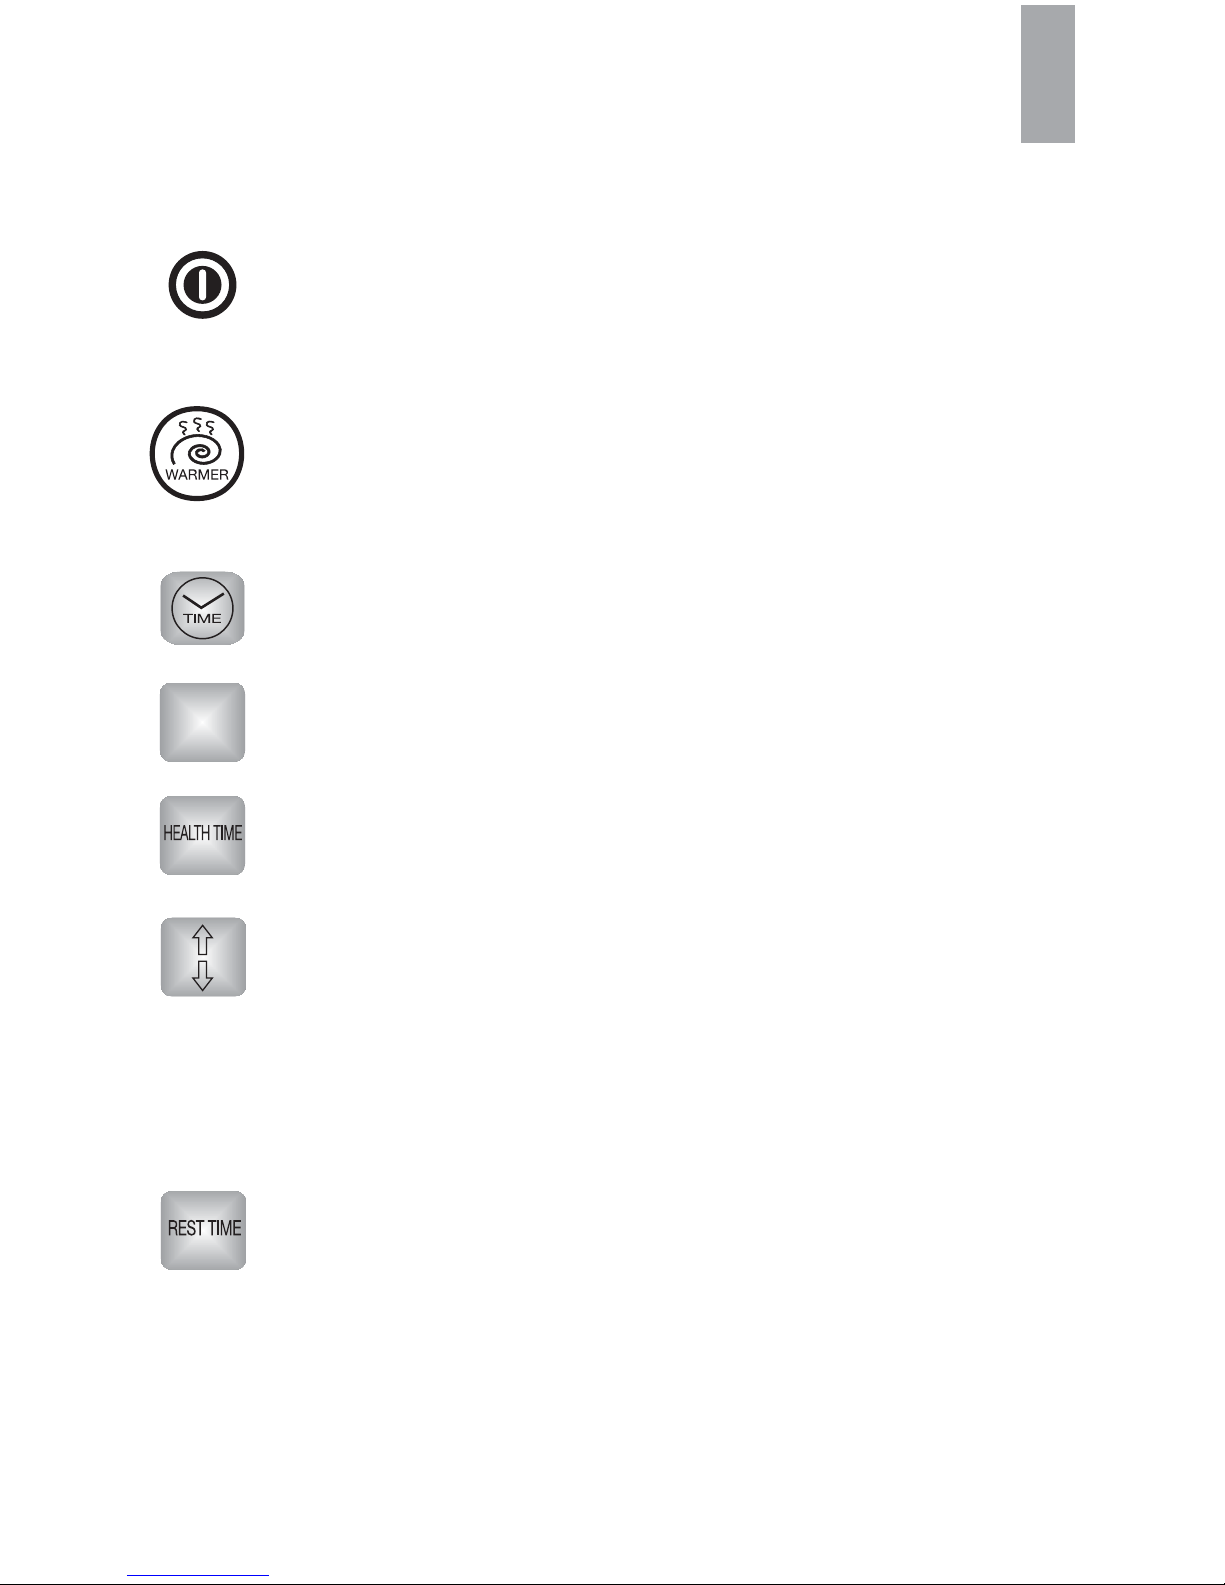
Function Descriptions
Press the button to turn on/off the chair. The LCD shows "15" when
the chair is on. When using the chair, press the button to reset the
chair to a fully upright position.
Power (Start / Stop)
Back / Leg warmer
Press the button to initiate the warmer.
Timer
Press the button to set the massage time from 5 to 30 minutes in
5-minute increments.
Health Time /Scandinavian-Medium (''B'' shown on LCD)
Press the button to turn on/off the 30-minute programmed massage.
Special Function: Rest Time ("C" shown on LCD)
Press the button to turn on /off the function. The preset time is
10 minutes, but it is manually adjustable up to 99 minutes.
The default rest time program performs a short 3-minute massage,
followed by an inactive ”rest” period for 4 minutes, finishing
with an awakening 3-minute massage for a total of 10 minutes.
Special Function A & B Note: When utilizing these functions, the
massage heads will move vertically one complete cycle down and
up for the purpose of detecting your shoulder and acupressure
points to provide a custom massage. No functions on the remote will
respond during this detection cycle. These programs will
automatically adjust the movement of all massage head functions.
Vibration, all air function, backrest and footrest adjustments are
adjustable in this mode.
See cautions for the warmer on page 6.
press once : back warmer
press twice : leg warmer
press 3 times : back and leg warmer press 4 times : warmer off
Fitness / Shiatsu Strong (''A'' shown on LCD)
Press the button to turn on/off the 20-minute programmed massage.
FITNESS
16
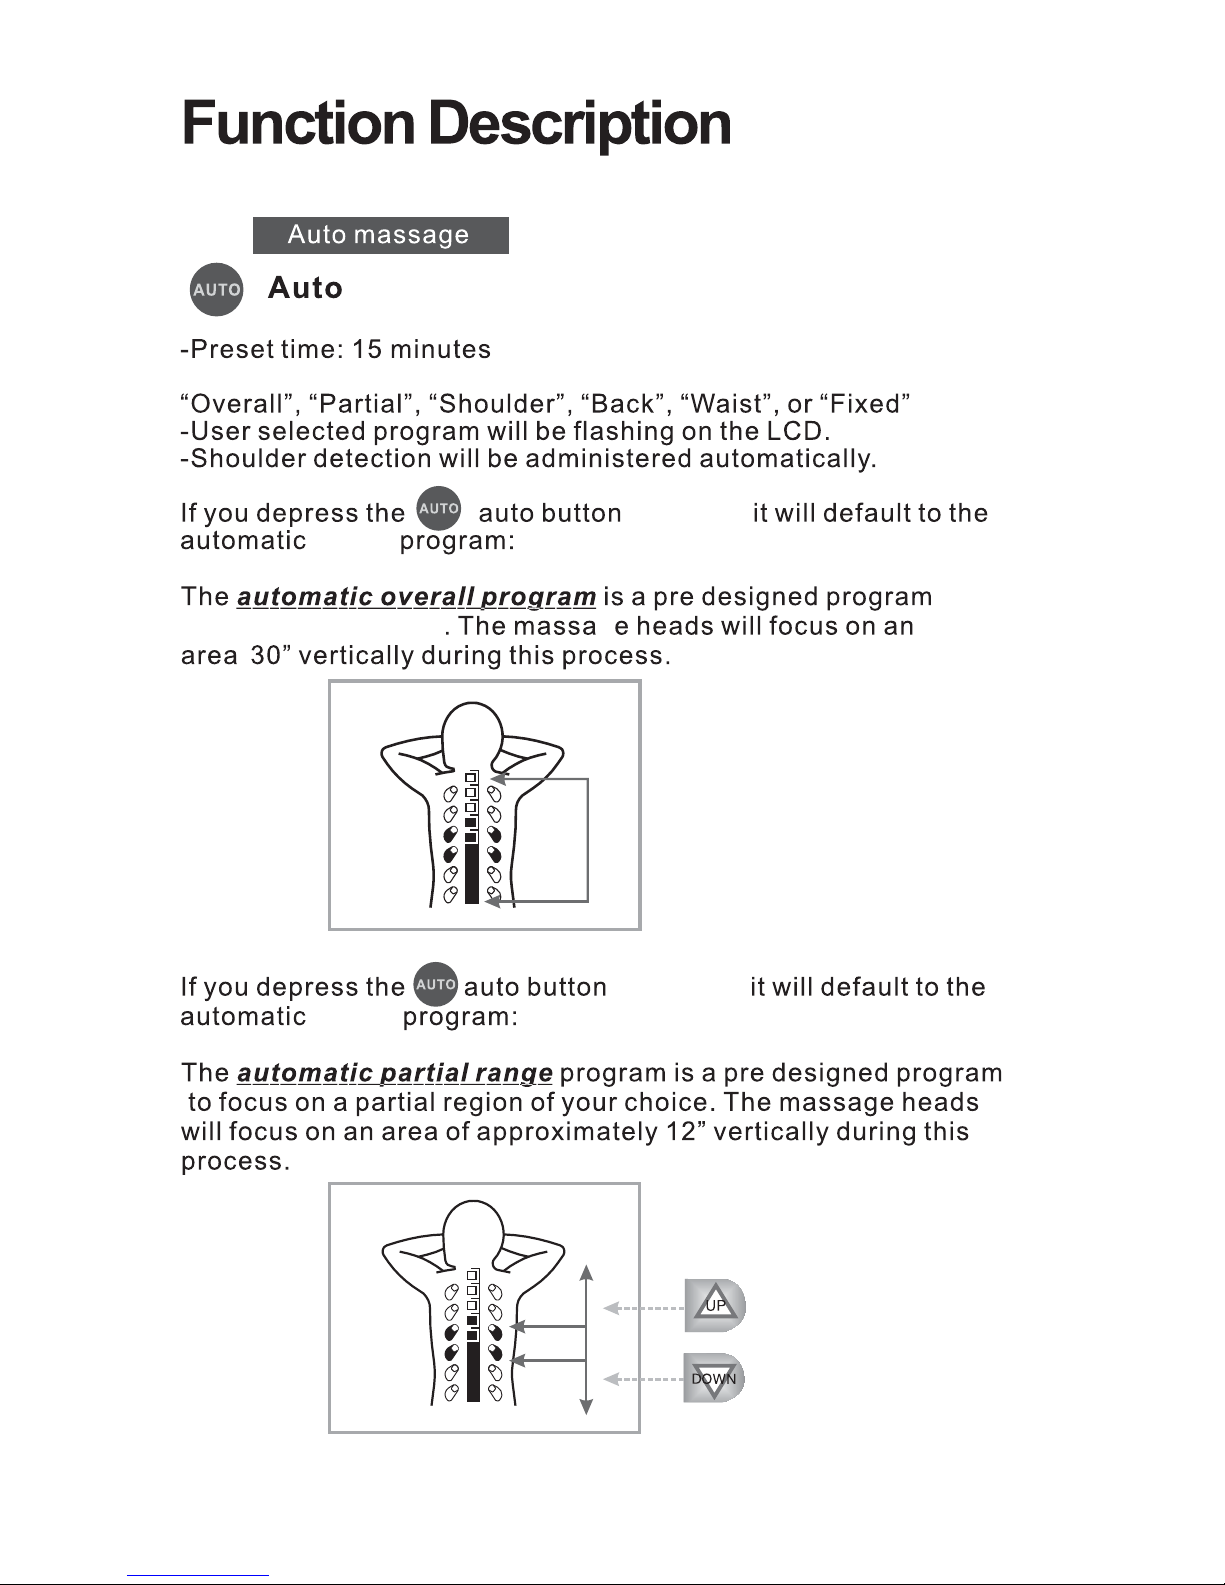
one time,
work the torso region g
overall
to
partial two times,
-Users may select a pre defined regional program from the selections below:
Use the Roller Position
buttons (see Page 19) to
adjust for desired region.
17
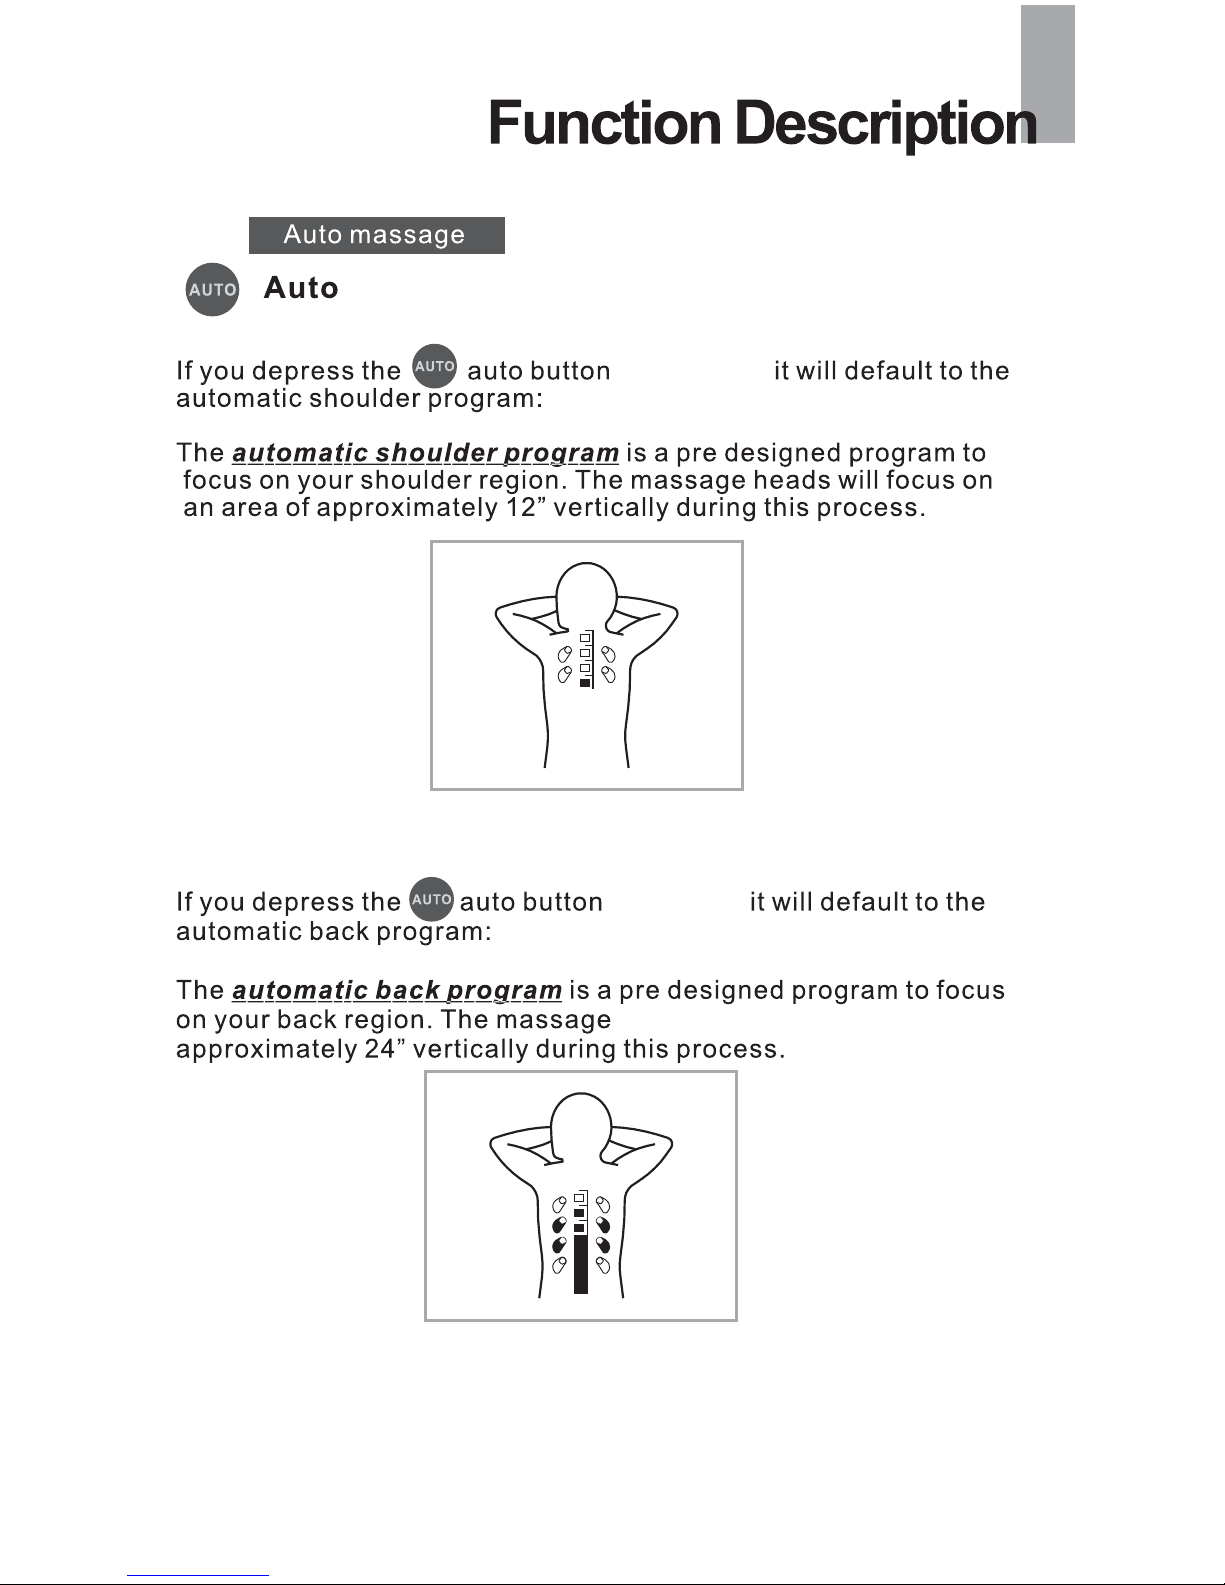
three times,
four times,
heads will focus on an area of
18
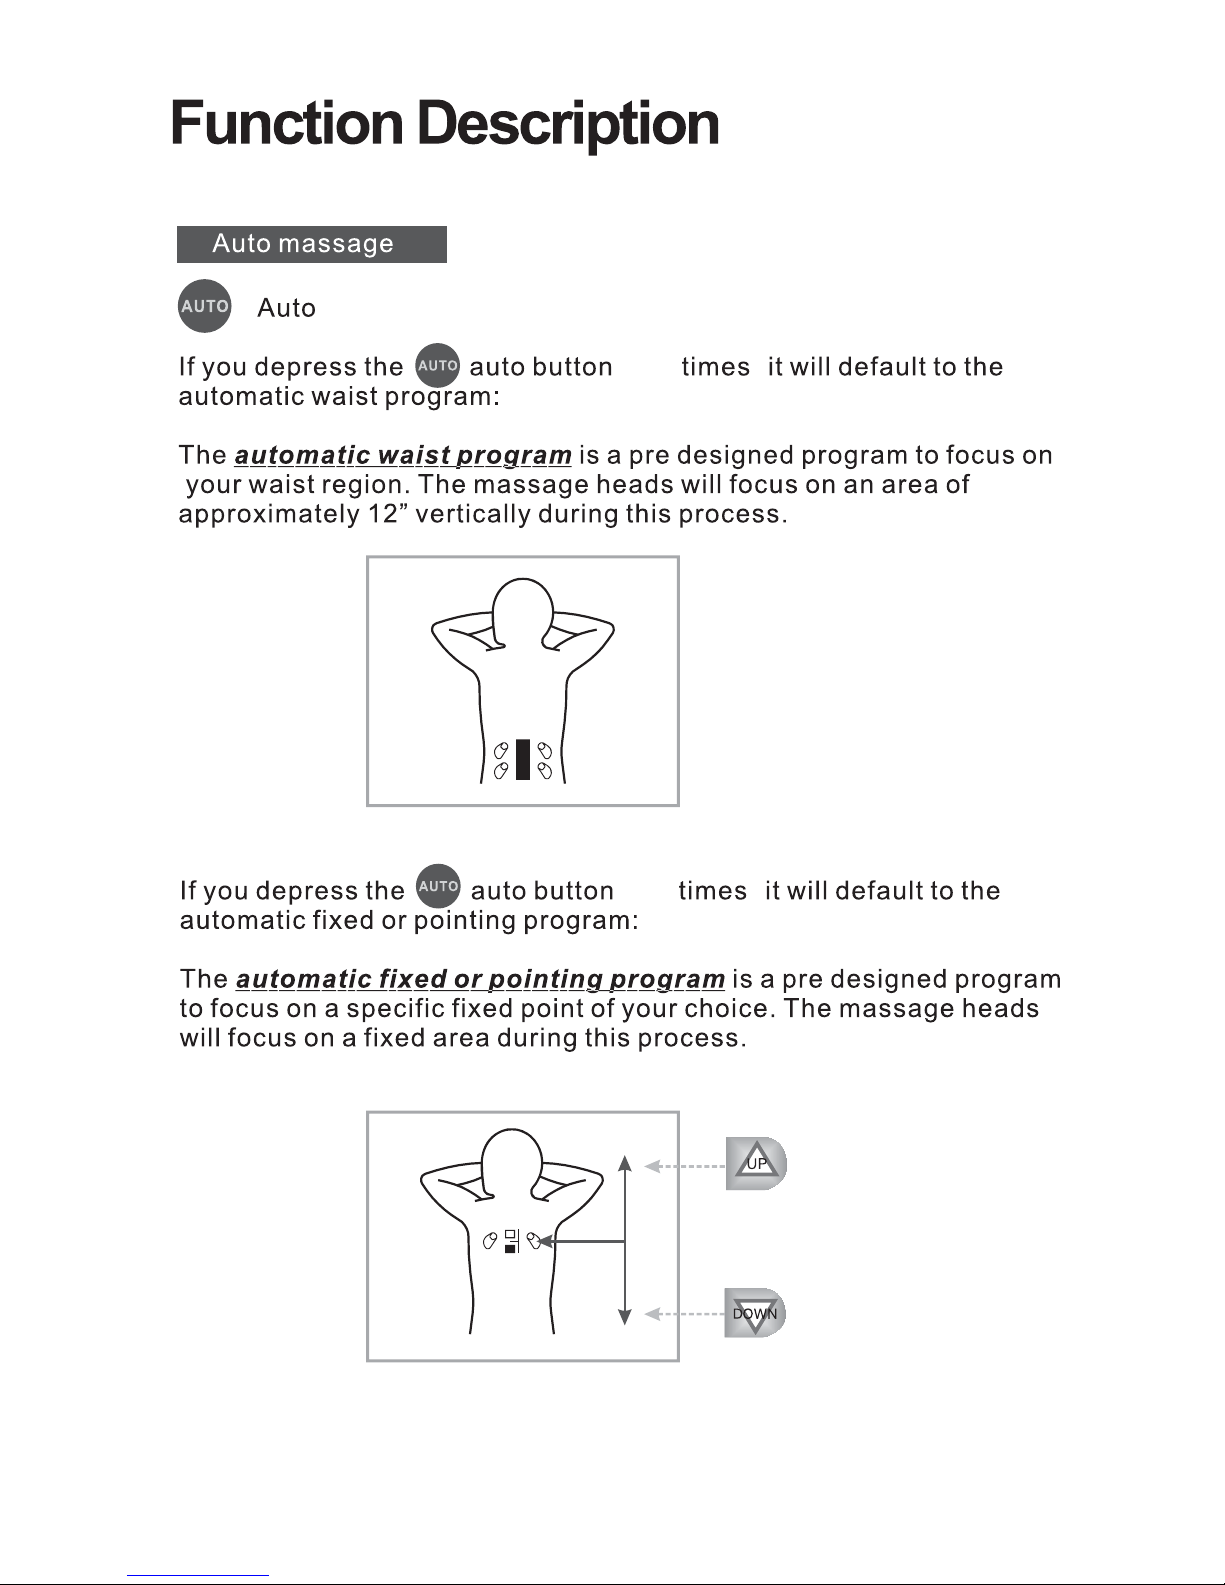
five
six
,
,
Use the Roller
Position buttons
(see Page 19) to
adjust to the fixed
point.
Table of contents
Other Elite Massage Chairs Massager manuals


