Elite ELITE B 20 User manual

Contents
CE certificate.........................................................................................…...........4
Intended use..........................….............................................................…...........5
Main parts…...........................................................................................…...........6
Use description...................…….............................................................................7
Technical features …...........................…................................................................7
Accessories...............................…........................................................................7
Safety si bology.........................................…........................................…............8
Operation …...........................................................................................…...........9
Fastening and adjust ent of drill bits.…................….......................................9
Cutting angle adjust ent …...................................................……....…............9
Grinding of the grinding wheel....................................…...............................10
Grinding wheel replace ent ….............................…….........................…........11
Drill sharpening
Fixing and adjust ent…..................................................…..........................12
Angle adjust ent.......................................................................................12
Twist drill sharpening………….........................................................….............13
Sharpening of bi-dia etric drills..….............................................…...............13
Sharpening of drills for sheet etal, wood and illing cutters…………………...……...14
Core e ptying of twist drills…………………………………………..…………….....…...............15
Spare parts list…..……………………………………………………………………………....................16
Maintenance and greasing ….......................................................................16
Warranty……...…………………………………………......................................................17
Joan Oró, 27. Pol. Ind. Sesrovires, St. Esteve Sesrovires, BCN, Spain– Tel: + 4 9 2 9 5 178 – info@elite.es

- Original -
CE Declaration of Conformity for Machinery
Hereby, the co pany Elite Sharpening Machines, SLU
C/Joan Oró, 2
ES-08635 Sant Esteve Sesrovires,
Spain
declares that the product indicated below, on the basis of its design and construction, as
well as the version placed on the arket by our co pany, co plies with the andatory
basic health and safety require ents of the CE directive.
This declaration beco es invalid if any unauthorised odifications are ade to the
product.
Product na e: ELITE B 20
Product type: Drill sharpening machine
Serial nu ber: ---
Co petences Machinery Directive CE (2006/42/CE)
CE Directives: European Directive on electromagnetic
compatibility (2014/30/UE)
The protection purposes of the CE Low
Voltage Directive (2006/95/CE) were
complied with in accordance with Annex I,
no. 1.5.1 of the Machinery Directive
2006/42/CE
The technical docu entation Sergi Valls Gramunt
was co piled by representative C/Joan Oró, 2
legal docu entation: ES-08635 Sant Esteve Sesrovires
Date / Manufacturer - Signature:
Signatory data: Sergi Valls Gra unt, Manager
Joan Oró, 27. Pol. Ind. Sesrovires, St. Esteve Sesrovires, BCN, Spain– Tel: + 4 9 2 9 5 178 – info@elite.es
4

Intended use
The ELITE odel B-20 drill bit sharpener has been designed exclusively for:
- Sharpening twist drills, bi-dia eter drills, wood drills, sheet etal drills and wood
(hard etal) drills.
The achine ust not be used for other uses than those specified otherwise it will be
established as i proper use.
Direct use also includes the reading of this anual as well as the assi ilation of the
operating instructions, especially the one concerning safety.
In the case of the ELITE odel B-20 a use other than that for which it is intended, safety
is no longer guaranteed.
Joan Oró, 27. Pol. Ind. Sesrovires, St. Esteve Sesrovires, BCN, Spain– Tel: + 4 9 2 9 5 178 – info@elite.es
5

Main parts of the machine
1. Grinding wheel cover, co plete
2. Motor 230V Single-phase
3. Start-up switch
4. Drill bit pris support
5. Wing screw
6. Upper angle adjust ent ca .
7. Hexagonal screw for fixing the otor bracket
8. Knurled nut with vernier to give the otor load
9. Knurled nut with vernier for drill bit feed
10. Reversible cla ping pris with capacity fro 2 to 20 .
11. Corundu grinding wheel
12. Adjustable cover
13. Magnifying glass
Joan Oró, 27. Pol. Ind. Sesrovires, St. Esteve Sesrovires, BCN, Spain– Tel: + 4 9 2 9 5 178 – info@elite.es
6

Use description
Elite odel B 20 portable drill bit sharpening achine is unique in its design and offers a
considerable alternative to ore expensive equip ent.
With its sturdy construction, high accuracy, the little space required and econo ical
price, the ELITE odel B 20 is an indispensable auxiliary equip ent and a real easure
of opti isation for both one-off operations and workshop use.
This sharpening achine facilitates the adjust ent and re-sharpening of twist drills so
that any operator can re-sharpen drills at the ost diverse angles.
The auto atically reversible pris ensures axi u precision and sy etry of cuts.
Technical features
Net di ensions: 290 x 220 x 250 ..
Net weight: 13,5 Kg.
Standard capacity 2-20 . Ø
Grinding wheel 125x20x20 .
Noise e ission: < 70 dB(A)
Voltage: 230 V. 50 Hz single-phase
Additional accessories
–CBN grinding wheel ø 1 25 grit B1 26/3, covered on 3 sides, broad 20
–CBN grinding wheel ø 1 25 grit B76/3, covered on 3 sides, broad 20
(standard) 1 7556 CBN grinding wheel ø 1 25 grit B46/3, covered on 3
sides, broad 20
–Corundu grinding wheel 1 25 x 20 x 20 grit 60 (coarse)
–Corundu grinding wheel 1 25 x 20 x 20 grit 80 (standard)
–Corundu grinding wheel 1 25 x 20 x 20 grit 1 80 (very fine)
–Corundu grinding wheel 1 25 x 05 x 20 grit 1 00 (HSS wood bits)
–Corundu cup wheel grit 60 (standard) for SZ
–Corundu cup wheel grit 80 ( ediu ) for SZ
–Corundu cupwheel grit100(fine)forSZ
–Grinding wheel support
Joan Oró, 27. Pol. Ind. Sesrovires, St. Esteve Sesrovires, BCN, Spain– Tel: + 4 9 2 9 5 178 – info@elite.es
7

–Dia ond grinding wheel D 76, covered on 3 sides for carbide wood drills
–Dia ond grinding wheel D 76, covered on 3 sides for carbide drills
–Dia ond cup wheel D 1 26 (standard) for SZ
–Dia ond cup wheel D 76 (fine) for SZ
–Universal cla ping device for single-lip cutters, cut off tools, etc. for SZ
–Magnetic depth stop for cutters
–Countersink sharpening device SVR 20 with collet 1 0
–Collet 6 for SVR 20
–Collet 8 for SVR 20
–Collet 12 for SVR 20
–Morse taper sleeve MK1
–Morse taper sleeve MK2
Joan Oró, 27. Pol. Ind. Sesrovires, St. Esteve Sesrovires, BCN, Spain– Tel: + 4 9 2 9 5 178 – info@elite.es
8

Safety simbology
The following safety sy bols are used in this anual.
These ust be understood by the user and are explained below.
They indicate that the use without observing the can lead to danger to life and li b of
the users.
Safety goggles ust be worn to prevent da age caused by particles
released during the sharpening process.
Use with caution and care.
When the achine is oved, it ust be disconnected fro the power
supply.
Lenses should be covered after each use:
Lenses should be covered after each use
Joan Oró, 27. Pol. Ind. Sesrovires, St. Esteve Sesrovires, BCN, Spain– Tel: + 4 9 2 9 5 178 – info@elite.es
9

Operation
Fastening and adjustment of drill bits
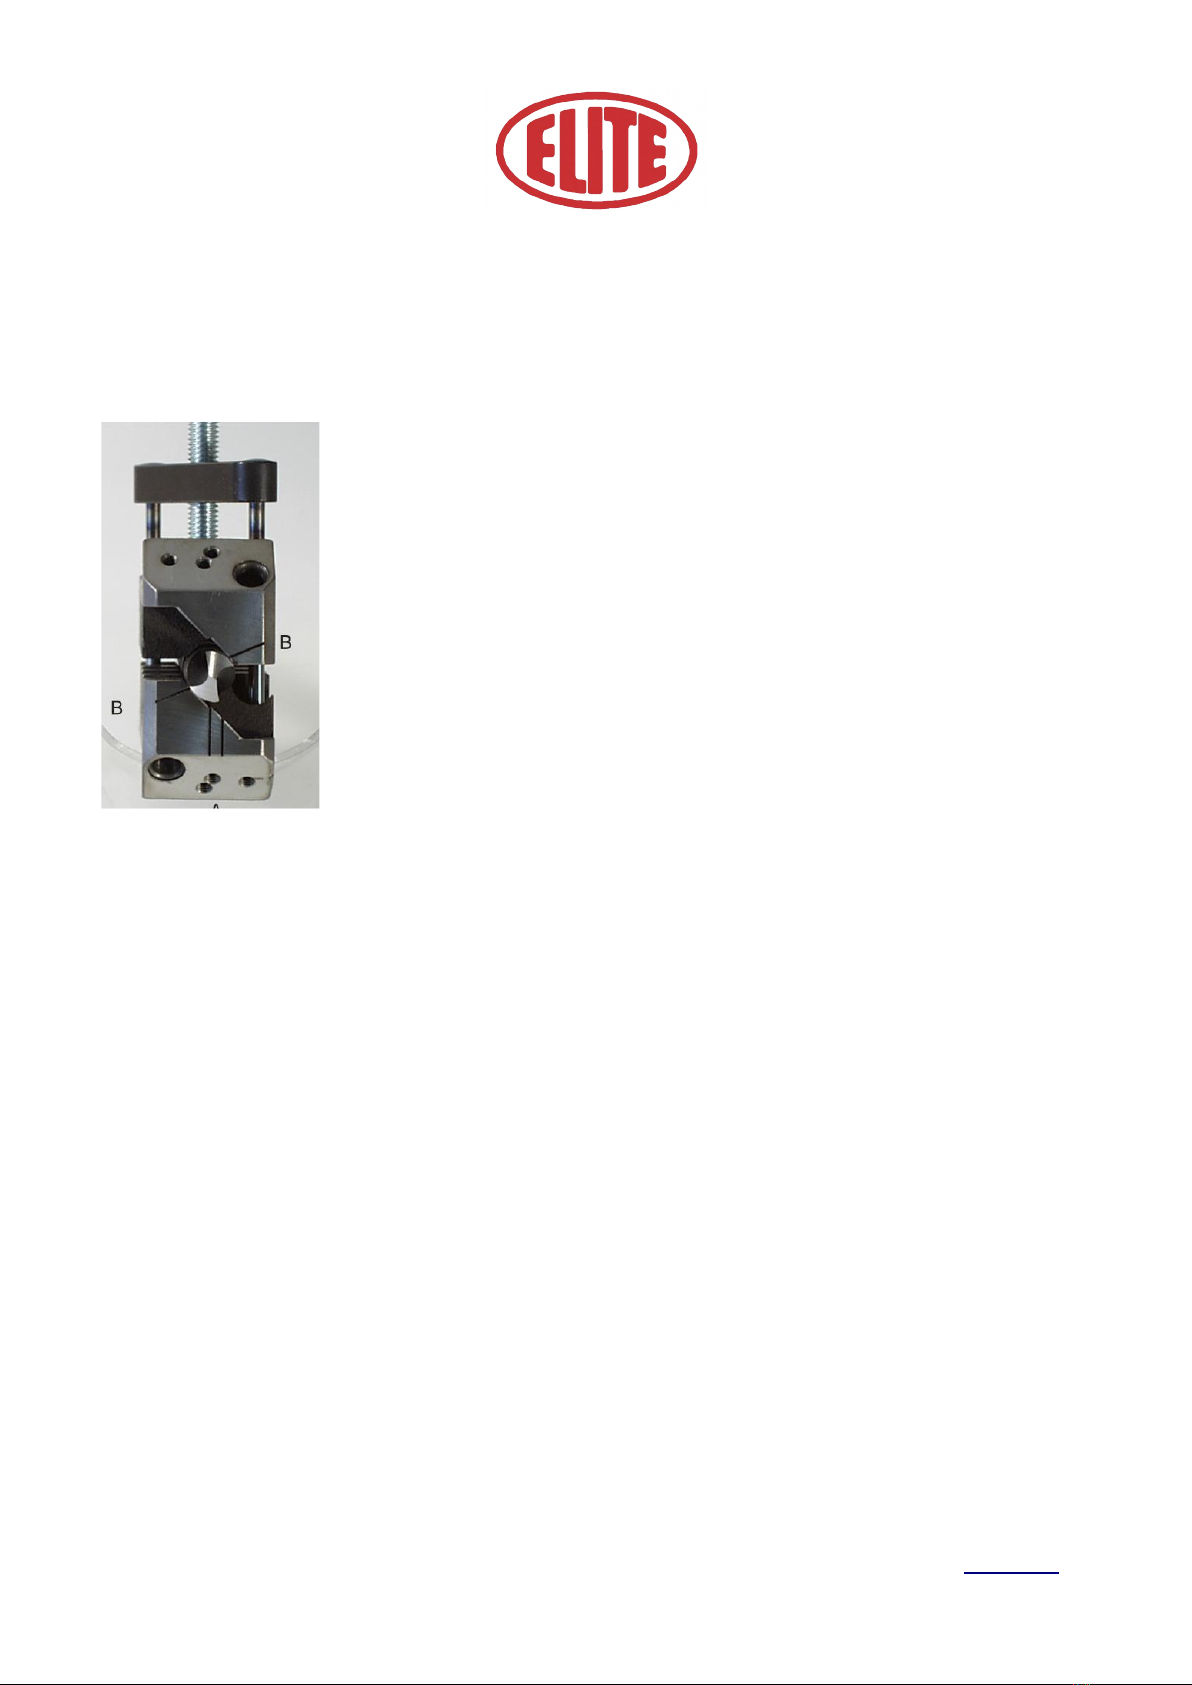
The reversible pris has a sharpening range fro 2 to 20 .
Fixing and align ent of the drill bits is achieved in the si plest
way. The pris is opened by eans of the knurled screw provided
for this purpose. Once opened, insert the drill bit to be sharpened.
Hold the drill bit so that the tip protrudes 15 to 20 . In front of
the cla p. Close the cla p gently with the knurled screw so that
you can still turn the drill bit by hand.
The only thing to do now is to align the cutting edge of the drill bit
so that it is parallel to the two arks shown.
Mark A: for right-hand drills Mark B: for left-hand drills
Once adjusted, we finish cla ping the cla p by hand and we can
now proceed to sharpening.
In addition to the basic settings, the rake angles can be adjusted depending on the
aterial to be cut.
If you want a higher rake angle - ore cutting capacity, you should ove the bit a little
to the left (less angle on the pris ). If you want less rake - less cutting capacity, just
ove it a little to the right.
In this way we can adjust to the angles required for each aterial.
In the case of sharpening a broken drill bit, as it has no cutting edge to adjust, we ust
cut so that it lies flat. Then we can adjust the ends of the cutting edge as close as
possible to the adjust ent arks and resharpen until a new cut appears, and we can
adjust as above.
Cutting angle adjustment.
In order to always work according to the aterial properties, we can infinitely adjust the
cutting angle.
The ost co on cutting angles are 118°, 130° and 80°.
These angles are arked on the base and can be quickly adjusted by opening the cla ping
ca (pos. 6 on page 7) and oving the pris base (pos. 4 on page 7).
Joan Oró, 27. Pol. Ind. Sesrovires, St. Esteve Sesrovires, BCN, Spain– Tel: + 4 9 2 9 5 178 – info@elite.es
10

Grinding of the grinding wheel
To carry out the dia ond dressing process, loosen the positioning ca on the tool holder
support and set the position to 150°.
Fix the dia ond dresser in the tool holder and fix it by eans of the knurled screw in the
lower position of the holder.
Move the otor s oothly to the right and left while slowly advancing the dia ond dresser
towards the grinding wheel, once they co e into contact, the advance should be s ooth.
Joan Oró, 27. Pol. Ind. Sesrovires, St. Esteve Sesrovires, BCN, Spain– Tel: + 4 9 2 9 5 178 – info@elite.es
11

Grinding wheel replacement
To change the grinding wheel, disconnect the machine
from the power supply.
Open the two screws 1 and 2 of the guard with a 10 spanner. Re ove the grinding
wheel guard.
Loosen the hexagonal screw with a 4 Allen key. Turn the screw until the grinding wheel
can be re oved with the grinding wheel holder.
Insert the new grinding wheel into the otor shaft and tighten the screw again, then tighten
the grinding wheel guard. Check that the grinding wheel is correctly ounted.
Grinding wheels ust confor to EN 12413 or EN 13236. After changing the grinding wheel,
carry out a 1- inute test run with the otor running. If the grinding wheel does not work
properly, switch it off and look for the reason for the alfunction.
Never use the machine without the grinding wheel cover
installed.
Joan Oró, 27. Pol. Ind. Sesrovires, St. Esteve Sesrovires, BCN, Spain– Tel: + 4 9 2 9 5 178 – info@elite.es
12

Drill bit sharpening, drill bit clamping and adjustment
The reversible pris has a drill bit range fro 2 to 20 . To
insert and align the drill bit we ust follow a few si ple steps,
open the tool holder by eans of the knurled screw provided for
this purpose, now we can insert the drill bit.
Keep the tip of the drill bit between 15 and 20 . Out of the tool
holder. Then close the cla p slightly by eans of the knurled
screw, so that we can still turn the drill bit by hand. At this point
we should adjust the drill bit parallel to the two existing arks (A
for right-hand drills and B for left-hand drills).
Once the cut has been ade, the cla p ust be closed, do not
start sharpening unless the cla p is correctly closed.
By varying the basic setting shown, the rake angle can be varied
depending on the aterial to be drilled.
If it is required a larger cutting angle, with ore cutting capacity,
then it should be adjusted a little ore to the left (less graduation
on the tool holder). If we want less cutting angle, with less cutting
capacity but ore durability, we should adjust a little ore to the right ( ore graduation on
the bit).
In the case of a broken bit, without a cut to fit, the bit should be sharpened to a point shape.
Align the corners as close as possible to the adjust ent lines and re-sharpen the drill bit
until a sharp edge appears, then adjust as above.
Cutting angle adjustement
In order to work according to the properties of the aterial, the cutting angle ust be
adjusted accordingly.
The ost co on cutting angles are 118º, 130º and 180º.
The angles are clearly arked on the pivot base of the pris . They can be easily adjusted by
opening the ca that holds the base.
Joan Oró, 27. Pol. Ind. Sesrovires, St. Esteve Sesrovires, BCN, Spain– Tel: + 4 9 2 9 5 178 – info@elite.es
1

Drill sharpening
Wear safety goggles!!
Once the tool holder is properly aligned, fix it on the cla ping base in front of the grinding
wheel (page 6 no. 4) and rotate it anually. At the sa e ti e, ove the feed of the tool
holder in the direction of the grinding wheel by eans of the vernier (page 6 no. 5), until we
have a well-shaped cut.
We note the final position of the feed vernier once we have a well-for ed cut and re ove
two or three positions by eans of the vernier. The drill bit should be oved up and down
until the sparks stop co ing out.
To achieve the best cutting sy etry, the tool holder should be rotated 180º without
changing the position of the feed. The other cut should be sharpened until sparks should
appear.
CAUTION!
To prevent the drill bit from overheating and becoming
crystallised, we must work with small feeds.
Sharpening of bi-diametric drills
For this type of drill bits we ust sharpen the first part as
in the previous process for standard drill bits. The cuts of
the second cutting edge ust be placed in the sa e
position (see the section "align ent and adjust ent of
the drill bit"). Once the drill bit is in the sa e position, we
ust extract it so that it is positioned as shown in the
photograph. Using the knurled screws 7 and 9 we can
achieve the fine adjust ent with respect to the grinding
wheel. The sharpening process is the sa e as described
for sharpening standard drill bits.
Joan Oró, 27. Pol. Ind. Sesrovires, St. Esteve Sesrovires, BCN, Spain– Tel: + 4 9 2 9 5 178 – info@elite.es
14

Sharpening of drills for sheet metal, wood and milling cutters
For this type of drill we reco end the use of profiled grinding wheels.
Re ove the cla p fro the holder and position it on the adjust ent line of the drill carriage.
The adjust ent of the drill bit is identical to that of conventional twist drills. The fine
adjust ent of the drill bit to the grinding wheel is carried out by eans of the screws
(Positions 7 and 9 on page 7).
Do not start the grinding wheel otor until the adjust ent is co pleted. In the case of
illing cutters the pris is fixed with the knurled screw in the lower position, fixed on the
side of the pris holder (Position 5 page 7).
By moving forward with the vernier, we sharpen one cut and by turning the tool
holder a half turn we can sharpen the second cut. For tools with 3 or 4 cutting
edges we need the magnetic brake (optional).
Joan Oró, 27. Pol. Ind. Sesrovires, St. Esteve Sesrovires, BCN, Spain– Tel: + 4 9 2 9 5 178 – info@elite.es
15

Core emptying of twist drills
With the new cla ping pris , it is now possible to e pty the
core of the already sharpened drill bit.
1. Holes A and B are for sharpening 4-faceted drills.
2. Hole C is used for coring.
For core drilling, we have to position the drill bit 25 outside
the tool holder without changing its position in the pris .
Outside the tool holder without changing the position of the drill
bit in the pris . Fix the tool holder with the knurled screw in
position C.
Use the upper position of the tool holder. Release the cla p and
position the holder at 90°.
By eans of the tool holder and the ove ent of the otor, we can perfor the core
casting using the left side of the grinding wheel.
Once one side is finished, note the position of the vernier and ove the position back one
turn. Now we can turn the tool holder 180°, fix it again in the hole C and ove the vernier
to the noted position.
Fixing screw
Tool holder support
Cla ping ca
90º
Joan Oró, 27. Pol. Ind. Sesrovires, St. Esteve Sesrovires, BCN, Spain– Tel: + 4 9 2 9 5 178 – info@elite.es
16

Spare parts list
Ref.
11303
17840
10546
16556
10554
10888
10550
10556
10557
10563
10565
10567
10568
10570
10571
15422
Description
2-20 tool holder.
Tool holder support
M8 locking ca with washer for fixing the bracket
Fixing screw for cla ping the tool holder
Pin 7 . For tool holder bracket
Dia ond cutter without dia ond
Dia ond for dia ond cutter
Noniu for drill bit advance
Noniu for otor ove ent
Grinding wheel cover
230 V. Motor. 50 Hz. 2800 RPM.
Vent protector
Fan
Switch
Switch box without switch
Complete grinding wheel holder without grinding wheel.
Only use original spare parts!
Maintenance and greasing
For a long life of the achine in perfect condition it is i portant that it is cleaned and
greased regularly.
Daily: Remove any dust that ay re ain in the working area. (Do not use co pressed
air!).
Weekly: Clean the machine thoroughly and spray all moving parts with oil spray.
The achine is equipped with grease nipples for greasing the guides, keep the clean with a
cloth.
The motor bearings are lubricated for life. In extreme cases, such as high hu idity,
extre e dust, etc. it is recommended to change bearings after 5 years.
Joan Oró, 27. Pol. Ind. Sesrovires, St. Esteve Sesrovires, BCN, Spain– Tel: + 4 9 2 9 5 178 – info@elite.es
17

Warranty
The warranty is based on the legal regulations (warranty law 1999/44/EC) and refers to one
working shift under proper working conditions.
The warranty includes the costs of replacing defective or incorrectly asse bled pairs,
including the ti e required.
Excluded fro the guarantee are parts subject to wear and tear, i proper use such as
excessive force.
In case of warranty claims, the serial number of the machine must be stated.
Returns ust be authorised by the anufacturer prior to collection.
We reserve the right to charge for transport costs if this has not been authorised by the
anufacturer.
Joan Oró, 27. Pol. Ind. Sesrovires, St. Esteve Sesrovires, BCN, Spain– Tel: + 4 9 2 9 5 178 – info@elite.es
18

Technical assistance service
At ELITE we try to satisfy our custo ers with reliable and easy to use products.
However, should you experience any proble s while using the achine, please
do not hesitate to contact us as soon as possible.
On our website: www.elite.es you have all the possible eans of contact, both
directly with us and with our authorised distributors, who will assist you, if
available in your country, with the best proxi ity and professionalis .
We wish you any years of enjoy ent fro this product, please: at the end of
its useful life, please dispose of it correctly to the appropriate bodies for its
proper disposal and recycling.
Joan Oró, 27. Pol. Ind. Sesrovires, St. Esteve Sesrovires, BCN, Spain– Tel: + 4 9 2 9 5 178 – info@elite.es
19
Table of contents
Other Elite Indoor Furnishing manuals
Popular Indoor Furnishing manuals by other brands

Alice's Garden
Alice's Garden EMILIA BS60C2 Assembly instructions

Schüco
Schüco 170191.00.00 Assembly instructions

Better Homes and Gardens
Better Homes and Gardens BH18-021-199-35 Assembly instructions

Magnolia Home
Magnolia Home 50000007 Assembly instruction

Hardware House
Hardware House St. Regis Assembly instructions

dobue MOVELARIA
dobue MOVELARIA Topazio 200574 Assembly instruction