ELIXAIR E 2100 User manual
ELIXAIR E 2100 AIR PURIFIER
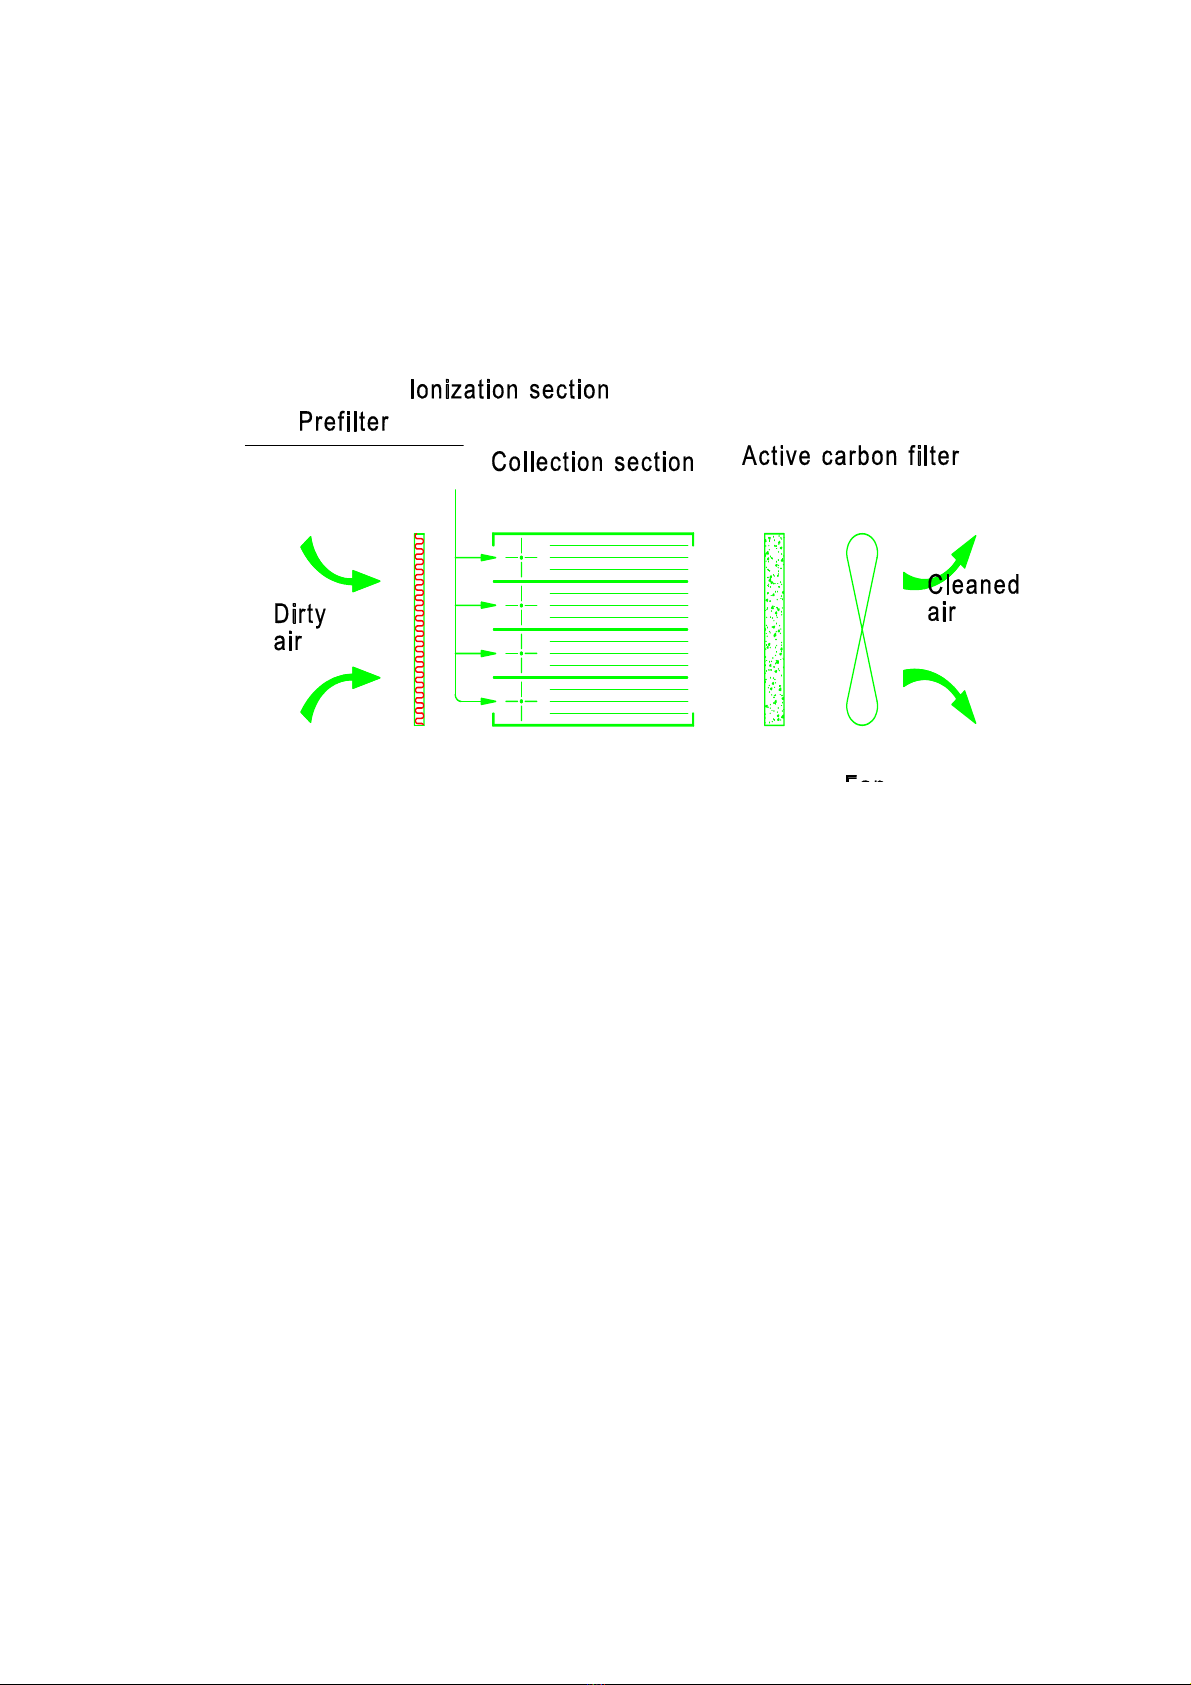
ELIXAIR AIR PURIFIER; OPERATING PRINCIPLE (figure 1)
1. The fan of Elixair draws the particles suspended in the air into the air purifier.
2. Fluff, fibres and other large particles remain in the prefilter.
3. The majority of airborne particles are so small that they are not caught by the prefilter.
In stead they proceed to the ionization section of the electronic collector cell, where
they receive a powerful electrical charge (8 kV).
4. The charged particles travel in the air stream to the collection section of the cell and
are drawn to the collector plates as a result of a strong electric field (4 kV) in the same
way as iron filings are drawn to a magnet. The particles cling to the plates until the cell
is washed.
5. The remaining gaseous impurities, such as odours, are removed by an active carbon
filter which is a standard replacement component.
6. The fan of the unit returns the clean air back to the room.
THE CONSTRUCTION OF ELIXAIR E 2100 (figure 2)
A) Active carbon filter (2 units)
(product no 030400)
B) Electronic collector cell (2
units)
(product no 250360)
C) Prefilter (2 units)
(product no 030390)
D) Grid
E) Wireless remote control
F) Service door
G) Transport supports (2 units)
THE LOCATION OF ELIXAIR E 2100 AIR PURIFIER
It is important to note that in addition to using the air purifier, ordinary ventilation is
necessary to bring in oxygen and to remove carbon dioxide, cigarette smoke and gaseous
impurities caused by various activities in the premises and discharged from the furniture and
the structures of the building. Elixair efficiently removes airborne particles and reduces
noxious gases and odours. It does not, however, render respirators or gas masks useless in
such premises where harmful airborne impurities are so abundant that respirator of fresh air
equipment would normally be required or where staying without any breathing protection is
limited.
Warning! Due to its mode of operation, the electronic collector cell may
occasionally emit sparks. Never use the air purifier in a place where flammable gases
or liquids or large amounts of dust may combine with air to form an explosive
mixture which could be ignited by a spark.
When locating the unit please note the following:
- Preferably install the unit to the ceiling. Also wall installation is acceptable. In case of
wall installation, part of the air flow from the purifier may immediately return to the unit
which weakens the effect of air cleaning in the premises.
- When installing your Elixair purifier, make sure to choose such a place where the
normal ventilation is not disturbed and on the other hand, where the functioning of
Elixair will not be disturbed. Thus avoid installing the air purifier next to fresh-air vents
or exhaust vents.
- Installation inside a suspended ceiling so that just the grid is in sight is allowed only if
the return flow of air from the purifier has free access back into the room. Also take

into account the extra space required for service and remote control.
- Avoid installing the purifier in a recession of the ceiling, especially if the recession is
not wide enough. This would prevent both proper flow of air into the room and the
maintenance of the purifier. It is even possible that the clean air from the exit would
flow directly back to the intake of the purifier and leave the rest of the air in the room
uncleaned.
- For best cleaning results install your Elixair purifier in the ceiling in the middle of the
room. Maintenance is easy and there are no obstructions for infra-red remote control.
An earthed mains socket (230 V) near the place of installation is required for power
supply to the air purifier.

INSTALLATION OF ELIXAIR E 2100 AIR PURIFIER
After finding a suitable place for the air
purifier, install it using the mounting bracket
provided.
A) Ceiling installation (figure 3)
1) Attach the bracket with the enclosed
screws so that the control panel of the
purifier will be facing the direction where
the remote control is used. Make sure to
allow sufficient room on the opposite side
for the service door to open for removal of
the grid, the collector cells and the filters.
2) Drive in 2 locking screws in the bracket to
prevent the purifier from sliding in too far
while installing it.
3) Hold the unit horizontally and lift it next to the mounting bracket and push to the grooves of
the bracket all the way to the locking screws.
4) Fasten the remaining 2 locking screws.
5) Open the service door and remove the two transport supports which hold the collector
cells (figure 2).
6) Remove the plastic wrapping from the active carbon filters and install the filters in the
grooves above the cells. Close the door properly.
B) Wall installation
Use wall installation only when installation to the ceiling is not possible.
1) Attach the mounting bracket to the wall so that the grooves of the bracket run horizontally.
2) Drive in 2 locking screws in the bracket to prevent the purifier from sliding in too far while
installing it.
3) Lift the unit next to the mounting bracket and push it to the grooves of the bracket all the
way to the locking screws. Support the unit while you push it.
Notice that the service door opens sideways.
4) Fasten the remaining 2 locking screws.
5) Open the service door and remove the two transport supports which hold the collector
cells (figure 2).
6) Remove the plastic wrapping from the active carbon filters and install the filters in the
grooves above the cells. Close the door properly.
C) Suspended installation
Installing the air purifier to the ceiling in a very
high room makes maintaining difficult. In such
cases you may suspend the mounting bracket
from the ceiling at the desired altitude using
chains, wires or threaded rods (figure 4). For the
rest of installation, follow the instructions of
ceiling installation. An extension mains cable may
be required for power supply. You can attach the
cable to one of the supports. A firm table or
similar platform and 1-2 assistants are required
when lifting the unit to its mounting bracket.
TESTING THE OPERATION
1) Connect the mains cable to the wall socket. The unit is on and running at speed II (2
green bars on the control panel display. The yellow high voltage indicator is continuously
on.
2) Test the functioning of the unit by pressing the red button on control panel. The speed of
the air purifier motor rotates in the following sequence: (figure 5)
YCstop Cspeed I Cspeed II Cspeed III CstopY
3) Repeat the same test using the remote controller. Point the infra-red beam from the
narrow end of the remote controller to the receiver in the control panel. The transmitter is
operated using the press-button (under the diaphragm). Pressing the button turns on the
green indicator light in front of the button. Pressing the remote control button is
equivalent to pressing the button on the control panel.
The maximum operating distance is ca. 10 m. The distance may be reduced by thick
cigarette smoke or any solid structure which restricts the passage of the infra-red light.
Accurate aiming or longer pressing of the button (2C3 seconds) is required when using
the remote controller at the outer limits of its operating distance.
4) The unit has a built-in option for wire-operated remote control. This requires, however,
additional installations. If you want to use this option (equivalent to pressing control panel
button) please call your authorized Elixair service company for further instructions.
Table of contents
Other ELIXAIR Air Cleaner manuals


