ELKATHERM ETT-100 User manual

...step by step
Thermostat
ETT-100 | EN
Manual

Contents
Description of the Device....................................5
Control Buttons.......................................................................5
Display..................................................................................5
Starting the device................................................................6
Placing the device into a working state
and setting the temperature....................................................6
Standby state........................................................................6
Minimum and Maximum temperature value.........................8
Setting and controlling the set temperature..........................8
Errors and device information..............................................11
Open Window Detection.......................................................11
Antifrost...............................................................................12
Child Lock............................................................................12
Device Offline....................................................11
Device Settings......................................................................13
Bluetooth Connect................................................................13
Smart Pairing........................................................................14
Factory Reset.........................................................................15
Mobile application and connectivity...................16
Add a device.........................................................................16
Delete the device...................................................................17
Share the device....................................................................17
Device status.........................................................................18
Set up settings - manage.......................................................19
Modes of operation...............................................................20
Notifications.........................................................................22
Sound...................................................................................23
Window tracking..................................................................24
Antifrost................................................................................25
Room temperature sensor calibration...................................26
Weekly program...................................................................26

5
...step by step
Description of the Device
Control Buttons
The device has two multifunctional control buttons,
(plus; increasing value) and (minus; decreasing value).
Display
The 2-digit display shows the status of the device. The dot
presents the level of 0.5 °C.
Eco/Comfort temperature.....................................................27
Adaptive program................................................................28
Update software on the heater.............................................28
Device groups....................................................30
How to group devices...........................................................30
Share group.........................................................................32
Rename group......................................................................33
Ungroup group.....................................................................34
Autoupdate...........................................................................35
Adaptive program.................................................................36
Antifrost................................................................................37
Setting the Eco temperature..................................................38
Setting the Comfort temperature...........................................39
Setting the weekly program..................................................40
Group individual settings...................................41
Individual Devices in Group..................................................41
Child Lock.............................................................................42
Thermostat information........................................................43
Autoupdate..........................................................................43
Heaters................................................................................44
Sound...................................................................................44
Error state............................................................................44
Surface temperature limit active...........................................45
Surface temperature limit reached........................................45
No information.....................................................................45
Temperature sensor calibration.............................................46
Setting the hysteresis.............................................................46
Window open detection........................................................47

6 7
User Manual
...step by step
Starting the device
When it is connected to the power supply for the first
time after factory settings the device produces sound and
automatically turn on the device and display to the initial
state ( -- ). Other reconnectings to the power supply, the
device will produce sound and display the last state it was
before the power supply was disconnected.
Placing the device into a working state
and setting the temperature
By pressing the button, the device shows the current status
on the display. To turn on the device from off state (oF)
press button +. The default temperature is 5 °C ( LO ). The
change step is 0.5 °C. Pressing the buttons and changing
set values produces short sound. This provides easier
handling with the device to blind and visually impaired
people.
Button increases the value, and the button
decreases. The long button press switches to “Fast Change
Mode”.
Standby state
After 10 seconds of inactivity, the display automatically
goes to standby state.
By pressing one of the buttons, display will turn on and
show its status (room temperature). Once it is on, the
temperature setting can be performed.

8 9
User Manual
...step by step
Minimum and Maximum temperature value
The minimum value of set temperature is LO, and the
maximum value is HI. Reaching maximum and minimum
temperature produces characteristic sounds, which makes
the device easier to handle for blind or visually impaired
people. Holding the button for several seconds, after
reaching the minimum set temperature of 5 °C (LO) will
automatically turn the device off (oF state).
Setting and controlling the set temperature
The hysteresis is determined by the thermostat software
and its value is 0.5 °C. After reaching the set temperature,
the device turns off the heater. When the temperature is
lower than the set temperature by 0.2 °C, the device turns
the heater on. When the heater is in the working state,
the device shows the current room temperature, and sign
“ON” alternately, showing the working state of the heater.
When the set temperature is lower than the room
temperature, the heater is turned off. The device shows the
current room temperature and. As said before, after 10
seconds of inactivity, the displays automatically switches to
the standby mode.
In order to change the set temperature, pressing any
button ( “-” or “+”) when display is not in stand by, will
show current set temperature. The set temperature will
blink, and it is changed by pressing buttons. Once the
setting is completed, the temperature will blink for several
seconds, and after, the current room temperature will be
shown (not blinking).
Maximum set temperature Minimum set temperature
Turning the device off
The heater is on
The room
temperature sign
and ON sign are
changing
alternately
The heater is off
10 seconds

10 11
User Manual
...step by step
If the temperature is changed on the thermostat, while in
program mode, the mode will be automatically changed
from program to manual.
Errors and device information
“E1” represents a problem with the room temperature
sensor. When the error is detected and showed on display
as “E1”, the heater device will be turned oF automatically
display will show state “oF”. The device can be turned on
manually by pressing the “+” button, and this will keep the
heater on, until the button “–“ is pressed which will then
turn the heater off (keep in mind that pressing any button
while display is in sleep will firstly awake the display and
another pressing will serve as a command). The display
will show “E1” and “oN” or “oF” depending on the heater
state, alternately.
Open Window Detection
“Open Window Detection” is integrated within the device
and it is possible to disable it in the settings of the mobile
app.
Mode of operation: By following the changes in room
temperature the device detects an open window. The
display shows digits “oP”. Simultaneously, the mobile app
gives notification for an open window.
Reset: After an open window has been detected, the device
disables the heater for the next 10 minutes. Setting the
new temperature (pressing of any control button) will reset

12 13
User Manual
...step by step
this feature. For the next 30 minutes, the device disables
open window detection.
Antifrost
“Antifrost” protects your heating system from damage at
cold temperatures. It can be enabled or disabled using
the mobile app. Temperature range in which this safety
meaure can be set goes from 0 °C to 17 °C. When the
device is turned off, if the current temperature is lower than
“antifrost temperature”, heating is activated.
In case of error “E1”, Antifrost is disabled. When antifrost is
activated, symbols “AF”and “oN” are displayed alternately.
The mobile app gives notification that ANTIFROST is
active.
Child Lock
“Child Lock” protects the device from unwanted changes in
temperature settings, that can occur by accidentally pressing
buttons on the device. When active, display shows LC
when buttons are pressed, and this is activated via mobile
application. In order to unlock the heater, press and hold two
buttons until LC is shown on the display. Releasing the buttons
will produce sound and unlock the device.
Device Offline
When the device is not connected to the internet on
the display “oo” symbol will be shown, along with other
statuses.
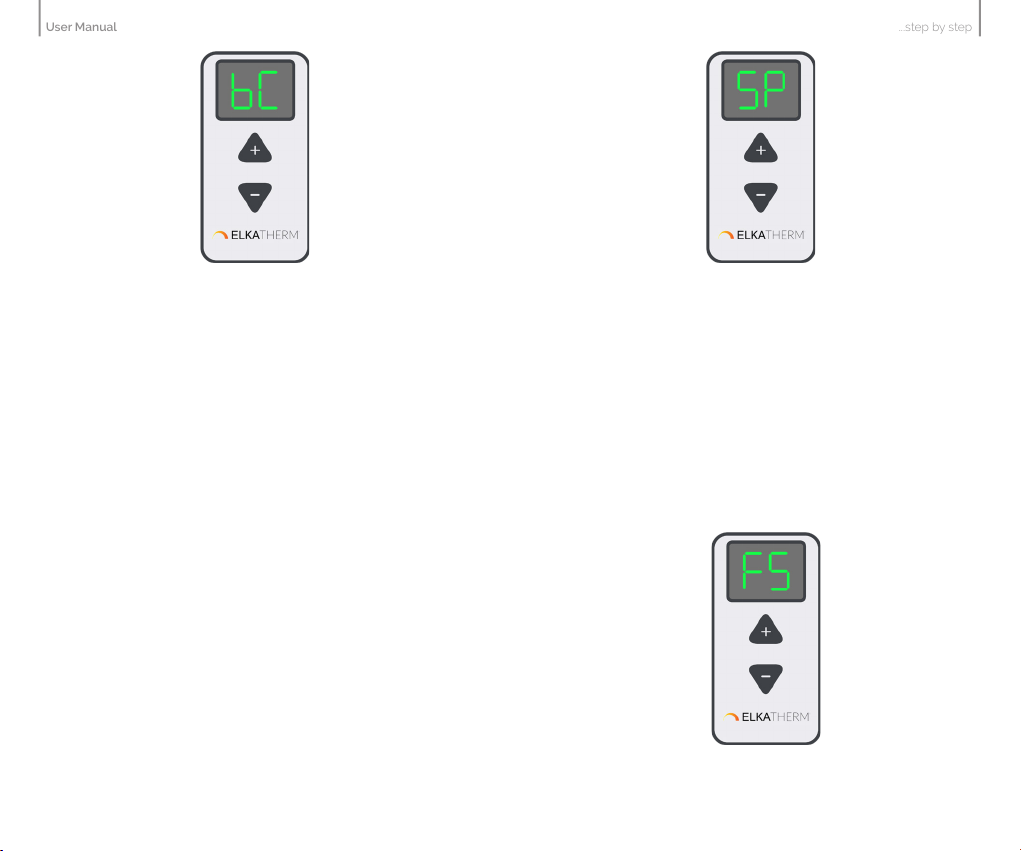
Device Settings
Entering the device settings menu is achieved by holding
down both control buttons on the thermostat and each
settings will be displayed alternately after “[ ]” symbol.
“bC” is for Bluetooth connect, “SP” is for Smart pairing
and “FS” is for Factory reset. The options in the menu are
rolling as the buttons are pressed. Leaving the settings
menu is achieved by releasing the buttons on “[ ]”.
1. Bluetooth Connect
The BluetoothConnect mode is activated by holding down
both control buttons on the thermostat until “bC“ is shown
on display.
Keep holding the buttons until the symbol „bC“ is shown
on the display. Release the buttons once the „bC“ is shown
on the display. After the „bC“ should blink on the display
then the BluetoothConnect mode is active.
14 15
User Manual
...step by step
3. Factory Reset
The device can be reset to factory settings.
The Factory reset is activated by holding down both control
buttons on the thermostat until “FS” is shown on display.
Release the buttons once the „FS“ is shown on the display.
After, the „FS“ should blink on the display then the device
is reset.
2. Smart Pairing
The Smart pairing on heater is activated by holding down
both control buttons on the thermostat until “SP” is shown
on display.
Release the buttons once the “SP” is shown on the display.
After, the “SP” should blink on the display then the device
is in smart pairing mode.
In order to pair heater and thermostat, the Smart Pairing
(SP) setting should be initiated on both thermostat and
heater. After configuration, the devices will be paired.
In order to pair multiple heaters with a thermostat, the “SP”
setting should be active on all heaters and thermostat. The
heaters will then pair with the thermostat that will control
all heaters with the same setting.
If the heater is already connected to a thermostat, it is
possible to add other heaters to the same thermostat. This
is achieved by activating the “SP” setting on thermostat and
on heater that needs to be connected to the thermostat.

16 17
User Manual
...step by step
Mobile application and connectivity
Add a device
• Adding new device is possible by using the mobile app
• Turn on Bluetooth and Location
• Add device via BluetoothConnect
• The BluetoothConnect mode is activated by holding
down both control buttons on the device until [ ] is shown
on display.
• Keep holding the buttons until the symbol bC is shown
on the display. Release the buttons once the bC is shown
on the display. After, the bC should blink on the display.
• In the mobile app, user check, fileds and insert WIFI password
• The unit receives its unique UUID number
• The device is assigned to the account
Delete the device
The device can be deleted from each account where it is
available, and deletion is only performed for that account.
Share the device
• The device can be shared to an unlimited number of
accounts as folows:
- The account that shares the device, should choose
“share device” option from setting menu. The QR code is
generated and shown on the display.The account which the
device is shown to. should choose “add a device” option
on its own account by clicking “+” in the applications
home screen, then choose option “scan the QR code”
which will open mobile camera, and the QR from the first
account should be scanned. This will add the device to
the other account.

18 19
User Manual
...step by step
Device status
• The device has the following working statuses:
o The thermostat is switched off - “SLEEP” status:
- Thermostat is receiving data from WIFI, but the
heating is off
- All setup options allowed, subject to first
switching on the thermostat from the mobile
application itself, not necessarily physical
activation
- When clicked on tab Heaters in the Settings
Menu, it shows the number of active heaters
that are interconnected and connected to the
app. For every individual heater there is a
control panel to set the modes ON, OFF or
AUTO. Beneath each heater the current
software version is mentioned. If the version
is up to date it will say UP TO DATE if the
new version is available it will say UPGRADE.
In case of Autoupdate is turned on, the software
will be upgraded automatically.
o The thermostat is switched off - “OFFLINE”
status
- Disappearance of electricity
- Loss of WIFI connection
- Loss of Cloud connection
- Internet disappearance
- Negligible thermostat status.
o Active - “ON” status
- Thermostat is on
- WIFI and Cloud are active
- All setup options are allowed
Set up settings - manage
• APP has the ability to set the following options
o Change the set temperature
o Set a weekly program
o ON / OFF Switching the device on and off
o Set mode (Manual, Program)
o Turn window open detection on or off
o Turn the sound on or off
o Turn antifrost on and off as well as set its
activating temperature
o Set the calibration of room temperature sensor
o Set the hysteresis
o Set child lock
o Set autoupdate
o Set eco/comfort temperature
o Set adaptive time

20 21
User Manual
...step by step
On the home screen of the device in the mobile app it is
possible to select and modify the modes of operation as
indicated on the figure above.
1. Manual mode will control heating by setting temperature
in the range of 5 to 35 °C. The slider (“+” or “-”) will
change the set temperature to the desired value.
2. Antifrost mode will control heating by setting
temperature in the range of 0 to 17 °C. The slider (“+” or
“-”) will change the set temperature to the desired value.
The temperature set in this mode will be applied in the
settings as well and used in the program mode.
3. Eco mode will control heating by setting temperature
in the range of 10 to 30 °C. The slider (“+” or “-”) will
change the set temperature to the desired value. The
temperature set in this mode will be applied in the settings
as well and used in the program mode.
4. Comfort mode will control heating by setting
• APP has the ability to read the following information:
o Current temperature
o Set temperature
o Weekly program
o Device status
o Current MODE operation
o Current window status (if monitoring is
enabled)
o The strength of WiFi signals
o The condition of the surface temperature ensor
o Condition of room temperature sensor
o Current software versions
Modes of operation
1. Manual mode
2. Antifrost mode
3. Eco mode
4. Comfort mode
5. Program mode

22 23
User Manual
...step by step
Sound
• Beeping of the device when pressing buttons and change
statuses can be disabled in mobile app.
• This can be done by turning on or off the Sound option.
temperature in the range of 15 to 35 °C. The slider (“+”
or “-”) will change the set temperature to the desired
value. The temperature set in this mode will be applied in
the settings as well and used in the program mode.
5. Program mode is activated on the screen and will set
the temperatures according to the 7 Days program, that
is explained in separate chapter, refered as “Weekly
program”. When in program mode the display will show
“Pr” symbol along with the set temperature and other
statuses, alternately.
Notifications
• The application allows you to turn all notifications on
and off.
• The application allows you to view notifications for each
individual device
o Notification of an open window if monitoring
is enabled
o Notification of error on the room temperature
sensor
o Information about surface temperature sensor
o Information about pending update
o Information about time not synced, when
device has not received time setting yet
• An application must be running to allow notifications
Example of the error information
Sound is now enabled
24 25
User Manual
...step by step
Window tracking
• Window open detection can be disabled or enabled via
mobile app.
• This is done by turning on or off Window tracking option.
Antifrost
• Antifrost temperature can be set in a range from 0 °C
to 17 °C
• If the device is turned off and the current temperature is
lower than “antifrost temperature”, heating is turned
Window open detection is now enabled
26 27
User Manual
...step by step
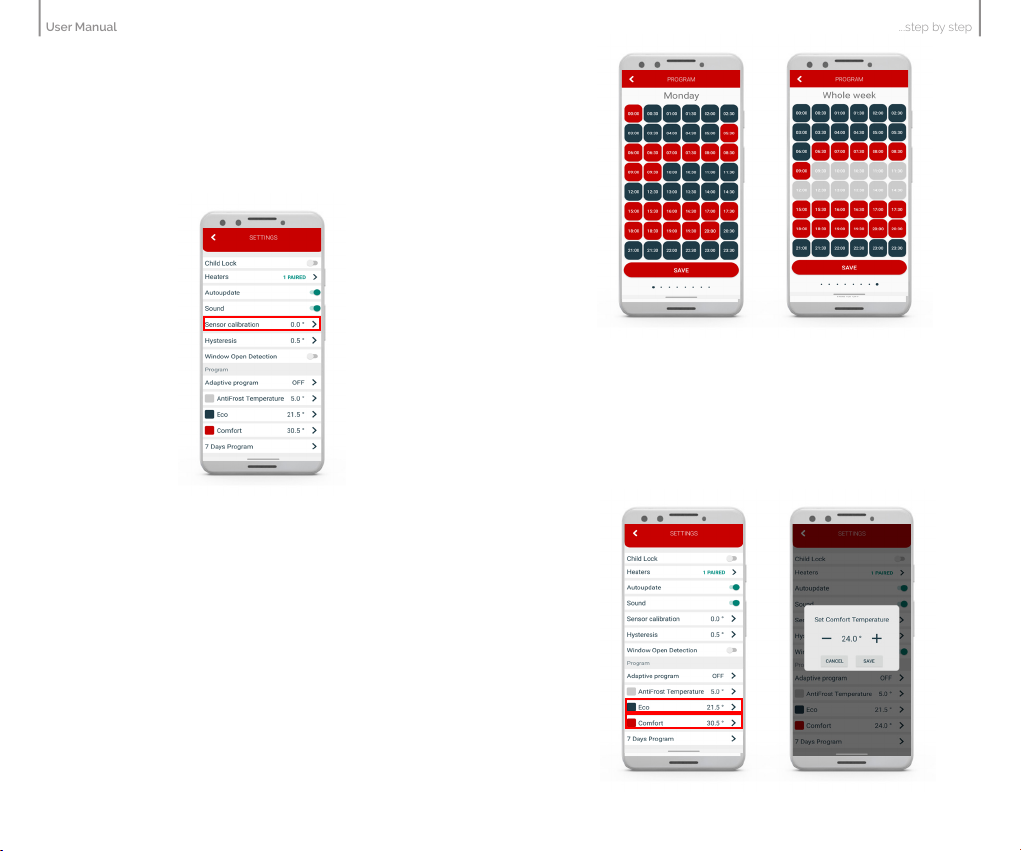
Room temperature sensor calibration
• The application allows you to calibrate the room
temperature sensor.
• The calibration range is ± 10 °C with changing levels
of 0.5 °C
Weekly program
• Program can be set for each day in a week separately.
• It is also possible to set a program for a whole week.
• Temperature can be set to either Comfort, Antifrost or
Economic for every half hour in the day.
Eco/Comfort temperature
• Eco/Comfort temperature can be changed in the mobile app.
• By default Eco temperature is set to 18°C, and Comfort
temperature is set to 21°C.
Current settings are shown here. Temperature change range is
0.5 °C.

28 29
User Manual
...step by step
Adaptive program
• Setting the adaptive automatic program is possible by
using the mobile app
• It enables the user to turn on the heating several minutes
before it is scheduled in 7 Days program, so that the
desired room temperature is achieved at the scheduled
time.
Update software on the heater
• The application shows the current version of the software
• When updating information, the application checks for
the availability of a new version on the server
• If there is a new version, it is possible to send the update
request to the device, i.e. the link to the specific file with
the latest version
• When receiving update, the device will show “uP”
symbol, during the process of configuring new software
• The AUTOUPDATE (enable / disable) option will enable
automatic update of the heaters firmware. By selecting
autoupdate, each subsequent available update will be
Current settings are shown here.
applied on the heater inside the device and will update
automatically.
• If Autoupdate is active, the heaters section will display
information about the current firmware version, and that
the update is registered and will be updated automatically.
There is a possibility of immediate update as before in
case the latest version is not registered. If the Autoupdate
option is turned off, in the heaters section there is an
option for manual firmware update if the new update
is avaible.
• If the AUTOUPDATE is active disconnecting power supply
and reconnecting will automatically update the software
once the device is back online if the update is available.
During the update, the device
display shows “uP” digits.

30 31
User Manual
...step by step
To add a device to an existing group:
1. Open the mobile app
2. Click on button (add to group)
3. Select the device you want to add.
4. Select the group to which you want to add the device
In this type of grouping the devices,all devices in the group
are configured with all group settings; all changes in the
group are automatically applied to each device in the group,
on all available accounts, regardless of whether the device
is separate or part of a group (same group which is shared;
because it cannot certainly be part of another group).
In this connection, any change on the device (devices in the
group): physically on the heater, or on the battery thermostat,
or via mobile application, will be automatically applied to all
devices in that group, and the main screen of groups in the
application will display the same status because each device
will receive the same setting. If the change on all devices
is to be made through the application, then on the main
control screen of the group, these changes will be set. In
this connection, the statuses of the individual devices will be
displayed on the additional screen.
On the group main screen it is possible to set temperature for
manual, eco, comfort, antifrost modes, or activate program
mode.
Device groups
How to group devices
It is possible to group only already online 2 or more
devices on main list.
1. Open the mobile app.
2. Click on button create group.
3. A check box will be displayed; check if you want to add.
4. Options Confirm if you want to create or Cancel
if you don’t want, are avaible on the screen
5. If you choose create group a new pop-up will be
displayed in which group name should be entered .
6. After clicking Confirm a group will be created.

32 33
User Manual
...step by step
Share group
It is possible to share already connected device with other
accounts (e.g. with family members) by using the mobile app.
1. Open the mobile app.
2. Select the group you want to share.
3. Click the symbol in the upper right corner.
4. Select SHARE GROUP.
5. Use other mobile phone to scan QR-code from the
screen of your group.
Rename group
It is possible to rename the group via mobile app.
1. Open the mobile app.
2. Select the device you want to rename.
3. Click the symbol in the upper right corner.
4. Select RENAME GROUP.
5. Choose RENAME if you want to rename the group or
CANCEL if you don’t want to rename the group.

34 35
User Manual
...step by step
Ungroup group
It is possible to ungroup the group from mobile app. If
the device is shared with multiple accounts, it will only be
ungroup from your account.
1. Open the mobile app.
2. Select the group you want to share.
3. Click the symbol in the upper right corner.
4. Select UNGROUP.
5. A message will be displayed; choose ACCEPT if you want
to ungroup the devices or CANCEL if you don’t want to
ungroup the devices.
Autoupdate
The AUTOUPDATE (enable/disable) option will enable
automatic update of the heater’s firmware. By selecting
autoupdate, each subsequent available update will be
forced on the heater inside the device and will update
automatically.
If Autoupdate is active, the heaters section will display
information about the current firmware version, and that
the update is registered and will be updated automatically.
There is a possibility of immediate update as before in
case the latest version is not registered. If the Autoupdate
option is turned off, in the heaters section there is an option
for manual firmware update as in previous applications/
versions.

36 37
User Manual
...step by step
Adaptive program
Setting the adaptive program is possible by using the mobile
app. It enables the user to turn on the heating several minutes
before it is scheduled in 7 Days program, so that the desired
room temperature is achieved at the scheduled time.
1. Click the symbol in the upper right corner and then
click SETTINGS.
2. Choose ADAPTIVE PROGRAM and set the desired value
desired value between 1 and 60 minutes, or OFF.
3. Click SAVE.
Antifrost
In the mobile app on the control panel antifrost can be
modified from 0-17C. It will also be immediately modified
in the settings.
To modify antifrost in the settings follow the steps:
1. Click on the symbol in the uper right corner and then
click on SETTINGS.
2. Click on on AntiFrost and set the desired temperature.
3. Click SAVE.

38 39
User Manual
...step by step
Setting the Eco temperature
In the mobile app, on the control panel, Eco temperature
can be modified from 10-30 C. It will also be immediately
modified in the settings.
To modify Eco temperature in the settings follow the steps:
1. Click the symbol in the upper right corner and then
click SETTINGS.
2. Choose Eco temperature and set desired value.
3. Click SAVE.
Setting the Comfort temperature
In the mobile app, on the control panel, Comfort temperature
can be modified from 15-35 C. It will also be immediately
modified in the settings.
To modify Comfort temperature in the settings follow the steps:
1. Click the symbol in the upper right corner and then
click SETTINGS.
2. Choose Comfort temperature and set desired value.
3. Click SAVE.
Table of contents


 operating instructions")


