Elle Decor LARA Installation guide

version 0919
Item 280-178
Warning
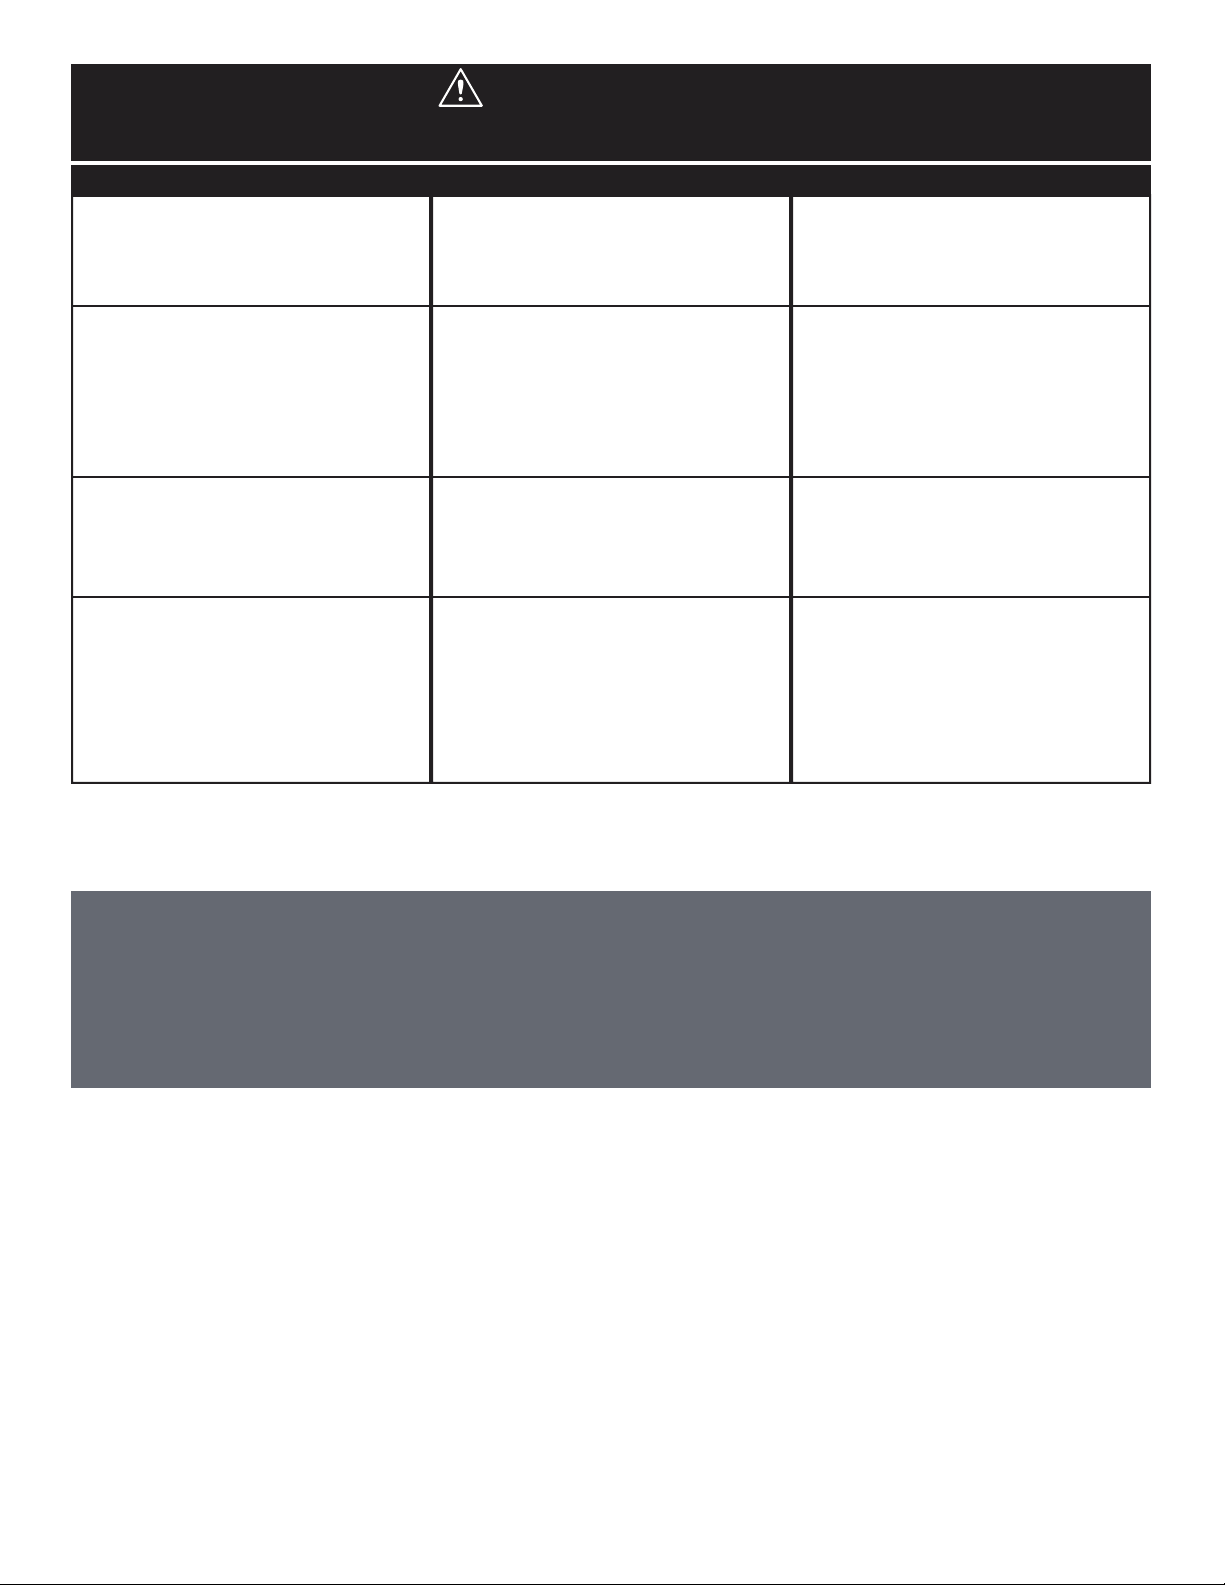
Children climbing on furniture. A child may try
to reach a toy or other object by climbing on
furniture. Children will play and be active near
a TV.
Risk of injury or death. A child climbing
on a piece of furniture or playing with a
TV can cause it to tip over.
Never allow children to climb on or play with
furniture. Do not place toys, food, etc. on the
top shelves and/or drawers. Children may try
to climb to reach them out of curiosity.
Overloaded drawers and/or shelves.
Improper loading can cause furniture to be
top-heavy.
Risk of injury or damage to furniture
and/or equipment. Overloaded drawers
and/or shelves can break.
Refer to your assembly manual for
maximum weight capacities. Load drawers
and shelves from the bottom to the top.
Place heavier items in lower drawers
and/or shelves. Unload drawers and
shelves from the top to the bottom before
moving the furniture.
Placing a TV on furniture that is not
designed to support a TV.
Risk of injury or death. TVs can be very
heavy. The weight and location of the picture
tube tends to make them unbalanced and
prone to tipping forward.
This product is not designed to support a TV.
Improperly moving furniture. Risk of injury or damage to furniture and/or
equipment. Furniture can tip over if not
moved carefully over obstacles or across a
changing floor surface (ex: from a wood floor
to carpeted floor).
Do not push furniture, especially on
carpeted floor. Have someone help you lift
the item and place it in its new location.
Remove any glass tops, shelves or doors
before moving.
Please use your furniture correctly and safely. Improper use can cause safety hazards,
or damage to your furniture or household items. Carefully read the following chart.
Look out for: What can happen: How to avoid:
Date Purchased: _____________
NOTES:
• Please read the instruction sheets completely before assembly.
• Remove all parts from carton and ensure all parts are included prior to assembly.
• Assemble the product on the carton or carpet to prevent scratching the product.
• Examine all packaging material and remove staples before discarding carton.
• Be careful not to cross-thread screws.
• Do not use power tools.
Customer Service 1-866-942-5362
Call Us First!
DO NOT RETURN TO STORE.
For immediate help with assembly or product information call our toll-free number:
1-866-942-5362 Mon-Fri 8:30 am - 4:30 pm PST.
Our staff is ready to provide assistance.
Damaged or missing parts ship from our facility in 1-2 business days.
Thank you for purchasing this product. We trust that you will be completely satisfied with your product
for years to come. This product is backed by a 1 year limited warranty and has been crafted with
today’s lifestyles in mind.
The maximum recommended weight allowance is 100 lbs (45.4 kg) for desk top.
The maximum recommended weight allowance is 50 lbs (22.7 kg) for open storage shelf.
Record date of purchase below and save this booklet for future reference. Call for parts & service
For customer support, Vendor Sticker can be found under the top panel toward the front end.
2
1-866-942-5362.

5
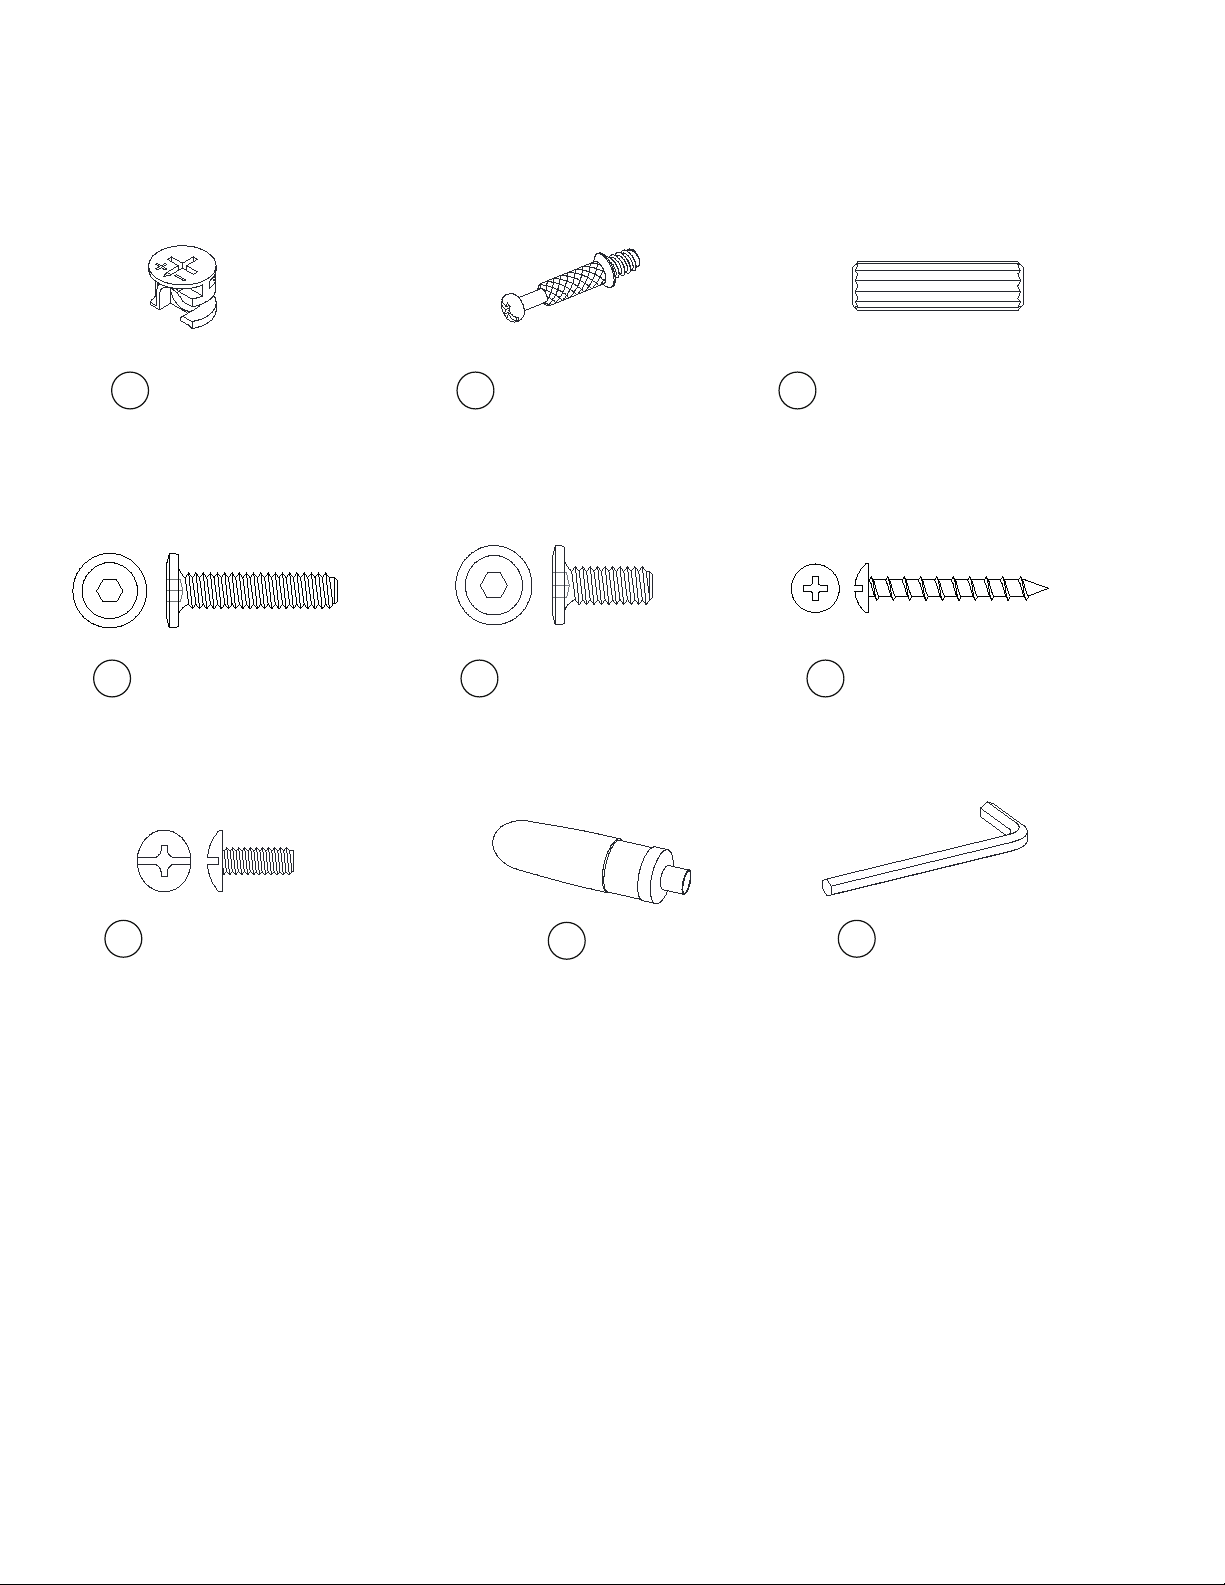
Parts List/ Liste des éléments/ Lista de piezas
A
Glass Top/
Dessus en verre/
Tapa de vidrio (1)
D
Right Side Panel/
Panneau latéral droit/
Panel lateral derecho (1)
B
Fixed Shelf/
Tablette fixe/
Repisa fijo (1)
C
Left Side Panel/
Panneau latéral gauche/
Panel lateral izquierdo (1)
I
Metal Bars/
Barres métalliques/
Barras metálicas (2)
H
Stretcher/
Châssis/
Bastidor (1)
G
Right Side Frame/
Cadre latéral droit/
Marco lateral derecho (1)
F
Left Side Frame/
Cadre latéral gauche/
Marco lateral izquierdo (1)
E
Back Panel/
Panneau arrière/
Panel posterior (1)
J
Cable Wheels/
Guide-câbles/
Guías para cables (2)
6
Parts List/ Liste des éléments/ Lista de piezas
8
Glue/
Colle/
Goma (1)
7
5/32" x 12 mm Small Bolts/
5/32" x 12 mm Petits boulons/
5/32" x 12 mm Tornillos pequeños (4 + 1 extra)
9
Hex Wrench/
Clé hexagonale/
Llave hexagonal (1)
2
Cam Bolt/
Boulon à came/
Tornillo de fijación (2)
1
Cam Lock/
Came/
Tuerca de fijación (2)
3
M8 x 30 mm Wood Dowel/
Goujon de bois M8 x 30 mm/
Perno M8 x 30 mm madera (8 + 1 extra)
5
1/4" x 15 mm Bolt/
1/4" x 15 mm Boulon/
1/4" x 15 mm Tornillo (4 + 1 extra)
4
1/4" x 28 mm Bolt/
1/4" x 28 mm Boulon/
1/4" x 28 mm Tornillo (10 + 1 extra)
6
M4 x 30 mm Screw/
M4 x 30 mm Vis/
M4 x 30 mm Tornillo (10 + 1 extra)
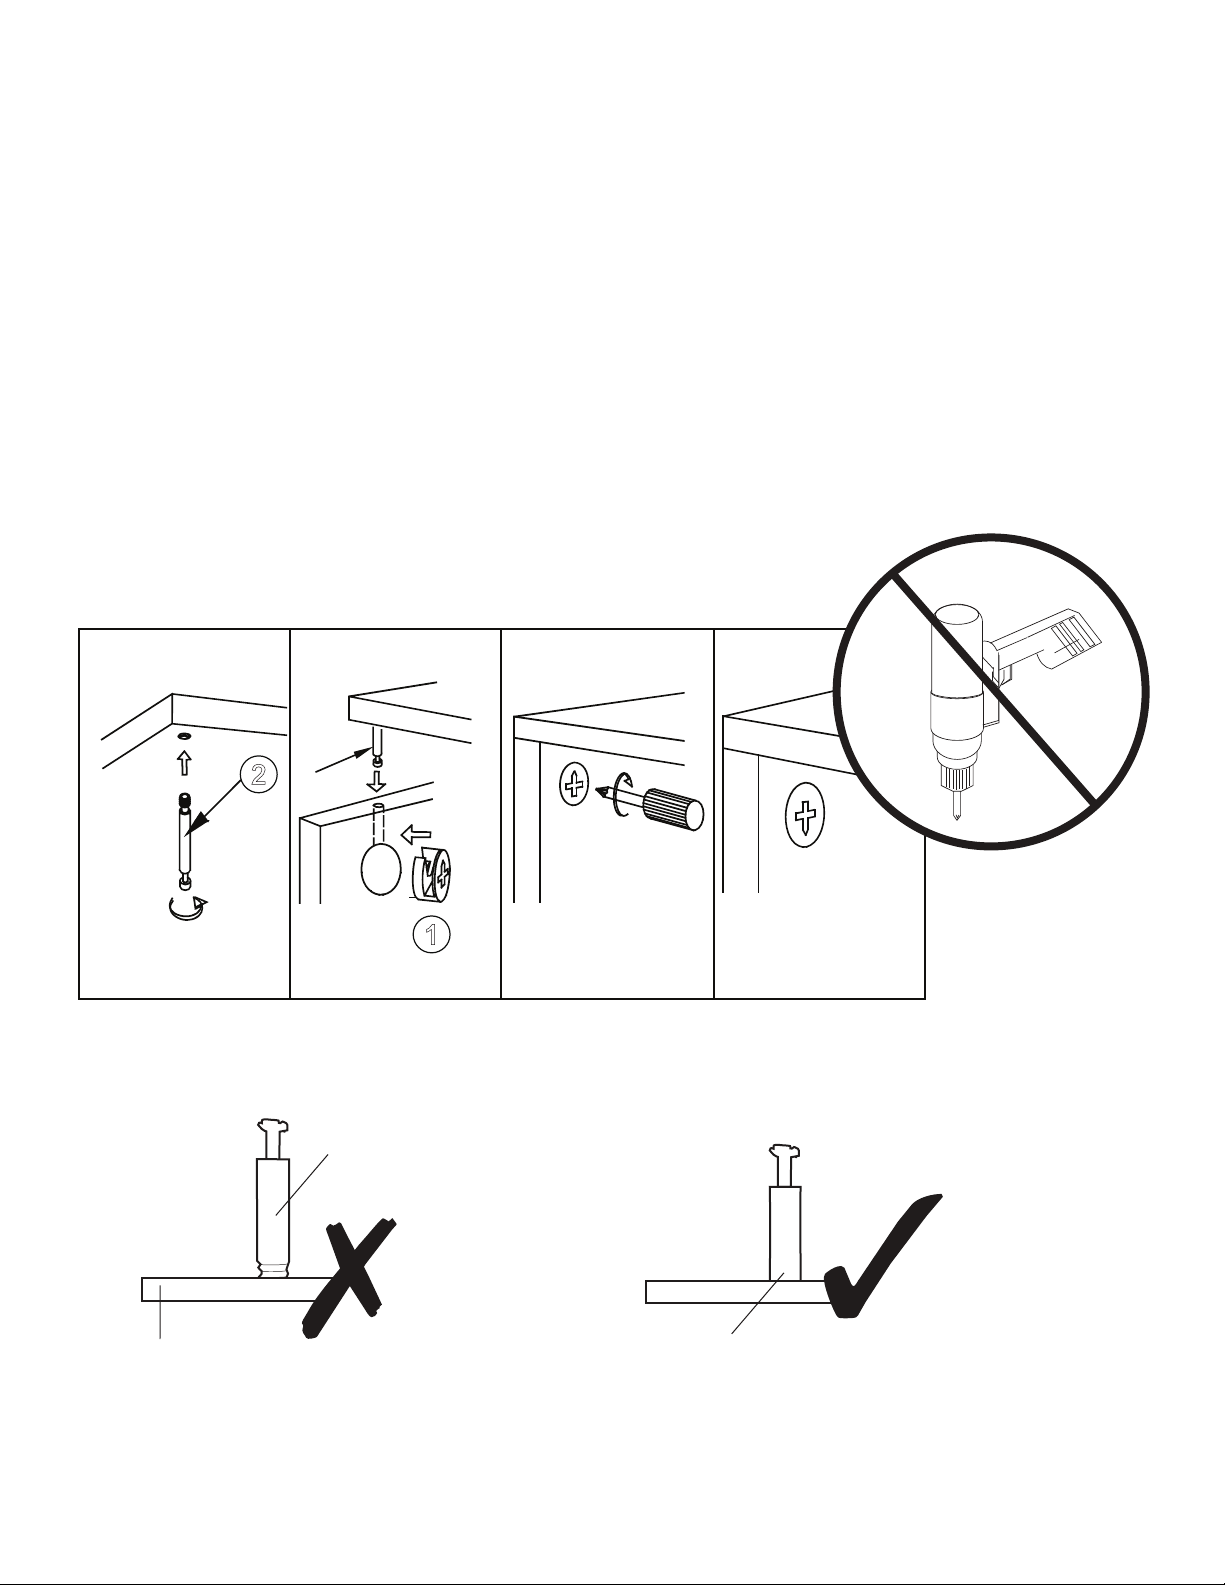
Installation of Cams and Pins :
Screw the Pin into hole. To set Cams correctly, ensure the arrow on the Cam head points to the
hole of the Pin it is locking. Lock Cam by turning Cam head one third clockwise with screwdriver.
Do not overtighten. Please don’t use an electric screwdriver to assemble the unit.
Installation des roulettes à blocage et des chevilles :
Vissez la cheville à l'intérieur du trou.assurez-vous que la flèche sur le dessus de la roulette pointe
vers le trou de la cheville à bloquer. Verrouillez la roulette à blocage en tournant le dessus de la
roulette d'un tiers de tour en sens horaire à l'aide d'un tournevis. Ne serrez pas trop.
Veuillez ne pas utiliser un tournevis électrique pour assembler ce meuble.
Instalación de levas y pernos :
Atornille el pasador en el agujero, asegúrese de que la flecha en la cabeza de la leva
apunta hacia el agujero del pasador que esta asegurando. Asegure la leva girando
la cabeza un tercio en el sentido de las agujas del reloj. No la apriete en exceso.
No utilice un destornillador eléctrico para ensamblar la unidad.
12
Pin
Cheville
Pasador
Panel
Panneau
Panel
No gap
Aucun écart
Ningún espacio
3 4
7
2
1
8
1--
2[ 2 ]
C
D
2
C
D
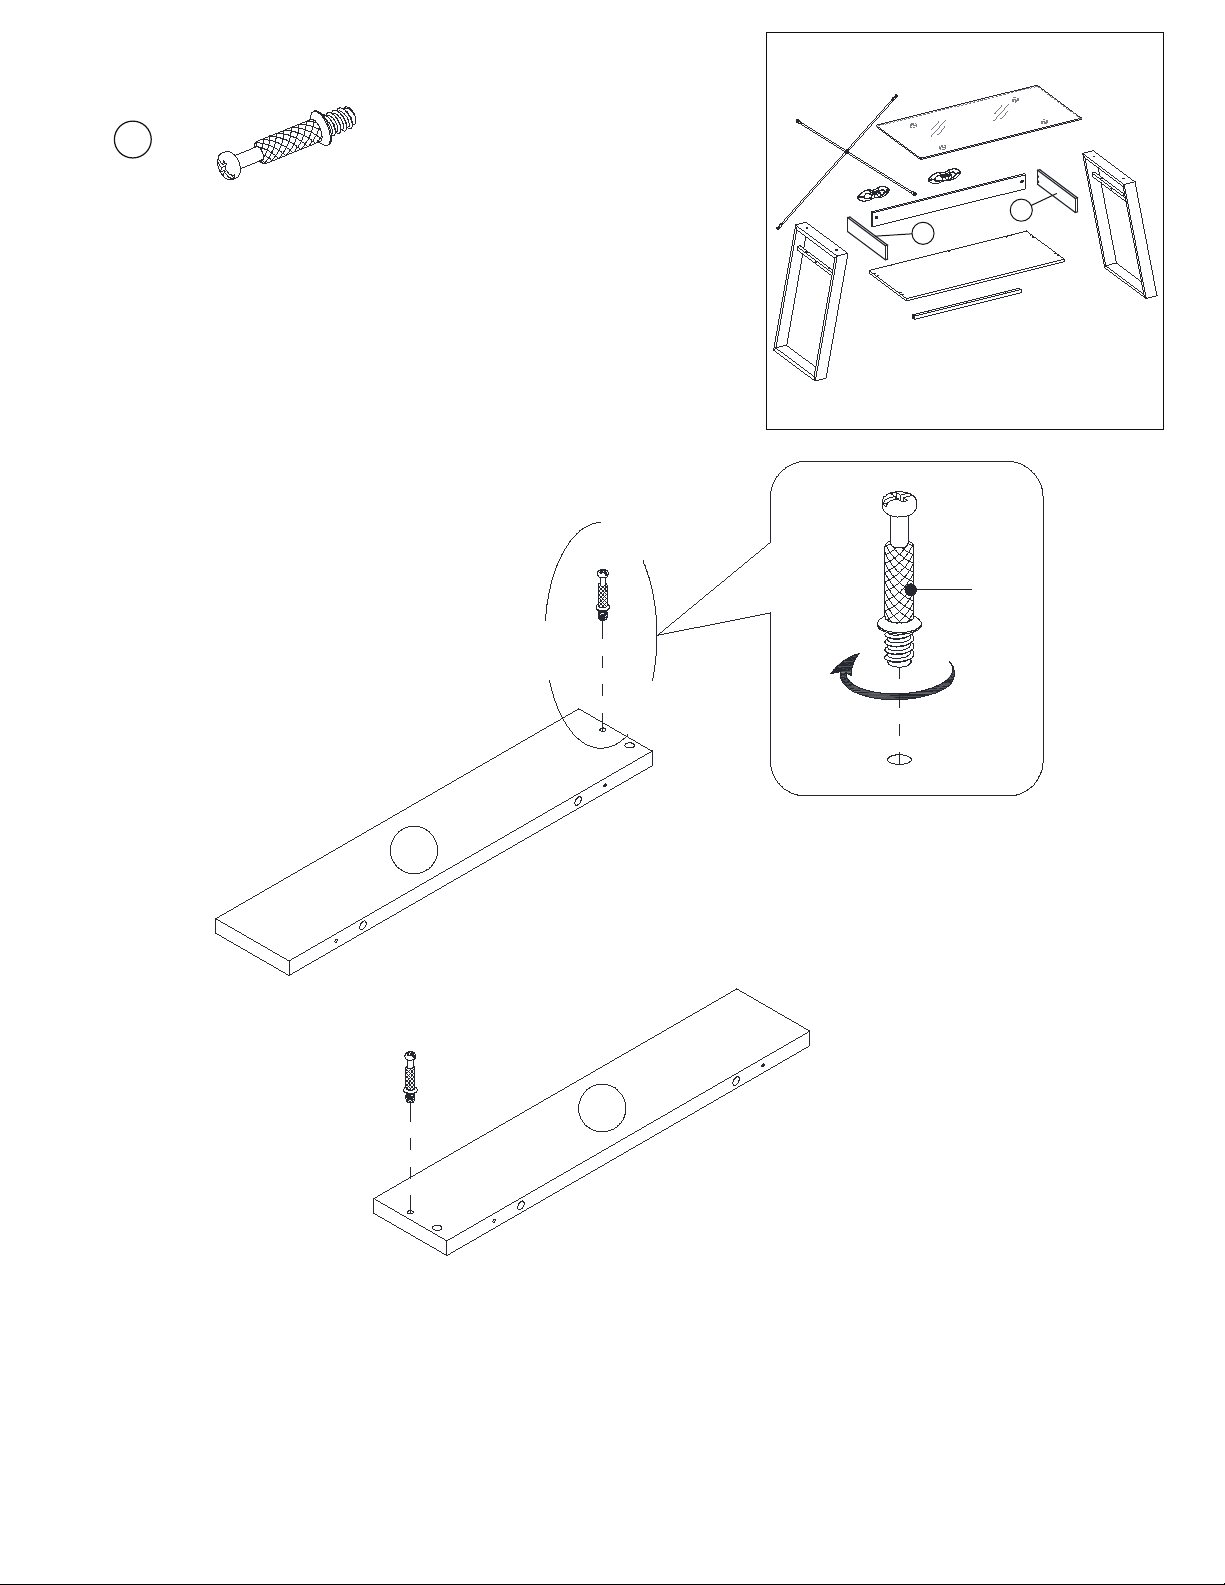
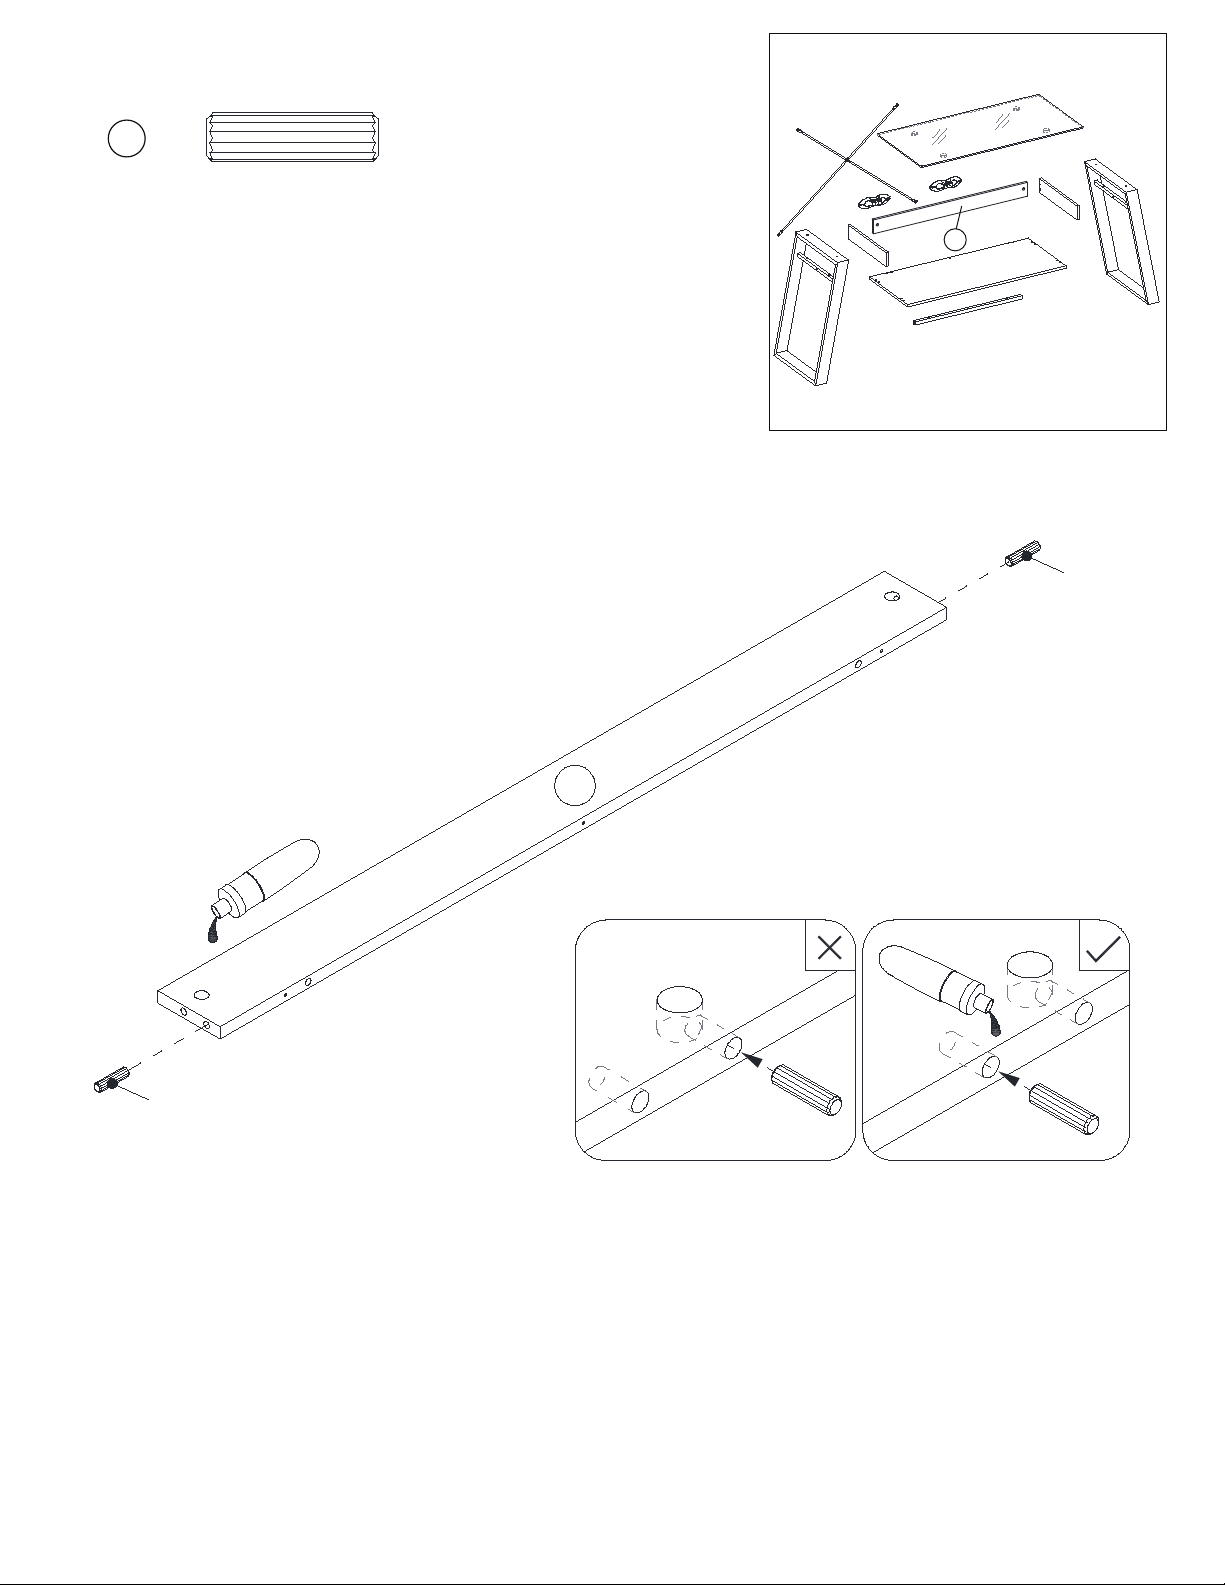
Remove all parts from the carton and place them on a protected surface or carpet. Securely screw the Cam Bolts (2) into the
designed small holes on the Side Panels (C and D) using a Phillips screwdriver.
Retirez tous les éléments du carton et positionnez-les sur une surface protégée ou de la moquette. Visser solidement les boulons à came
(2) dans les petits trous désignéssur les panneaux latéraux (C et D) à l’aide d’un tournevis à pointe cruciforme.
Saque todas las piezas de la caja y colóquelas sobre una superficie protegida o una alfombra. Atornille los tornillos de fijación (2)
en los orificios pequeños designados en los paneles laterales (C y D) con un destornillador Phillips.
9
2--
E
3[ 2 ]
3
3
E
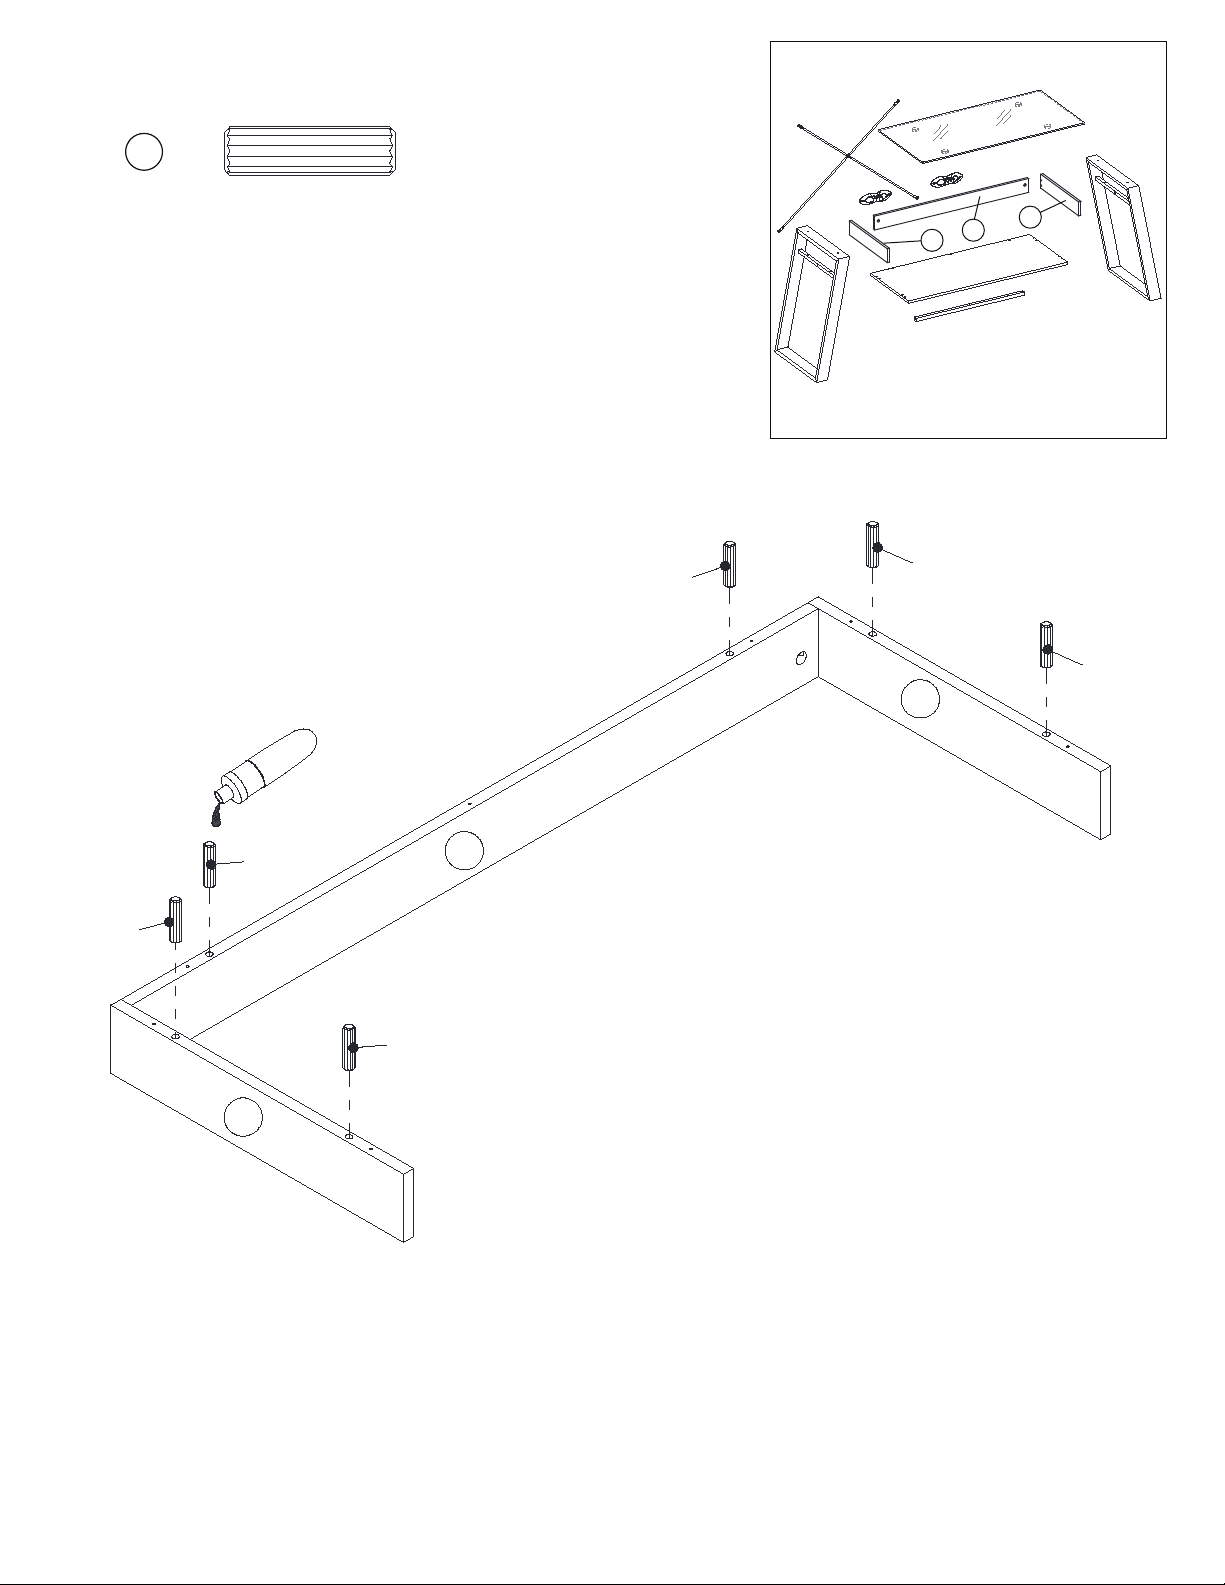
Insert two Wood Dowels (3) into the end holes of Back Panel (E). Make sure that you use a small amount of glue with both
ends of all dowels.
Insérer deux goujons de bois (3) dans les trous du panneau arrière (E). S’assurer d’utiliser une petite quantité de colle aux
deux extrémités de tous les goujons.
Inserte dos pernos de madera (3) en los orificios del extremo del panel posterior (E). Asegúrese de que utiliza una pequeña
cantidad de pegamento en los dos extremos de los pernos.

10
3-- Align and attach the Back Panel (E) between the Side Panels (C and D) by engaging two Cam Locks (1).
Alignez et fixez le panneau arrière (E) entre les panneaux latéraux (C et D) en engageant deux cames (1).
Alinee y fije el panel posterior (E) entre los paneles laterales (C y D) enganchando dos tuercas de fijación (1).
1[ 2 ]
C
D
E
D
C
E
1
1
11
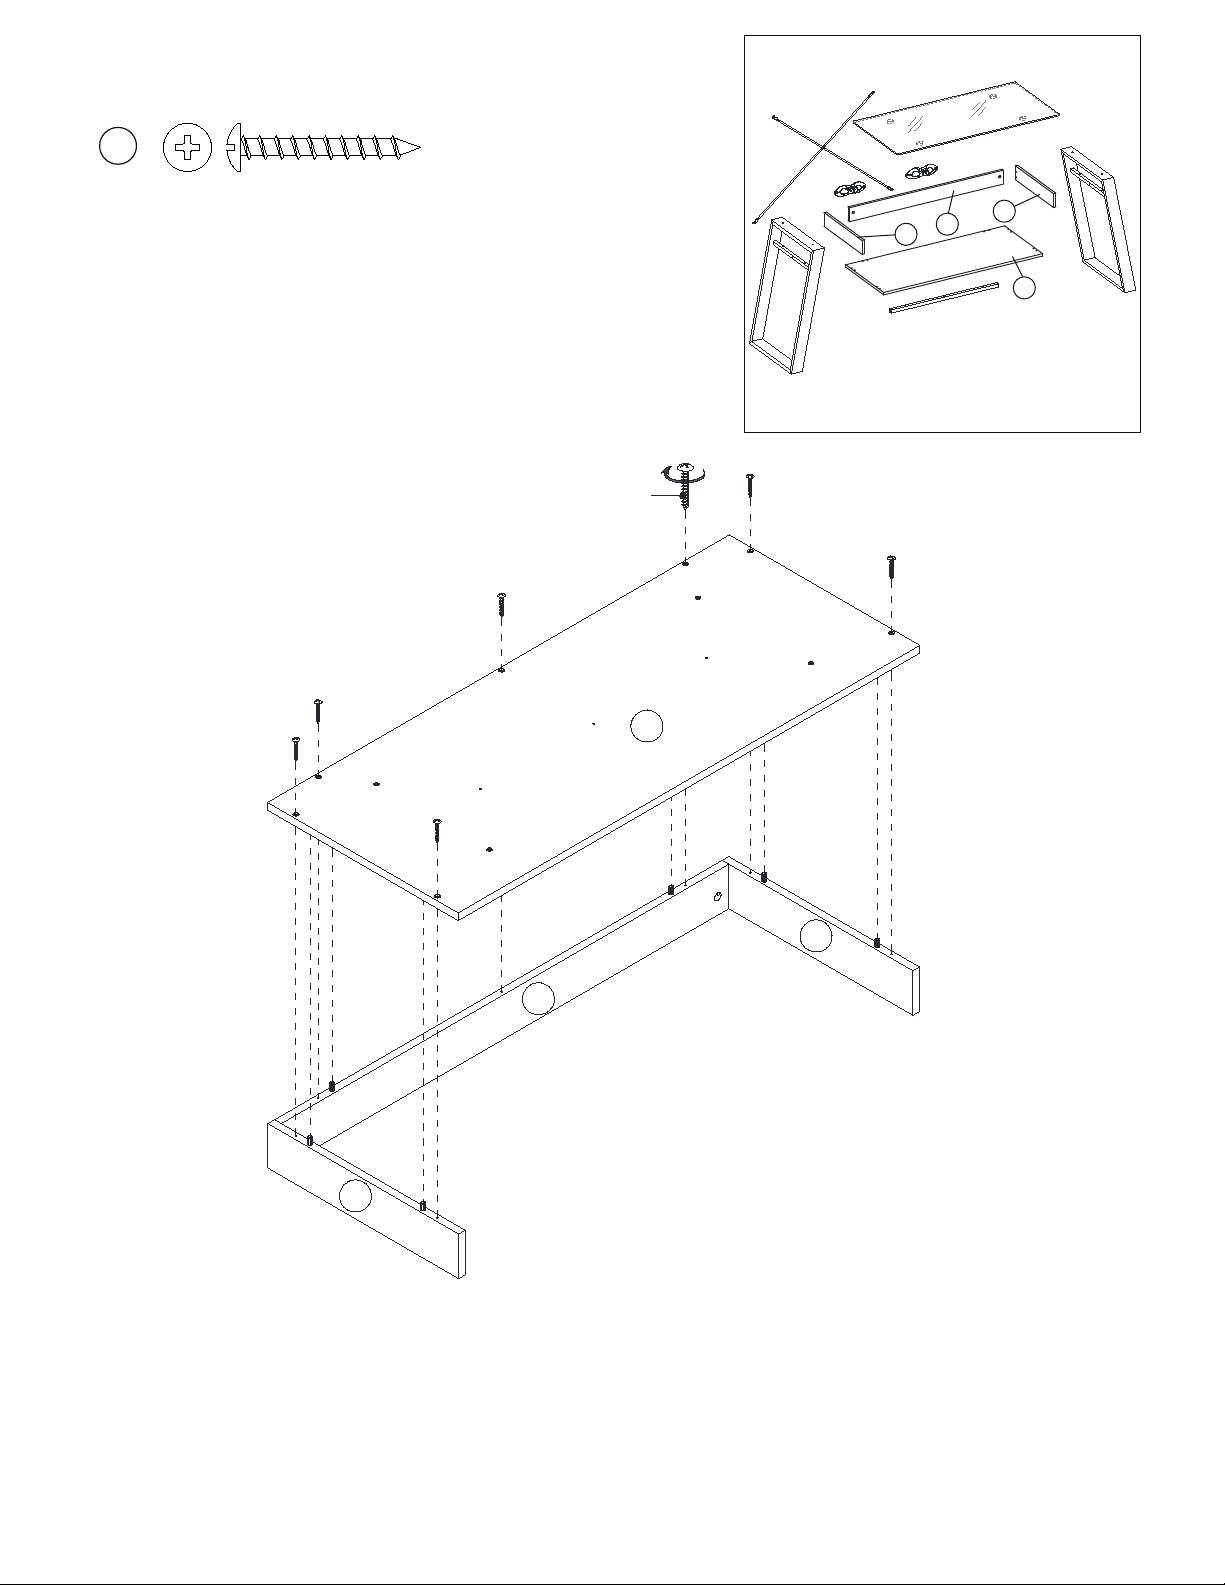
4-- Insert six Wood Dowels (3) into the bottom of the previous assembly.
Insérer six goujons de bois (3) dans le bas de l’assemblage précédent.
Inserte seis pernos de madera (3) en la parte inferior del ensamblaje anterior.
3[ 6 ]
D
C
E
3
3
3
3
3
3
C
D
E
12
5--
6[ 7 ]
C
D
E
B
6
B
C
E
D
Using the wood dowels as a guide, align and attach the Fixed Shelf (B) to the previous assembly with seven 30 mm Screws
(6). Tighten the screws with a Phillips screwdriver.
En utilisant les goujons en bois insérés comme guide, alignez et fixez la tablette fixe (B) à l’assemblage précédent
avec
sept vis de 30 mm (6). Serrer toutes les vis avec un tournevis à pointe cruciforme.
Usando los pernos de madera insertadas como guía, alinee y fije el repisa fijo (B) al ensamblaje anterior con siete tornillos de
30 mm (6). Apriete los tornillos con un destornillador estrella.

13
6--
4[ 2 ]
G
H
H
4
4
G
F
F
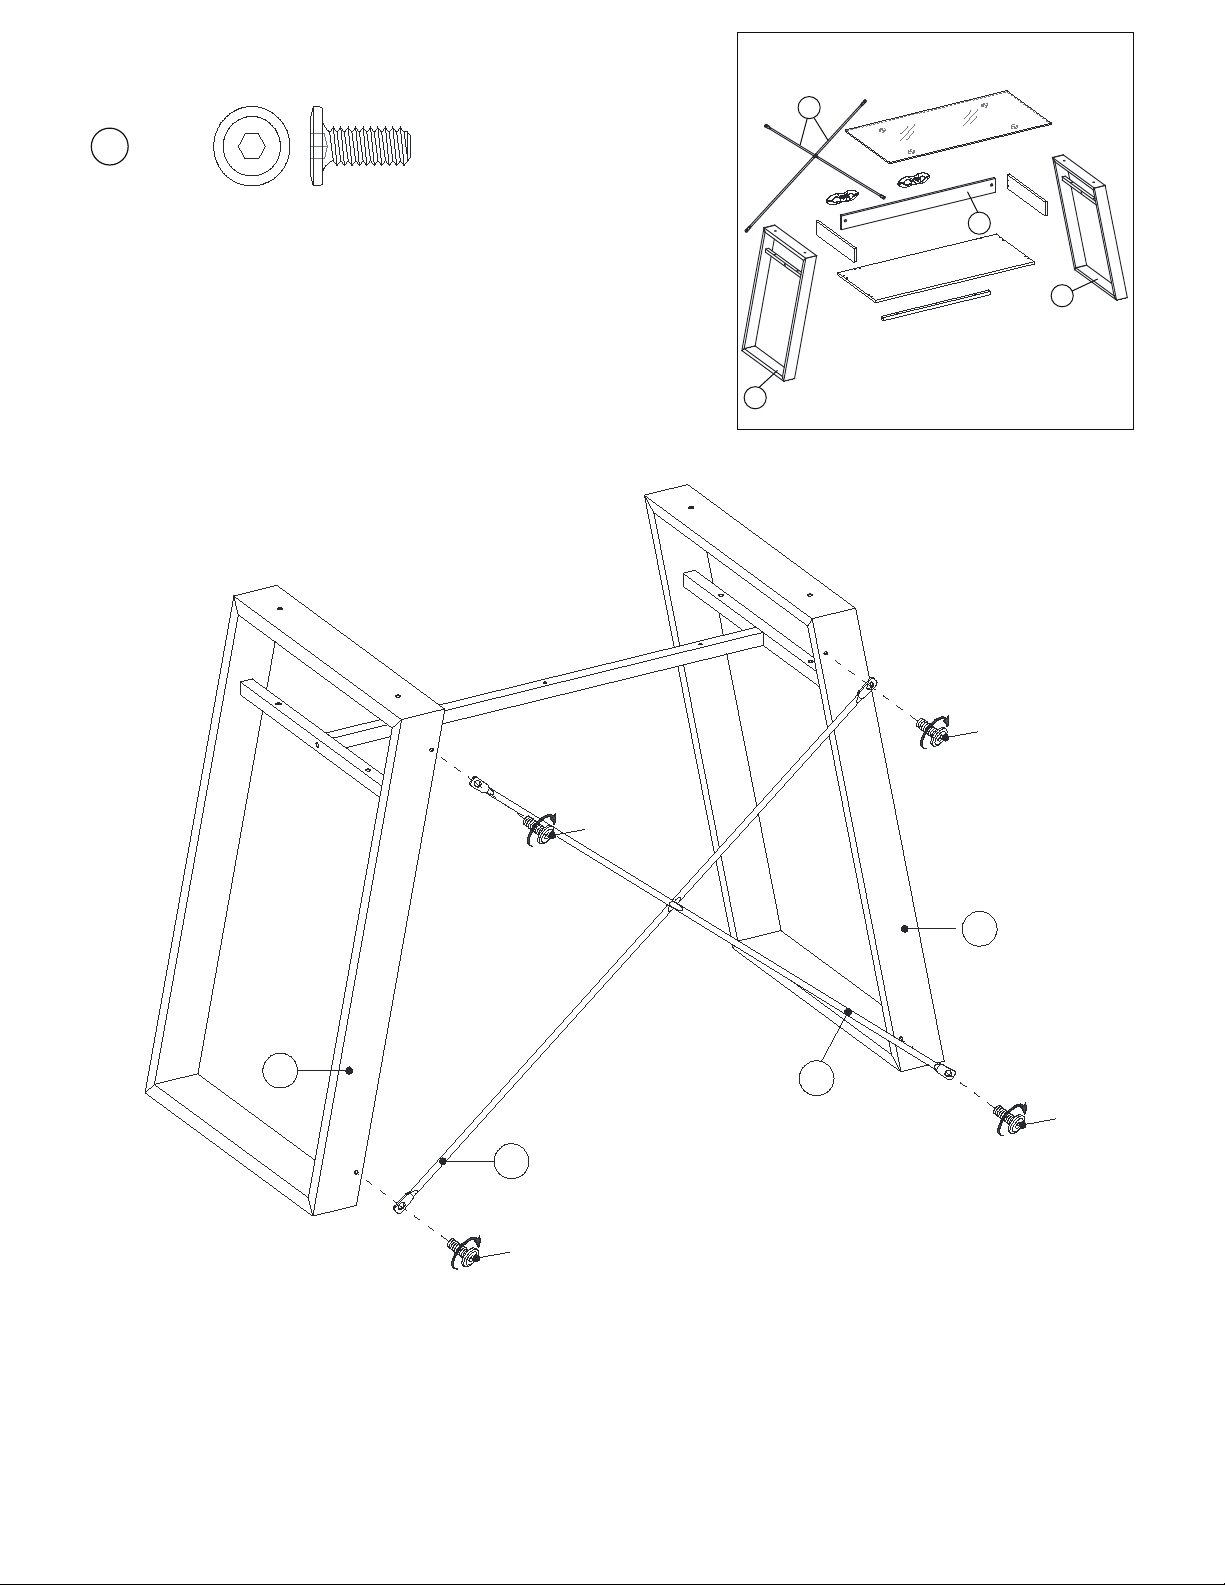
Attach the Stretcher (H) between the Side Frames (F and G) with two 28 mm Bolts (4).
Fixez le châssis (H) entre les cadres latéraux (F et G) avec deux boulons de 28 mm (4).
Fije el bastidor (H) entre los marcos laterales (F y G) con dos tornillos de 28 mm (4).
The through holes will face the floor when the unit is turned upright.
Les trous traversants feront face au sol lorsque le produit est debout.
Los orificios pasantes quedarán orientados hacia el suelo
cuando el escritorio se coloque en posición vertical.
14
7--
G
F
E
5[ 4 ]
I
Lift the unit upright and fasten the Metal Bars (I) to the back of both Side Frames (F and G) with four 15 mm Bolts (5) as
shown.
Mettez le produit droit et fixez les barres métalliques (I) à l’arrière des deux cadres latéraux (F et G) à l’aide de quatre
boulons de 15 mm (5), comme indiqué.
Levante toda la pieza y colóquela en posición vertical y fije las barras de metal (I) a la parte posterior de ambos marcos
laterales (F y G) con cuatro tornillos de 15 mm (5) como se muestra.
G
F
I
I
5
5
5
5
15
8--
4[ 4 ]
G
A
F
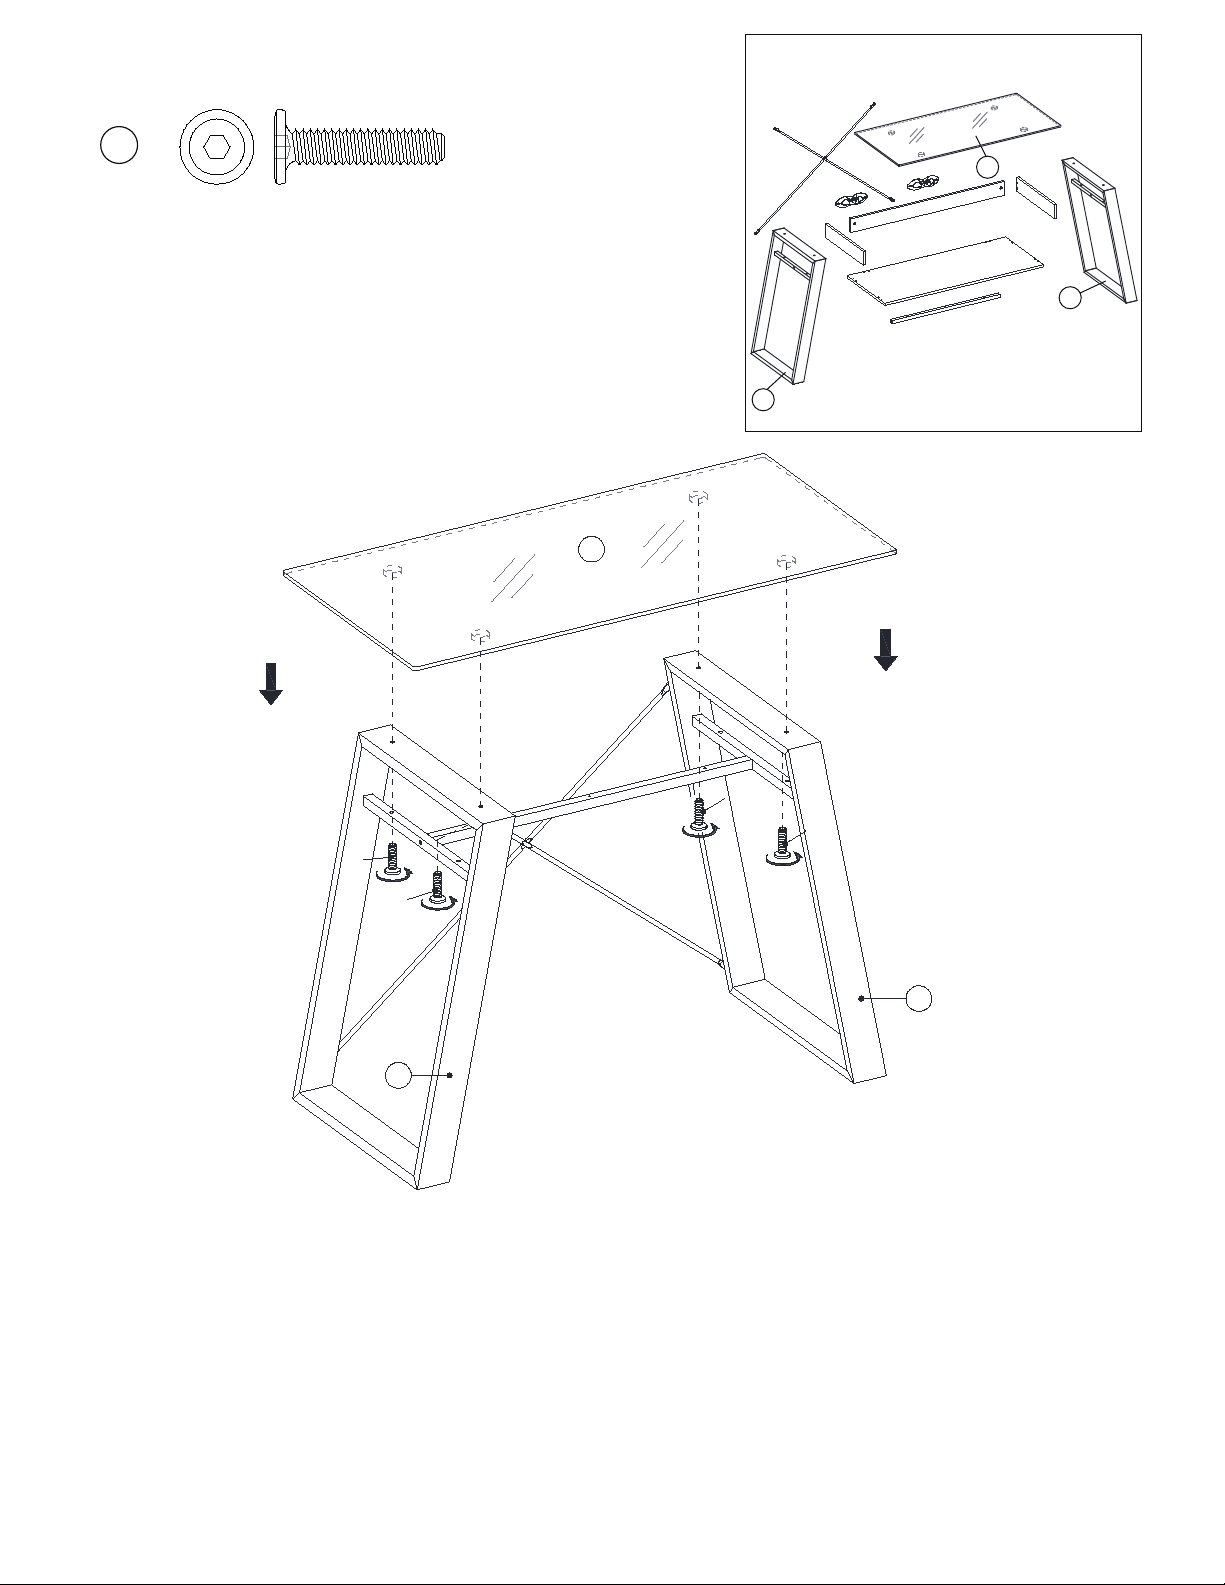
Align and attach the Glass Top (A) to the assembled Side Frames (F and G) so that the drilled holes on both Side Frames (F and
G) overlap the threaded sockets on the metal plates simultaneously. Insert four 28 mm Bolts (4) through the drilled holes on both
Side Frames (F and G) and securely screw into place.
Alignez et fixez les dessus en verre (A) au cadres latéraux assemblés (F et G) de sorte que les trous percés sur les deux cadres
latéraux (F et G) chevauchent les douilles filetées des plaques de métal simultanément. Insérez quatre boulons de 28 mm (4)
dans les trous percés des deux cadres latéraux (F et G) et vissez-les solidement.
Alinee y fije la tapa de vidrio (A) a los marcos laterales ensamblados (F y G) para que los orificios perforados en ambos marcos
laterales (F y G) se superpongan con los receptáculos roscados en las placas de metal simultáneamente. Inserte cuatro tornillos
de 28 mm (4) a través de los orificios perforados en ambos marcos laterales (F y G) y fije en su lugar.
A
F
G
4
4
4
4

16
9--
G
F
C
D
B
Slide the assembled tray onto the middle rails of Side Frames (F and G) and the Stretcher (H) properly.
Faites glisser le plateau assemblé sur les rails intermédiaires des cadres latéraux (F et G) et de la châssis (H) correctement.
Deslice la bandeja ensamblada sobre los riels intermedios de los marcos laterales (F y G) y el bastidor (H) correctamente.
B
C
G
F
A

17
10--
G
F
B
4[ 4 ]
6[ 3 ]
H
Fasten the Fixed Shelf (B) to the middle rails of Side Frames (F and G) with four 28 mm Bolts (4) and fasten to the Stretch-
er (H) with three 30 mm Screws (6).
Fixez le tablette fixe (B) aux rails intermédiaires des deux cadres latéraux (F et G) avec quatre boulons de 28 mm (4) et
fixez à la
châssis
(H) avec trois vis de 30 mm (6).
Sujete el repisa fijo (B) a los riels intermedios de los marcos laterales (F y G) con cuatro tornillos de 28 mm (4) y sujete al
bastidor (H) con tres tornillos de 30 mm (6).
6
B
C
F
G
4
4
4
4
18
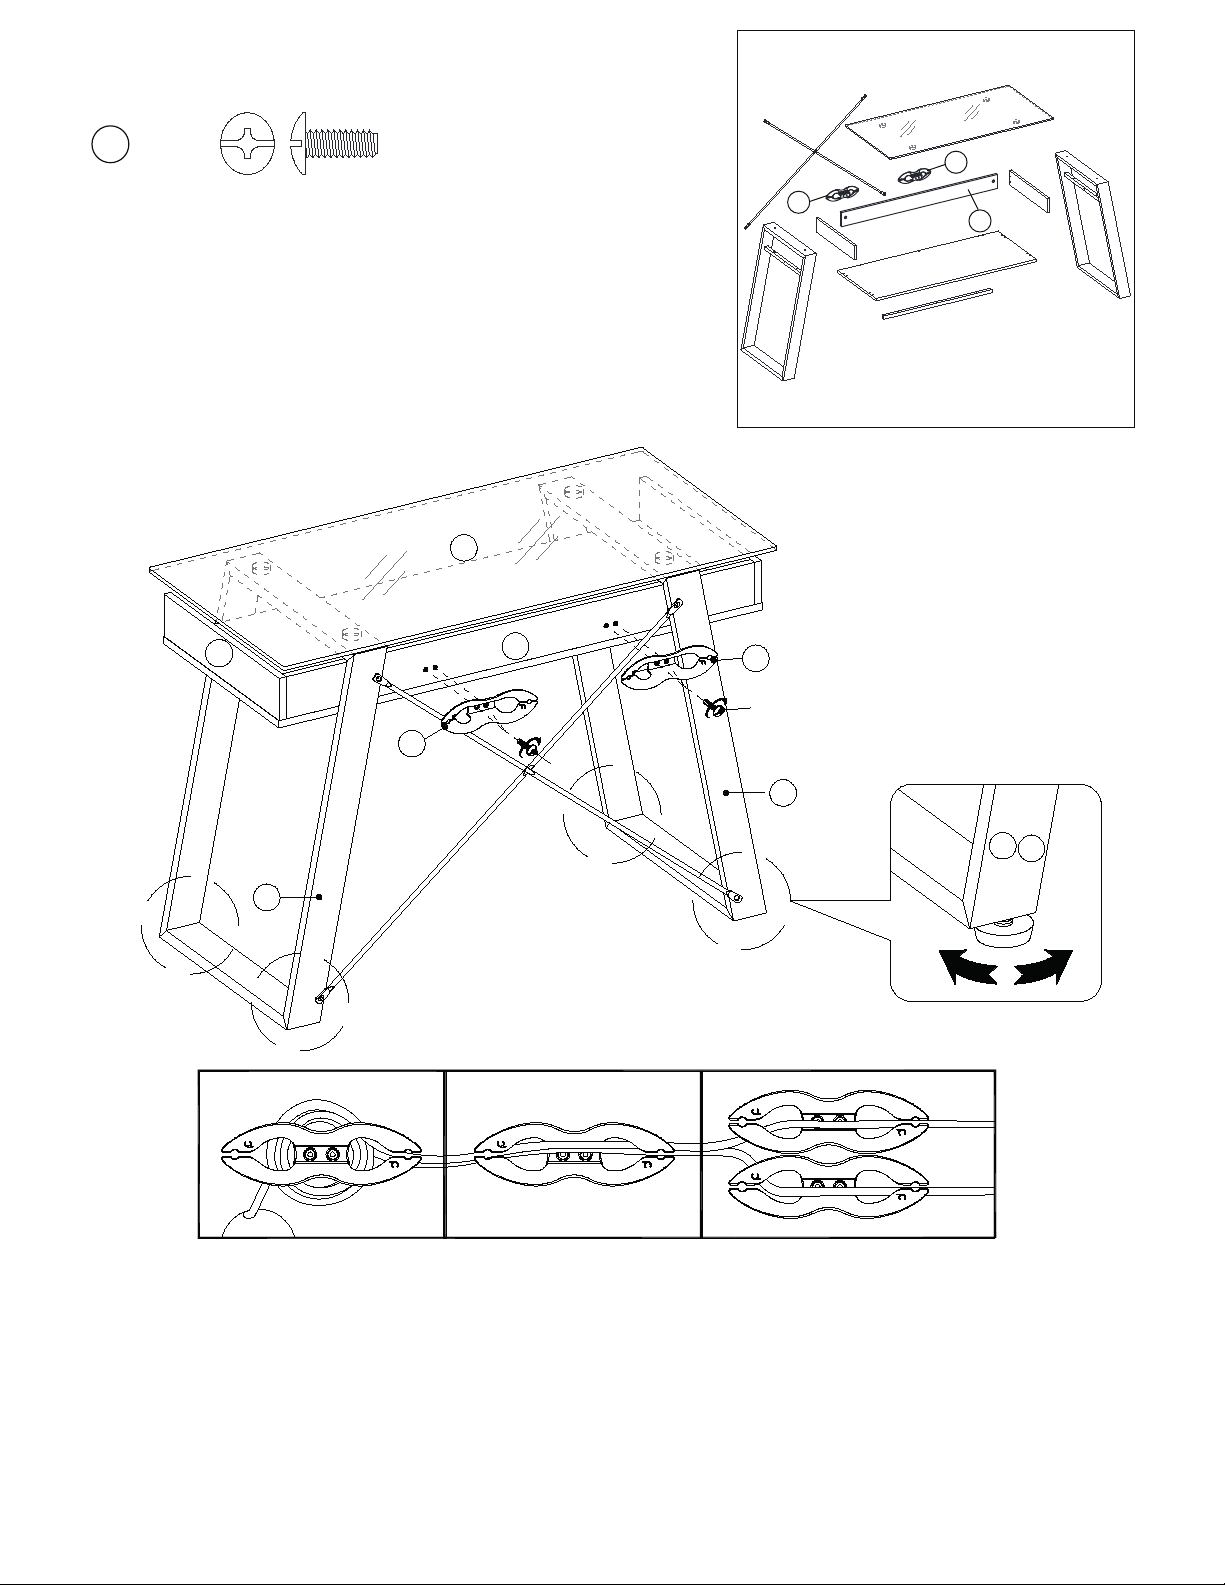
11--
E
7[ 4 ]
J
J
Wrap
Envelopper
Envolver
Route
Itinéraire
Ruta
Separate
Séparé
Separar
Align and attach the Cable Wheels (J) to the Back Panel (E) with 12 mm Small Bolts (7) so that the cable can be tidied as
shown.
If necessary, adjust the pre-attached floor levelers to correct tilting.
Alignez et fixez les guide-câbles (J) au panneau arrière (E) avec les petits boulons de 12 mm (7) afin que le câble puisse
être rangé comme indiqué. Si nécessaire, ajuster les niveleurs pré-attachés pour corriger l’inclinaison.
Alinee y fije las guías para cables (J) al panel inferior (E) con
los tornillos pequeños de 12 mm (7) de manera que el cable
pueda ser colocado como se muestra. Si es necesario, ajustar los niveladores de piso previamente colocados para corregir
la incinación.
FG
A
D
G
F
E
7
J
J
7

19
Natural variations occurring in wood or other materials will not be considered defects, and
ODI does not warrant the color-fastness or matching of colors, grains, or textures of such
materials. This warranty does not apply to: modifications of the product, attachments to the
product not approved by ODI, and products that were not installed, used, or maintained in
accordance with product instructions and warnings.
This warranty has the following exceptions: Fabrics, foam, veneer finishes and other covering
materials are warranted for six months from date of purchase.
Proof of purchase is required in the form of a receipt (copy or original) to validate warranty. Warranty
claims without the receipt may be rejected.
If Office Depot, Inc. chooses to provide a refund for such product, it will be fulfilled in the form of an
Office Depot Merchandise card. Claims fulfilled in this manner take approximately 30 days to
process.
ODI PROVIDES THIS LIMITED WARRANTY IN LIEU OF ALL OTHER WARRANTIES EITHER
EXPRESSED OR IMPLIED. EXPRESSLY EXCLUDED ARE ALL WARRANTIES OF FITNESS FOR
A PARTICULAR PURPOSE OR MERCHANTABILITY. OFFICE DEPOT’S SOLE OBLIGATION AND
THE USER’S EXCLUSIVE REMEDY UNDER THIS WARRANTY SHALL BE LIMITED TO THE
REPAIR, REFUND (IN THE FORM OF AN OFFICE DEPOT MERCHANDISE CARD) OR
REPLACEMENT AT ODI’S SOLE DISCRETION AND COST, OF PRODUCT OR COMPONENTS.
IN NO EVENT SHALL ODI, ITS AFFILIATES, SUBSIDIARIES OR PARENT COMPANIES BE
RESPONSIBLE FOR CONSEQUENTIAL, SPECIAL, OR INCIDENTAL DAMAGES ARISING OUT
OF A CLAIM OF DEFECTIVE PRODUCT EVEN IF ODI HAS BEEN ADVISED OF THE
POSSIBILITY OF SUCH DAMAGES.
SOME STATES OR PROVINCES DO NOT ALLOW THE EXCLUSION OF IMPLIED WARRANTIES
OR LIMITATIONS ON HOW LONG AN IMPLIED WARRANTY LASTS OR THE EXCLUSION OR
LIMITATION OF INCIDENTIAL OR CONSEQUENTIAL DAMAGES SO THE ABOVE LIMITATIONS
MAY NOT APPLY TO YOU. THIS WARRANTY GIVES YOU SPECIFIC LEGAL RIGHTS, AND YOU
MAY ALSO HAVE OTHER RIGHTS WHICH MAY VARY BY STATE OR PROVINCE.
THIS WARRANTY APPLIES ONLY TO THE U.S. AND CANADA.
Service Instructions
Please call: 1-866-942-5362 for warranty service.
Office Depot, Inc. Limited One Year Product Warranty
This limited warranty covers the original purchase of new product used for normal commercial,
personal or household use. Office Depot, Inc. (ODI) warrants its products will be free from defects in
materials and workmanship (normal wear and tear excepted), for one (1) year from the date of
purchase, except as provided below. ODI, at its option, will replace with a comparable product, free
of charge, any product purchased from it that fails under normal use as a result of such defect. This
warranty does not apply to damage caused by fire, accident, negligence, misuse, use other than as
stated in product instructions, improper cleaning or other circumstances not directly attributable to
defects in materials and workmanship.
Other Elle Decor Indoor Furnishing manuals

Elle Decor
Elle Decor Stara Installation guide

Elle Decor
Elle Decor FCTCLECCOC01 User manual

Elle Decor
Elle Decor Ophelia User manual

Elle Decor
Elle Decor 4131900 Installation guide

Elle Decor
Elle Decor DANI Installation guide

Elle Decor
Elle Decor Stara 6773809 Installation guide

Elle Decor
Elle Decor Vallauris Three Piece User manual

Elle Decor
Elle Decor Alliel Live Edge Installation guide

Elle Decor
Elle Decor HB1000015 User manual

Elle Decor
Elle Decor Office DEPOT ALLIEL Installation guide


