elmeg C300 User manual

Short reference elmeg C300 - CS300
1
G:\_elmeg\Ccs300\V1\Eng\print-doku\uk-300-smn-10x4.vp
Freitag, 20. September 2002 14:38:43
Farbprofil: Generic CMYK printer profile - None
Komposit Standardbildschirm

Table of contents
1 Description . . . . . . . . . . . . . . . . . . . . . . . 1
1.1 Safety instructions. . . . . . . . . . . . . . . . . . . . . . . . . . . 1
1.2 Contents of package . . . . . . . . . . . . . . . . . . . . . . . . . 2
1.3 Cleaning and maintenance . . . . . . . . . . . . . . . . . . . . . . 2
1.4 Placing the telephone . . . . . . . . . . . . . . . . . . . . . . . . . 2
1.5 User interface of your telephone . . . . . . . . . . . . . . . . . . . 3
1.6 Display, Buttons, LEDs, Pictographs and signals . . . . . . . . . . . 4
2 Installation of the telephone . . . . . . . . . . . . . . 8
2.1 Connection of the handset connecting cord . . . . . . . . . . . . . 8
2.2 Connection of the ISDN connecting cord. . . . . . . . . . . . . . . 8
2.3 Connection of the telephone to the PC. . . . . . . . . . . . . . . . 9
3 Settings . . . . . . . . . . . . . . . . . . . . . . . . 10
3.1 Telephone numbers (MSN or extension number) . . . . . . . . . . 10
3.2 Volume Settings (CD-ROM) . . . . . . . . . . . . . . . . . . . . . 11
3.3 Call forwarding (call rerouting) . . . . . . . . . . . . . . . . . . . . 12
3.4 Call waiting . . . . . . . . . . . . . . . . . . . . . . . . . . . . . . 13
3.5 Other Settings (CD-ROM) . . . . . . . . . . . . . . . . . . . . . . 14
3.6 Programming the phone directory . . . . . . . . . . . . . . . . . . 15
3.7 Programming VIP numbers . . . . . . . . . . . . . . . . . . . . . 17
3.8 Programming direct dialing numbers . . . . . . . . . . . . . . . . 18
3.9 Additional Information in the Display. . . . . . . . . . . . . . . . . 20
4 Settings at a PABX (CD-ROM) . . . . . . . . . . . . 21
5 Operation . . . . . . . . . . . . . . . . . . . . . . . 22
5.1 Starting a call . . . . . . . . . . . . . . . . . . . . . . . . . . . . 22
5.2 Accepting a call . . . . . . . . . . . . . . . . . . . . . . . . . . . 24
5.3 »Station guarding« . . . . . . . . . . . . . . . . . . . . . . . . . . 24
5.4 Redialing . . . . . . . . . . . . . . . . . . . . . . . . . . . . . . . 25
5.5 Caller and memo list . . . . . . . . . . . . . . . . . . . . . . . . . 26
5.6 Call waiting, Enquiry call, Broker`s call, three-party conference,
call transfer, Call-Back on busy(CCBS) . . . . . . . . . . . . . . . 29
5.7 Other functions (CD-ROM) . . . . . . . . . . . . . . . . . . . . . . 31
5.8 Service Functions (CD-ROM) . . . . . . . . . . . . . . . . . . . . 31
6 Declaration of conformity. . . . . . . . . . . . . . . 32
7 Index . . . . . . . . . . . . . . . . . . . . . . . . . . 33
2
G:\_elmeg\Ccs300\V1\Eng\print-doku\uk-300-smn-10x4.vp
Freitag, 20. September 2002 14:38:43
Farbprofil: Generic CMYK printer profile - None
Komposit Standardbildschirm

1 Description
These operating instructions describe the functions for both elmeg C300 and
elmeg CS300 ISDN telephones.
You can connect the ISDN telephone to the Euro-ISDN point-to-point connection
(DSS1 protocol) provided by your network service provider, or at the internal ISDN con-
nection (point-to-point connection DSS1 protocol) in a PABX system. The ISDN tele-
phone is linked to the ISDN network via an ISDN jack (Western or RJ45). After being con-
nected to the ISDN network, your ISDN telephone is immediately ready for operation
and can fully utilize its configured performance features.
Up to eight (8) ISDN terminal devices can be connected and managed at a network ter-
mination of a network service provider. Of these eight (8) available lines, one supply line
(max. 4 W) is available for ISDN telephones without their own internal power supply. A
link can be set up simultaneously for two (2) ISDN terminal devices at each base access
terminal (2 B channels, 1 D channel).
An internal ISDN connection for a PABX system is comparable to an ISDN base access
terminal (point-to-point connection) of a network service provider. Up to eight (8) ISDN
terminal devices can be connected and managed at each internal ISDN connection. The
power available at this internal ISDN connection determines how many terminal devices
can be supplied with power by the PABX system. Refer to the operating instructions for
your PABX, or contact the PABX manufacturer for more details about this. A link can be
set up simultaneously for two (2) ISDN terminal devices at each internal ISDN connec-
tion.
The elmeg CS300 ISDN telephone provides system features when connected to certain
elmeg PABX systems. The internal connection (S0 bus) on these PABX systems
automatically interfaces with the elmeg CS300 ISDN telephone. Please refer to the
operating instructions of your PABX to determine whether these typical system
performance features are provided with the various elmeg telephones.
The typical system performance features described in these operating instructions
apply only to the elmeg CS 300 ISDN telephone, and not to the elmeg C300 ISDN
telephone.
1.1 Safety instructions
•Unauthorized opening of the system telephone and improper repairs may
result in risk of injury for the user.
•Do not expose the inside of the system telephone to any liquids. This can
result in electric shock. If you expose the inside of the telephone to liquids
the telephone can be destroyed.
•You should not connect or disconnect any lines during thunderstorms.
1
3
G:\_elmeg\Ccs300\V1\Eng\print-doku\uk-300-smn-10x4.vp
Freitag, 20. September 2002 14:38:43
Farbprofil: Generic CMYK printer profile - None
Komposit Standardbildschirm

•To prevent mutual interference, do not install your system telephone in the
immediate vicinity of electronic devices such as stereo equipment, electric
office equipment or microwave units.
•Avoid installing your telephone near sources of excessive heat, e.g. radia-
tors or in rooms with excessive humidity.
The ambient temperature must not be lower than 5° or above 40°C.
1.2 Contents of package
•ISDN system telephone elmeg C300 or
ISDN system telephone elmeg CS300
•handset with handset connecting cord
•ISDN connecting cord (approx. 3m)
•RS232 connecting cable RJ12 / D-SUB 9-pin (approx. 3m)
•operating instruction
•Label for direct dialing/function keys
•elmeg WIN-Tools CD-ROM with: detailed operating instruction;
configuration manager, telephone directory manager, download and LCR
manager;
TAPI driver and TAPI application elmeg PC-Tel;
Adobe Acrobat-file (ccs300_int.pdf) for the printing of individual labels
1.3 Cleaning and maintenance
The ISDN system telephone has been manufactured for normal, everyday use. When
required, clean the ISDN system telephone with a slightly moistened cloth, or with an
anti-static cloth. Never use a solvent to clean the phone! Never use a dry cloth. Electro-
static charges could damage the electronics in the system. It is essential that no liquids
penetrate into the inside of the ISDN system telephone, as this could destroy the phone.
1.4 Placing the telephone
Please note that the plastic feet of your ISDN system telephone may leave marks on sen-
sitive surfaces, such as furniture. The manufacturer of the ISDN system telephone is not
liable for any such damage. Therefore, use appropriate non-skidding pads under the
phone.
2
4
G:\_elmeg\Ccs300\V1\Eng\print-doku\uk-300-smn-10x4.vp
Freitag, 20. September 2002 14:38:43
Farbprofil: Generic CMYK printer profile - None
Komposit Standardbildschirm
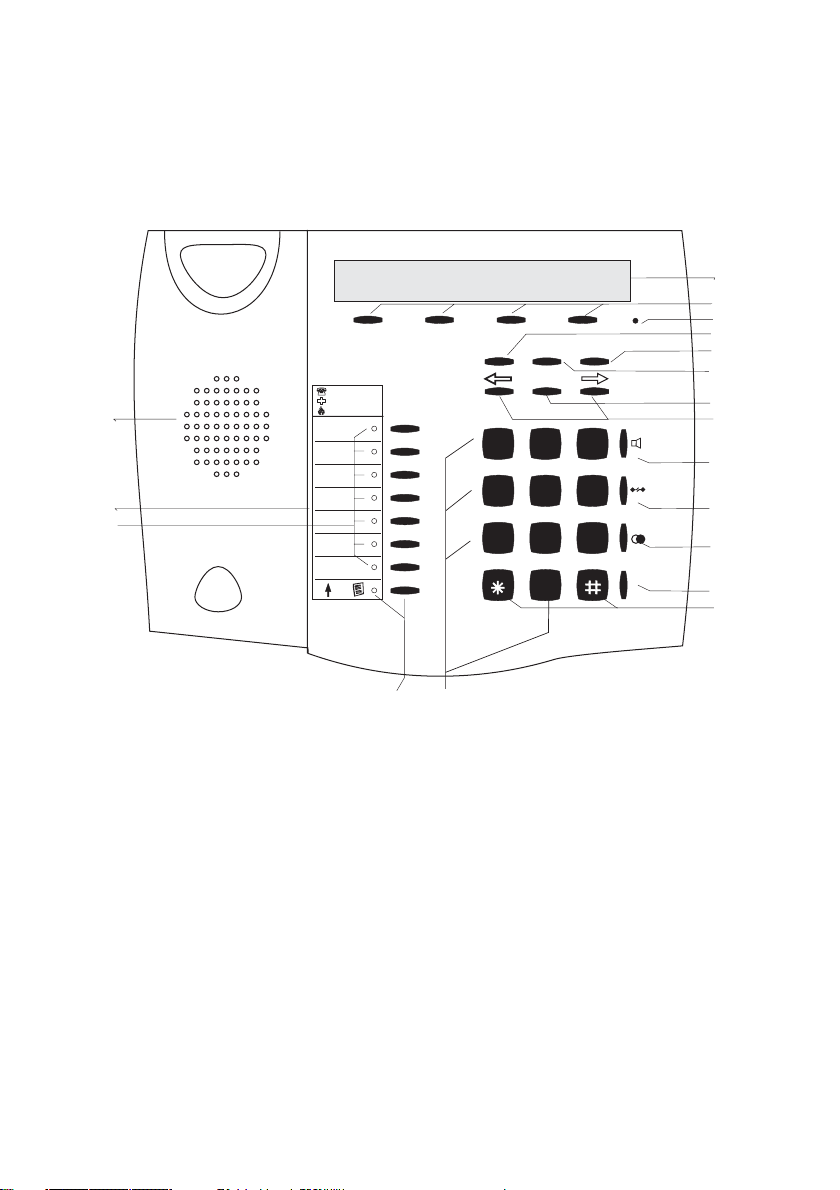
1.5 User interface of your telephone
3
1
FESC C
OK
1
2
4
5
6
17
16
15
14
13
12
9
10
7
8
11
18
01.04.00\10:34\\\\\\\\\}
tbook vip quiet
3
123
456
789
0
ABC DEF
GHI JKL MNO
PQRS TUV WXYZ
R
1 Speaker
2 Label panel for VIP keys and
function keys
3 7 direct dialing/ function keys
with LED
4 Shift button with LED
5 Display
6 4 softkeys
7 Microphone
8 Function key
9 C-button
10 Escape
11 Acknowledgement
12 Arrow buttons »left« / »right«
13 Open listening/ hands-free
14 Disconnect
15 Redial
16 Enquiry
17 Asterix button / number symbol
18 Dial / VIP buttons
Fig. 1: User interface of your telephone
5
G:\_elmeg\Ccs300\V1\Eng\print-doku\uk-300-smn-10x4.vp
Freitag, 20. September 2002 14:38:48
Farbprofil: Generic CMYK printer profile - None
Komposit Standardbildschirm

1.6 Display, Buttons, LEDs, Pictographs and signals
1.6.1 Display
After you connect the system to the ISDN connection,
the date and time are shown on the top line of the dis-
play. The date and time are imported automatically
from the PABX system, or from the ISDN network.
Terms are displayed in capital and small letters on the
first line. The functions of the softkeys are displayed in
capital or small letters (depending on your settings) in
the second line.
ˆ01.04.00 10:34 }
ˆtbook vip quiet
The text displayed for a function on line 2 is always lo-
cated above the corresponding softkey. When you
press the softkey, the next level is displayed.
ˆ Functions
ˆaudib adjust prog config
1.6.2 Buttons
FFunction button: This key opens the pro-
gramming menu. If you are already lo-
cated in a menu and then press the
function key, either menu-specific func-
tions are shown, or you are moved back
one programming step.
ˆ Functions
ˆaudib adjust prog config
4
1st line
2nd line
24 chars
SSSS
4 softkeys
Text assignment
to softkey
Date Time
Arrow: further menu items
accessible with arrow buttons
01.04.00\10:34\\\\\\\\\}
tbook\ vip \\quiet
Fig. 2: Display of your telephone
6
G:\_elmeg\Ccs300\V1\Eng\print-doku\uk-300-smn-10x4.vp
Freitag, 20. September 2002 14:38:53
Farbprofil: Generic CMYK printer profile - None
Komposit Standardbildschirm

EEscape button: Pressing the Esc button
during programming returns the tele-
phone to its idle status.
ˆ Functions
ˆaudib adjust prog config
OOK key: Pressing this button stores a setting in the telephone. You then hear
the acknowledgement signal.
CC-button: Press this button to move back one menu step in the menu. If you
are currently in the input mode, this button can be used to delete individual
characters.
<> Arrow button: The arrows »{« and »}«in
the right corner on the top line of the dis-
play indicate that you can call up further
functions on the second line using the ar-
row buttons.
ˆ01.04.00 10:34 }
ˆ vip quiet
ˆ01.04.00 10:34 {}
ˆunpark rate
Special feature for changing existing entries
You have various options available to you for changing existing entries (e.g. names or
numbers).
Example 1:
You wish to change an existing number / MSN ), as the telephone is to be used at a dif-
ferent ISDN connection.
tWhen you use the pushbutton set to enter
the first digit of the new number the exist-
ing number is deleted completely.
ˆ Program dial number
ˆMSN1>123456
ˆ program dial number
ˆMSN1>9_
tEnter the other digits of the new number. ˆ program dial number
ˆMSN1>987654_
Example 2:
You wish to change parts of a name in a telephone directory listing (see Page 16), be-
cause the name has changed (e.g. in the case of marriage).
<>
C
Using the arrow keys, first select the let-
ters of the entry that are to be changed (in
this example: the surname »Miller«) and
delete this name using the C button.
ˆChange tbook data input
ˆname>TINA_MILLER
ˆChange tbook data input
ˆname>TINA _
5
7
G:\_elmeg\Ccs300\V1\Eng\print-doku\uk-300-smn-10x4.vp
Freitag, 20. September 2002 14:38:53
Farbprofil: Generic CMYK printer profile - None
Komposit Standardbildschirm

tNow enter the new letters for the new
name (in the example the surname
»PETERS«).
ˆChange tbook data input
ˆname>TINA PETERS_
1.6.3 Entering figures and numbers
The following buttons are configured for the entry of figures and numbers (e.g. telephone
directory, vip memory):
Button 1.press 2.press 3.press 4.press 5.press 6.press 7.press
11
2ABC2Ä
3DEF 3
4GHI 4
5JKL5
6MNO6 Ö
7PQRS7ß
8TUV8Ü
9WX Y Z 9
0(space) . , - 0 / &
**
##
6
8
G:\_elmeg\Ccs300\V1\Eng\print-doku\uk-300-smn-10x4.vp
Freitag, 20. September 2002 14:38:53
Farbprofil: Generic CMYK printer profile - None
Komposit Standardbildschirm

1.6.4 Pictographs
The pictographs (symbols) described in the following have been used in these operating
instructions to illustrate some procedures for setting and using the telephone.
bLiftupthehandset,activatehandsfreecalling,orstartinitializingselec-
tion.
aHang up the handset and end hands free calling.
The telephone is idle.
lA call is signaled.
The ringing tone melody sounds.
gYou are conducting a call.
dA three-party conference call is initiated.
qYou hear the positive or negative acknowledgement signal.
tSelect the number, code, character or text.
0...9
*#
Press the appropriate button on the pushbutton set.
7
9
G:\_elmeg\Ccs300\V1\Eng\print-doku\uk-300-smn-10x4.vp
Freitag, 20. September 2002 14:38:53
Farbprofil: Generic CMYK printer profile - None
Komposit Standardbildschirm

2 Installation of the telephone
2.1 Connection of the handset connecting cord
Connect the handset cord as shown in Figure 3. Lay the handset cord in the cord groove
and lock it below the two cord retainers.
2.2 Connection of the ISDN connecting cord
Connect the ISDN cord as shown in Figure 4. Then lay the ISDN cord in the cord groove
and lock it below the two cord retainers. Ensure that the longer ISDN connector is
plugged into the ISDN jack and the shorter ISDN connector into the ISDN jack on the
telephone.
8
Handset
Handset cord
ISDN telephone seen from the bottom
Handset connector
Jack for connecting
the handset
Handset jack
Cord holder
Fig. 3: Connecting of the handset connecting cord
ISDN connectorr
(long)
Jack for ISDN connecting cord
Cord holder
ISDN connector
(short)
Telephone seen from the bottom
Fig. 4: Connecting of the ISDN connecting cord
10
G:\_elmeg\Ccs300\V1\Eng\print-doku\uk-300-smn-10x4.vp
Freitag, 20. September 2002 14:39:04
Farbprofil: Generic CMYK printer profile - None
Komposit Standardbildschirm

2.3 Connection of the telephone to the PC
Connect the cable RS232(V.24) as shown in figure 5. Plug the RJ12 connector into the
RJ12 jack on the back of the telephone and the 9-pin D-SUB connector onto the corre-
sponding connecting jack of your PC.
Only use the RS232(V.24) cable delivered with the system, as this is not a standard
serial cable.
RS232(V.24)-cable
9
Telephone seen from
the back
Jack(RJ12) for connecting
the RS232(V.24) cable
RS232(V.24) connector
(D-SUB 9 poles)
RS232(V.24) connector
(RJ12)
Fig. 5: Connecting of the telephone to the PC
RJ12 connector
(6-poles)
RS 232(V.24) connector
(9 poles)
2
3
5
6
7
8
4
1
9
3
4
6
1
2
5
11
G:\_elmeg\Ccs300\V1\Eng\print-doku\uk-300-smn-10x4.vp
Freitag, 20. September 2002 14:39:14
Farbprofil: Generic CMYK printer profile - None
Komposit Standardbildschirm

3 Settings
3.1 Telephone numbers (MSN or extension number)
Up to 10 MSNs can be configured on your telephone. When you enter an MSN in your
ISDN system telephone you are essentially defining that your ISDN system telephone is
called using this MSN when a call is made. If you enter more than one MSN in your ISDN
system telephone, your phone will ring each time one of these MSNs is called.
If you are using your telephone on the external ISDN port of your service provider, pro-
gram your telephone with the MSNs allocated to you by the network service provider.
Usually your network service provider will provide you with 3 MSNs. You can apply for
further MSNs from your network service provider.
When you operate your telephone on the internal ISDN connection of a PABX you must
enter the internal instead of the external number of your telephone at the PABX. Please
observe the instructions in the PABX manual.
You can define and set a name, a specific melody and its volume for each MSN that you
enter. If, for example, you assign the name »elmeg« to a number, »elmeg« will appear in
the display instead of »msn-1« when that phone is called.
When you call a subscriber, you can select a certain number (MSN) that is transmitted to
the subscriber (e.g. for separate charges). If you do not select any number, the number
(MSN) that has been entered first in the phone (MSN-1) is used.
How to configure an MSN is described in the following example with MSN1.
3.1.1 Entering MSNs (extension number)
Begin as follows:
aFSS<>SS
config msn msn-1 tnumb
tDial the number (26 digits max.).
Example: »123456«.
ˆ Program dial number
ˆMSN-1>123456
OConfirm your entry by pressing OK. ˆ MSN-1 program }
ˆtnumb sound volume x-fer
10
12
G:\_elmeg\Ccs300\V1\Eng\print-doku\uk-300-smn-10x4.vp
Freitag, 20. September 2002 14:39:14
Farbprofil: Generic CMYK printer profile - None
Komposit Standardbildschirm

3.1.2 Other settings for each MSN (extension number)
Begin as follows:
aFSSS
config msn msn-1
You can now make other settings for the
selected MSN.
ˆ MSN-1 program }
ˆtnumb sound volume x-fer
S»sound« Setting the call signaling melody
S»volume« Setting the volume of the call signaling melody.
S»x-fer« Default setting of an MSN for forwarding of calls
(Call Deflection).
S»msn_name« Assign a name to the MSN (max. 5 characters)
that is to be shown in the display instead of
»msn-1«.
S»rate« Setting up of a charge detail account that is
available for making charged calls (for transferring
of this outgoing MSNs).
3.2 Volume Settings (CD-ROM)
You can make the following acoustic settings at this telephone:
•Speaker volume, set or temporary
•Repeat and volume of the call waiting signal
•Acknowledgement tones, never, for wrong number, or always
•Handset volume, set or temporary
•Volume for the notice signal with the function »Don't disturb«
For more information about these acoustic settings refer to the detailed Operator’s
Manual on the enclosed CD.
11
13
G:\_elmeg\Ccs300\V1\Eng\print-doku\uk-300-smn-10x4.vp
Freitag, 20. September 2002 14:39:15
Farbprofil: Generic CMYK printer profile - None
Komposit Standardbildschirm

3.3 Call forwarding (call rerouting)
With this telephone you can be reached, even if you are not in the vicinity of your phone.
This is made possible by automatic forwarding of calls to any other number.
Call rerouting can be configured separately for any of the entered numbers (MSNs). You
must have configured at least one number in order to utilize the call rerouting function.
The following settings are possible for all MSNs.
»delayed« Call forwarding delayed
All calls for the number for which delayed call forwarding has been
configuredaresignaledfor a definedtime atthe exchange officeorin
the PABX and are then forwarded when this period expires.
»busy« Call forwarding on busy:
The calls for a defined number are forwarded only when the tele-
phone is busy.
(For example: There are already two (2) connections made, or one
connection has been made and call waiting is not permitted.)
»fixed« Permanent call forwarding
All calls for a number for which “fixed” call forwarding has been con-
figuredarererouted.Yourtelephonewillnotring, whenthisnumberis
called.
The following example describes how to set up MSN 1 for permanent call forward-
ing.
3.3.1 Activating call forwarding
Begin as follows:
aFSSSS
adjust forward fixed msn-1
tEnter the number to which the calls are to
be forwarded.
In this example: »0123456789«.
ˆ Call forwarding direct
ˆMSN-1>0123456789_
OConfirm your entry by pressing OK.
Call forwarding has been registered. The
three dots at the right lower corner flash al-
ternately.
ˆ Call forwarding direct
ˆMSN1>0123456789 …
12
14
G:\_elmeg\Ccs300\V1\Eng\print-doku\uk-300-smn-10x4.vp
Freitag, 20. September 2002 14:39:15
Farbprofil: Generic CMYK printer profile - None
Komposit Standardbildschirm

Call forwarding has been configured. You
see this display for about 10 seconds.
ˆMSN-1
ˆ Direct call forwarding!
ˆ call forwarding
ˆ off delayed busy fixed
3.3.2 Deactivating call forwarding
Begin as follows:
aFSSSS
adjust forward off msn1
3.4 Call waiting
If, during an ongoing call, a second call comes in for you, the second call is signaled
when “Call waiting on” is set. When “Call waiting off” is set, the caller only hears a busy
signal.
A waiting call is indicated by a brief acoustic signal in the handset and also displayed.
You can set the volume of the call waiting signal and select whether a waiting call is to be
signaled only one time, or several times.
When »Station guarding« is set, the call is indicated as described on documentation at
CD-ROM. If you have configured “Hands-free calling” for an active connection, waiting
calls will only be signaled optically in the display.
Begin as follows:
aFSS
adjust wait
Press the softkey below »no« to inhibit the
call waiting function. Use the softkey
below »ok« to enable the call waiting
function.
ˆ Call waiting enable?
ˆ no ok
ˆ Settings }
ˆforward wait date
13
15
G:\_elmeg\Ccs300\V1\Eng\print-doku\uk-300-smn-10x4.vp
Freitag, 20. September 2002 14:39:15
Farbprofil: Generic CMYK printer profile - None
Komposit Standardbildschirm

3.5 Other Settings (CD-ROM)
You can also make the following settings at your telephone:
•Appointments
•Call filter
•Date and time
•Control settings (Softkey display, Headset, etc.)
•Direct dial-in call
•MSN display
•Display during an ongoing call
•Display language
•Dialing filter
•Safeguard configuration using PIN (Password)
•Charge rate information /Tariff factor, Currency, etc.)
•Least Cost Routing (LCR)
•Standard Park code
•Emergency operation
Making and using these settings is explained in the detailed Operator’s Manual on the
enclosed CD.
Important information about the implemented LCR procedure:
This performance feature can be used in Germany only.
The tariff data for the LCR feature can be
downloaded from TELEDATA-UPDATE
Gesellschaft für Telefon-Tarifdaten-Management
mbH using a dial-in number preset in your
telephone. ELMEG GmbH & Co. KG
Kommunikationstechnik cannot warrant that this
tariff data is up-to-date, complete and correct and
declines any liability resulting from the use of such
data.
14
16
G:\_elmeg\Ccs300\V1\Eng\print-doku\uk-300-smn-10x4.vp
Freitag, 20. September 2002 14:39:15
Farbprofil: Generic CMYK printer profile - None
Komposit Standardbildschirm

3.6 Programming the phone directory
You can store up to 250 names (20 characters max.) with telephone number (26 digits
max.) in the directory of your telephone. To select a name, you can page through the di-
rectory using the arrow buttons, or enter the specific first letter(s) of the name using the
pushbutton set.
If the name of the caller is to be shown in the display instead of the caller’s number,
this number must be entered in the telephone directory with that name (including
prefix and, when used with a PABX the line access digit).
Display of the caller name is only made when the transmitted number corresponds
to the number stored in the phone directory.
If the telephone is disconnected from the ISDN network and then reconnected, or if the
data for the telephone directory are transferred to the system telephone via the PC pro-
gram, the directory must be reorganized internally. This process takes place automati-
cally and may require a few minutes. During this time, the telephone directory of your
telephone is not available for use.
3.6.1 Directory entries
Each button of the pushbutton set is labelled with three or four letters of the alphabet.
You can advance through the letters by pressing the appropriate button repeatedly (see
Page 6). If there are two consecutive letters on the same button of the pushbutton set,
press the right arrow button after entering the first letter and then enter the next letter.
You can also change the position where the letters are entered using the arrow buttons
(e.g. for entering a space).
Begin as follows:
aFSSS
prog tbook new
t
O
Enter the name.
In this example: »ELMEG HOTLINE«.
Confirm your entry by pressing OK.
ˆ Input telephone book
ˆname>ELMEG HOTLINE
t
O
Enter the telephone number.
In this example: »00190510110«.
Confirm your entry by pressing OK.
ˆ Input telephone book
ˆtnumb>00190510110
If you wish to make further entries proceed
as described above.
ˆ Telephone book
ˆ delete list new
15
17
G:\_elmeg\Ccs300\V1\Eng\print-doku\uk-300-smn-10x4.vp
Freitag, 20. September 2002 14:39:15
Farbprofil: Generic CMYK printer profile - None
Komposit Standardbildschirm

3.6.2 Editing entries in the directory
Begin as follows:
aFSSS
prog tbook list
tEnter the first letter of the directory entry
and/ or search it with the arrow buttons.
ˆ Make initial select.
ˆname>ELM_
OConfirm your entry by pressing ok.
CDelete the existing characters by pressing
the C button.
ˆChange tbook data input
ˆname>ELMEG HOTLINE
t
O
Enter the new letters.
In this example: »ELMEG MARKETING«.
Confirm your entry by pressing ok.
ˆChange tbook data input
ˆname>ELMEG MARKETING
CDelete the existing telephone number by
pressing the C button.
ˆChange tbook data input
ˆtnumb>00190510110_
t
O
Enter the new number.
In this example: »001122334455«.
Confirm your entry by pressing OK.
ˆChange tbook data input
ˆtnumb>001122334455_
To edit further entries proceed as de-
scribed above.
ˆN:ELMEG MARKETING
ˆT:001122334455
3.6.3 Further information about the phone directory
For further information about the telephone directory for your phone refer to the detailed
Operator’s Manual on the enclosed CD. For example, deleting phone directory entries,
reorganization of the phone directory, assigning special call ringing signals to individual
phone directory entries.
16
18
G:\_elmeg\Ccs300\V1\Eng\print-doku\uk-300-smn-10x4.vp
Freitag, 20. September 2002 14:39:15
Farbprofil: Generic CMYK printer profile - None
Komposit Standardbildschirm

3.7 Programming VIP numbers
You can program VIP numbers for each of the ten buttons 1... 0including a name
(20 characters max.) and a telephone number (26 digits max.).
3.7.1 Programming VIP entries
The following example describes how to program a VIP entry for destination »V5«. If you
wish to program further entries, proceed as described for »V5«.
Begin as follows:
aFSSS<>O
prog vip new Select VIP
destination
t
O
Enter the name of the VIP entry »V5«.
In this example: »BEATRICE«.
Confirm your entry by pressing OK.
ˆ Program VIP name
ˆV5>BEATRICE_
t
O
Enter the telephone number.
In this example: »0123456789«.
Confirm your entry by pressing ok.
ˆ Program VIP number
ˆV5>0123456789_
ˆ Reprogram VIP {}
ˆV5:BEATRICE
3.7.2 Editing VIP entries
Begin as follows:
aFSSS<>O
prog vip list Select VIP
destination
C
t
O
Delete the existing entry by pressing the C
button and enter the new name for this VIP
entry.
In this example, the name is left un-
changed.
Confirm your entry by pressing OK.
ˆ Program VIP name
ˆV5>BEATRICE
CDelete the existing telephone number by
pressing the C button.
ˆ Program VIP number
ˆV5>0123456789
17
19
G:\_elmeg\Ccs300\V1\Eng\print-doku\uk-300-smn-10x4.vp
Freitag, 20. September 2002 14:39:15
Farbprofil: Generic CMYK printer profile - None
Komposit Standardbildschirm

t
O
Enter the new number.
In this example: »0987654321«.
Confirm you entry by pressing OK.
ˆ Program VIP number
ˆV5>0987654321_
ˆ Select VIP {}
ˆV5:BEATRICE
3.8 Programming direct dialing numbers
Direct dialing is initiated using the direct dialing keys Z. Each of the 7 keys can be pro-
grammed with two direct dialing numbers. Using the Shift button you can switch be-
tween the two levels for direct dialing. Pressing the shift button is indicated by »[a]«on
the top line in the display.
With the elmeg CS300 telephone you can also program other typical system functions
for the direct dialing buttons in addition to the ones described here.
3.8.1 Programming dtmf or keypad sequences
The following example describes how to program the direct dialing button 5. If you wish
to configure further buttons proceed as described for Button 5.
Begin as follows:
aFSSS<>O
prog direct new Select direct
dial button
tEnter the telephone number or the dtmf/
keypad sequence (26 digits max.).
In this example: Rufnummer »0123456«.
ˆ Program keys
ˆ5_> 0123456_
If you wish to program a tone frequency or keypad sequence press the Shift button and
set the desired entry mode in the display before you input the digits.
(No character) Telephone number
»T« DTMF sequence (Tone frequency dialing)
»V« Keypad sequence (Keypad function)
OConfirm your entry by pressing OK. ˆProg. new direct dial {}
ˆ5_: 0123456
18
20
G:\_elmeg\Ccs300\V1\Eng\print-doku\uk-300-smn-10x4.vp
Freitag, 20. September 2002 14:39:16
Farbprofil: Generic CMYK printer profile - None
Komposit Standardbildschirm
Other manuals for C300
1
This manual suits for next models
1
Table of contents
Other elmeg Telephone manuals

elmeg
elmeg CS410 User manual

elmeg
elmeg IP120 Installation manual

elmeg
elmeg IP290 User manual

elmeg
elmeg C46e Operating and installation instructions

elmeg
elmeg CS290 User manual

elmeg
elmeg CS410 User manual

elmeg
elmeg DECT 300 User manual

elmeg
elmeg C310 User manual

elmeg
elmeg C300 User manual

elmeg
elmeg CS290 User manual
Popular Telephone manuals by other brands

Yealink
Yealink T56A Skype for Business quick start guide

switel
switel TF550 operating instructions

Nortel
Nortel ENTERPRISE EDGE M7100 Quick reference guide

Polycom
Polycom Polycom SoundPoint IP 430 user guide

Custom Audio Electronics
Custom Audio Electronics FX220 owner's manual

AP radiotelefon
AP radiotelefon ap4112 Service manual


