elmeg CS410 User manual
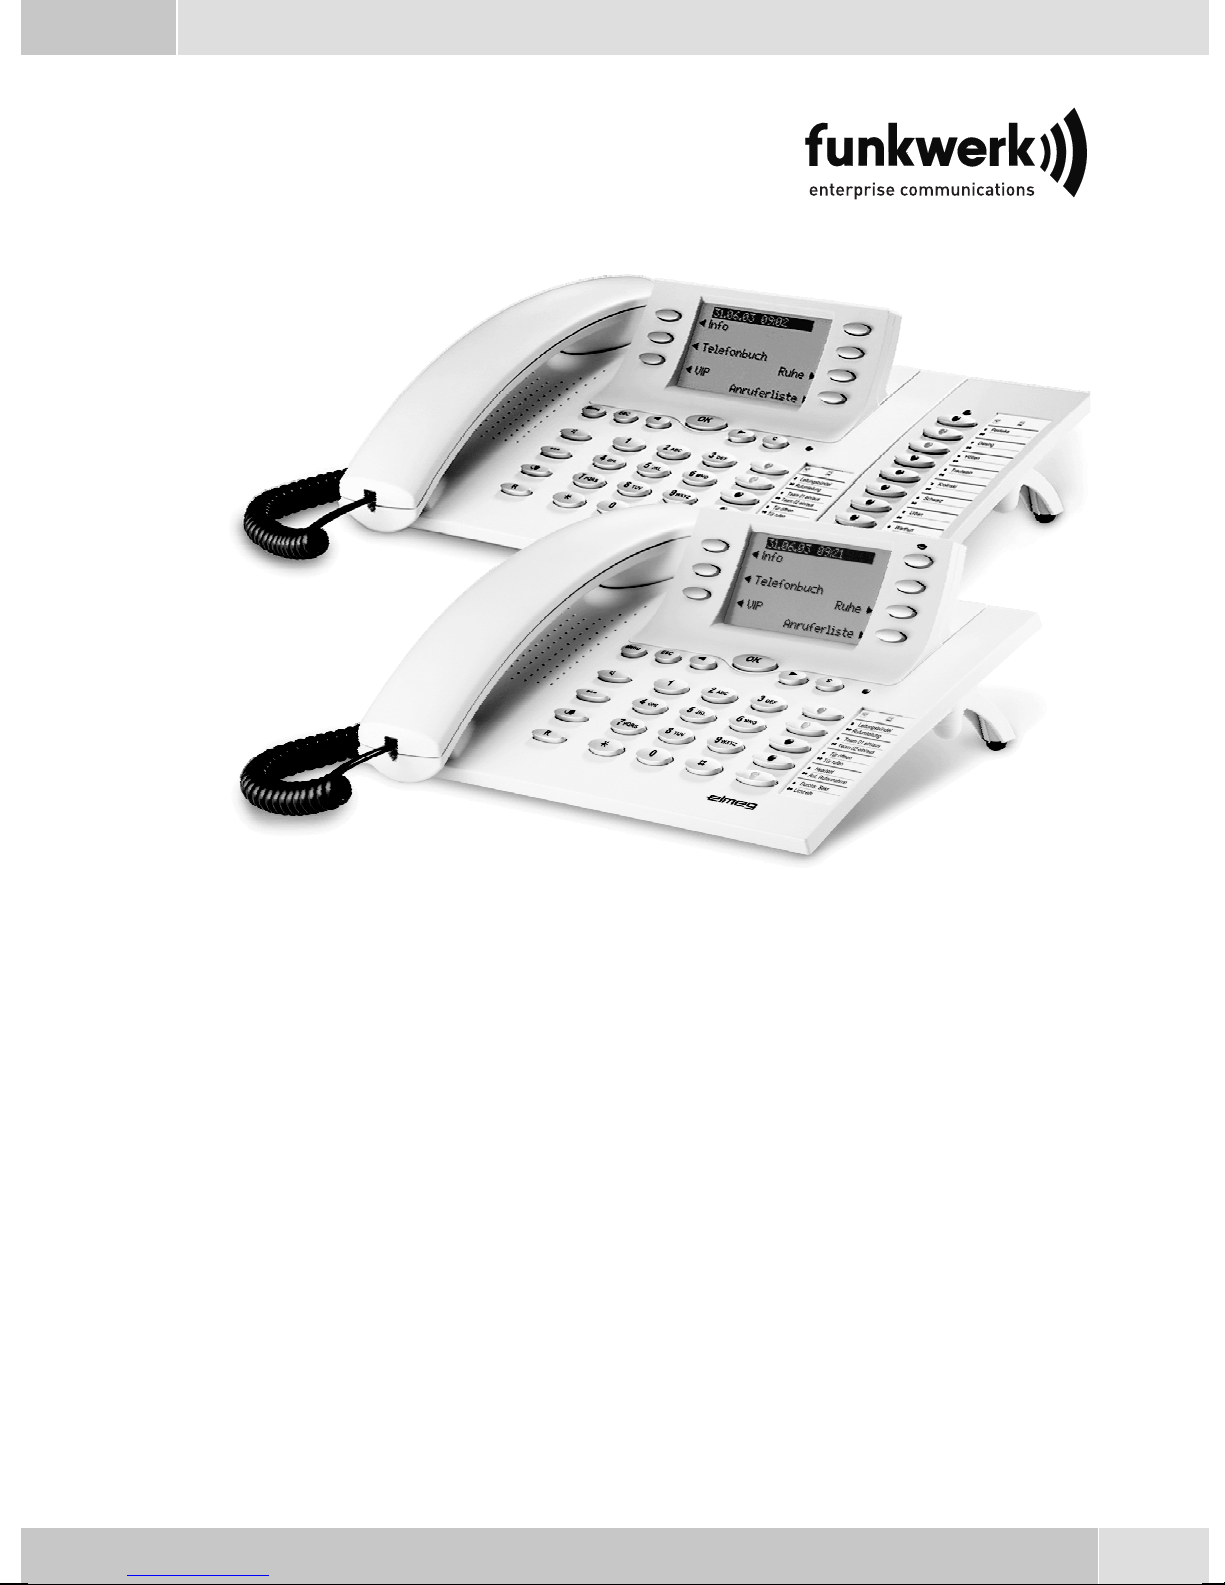
elmeg CS410 / CS410-U / CS400xt / IP-S400
English - Deutsch - Français - Italiano - Español - Svenska
Norsk - ÅëëçíéêÜ - Dansk - Polski - Nederlands - Português
Operating instructions
Bedienungsanleitung
Notice d'utilisation
Istruzioni per l'uso
Instrucciones de servicio
Bruksanvisning
Brukerveiledning
åã÷åéñßäéï ÷ñÞóçò
Betjeningsvejledning
Instrukcji obslugi
Handleiding
Manual de instruções


English . . . . . . . . . . . . . . . . . . . . . . . . . . . . . . . . . . . . . . 1
Telephone display and buttons . . . . . . . . . . . . . . . . . . . . . . . . . . . . . . . . . . . . . . . . . 2
Description and Installation . . . . . . . . . . . . . . . . . . . . . . . . . . . . . . . . . . . . . . . . . . . 3
Making Calls . . . . . . . . . . . . . . . . . . . . . . . . . . . . . . . . . . . . . . . . . . . . . . . . . . . 11
Telephone operation. . . . . . . . . . . . . . . . . . . . . . . . . . . . . . . . . . . . . . . . . . . . . . . 15
Configuration settings. . . . . . . . . . . . . . . . . . . . . . . . . . . . . . . . . . . . . . . . . . . . . . 17
Declaration of conformity and CE mark . . . . . . . . . . . . . . . . . . . . . . . . . . . . . . . . . . . 19
Deutsch . . . . . . . . . . . . . . . . . . . . . . . . . . . . . . . . . . . . . . 1
Display und Tasten des Telefons . . . . . . . . . . . . . . . . . . . . . . . . . . . . . . . . . . . . . . . . 2
Beschreibung und Installation . . . . . . . . . . . . . . . . . . . . . . . . . . . . . . . . . . . . . . . . . . 3
Telefonieren . . . . . . . . . . . . . . . . . . . . . . . . . . . . . . . . . . . . . . . . . . . . . . . . . . . 11
Telefon bedienen. . . . . . . . . . . . . . . . . . . . . . . . . . . . . . . . . . . . . . . . . . . . . . . . . 16
Einstellungen in der Konfigurierung . . . . . . . . . . . . . . . . . . . . . . . . . . . . . . . . . . . . . 17
Konformitätserklärung und CE-Zeichen . . . . . . . . . . . . . . . . . . . . . . . . . . . . . . . . . . . 19
Français . . . . . . . . . . . . . . . . . . . . . . . . . . . . . . . . . . . . . . 1
Afficheur et touches du téléphone. . . . . . . . . . . . . . . . . . . . . . . . . . . . . . . . . . . . . . . . 2
Description et installation . . . . . . . . . . . . . . . . . . . . . . . . . . . . . . . . . . . . . . . . . . . . 3
Téléphoner . . . . . . . . . . . . . . . . . . . . . . . . . . . . . . . . . . . . . . . . . . . . . . . . . . . . 11
Utilisation. . . . . . . . . . . . . . . . . . . . . . . . . . . . . . . . . . . . . . . . . . . . . . . . . . . . . 16
Réglages dans la configuration . . . . . . . . . . . . . . . . . . . . . . . . . . . . . . . . . . . . . . . . . 17
Déclaration de conformité et marque CE . . . . . . . . . . . . . . . . . . . . . . . . . . . . . . . . . . . 19
Italiano . . . . . . . . . . . . . . . . . . . . . . . . . . . . . . . . . . . . . . 1
Display e tasti del telefono . . . . . . . . . . . . . . . . . . . . . . . . . . . . . . . . . . . . . . . . . . . . 2
Descrizione e installazione . . . . . . . . . . . . . . . . . . . . . . . . . . . . . . . . . . . . . . . . . . . . 3
Telefonare. . . . . . . . . . . . . . . . . . . . . . . . . . . . . . . . . . . . . . . . . . . . . . . . . . . . . 11
Rubrica telefonica . . . . . . . . . . . . . . . . . . . . . . . . . . . . . . . . . . . . . . . . . . . . . . . . 16
Impostazioni nella configurazione. . . . . . . . . . . . . . . . . . . . . . . . . . . . . . . . . . . . . . . 17
Dichiarazione di conformità e marcatura CE. . . . . . . . . . . . . . . . . . . . . . . . . . . . . . . . . 19
Español . . . . . . . . . . . . . . . . . . . . . . . . . . . . . . . . . . . . . . 1
Pantalla y teclas del teléfono . . . . . . . . . . . . . . . . . . . . . . . . . . . . . . . . . . . . . . . . . . . 2
Descripción e instalación . . . . . . . . . . . . . . . . . . . . . . . . . . . . . . . . . . . . . . . . . . . . . 3
Telefonear. . . . . . . . . . . . . . . . . . . . . . . . . . . . . . . . . . . . . . . . . . . . . . . . . . . . . 11
Programar guía telefónica. . . . . . . . . . . . . . . . . . . . . . . . . . . . . . . . . . . . . . . . . . . . 16
Ajustes en la configuración . . . . . . . . . . . . . . . . . . . . . . . . . . . . . . . . . . . . . . . . . . . 17
Declaración de conformidad y símbolo CE . . . . . . . . . . . . . . . . . . . . . . . . . . . . . . . . . . 19
Svenska . . . . . . . . . . . . . . . . . . . . . . . . . . . . . . . . . . . . . . 1
Display och telefonens knappar . . . . . . . . . . . . . . . . . . . . . . . . . . . . . . . . . . . . . . . . . 2
Beskrivning och installation . . . . . . . . . . . . . . . . . . . . . . . . . . . . . . . . . . . . . . . . . . . 3
Telefonera. . . . . . . . . . . . . . . . . . . . . . . . . . . . . . . . . . . . . . . . . . . . . . . . . . . . . 11
Telefonkatalog programmering . . . . . . . . . . . . . . . . . . . . . . . . . . . . . . . . . . . . . . . . 16
Inställningar i konfigureringen. . . . . . . . . . . . . . . . . . . . . . . . . . . . . . . . . . . . . . . . . 17
Konformitetsförklaring och CE-märken . . . . . . . . . . . . . . . . . . . . . . . . . . . . . . . . . . . 19
I

Norsk . . . . . . . . . . . . . . . . . . . . . . . . . . . . . . . . . . . . . . . 1
Telefonens display og taster . . . . . . . . . . . . . . . . . . . . . . . . . . . . . . . . . . . . . . . . . . . 2
Beskrivelse og Installation . . . . . . . . . . . . . . . . . . . . . . . . . . . . . . . . . . . . . . . . . . . . 3
Telefonering . . . . . . . . . . . . . . . . . . . . . . . . . . . . . . . . . . . . . . . . . . . . . . . . . . . 11
Betjening av telefonen . . . . . . . . . . . . . . . . . . . . . . . . . . . . . . . . . . . . . . . . . . . . . . 16
Innstillinger i konfigureringen . . . . . . . . . . . . . . . . . . . . . . . . . . . . . . . . . . . . . . . . . 17
Konformitetserklæring og CE-merker. . . . . . . . . . . . . . . . . . . . . . . . . . . . . . . . . . . . . 19
ÅëëçíéêÜ .....................................1
Ïèüíç êáéÐëÞêôñá ôçò ôçëåöùíéêÞò óõóêåõÞò ................................2
ÐåñéãñáöÞ êáé åãêáôÜóôáóç...........................................3
×ñÞóç ôçëåöùíéêþí óõóêåõþí.........................................12
×åéñéóµüò ôçëåöþíïõ ..............................................17
ÅðéëïãÝò ôùí ñõèµßóåùí ............................................19
ÄÞëùóç óõìöùíßáò êáé óÞìá CE........................................21
Dansk . . . . . . . . . . . . . . . . . . . . . . . . . . . . . . . . . . . . . . . 1
Display og telefonens taster . . . . . . . . . . . . . . . . . . . . . . . . . . . . . . . . . . . . . . . . . . . 2
Beskrivelse og installation . . . . . . . . . . . . . . . . . . . . . . . . . . . . . . . . . . . . . . . . . . . . 3
Telefonering . . . . . . . . . . . . . . . . . . . . . . . . . . . . . . . . . . . . . . . . . . . . . . . . . . . 11
Betjening af telefonen . . . . . . . . . . . . . . . . . . . . . . . . . . . . . . . . . . . . . . . . . . . . . . 16
Indstillinger i konfigurationen . . . . . . . . . . . . . . . . . . . . . . . . . . . . . . . . . . . . . . . . . 17
Konformitetserklæring og CE-mærke . . . . . . . . . . . . . . . . . . . . . . . . . . . . . . . . . . . . . 19
Polski . . . . . . . . . . . . . . . . . . . . . . . . . . . . . . . . . . . . . . . 1
Opis i instalacja ..................................................2
Opis i instalacja ..................................................3
Wykonywanie po³¹czeñ .............................................11
Obs³ugiwanie telefonu..............................................16
Ustawienia w konfiguracji ...........................................17
Deklaracja zgodnoœci i symbol CE .......................................19
Nederlands . . . . . . . . . . . . . . . . . . . . . . . . . . . . . . . . . . . . 1
Display en toetsen van de telefoon . . . . . . . . . . . . . . . . . . . . . . . . . . . . . . . . . . . . . . . 2
Beschrijving en installatie . . . . . . . . . . . . . . . . . . . . . . . . . . . . . . . . . . . . . . . . . . . . 3
Telefoneren . . . . . . . . . . . . . . . . . . . . . . . . . . . . . . . . . . . . . . . . . . . . . . . . . . . . 11
Telefoon bedienen . . . . . . . . . . . . . . . . . . . . . . . . . . . . . . . . . . . . . . . . . . . . . . . . 16
Instellingen in de configuratie . . . . . . . . . . . . . . . . . . . . . . . . . . . . . . . . . . . . . . . . . 17
Conformiteitsverklaring en CE-teken . . . . . . . . . . . . . . . . . . . . . . . . . . . . . . . . . . . . . 19
Português . . . . . . . . . . . . . . . . . . . . . . . . . . . . . . . . . . . . . 1
Display e teclas do telefone . . . . . . . . . . . . . . . . . . . . . . . . . . . . . . . . . . . . . . . . . . . . 2
Descrição e instalação. . . . . . . . . . . . . . . . . . . . . . . . . . . . . . . . . . . . . . . . . . . . . . . 3
Telefonar . . . . . . . . . . . . . . . . . . . . . . . . . . . . . . . . . . . . . . . . . . . . . . . . . . . . . 11
Operar o telefone. . . . . . . . . . . . . . . . . . . . . . . . . . . . . . . . . . . . . . . . . . . . . . . . . 16
Ajustes na configuração . . . . . . . . . . . . . . . . . . . . . . . . . . . . . . . . . . . . . . . . . . . . . 17
Declaração de conformidade e o símbolo CE . . . . . . . . . . . . . . . . . . . . . . . . . . . . . . . . . 19
II

1
elmeg CS410 / CS410-U / CS400xt / IP-S400
English
Operating instructions
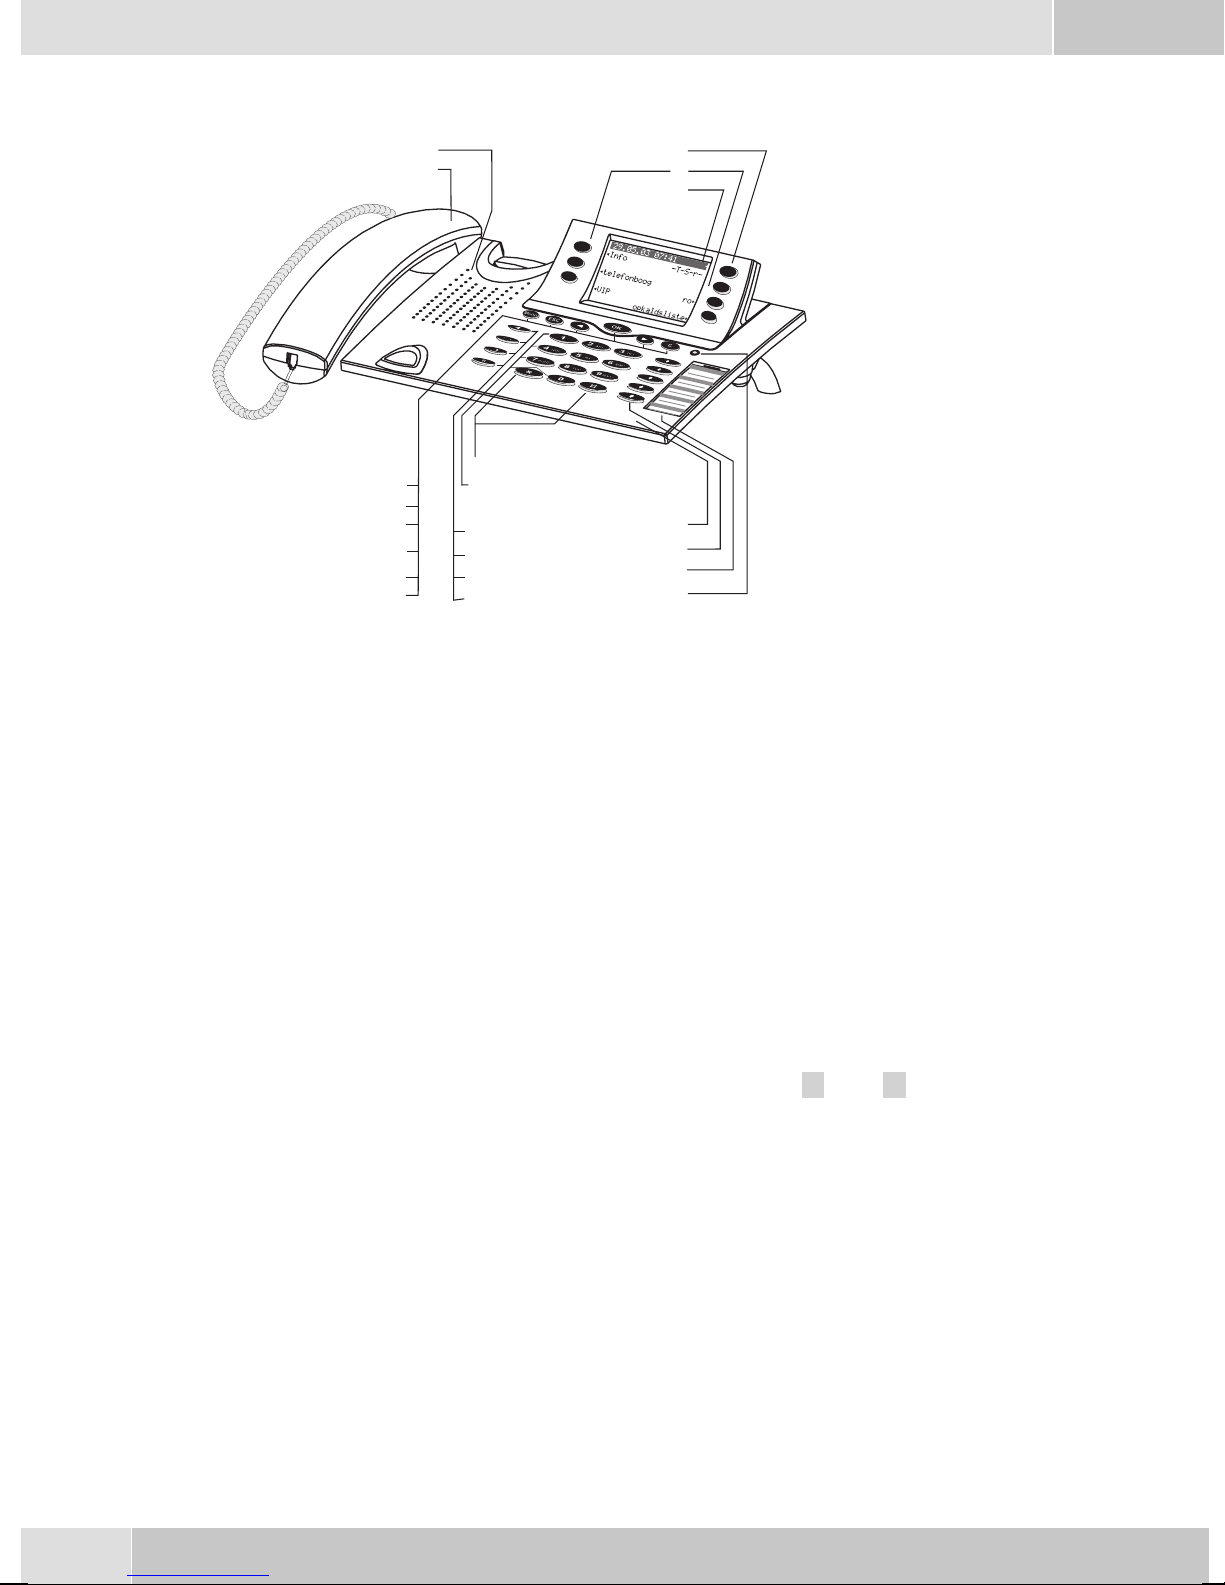
Telephone display and buttons
1 Speaker
2 Handsetwithconnectingcord
3 Answering machine button on the telephone (optional module) or »PABX menubut-
ton
4 6Softkeys
5 Seven-linebacklitdisplay
6 Menukey:Thiskeyopenstheprogrammingmenu. Ifyouarealreadylocatedinamenu
and then press the key, either menu-specific functions are shown, or you are moved
backoneprogrammingstep.
7 ESCkey:PressingtheEscbuttonduringprogrammingreturnsthetelephonetoitsidle
status.
8 / 10 Arrowbutton»Totheleft«/»Totheright«:Thearrows» {«and»}«intherightcor-
neronthetoplineofthedisplayindicatethatyoucancallupfurtherfunctionsonthelo-
werlinesusingthearrowbuttons.
9 OKkey: Pressingthisbuttonconfirmsanentryor storesasettinginthetelephone.
11 Ckey:Pressthisbuttontomovebackonemenustepinthemenu. Ifyouarecurrentlyin
theinputmode,thisbuttoncanbeusedto deleteindividualcharacters.
12 Asteriskkey/hashkey
13 Dialbuttons
14 Openlistening/hands-freebutton
15 Endingacall
16 Redialbutton
17 Enquirybutton
18 Microphone
English
2
1
23
4
5
18
19
20
21
12
13
14
15
16
1
7
6
7
8
9
10
11
Figure 5

19 Five programmable function keys with LED: Each button has an inset two-color LED
(level1-red /level2-yellow).TheseLEDscanbeusedtoindicatecertainfunctions.
20 Labelpanelfor functionkeys
21 Callsignaling(red)andansweringmachine(yellow)LED
Description and Installation
These operating instructions describe only the most important routines for using the telephone.
Detailed information and documentation can be found on the CD-ROM.
CS410
This system telephone is designed for connection to an internal S0-port (4 wires) of an elmeg pabx system.
If you wish to connect the telephoneto an internal Up0-port, be sure to install the internal Up0/S0-module
into the telephone or use the external Up0/S0-converter.
CS410-U
This system telephone is designed for connection to an internal Up0-port (2 wires) of an elmeg pabx sys-
tem. The internal Up0/S0-module or the external Up0/S0- converter are then no longer required.
CS400xt
Thissystemtelephoneis deliveredwith akey extensionmodule(T400/2), providingyou with10 additional,
freely configurable keys.
Itis designedfor connectionto an internalS0 port (4-wire cable)of aPABXsystem. Thesystem telephoneis
not equipped with a USB or serial port for configuration or other uses. This phone must be configured via
the internal ISDN port using the WinTools Professional Configurator. There are also no »Audio functions«
implemented and you can not use the Answering machine or Up0 modules or functions. None of the
functions for this module are shown in the display, nor can they be used.
This telephone is equipped with the function »Emergencyoperation«, mea-
ning it can be operated at NT via the PABX system on a loss of 230 V~ po-
wer. Please notethat your PABX system supports this featureand that it can
not be used via a Up0/S0 converter.
elmeg IP-S400
Connectthissystemtelephoneto thecorrespondingLANport(ornetwork) ofthePABXsystem usingaCat.
5cable.Thesystem telephoneisequipped withaPC outputthat canbeused toconnectother IPterminalde-
vices.
Setting up/ Configuring the system telephone
On the system telephone itself you can only carry out a limited configuration of the supported features. A
fullconfiguration is onlypossiblewith an elmegtelephonesystem using theprofessionalWINtool configu-
rator via the corresponding system telephone interface.
You will find additional information on the configuring of the system telephones in the detailed
instruction manual on the CD-ROM.
English
3
OFF
ON

System telephone extension modules
•Modul Up0/S0 (CS410)
•Answering machine module (CS410)
•Additional »T400«,»T400/2« keyboard (CS410, IP-S400)
Safety notes
•Mind the storage and operation temperatures for the device listed in the technical specifications.
Only connect the device when the permissible ambient operating temperature has been reached.
•Please note that condensation on or in the unit must be prevented when moving from cold to warm
surroundings.Only removethe unit fromthe package whenthe permissibleambientoperating tem-
perature has been reached.
•You should not make calls or connect or disconnect any lines duringthunderstorms.
•Only attach the connecting cords at the connections provided.
•Make sure phone cables are installed in a safe manner to preventtripping.
•Avoid the following:
Direct sunlight
Sources of heat (for example radiators)
Electronic devices (for example stereo components, office equipment or microwave devices
Ingress of moisture or liquids
Aggressive fluids or vapors
Dusty environment
•Do not use the unit in excessively humid rooms or hazardous locations.
•Only open those sections of the device specified in the assembly / operating instructions.
•Do not touch plug connectors with pointed, metal, or moist objects.
•Ifyou do notpermanently mountthe deviceor any accessories, besure to placeit/them ona non-slip
surface.
•When required, clean the unit with a slightly moistened cloth.
•Only use approved accessories.
•Only terminalswith SELV and/orwhich complywith ETS 300047 maybe connectedto the unit.This
regulation is fulfilled when approved terminal devices are used as intended.
Plug-in power supply
•Use only approved power plug-in units (DSA-0101F-05 UP or L15 D52 AB DDLAWO).
•Do not use power plug-in units with visibledefects or damage (fissures, cracks, etc.)
Elektrostatic charges
The telephone is supplied with enhanced ESD protection against the effects of electrostatic discharge that
exceeds the protection level cited in the approval specification. Elevated ESD levels should nevertheless be
avoided to the greatest possible extent. In some cases, electrostatic discharge levels can far exceed the ap-
proval limits or the resistance levels already implemented in your telephones. Eliminate the causes or con-
ditions that promote these elevated ESD levels, such as insufficient humidity or carpeting. The telephone
manufacturer does not assume any liability for damage caused under such circumstances.
English
4
Unpacking and placing the telephone
Unpacking
•ISDN system telephone
•Handset with handset connecting cord
•2 feet
•ISDN connecting cord (approx.6 m)
•PC-Connection cable (USB, ca. 3M), (not withCS400xt)
•PC-audio cable (3.5mm stereo plug, ca. 2.5m), (not withCS400xt)
•Adapter cord for headsets with a 4 pin connecting cord (8 pin / 4 pin)
•Cable holder (self-adhesive after removing the film), (not withCS400xt)
•Operating instructions and labels for function keys
•WIN-Tools CD-ROM with:
Professional Configurator, telephone, Download and Sound Manager,
TAPI-, USB-, CAPI- and NDISWAN-drivers, Adobe Acrobat Reader,
Operating instructions and Adobe Acrobat file for theprinting of individual labels
Placing the telephone
Before placing the telephone, mount the rear feet at the positions (6) shown in figure 6.
Please note that the plastic feet of your ISDN system telephone may leave marks on sensitive surfaces, such
as furniture. The manufacturer of the ISDN system telephone isnot liable for any such damage. Therefore,
use appropriate non-skidding pads under the phone.
Cleaning the telephone
The ISDN system telephone has been manufactured for normal, everyday use. When required, clean the
ISDN system telephone with a slightly moistened cloth, or with an anti-static cloth. Never use a solvent to
clean the phone! Never use a dry cloth. Electrostatic charges could damage the electronics in the system. It
is essential that no liquids penetrate into the inside of the ISDN system telephone, as this could destroy the
phone.
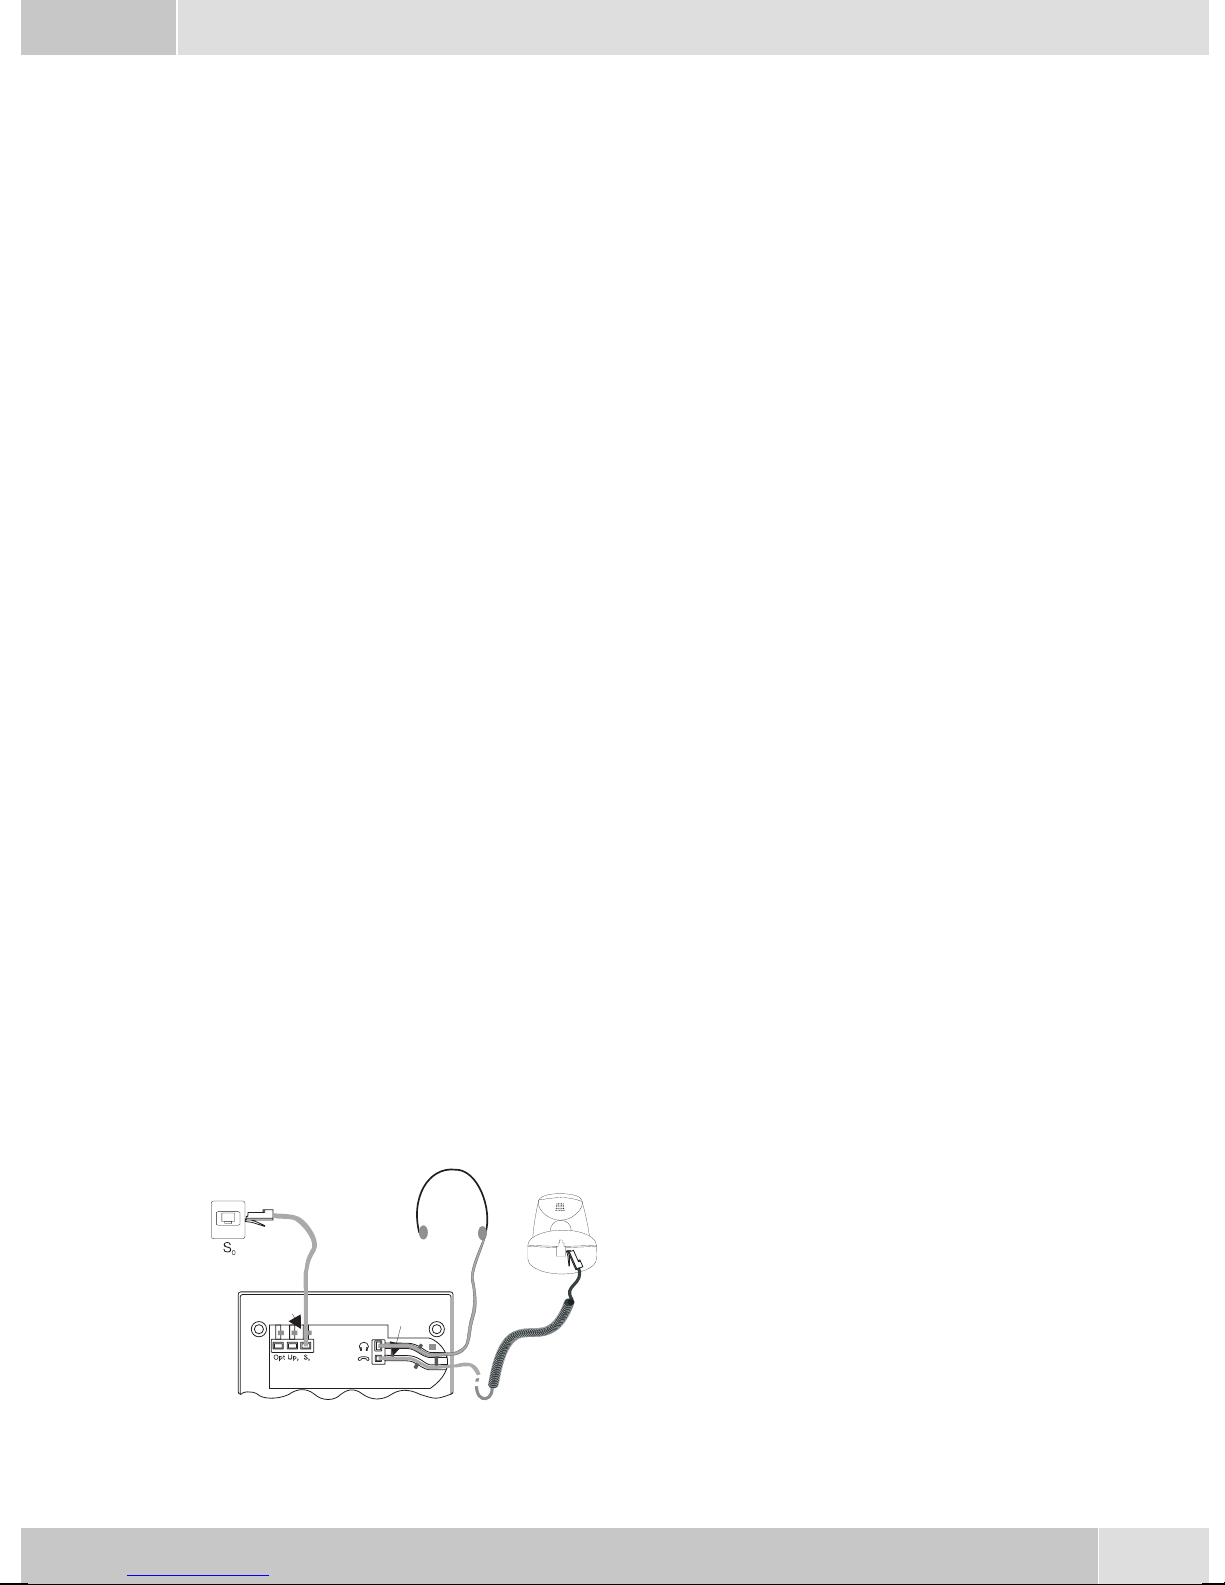
Connecting the telephone (ISDN and handset cords)
PleaseconnecttheISDNcableand thehandsetcable.Otherwiseyou willnotbeabletooperatethephone.
Connecting the handset connecting cord
Connect the handset cord (1) as shown in figure 6.
Lay the handset cord in the cord groove (4) and lock
it below the two cord retainers (5).
English
5
1
23
4
4
45
5
66
7
Figure 6
Connecting the ISDN cord
Connection to the S0 (CS400xt CS410)
Connect the ISDN cord (2) as shown in figure 6 (S0-connector). Ensure that the longer ISDN connector is
plugged into the ISDN socket and the shorter ISDN connector into the ISDN socket on the telephone. Then
lay the ISDN cord in the cord groove (4) and lock it below the two cord retainers (5).
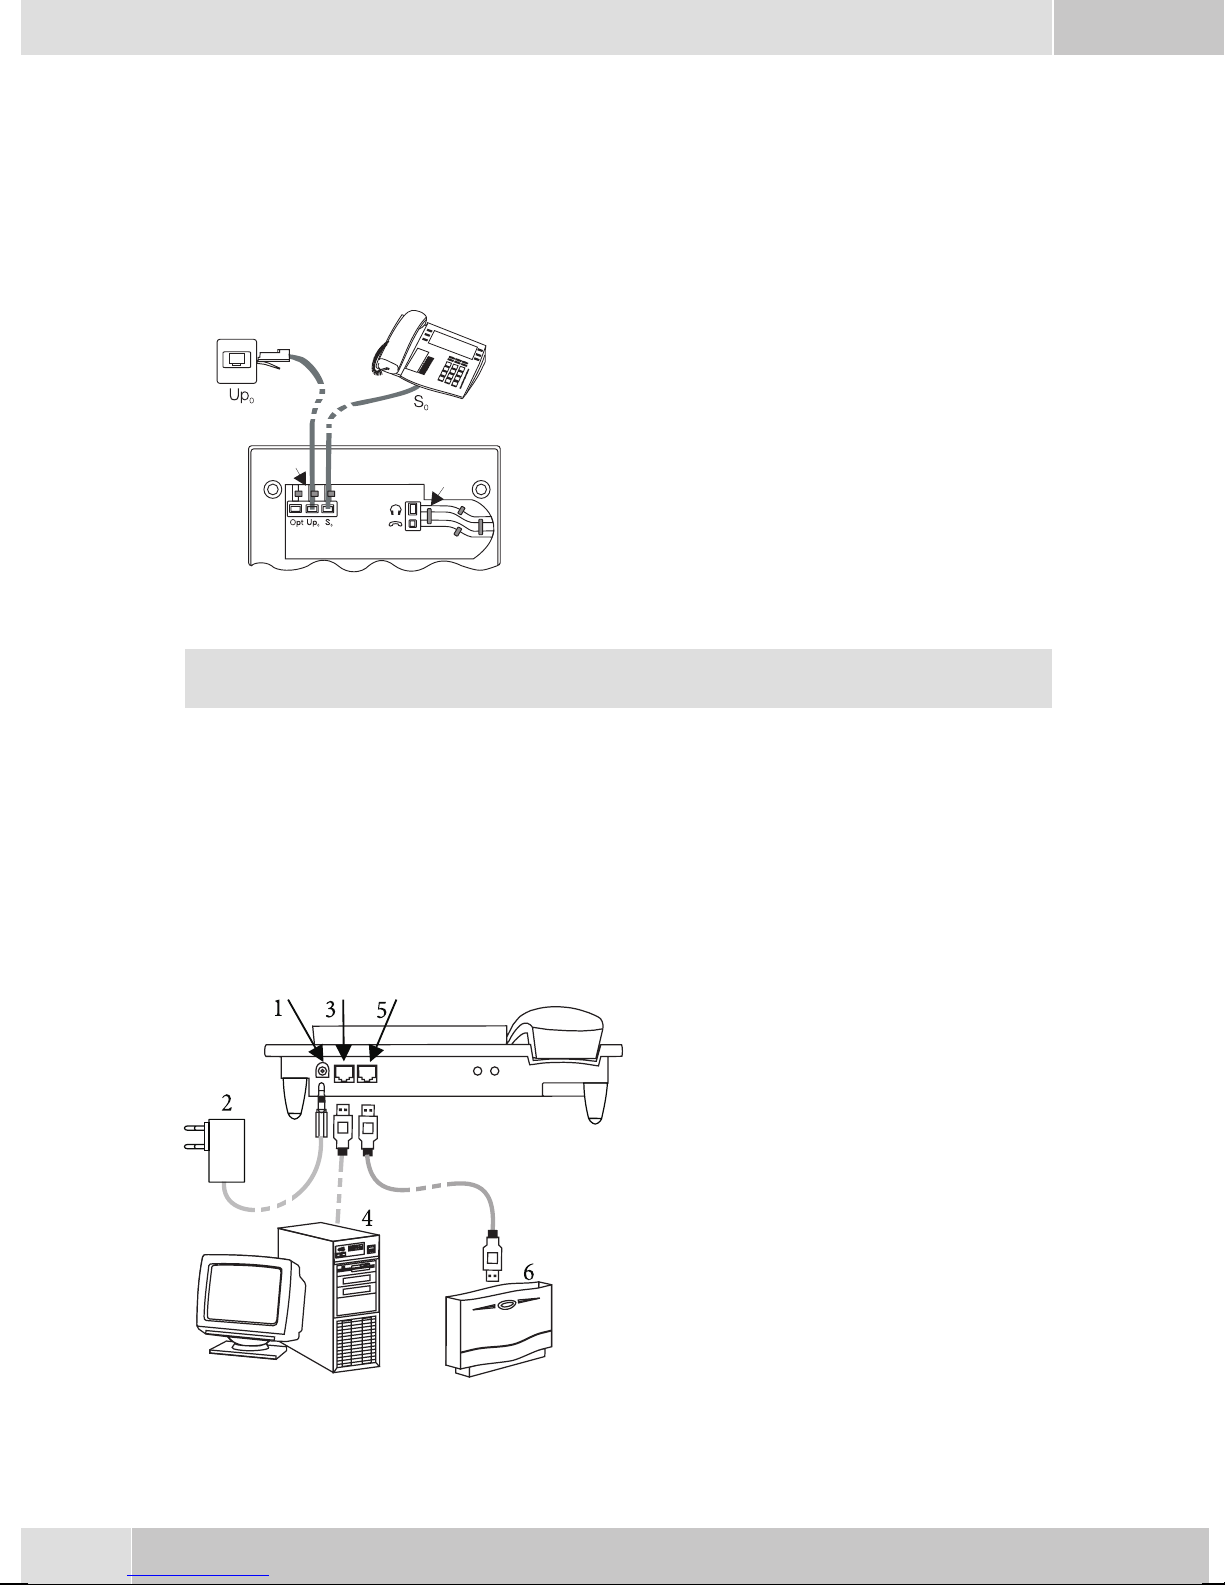
Connection to the Up0 (CS410-U)
Connect the ISDN cable (2) as shown in figure 3
(Up0-socket). Ensure that the longer ISDN connec-
tor is plugged into the ISDN outlet and the shorter
ISDN connector into the ISDN socket on the tele-
phone. Then lay the ISDN cord in the cord groove
(4) and lock it below the two cord retainers (5).
CS410 telephones equipped with a Up0/S0 module or CS410-U phones may not be connected
through the S0-socket (3) to the ISDN connection (e.g. internal ISDN port of the PABX) .
Important notes for the UP0-connection
•An ISDN terminal device equipped with S0-port can be connected to the phone's S0-jack.
•The maximum line distance between the elmeg CS410-Uand any downstream ISDN terminal devi-
ces may not exceed 10 meters.
•Terminating resistors may not be connected.
elmeg IP-S400 at the Ethernet-port
1-Connection for plug-in power
supply unit
2-Plug-in power supply unit
3-Ethernet PC-Connection
4-PC or other IP-telephone
5-Ethernet-port of the pabx
6-elmeg pbx
English
6
2
3
1
4
5
Figure 3
Figure 4

Connecting to and operating the system telephone at the pabx system (basic function including
DHCP)
Consult the installation instructions for the PABX system to determine which port can be used for connec-
ting the IP-S400. Connect this port with the Ethernet PABX port on the system telephone.
•Configure your PABX system for use with IP system telephones.
•Define the MSNs for the IP system telephones within the PABX system.
•Switch on the power (plug-in power supply unit) to the IP system telephone and wait until the tele-
phone has been initialized.
Oncethe IPsystemtelephonehasbeeninitializedyouwillberequestedtoselect thelanguageinthedisplay.
•Select the display language.
Press the buttons to view the available langua-
ges.
Which Country? }
Italiano
Español
Deutsch
®English
Française
Nederland
•Enter one of the MSNs that has been input to the PABX system (in the example shown here, 12) .
Confirm your entry by pressing O.Programm dial number
MSN-1>12
If no PIN has been entered in the system con-
figuration, press button Oand button
Oagain after being requested to do so.
IPS login PIN for sys
server
MSN-1>
•Swtich to Use DHCP.
Select »on«. Use automatic IP
adress setting
off
on®
•The telephone and PABX system are synchronized.
If there is no connection to the PABX system (no LAN link, or the telephone has not been logged
in),thesymboll» -----/ /----‰ «willbeshowninthedisplayinsteadof thetime.
You can now use the IP system telephone at the ISDN or UP0 port.
Changing the label
The labels for the function keys are provided on the last page of this operating manual. Cut out the label you
wish to use.
To change the label panel, press the flexible cover together between your index finger and thumb and lift it
out. The label panel can now be changed.
You can fill in the label panel via your PC yourself. The CD ROM supplied with the system contains an Ado-
be Acrobat file with templates.
English
7

Pictograph
The pictographs (symbols) described as follows have been used in these operating instructions to illustrate
some petting and using the telephone.
bLiftupthehandsetorstartinitializingselection.
aReplacehandset. Thetelephoneisidle.
lAcallissignaled.Theringingtonemelodysounds.
gYouareconductingacall.
dAthree-partyconferencecallisinitiated.
qYouhearthepositiveornegativeacknowledgementsignal.
tSelectthenumber,code,character ortext.
09
*#
Presstheappropriate buttononthepush-buttonset.
Country-specific settings
Certain specific parameters need to be set if the telephone is to be used in a country other than the country
configured as default.
This includes setting the language, the currency and certain default specific parameters for a country’s
ISDN network.
Check as described as follows whether you need to set country-specific parameters for the country in which
the telephone is to be used.
Begin as follows:
aMs s tO>s
Konfigu-
ration Service Telephone PIN Country
sPress the arrow keys to view the countries, for
which specific settings are available.
Press the softkey for the desired country. For
example: »English«.
Which Country? }
Italiano
Español
Deutsch
®English
Française
Nederland
All country-specific settings take effect imme-
diately. The telephone data will not be dele-
ted.
29.05.06 07:41 }
Tel. drctry
Quiet
VIP
English
8

Telephone display
1-Date
2-Time
3-21 characters per line
4-Arrow: Further menu items accessible by using the ar-
row keys.
5-Answering machine button on the telephone (optional
module) or »PABX menubutton
6-Arrow: Indication of the softkey that can be used in the
current menu.
The telephone is equipped with a seven-line backlit display. Backlighting is automatically switched on or
off.
After you connect the system to the internal ISDN connection of your pabx system, the date and time are
shown on the top line of the display. The date and time are imported automatically from the pabx system.
The text displayed for a function is always located next to the corresponding softkey. When you press the
softkey, the next level is displayed. If not all information fit into the screen, this will be indicated by »««or
»««. To view further characters, press the R key and then use the corresponding arrow key.
Various telephone display shots are illustrated in this operator’s manual to help explain the different set-
tingsanduseof thesystem. Awavy lineat thetopor bottomof an illustrationindicates that notall ofthe 7li-
nes of that particular display are shown (only pertinent lines shown).
Use the buttons as follows when entering texts, letters digits or special characters:
Key Press
Key 1234567
11
2ABC2ÄÅÆ
3DEF3 €
4GH I 4
5JKL5
6MNO 6 ÖØ
7PQRS7ß$
8TUV8Ü
9WX Y Z 9 ¥
**
##
English
9
09.03.06 07:00
Figure 5
0Several special characters are assigned to the button »0«. For special characters, press
the0 key.
Forexampe.:»!«,»&«,»?«,»+«,»-«,»=«,»(«,»)«,»@«,»$«,...
Input mode for entering letters
You have various possibilities for entering letters. The currently set input mode is displayed on the top half
of the display on the right-hand side (no display, »Abc« or »ABC«).
»Abc« Thenextletterthatyouenterisshownasacapital,allothersassmallcaseletters.Exam-
ple:»Dean, James«.
no display Everyletterthatyouenterisshowninsmallcase.
Example:»dean, james«.
»ABC« Everyletterthatyouenterisshownascapitals.
Example:»DEAN, JAMES«.
When you start entering texts, the input mode is always »Abc«. Press the R key to change the in-
put mode. To insert a character while in »Abc« mode, press the C key.
Displays for programmed features
sWhen the telephone is in the idle state, addi-
tional information about functions that have
been configured are shown on »Info« line
of the display. In this example:
»-D-I-q-«.
Press the softkey next to »Info« if you wish
to get more information about the configured
functions.
29.05.03 07:21 }
Info -D-I-q-
Tel. drctry
Quiet
VIP
Caller list
If you have programmed several features,
press the arrow buttons to view the various
settings.
ªªªªªªªªªªªªªªªªªªªªªª
Inhibit/Menu:
Guard for modificatio
¬¬¬¬¬¬¬¬¬¬¬¬¬¬¬¬¬¬¬¬¬¬
Display Configured function
»-D-«Active appointment reminder set.
»-I-«Dial ranges or call filter active,
Access to telephone menus is protected.
»-q-«Function »Station guarding« (only brief signal) active.
»-Q-«Function »Station guarding« (complete) active.
(All call signals are switched off)
»-U-«Call forwarding active.
»-i- «Information about programmed function keys
For example: Message enabled / inhibited.
»--«Answering machine, time control, call forwarding signaling or remote control are ac-
tivated (optional module).
English
10
Making Calls
Starting a call
Dial number - no correction possible
btg
Dial number
Dial number - correction possible
atbg
Dial number
To change the number or to correct a wrong entry, select the wrong figure with the arrow buttons and press
C key to delete it. Now enter the correct number.
If you wish to conduct the call using the handset, just lift it up after dialing the number. Any time during a
call you can switch back and forth between hands-free calling, speaker function and use of the handset.
After you have dialed the number you can also press the speaker button to have the number dialed and to
use hands-free calling.
If a call can not be put through (e.g. number is inhibited via the dial ranges control, or the account for the
number/MSN is empty), a corresponding message will appear in the display. For example: »Inhibit.
: MSN ext.«, when the dial range filter is active.
Other options for dialing without lifting the handset
The option of dialing without lifting thehandset and of correcting or adding to a number also exists during
dialing:
•from the redialing memory.
•from the caller/ memo list.
•from the telephone directory.
•from the VIP memory.
•from the direct dialing memory.
•via CTI, TAPI (CS 410) features.
Ifyou are usingone ofthese options, you canmake further entriesprior to initiatingthe call. You candefine
which number (MSN), if any, is to be transmitted to the party being called.
Dialing from the pabx telephone directory
When you use this telephone with a system telephony supporting pabx system, you can dial from the tele-
phone directory of the pabx.
aRs tO<>O b
Tel.
drctry Enter first
letter Select
entry
English
11

Dialing from the phone’s directory
You can store up to 250 names and numbers in the telephone directory. To select a name, you can page
through the directory using the arrow buttons, or enter the specific first letter(s) of the name using the
push-button set.
astO<> O bg
Tel. drctry Enter first letter Select entry
For information on how to program and configure the telephone directory, please refer to page 15 of these
operating instructions.
Dialing from the VIP memory
Youcan programVIP numbersfor eachof theten buttons1 … 0includinganame (20characters max. )and
a telephone number (26 digits max.).
asor tbg
VIP Select
VIP
destina-
tion
Select VIP
destination
For information on how to program VIP entries, please refer to page 16 of these operating instructions.
Direct dialing with function keys
Direct dialing is initiated using the direct dialing keys. Each of the keys can be programmed with two
functions or direct dialing numbers.
aZbg
Press the function key
Use the function keys to select the desired number.
Ifyou wishto diala numberfromthe secondlevel, pressthe correspondingkey two times.Thismust beexe-
cuted at a short interval.
You can program the direct dialing / function keys via the PC configuration program or the extendedconfi-
guration of the telephone.
Dialing from the caller/memo list
The phone has a combined caller and memolist. A maximum of 30 entries (calls, memos SMS messages or
UUS1- messages) are stored in this list. Entries in the caller or memo list are indicated by the »Caller
list« softkey.
asb
Caller list Select entry
Further functions
Accepting/rejecting a call
albg
English
12

Rejecting a call
al
s
reject
Forwarding a call (call deflection)
al
stO
transfer Dial number
Calling line identification (anonymus call) restriction
at
OM s bg
Dial number Concealed
al
sbg
Concealed
Starting a call with a set number (MSN)
at
OMs s bg
Dial number MSN MSN-1 ...
MSN-10
Extended redialing
In the extended redialing the numbers of the last 20 calls, connections (conversations) and text messages
are stored. You can view these by pressing the redial button or the arrow buttons and subsequently have
them redialed automatically.
aWWO bg
Select entry
Automatic redialing
If you placed a call to a subscriber whose numberis busy or who does not answer, you can then activate au-
tomatic redialing which will call that same subscriber again after about 10 seconds.
btg
Wor sa
Dial number Subscriber
busy
Autom.repeat
request
Deactivating automatic redialing
ass
Autom.repeat request Yes
Activating/ muting the microphone
gsRoom enquiry sg
Mute speak
English
13

Speaker function
gLL g
Begin open listening End open listening
Hands Free Calling
aLtL
Begin hands free calling Dial number End hands free calling
Headset use
For headset operation, one of the functions buttons must be configured as a headset key. The LED assigned
to this key indicates, whether the headset in switched on or off (LED on or off).
aztg
z
activate headset Dial number Call via headset deactivate headset
Message
aMs>s
tg
Acou
stic Message Dial internal
number message
Intercom
aMs>s
tg
Acou
stic Inter-
com Dial internal
number intercom
Automatic completion of call
btg
sa
Dial number Subscriber busy or
does not answer
Clbckbusy
Keypad
gst
Keypad Input of character strings and digit
sequences
Tone Frequency Dialing (DTMF dialing)
gst
dtmf Input of character strings and digit
sequences
Conducting calls with several parties
Call waiting
gwaiting call
(subscribers 2) sg
Call with subscriber 1 accept Call with subscriber 2;
Party 1 is put on hold
English
14
Enquiry Call
gRtg
Call with subscriber Party 1 is put on hold Dial number Call with subscriber 2
Call transfer (switching)
gRtg
s
Call with subscriber 1 Party 1 is put on hold Dial number Call with subscriber 2 transfer
Broker’s call
g>s g>s g
Call with sub-
scriber
Connection 1
...
Connection 4
Call with desi-
red subscriber
Connection 1
...
Connection 4
Call with desi-
red subscriber
Three-party conference
g>s gsd
Call with subscriber
1
Connection 2 Call with subscriber
2
Conferen-
ce Conference with
subscribers 1 and 2
Telephone operation
Telephone directory
You can store up to 250 names and numbers in the telephone directory. To select a name, you can page
through the directory using the arrow buttons, or enter the specific first letter(s) of the name using the
push-button set.
If the name of the caller is to be shown in the display instead of the caller’s number, this number
mustbeentered inthetelephonedirectory with thatname(includingprefixand, whenused witha
PABX, the line access digit).
Display of the caller name is only made when the transmitted number corresponds to the number
stored in the phone directory.
Ifthetelephoneisdisconnected fromtheISDN networkand thenreconnected, or ifthe data forthe telepho-
ne directory are transferred to the system telephone via the PC program, the directory must be reorganized
internally. This process takes place automatically and may require a few minutes. During this time, the te-
lephone directory of your telephone is not available for use.
Settings for telephone book entries
•Name and number
•Outgoing number(MSN assignment)
•Special dial (VIP tone) tone
•Info text
English
15

Adding an entry to the telephone book
Begin as follows:
aMsss
Program nos. Tel. drctry New
tEnter the name.
In this example: »Dean«.
Confirm your entry by pressing O.
Input telephone book
Name>Dean_
¬¬¬¬¬¬¬¬¬¬¬¬¬¬¬¬¬¬¬¬¬¬
tInsert a number.
In this example: »0123456«.
Confirm your entry by pressing O.
Input telephone book
Number>0123456_
¬¬¬¬¬¬¬¬¬¬¬¬¬¬¬¬¬¬¬¬¬¬
VIP Memory
Youcan programVIP numbersfor eachof theten buttons1 … 0includinganame (20characters max. )and
a telephone number (26 digits max.).
Making an entry into the VIP memory
Begin as follows:
aM s s s <> O
Program nos. VIP New Select VIP
destination
tEnter the name of the VIP target. In this ex-
ample: »Dean«.
Confirm your entry by pressing OK.
Program VIP name
V0>Dean_
¬¬¬¬¬¬¬¬¬¬¬¬¬¬¬¬¬¬¬¬¬¬
tInsert a number.
In this example: »012345«.
Confirm your entry by pressing OK.
Program VIP number
V0>012345_
¬¬¬¬¬¬¬¬¬¬¬¬¬¬¬¬¬¬¬¬¬¬
Station guarding
Ifyou do not wishcalls to besignaled withthe programmed melodyand volume, youcanactive the »Station
guarding« feature. Dependingon the specific setting,all calls will bedisplayed optically or along witha brief
acoustic signal. In the idle state an »q«or»Q« in the display shows that the function »Station guarding« is
activated.
»No« Thefunction»Stationguarding«isdeactivated.
»Ringing
signal off«
Callsaresignaledopticallyonly(»Q«showninthedisplay).
»ok« Calls are signaled first by a brief acoustic signal and then only optically displayed
(»q«).
English
16
Other manuals for CS410
1
This manual suits for next models
3
Table of contents
Languages:
Other elmeg Telephone manuals

elmeg
elmeg C300 User manual

elmeg
elmeg C46e Operating and installation instructions

elmeg
elmeg C300 User manual

elmeg
elmeg CS290 User manual

elmeg
elmeg IP290 User manual

elmeg
elmeg CS410 User manual

elmeg
elmeg CS290 User manual

elmeg
elmeg DECT 300 User manual

elmeg
elmeg C310 User manual

elmeg
elmeg IP120 Installation manual


