elmeg CS410 User manual

Operating instructions elmeg CS410 / CS410-U
1
G:\_elmeg\CS410\V1\uk\mn\uk-410-mn-10x1.vp
Mittwoch, 11. Juni 2003 15:05:39
Farbprofil: Generic CMYK printer profile - None
Komposit Standardbildschirm

2
G:\_elmeg\CS410\V1\uk\mn\uk-410-mn-10x1.vp
Mittwoch, 11. Juni 2003 15:05:39
Farbprofil: Generic CMYK printer profile - None
Komposit Standardbildschirm

Table of contents
Description and Installation . . . . . . . . . . . . . . . . . . 1
Safety notes . . . . . . . . . . . . . . . . . . . . . . . . . . . . . . . . . . . . . . 2
Unpacking and placing the telephone . . . . . . . . . . . . . . . . . . . . . . . . . . 3
Connecting the telephone (ISDN and handset cords) . . . . . . . . . . . . . . . . . . 4
Connecting an configuring a headset (not included). . . . . . . . . . . . . . . . . . . 5
Connecting the telephone to a PC . . . . . . . . . . . . . . . . . . . . . . . . . . . 6
Changing the label panel . . . . . . . . . . . . . . . . . . . . . . . . . . . . . . . . 7
Pictographs . . . . . . . . . . . . . . . . . . . . . . . . . . . . . . . . . . . . . . . 8
Setting the language of the display . . . . . . . . . . . . . . . . . . . . . . . . . . . 8
Telephone display and buttons . . . . . . . . . . . . . . . . . . . . . . . . . . . . . 9
Function and LEDs . . . . . . . . . . . . . . . . . . . . . . . . . . . . . . . . . . 12
Displays for programmed features . . . . . . . . . . . . . . . . . . . . . . . . . . . 13
Making Calls. . . . . . . . . . . . . . . . . . . . . . . . . . 14
Starting a call . . . . . . . . . . . . . . . . . . . . . . . . . . . . . . . . . . . . . 14
Accepting/rejecting a call . . . . . . . . . . . . . . . . . . . . . . . . . . . . . . . 16
Forwarding a call (call deflection). . . . . . . . . . . . . . . . . . . . . . . . . . . . 16
Calling line identification (anonymus call) restriction . . . . . . . . . . . . . . . . . . 17
Starting a call with a set number (MSN) . . . . . . . . . . . . . . . . . . . . . . . . 17
Redialing. . . . . . . . . . . . . . . . . . . . . . . . . . . . . . . . . . . . . . . . 17
Microphone activation/deactivation, open listening and hands-free calling . . . . . . . 20
Headset use . . . . . . . . . . . . . . . . . . . . . . . . . . . . . . . . . . . . . . 21
Message. . . . . . . . . . . . . . . . . . . . . . . . . . . . . . . . . . . . . . . . 21
Intercom . . . . . . . . . . . . . . . . . . . . . . . . . . . . . . . . . . . . . . . . 22
Automatic completion of call. . . . . . . . . . . . . . . . . . . . . . . . . . . . . . 23
Parking . . . . . . . . . . . . . . . . . . . . . . . . . . . . . . . . . . . . . . . . 24
Malicious call identification (MCID) . . . . . . . . . . . . . . . . . . . . . . . . . . . 25
Keypad and tone frequency dialing (dtmf dialing) . . . . . . . . . . . . . . . . . . . 26
Conducting calls with several parties . . . . . . . . . . . . 27
Call waiting . . . . . . . . . . . . . . . . . . . . . . . . . . . . . . . . . . . . . . 27
Table of contents I
3
G:\_elmeg\CS410\V1\uk\mn\uk-410-mn-10x1.vp
Mittwoch, 11. Juni 2003 15:05:39
Farbprofil: Generic CMYK printer profile - None
Komposit Standardbildschirm

Enquiry Call . . . . . . . . . . . . . . . . . . . . . . . . . . . . . . . . . . . . . . 27
Call transfer (switching) . . . . . . . . . . . . . . . . . . . . . . . . . . . . . . . . 27
Broker’s call . . . . . . . . . . . . . . . . . . . . . . . . . . . . . . . . . . . . . . 28
Three-party conference . . . . . . . . . . . . . . . . . . . . . . . . . . . . . . . . 28
Telephone operation . . . . . . . . . . . . . . . . . . . . . 29
Telephone directory . . . . . . . . . . . . . . . . . . . . . . . . . . . . . . . . . . 29
VIP Memory . . . . . . . . . . . . . . . . . . . . . . . . . . . . . . . . . . . . . . 32
Caller and memo list . . . . . . . . . . . . . . . . . . . . . . . . . . . . . . . . . 33
SMS and UUS1 text messages . . . . . . . . . . . . . . . . . . . . . . . . . . . . 37
Station guarding . . . . . . . . . . . . . . . . . . . . . . . . . . . . . . . . . . . . 42
Setting up cost monitoring . . . . . . . . . . . . . . . . . . 43
Viewing and deleting costs . . . . . . . . . . . . . . . . . . . . . . . . . . . . . . 43
Setting the tariff factor and the currency . . . . . . . . . . . . . . . . . . . . . . . . 44
Programming a charge limitation for a specific extension number . . . . . . . . . . . 45
Enabling or inhibiting an extension number (MSN) for outgoing calls . . . . . . . . . . 45
Displays during a call and charge information . . . . . . . . . . . . . . . . . . . . . 46
System telephony . . . . . . . . . . . . . . . . . . . . . . . 49
Function keys . . . . . . . . . . . . . . . . . . . . . . . . . . . . . . . . . . . . . 49
System menu for pabx systems with system telephony capability . . . . . . . . . . . 54
Configuration settings . . . . . . . . . . . . . . . . . . . . 55
Telephone numbers (MSN extension numbers) . . . . . . . . . . . . . . . . . . . . 55
Telephone PIN (password). . . . . . . . . . . . . . . . . . . . . . . . . . . . . . . 57
Protecting access to the telephone menus by a PIN . . . . . . . . . . . . . . . . . . 58
Parking code (default setting) . . . . . . . . . . . . . . . . . . . . . . . . . . . . . 59
Programming the telephone name. . . . . . . . . . . . . . . . . . . . . . . . . . . 59
Number for the SMS center . . . . . . . . . . . . . . . . . . . . . . . . . . . . . . 59
Volume settings . . . . . . . . . . . . . . . . . . . . . . . . 61
Speaker volume setting . . . . . . . . . . . . . . . . . . . . . . . . . . . . . . . . 61
Setting the volume of the handset . . . . . . . . . . . . . . . . . . . . . . . . . . . 61
Acknowledgement signals . . . . . . . . . . . . . . . . . . . . . . . . . . . . . . . 62
II Table of contents
4
G:\_elmeg\CS410\V1\uk\mn\uk-410-mn-10x1.vp
Mittwoch, 11. Juni 2003 15:05:40
Farbprofil: Generic CMYK printer profile - None
Komposit Standardbildschirm

Setting the volume of the »Station guarding« tone . . . . . . . . . . . . . . . . . . . 63
Call waiting tone . . . . . . . . . . . . . . . . . . . . . . . . . . . . . . . . . . . . 63
Setting the headset type. . . . . . . . . . . . . . . . . . . . . . . . . . . . . . . . 64
Volume setting for appointment reminders . . . . . . . . . . . . . . . . . . . . . . 64
Possible audio output features . . . . . . . . . . . . . . . . . . . . . . . . . . . . 65
Further settings . . . . . . . . . . . . . . . . . . . . . . . . 66
Call forwarding (call rerouting) . . . . . . . . . . . . . . . . . . . . . . . . . . . . . 66
Call waiting feature . . . . . . . . . . . . . . . . . . . . . . . . . . . . . . . . . . 67
Direct call . . . . . . . . . . . . . . . . . . . . . . . . . . . . . . . . . . . . . . . 68
Appointment reminders . . . . . . . . . . . . . . . . . . . . . . . . . . . . . . . . 70
Setting the display contrast . . . . . . . . . . . . . . . . . . . . . . . . . . . . . . 71
Auto-answer. . . . . . . . . . . . . . . . . . . . . . . . . . . . . . . . . . . . . . 71
Automatic headset use . . . . . . . . . . . . . . . . . . . . . . . . . . . . . . . . 71
Call filter . . . . . . . . . . . . . . . . . . . . . . . . . . . . . . . . . . . . . . . . 72
Setting the time . . . . . . . . . . . . . . . . . . . . . . . . . . . . . . . . . . . . 73
Extended configuration . . . . . . . . . . . . . . . . . . . . 74
Settings for an MSN extension number . . . . . . . . . . . . . . . . . . . . . . . . 74
Connected to a pabx . . . . . . . . . . . . . . . . . . . . . . . . . . . . . . . . . 75
Dial ranges. . . . . . . . . . . . . . . . . . . . . . . . . . . . . . . . . . . . . . . 75
Setting the User Interface . . . . . . . . . . . . . . . . . . . . . . . . . . . . . . . 76
Programming function keys . . . . . . . . . . . . . . . . . . . . . . . . . . . . . . 76
Service functions . . . . . . . . . . . . . . . . . . . . . . . 80
Reading the telephone’s firmware version . . . . . . . . . . . . . . . . . . . . . . . 80
Country-specific settings . . . . . . . . . . . . . . . . . . . . . . . . . . . . . . . 80
Downloading a new firmware . . . . . . . . . . . . . . . . . . . . . . . . . . . . . 81
Telephone BIOS . . . . . . . . . . . . . . . . . . . . . . . . . . . . . . . . . . . . 83
Reset - Resetting to default state . . . . . . . . . . . . . . . . . . . . . . . . . . . 84
Telephone and PC . . . . . . . . . . . . . . . . . . . . . . 85
CTI / TAPI using the telephone’s USB port . . . . . . . . . . . . . . . . . . . . . . 85
CAPI using the telephone’s USB port . . . . . . . . . . . . . . . . . . . . . . . . . 85
Audio applications using the telephone’s audio sockets. . . . . . . . . . . . . . . . 86
Table of contents III
5
G:\_elmeg\CS410\V1\uk\mn\uk-410-mn-10x1.vp
Mittwoch, 11. Juni 2003 15:05:40
Farbprofil: Generic CMYK printer profile - None
Komposit Standardbildschirm

Contents of the WIN-Tools CD-ROM . . . . . . . . . . . . . . . . . . . . . . . . . 86
Installing the programs from CD-ROM . . . . . . . . . . . . . . . . . . . . . . . . . 87
Appendix . . . . . . . . . . . . . . . . . . . . . . . . . . . 89
Declaration of conformity and CE mark . . . . . . . . . . . . . . . . . . . . . . . . 89
Default telephone settings . . . . . . . . . . . . . . . . . . . . . . . . . . . . . . . 89
Telephone menus . . . . . . . . . . . . . . . . . . . . . . . . . . . . . . . . . . . 91
Technical specifications . . . . . . . . . . . . . . . . . . . 95
Index. . . . . . . . . . . . . . . . . . . . . . . . . . . . . . 97
Brief description of functions
Warranty Declaration
IV Table of contents
6
G:\_elmeg\CS410\V1\uk\mn\uk-410-mn-10x1.vp
Mittwoch, 11. Juni 2003 15:05:40
Farbprofil: Generic CMYK printer profile - None
Komposit Standardbildschirm

Description and Installation
You can connect the ISDN system telephone at the internal ISDN connection of an elmeg
pabx system (S0 or Up0). The ISDN telephone is connected to the ISDN network through an
ISDN jack (Western or RJ.45).
The ISDN telephone provides system features when connected to certain elmeg PABX sys-
tems. For example:
•Dialing from the pabx telephone directory
•Sending and receiving SMS messages
•Messaging and intercom calls with other system telephones connected to the pabx.
•Function keys for controlling special pabx features (switching call modes, team
log-in/off, line buttons, extension buttons).
The status of the programmed features can be displayed by means of LEDs assigned
to the specific function keys.
•Accessing the PABX system menu. This menu provides further pabx features.
The internal ISDN connection of the PABX systems automatically interfaces with the system
telephone. Please refer to the operating instructions of your PABX to determine whether the-
se typical system features are provided with the various system telephones.
CS410
This system telephone is designed for connection to an internal S0-port (4 wires) of an elmeg
pabx system. If you wish to connect the telephone to an internal Up0-port, be sure to install
the internal Up0/S0-module into the telephone or use the external Up0/S0-converter.
CS410-U
This system telephone is designed for connection to an internal Up0-port (2 wires) of an el-
meg pabx system. The internal Up0/S0-module or the external Up0/S0- converter are then
no longer required.
Setting up/ Configuring the system telephone
On the system telephone itself you can only carry out a limited configuration of the supported
features. You can only perform a complete configuration of the system telephone with the
Professional Configurator supplied with the WIN-Tools CD-ROM via the internal ISDN port of
an elmeg pabx system (starting from firmware version 5.40, CD version 5.43 and higher,
WIN-Tools Telephones from Version 3.30) or via the telephone’s USB-port.
System telephone extension modules
Your telephone is equipped with two slots for connecting optional modules and a dedicated
interface for an additional »T400« keyboard.
•Up0/S0-module (CS410 only)
You can install the Up0/S0 module in your telephone to connect it at a Up0 port of an
elmeg PABX system. The external Up0/S0- converter is then no longer required.
•Answering machine module
This module provides your telephone with a multi-function digital answering machine.
Description and Installation 1
7
G:\_elmeg\CS410\V1\uk\mn\uk-410-mn-10x1.vp
Mittwoch, 11. Juni 2003 15:05:41
Farbprofil: Generic CMYK printer profile - None
Komposit Standardbildschirm

For example: Separate programming for each MSN extension number, time control
feature for voice announcement related to specific MSN extension numbers, automa-
tic message forwarding with newly recorded calls, recording of dictations, logging of
calls, remote polling protected by PIN
A special key and LED are provided for operation of the answering machine.
•Additional keypad »T400«
This additional keypad has 20 buttons with an inset LED, which can be used on two le-
vels as function buttons. The LED is assigned to the first level. Another two LEDs are
provided for indicating additional information.
Up to three additional keypads can be connected (cascaded) to your telephone. A
plug-in power supply is required if you use more than one additional keypad. Use only
the approved power supply units available as accessory.
(Plug-in power supply unit T400 / Ident-Number: 220872.5
Plug-in power supply unit T400-UK / Ident-Nummer: 220873.3)
Safety notes
•Storage temperature: -25°C ... +70°C.
•Operating temperature: +5°C ... +40°C.
Only connect the telephone when the permissible ambient operating temperature has
been reached.
Please note that condensation on or in the telephone may occur when moving
from cold to warm surroundings. Only remove the telephone from the package
when the permissible ambient operating temperature has been reached.
•You should not make calls or connect or disconnect any lines during thunderstorms.
•Only attach the connecting cords at the connections provided.
•Make sure phone cables are installed in a safe manner to prevent tripping.
•Avoid the following:
Direct sunlight
Sources of heat (for example radiators)
Electronic devices (for example stereo components, office equipment or microwave
devices
Ingress of moisture or liquids
Aggressive fluids or vapors
Dusty environments
•Do not use the phone in excessively humid rooms or hazardous locations.
•Never open the telephone, or accessories, yourself.
•Do not touch plug connectors with pointed, metal, or moist objects.
•Place the phone or accessories on a non-skid surface.
•When required, clean the telephone with a slightly moistened cloth.
•Only use approved accessories.
2 Description and Installation
8
G:\_elmeg\CS410\V1\uk\mn\uk-410-mn-10x1.vp
Mittwoch, 11. Juni 2003 15:05:41
Farbprofil: Generic CMYK printer profile - None
Komposit Standardbildschirm

Elektrostatic charges
The telephone is supplied with enhanced ESD protection against the effects of electrostatic
discharge that exceeds the protection level cited in the approval specification. Elevated ESD
levels should nevertheless be avoided to the greatest possible extent. In some cases, elec-
trostatic discharge levels can far exceed the approval limits or the resistance levels already
implemented in your telephones. Eliminate the causes or conditions that promote these ele-
vated ESD levels, such as insufficient humidity or carpeting. The telephone manufacturer
does not assume any liability for damage caused under such circumstances.
Unpacking and placing the telephone
Unpacking
•ISDN system telephone
•Handset with handset connecting cord
•2 feet
•ISDN connecting cord (approx.6 m)
•PC connecting cable (USB, approx. 3m)
•PC-audio cable (3.5 mm stereo plug, approx. 2.5m)
•Adapter cord for headsets with 4-pin connection cable (8-pin / 4-pin)
•Cord holder (self-adhesive after removing the film)
•Operating instructions and labels for function keys
Supplement with telephone safety instructions
•WIN-Tools CD-ROM with:
Professional Configurator, telephone, Download and Sound Manager,
TAPI-, USB-, CAPI- and NDISWAN-drivers, Adobe Acrobat Reader,
Operating instructions and Adobe Acrobat file for the printing of individual labels
Placing the telephone
Before placing the telephone, mount the rear feet at the positions (6) shown in figure 1.
Please note that the plastic feet of your ISDN system telephone may leave marks on sensitive
surfaces, such as furniture. The manufacturer of the ISDN system telephone is not liable for
any such damage. Therefore, use appropriate non-skidding pads under the phone.
Cleaning the telephone
The ISDN system telephone has been manufactured for normal, everyday use. When requi-
red, clean the ISDN system telephone with a slightly moistened cloth, or with an anti-static
cloth. Never use a solvent to clean the phone! Never use a dry cloth. Electrostatic charges
could damage the electronics in the system. It is essential that no liquids penetrate into the
inside of the ISDN system telephone, as this could destroy the phone.
Description and Installation 3
9
G:\_elmeg\CS410\V1\uk\mn\uk-410-mn-10x1.vp
Mittwoch, 11. Juni 2003 15:05:41
Farbprofil: Generic CMYK printer profile - None
Komposit Standardbildschirm

Connecting the telephone (ISDN and handset cords)
Please connect the ISDN cable and the handset cable. Otherwise you will not be able to ope-
rate the phone.
Connecting the handset connecting cord
Connect the handset cord (1) as shown in figure 1. Lay the handset cord in the cord groove
(4) and lock it below the two cord retainers (5).
Connecting the ISDN cord
Connection to the S0 (CS410)
Connect the ISDN cord (2) as shown in figure 1 (S0-connector). Ensure that the longer ISDN
connector is plugged into the ISDN socket and the shorter ISDN connector into the ISDN so-
cket on the telephone. Then lay the ISDN cord in the cord groove (4) and lock it below the two
cord retainers (5).
Connection to the Up0 (CS410 with Up0/S0-module or CS410-U)
Connect the ISDN cable (2) as shown in figure 2 (Up0-socket). Ensure that the longer ISDN
connector is plugged into the ISDN outlet and the shorter ISDN connector into the ISDN so-
cket on the telephone. Then lay the ISDN cord in the cord groove (4) and lock it below the two
cord retainers (5).
CS410 telephones equipped with a Up0/S0 module or CS410-U phones may not
be connected through the S0-socket (3) to the ISDN connection (e.g. internal
ISDN port of the PABX) .
4 Description and Installation
1
23
4
4
45
5
66
7
Figure 1
10
G:\_elmeg\CS410\V1\uk\mn\uk-410-mn-10x1.vp
Mittwoch, 11. Juni 2003 15:05:49
Farbprofil: Generic CMYK printer profile - None
Komposit Standardbildschirm

Important notes for connecting the telephone to the Up0
•You can connect a further ISDN device with an S0 port (for example an ISDN card or a
another telephone) at the S0 socket (3) of the telephone. For each additional ISDN de-
vice this connection provides a power of 1 watt.
•If you connect an internal ISDN bus (for example for a telephone in a neighboring
room) at the S0 socket (3), this ISDN bus must be equipped with terminating resistors .
For more information on installation procedures please refer to the Assembly instruc-
tions for your PABX.
Connecting an configuring a headset (not included)
You can connect a headset to your telephone. Ask your dealer which headset models can be
used or retrieve the required information from the Internet at http://www.elmeg.com.
The telephone is equipped with an 8-pin socket for connecting a headset. Headsets with a
DSHG-interface (e.g. cordless DECT-headsets) can be connected to the telephone right
away. Special accessories are not required for this. Use the adapter cord included in the sco-
pe of supply for connecting standard headsets (4-pin connection cable, e.g. U10PS).
You can not connect / install the optional Answering Machine module and a head-
set with a DSHG port simultaneously to/in a system. You can only use one of these
two options at your phone at any one time.
Connecting a headset
Connect the headset as shown in figure 1on page 4 to the telephone’s dedicated headset
socket. Then lay the headset cord (3) in the cord groove (4) and lock it below the cord retai-
ners (5).
If the headset cord does not fit in the cord guide, attach the self-adhesive cord holder supp-
Description and Installation 5
2
3
1
Figure 2
11
G:\_elmeg\CS410\V1\uk\mn\uk-410-mn-10x1.vp
Mittwoch, 11. Juni 2003 15:05:55
Farbprofil: Generic CMYK printer profile - None
Komposit Standardbildschirm

lied with the system to the bottom of your telephone (7). Then, route the headset cord under
the cord holder.
Headset socket assignments
8 - DSHG-transmitter
7 - V+ (3.3V)
6 - Microphone - (Ground)
5 - Handset (3.3V, switchable via resistor)
4 - Handset (Ground)
3 - Microphone +
2 - Ground (Ground)
1 - DSHG-receiver
Further settings when using a headset
You can use the handset or the headset for making calls. With headset operation, the follo-
wing settings are required or possible:
•When configuring your telephone, program one of the function keys for headset ope-
ration (headset button, see page 51).
•You can use the headset connected to your system automatically for certain actions
on the phone (see page 71).
•If a special support feature is stored in your telephone for the headset your are using,
set your phone for that headset model.
For example, the LED in the microphone extension for »Firefly F142 N« from Plantro-
nics can be activated by the telephone.
•If you would like to use the auto-answer feature with your headset, set the time after
which a call is answered (see page 71). When configuring your telephone, you should
program a function key to be used for activating or deactivating the auto-answer fea-
ture.
Connecting the telephone to a PC
Connecting the PC connection cord (USB)
Use the USB cord supplied with the system to connect the telephone to the PC, or
to the hub. If you use a different USB cord, ensure that the distance between the
telephone and the PC, or between the telephone and the hub, does not exceed
five meters, depending on the type of cord you are using.
Connect the USB cord (4) as shown in figure 4 (PC-socket). Plug the USB connector (type A)
into the corresponding socket of your PC and the USB connector (type B) into the USB so-
cket on the back of the telephone (1). The telephone is automatically detected by the PC,
provided that both devices (telephone and PC) are switched on.
6 Description and Installation
8
6
4
2
7
5
3
1
Figure 3
12
G:\_elmeg\CS410\V1\uk\mn\uk-410-mn-10x1.vp
Mittwoch, 11. Juni 2003 15:06:01
Farbprofil: Generic CMYK printer profile - None
Komposit Standardbildschirm

Installation of a device driver is started automatically when initially connecting the
telephone to a PC. Insert the WIN-Tools CD-ROM supplied with the telephone
and follow the instructions displayed on the screen.
You will need a hub (USB distributor) if you plan to use several USB terminal devices at your
PC. Connect the hub to the USB port of the PC. You can then connect other USB terminal
devices, including the telephone to the hub.
Connecting the audio sockets (Audio in / Audio out)
The telephone is equipped with an input (2) and an output (3) for audio signals. Both these
ports have a 3.5 mm stereo jack. When using the optional answering machine module, you
can connect the telephone via these ports to the PC sound card in order to upload announ-
cements into the phone or save recorded messages on the PC.
You can also use specific telephone features with the Audio-Out output (see page 64). Con-
nect the speakers (5) with a 3.5 mm stereo jack to the telephone’s Audio-Out (3) output, as
shown in figure 4.
Changing the label panel
The label panels for the function keys are included on a separate sheet enclosed in the opera-
ting instructions. Cut out the label you wish to use .
To change the label panel, press the flexible cover together between your index finger and
thumb and lift it out. The label panel can now be changed.
You can fill in the label for your telephone with your own information and then print it out using
the Professional Configurator. Also available on the WIN-Tools CD-ROM is an Adobe Acro-
bat file containing templates that you can also fill in and print out.
Description and Installation 7
1
2 3
4 5
Figure 4
13
G:\_elmeg\CS410\V1\uk\mn\uk-410-mn-10x1.vp
Mittwoch, 11. Juni 2003 15:06:08
Farbprofil: Generic CMYK printer profile - None
Komposit Standardbildschirm

Pictographs
The pictographs (symbols) described as follows have been used in these operating instruc-
tions to illustrate some procedures for setting and using the telephone.
bLift up the handset or start initializing selection.
aReplace handset. The telephone is idle.
lA call is signaled. The ringing tone melody sounds.
gYou are conducting a call.
dA three-party conference call is initiated.
qYou hear the positive or negative acknowledgement signal.
tSelect the number, code, character or text.
09
*#
Press the appropriate button on the push-button set.
Setting the language of the display
You can select the language of your display.
Begin as follows:
aM s s s
Configuration Display Language
<>
s
Press the arrow buttons to view the available
languages.
Press the softkey adjacent to the desired
language. The display switches to the changed
language immediately.
ˆ Which language? }
ˆItaliano Español
ˆDeutsch English
ˆFrançaise Nederland
8 Description and Installation
14
G:\_elmeg\CS410\V1\uk\mn\uk-410-mn-10x1.vp
Mittwoch, 11. Juni 2003 15:06:08
Farbprofil: Generic CMYK printer profile - None
Komposit Standardbildschirm
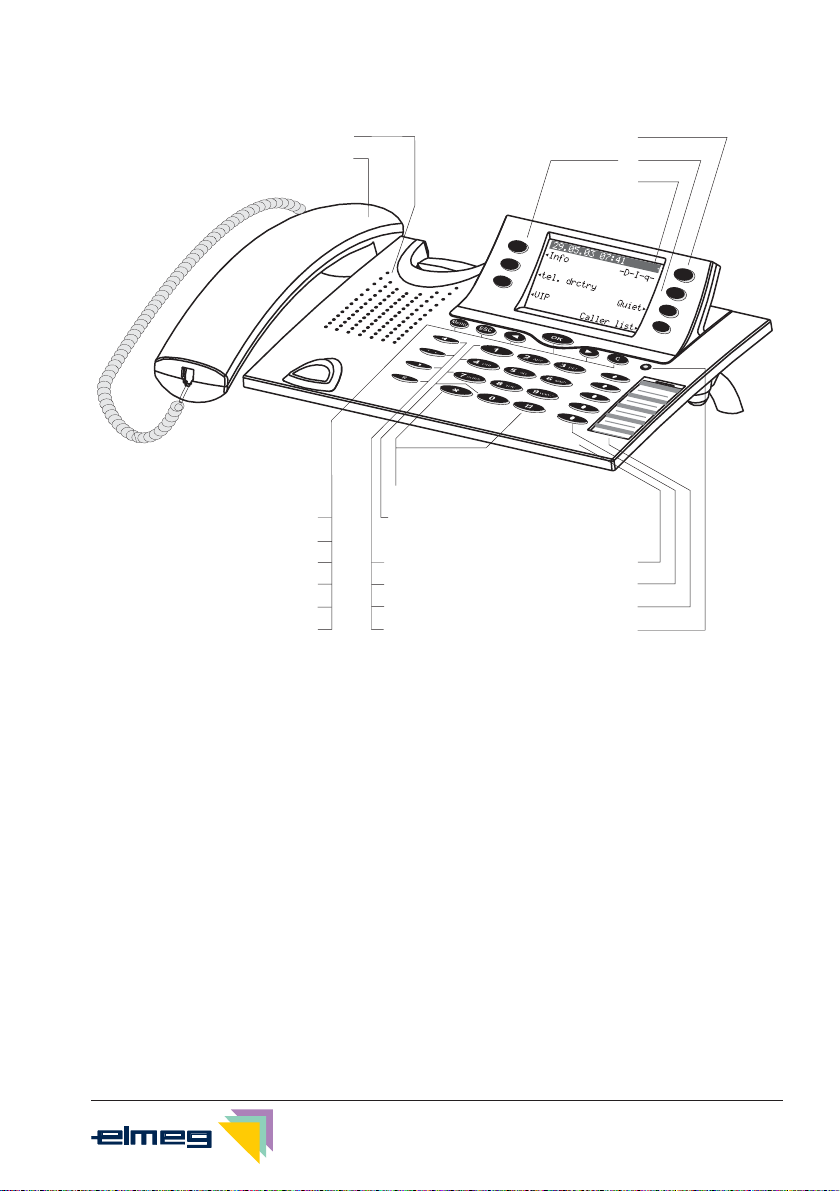
Telephone display and buttons
1 Speaker
2 Handset with connecting cord
3 Answering machine button on the telephone (optional module)
4 6 Softkeys
5 Seven-line backlit display
6 Menukey:This key openstheprogrammingmenu. Ifyou arealreadylocatedin a
menu and then press the key, either menu-specific functions are shown, or you
are moved back one programming step.
7 ESC key: Pressing the Esc button during programming returns the telephone to
its idle status.
8 / 10 Arrow button »To the left« / »To the right«: The arrows »{« and »}« in the right cor-
ner on the top line of the display indicate that you can call up further functions on
the lower lines using the arrow buttons.
9 OK key: Pressing this button confirms an entry or stores a setting in the telepho-
ne.
Description and Installation 9
3
4
5
12
13
14
15
16
17
6
7
8
9
10
11
18
19
20
21
1
2
Figure 5
15
G:\_elmeg\CS410\V1\uk\mn\uk-410-mn-10x1.vp
Mittwoch, 11. Juni 2003 15:06:16
Farbprofil: Generic CMYK printer profile - None
Komposit Standardbildschirm
11 Ckey: Press this buttonto move back one menu step in the menu. If you are cur-
rently in the input mode, this button can be used to delete individual characters.
12 Asterisk key/ hash key
13 Dial buttons
14 Open listening / hands-free button
15 Ending a call
16 Redial button
17 Enquiry button
18 Microphone
19 Five programmable function keys with LED: Each button has an inset two-color
LED (level 1 - red / level 2 - yellow). These LEDs can be used to indicate certain
functions.
20 Label panel for function keys
21 Call signaling (red) and answering machine (yellow) LED
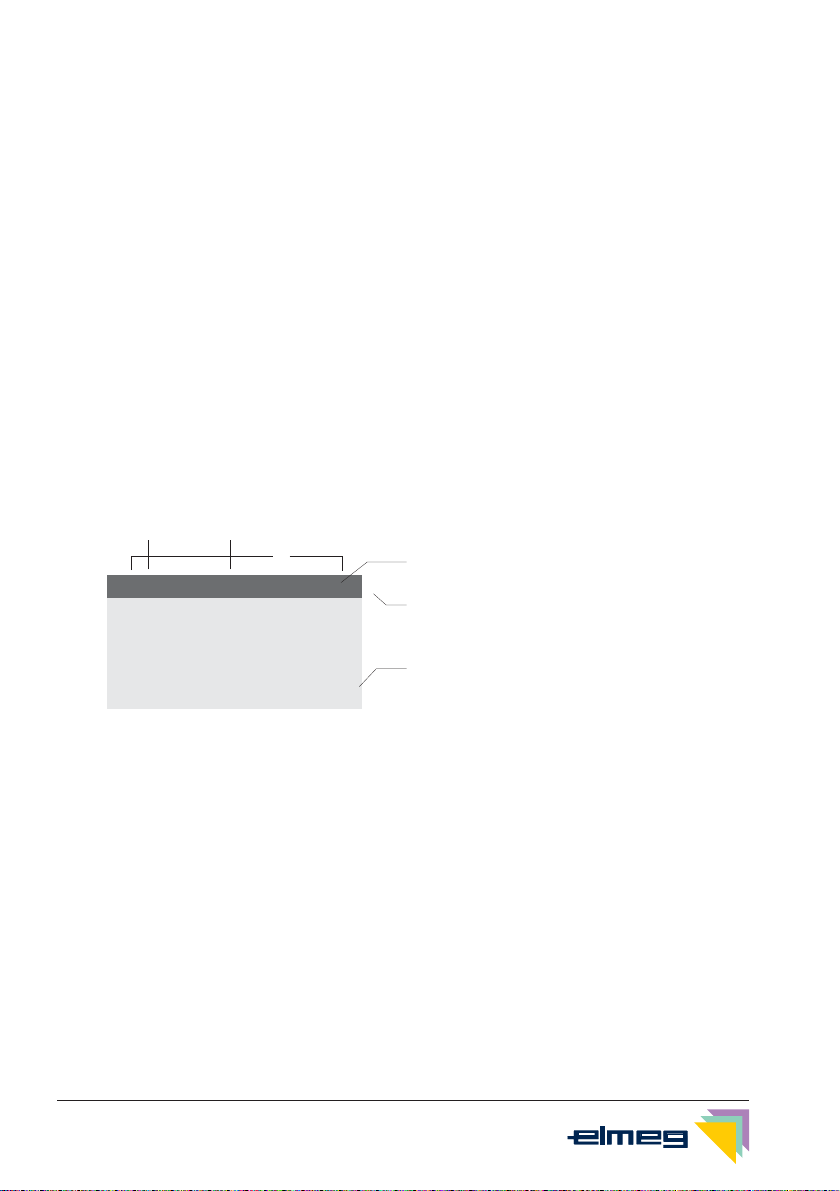
Telephone display
1 Date
2 Time
3 21 characters per line
4 Arrow: Further menu items ac-
cessible by using the arrow
keys.
5 Answering machine button on
the telephone (optional module)
6 Arrow: Indication of the softkey
that can be used in the current
menu.
The telephone is equipped with a seven-line backlit display. Backlighting is automatically
switched on or off.
After you connect the system to the internal ISDN connection of your pabx system, the date
and time are shown on the top line of the display. The date and time are imported automati-
cally from the pabx system. The text displayed for a function is always located next to the cor-
responding softkey. When you press the softkey, the next level is displayed. If not all informa-
tion fit into the screen, this will be indicated by »««or»««. To view further characters, press
the R key and then use the corresponding arrow key.
Various telephone display shots are illustrated in this operator’s manual to help explain the
different settings and use of the system. A wavy line at the top or bottom of an illustration indi-
cates that not all of the 7 lines of that particular display are shown (only pertinent lines shown).
10 Description and Installation
¡ Info -D-I-q-
¡ Tel. drctry
Quiet ¨
¡ VIP
Caller list ¨
29.05.03 07:41 }
4
6
3
1 2
S
S
S
S
S
S
S
5
Figure 6
16
G:\_elmeg\CS410\V1\uk\mn\uk-410-mn-10x1.vp
Mittwoch, 11. Juni 2003 15:06:22
Farbprofil: Generic CMYK printer profile - None
Komposit Standardbildschirm

Special feature for displaying lists in the display
Several entries are shown in the display as a list for certain settings or when using the phone.
These lists are required for telephone directory or VIP memory programmings for example.
<> The active entry (the one you have selected) is
highlighted. Use the menu or the OK button to
display further features or select the high-
lighted entry.
ˆVIP digit to select{}
ˆ
ˆV0:···········0123456
ˆV1:TONY··········
ˆV2:
¬¬¬¬¬¬¬¬¬¬¬¬¬¬¬¬¬¬¬¬¬¬
Special feature for changing existing entries
You have various options available for changing existing entries (for example names or num-
bers).
Example 1:
You may want to change the telephone number of an entry, because that subscriber has mo-
ved to another place.
When you use the push-button set to enter the first digit of the new number the existing num-
ber is deleted completely. Enter the other digits of the new number.
Example 2:
You wish to change parts of a name in a telephone directory listing, because the name has
changed (e. g. in the case of marriage).
Use the arrow buttons to specify the storage position for that entry. You can overwrite an exi-
sting surname right away or delete it with the C-button and then enter the new name.
Use the buttons as follows when entering texts, letters digits or special
characters:
Key Press
12345 6 7
11
2A B C 2 Ä Å Æ
3
DEF3 €
4G H I 4
5J K L 5
6M N O 6 Ö Ø
7P Q R S 7 ß $
8T U V 8 Ü
9W X Y Z 9 ¥
Description and Installation 11
17
G:\_elmeg\CS410\V1\uk\mn\uk-410-mn-10x1.vp
Mittwoch, 11. Juni 2003 15:06:22
Farbprofil: Generic CMYK printer profile - None
Komposit Standardbildschirm

Key Press
12345 6 7
**
##
0Several special characters are assigned to the button »0«. For special
characters, press the 0key.
For exampe.: »!«, »&«, »?«, »+«, »-«, »=«, »(«, »)«, »@«, »$«, ...
Input mode for entering letters
You have various possibilities for entering letters. The currently set input mode is displayed
on the top half of the display on the right-hand side (no display, »Abc« or »ABC«).
»Abc« The next letter that you enter is shown as a capital, all others as small case
letters. Example: »Dean, James«.
no display Every letter that you enter is shown in small case.
Example: »dean, james«.
»ABC« Every letter that you enter is shown as capitals.
Example: »DEAN, JAMES«.
When you start entering texts, the input mode is always »Abc«. Press the R key to
change the input mode. To insert a character while in »Abc« mode, press the C
key.
Call signaling
Call signaling is effected using the ringing tone that has been set for the dialed number (MSN)
in each telephone.
If you are using the telephone at an internal ISDN connection of certain elmeg PABX systems,
you can program each MSN extension number with special ringing melodies for internal and
external calls.
Function and LEDs
You can program the five function keys on two levels with different functions via the PC confi-
guration program for the telephone. Each key is equipped with an LED that is used to display
the active function. Each color is assigned to a particular level for the function key (level 1 - red
/ level 2 - yellow).
Press the key two times to reach the second level for the function keys. This must be done at
a short interval.
LED for call signaling and answering machine
flashes red: Incoming calls
lit yellow: Answering machine switched on
flashes yellow: New messages recorded by the answering machine
12 Description and Installation
18
G:\_elmeg\CS410\V1\uk\mn\uk-410-mn-10x1.vp
Mittwoch, 11. Juni 2003 15:06:22
Farbprofil: Generic CMYK printer profile - None
Komposit Standardbildschirm
Acknowledegement signals
Entries or settings you make at your telephone are sometimes confirmed by acknowledge-
ment signals.
Positive acknowledgement signal (1 long tone):
The positive acknowledgement signal indicates that your input has been accepted and sto-
red by the telephone.
Negative acknowledgement signal. (3 short tones):
You will hear the negative acknowledgement signal when your input has not been accepted
by the telephone, or when invalid input has been made.
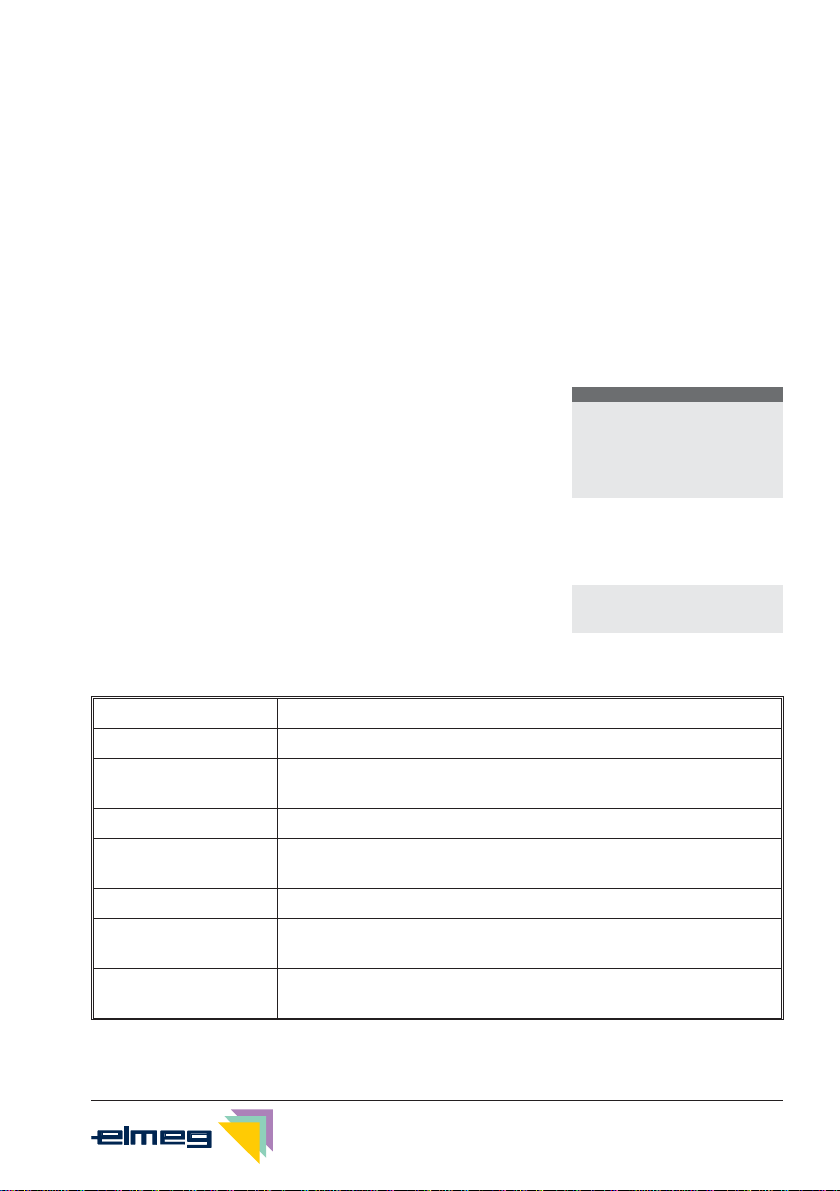
Displays for programmed features
s
When the telephone is in the idle state, additio-
nal information about functions that have been
configured are shown on »Info« line of the
display. In this example: »-D-S-q-«.
Press the softkey next to »Info« if you wish to
get more information about the configured
functions.
ˆ29.05.03 07:21 }
ˆInfo -D-S-q-
ˆ
ˆTel. drctry Quiet
ˆVIP Caller list
<> If you have programmed several features,
press the arrow buttons to view the various
settings.
ªªªªªªªªªªªªªªªªªªªªªª
ˆInhibit/Menu:
ˆGuard for modificatio
¬¬¬¬¬¬¬¬¬¬¬¬¬¬¬¬¬¬¬¬¬¬
Display Configured function
»D« Active appointment reminder set.
»I« Dial ranges or call filter active,
Access to telephone menus is protected.
»q« Function »Station guarding« (only brief signal) active.
»Q« Function »Station guarding« (complete) active.
(All call signals are switched off)
»U« Call forwarding active.
»i« Information about programmed function keys
For example: Message enabled / inhibited.
»×« Answering machine, time control, call forwarding signaling or re-
mote control are activated (optional module).
Description and Installation 13
19
G:\_elmeg\CS410\V1\uk\mn\uk-410-mn-10x1.vp
Mittwoch, 11. Juni 2003 15:06:23
Farbprofil: Generic CMYK printer profile - None
Komposit Standardbildschirm

Making Calls
Starting a call
Dial number - no correction possible
b t g
Dial number
Dial number - correction possible
a t b g
Dial number
To change the number or to correct a wrong entry, select the wrong figure with the arrow
buttons and press C key to delete it. Now enter the correct number.
If you wish to conduct the call using the handset, just lift it up after dialing the number. Any
time during a call you can switch back and forth between hands-free calling, speaker functi-
on and use of the handset.
After you have dialed the number you can also press the speaker button to have the number
dialed and to use hands-free calling.
If a call can not be put through (e.g. number is inhibited via the dial ranges control, or the ac-
count for the number/MSN is empty), a corresponding message will appear in the display.
For example: »Inhibit. : ext. number«, when the dial range filter is active.
Other options for dialing without lifting the handset
The option of dialing without lifting the handset and of correcting or adding to a number also
exists during dialing:
•from the redialing memory (see page 17).
•from the caller/ memo list (see page 33).
•from the telephone directory (see page 29).
•from the VIP memory (see page 32).
•from the direct dialing memory (see page 15).
•via CTI (TAPI) features (see page 85).
If you are using one of these options, you can make further entries prior to initiating the call.
You can define which number (MSN), if any, is to be transmitted to the party being called.
Dialing from the pabx telephone directory
When you use this telephone with a system telephony supporting pabx system, you can dial
from the telephone directory of the pabx.
14 Making telephone calls Kommunikationstechnik
20
G:\_elmeg\CS410\V1\uk\mn\uk-410-mn-10x1.vp
Mittwoch, 11. Juni 2003 15:06:23
Farbprofil: Generic CMYK printer profile - None
Komposit Standardbildschirm
Other manuals for CS410
1
This manual suits for next models
1
Table of contents
Other elmeg Telephone manuals

elmeg
elmeg IP120 Installation manual

elmeg
elmeg IP290 User manual

elmeg
elmeg C310 User manual

elmeg
elmeg DECT 300 User manual

elmeg
elmeg C300 User manual

elmeg
elmeg C46e Operating and installation instructions

elmeg
elmeg C300 User manual

elmeg
elmeg CS290 User manual

elmeg
elmeg CS410 User manual

elmeg
elmeg CS290 User manual


