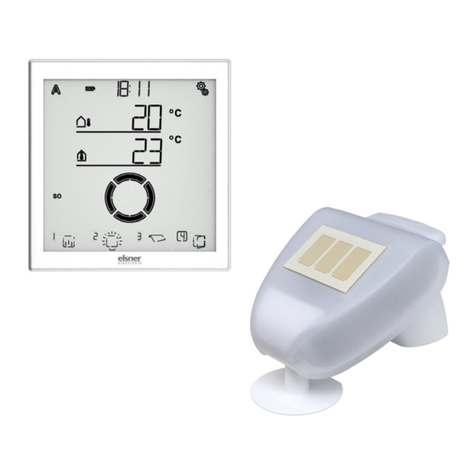
elsner elektronik Arexa User manual

Window Control
Arexa
Installation and Operation

Description............................................................................................. 3
Scope of supply ................................................................................................................................... 3
Commissioning procedure ................................................................................................................. 3
Options for connection and control ................................................................................................... 3
Overview of available automatic functions.......................................................................................4
Operation ............................................................................................... 5
Key functions and display symbols of the meteorological data display........................................ 5
Display of lightness and wind speed ................................................................................................. 6
Manual operation................................................................................................................................. 7
Setting of automatic .............................................................................. 9
A. Indoor temperature for opening .............................................................................10
B. Outdoor temperature block.....................................................................................11
C. Wind alarm..............................................................................................................11
Table for wind speeds ....................................................................................................................... 12
D. Rain alarm...............................................................................................................13
E. Storage of automatic settings.................................................................................13
Basic settings....................................................................................... 14
1. Radio connection to the weather station ................................................................16
2. Rotational direction of the motor ...........................................................................17
3. Operating direction .................................................................................................18
4. Operating command in case of wind or rain alarm .................................................19
5. Sending of meteorological and automatic data ......................................................20
6. Opening position.....................................................................................................21
6.1. Closed position ........................................................................................................................... 22
6.2. Setting of the desired position .................................................................................................. 22
7. Saving of basic settings..........................................................................................23
Safety instructions for automatic and alarm functions ..............................................23
Installation and Commissioning........................................................... 25
Installation of weather station and connection of drive mechanism .........................26

2
Position ............................................................................................................................................... 26
Attaching the mount.......................................................................................................................... 26
Preparation of the weather station................................................................................................... 28
Connection of voltage supply and drive mechanism..................................................................... 29
Mounting of the weather station...................................................................................................... 30
Details for the installation of the weather station........................................................................... 30
Installation of operating unit ......................................................................................31
Notes on radio installations ........................................................................................31
Commissioning ...........................................................................................................31
Sensor testing.............................................................................................................33
Sun sensor testing............................................................................................................................. 33
Wind sensor testing........................................................................................................................... 33
Rain sensor testing ............................................................................................................................ 33
Temperature sensor testing.............................................................................................................. 33
Service ................................................................................................. 34
Service and maintenance ............................................................................................34
Weather station.................................................................................................................................. 34
Operating unit .................................................................................................................................... 34
Insert batteries (operating unit)........................................................................................................ 34
Error messages .................................................................................................................................. 35
Query service data............................................................................................................................. 37
Factory settings ..........................................................................................................37
Abbreviations..............................................................................................................37
Technical data.............................................................................................................37
Operating unit .................................................................................................................................... 38
Weather station.................................................................................................................................. 38
Connection diagram for weather station......................................................................................... 39
View of rear side and drill hole plan for the weather station ........................................................ 40
View of rear side and drill hole plan for the operating unit........................................................... 41
Connection samples for several drive mechanisms as group ...................................................... 42
Personal setting data of the automatic.......................................................................43
Arexa • from software version operating unit 3.0, Arexa weather station 3.0 •Status: 01/10/2009.
Errors excepted. Subject to technical changes.

3
Description
The Arexa window control system has been developed for the automatic control
of a window (or a group of windows) and for comfortable manual operation. The
control system offers a highest degree of flexibility for installation and setting
and may therefore be adjusted individually to different conditions. Please
anxiously use this instruction manual in order to adjust the automatic function to
your requirements.
Scope of supply
The Arexa window control system consists of weather station and operating
unit. Batteries for the operation of the operating unit are included in the scope of
delivery (2 pcs.).
Commissioning procedure
Installation, inspection, commissioning and troubleshooting
of the control system must only be arried out by a competent
electrician.
Proceed as follows when commissioning the Arexa control system:
1. Installation and connection (see chapter „Installation and commissioning")
2. Basic setting (see chapter „Basic settings“)
3. Setting of the automatic (see chapter „Setting of automatic")
Options for connection and control
A drive mechanism for windows may be connected to the Arexa control system.
If several windows shall be controlled together, the connection via a group
control relay is possible.
The following environmental parameters are measured and displayed:
•Outdoor and indoor temperature
•Lightness
•Wind speed
•Precipitation

4
Arexa may be deployed in the control system XS as control centre and as
transducer. In this case, the control is upgraded with motor control units and
operating units of system XS.
Overview of available automatic functions
•Open when a selectable indoor temperature is reached
•Close and keep closed below a selectable outdoor temperature (outdoor
temperature block)
•Open until a programmable position is reached
•Close when a selectable wind speed is reached (wind alarm, function may
be deactivated)
•Close in case of rain (rain alarm, function may be deactivated)
The window is closed in automatic mode as soon as the value of a set indoor
temperature falls below or in case of rain/wind alarm.
The wind and rain protection functions are also active in manual mode if they
have been set in automatic.

5
Operation
Key functions and display symbols of the meteorological
data display
Automatic
Manual
Battery
Rain alarm
Wind alarm
Manual/
Automatic Up Stop Down Setting
Indoor Temperature
Outdoor Temperature
The basic position of the operating unit of the control system displays the
current outdoor temperature (upper line) and the indoor temperature (lower line)
as well as the function mode (automatic or manual), the battery load and the
current alarm messages for rain or wind. The meteorological data are updated
once per minute (and in case of a keystroke).
Outdoor temperature
Indoor temperature
Battery symbol (indicates the charge status of the battery) - full
- half full
- empty

6
Automatic mode activated
Manual mode activated. The connected drive mechanism was
operated manually (with arrow keys) or key was pressed. Thus,
the automatic functions are deactivated, there is no control in terms
of temperature. The safety functions rain alarm and wind alarm are
still activated. The control is in manual mode until you change to
automatic mode with key.
Rain alarm. The window is closed, manual operation is blocked. The
rain protection function may be turned on and off in the automatic
settings.
Wind alarm. The window is closed, manual operation is blocked.
The wind protection function may be set up or turned off in the
automatic settings.
Display of lightness and wind speed
Press the key during temperature display once for a short moment, and
current lightness (in kilolux, kLux) and wind speed (in meters per second, m/sec)
are displayed. The values are updated every 4 seconds.
Note: During the first approx. 90 seconds after the return of voltage at the
weather station, the wind value is not displayed correctly (e.g. after a power fail
or in case of a first start). Therefore, manual operation is blocked in this period of
time in case of activated wind alarm.
If you press the key again for a short moment, you get back to the
temperature display (or to the central command display, see next chapter). After
approx. 60 seconds, the display switches automatically to the temperature
display.

7
Manual operation
Manual control as well as the presetting of the automatic functions and the basic
setting of the connected shading is accomplished with the keys of the operating
unit.
Up Stop Down
The connected window may be manually operated with the keys , and .
The arrow keys are provided with a time automatic. By short pressing (less than
1 second), the window may be exactly positioned. If the key is pressed more
than 1 second, the drive mechanism moves automatically to the final position. If
you press , the drive mechanism stops.
In case of rain or wind alarm, the manual operation is blocked.
Manual/automatic
Key switches between automatic mode (display ) and manual mode
(display ). After the manual operation with the keys , or , the control
system is in manual mode. The automatic functions then are deactivated, there
is no control in terms of temperature. With key , the control is reset to
automatic (display ).
If the sending of meteorological data and automatic commands has been
activated (see chapter 5 of the basic settings), you additionally obtain the
following display after the manual mode:

8
In order to get to the display, press key twice shortly in automatic mode ( )
and once shortly in manual mode ( ).
As long as the display shows , manual operating commands of this
operating unit are submitted to all drive mechanisms in system XS. During this
display, use the keys , and in order to centrally operate all drive
mechanisms.
With the SET key and by pressing shortly, you access the display of lightness
and wind speed.
By pressing long, you access the setting menu of the automatic and the basic
setting. For this purpose, please read chapters “Setting of automatic” or „Basic
settings“.

9
Setting of automatic
For an optimal aeration, the values for automatic operation must be adjusted to
the local conditions. The following settings are queried one after the other:
A. Indoor temperature for opening
B. Outdoor temperature block
C. Wind alarm
D. Rain alarm
E. Storage
This is how you access the automatic settings:
In meteorological data display, press the key for at least 3
seconds in order to access the automatic setting.
You are in the automatic settings as soon as the symbols and are shown
left in the display. You can see the first parameter (lightness) which must be set.
You are
in the
automatic
etting
+Leave -Confirm/
next

10
You may leave the automatic settings at any time by pressing the key . The
accomplished changes of the values are not saved in this case.
If you do not press any key in the automatic settings for 5 minutes, the display
automatically changes to temperature display. Accomplished settings are not
saved either.
A. Indoor temperature for opening
In the automatic settings, you must indicate at first the lightness from which
shading shall start.
As soon as the value indicated here is exceeded, the automatic opens the
window (unless the blocking value for the outdoor temperature has fallen below,
see next parameter)
The presetting is 25°C.
Adjust the value with (higher) and (lower) or select (off) in order to
switch off the function. You reach the setting by pressing once more
when the display shows “5°C”. If you select , there is no control in terms of
temperature. Therefore, the following automatic parameter (chapter B) is
skipped. The window may be operated manually and the protection against wind
and rain is active (if set accordingly, see chapter "C. Wind alarm” and “D. Rain
alarm”).
Press in order to get to the setting of the next parameter.

11
B. Outdoor temperature block
After the setting of the indoor temperature, now select the maximum outdoor
temperature up to which the window shall remain closed.
The outdoor temperature block keeps the window closed as long as the
temperature is below the selected value. This means that in automatic mode, an
opened window is closed and not opened again if the indoor temperature value
(chapter A) is exceeded. Thus avoids energy losses during ventilation and
protects plants from cold external air.
The presetting for the outdoor temperature block is 5°C.
Adjust the value with (higher) and (lower) or select (off) in order to
switch off the outdoor temperature block. You reach the setting by pressing
once more when the display shows “-20°C”.
Press in order to access the setting of the next parameter.
C. Wind alarm
After the setting of the outdoor temperature block, now provide the value for the
wind protection function.

12
The wind alarm protects the window and furniture and fixtures from damage. If
the indicated wind value is exceeded, the window closes and the manual
operation is blocked.
Wind speed is indicated in m/sec (meters per second). The wind alarm is
maintained for 5 minutes. If the set wind value is exceeded within these 5
minutes, the stop time starts from the beginning.
The following table (see next chapter) serves as indication in order to set the
wind value. Depending on the position of the winter garden and the assembly
position of the weather station, different wind values may be optimal. Observe
the behaviour of the window in case of wind and correct the wind value
accordingly.
The presetting for the retraction in case of wind is 4 m/sec.
Adjust the value with (higher) and (lower) or select (off) in order to
deactivate the function.
Then press in order to access the setting of the next parameter.
Table for wind speeds
Description m/sec km/h Beaufort knots
Calm < 0,3 < 1,1 0 < 1
Almost calm 0,3-1,5 1,1-5,4 1 1-3
Very weak wind 1,6-3,3 5,5-11,9 2 4-6
Weak wind 3,4-5,4 12,0-19,4 3 7-10
Moderate wind 5,5-7,9 19,5-28,4 4 11-16
Fresh wind 8,0-10,7 28,5-38,5 5 17-21
Very fresh wind 10,8-13,8 38,6-49,7 6 22-27
Strong wind 13,9-17,1 49,8-61,5 7 28-33
Very strong wind 17,2-20,7 61,6-74,5 8 34-40
Storm 20,8-24,4 74,6-87,8 9 41-47
Heavy storm 24,5-28,4 87,9-102,2 10 48-55
Gale-force wind 28,5-32,6 102,3-117,3 11 56-63
Hurricane > 32,6 > 117,3 12 > 63

13
D. Rain alarm
After the setting of the wind alarm, now select whether the rain alarm shall be
switched on or off.
The rain alarm protects furniture and fixtures from damage. In case of rain, the
window is automatically retracted and the manual operation is blocked.
The rain message is maintained for 5 minutes. If the system recognises rain
again during these 5 minutes, the stop time starts from the beginning.
In the presetting, the rain alarm is activated (display ). With the arrow keys,
you may select between activated (display ) and deactivated (display ).
Then press in order to get to the storage of the setting.
E. Storage of automatic settings
At the end of the entry of automatic settings, the symbol (save) asks
whether the accomplished setting shall be saved.
Press the key in order to save your entered data and to access the
meteorological data display. With , you quit the automatic settings without
saving.

14
Basic settings
These are the basic settings of the device for the commissioning of the control
system. The following settings are queried one after the other:
1. Radio connection to the weather station
2. Rotational direction of the motor
3. Operating direction
4. Operating command in case of wind or rain alarm
5. Sending of meteorological and automatic data
6. Opening position
7. Save
This is how you access the basic settings:
In meteorological data display, press the key for at least 3
seconds in order to access the automatic setting.
You are in the automatic settings as soon as the symbols and are
indicated left in the display.
Then press again for at least 3 seconds in order to access
the basic settings.
You are in the basic settings as soon as the symbol is indicated left in the
display and as soon as you can see the first setting step (radio connection).

15
You are
in the
ba ic
etting
Change Leave Confirm/
next
You may leave the basic settings at any time by pressing the key . The
accomplished changes are not saved in this case.
If you do not press any key in the basic settings for 5 minutes, the display
automatically changes to temperature display. Accomplished settings are not
saved either.

16
1. Radio connection to the weather station
The first step is the teaching in (or later the deletion) of the radio connection.
The teaching in may only be accomplished by a qualified
person for electronics because the programming key is
inside the weather station.
Select the desired step with the key:
(continue) in order to skip this step,
(learn) in order to teach in a radio connection to the weather station,
(clear) in order to delete an existing radio connection.
Confirm your selection with the key.
As soon as you have confirmed (learn) with the key, the radio symbol
stops flashing and the radio waves are animated (they “run”).
Now press the orange programming key inside the weather station in order to
teach in the radio connection (you can find a diagram of the circuit board in the
chapter "Preparation of the weather station”).
The learning has been successful if the LED next to the programming key shortly
flashes twice and the display skips to step 2 of the basic settings (rotational
direction of the motor).
As soon as you have confirmed (clear) with the key, the radio
connection is deleted. The display automatically skips to (learn) in order to
enable the teaching in of a new connection.

17
2. Rotational direction of the motor
After the teaching in of the radio, you may now set the rotational direction of the
motor.
If the up and down connection cables have been mixed up when connecting the
drive mechanism, this may be corrected in this step. First open the window a
little bit for the rotational direction test. Check both arrow keys and make a
setting in the display, whether the window closes again with or with .
If the window closes ( ,close) with key , then select the display (up) with
the key .
If the window closes ( , close) with key , then select the display (down)
with the key .
Press the key in order to access the next setting step.
Rain and wind alarm are deactivated for this test.

18
3. Operating direction
After the setting of the rotational direction of the motor, now select which key
shall open the window.
In this step, you change the allocation of the arrow keys so that they correspond
with the operating direction of the window. You may directly test the setting
with the arrow keys.
Press the key in order to switch between the displayed symbols. Select
if the window shall open with the key or
if the window shall open with the key .
Press the key in order to access the next setting step.
Rain and wind alarm are deactivated for this test.

19
4. Operating command in case of wind or rain alarm
After the setting of the operating direction, you may now select whether the
operating command in case of wind or rain alarm is temporary or permanent.
After the wind or rain alarm has been activated, the window is closed. The
operating command for the connected drive mechanism either ends after 4
minutes or is permanently maintained as long as the alarm message exists. The
permanent operating command is necessary if Arexa is used as control centre
for wired motor drive units (e. g. IMSG 230) which control several drive
mechanisms.
Press the key in order to switch between the displays Off and On.
Select
if in case of alarm, the operating command shall stop after 4
minutes (setting for conventional window control systems) or
if in case of alarm, the operating command shall be permanently
activated (operating command ends as soon there is no alarm
message anymore).
Press the key in order to access the next setting step.
Table of contents
Other elsner elektronik Remote Control manuals
elsner elektronik
elsner elektronik Solexa II Instruction Manual
elsner elektronik
elsner elektronik Remo KNX RF User manual
elsner elektronik
elsner elektronik Remo KNX Guide

elsner elektronik
elsner elektronik Remo 8 User manual
elsner elektronik
elsner elektronik RF-MSG User manual

elsner elektronik
elsner elektronik Remo 8 User manual
Popular Remote Control manuals by other brands
JVC
JVC KS-RC109 Installation & connection manual
Reflex
Reflex Control Basic operating manual
Radio Shack
Radio Shack 2-in-1 Remote Control owner's manual
Toshiba
Toshiba TCB-SC643TLE installation manual

Rinnai
Rinnai CNTRLDRCIPW Operation and installation manual

iSmartHome
iSmartHome id smart box instruction manual
