Emerald Planet EP-HW-240-R1 User manual

EMERALD PLANET HEAD OFFICE - SYDNEY Unit 2 / 29 Mitchell Road, Brookvale NSW 2100 Australia P02 9466 6000
SMOKE ALARM
USER MANUAL
POWER: AC220~240V 50Hz with 9V battery backup
BATTERY LIFETIME: 12 months
OPERATION CURRENT: <100mA
ALARM VOLUME: > 85dB(A) at 3 meters
ALARM SENSITIVITY: 0.09~0.15dB/m
HUSH/SILENCE TIME: approx. 8 minutes
INTERCONNECTION: up to 12 smoke alarms, hardwired
COMPLIES WITH: AS3786:2014
SOUND PATTERN: ISO8201(BI 0.5s - pause 0.5s - BI 0.5s - pause 0.5s - BI 0.5s - pause 1.5s, with
the RED LED flash, repeat this alarm pattern)
DESCRIPTION
This unit uses a photoelectric smoke detection
chamber. Photoelectric technology is more
sensitive to detecting slow smoldering fires which
generate thick, black smoke, a little heat and may
smolder for hours before bursting into flames.
Unlike previous ionizing alarms, this smoke alarm
does not contain radioactive material and is
harmless to the environment.
Emerald Planet recommends that smoke alarms
be installed in every room (except bathrooms
and kitchens), and every other area of the home,
making sure all people in the home will be able to
hear and respond to the alarm when activated.
Each state of Australia has its own legislation
regarding smoke alarm requirements. Please refer
to the following websites to check your states
current installation requirements.
NSW
fire.nsw.gov.au/page.php?id=80
QLD
www.qfes.qld.gov.au/community-safety/smokealarms
SA
mfs.sa.gov.au/site/community_safety/home_fire_and_life_
safety_information_sheets_domestic/smoke_alarms_what_
you_need_to_know.jsp
WA
dfes.wa.gov.au/safetyinformation/fire/fireinthehome/
FireintheHomeManualsGuidelines/DFES_FireintheHome-
SmokeAlarm-Legislative-Requirements-LAWS.pdf
TAS
tfseducation.com.au/resources/publications
ACT
esa.act.gov.au/community-information/home-fire-safety/
smoke-alarms/
NT
https://nt.gov.au/emergency/community-safety/
fire-safety-at-home/smoke-alarms
MODEL NUMBER: EP-HW-240-R1
Thank you for choosing this smoke alarm.
Please take a few minutes to read the user’s
manual thoroughly and familiarise yourself and
your family with its operation, and save it for
future reference.
This unit has been designed to meet the latest
safety standards demanded in Australia and
complies with the requirements of AS3786:2014.
EMERALD PLANET HEAD OFFICE - SYDNEY Unit 2 / 29 Mitchell Road, Brookvale NSW 2100 Australia P02 9466 6000
DIAGRAM 2
IMPORTANT SAFETY INFORMATION
1: The test button accurately tests the smoke alarm functions.
Do not use any other test method. Test smoke alarms weekly
to ensure proper operation.
2: If you’re sure it isn’t a real alarm, open windows or fan the air
around the smoke alarm device to silence it
3: Observe and follow all local and national electrical and
building codes for proper installation.
4: This smoke alarm is powered by AC 220~240V mains
voltage. The smoke alarm should only be installed by
a licensed, qualified electrician. Observe and follow all
local and national electrical and building codes to ensure
compliant installation.
5: This smoke alarm is not suited for connection to non-pure
sinusoidal power sources (e.g. derived from square-wave
invertors). If installing on off grid premises, please check the
supply is suitable.
6: Smoke alarms can only activate when they detect smoke
or detect combustion particles in the air. They do not sense
heat, flames, or gas. This smoke alarm is designed to give
audible warning of a developing fire. However, many fires
are fast - burning, explosive, or intentional, and others
are caused by carelessness or safety hazards. In these
circumstances, there may be insufficient smoke to activate
the alarm QUICKLY ENOUGH to ensure safe escape.
7: Smoke alarms have limitations. This smoke alarm is not
foolproof and is not warranted to protect lives or property
from fire. Smoke alarms are not a substitute for insurance.
Homeowners and renters should insure their lives and
property. In addition, it is possible for the smoke alarm to fail
at any time. For this reason, you must test the smoke alarm
weekly and replace unit every 10 years.
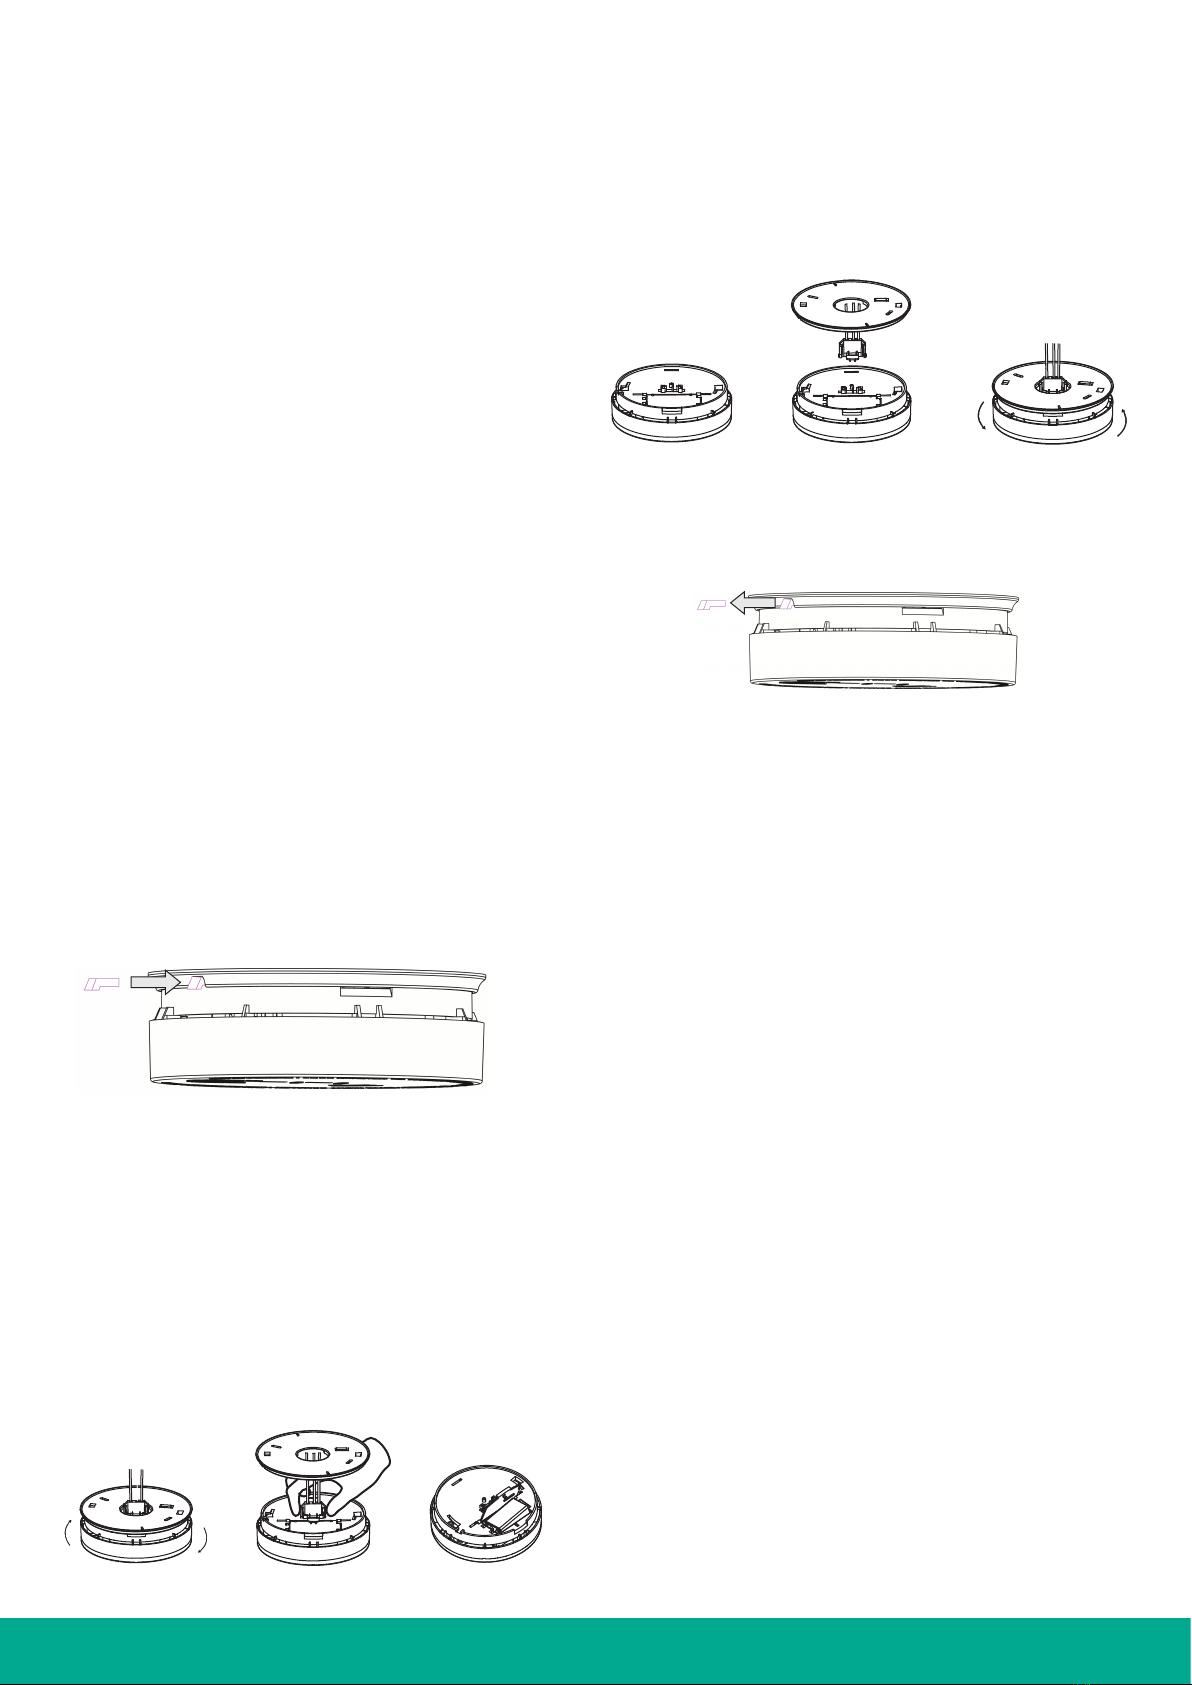
BATTERY REPLACEMENT
1. Remove the locking plug from between the bracket and the
base of the smoke alarm if fitted. (See Diagram 1)
2. Remove the alarm body from the bracket.
3. Squeeze the locking arms on the sides of the AC Quick
connector while pulling the connector away from the bottom
of the alarm.
4. After alarm has been removed, you can open the battery
cover and replace with a new battery. (See Diagram 2)
5. Close the battery cover.
6. Plug the AC QUICK CONNECTOR into the back of the alarm,
making sure that the locks on the connector snap into place.
The green LED will illuminate.
7. Fit the alarm body back onto the bracket and turn the alarm
body clockwise (See Diagram 3).
8. Insert the locking plug into the gap between the bracket and
the base of the smoke alarm if desired. (See Diagram 4).
Test the smoke alarm by pressing and holding the Test button,
the alarm should beep 3 times then release the button.
The unit will now go into Hush/Silence mode for 8 minutes.
During this period, the RED LED will flash once every 8
seconds. After 8 minutes, it will go into normal operating status
and flash once every 32 seconds.
If there’s no sound when the test button is pressed, it
means that the smoke alarm is faulty or it has been installed
incorrectly, please refer to the “Troubleshooting” section.
CAUTION: TEST THE SMOKE ALARM FOR CORRECT
OPERATION USING THE TEST BUTTON WHENEVER THE
BATTERY IS REPLACED.
DO NOT INSTALL SMOKE ALARMS IN THE
FOLLOWING PLACES
1: Near appliances or areas where normal combustion regularly
occurs (kitchens, near furnaces, open fireplaces, hot water
heaters etc.).
2: In areas with high humidity, like bathrooms or areas near
dishwashers or washing machines. Install at least 10 feet
away from these areas.
3: Near air returns or heating and cooling supply vents. Install
at least 3 feet away from these areas. The air could blow
smoke away from the detector, interrupting its alarm.
4: In rooms where temperatures may fall below 5° or rise above
45°, or in humidity higher than 85%. These conditions could
reduce battery life or cause a false alarm.
5: In extremely dusty, dirty, or insect–infested areas influence
particles interfere with smoke alarm device operation.
DIAGRAM 1
DIAGRAM 3
DIAGRAM 4

EMERALD PLANET HEAD OFFICE - SYDNEY Unit 2 / 29 Mitchell Road, Brookvale NSW 2100 Australia P02 9466 6000
OPERATION
TESTING
Test the unit to ensure proper operation by pressing the test
button, this will sound the alarm if the electronic circuitry, horn,
and battery are working. If no alarm sounds, please refer to the
“Troubleshooting” section for solution.
DO NOT USE AN OPEN FLAME TO TEST YOUR ALARM, YOU
COULD DAMAGE THE ALARM OR IGNITE COMBUSTIBLE
MATERIALS AND START A FIRE.
CAUTION: DUE TO THE LOUDNESS (85 DECIBELS) OF THE
ALARM, ALWAYS STAND AT ARMS-LENGTH AWAY FROM
THE UNIT WHEN TESTING. TEST THE ALARM WEEKLY TO
ENSURE PROPER OPERATION. ERRATIC OR LOW SOUND
COMING FROM YOUR ALARM MAY INDICATE A DEFECTIVE
ALARM, PLEASE REFER TO “TROUBLESHOOTING” SECTION
FOR SOLUTION.
NOTE: WEEKLY TESTING IS REQUIRED.
LED INDICATORS
Green LED illuminated: indicates that the alarm is receiving AC
power. This alarm is also equipped with a Red LED indicator,
with two modes of operation.
Red LED-Flashing once every 32 seconds: indicates that the
smoke alarm device is operating properly.
Red LED-Flashing when the test button is pressed, or when the
smoke alarm device senses particles of combustion and goes
into alarm (constant pulsating sound), the red LED will flash
once per second. The flashing LED and pulsating alarm will
continue until the air is cleared or test button is released.
Red LED-Alarm silencer (Hush mode) indication: The red LED
will flash once every 8 seconds, indicating the smoke alarm
device is in the alarm silence (Hush) mode.
Low battery indication - An intermittent “chirp” with red
LED flashes once every 32 seconds: indicates that the smoke
alarm device is low on battery, you may press the test button
to pause the alarm for 10 hours, but it will reset automatically
after 10 hours.
Fault indication - The alarm chirp occurs every 40 seconds.
NOTE: WHEN THE UNIT CHIRPS ONCE EVERY 40 SECONDS,
YOU CAN PRESS THE TEST BUTTON TO TEMPORARILY
PAUSE THIS WARNING TONE FOR 10 HOURS. IT CAN STILL
NORMALLY DETECT SMOKE DURING THIS PERIOD, IT ONLY
REMOVES NUISANCE WARNING TONE. YOU CAN REFER TO
“TROUBLESHOOTING” FOR SOLUTION. IF THERE ARE STILL
FAILURES, YOU MUST REPLACE IT WITH A NEW ALARM AT
ONCE OR CONTACT YOUR RETAILER DURING WARRANTY
PERIOD.
ALARM SILENCE (HUSH MODE)
To silence an alarm, push the test button, it will pause the
alarm for approx. 8 minutes. The red LED will flash once every
8 seconds, it indicates the smoke alarm is running in “silence
mode”. Smoke alarms are designed to minimise nuisance
alarms. Combustion particles from cooking may set off the
alarm if the alarm is located close to the cooking area. Large
quantities of combustible particles are generated from spills or
when grilling/frying. Using the fan on a range hood that vents
to outside (non-recirculating type) will also help remove these
combustible particles from the kitchen. The alarm silence (test
button) is extremely useful in a kitchen area or other areas
prone to nuisance alarms. The silence feature is to be used only
when a known alarm condition, such as smoke from cooking
activates the alarm.
The smoke alarm will automatically reset after approximately
10 minutes, if after this period, particles of combustion are still
present, the alarm will sound again. The alarm silencer (silence
mode) can be repeatedly until the air has been cleared of the
condition causing the alarm.
CAUTION: BEFORE SILENCING THE ALARM IDENTIFY THE
SOURCE OF SMOKE AND ENSURE THERE IS NO RISK OF
FIRE.
NOTE: DENSE SMOKE WILL OVERRIDE THE SILENCE MODE
AND THE ALARM WILL SOUND A CONTINUOUS ALARM
AGAIN.
DANGER: IF THE ALARM SOUNDS, AND IT IS NOT BEING
TESTED, IT MEANS THE UNIT IS DETECTING SMOKE AND
REQUIRES YOUR IMMEDIATE ATTENTION AND ACTION.
MAINTENANCE & CLEANING
The alarm should be cleaned at least once a year.
• To clean your alarm, remove it from its bracket on ceiling,
you can clean it by using compressed air or a vacuum
cleaner hose with a soft brush attachment. Blow or vacuum
around the perimeter of the alarm to remove dust and dirt
and debris. The outside of the alarm can be wiped with a
damp cloth but you should avoid using a wet cloth in order
to avoid water entering the interior of alarm.
• After cleaning, reinstall it and test it by pressing the Test
button. The alarm should be replaced if cleaning can’t
restore the alarm to normal operation.
• This alarm has a low battery monitor which will cause the
alarm to “chirp” approx. every 40 seconds and the red LED
flash once at the same time for a minimum of thirty days
when the battery gets low.
If there is a defective battery or other failures, you can refer
to “Troubleshooting” for solution, or deactivate this alarm
to stop nuisance alarm which is caused by a failure of their
function. If there are still failures during warranty period, you
can return to your retailer.
• Don’t paint the unit. Paint will seal the vents and interfere
with the sensor’s ability to detect smoke.
NOTE:
1. REGULAR WEEKLY TESTING IS RECOMMENDED.
2. ALARMS MUST BE REACTIVATED BEFORE USE IF
THEY ARE DEACTIVATED.
REPLACING THE ALARM
It is recommended this alarm should be replaced ten years
from the date of manufacture. This date has been provided on
the product label which is located on the back of the alarm
IMPORTANT: DO NOT ATTEMPT TO REMOVE THE COVER
TO CLEAN INSIDE. THIS WILL AFFECT WARRANTY.
REPAIR
If the alarm is not operating properly, and is still under
warranty, return it to the original place of purchase.
If the alarm is no longer under warranty, please replace it
immediately with a comparable alarm.
CAUTION: DO NOT ATTEMPT TO REPAIR THE ALARM. IT
WILL AFFECT YOUR WARRANTY.
EMERALD PLANET HEAD OFFICE - SYDNEY Unit 2 / 29 Mitchell Road, Brookvale NSW 2100 Australia P02 9466 6000
PRACTICE FIRE SAFETY
If the alarm sounds, and the test button has not been pressed,
it is warning of a potentially dangerous situation. To prepare for
such occurrences, develop family escape plans, discuss them
with all household members, and practice them regularly.
1: Familiarise everyone with the sound of a smoke alarm and
explain what the sound means.
2: Determine possible exits from each room and an escape
route to the outside from each exit.
3: Educate all household members to touch the door and use
an alternate exit when the door is hot, instruct them not to
open the door if the door is hot.
4: Teach household members to crawl along the floor to stay
below dangerous smoke, fumes and gases.
5: Determine a safe meeting place for all members outside the
building.
WHAT TO DO IN CASE OF FIRE
1: Do not panic, stay calm.
2: Leave the building as quickly as possible. Touch doors to
feel if they are hot before opening them. Use an alternate
exit if necessary. Crawl along the floor, and do stop to
collect anything.
3: Meet at a pre-arranged meeting place outside the building.
4: Call the fire department from outside the building.
5: Do not go back inside a burning building. Wait for the fire
department to arrive.
NOTE: THESE GUIDELINES WILL ASSIST YOU IN THE EVENT
OF A FIRE, ALWAYS FOLLOW THE INSTRUCTIONS OF
FIREFIGHTING PROFESSIONALS.
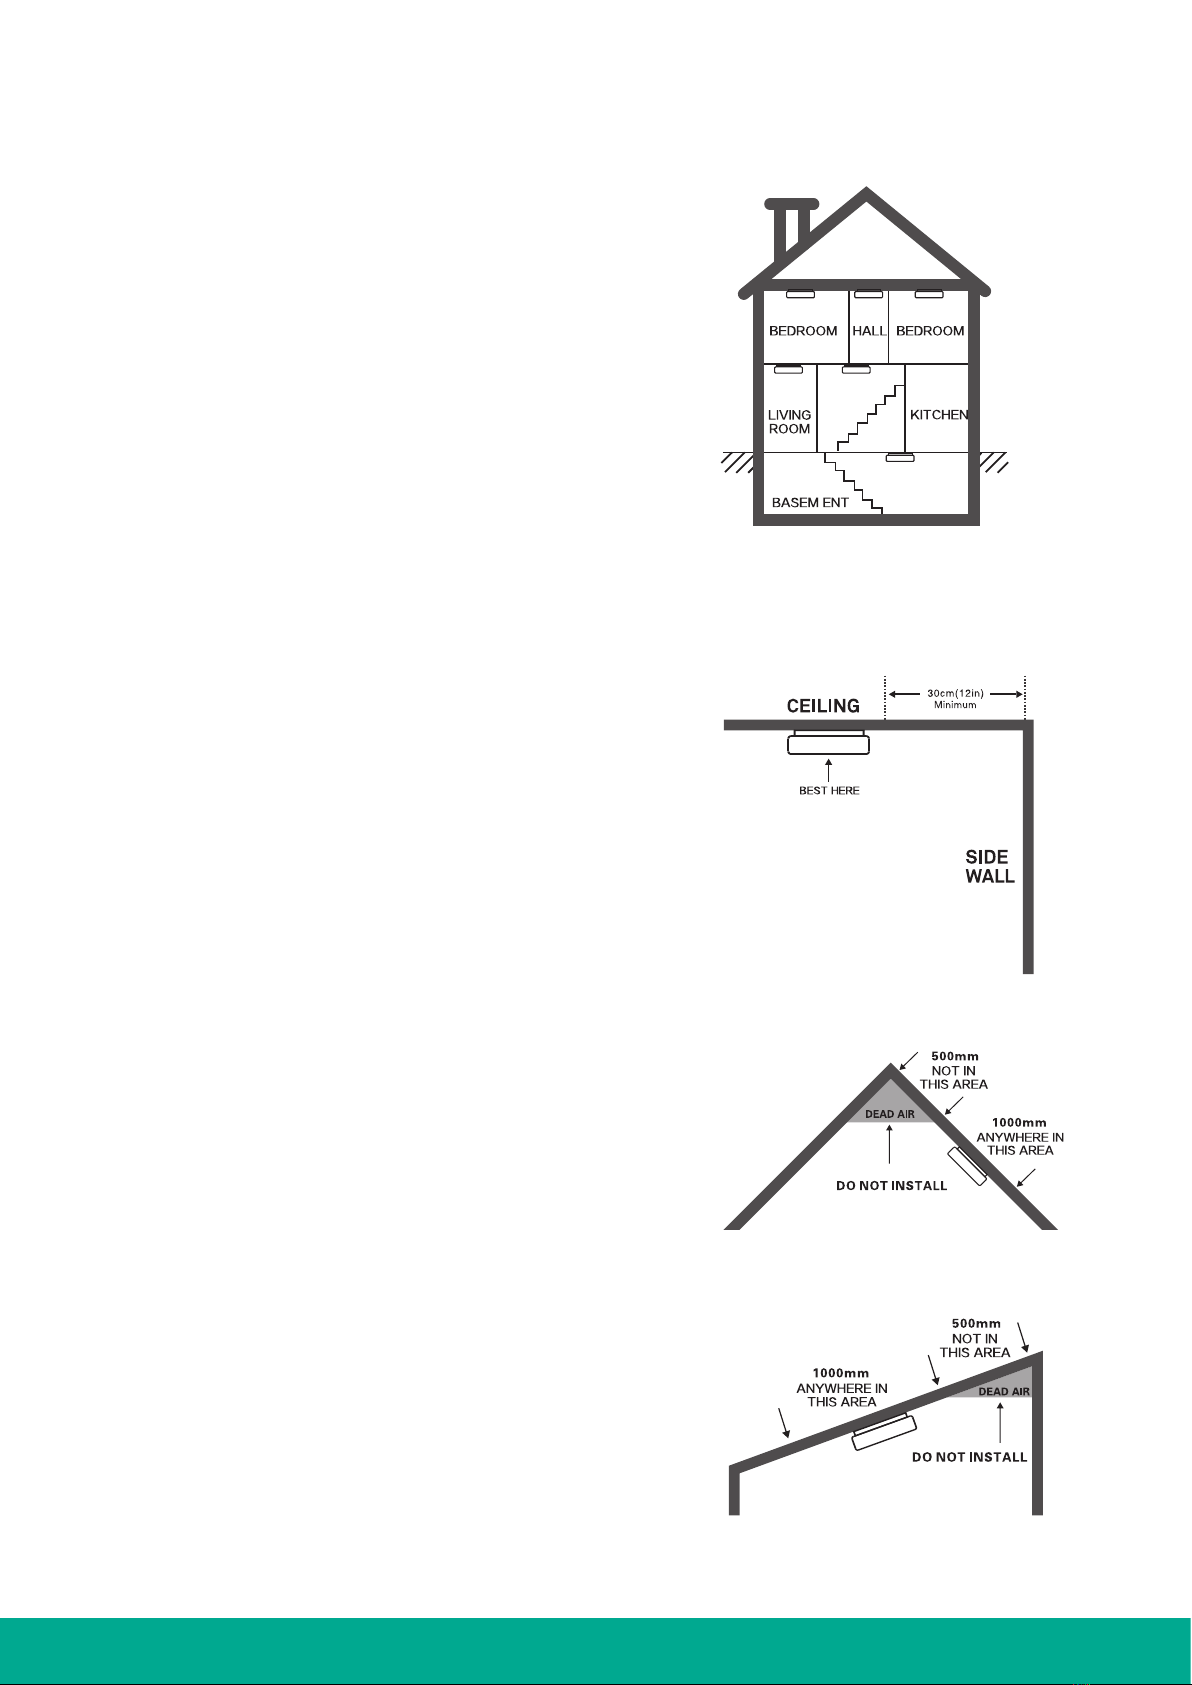
INSTALLATION POSITIONING ADVICE
When mounting an alarm on the ceiling, locate it a minimum
of 30 cm from the side wall (see Diagram 6).
• Put smoke alarms at both ends of a bedroom hallway or
large room if larger than 10m long.
• Install smoke alarms on slopped, peaked or cathedral
ceilings between 500 and 1500mm from the highest point
of the ceiling. Smoke alarms in rooms with ceiling slopes
greater than 1m in 8 m horizontally should be located on
the high side of the room (See Diagram 7)
DIAGRAM 7
PEAK CEILING PLACEMENT
Smoke alarm should be located between
500mm and 1500mm from the highest point.
SLOPED CEILING PLACEMENT
DIAGRAM 5
MULTIPLE FLOOR PLAN
DIAGRAM 6
CEILING PLACEMENT
EMERALD PLANET HEAD OFFICE - SYDNEY Unit 2 / 29 Mitchell Road, Brookvale NSW 2100 Australia P02 9466 6000
INSTALLATION
WIRING INSTRUCTIONS:
• The appropriate power source is 220~240 volt AC single
phase supplied. When installing or removing the smoke
alarm you must turn off the AC power to ensure safety.
• Connecting wires are recommended to use a cross sectional
area from 0.8 mm2 to 1.5 mm2, or according to local wiring
standard.
• The smoke alarm device shall be connected to an ALL-
POLE MAINS SWITCH from a circuit within the household
consumer unit. The ALL-POLE MAINS SWITCH shall have a
contact separation of at least 3 mm in each pole.
• A terminal block should be used to connect the AC
QUICK CONNECTOR to the AC main power supply. The
terminalshould allow the connection of conductors having
nominal cross-sectional areas of between 0.4mm2 and 1.5
mm2. (refer to Diagram 10)
• When alarms are interconnected, all interconnected units
should be powered from a single circuit.
• A maximum of 12 Emerald Planet smoke alarms is
recommended to be interconnected in a multiple station
arrangement, over 12 devices maybe result in overload.
• Diagram 8 illustrates interconnection wiring, inappropriate
connection may result in damage to the alarm, failure to
operate, or a shock hazard.
WIRES CONNECTED TO:
• Brown wire - Live wire of AC line
• Blue wire - Neutral wire of AC line
• White wire - I/O signal as interconnect line with other
smoke alarms in a multiple station set up.
MOUNTING INSTRUCTIONS:
• After selecting the proper location for your smoke alarm,
wiring the AC QUICK CONNECTOR as described in the
Wiring instructions (AC power should be turned off at
this stage).
• Pull the AC QUICK CONNECTOR through the center hole in
the bracket.
• Remove the plastic tab from the battery enclosure.
• Connect the AC QUICK CONNECTOR to the
alarm body.
DIAGRAM 10
INSTALLATION SKETCH MAP
D I A G R A M 11
DIAGRAM 9
LOCKING PLUG
DIAGRAM 8
INTERCONNECTION WIRING
Live wire
Neutral wire
Signal wire
First alarm Additional alarm Additional alarm
white blue brown
Locking Plug

EMERALD PLANET HEAD OFFICE - SYDNEY Unit 2 / 29 Mitchell Road, Brookvale NSW 210 0 Australia P02 9466 6000
PROBLEM TROUBLE SHOOTING
Green LED does not come on when
connected to the power
1. Check the AC QUICK CONNECTOR is properly connected to the smoke alarm.
2. If problem persists, replace the smoke alarm.
Alarm does not sound during testing 1. Ensure Alarm is activated before installation. Refer to “Installation” section.
2. Clean smoke alarm. Refer to “Maintenance & Cleaning” section.
3. Contact supplier for advice
The alarm “chirps” and red LED flashes
every 32 seconds
1. The battery is low. Replace the battery.
The alarm “chirps” every 32 seconds. (no
led Flash)
1. Clean smoke alarm. Refer to “Maintenance & Cleaning” section.
2. Replace smoke alarm if problem persists.
Smoke Alarm sounds unnecessarily. (e.g.
for no apparent reason, while cooking,
when someone is showering etc.)
1. Press the “Test” button to pause the alarm.
2. Clean smoke alarm. Refer to “Maintenance & Cleaning” section.
3. Move smoke alarm to new location if necessary and press the “Test” button.
TROUBLESHOOTING
Table of contents
Other Emerald Planet Smoke Alarm manuals


