Emerald BMW09 User manual

erald Int ons
www.emeraldintegrations.com
Specication & Installation
Model: PIP-BM09-N3-V2
BMW09

-PIP BMW 09 Feature
-
Clear quality view
-
Clear
quality
view
-NTSC, PAL Auto detection
-AV source switching thru genuine button in vehicle.
-Convenient use by remote & keypad
-SAFETY function
Emerald Integrations
www.emeraldintegrations.com

-Precaution
-Ignition key should be taken off before starting installation, interface power
ti tbthltt iitllti
connec
ti
on mus
t
b
e
th
e
l
as
t
s
t
ep
i
n
i
ns
t
a
ll
a
ti
on.
-Power cable should be separated when connecting interface.
-Should be no any electronic devices or magnetic pole around installation place.
All steps of installation should be done by well
trained specialist
-
All
steps
of
installation
should
be
done
by
well
-
trained
specialist
.
-Dismantling without manufacturer’s permission can not be guaranteed, (No
permission to break attached label on the board )
permission
to
break
attached
label
on
the
board
.
)
-Kindly check all parts are in the box, when receiving the product, if anything missing,
inform to the supplier or manufacturer
inform
to
the
supplier
or
manufacturer
.
-According to our sales policy, any problems caused by user’s mistake, careless can
not be guaranteed
not
be
guaranteed
.
Emerald Integrations
www.emeraldintegrations.com

-Main S
p
ec.
1. Input Spec. (MULTI VIDEO INTERFACE)
3A/VI (E lid )
p
-.
3
x
A/V
I
nput
(E
xterna
l
v
id
eo source
)
.
-. 1 x CVBS(REAR CAMERA) Input. (Rear camera source)
-. 1 x Analog RGB Input (Navigation System output)
-. 1 x LCD Input (Car system Input)
2. Output Spec.
-. 1 x LCD Output
3. Power Spec.
- Input Power : 8VDC ~ 24VDC
C ti P 12WATT M
-
C
onsump
ti
on
P
ower :
12WATT
,
M
ax
4. Switch Input mode
- Input Video MUTE Function : Possible to make each input mute by operating Dip S/W.
Piblt ithItdithK d(R t tl)
-
P
oss
ibl
e
t
o sw
it
c
h
I
npu
t
mo
d
e w
ith
K
eypa
d(
or
R
emo
t
e con
t
ro
l)
- Possible to switch AV3(Front camera) with switch for source toggle
- Detecting rear camera by CAN or rear-lamp wire
Emerald Integrations
www.emeraldintegrations.com
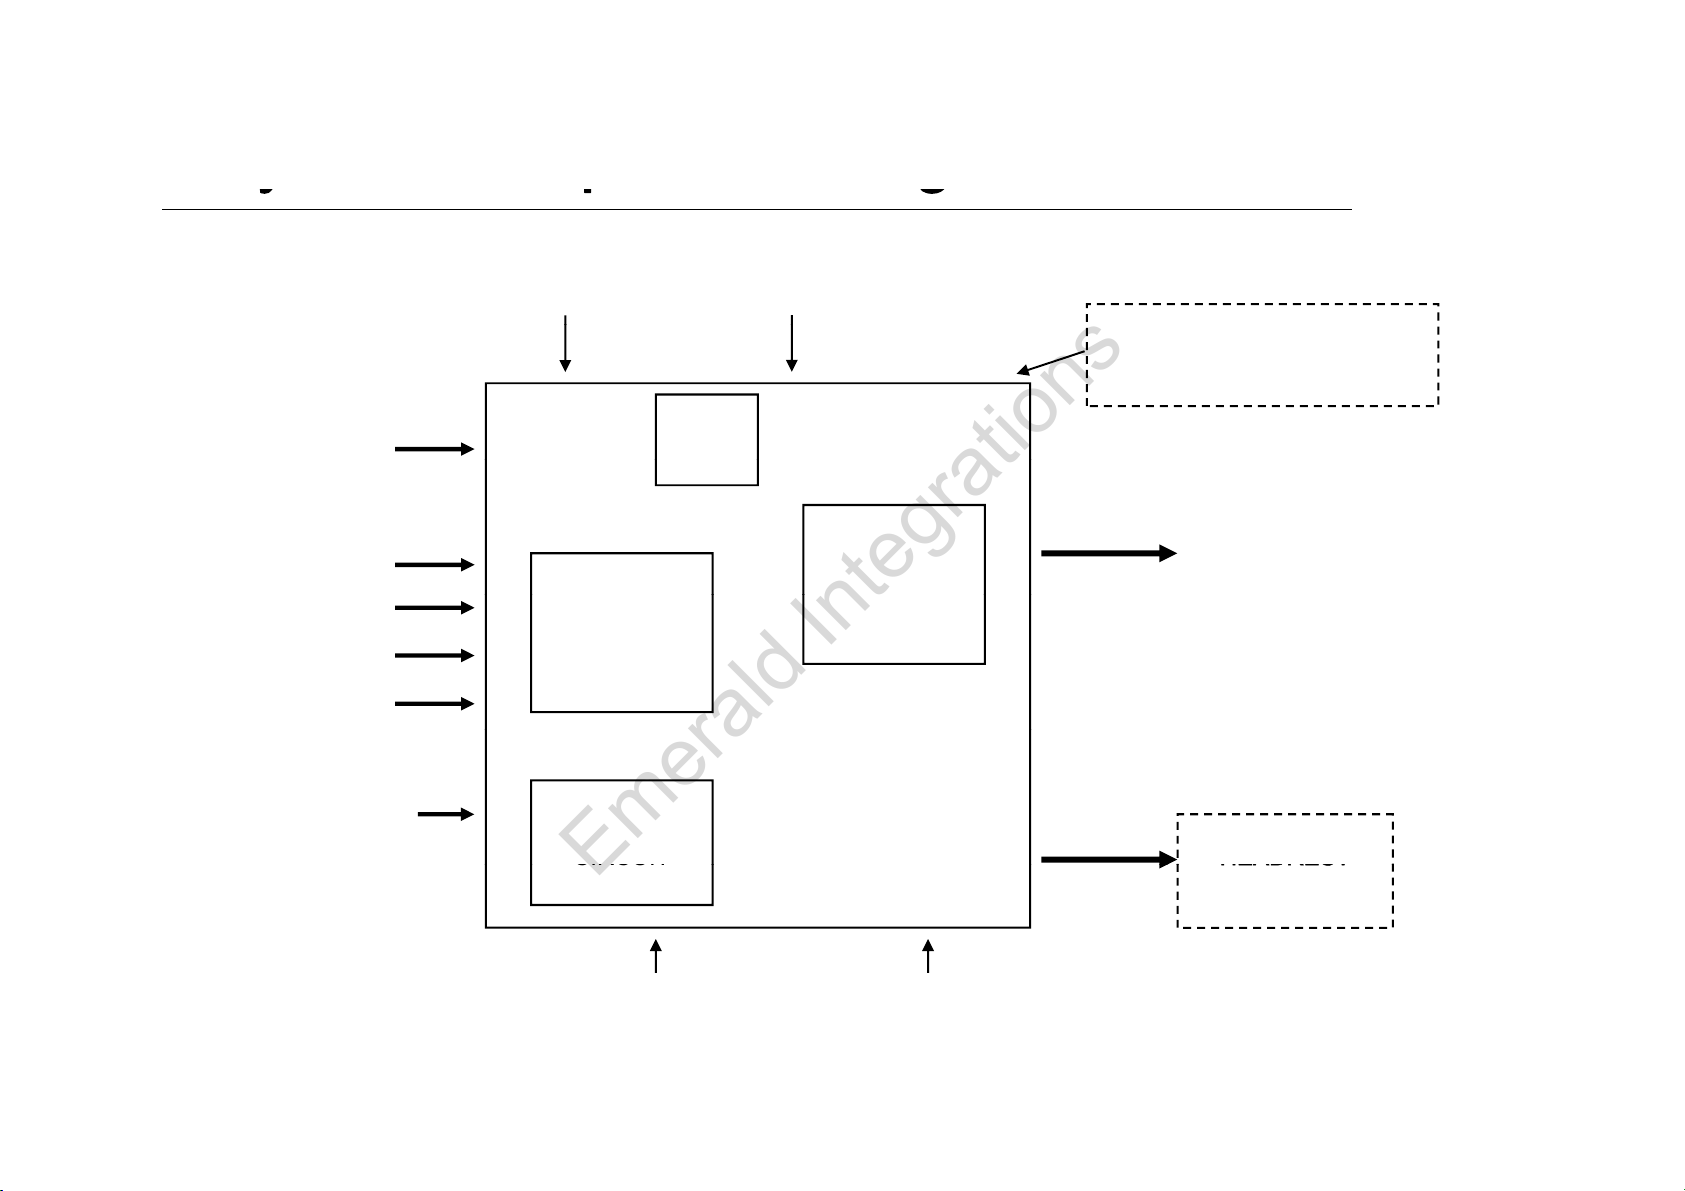
-S
y
stem Com
p
osition Dia
g
ram
Keypad Switch for source toggle
yp g
NAVIGATION Input MCU
OEM Button (Can Intrface)
DISPLAY
A/V 1
(Analog RGB)
VIDEO MUX
Car Installation
OEM LCD
CVBS
(R )
A
/V 2
A/V 3
VIDEO
CIRCUIT
(CAR MAIN BOARD)
(R
ear camera
)
Car Screen Input POWER
CIRCUIT
A/V OUT
HEADREST
Power Input
CIRCUIT
Dip S/W
HEADREST
MONITOR
Power
Input
(+8VDC ~ +24VDC)
Dip
S/W
Emerald Integrations
www.emeraldintegrations.com

-Dimension
155mm * 93mm * 22mm
155mm
155mm
93mm
22mm
Emerald Integrations
www.emeraldintegrations.com
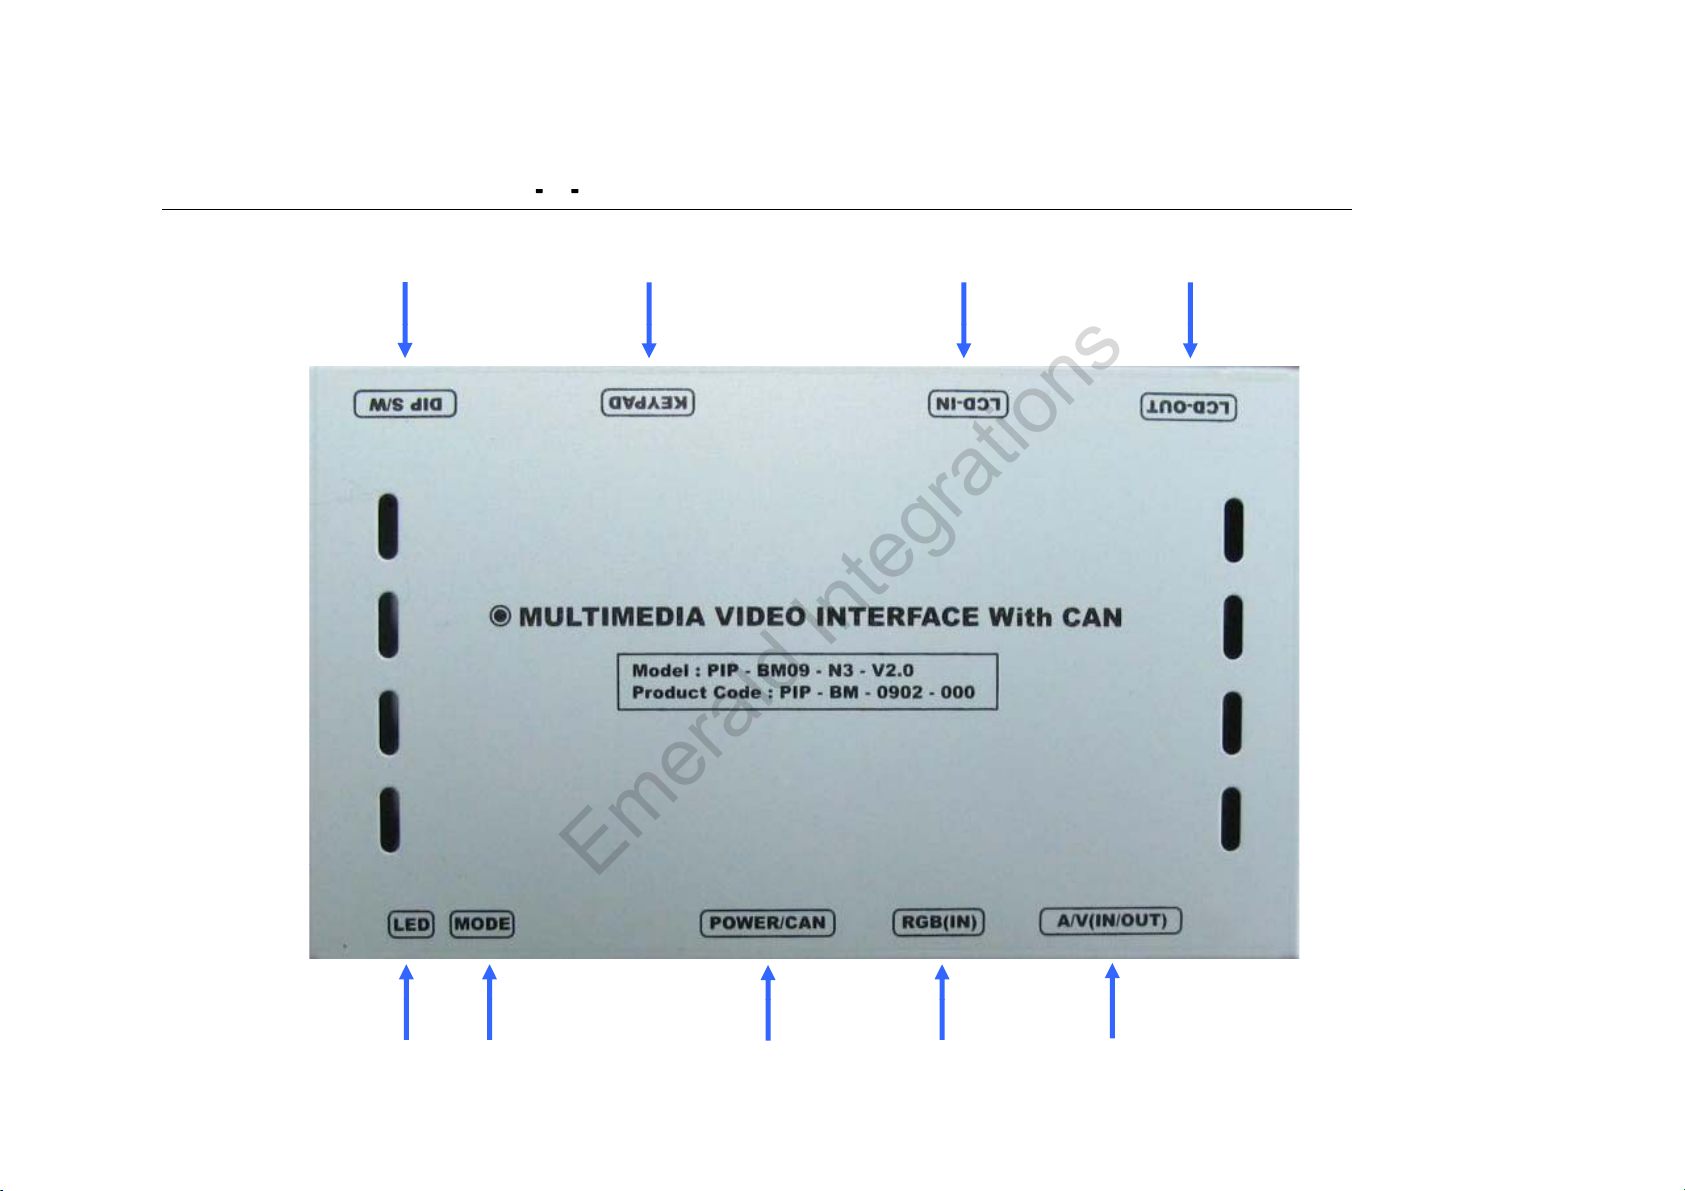
-External A
pp
earance
LCD-IN LCD-OUT
DIP S/W KEYPAD
pp
A/V(IN/OUT)
POWER/
CAN
MODE RGB(IN)
LED
Emerald Integrations
www.emeraldintegrations.com
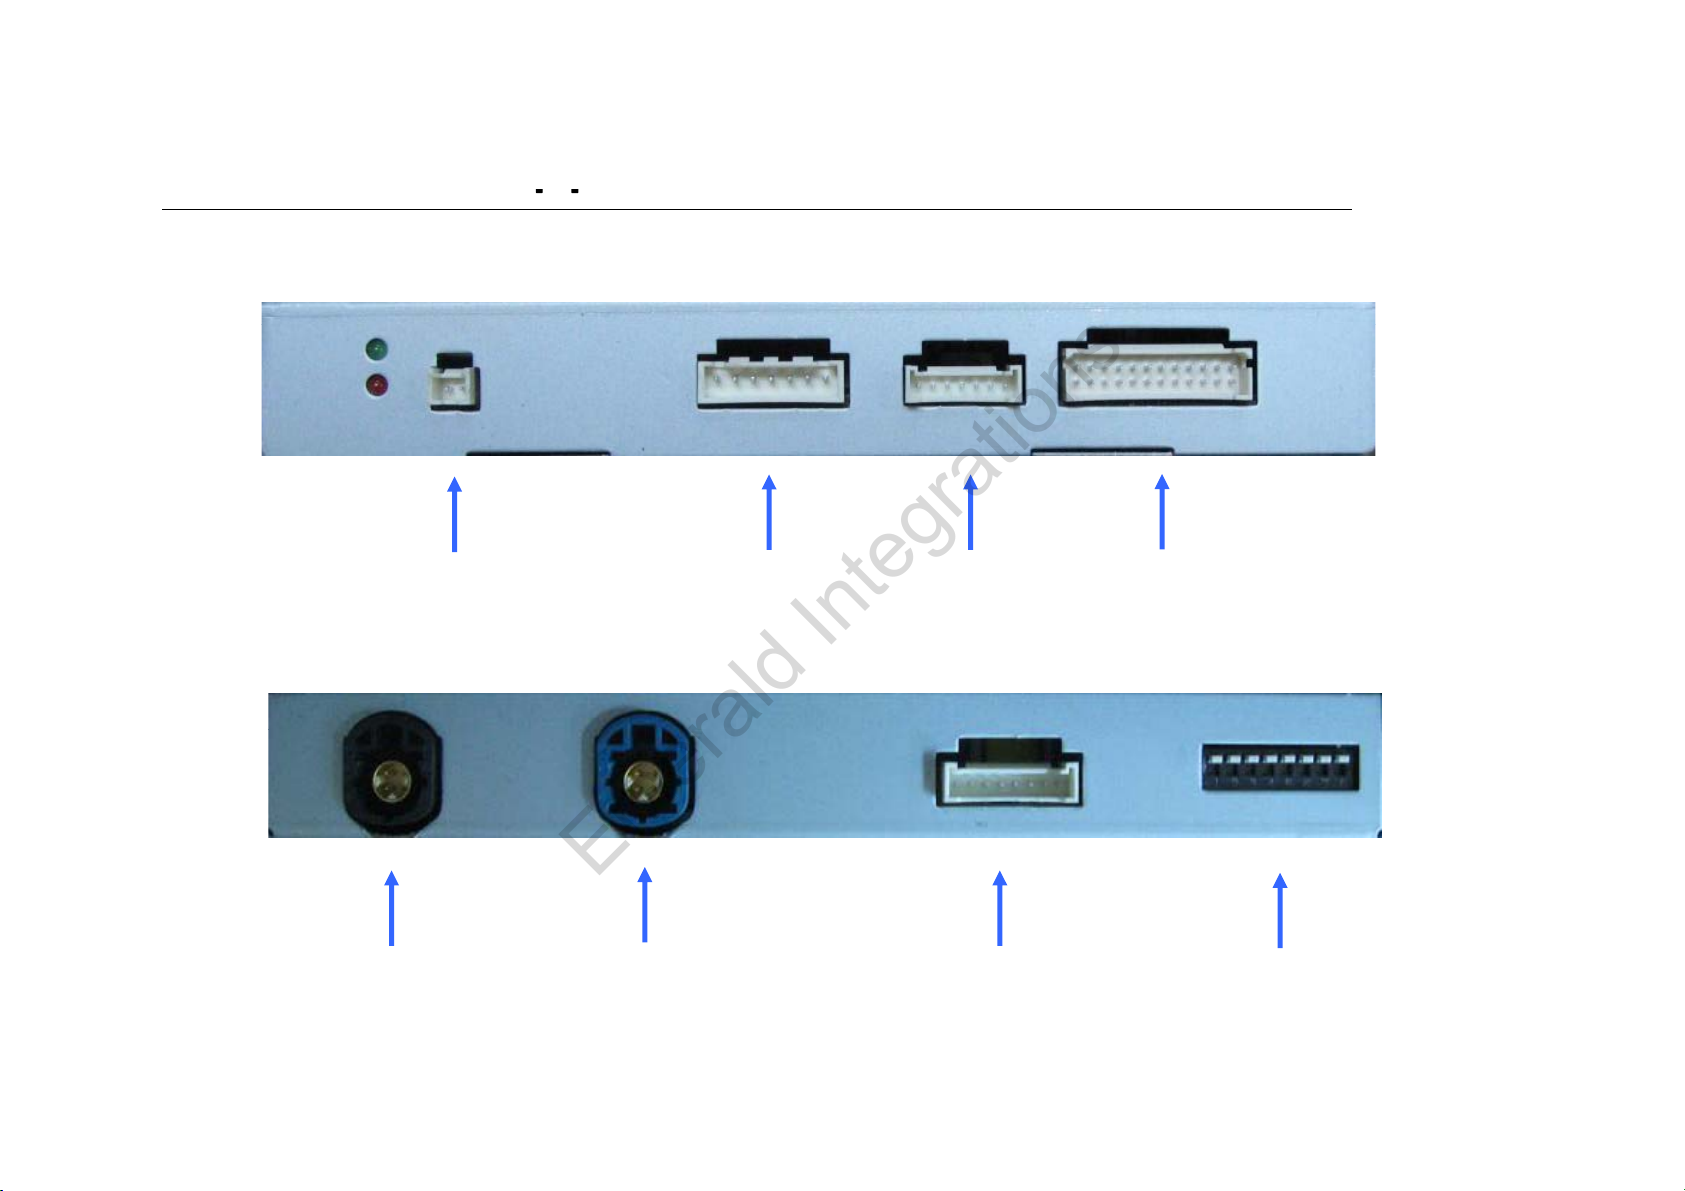
-External A
pp
earance
pp
A/V(IN/OUT)
POWER/CAN
MODE RGB(IN)
LCD-OUT KEYPAD DIP S/W
LCD-IN
Emerald Integrations
www.emeraldintegrations.com
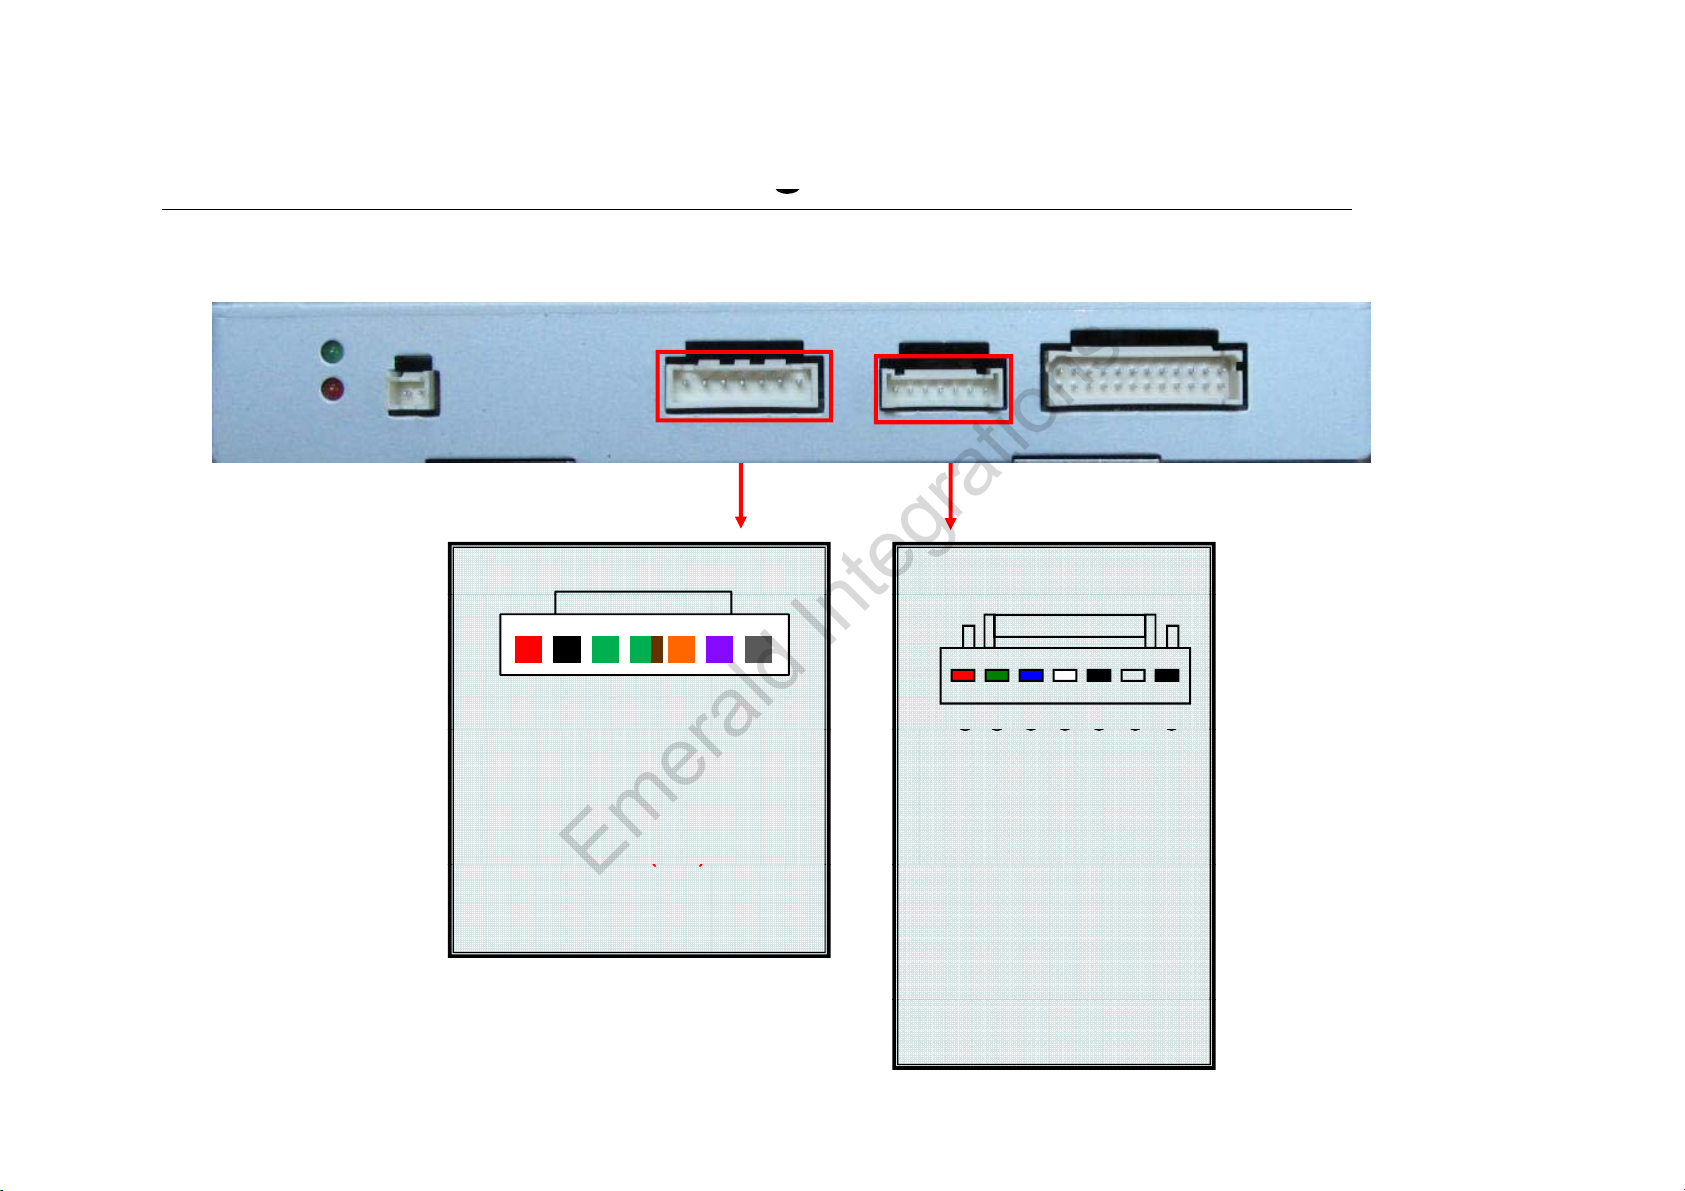
-Connector Pin Assi
g
nment
g
*RGB-IN Connect
*Power Connect
①
②
③
④
⑤
⑥
⑦
①
ACC (RED)
①②③④⑤⑥ ⑦
①
②
③
④
⑤
⑥
⑦
① R DATA (Red)
② G DATA (Green)
③ B DATA (Blue)
①
ACC
(RED)
② GND (Black)
③ CAN(H) (Green+Brown)
④ CAN(L) (Green)
⑤ F-CAM-DET
(
N.C
)
④ SYNC (White)
⑤ GND (Black)
⑥N.C
⑦N.C
()
⑥ SAFE (Violet)
⑦ REAR-C (Grey)
Emerald Integrations
www.emeraldintegrations.com

-Connector Pin Assi
g
nment
* Power Cable
g
FILTER
& FUSE BOX
CAN-H
GND
ACC : 12V~24V
REAR
C
SAFE
F-CAM-DET (Not Available)
CAN-L
REAR
-
C
1m *SAFE : When connecting to
GND, switched to MAIN image
and initialized.
Emerald Integrations
www.emeraldintegrations.com

-
DIP SW
DIP
SW
※ ON : DOWN, OFF : UP ; Default : all OFF
#PI
NFUNCTION DIP S/W Selection
1 RGB INPUT MUTE ON : Skipping RGB Mode
OFF : RGB Display
※DIP S/W Use Example
OFF
:
RGB
Display
2 A/V 1 MUTE ON : Skipping A/V 1
OFF : A/V1 Display
ON :
Skipping A/V 2
-. Use Input Mode : A/V2, A/V3
-. Use original Navigation
-. Use rear camera
▷
DIP S/W : 1 2
ON (INPUT MODE SKIP)
3
A
/V 2 MUTE
ON
:
Skipping
A/V
2
OFF : A/V2 Display
4 A/V 3 MUTE ON : Skipping A/V 3
OFF : A/V3 Display
▷
DIP
S/W
:
1
,
2
-
ON
(INPUT
MODE
SKIP)
▷ DIP S/W : 3 -OFF (enable A/V3)
▷ DIP S/W : 4 -OFF (enable A/V3)
▷ DIP S/W : 5,6 -OFF
▷ DIP S/W : 7 -ON
5N.C
6N.C
▷ DIP S/W : 8 -OFF
7 When to choose rear mode (ON : CVBS4, OFF : MAIN)
8N.C
Emerald Integrations
www.emeraldintegrations.com

-How to use remote
Dimension : 85 * 40 * 8 (mm) – Remote or Keypad (Optional)
POWER&PIP : N.C
MENU : OSD MENU
OK : Selection
▲
: Up More than 5sec : Operating
“
SAFE MODE
”
▲
:
Up
,
More
than
5sec
:
Operating
SAFE
MODE
▼: Down
◀ : Left
▶ : Right
*FACTORY MODE (Interface setting for installer)
: Operated by pressing ▲ → ▼ → ▲ →MENU of remote or
keypad in order.
Emerald Integrations
www.emeraldintegrations.com

-How to use Ke
yp
ad
yp
※ Remote or Keypad (Optional)
MENU : OSD Menu, switching to previous mode.
SEL : Selection in menu, switching AV sources.
UP : Move to Left, Up
DOWN : Move to Right, Down
UP + DOWN at once : Operating “SAFE MODE”
*FACTORY MODE (Interface setting for installer)
: Operated by pressing
▲
→
▼
→
▲
→
MENU of remote or keypad in order
:
Operated
by
pressing
▲
→
▼
→
▲
→
MENU
of
remote
or
keypad
in
order
.
Emerald Integrations
www.emeraldintegrations.com
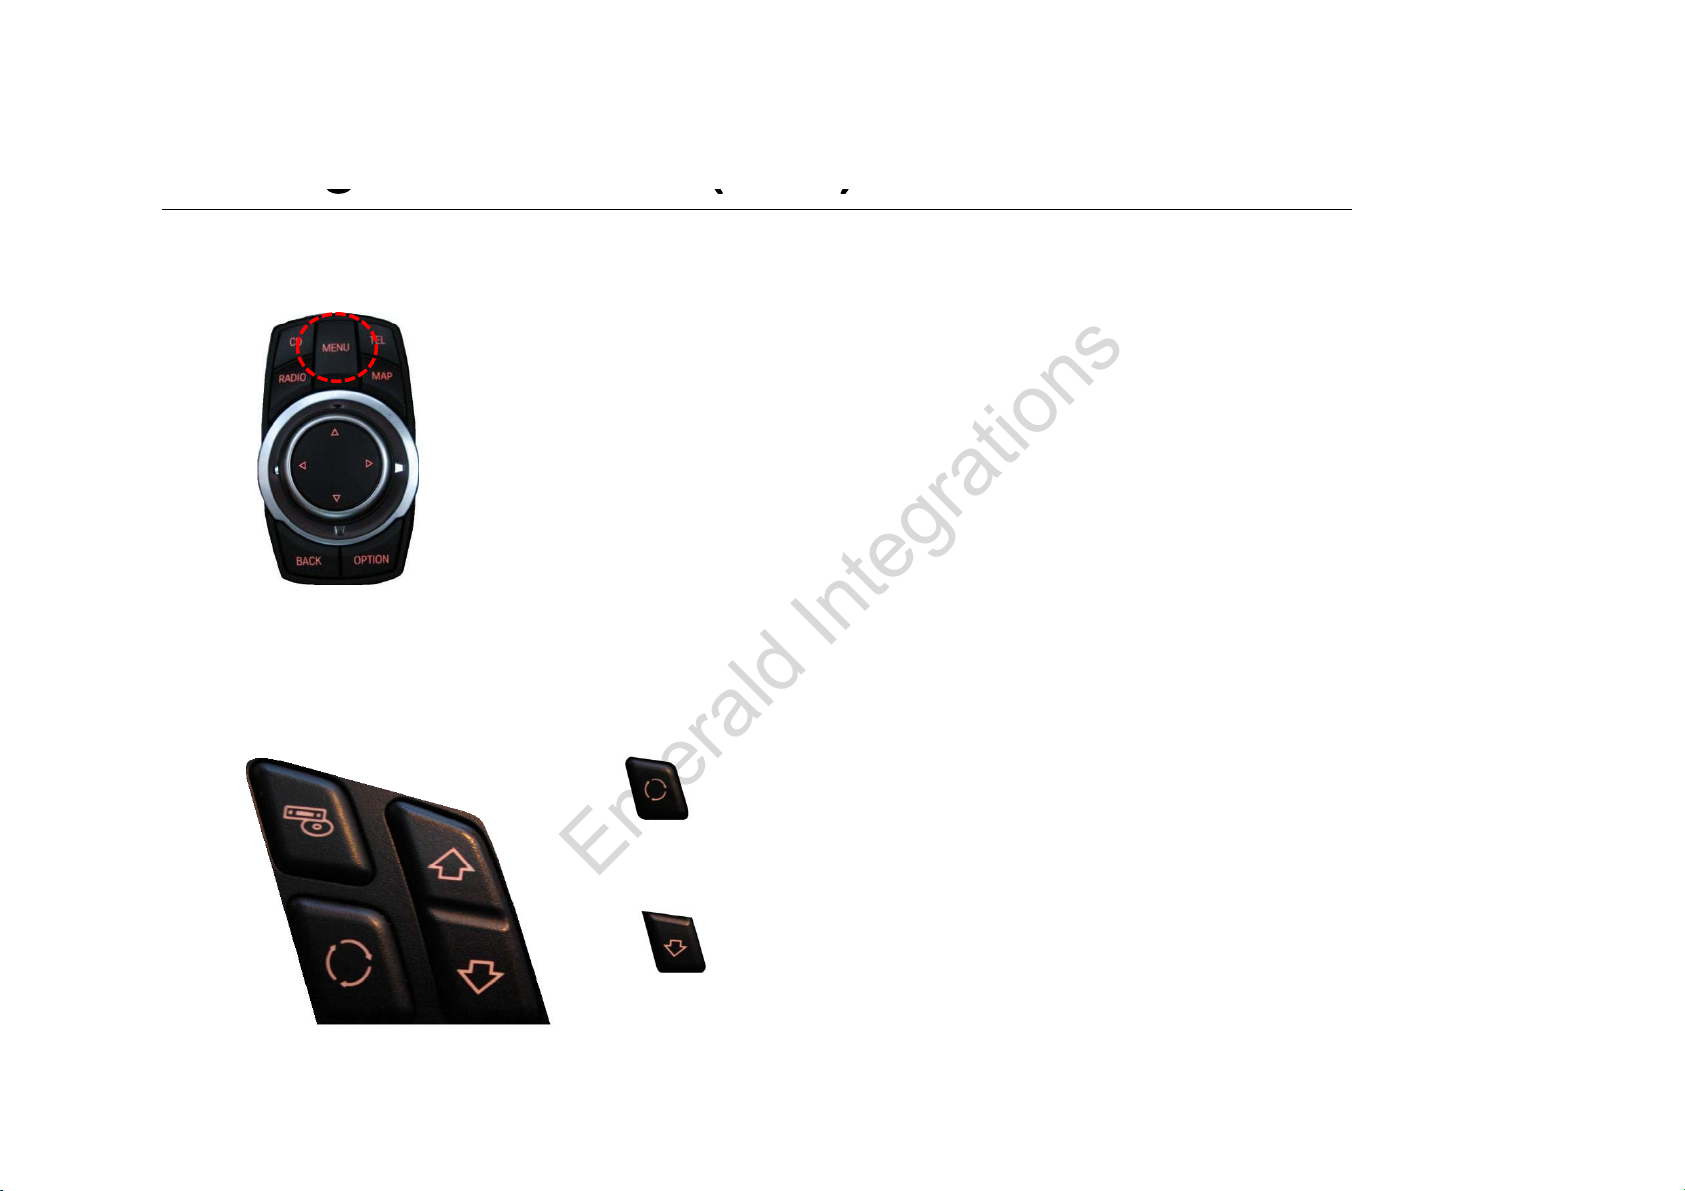
-Ori
g
inal buttons
(
E60
)
g()
- I-Drive Button
“MENU button” : Long press – Mode switching
Short press – Switching to OEM mode
- Steering wheel buttons
button : Long press – Dual screen operation
button : Long press - Mode Switching
Emerald Integrations
www.emeraldintegrations.com

-Ori
g
inal buttons
(
E65
)
- I-Drive Button
g()
MENU Button
: Long press
Mode switching
MENU
Button
:
Long
press
–
Mode
switching
Short press – Back to OEM image
▽ Button : Long press – PIP function Operation
※ In Reverse gear – This function is only available in
cars with aftermarket rear camera.
▽ Button : Long press – PIP function Operation
Short press
–
Positioning Translucent
PDC
Short
press
–
Positioning
Translucent
PDC
Image
Emerald Integrations
www.emeraldintegrations.com

-OSD
(
On Screen Dis
p
la
y)
(py)
· Analog RGB Mode ·Video Mode
IMAGE Menu :
-BRIGHTNESS
-CONTRAST
SATURATION
-
SATURATION
-HUE
-SHARPNESS
USER IMAGE
-
USER
IMAGE
Emerald Integrations
www.emeraldintegrations.com

OSD
(
On Screen Dis
p
la
y)
(py)
· Analog RGB Mode · Video Mode
OSD Menu
-LANGUAGE
OSD TRANS
-
OSD
TRANS
-OSD H_POS
-OSD V_POS
Emerald Integrations
www.emeraldintegrations.com

OSD
(
On Screen Dis
p
la
y)
(py)
· Analog RGB Mode · Video Mode
UTIL Menu
-FACTORY RESET : Initializing setting value (NAVI, AV individual initialization)
Emerald Integrations
www.emeraldintegrations.com
OSD
(
On Screen Dis
p
la
y)
(py)
· Factory Mode
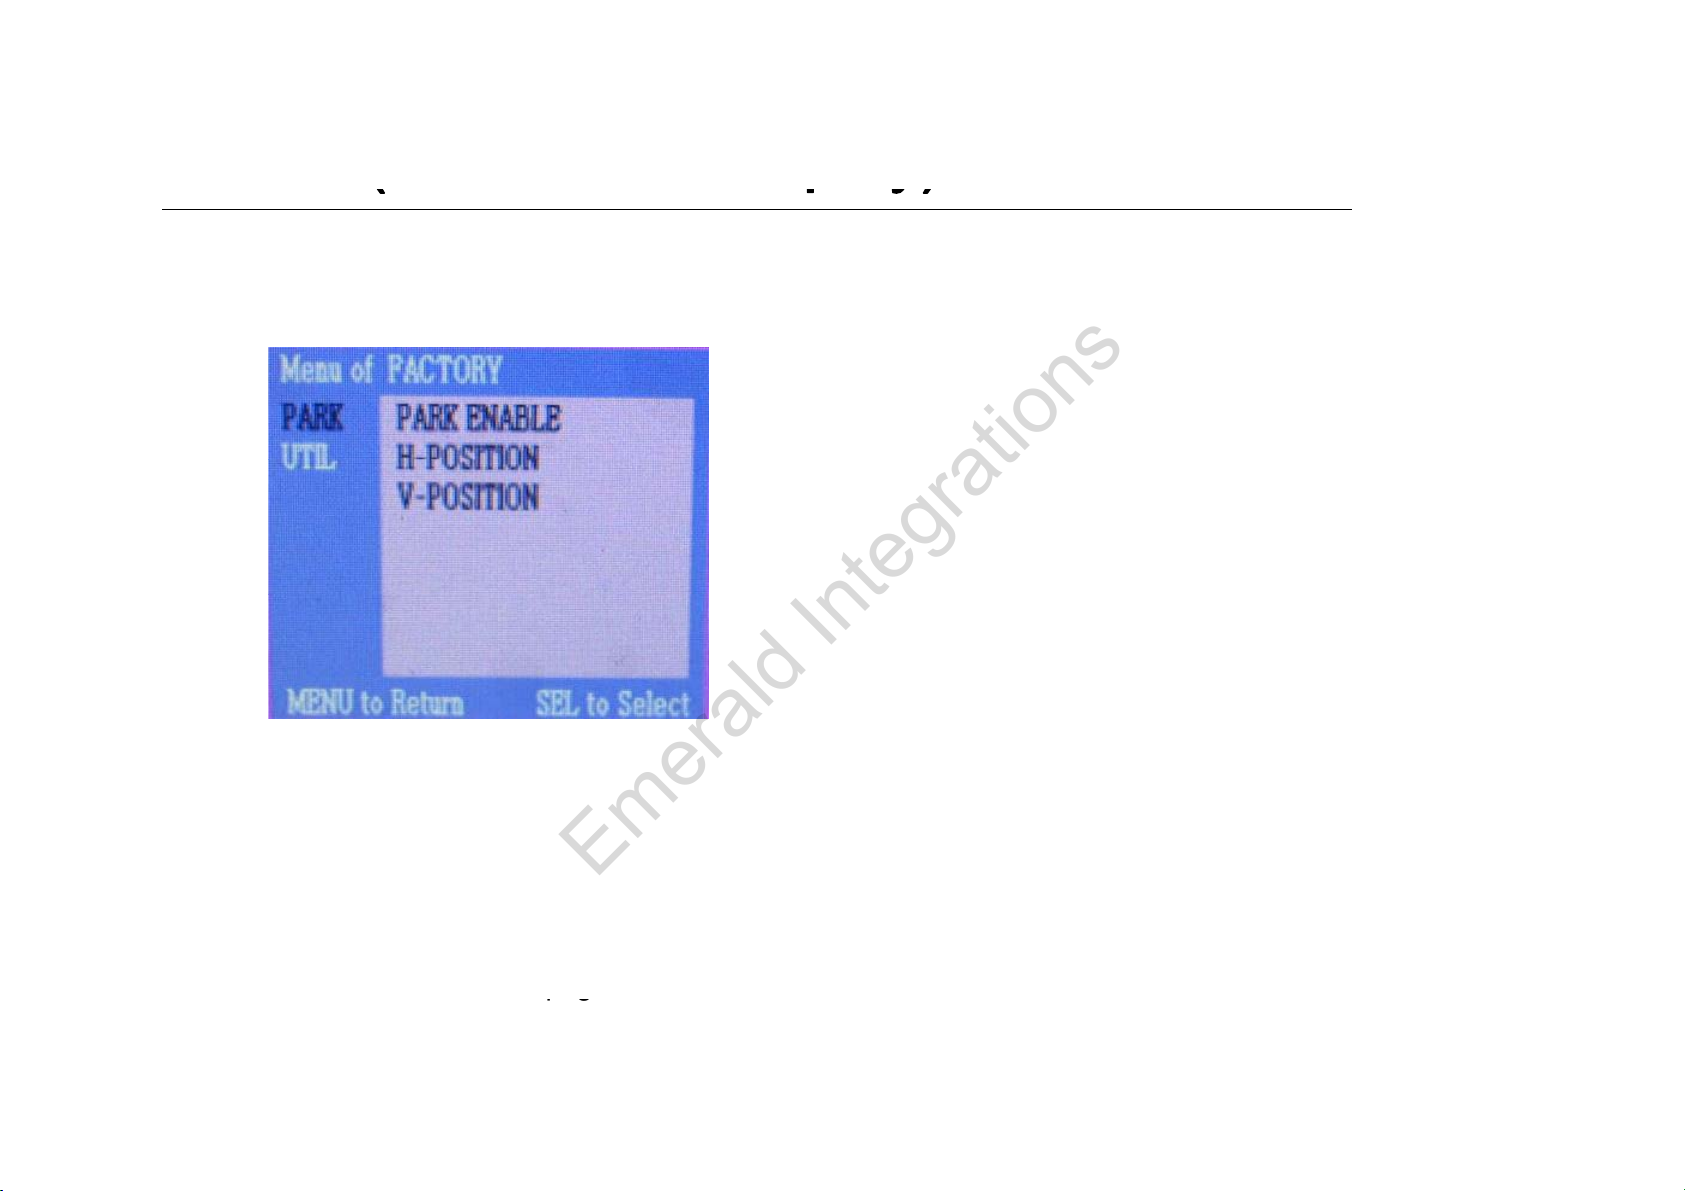
-Operated by pressing ▲ → ▼ → ▲ →MENU of remote or keypad in order.
Factory Mode
-IMAGE :
- H-POSITION : Move to left and right
- V-POSITION : Move to up and down
-PARK : Refer to the next
p
a
g
e for detail.
pg
Emerald Integrations
www.emeraldintegrations.com

OSD
(
On Screen Dis
p
la
y)
(py)
· Factory Mode
-Operated by pressing ▲ → ▼ → ▲ →MENU of remote or keypad in order.
Factory Mode
-UTIL :
R Slti R C Dtti MthdSlti
-
R
ear
S
e
l
ec
ti
on :
R
ear
C
amera
D
e
t
ec
ti
on
M
e
th
o
d
S
e
l
ec
ti
on
LAMP : Detecting Rear Cam by rear lamp in vehicle (‘Rear-C’ wire of
Power cable should be connected with rear lamp in vehicle)
CAN : Detecting Rear Cam by CAN Signal (‘CAN’ wires of power should
btdithCANiihil)
b
e connec
t
e
d
w
ith
CAN
w
i
res
i
n ve
hi
c
l
e
)
- FACTORY RESET : Initialization
Emerald Integrations
www.emeraldintegrations.com
Table of contents
Popular Security System manuals by other brands

CADDX
CADDX NetworkX NX-6 installation manual

Honeywell
Honeywell Ademco VISTA-20PCN Programming guide

Autronica
Autronica AutroSafe Maritime Gas Detection Operating instructions and system description

GardaWorld
GardaWorld 2GIG-CP21-345E Quick setup guide

Uniden
Uniden Guardian G955 user guide

Shield
Shield STEML-U9 installation manual


