emerio AF-124772 User manual


- 1 -
Content –Inhalt –Teneur –Innehåll –Inhoud –Treść – Содержание
Instruction manual –English......................................................................................- 2 -
Bedienungsanleitung –German...............................................................................- 11 -
Mode d‘emploi – French..........................................................................................- 21 -
Bruksanvisning –Swedish ........................................................................................- 31 -
Gebruiksaanwijzing –Dutch.....................................................................................- 40 -
Instrukcja obsługi – Polish........................................................................................- 50 -
Инструкция по эксплуатации –Russian .................................................................- 60 -

- 2 -
Instruction manual –English
SAFETY INSTRUCTIONS
Before use make sure to read all of the below instructions in
order to avoid injury or damage, and to get the best results
from the appliance. Make sure to keep this manual in a safe
place. If you give or transfer this appliance to someone else
make sure to also include this manual.
In case of damage caused by user failing to follow the
instructions in this manual the warranty will be void. The
manufacturer/importer accepts no liability for damages
caused by failure to follow the manual, a negligent use or
use not in accordance with the requirements of this manual.
1. This appliance can be used by children aged from 8 years
and above and persons with reduced physical, sensory or
mental capabilities or lack of experience and knowledge if
they have been given supervision or instruction
concerning use of the appliance in a safe way and
understand the hazards involved.
2. Children shall not play with the appliance.
3. Cleaning and user maintenance shall not be made by
children unless they are older than 8 and supervised.
4. Keep the appliance and its cord out of reach of children
less than 8 years.
5. If the supply cord is damaged, it must be replaced by the
manufacturer, its service agent or similarly qualified
persons in order to avoid a hazard.
6. Regarding the instructions for cleaning the surfaces which
come in contact with food or oil, please refer to the
paragraph “cleaning and maintenance” of the manual.
7. This appliance is not intended to be operated by means of
an external timer or separate remote-control system.
8. This appliance is intended to be used in household and
similar applications such as: staff kitchen areas in shops,
offices and other working environments; farm houses; by
clients in hotels, motels and other residential type
environments; bed and breakfast type environments.
9. Before inserting the plug into the mains socket, please
check that the voltage and frequency comply with the
specifications on the rating label.

- 3 -
10. Disconnect the mains plug from the socket when the
appliance is not in use and before cleaning.
11. If an extension cord is used it must be suited to the power
consumption of the appliance, otherwise overheating of
the extension cord and/or plug may occur. There is a
potential risk of injuries from tripping over the extension
cord. Be careful to avoid dangerous situations.
12. Ensure that the mains cable is not hung over sharp edges
and keep it away from hot objects and open flames.
13. Do not immerse the appliance or the mains plug in water
or other liquids. There is danger to life due to electric
shock!
14. To remove the plug from the plug socket, pull the plug. Do
not pull the power cord.
15. Do not touch the appliance if it falls into water. Remove
the plug from its socket and send it to an authorized
service center for repair.
16. Do not plug or unplug the appliance from the electrical
outlet with a wet hand.
17. Never attempt to open the housing of the appliance, or to
repair the appliance yourself. This could cause electric
shock.
18. Never leave the appliance unattended during use.
19. This appliance is not designed for commercial use.
20. Do not use the appliance for other than intended use.
21. Do not wind the cord around the appliance and do not
bend it.
22. Place the appliance on a stable, level surface from which
it cannot fall off.
23. Please prevent the product to be exposed to excessive
dirt and humidity.
24. Do not operate the machine without supervision, if you
should leave the workplace, always switch the machine
off or remove the plug from socket (pull the plug itself,
not the lead).
25. Do not place the appliance against a wall or against other
appliance. Leave at least 10cm free space on the back and
sides and above the appliance.

- 4 -
26. During hot air frying, hot steam is released through the air
outlet openings. Keep your hands and face at a safe
distance from the steam and from the air outlet openings.
Also be careful of hot steam and air when you remove the
pan from the appliance.
27. Immediately unplug the appliance if you see dark smoke
coming out of the appliance. Wait for the smoke emission
to stop before you remove the pan from the appliance.
28. Make sure before each use of the appliance that the
heating element and surroundings are clean and clear
from any food remainders in order to ensure a flawless
function.
29. Caution, hot surface.
WARNING!! Please do not touch surface while in use. The
temperature of accessible surfaces may be high when the
appliance is operating.
30. Hot air comes out of the air vent at the back side of the
appliance. Be sure to keep sufficient distance to materials,
like glass, that are sensitive to heat.
31. Never place the hot accessories on the surface of the
open door. The hot accessories could damage the door. In
addition, the device could tip over and present a risk of
injury.
32. Do not connect the device along with other consumers
(with a high wattage) to a multiple socket in order to
prevent overloading and a possible short circuit (fire).
33. Do not insert anything into the ventilation openings of the
device and make sure that these do not become clogged.
34. Make sure that foodstuffs containing oil and fats are not
overheated. Do not place any vessels filled with oil or
other liquids into the device.
35. Do not cover the device during operation in order to
prevent it from catching fire.

- 5 -
AF-124772 EN
PARTS DESCRIPTION
1. Main unit
2. Control panel
3. Cooking chamber
4. Door
5. Rotating basket
6. Handle for rotisserie spit rod and rotating basket
7. Rotisserie fork
8. Rotisserie spit rod
9. Oil tray
10. Skewers
11. Wheel discs
12. Baking rack (3 pieces)
Control panel
1. Cooking chamber lamp
2. Rotating function
3. Menu list
4. Digital display
5. On/Off switch button
6. Fan symbol
7. Temperature increasing “+” / decreasing “-” buttons
8. Cooking time increasing “+” / decreasing “-” buttons

- 6 -
BEFORE USE
First read all instructions before use and retain the manual for later reference. Only plug this appliance into an
earthed socket. Before first use, remove the packing materials. Clean the appliance according to the section
“cleaning and maintenance”. Wipe inside and outside of the appliance with a soft cloth. Make sure that the
electrical parts remain dry.
Operate the appliance before first use for approximately 10 minutes in order to burn off production residues.
Make sure there is good ventilation. The appliance may emit some smoke and a characteristic smell when you
switch it on for the first time. This is normal and will stop soon.
USE
1. Place the appliance on a dry, stable and heat-resistant surface. Since the appliance becomes hot during
use, make sure that it is not too close to other objects.
2. Open the cooking chamber by the door handle and put in the food to be cooked. Choose your desired
accessories:
Baking rack: The baking racks are intended for drying. However, they
can also be used for crisping, warming up etc. The heating element is
located at the top. In the upper position, the food will be cooked
faster and crispy. The middle position can be selected to achieve
uniform heating from all sides. The bottom position is suitable for
gentle cooking. Insert the rack into the cooking chamber. Choose your
desired cooking position.
Rotisserie spit rod with forks: to cook large pieces of meat. Have the
rotisserie spit rod across the centre of the food you are going to
prepare. Fix the food with the forks; secure with screws. Do not
secure over the notches which mark the outermost positions for the
locking screws. Plug one end of the rotisserie spit rod into the round
holder on the left-hand side of the cooking chamber, and then hang
the other end of the rotisserie spit rod into the support on the right-
hand side of the cooking chamber.
Rotisserie spit rod with skewers and wheel discs: Insert the rotisserie
spit rod into the wheel discs. Secure with the locking screws. Insert
the skewers with meat into the wheel discs. Make sure the skewers
are locked in position. Plug one end of the rotisserie spit rod into the
round holder on the left-hand side of the cooking chamber, and then
hang the other end of the rotisserie spit rod into the support on the
right-hand side of the cooking chamber.
Rotating basket: to cook chips or other potato products, pieces of
vegetables, meat and frozen products like chicken nuggets or squid
rings. Open the rotating basket by the flap. Fill the rotating basket no
more than ¾full with food. Do not overfill the basket with
ingredients. Otherwise, the food will not be cooked evenly. Close the
basket and make sure it is shut correctly so that it cannot open during
cooking process. Insert the basket into the cooking chamber according
to the direction marks on two sides of the basket: L= Left; R= Right.
3. Place the oil tray on the bottom to collect the dripping oils.
4. Close the cooking chamber and plug in. The buzzer sends out a beep sound. The digital display and control
panel flash once while the indicator light of the key “” keeps on. The appliance enters into standby
mode. Under standby mode, only the key “” is operable; others are not.

- 7 -
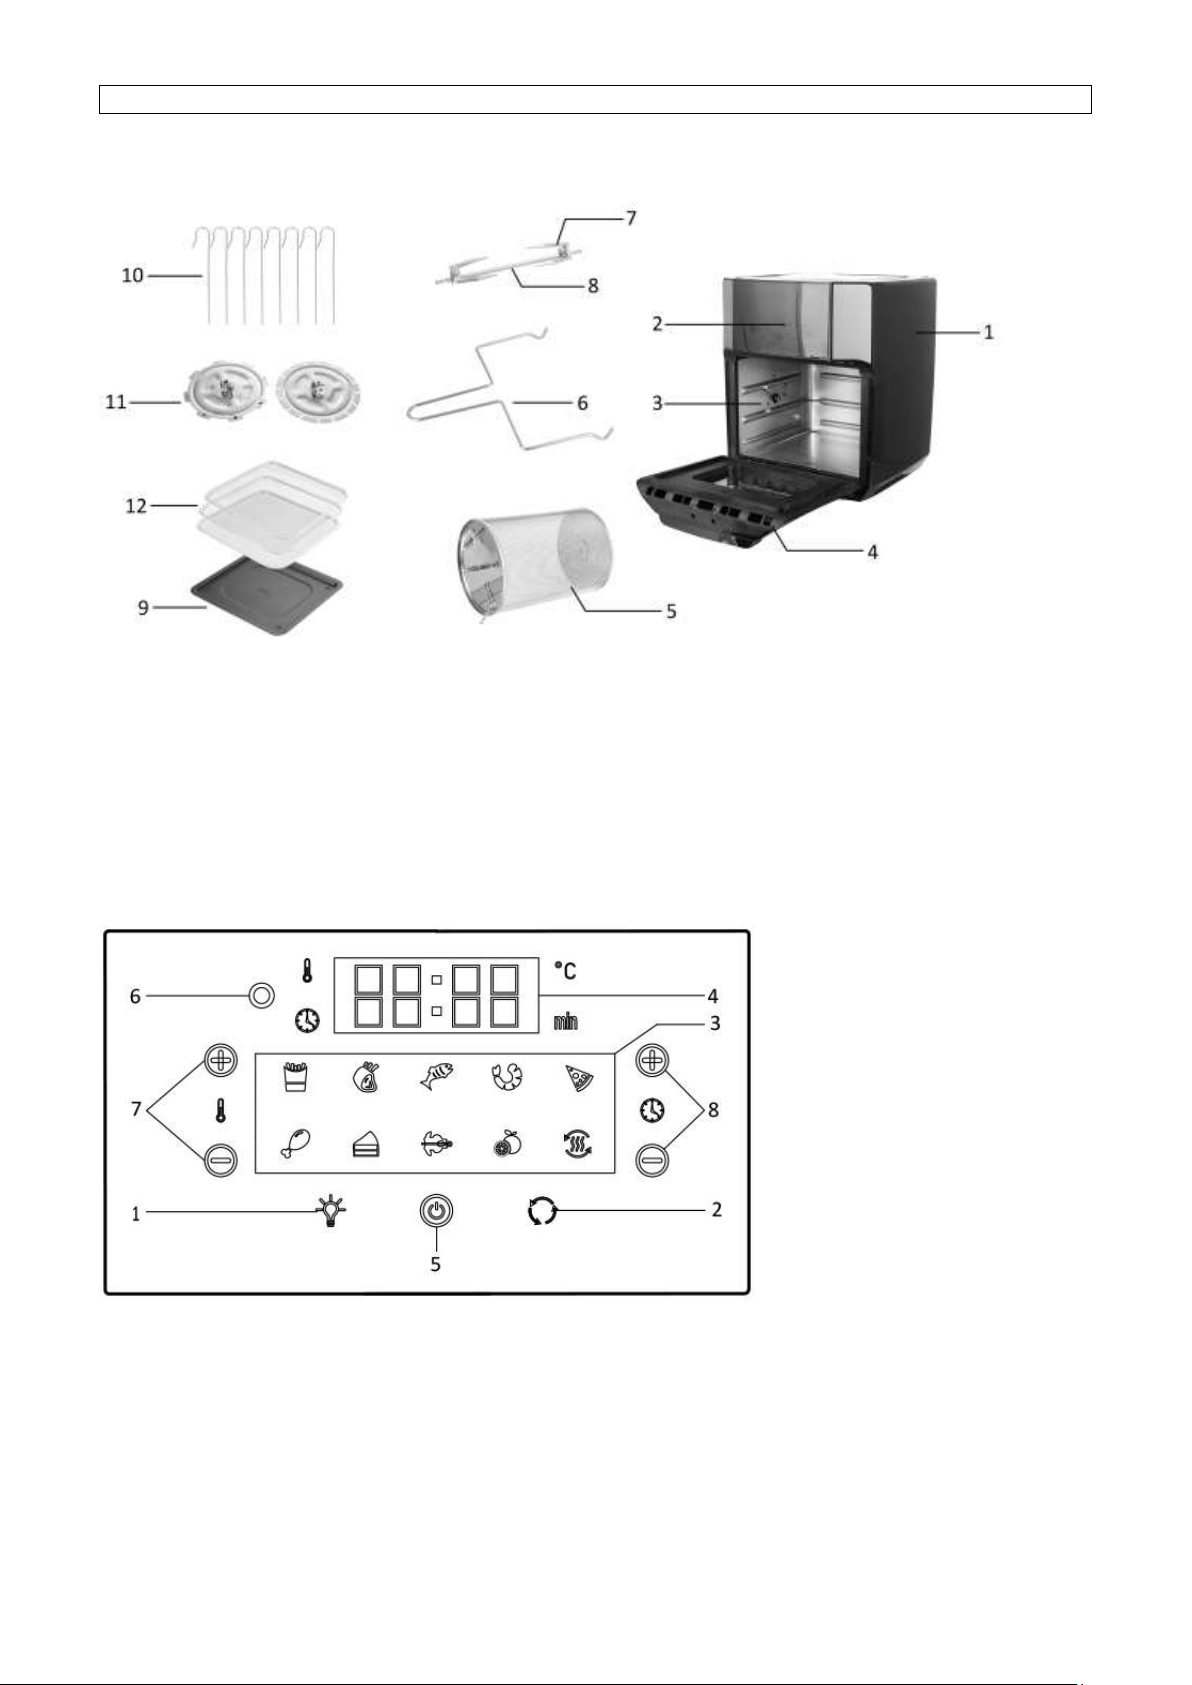
5. Press the key “ ” under standby mode, the buzzer sends out a beep sound. The appliance enters into
setting mode. All the indicator lights (except for the fan symbol) on the control panel illuminate. The
digital display shows the default working temperature (185℃) and the default working time (15 minutes)
alternately. Under setting mode, all the keys are operable.
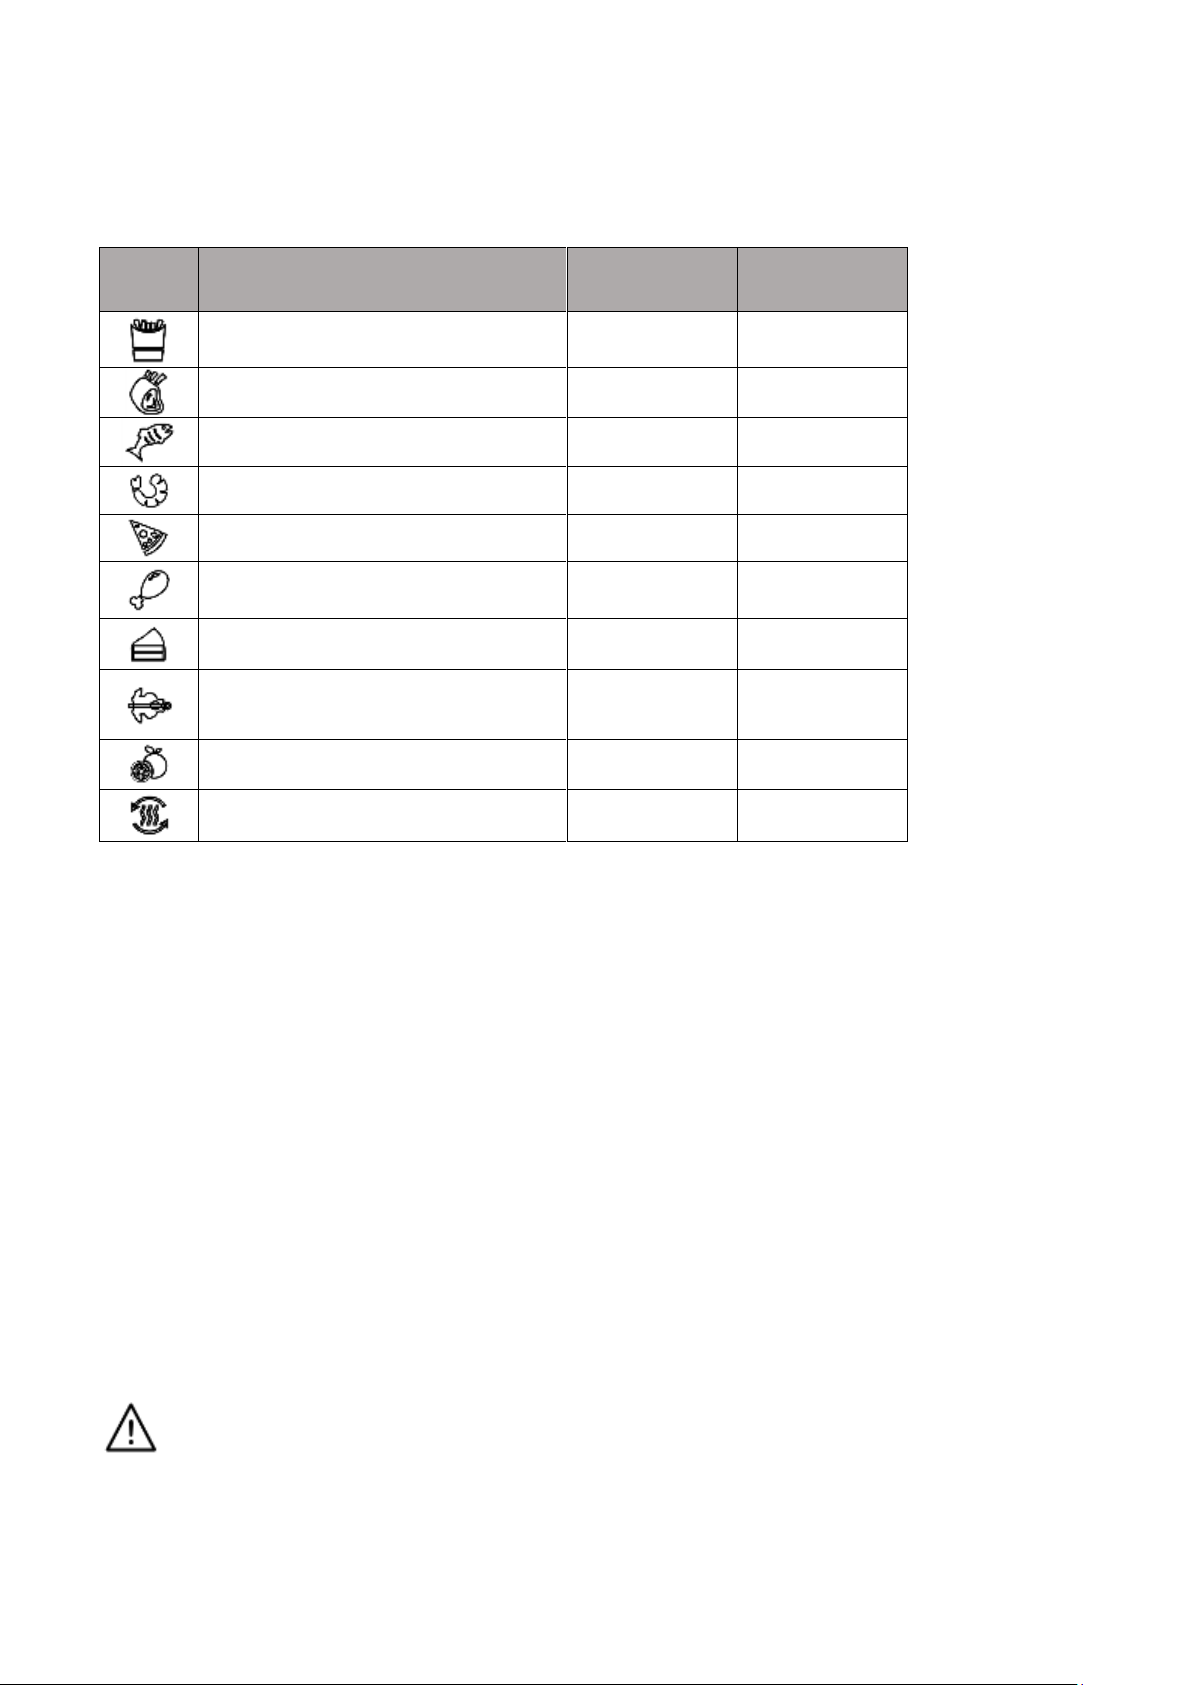
6. Press the keys on the menu list to choose your desired food type to be cooked. The working temperature
and working time are in default. You can also press the keys “+” / “-”to set your own working
temperature (adjusted from 80 - 200℃) and working time (adjusted from 1 - 90 minutes) manually. Note:
If no operation of the keys over 4 seconds, the appliance will begin to work automatically.
Two more functions:
-“ ”: If you would like to check the food condition during cooking process, press the key to turn on
the lamp inside the cooking chamber. Press the key again, the lamp will be turned off.
-“ ”: Press the key to turn on the rotating function when rotisserie spit rod or rotating basket is used.
Press the key again, the rotating will stop.
7. After the setting is finished, press the key “” to start the appliance. The appliance enters into working
mode. The digital display shows the set working temperature and the remaining working time.
8. During working, the digital display shows the countdown time till “OFF” and then the appliance turns into
shutdown mode. For example: 08→07→…→01→OFF (shutdown mode). When the appliance enters into
shutdown mode, the heating element stops working immediately and the fan keeps on running for approx.
26 seconds. With 5 long beep sounds, the appliance enters into standby mode.
You can also press the key “ ” to shut down the appliance manually. The heating element stops
working immediately and the fan keeps on running for approx. 26 seconds. The appliance will enter into
standby mode.
9. Open the cooking chamber to take out the food. Check if the ingredients are ready. If not, set the working
time to a few extra minutes. Then press the key “ ” to start the appliance again. You can also open the
cooking chamber to check the ingredients during cooking process. The appliance will stop working
immediately. Close the cooking chamber and the unit will continue to work with the setting. Press the
keys “+” / “-” to adjust the working temperature/time as needed.
10. After use, remove the mains plug from the wall socket. Always use the oven gloves and the handle (for
rotisserie spit rod and rotating basket) to take the food out of the appliance.
Note: The device has overheating protection. It switches off if it is overloaded. In this case, pull the mains plug
out of the plug socket and allow the device to cool down completely.
CAUTION:
1. Do not immerse the housing in water or rinse it under the tap.
2. Avoid any liquid entering the appliance to prevent from electric shock or short circuit.
3. Do not cover the air inlet and the outlet when the appliance is working.
4. Do not touch the inside of the appliance when it is in operation.

- 8 -
5. During operation, hot steam is released through the air outlet. Keep your hands and face at a safe distance
from the steam and the air outlet.
6. Before handling or cleaning the appliance, let it cool down for approximately 30 minutes.
Menu list for reference
Symbol
Programme
Temperature
Cooking time
Chips
200 ℃
15 min
Steaks / cutlets
175 ℃
25 min
Fish
165 ℃
15 min
Shrimps
160 ℃
12 min
Pizza
180 ℃
15 min
Chicken
185 ℃
40 min
Baking
160 ℃
30 min
Rotary grilling
(with automatic rotating function)
190 ℃
30 min
Drying
30 ℃
2 h
Heat up
115 ℃
12 min
Note: The default working temperature and time for dried fruit is 30℃and 2h, the set temperature range is
30-80℃, and the time range is 2-24h.
CLEANING AND MAINTENANCE
1. Remove the mains plug from the wall socket and let the appliance cool down completely.
2. Clean the outside and inside of the appliance with a damp cloth and dry with a soft, clean cloth.
3. Never use abrasive cleaners or sponges.
4. Rinse all the used accessories with dish soap and warm water. Clean thoroughly and dry well before use.
In the case of stubborn dirt, we recommend soaking the accessories in warm water and detergent
beforehand. All the accessories are dishwasher safe.
5. Do not immerse the main unit in water or other liquids! Do not place it in the dishwasher!
6. Clean the main unit and the used accessories after each use to prevent germ formation and burning of
food residues. Do not allow food residues to dry on.
TROUBLESHOOTING
If the device does not work properly, first check whether you are able to rectify the problem yourself. If the
problem cannot be solved with the following steps, contact the customer service department.
Do not attempt to repair an electrical device yourself!

- 9 -
Problem
Possible cause
Solution
The device does not work. The
displays on the control panel does
not switch on.
The door is not closed properly.
Close the door.
The mains plug is not inserted
correctly in the plug socket.
Push the mains plug into the plug
socket as far as it will go.
The plug socket is defective.
Try another plug socket.
No mains voltage is predent.
Check the fuse of the electical
distributor (fuse box).
The overheating protection has
been triggered.
Pull the mains plug out of the plu g
socket and allow the device to cool
down completely. Then try again.
The fuse in the electical
distributor (fuse box) is triggered.
Too many devices connected to
the same circuit.
Reduce the number of devices in
the circuit.
The food has not been cooked
evenly.
Different items of food with
different cooking times have been
prepared at the same time.
Place food with a longer cooking
time in the device first, and then
add ingredients with a shorter
cooking time later.
Items of food which require
different cooking temperatures
have been prepared at the same
time.
Prepare items of food with
defferent cooking temperatures
one after another.
The set cooking time was too short
or the temperature was too low.
Increase the cooking time or
temperature.
The rotating basket or baking rack
is overfilled.
Reduce the amount of food.
The items of food are piled on top
of one after another.
Spread the food and mix it around
from time to time.
The food is slightly burnt.
The selected temperature is too
high or the cooking time is too
long.
Reduce the temperature or
cooking time.
Chips made from fresh potatoes
are not crispy.
The potatoes contain too much
water.
Cut the potatoes into narrow
pieces. Dab the potato pieces dry
with some kitchen towel and then
trickle a little cooking oil over
them.
During use, an unpleasant smell
or smoke is detected.
The device is dirty.
Follow the instructions in the
section “cleaning and
maintenance”.
The device is being used for the
first time.
A smell often develops when new
devices are first used. The smell
should disappear once the device
has been used several times.
Too much oil or grease.
Remove excessive oil or grease.
Error messages E1 or E2
The sensor is defective.
Contact the customer service
department.
TECHNICAL DATA
Operating voltage: 220-240V~ 50/60Hz
Power: 1800W

- 10 -
GUARANTEE AND CUSTOMER SERVICE
Before delivery our devices are subjected to rigorous quality control. If, despite all care, damage has occurred
during production or transportation, please return the device to your dealer. In addition to statutory legal
rights, the purchaser has an option to claim under the terms of the following guarantee:
For the purchased device we provide 2 years guarantee, commencing from the day of sale. If you have a
defective product, you can directly go back to the point of purchase.
Defects which arise due to improper handling of the device and malfunctions due to interventions and repairs
by third parties or the fitting of non-original parts are not covered by this guarantee. Always keep your receipt,
without the receipt you can’t claim any form of warranty. Damage caused by not following the instruction
manual, will lead to a void of warranty, if this results in consequential damages then we will not be liable.
Neither can we hold responsible for material damage or personal injury caused by improper use if the
instruction manual is not properly executed. Damage to accessories does not mean free replacement of the
whole appliance. In such case please contact our service department. Broken glass or breakage of plastic parts
is always subject to a charge. Defects to consumables or parts subjected to wearing, as well as cleaning,
maintenance or the replacement of said parts are not covered by the warranty and are to be paid.
ENVIRONMENT FRIENDLY DISPOSAL
Recycling –European Directive 2012/19/EU
This marking indicates that this product should not be disposed with other household wastes. To
prevent possible harm to the environment or human health from uncontrolled waste disposal,
recycle it responsibly to promote the sustainable reuse of material resources. To return your used
device, please use the return and collection systems or contact the retailer where the product was purchased.
They can take this product for environmental safe recycling.
Emerio Deutschland GmbH (no service address)
Lerchenweg 3
40789 Monheim am Rhein
Deutschland
Customer service:
T: +49 (0) 3222 1097 600

- 11 -
Bedienungsanleitung –German
SICHERHEITSHINWEISE
Lesen Sie vor dem Gebrauch unbedingt die nachfolgenden
Anleitungen, um Verletzungen oder Beschädigungen zu
vermeiden und das beste Ergebnis mit dem Gerät zu erzielen.
Bewahren Sie diese Bedienungsanleitung an einem sicheren
Ort auf. Wenn Sie dieses Gerät an eine andere Person
weitergeben, stellen Sie sicher, dass Sie auch diese
Bedienungsanleitung aushändigen.
Im Falle von Beschädigungen, die durch die Missachtung der
Anleitungen in dieser Bedienungsanleitung verursacht
wurden, wird die Garantie ungültig. Der
Hersteller/Importeur haftet nicht für Schäden, die durch
Missachtung der Bedienungsanleitung, fahrlässigen
Gebrauch oder Benutzung, die nicht in Übereinstimmung mit
den Anforderungen dieser Bedienungsanleitung erfolgt,
verursacht wurden.
1. Dieses Gerät kann von Kindern ab 8 Jahren und Personen
mit eingeschränkten körperlichen, sensorischen oder
geistigen Fähigkeiten oder mangelnder Erfahrung und
Kenntnis benutzt werden, wenn sie beaufsichtigt werden
oder in die sichere Benutzung des Gerätes unterwiesen
werden und die damit verbundenen Gefahren verstehen.
2. Kinder dürfen nicht mit dem Gerät spielen.
3. Die Reinigung und vom Benutzer auszuführende
Wartungsarbeiten sollten nicht von Kindern durchgeführt
werden; es sei denn, sie sind älter als 8 Jahre und werden
beaufsichtigt.
4. Halten Sie das Gerät und sein Netzkabel außer Reichweite
von Kindern unter 8 Jahren.
5. Wenn das Netzkabel beschädigt ist, muss es vom
Hersteller, seinem Kundendienst oder einer ähnlich
qualifizierten Person ausgewechselt werden, um
Gefahren zu vermeiden.

- 12 -
6. Um Informationen zur Reinigung der Flächen zu erhalten,
die mit Lebensmitteln oder Ö l in Berührung kommen,
lesen Sie bitte den Abschnitt „Reinigung und Pflege“ in
der Bedienungsanleitung.
7. Dieses Gerät ist nicht für die Bedienung über einen
externen Timer oder ein separates Fernbedienungssystem
bestimmt.
8. Dieses Gerät ist für die Verwendung im Haushalt oder für
ähnliche Anwendungen vorgesehen, wie: in
Personalküchen von Geschäften, Büros und anderen
Arbeitsumgebungen; auf Bauernhöfen; von Kunden in
Hotels, Motels und in anderen Unterkünften; in
Unterkünften mit Halbpension.
9. Bevor Sie den Stecker mit der Netzsteckdose verbinden,
prüfen Sie bitte, ob die Spannung und die Frequenz mit
den Angaben auf dem Typenschild übereinstimmen.
10. Ziehen Sie den Netzstecker aus der Steckdose, wenn das
Gerät nicht benutzt und bevor es gereinigt wird.
11. Falls ein Verlängerungskabel verwendet wird, muss es für
den Stromverbrauch des Gerätes geeignet sein, sonst
kann es zum Überhitzen des Verlängerungskabels
und/oder des Steckers kommen. Es besteht
Verletzungsgefahr durch Stolpern über das
Verlängerungskabel. Lassen Sie Vorsicht walten, um
gefährliche Situationen zu vermeiden.
12. Achten Sie darauf, dass das Netzkabel nicht über scharfe
Kanten hängt und halten Sie es von heißen Objekten und
offenen Flammen fern.
13. Tauchen Sie das Gerät oder den Netzstecker nicht in
Wasser oder andere Flüssigkeiten. Es besteht
Lebensgefahr aufgrund von Stromschlag!
14. Um den Stecker aus der Steckdose zu entfernen, ziehen
Sie am Stecker. Ziehen Sie nicht am Kabel.

- 13 -
15. Berühren Sie das Gerät nicht, wenn es ins Wasser gefallen
ist. Ziehen Sie den Stecker aus der Steckdose und schicken
Sie es an einen autorisierten Kundendienst zwecks
Reparatur.
16. Den Netzstecker des Gerätes nicht mit einer nassen Hand
aus der Steckdose ziehen oder mit der Steckdose
verbinden.
17. Versuchen Sie unter keinen Umständen, das Gehäuse des
Gerätes zu öffnen oder das Gerät selbst zu reparieren.
Dies könnte einen Stromschlag verursachen.
18. Lassen Sie das Gerät während des Gebrauchs niemals
unbeaufsichtigt.
19. Dieses Gerät ist nicht für den gewerblichen Gebrauch
konzipiert.
20. Verwenden Sie das Gerät nur zu seinem
bestimmungsgemäßen Zweck.
21. Wickeln Sie das Kabel nicht um das Gerät und knicken Sie
es nicht.
22. Stellen Sie das Gerät auf eine stabile, ebene Fläche, von
der es nicht herunterfallen kann.
23. Bitte schützen Sie das Produkt vor übermäßiger
Verschmutzung und Feuchtigkeit.
24. Lassen Sie das Gerät nicht unbeaufsichtigt laufen. Wenn
Sie den Arbeitsplatz verlassen, schalten Sie das Gerät
immer aus oder ziehen Sie den Stecker aus der Steckdose
(ziehen Sie direkt am Stecker, nicht am Kabel).
25. Das Gerät nicht an eine Wand oder ein anderes Gerät
stellen. Lassen Sie mindestens 10 cm Platz an Rückseite,
Seiten und über dem Gerät.
26. Beim Frittieren mit Heißluft entweicht heißer Dampf
durch die Luftaustrittsöffnungen. Halten Sie Ihre Hände
und Ihr Gesicht in einem sicheren Abstand zum Dampf
und zu den Luftaustrittsöffnungen. Nehmen Sie sich auch
vor heißem Dampf und heißer Luft in Acht, wenn Sie den
Behälter aus dem Gerät entfernen.

- 14 -
27. Ziehen Sie sofort den Stecker des Gerätes aus der
Steckdose, wenn Sie dunklen Rauch aus dem Gerät
kommen sehen. Warten Sie, bis kein Rauch mehr zu sehen
ist, bevor Sie den Behälter aus dem Gerät nehmen.
28. Vergewissern Sie sich vor jedem Gebrauch des Gerätes,
dass das Heizelement und die Umgebung sauber und frei
von Speiseresten sind, um eine einwandfreie Funktion zu
gewährleisten.
29. Vorsicht –heisse Oberfläche.
WARNUNG! Bitte berühren Sie während des Gebrauchs
nicht die Oberfläche. Die Temperatur der zugänglichen
Oberflächen kann sehr hoch sein, wenn das Gerät in
Betrieb ist.
30. Aus dem Lüftungsschlitz an der Rückseite des Gerätes
kommt heiße Luft. Achten Sie darauf, ausreichend
Abstand zu Material, das hitzeempfindlich ist, wie zum
Beispiel Glas, einzuhalten.
31. Legen Sie niemals heißes Zubehör auf die offene Tür.
Durch das heiße Zubehör kann die Tür beschädigt werden.
Außerdem besteht Verletzungsgefahr, da das Gerät
umkippen kann.
32. Schließen Sie das Gerät nicht zusammen mit anderen
Verbrauchern mit hoher elektrischer Leistung an eine
Mehrfachsteckdose an, um Überlastung und einen
möglichen Kurzschluss (Brand) zu vermeiden.
33. Stecken Sie keine Gegenstände in die Lüftungsöffnungen
des Geräts und achten Sie darauf, dass diese Öffnungen
nicht verstopfen.
34. Achten Sie darauf, dass Speisen, die Ö l und Fett enthalten,
nicht überhitzt werden. Stellen Sie keine mit Ö l oder
Flüssigkeit gefüllten Behälter in das Gerät.
35. Decken Sie das Gerät während des Betriebs nicht ab. Es
besteht Brandgefahr durch Überhitzung.

- 15 -
AF-124772 DE
TEILEBESCHREIBUNG
1. Hauptgerät
2. Bedienfeld
3. Garraum
4. Tür
5. Rotierender Korb
6. Griff für Grillspieß und rotierenden Korb
7. Spießgabel
8. Grillspieß
9. Fettauffangschale
10. Schaschlikspieße
11. Drehscheiben
12. Backblech (3 Stück)
BEDIENFELD
1. Garraumlampe
2. Rotationsfunktion
3. Menüliste
4. Digitalanzeige
5. Ein-/Ausschalter
6. Lüftersymbol
7. Tasten Temperatur „+“ / Temperatur „-“
8. Tasten Garzeit „+“ / Garzeit „-“

- 16 -
VOR DEM GEBRAUCH
Lesen Sie vor Gebrauch zuerst alle Anweisungen durch und bewahren Sie diese für späteres Nachschlagen auf.
Schließen Sie dieses Gerät ausschließlich an eine geerdete Steckdose an. Entfernen Sie vor der Erstnutzung das
Verpackungsmaterial. Reinigen Sie das Gerät wie unter „Reinigung und Pflege“ beschrieben. Reinigen Sie das
Gerät innen und außen mit einem weichen Tuch. Achten Sie hierbei darauf, dass die elektrischen Bauteile
trocken bleiben.
Lassen Sie das Gerät vor dem ersten Gebrauch etwa 10 Minuten laufen, um alle Produktionsrückstände
abzubrennen. Stellen Sie sicher, dass eine gute Belüftung gewährleistet ist. Wenn Sie das Gerät zum ersten
Mal einschalten, breitet sich vom Gerät etwas Rauch und ein typischer Geruch aus. Dies ist normal und wird
bald aufhören.
GEBRAUCH
1. Stellen Sie das Gerät auf eine trockene, feste und hitzebeständige Fläche. Das Gerät wird während des
Gebrauchs heiß; stellen Sie es daher nicht in die unmittelbare Nähe anderer Objekte.
2. Ö ffnen Sie den Garraum am Türgriff und legen Sie die Zutaten in den Garraum. Wählen Sie das
gewünschte Zubehör:
Backblech: Die Backbleche sind zum Trocknen bestimmt. Sie können
allerdings auch zum Aufbacken, Aufwärmen usw. verwendet werden.
Das Heizelement befindet sich oben. In der oberen Position werden
die Speisen schneller gegart und das Ergebnis ist knusprig. Die mittlere
Position empfiehlt sich für gleichmäßiges Erhitzen von allen Seiten.
Die untere Position eignet sich für schonendes Garen. Schieben Sie
das Backblech in den Garraum. Wählen Sie die gewünschte
Garposition.
Grillspieß mit Gabeln: zum Grillen großer Fleischstücke. Stecken Sie
den Grillspieß längs durch das Fleisch, das Sie zubereiten möchten.
Fixieren Sie das Fleisch mit den Gabeln; sichern Sie den Spieß mit den
Schrauben. Schrauben Sie die Schrauben nicht hinter den Kerben fest,
die die äußerste Position für die Befestigungsschrauben markieren.
Stecken Sie das eine Ende des Grillspießes in die runde Halterung an
der linken Wand des Garraums, und hängen Sie dann das andere Ende
des Grillspießes in die Halterung an der rechten Wand des Garraums
ein.
Grillspieß mit Schaschlikspießen und Drehscheiben: Stecken Sie den
Grillspieß in die Drehscheiben. Fixieren Sie ihn mit den
Befestigungsschrauben. Stecken Sie die Schaschlikspieße mit Fleisch in
die Drehscheiben. Achten Sie darauf, dass die Schaschlikspieße
eingerastet sind. Stecken Sie das eine Ende des Grillspießes in die
runde Halterung an der linken Wand des Garraums, und hängen Sie
dann das andere Ende des Grillspießes in die Halterung an der rechten
Wand des Garraums ein.
Rotierender Korb: für die Zubereitung von Pommes frites oder
anderen Kartoffelspeisen, Gemüsestücken, Fleisch und
Tiefkühlprodukte wie Hähnchen-Nuggets oder Tintenfischringe.
Ö ffnen Sie die Klappe des rotierenden Korbs. Befüllen Sie den
rotierenden Korb zu höchstens ¾ mit Gargut. Überfüllen Sie den Korb
nicht mit Zutaten. Sonst werden die Lebensmittel nicht gleichmäßig
gegart. Schließen Sie den Korb und achten Sie darauf, dass er korrekt
verschlossen ist, und sich während des Garvorgangs nicht öffnen
kann. Hängen Sie den Korb gemäß den Richtungsmarkierungen an
beiden Seiten des Korbs in den Garraum: L = links; R = rechts

- 17 -
3. Stellen Sie die Fettauffangschale auf den Boden, um tropfendes Fett aufzufangen.
4. Schließen Sie den Garraum und verbinden Sie das Gerät mit der Stromquelle. Der Buzzer erzeugt einen
Piepton. Das digitale Display und das Bedienfeld blinken einmal, wohingegen die Anzeigeleuchte der Taste
„ “ dauerhaft leuchtet. Das Gerät schaltet in den Stand-by-Modus. Im Stand-by-Modus ist nur die Taste
„ “ bedienbar; die anderen können nicht bedient werden.
5. Drücken Sie die Taste „ “ im Stand-by-Modus, der Buzzer erzeugt daraufhin einen Piepton. Das Gerät
schaltet in den Einstell-Modus. Alle Anzeigeleuchten (außer dem Lüftersymbol) auf dem Bedienfeld
leuchten nun. Das digitale Display zeigt abwechselnd die voreingestellte Gartemperatur (185℃) und die
voreingestellte Garzeit (15 Minuten) an. Im Einstell-Modus sind alle Tasten bedienbar.
6. Drücken Sie die Tasten auf der Menüliste, um die gewünschte Speise auszuwählen. Die Gartemperatur
und die Garzeit sind voreingestellt. Sie können auch die Tasten „+“ / „-“ drücken, um Ihre bevorzugte
Gartemperatur (von 80 bis 200℃) und Garzeit (von 1 bis 90 Minuten) manuell einzustellen. Hinweis:
Wenn 4 Sekunden lang keine Taste betätigt wird, schaltet sich das Gerät automatisch ein.
Zwei weitere Funktionen:
-„ “: Wenn Sie während des Garvorgangs die Lebensmittel prüfen möchten, drücken Sie diese Taste,
um die Lampe im Garraum einzuschalten. Drücken Sie die Taste erneut, um die Lampe auszuschalten.
-„ “: Drücken Sie die Taste, um die Rotationsfunktion zu aktivieren, wenn der Grillspieß oder
rotierende Korb verwendet wird. Drücken Sie die Taste erneut, um die Rotation abzubrechen.
7. Drücken Sie nach dem Einstellen die Taste „ “, um das Gerät zu starten. Das Gerät schaltet in den
Garmodus. Das digitale Display zeigt die Gartemperatur und die verbleibende Garzeit an.
8. Während des Garvorgangs zeigt das digitale Display die Countdown-Zeit bis „OFF“ an. Das Gerät schaltet
in den Stopp-Modus. Zum Beispiel: 08→07→…→01→OFF (Stopp-Modus). Im Stopp-Modus schaltet sich
das Heizelement sofort aus, und der Lüfter läuft etwa 26 Sekunden lang weiter. Das Gerät schaltet mit
fünf langen Pieptönen in den Standby-Modus.
Sie können auch die Taste „ “ drücken, um das Gerät manuell auszuschalten. Das Heizelement schaltet
sich sofort aus, und der Lüfter läuft ca. 26 Sekunden lang weiter. Das Gerät wechselt in den Standby-
Modus.
9. Ö ffnen Sie den Garraum, um die Speisen herauszunehmen. Prüfen Sie, ob die Speisen gar sind. Falls nicht,
verlängern Sie die Garzeit um einige Minuten. Drücken Sie dann die Taste „ “, um das Gerät erneut zu
starten. Sie können auch den Garraum öffnen, um die Speisen während des Garvorgangs zu prüfen. Das
Gerät stoppt sofort. Schließen Sie den Garraum, das Gerät setzt den Betrieb dann mit der Einstellung fort.
Drücken Sie die Tasten „+“ / „-“, um Gartemperatur/Garzeit nach Bedarf anzupassen.
10. Ziehen Sie nach dem Gebrauch den Netzstecker aus der Wandsteckdose. Tragen Sie immer
Ofenhandschuhe und benutzen Sie den Griff (für den Grillspieß und den rotierenden Korb), wenn Sie die
Speisen aus dem Gerät nehmen.
Hinweis: Das Gerät ist mit einem Überhitzungsschutz ausgestattet. Bei Überlastung schaltet es ab. Ziehen Sie
in diesem Fall den Netzstecker aus der Steckdose, und lassen Sie das Gerät vollständig abkühlen.

- 18 -
VORSICHT:
1. Tauchen Sie das Gehäuse nicht ins Wasser und spülen Sie es nicht unter dem Wasserhahn ab.
2. Vermeiden Sie das Eindringen von Flüssigkeiten in das Gerät, um einen Stromschlag oder Kurzschluss zu
verhindern.
3. Der Luftein- und -auslass darf während der Betriebszeit des Geräts nicht abgedeckt werden.
4. Berühren Sie während des Betriebs nicht die Geräteinnenseiten.
5. Während des Betriebs strömt heißer Dampf aus dem Luftauslass. Halten Sie mit Händen und Gesicht einen
sicheren Abstand zum Luftauslass und Dampf.
6. Lassen Sie das Gerät für ca. 30 Minuten abkühlen, bevor Sie es anfassen oder säubern.
Menüliste
Symbol
Programm
Temperatur
Garzeit
Pommes frites
200 ℃
15 min
Steaks / Koteletts
175 ℃
25 min
Fisch
165 ℃
15 min
Garnelen
160 ℃
12 min
Pizza
180 ℃
15 min
Hühnerfleisch
185 ℃
40 min
Backen
160 ℃
30 min
Grillen am Spieß
(mit automatischer Drehung)
190 ℃
30 min
Trocknen
30 ℃
2 h
Aufwärmen
115 ℃
12 min
Hinweis: Die voreingestellte Garzeit und -temperatur für Trockenobst beträgt 30℃und 2 h; die Temperatur
kann von 30 bis 80℃und die Garzeit von 2 bis 24 h eingestellt werden.
REINIGUNG UND PFLEGE
1. Ziehen Sie den Netzstecker aus der Steckdose und lassen Sie das Gerät vollständig abkühlen.
2. Säubern Sie die Außen- und Innenseite des Geräts mit einem feuchten Tuch und reiben Sie es mit einem
weichen, sauberen Tuch trocken.
3. Keinesfalls scheuernde Reiniger oder Schwämme verwenden.
4. Waschen Sie alle gebrauchten Zubehörteile mit Geschirrspülmittel und warmem Wasser ab. Reinigen Sie
das Zubehör gründlich und trocknen Sie es vor dem Gebrauch sorgfältig ab. Bei hartnäckiger
Verschmutzung wird empfohlen, das Zubehör vorher in warmem Wasser mit Spülmittel einzuweichen.
Alle Zubehörteile sind spülmaschinenfest.
5. Tauchen Sie das Gerät nicht in Wasser oder andere Flüssigkeiten! Nicht in die Spülmaschine stellen!
6. Reinigen Sie das Gerät und das verwendete Zubehör nach jedem Gebrauch, um Keimbildung und die
Verbrennung von Speiseresten zu vermeiden. Lassen Sie Speisereste nicht antrocknen.

- 19 -
PROBLEMBEHEBUNG
Falls das Gerät nicht ordnungsgemäß funktioniert, überprüfen Sie zunächst, ob Sie das Problem selbst beheben
können. Wenn sich das Problem mit nachfolgenden Maßnahmen nicht beheben lässt, wenden Sie sich bitte an
den Kundendienst.
Versuchen Sie nicht, ein Elektrogerät selbst zu reparieren!
Problem
Mögliche Ursache
Lösung
Gerät funktioniert nicht. Anzeige
auf dem Bedienfeld schaltet sich
nicht ein.
Tür ist nicht richtig geschlossen.
Tür schließen.
Netzstecker steckt nicht richtig in
der Steckdose.
Netzstecker bis zum Anschlag in
die Steckdose stecken.
Steckdose defekt.
Andere Steckdose versuchen.
Keine Netzspannung vorhanden.
Sicherung im Sicherungskasten
überprüfen.
Überhitzungsschutz hat ausgelöst.
Netzstecker aus der Steckdose
ziehen und Gerät vollständig
abkühlen lassen. Dann erneut
versuchen.
Sicherung im Sicherungskasten
hat abgeschaltet.
Zu viele Geräte am selben
Stromkreis angeschlossen.
Zahl der Geräte im Stromkreis
verringern.
Speisen sind nicht gleichmäßig
gegart.
Speisen mit unterschiedlichen
Garzeiten wurden gleichzeitig
zubereitet.
Speisen mit längerer Garzeit zuerst
ins Gerät geben und einige Zeit
später die Speisen mit kürzerer
Garzeit hinzufügen.
Speisen mit unterschiedlichen
Gartemperaturen wurden
gleichzeitig zubereitet.
Speisen mit unterschiedlichen
Gartemperaturen der Reihe nach
garen.
Eingestellte Garzeit zu kurz oder
Temperatur zu niedrig.
Garzeit oder Temperatur erhöhen.
Rotierender Korb oder Backblech
überfüllt.
Speisenmenge verringern.
Die Speisen liegen aufeinander.
Gargut ausbreiten und gelegentlich
durchmischen.
Speisen angebrannt.
Eingestellte Temperatur zu hoch
oder Garzeit zu lang.
Temperatur oder Garzeit
verringern.
Pommes frites aus frischen
Kartoffeln sind nicht knusprig.
Die Kartoffeln enthalten zu viel
Wasser.
Kartoffeln in schmale Stücke
schneiden. Kartoffelstücke mit
Küchentuch trockentupfen und
dann mit etwas Speiseöl
beträufeln.
Unangenehmer Geruch oder
Rauch während des Betriebs.
Gerät ist verschmutzt.
Gerät wie unter „Reinigung und
Pflege“ beschrieben reinigen.
Gerät wird zum ersten Mal
verwendet.
Bei Erstbenutzung neuer Geräte
tritt meistens Geruchsentwicklung
auf. Der Geruch verschwindet
normalerweise nach einigen
Verwendungen des Geräts.
Zu viel Ö l oder Fett.
Ü berschüssiges Ö l oder Fett
entfernen.
Fehlermeldungen E1 oder E2
Sensor defekt.
Bitte wenden Sie sich an den
Kundendienst.
Table of contents
Languages:
Other emerio Oven manuals