EMMO Monta Pro User manual
1
EMMOM
Monta 2019
EMMO
Monta Pro
USER’S MANUAL

2
© 2019 Emmo Inc. All rights reserved. No texts, details, or illustrations from this Manual may be reproduced or
distributed, or become the subject of unauthorized use for commercial purposes. Should you discover any errors,
we would be grateful if you would bring them to our attention.
CAUTIONS
This manual contains important safety, performance and
service information. Read and understand it along with the
information provided during the on-delivery instructions before
using the product, and keep it for reference.
MENU

3
CAUTIONS MENU
About EMMO --------------------------------------------------- 4
Rules and Regulations of Riding an E-Bike --------- 5
Parts Overview ------------------------------------------------ 6
Speedometer and Control Buttons ---------------------
25
26
27
28
31
33
34
Gear Shifter -----------------------------------------------------
Thumb Throttle -------------------------------------------------
Safety Instructions ------------------------------------------
How to ride -----------------------------------------------------
How to charger -------------------------------------------------
How to remove the battery ------------------------------
Maintenance ----------------------------------------------------
E-Bike Registration Form ----------------------------------
7
29

4
RULES AND REGULATIONSABOUT EMMO
Established in 2009, Emmo Inc. is a proud Canadian venture that is
focused on creating a more sustainable future by providing high quality
electric bicycles. We oer a wide variety of E-bikes that are suitable for
leading a greener, and more stylish, way of living. Emmo E-bikes are
priced competitively with other green solutions. At Emmo, you will get
the best e-bikes and also receive the best service.

5
ABOUT EMMO RULES AND REGULATIONS
of riding an e-bike
According to Canada’s Motor Vehicle Safety Regulations ( MVSR ). A qualified e-
bike (defined as Power Assist Bicycle) must meet the following requirements:
•The e-bike must have operable pedals
•Upper wattage limit for the motor is 500W.
Other requirements include a permanently affixed compliance label from the
manufacturer stating that the vehicle is a power-assisted bicycle under statutory
requirements in force at the time of manufacture. Currently, there is no license, no
insurance, and no vehicle registration required to operate a qualified e-bike
according to federal legislation. E-Bike riders share the same rights and
responsibilities as other road users.
However, provinces and local municipalities have the power to restrict the use of e-
bikes. Most provinces require the rider to wear a helmet. Some provinces have
special requirements with regard to the age limit to operate an e-bike, the type of
helmet required, even the number of wheels and wheel size. In Ontario, typically, e-
bikes are generally treated the same as regular bicycles. According to the Ministry of
Transportation of Ontario
(MTO), the age limit to operate an e-bike is 16 years old and above; the maximum
weight of the bike is 120 kilograms (265 pounds); the bike must have a brake
distance of less than 9 meters; Any modifications made to the bike’s motor tocreate
speeds greater than the legal speed limit are pro-hibited.
As the rules and regulations are subject to changes in different provinces and
municipalities. Please check your municipal bylaw and see where you stand.

6
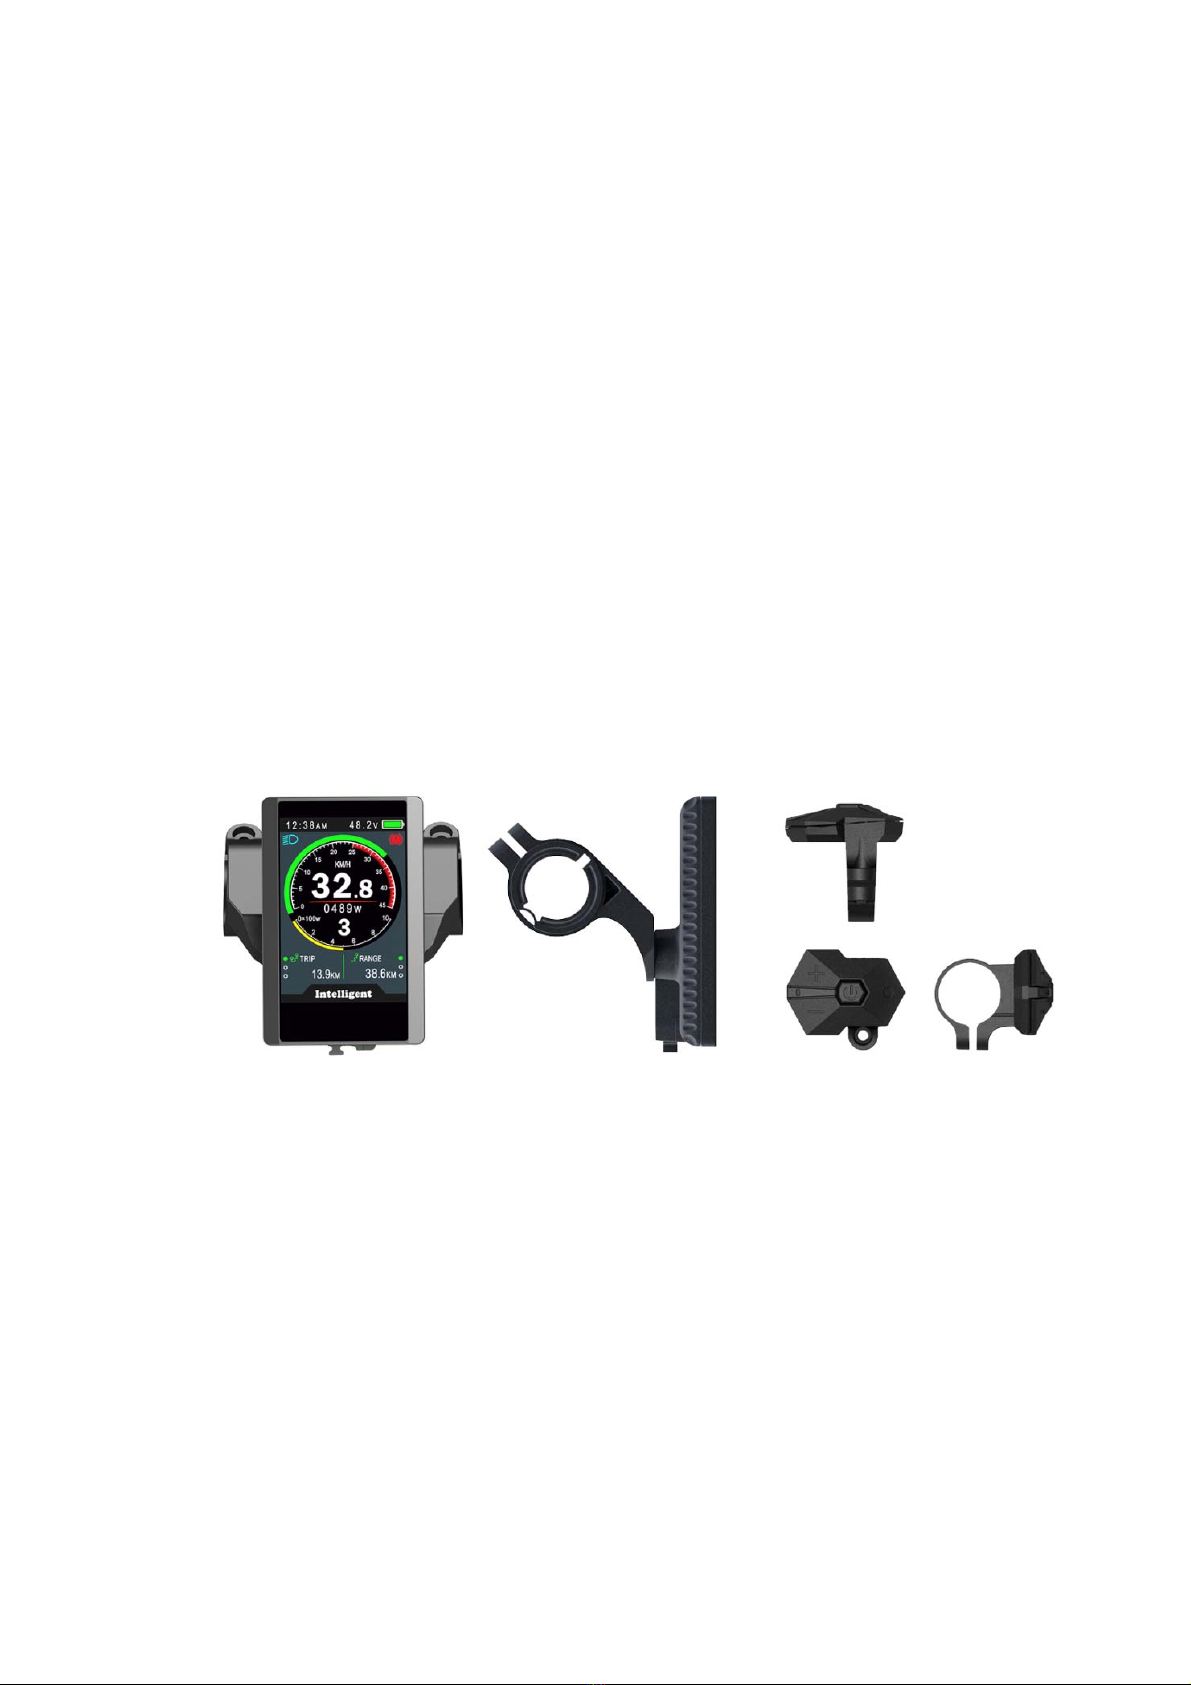
1. PARTS OVERVIEW
2.1 Electrical Parameters
3.2inch IPS screen
24V/36V/48V battery supply
Rated operating current : 40mA
Max operating current : 100mA (36V battery, with USB equipment changed)
USB changing port : 5V 500mA
Off leakage current < 1uA
Max output current to controller : 100mA
Operating temperature : -20~70℃, Storage temperature : -30~80℃
2.2.Dimensions & Material
Product shell is ABS, transparent window is made with high strength Acrylic.
Dimensions : host/L92mm*W60mm*H14mm
2.SPEEDOMETER
7

2.3 Features
Suitable for low temperature,Max -20℃.
High-contrast 3.2inch IPS colorful matrix screen.
Ergonomic external button design, easy to operate.
Speed display : AVG SPEED, MAX SPEED, SPEED(Real-time).
Kilometer / Mile : Can be set according to customers’ habits.
Smart battery indicator : Provide a reliable battery indicator.
9-level Assist :3-level/5-level/9-level optional.
Mileage indicator : Odometer/Trip distance/ Clock/ Riding time.
Power indicator :real time power indicator, digital or analog.
Battery information(needs to be supported by battery communication)
DST indicator(needs to be supported by battery communication)
Speed limit value indicator
Error code indicator.
Light sensor(Optional )
Software upgraded : Software can be upgraded through UART.
USB charging port : 5V/500mA
8

2.4.Display explanation
2.5 Functional Description
•1 Power On/Off
Press and hold Power button for 1 second can turn on/off the display. The Display can
automatically shut down when there is no operate & ride for X minutes(X could be
0~9).
*If the display has been set password power on, you need to input the right password before start.
•2 Assist level
Short press UP/DOWN
button can change the assist level. Available assist levels can
be set in the advanced setting. There are 5 assist levels by default.
Battery
Brake Signal
Front Light
Clock
Power loop
Speed value
Power
Assist level
Power indicator
Mileage Time
Speed Scale
Power Scale
Switchover area
9
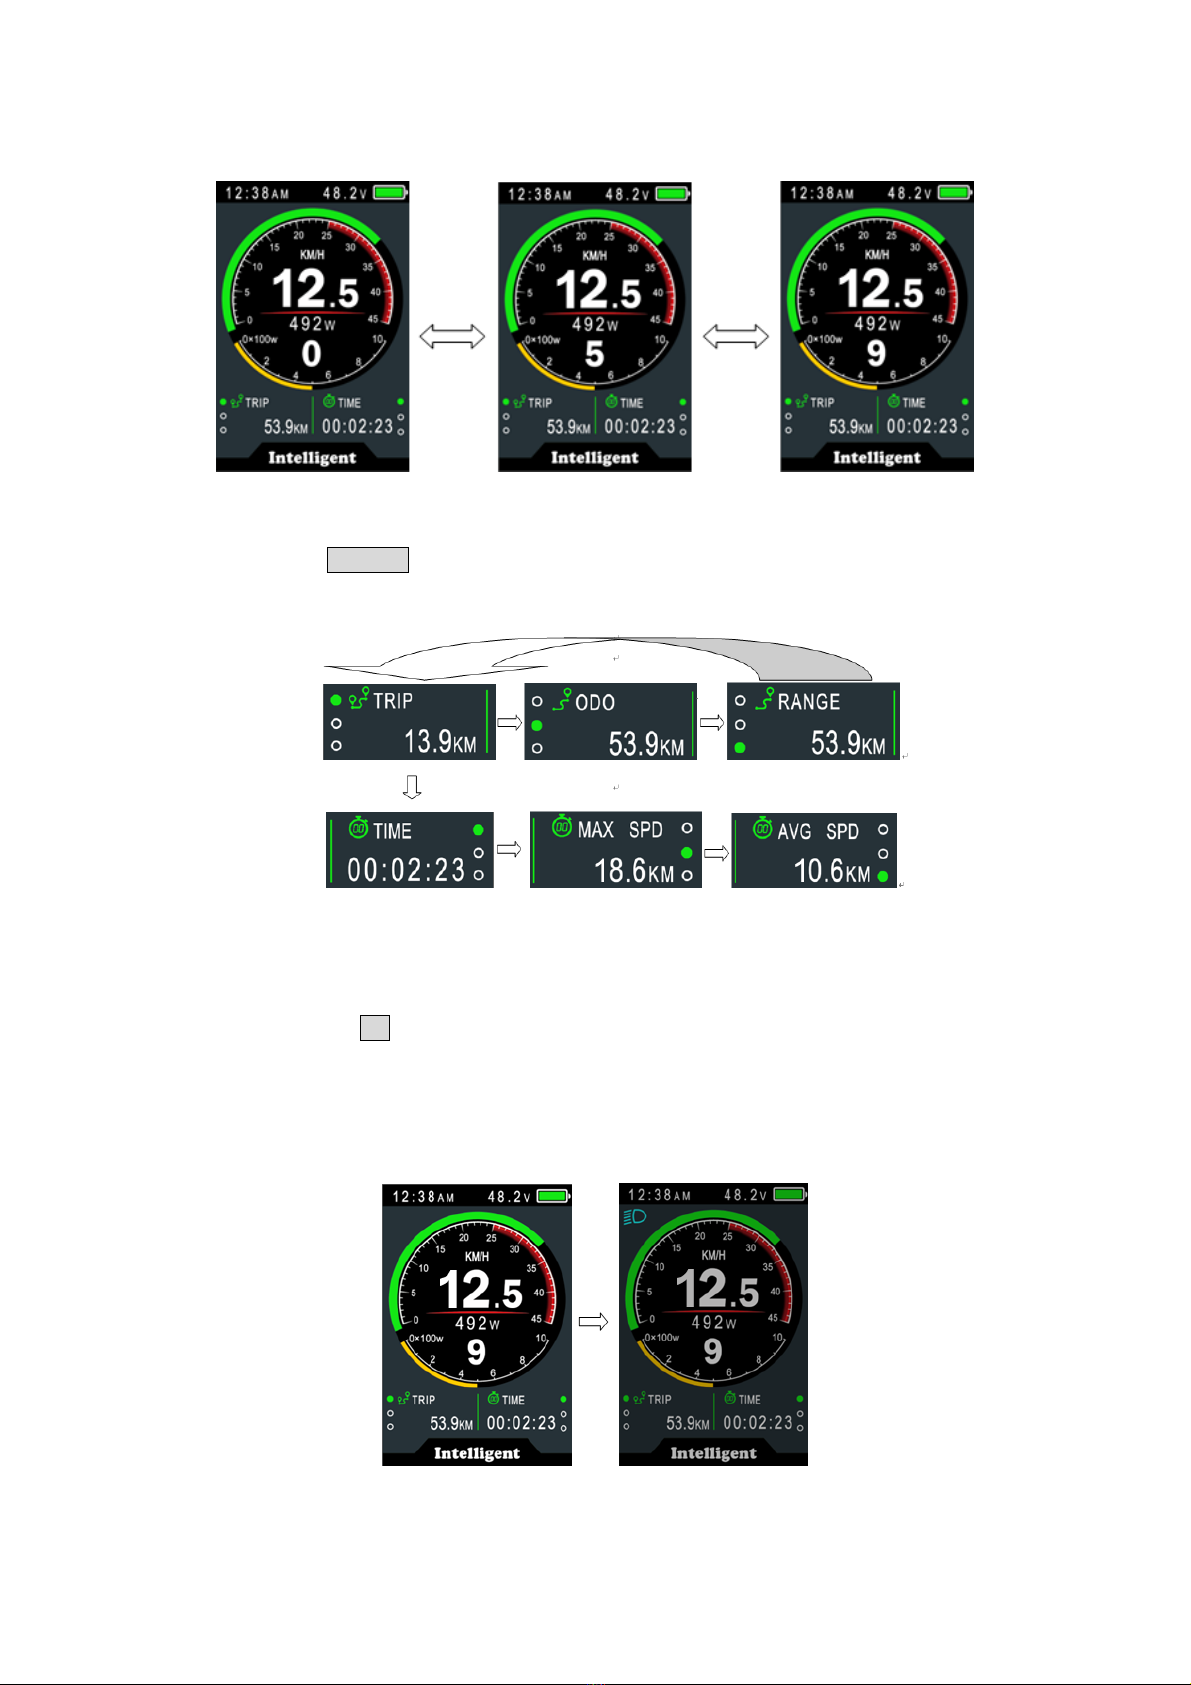
•3 Speed & Mileage mode switch
Short press POWER button can change betweenthe speed and mileage info,TRIP→
ODO→RANGE→TRIP→TIME→MAX SPEED→AVG SPEED
**If there is no operation for 5 seconds, display will return Speed (Real-Time) display automatically.
•4 Headlight/backlight On/Off
Press and hold UP
button for 1 second can turn on/off the headlight, and the screen will
switch to the corresponding mode.
*Although the motor does not work when the battery voltage is low, The headlight can still work for a
while.
Daytime mode night mode
10

button can get into walking mode, quit the mode when the button
•5 Walking mode (6km/h)
Press and hold DOWN
is released.
* This feature needs to be supported by controller.
•6 Temporary data clearance
Press and hold UP & DOWN buttons together for 1 second can reset several temporary
data, temporary data include AVG Speed / MAX Speed / Trip /
Time.
*These temporary data can’t be erased bypowering off.
2.6 Parameter setting
Double press POWER button (press interval less than 0.3 second) can get into setting
menu, press UP/DOWN buttons to change the parameter setting, press POWER button
can switch to next item. Double press
POWER button will exit from the setting menu.
* Display will automatically quit menu when there is no operation for 30 seconds.
* For safety reasons, display can’t get into MENU when riding.
* Display will quit MENU when start riding.
The order of parameters are as follow.
11
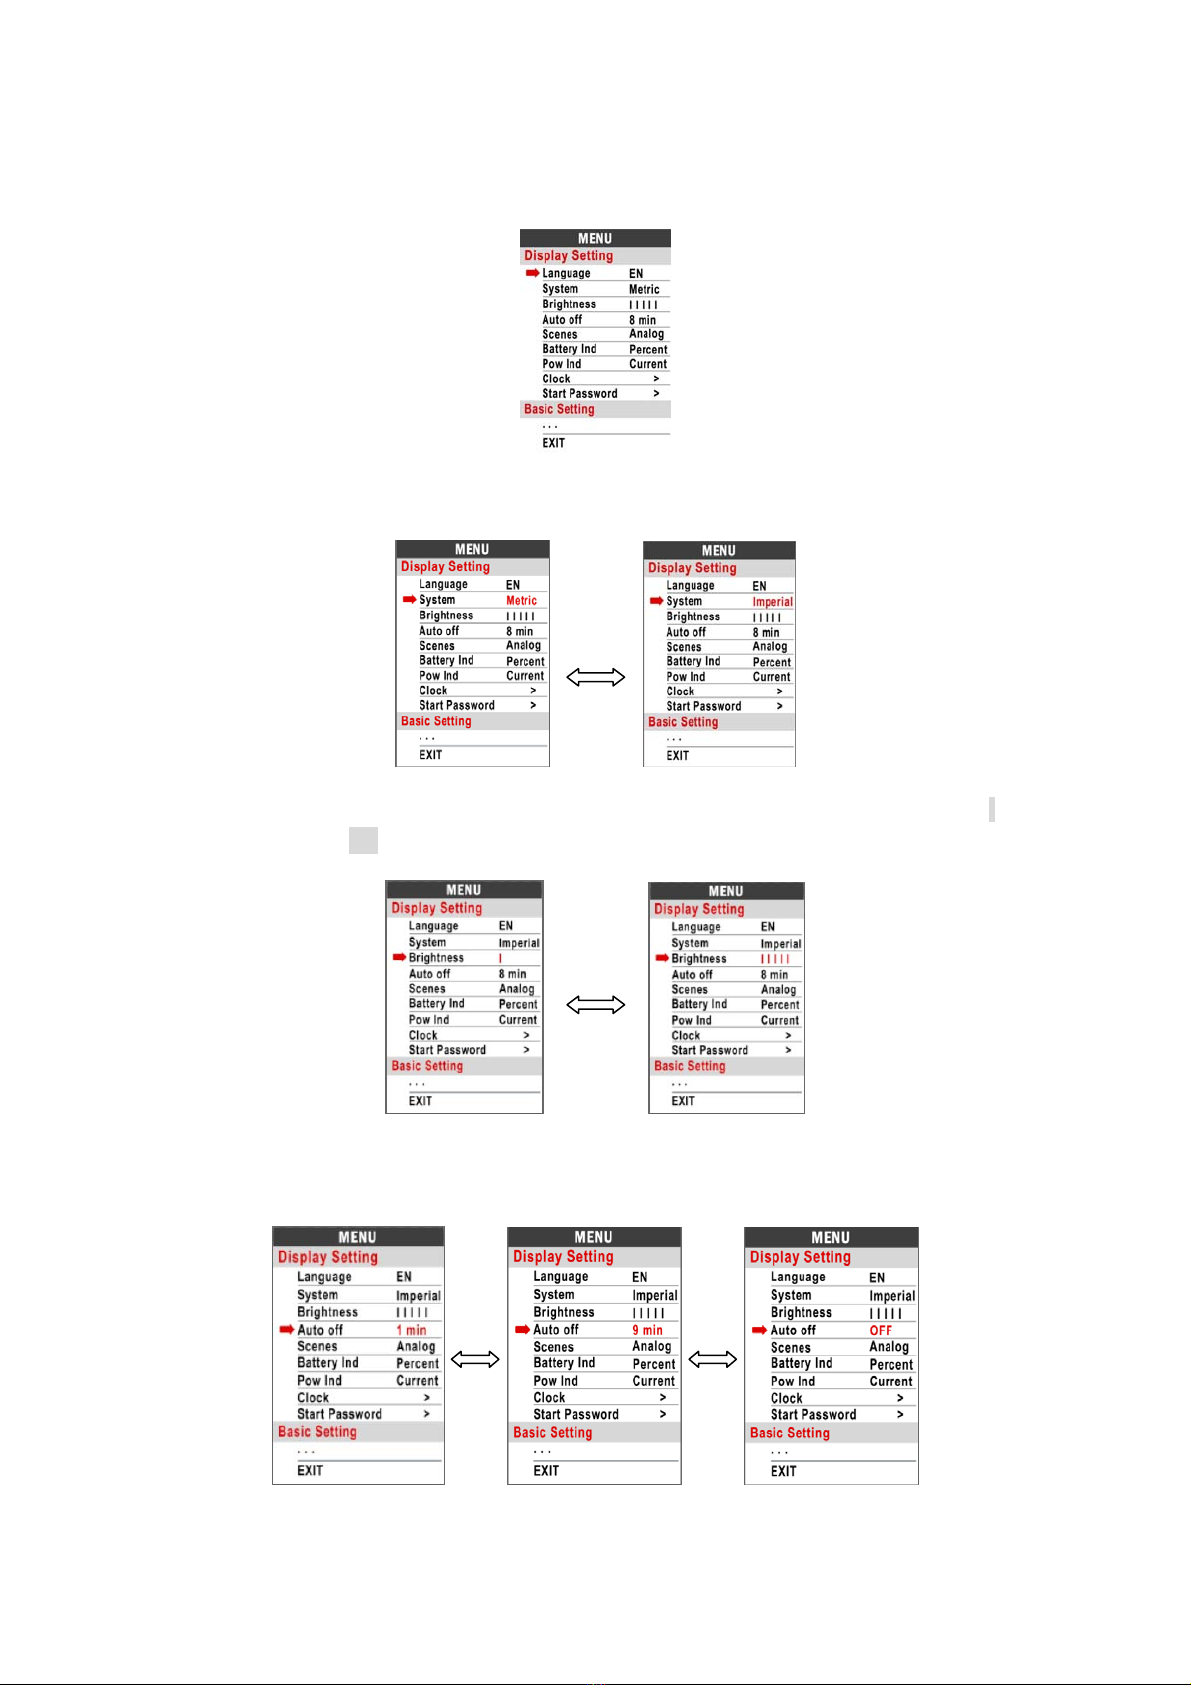
2.6.1 Language:Default EN, Unadjustable
2.6.2 System unit: Press Up / Down button to switch between Metric / Imperial.
2.6.3 Brightness : Press Up / Down button to change the brightness of the backlight, ׀is
the dimmest,׀׀׀׀׀ is the brightest.
2.6.4 Auto off : Press UP/DOWN button to change the auto power off time, from 1 to 9, the
number represent time (in minutes) to shutdown, default value is 5 minutes.
12
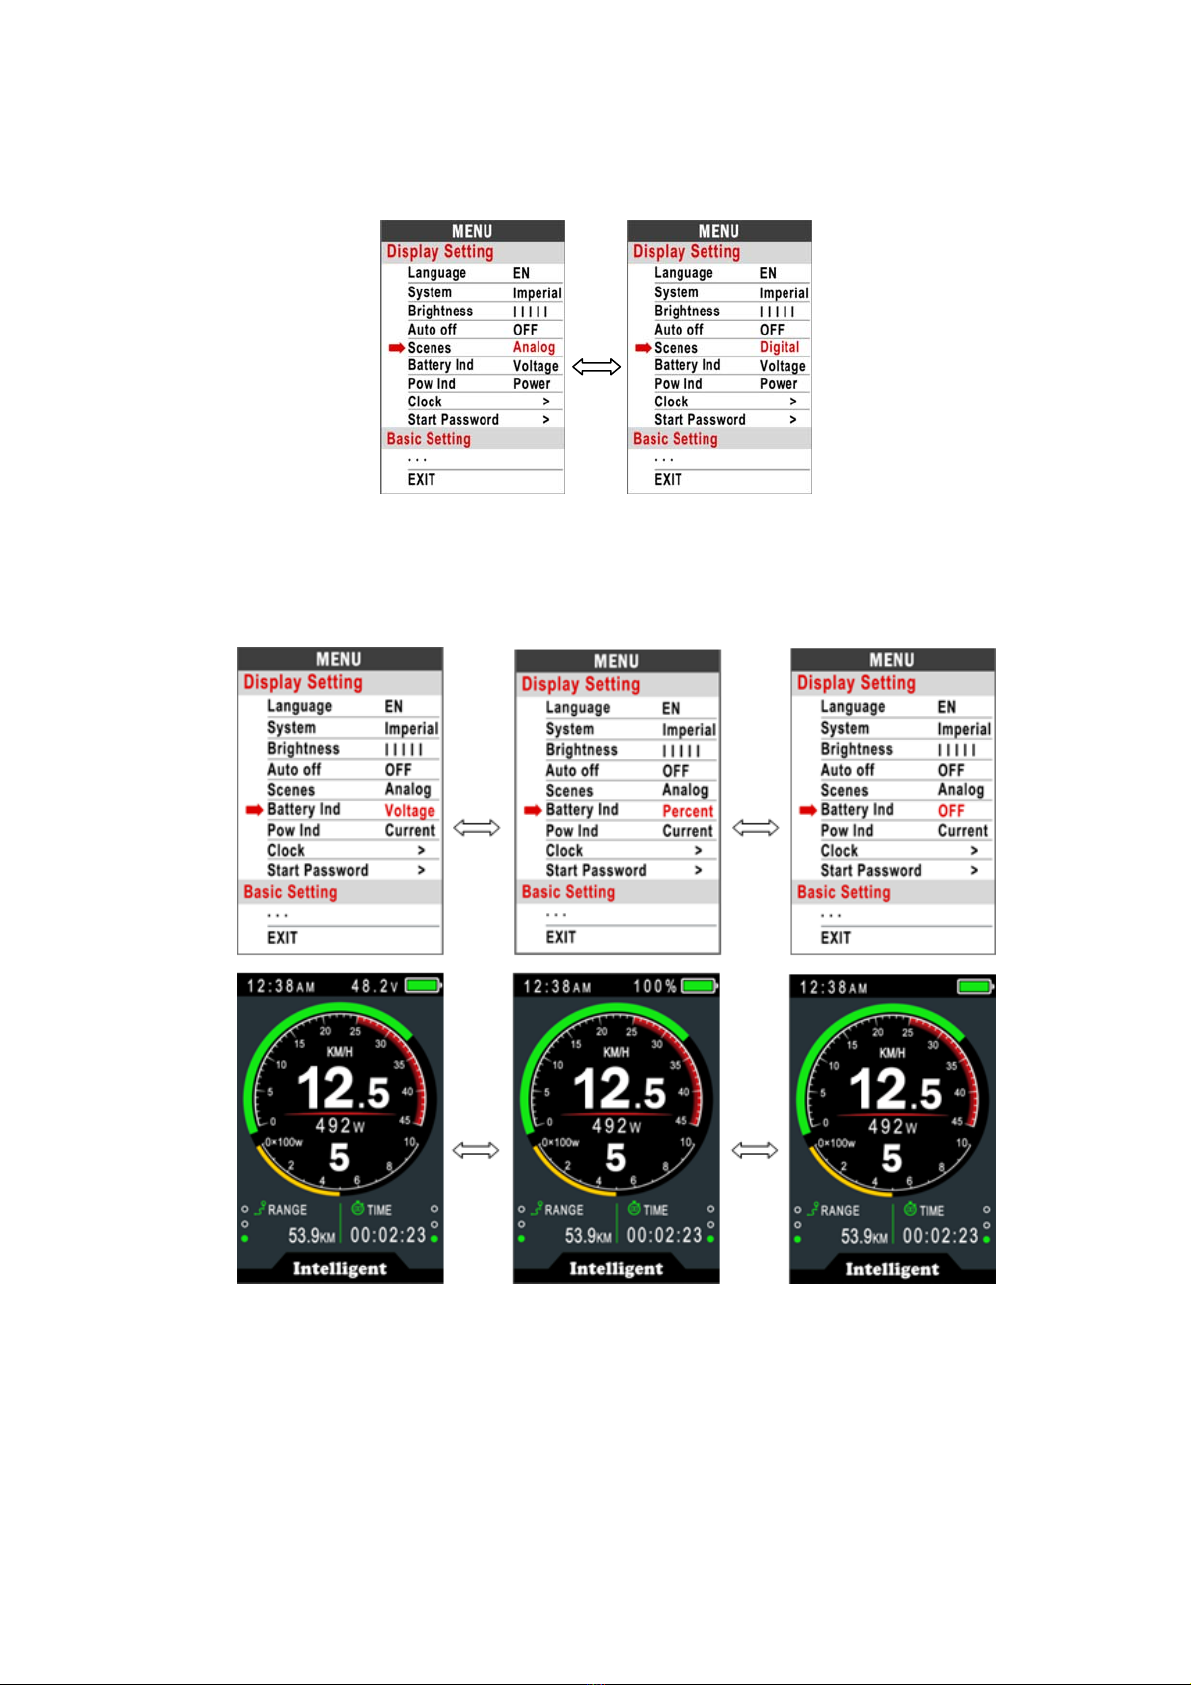
2.6.5 Scenes : Press UP/DOWN button to change the scenes, Digital / Analog(default).
2.6.6 Battery Ind : Press UP/DOWN button to change the battery indicator, Voltage /
Percentage / OFF.
Voltage Percentage OFF
13
2.6.7 Pow Ind : Press UP/DOWN button to change the Power indicator, Power / Current.
* This data represent power output of the battery (not motor).
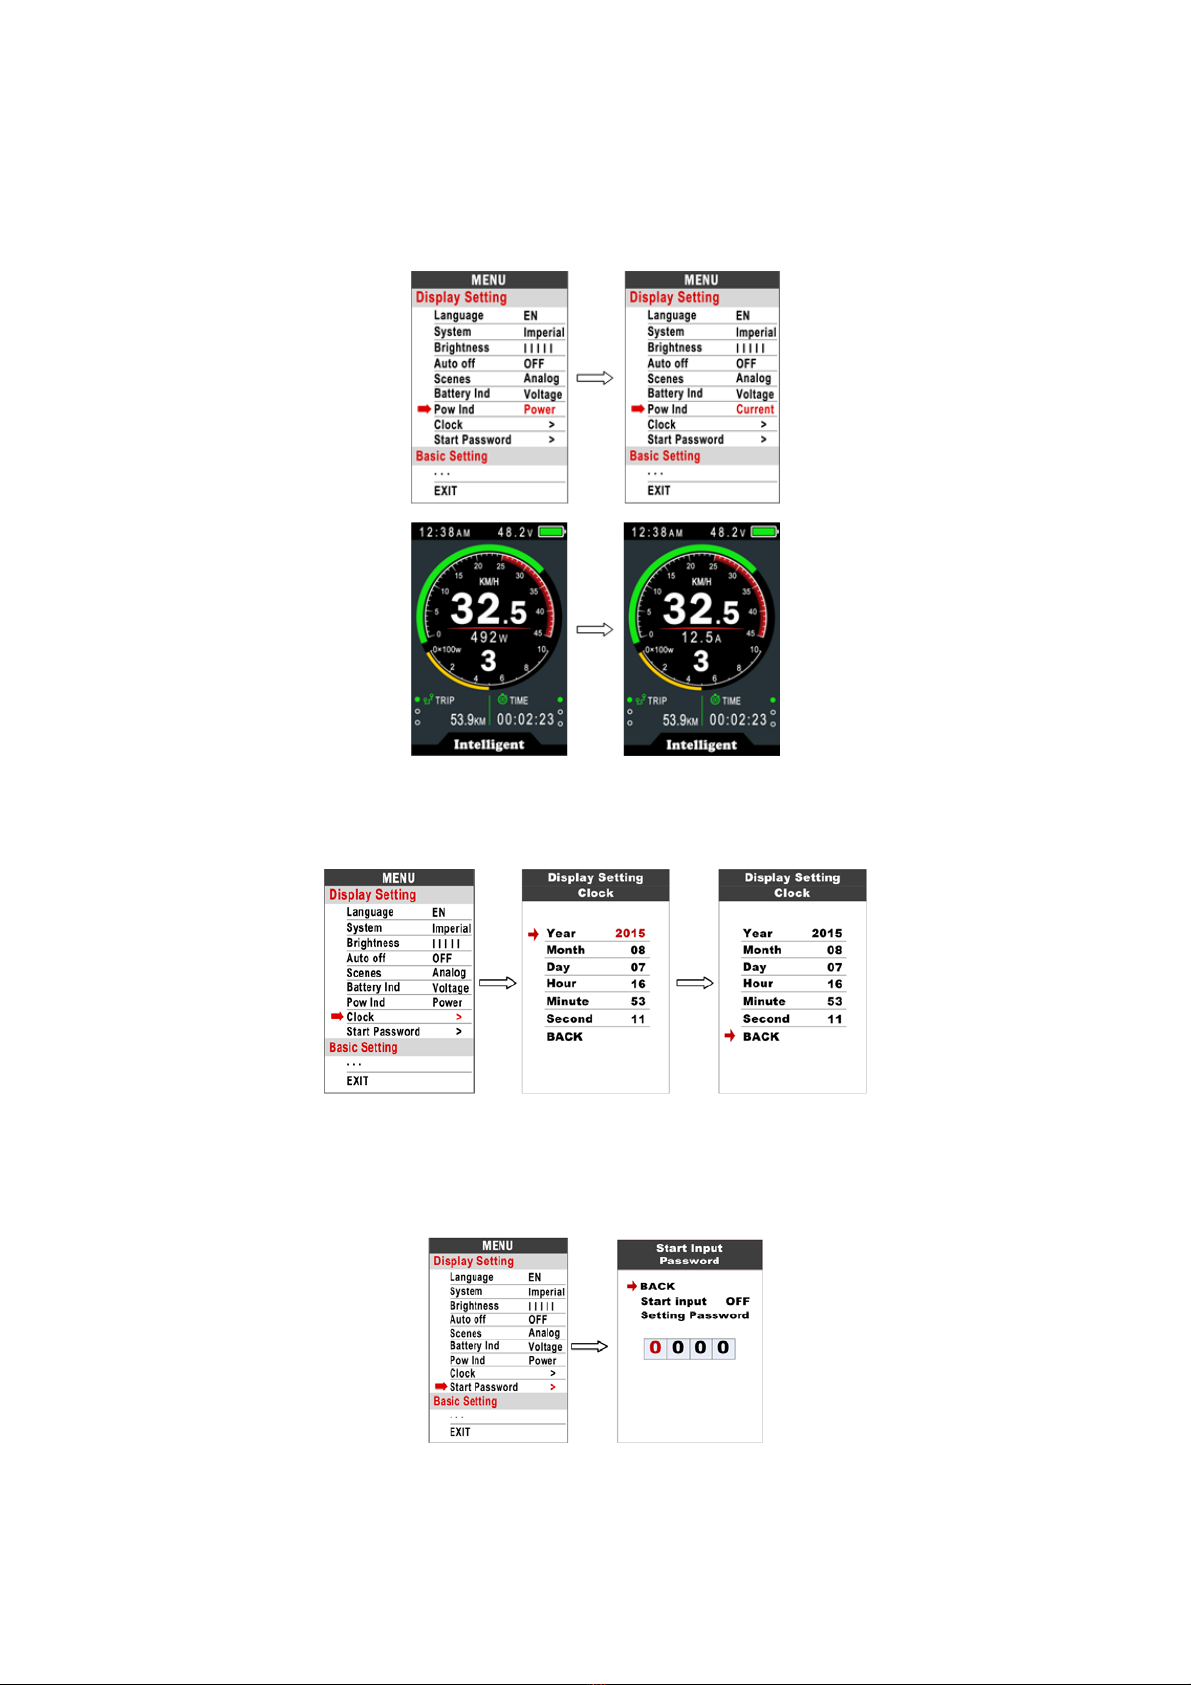
2.6.8 Clock : Clock setting, press POWER button get into the clock setting menu, press
UP/DOWN button to set Year/Month/Day/Hour/Min/Sec.
2.6.9 Start password : Press POWER button get into the password setting menu. If you turn
it on, you must input right password before powering it on.To set the password,
press UP/DOWN to change the number and press POWER to switch to the next digit.
14

You need to input the correct password within 30 seconds, the display will power
off automatically if the password is wrong.
Basic Setting
*Press DOWN button to move the red arrow to , press POWER button can show all
items of the Basic Setting.
2.6.10 Wheel : Press UP/DOWN can change the wheel setting, optional wheel diameter is
16/18/20/22/24/26/27/27.5/28/29 inch.
15

2.6.11 Battery: Press UP/DOWN will change battery voltage setting, optional value is
24V/36V/48V/UBE,UBE means user define value.
button to change the setting. OFF means no power on
the USB port when the bike is off.
2.6.13 Light sensor (Optional): Press the UP/DOWN button to turn ON/OFF the
sensor. Press the POWER button to switch to sensitivity setting. You can change
between HI/MID/LO.
2.6.12 USB port:Press UP/DOWN
16
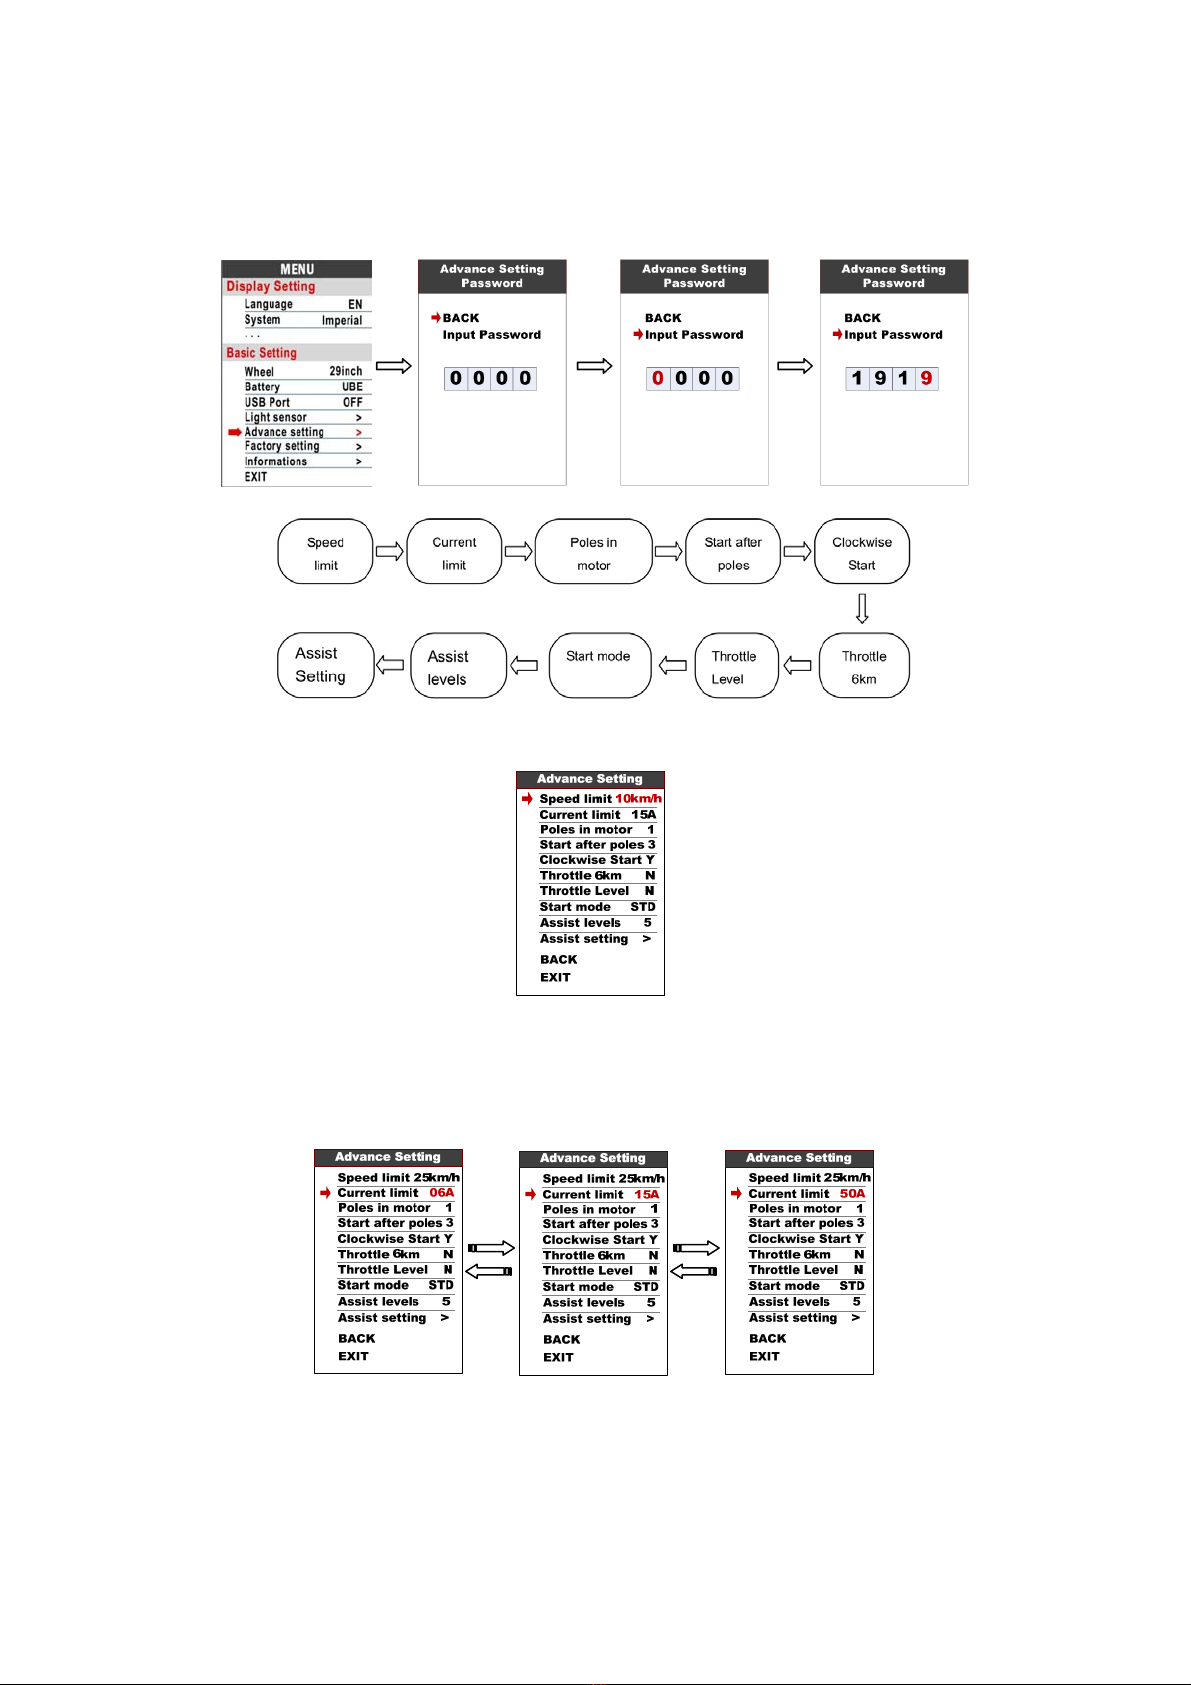
2.6.14 Advance setting : Press POWER button can get into the advance setting menu,
default password is ‘1919’.
2.6.15 Speed limit : Press UP/DOWN will change the speed limit.
2.6.16 Current limit : Press UP/DOWN will change current limit, range 6A~50A. Default
value is 15A.
*Speed limit and current limit are restricted by controller and motor.
17

2.6.17 Poles in motor : Magnetic poles inside the motor, press UP/DOWN will change pole
number, range 1~6. Default value is 1.
2.6.18 Start after poles : How many poles (speed sensor) need to be detected by controller
before starting motor. Default value is 3.
2.6.19 Clockwise start : This parameter represent speed sensor turning direction, default
value is Y (forward).
18
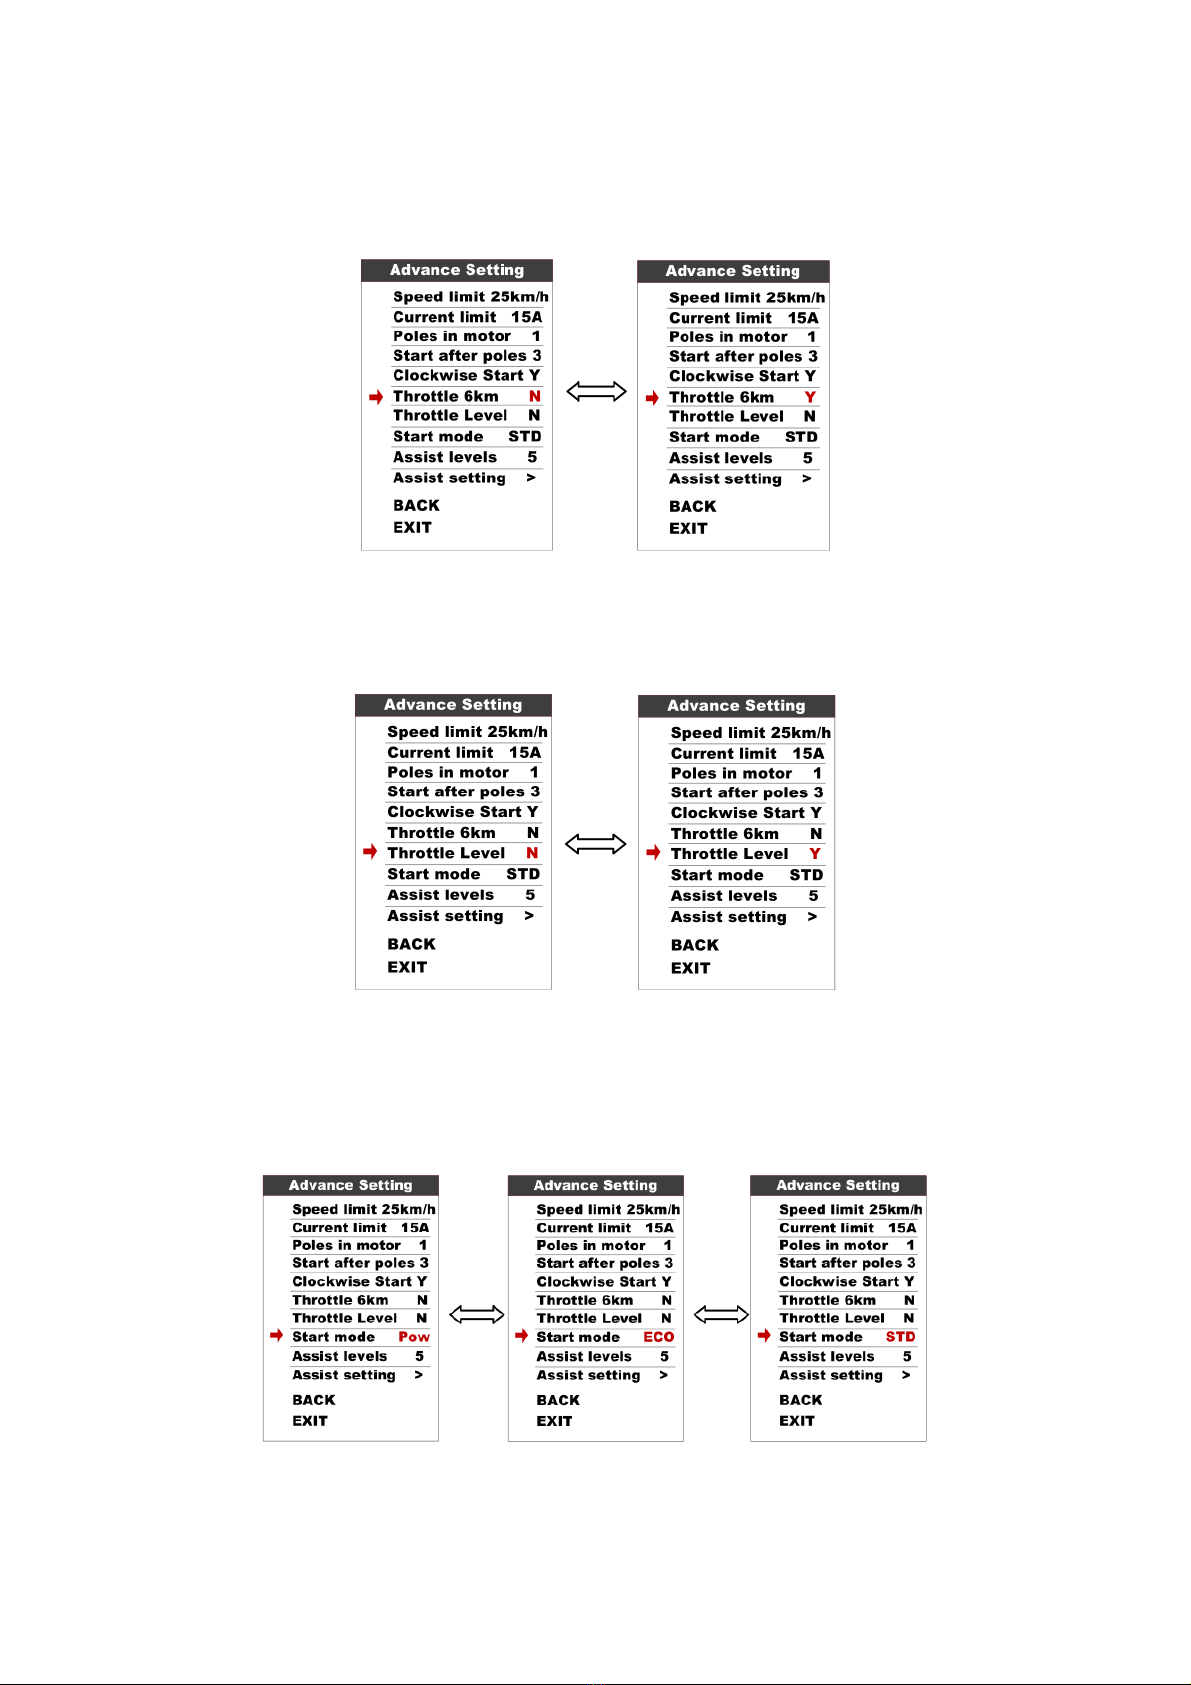
2.6.20 Throttle 6KM : this parameter can set the throttle function, N represent max speed, Y
represent 6km/h.
2.6.21 Throttle Level : This parameter is only valid when Throttle 6KM is set as N,
Press UP/DOWN will change Y/N, N represent Throttle start max speed, Y
represent throttle’s speed is related to the assist level.
2.6.22 Start mode : Pow/ECO/STD(default) represent Power/ECO/Standard, Power mode
means use maximum current when speed up, ECO mode means use minimum
current.
*This function is optional, may not supported by the system.
19
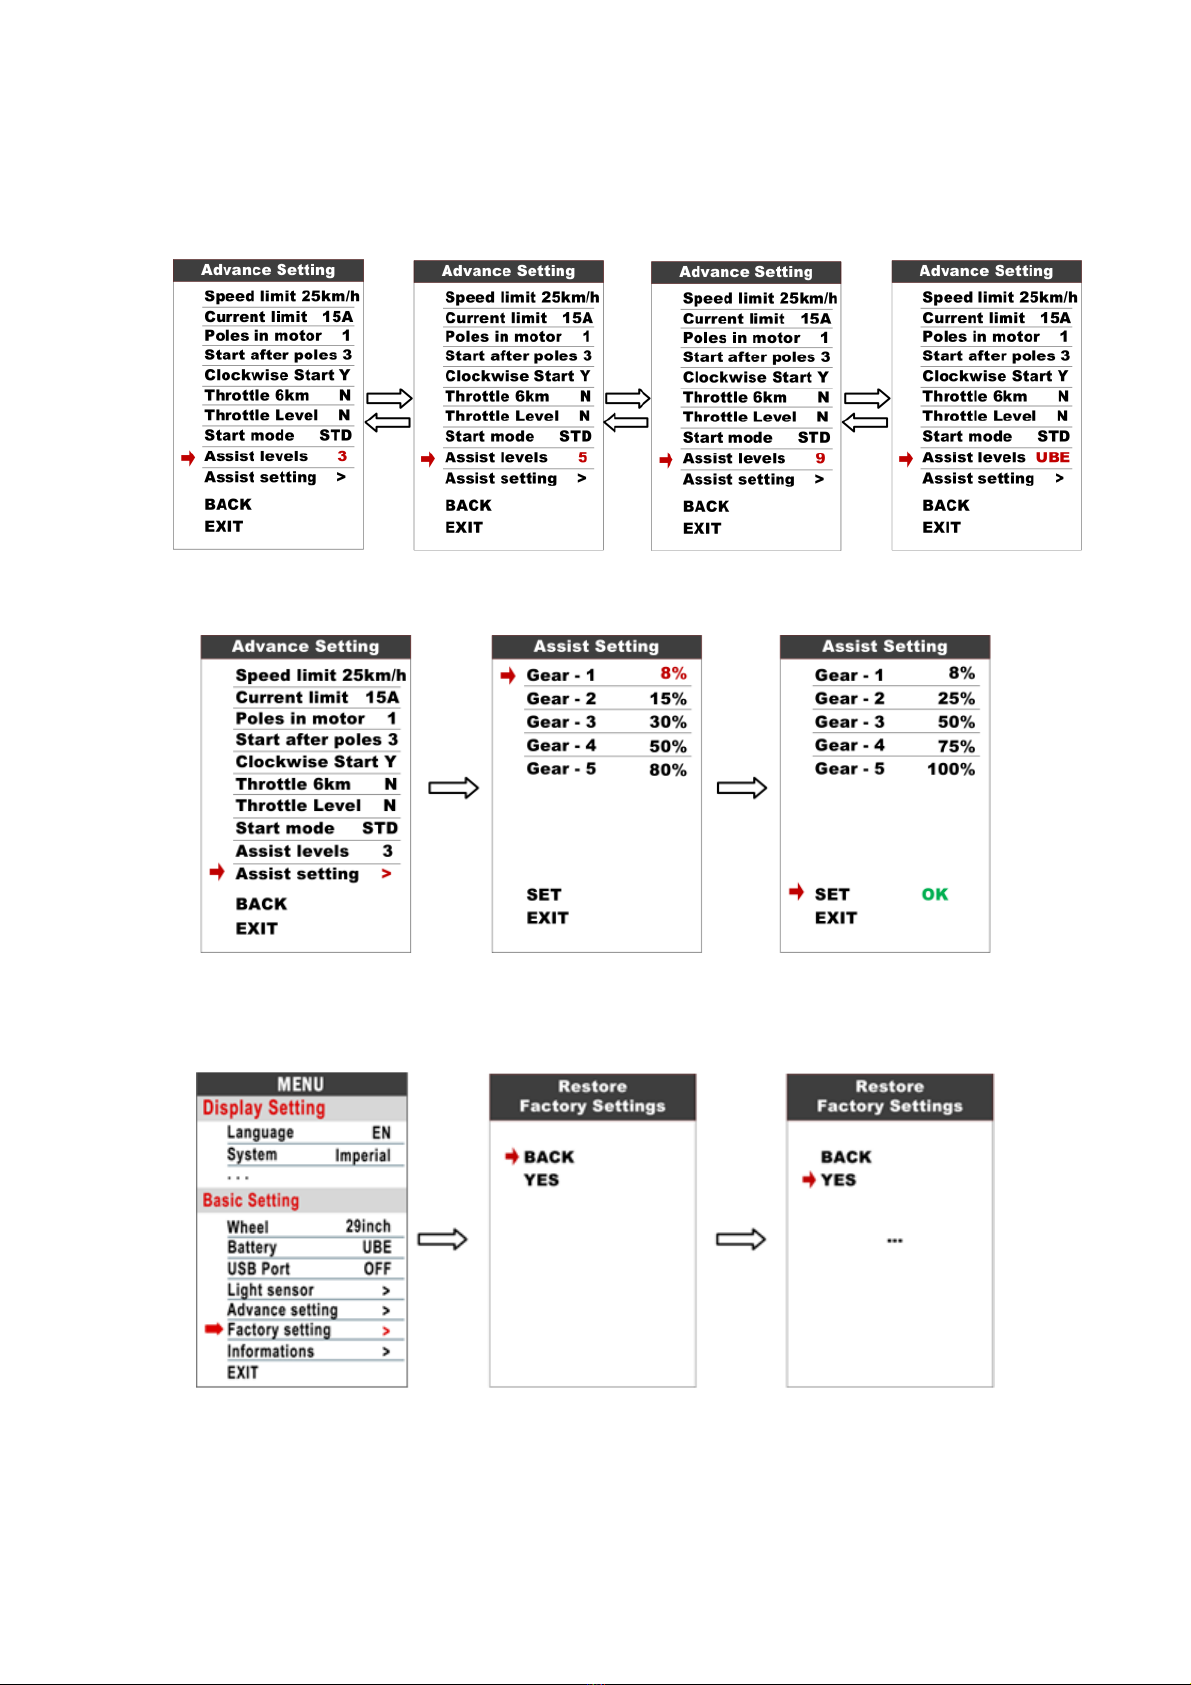
2.6.23 Assist levels : This parameter can customize assist levels, options are 3/5/9/UBE,
UBE represent factory default settings.
2.6.24 Assist Setting : This parameter can customize assist ratio.
2.6.25 Factory setting : Press POWER button to enter Restore Factory Settings, set YES
will restore all parametersto factory default values.
20
Other manuals for Monta Pro
1
Table of contents
Other EMMO Bicycle manuals


