EMP-Centauri MS13/13+6ECU-4 User manual

Instruction Manual
MS13/13+6ECU-4
MS13/13+10ECU-4
MS13/13+16ECU-12
MS13/13+20ECU-12
MS13/13+26ECU-17
MS13/13+30ECU-17
Dear Customer,
congratulations on the purchase of the EMP-Centauri product. Before its installation and putting into
operation, read carefully the entire operation manual. Keep the purchase and rework if any) records for
future need.
1) Field of Application, Warranty
The product is designed for the distribution of satellite & terrestrial including cable) TV and radio signals. Its
main purpose is to allow connecting of multiple user to the common antenna SMATV).
The manufacturer provides for E.LITE CLASS products extended 4 four) years warranty from the date of
purchase, see details in EMP-Centauri’s General trade conditions, published at manufacturer’s website
www.emp-centauri.cz.
It is prohibited to dismantle the product and make any interventions in it. Repairs or any interventions in the
product may be performed only by EMP-Centauri company, or other companies authorized by EMP-
Centauri.
2) Technical Specifications
Products are cascadable multiswitches for distribution of terrestrial and satellite signals from 3 satellite
positions 12 polarities) to up to 30 users, depending on model. All trunk lines are passive.
Terrestrial band can be switched passive / active for user’s outputs. The insertion loss can be adjusted in
the range 5–20 dB for groups of user’s outputs.
The multiswitch is DC supplied from connected satellite receivers, DC2.1 socket for external power is
connected to all satellite trunk lines. DC pass is provided through the TERR line.
Specification MS13/13+
6E U-4
MS13/13+
10E U-4
MS13/13+
16E U-12
MS13/13+
20E U-12
MS13/13+
26E U-17
MS13/13+
30E U-17
Number of Trunk Lines 13 12 x SAT, 1 x TERR)
Number of User Outputs 6 10 16 20 26 30
Frequency Range SAT 950–2150 MHz, TERR 40–862 MHz
Insertion Loss – User Outputs* SAT 5–20 dB
TERR 8 / 25 dB
SAT 5–20 dB
TERR 12 / 26 dB
SAT 5–20 dB
TERR 20 / 35 dB
Insertion Loss – Trunk Lines* SAT 3 dB, TERR 5 dB SAT 5 dB, TERR 6 dB
Isolation – User Outputs min) 20 dB
Isolation – Trunk Lines min) 25 dB
Maximum Input level** SAT 105 dBuV, TERR 105 dBuV
1 of 4

Specification MS13/13+
6E U-4
MS13/13+
10E U-4
MS13/13+
16E U-12
MS13/13+
20E U-12
MS13/13+
26E U-17
MS13/13+
30E U-17
Max. Level at User Outputs** SAT 100 dBuV
TERR 97 dBuV
SAT 100 dBuV
TERR 93 dBuV
SAT 100 dBuV
TERR 85 dBuV
Current drawn 100 mA per user output)
Dimensions w,d,h) 18.6 x 14.6 x 5.1 cm 18.6 x 24.5 x 5.1 cm 18.6 x 33.2 x 5.1 cm
Temperature Range −25 – +60 °C
Notes: * average values; SAT: adjustable range, TERR: switchable active / passive
** according to EN 50083-3/35dB IMA3 SAT), EN 50083-3/60dB IMA3 TERR)
3) Product Takeover
Make sure that the product is not damaged. In the case of damage please contact your dealer.
4) Product Storing and Installation
We recommend the device to be installed and serviced by the qualified technician.
The product must not be stored and installed:
•in the place with excessive humidity
•in the place with dropping or splashing water,
•in the place with excessive dust pollution, mechanical vibrations or impacts
•in the place out of temperature limits specified in the section 2) Technical Specifications
•close to heat sources radiators or air ventilators, direct sunshine etc.)
•in the reach of children
Use the apparatus only in moderate climates not in tropical climate).
Fix the product firmly on a wall or another hard and inflammable surface with screws and dowels. The
product shall be in no case held only by the connected cables.
Further instructions:
•ensure the free space at least 10 cm around the product for the sufficient air circulation
•do not cover the product with curtains etc.)
•do not place any containers with liquids vases, glasses etc.) or naked flame sources lighted
candle etc.) on the product or near the product
5) Product onnection
Connect the product in accordance with this manual and valid regulation in you country. Use high quality 75 Ω
coaxial cable designed for satellite reception. The coaxial cables shall not be broken, the minimum bending
radius should be 5 cm. Mount the F connectors screw, crimp or compress type) on the ends of coaxial cables
.
Connect the F connectors into the F sockets of product and fasten them with an appropriate force.
•Connect input F sockets marked “A” – “D”, “TERR” with outputs of preceding device in the
cascade LNB/antenna, amplifier, cascadable multiswitch)
•Connect output F sockets marked “A” – “D”, “TERR” with inputs of following device in the cascade
cascadable multiswitch, amplifier) or with 75 Ohm terminators DC-blocked)
•Connect output F sockets marked “1”, “2”, “3”… with wall sockets or receivers or terminate them
with 75 ohm terminators*
2 of 4
•Connect connector marked with protective earth symbol with protective bonding conductor
•Connect DC2.1 socket marked “DC 12V” with power supply
* Termination is not required if terrestrial reception is not used.
Warning! D power is present at the TERR line, avoid short circuit!
6) Product Settings
Turn the knob “act. pass.” to switch between active and passive mode of terrestrial band. Turn knobs “− 5dB
− 20 dB” to adjust signal level of satellite signals for groups of user’s outputs, as indicated at the sticker.
Each connected satellite receiver must be properly set up to have access to all connected LNBs. Follow
instruction manual for satellite receiver or TV set. The most common styles of setup are shown in the table:
SAT SYSTEM LNB) Setting style 1 Setting style 2 Setting style 3
A DiSEqC 1.0: 1 of 4 DiSEqC 1.0: A committed: AA
B DiSEqC 1.0: 2 of 4 DiSEqC 1.0: B committed: AB
C DiSEqC 1.0: 3 of 4 DiSEqC 1.0: C committed: BA
7) Safety
Due to security reasons the product and wiring in which the product is connected, must be grounded
properly. Use the terminal identified with the appropriate symbol to ground the product. Make sure the
antennas are properly protected against lightning.
The product should be disconnected from the wiring immediately if it gets into contact with liquids dropping
water, spilled drinks etc.).
8) Product Maintenance
The maintenance operation is especially cleansing of the product. Use only dry cloth to clean the product
and do not use any liquid agents.
Coaxial cables installed outdoors should be replaced once in a few years. Unscrew all F connectors and
clean connector contacts, resp. shorten the coaxial cable by approx. 2 cm, every 2 years.
9) Symbols Explanation
Certificate of conformity Protective earth
According to EU directive, electric and electronic devices which are identified by one of the
following symbols must not be disposed of together with municipal waste. When disposing
of the old device, use local waste collection and separation systems.
3 of 4
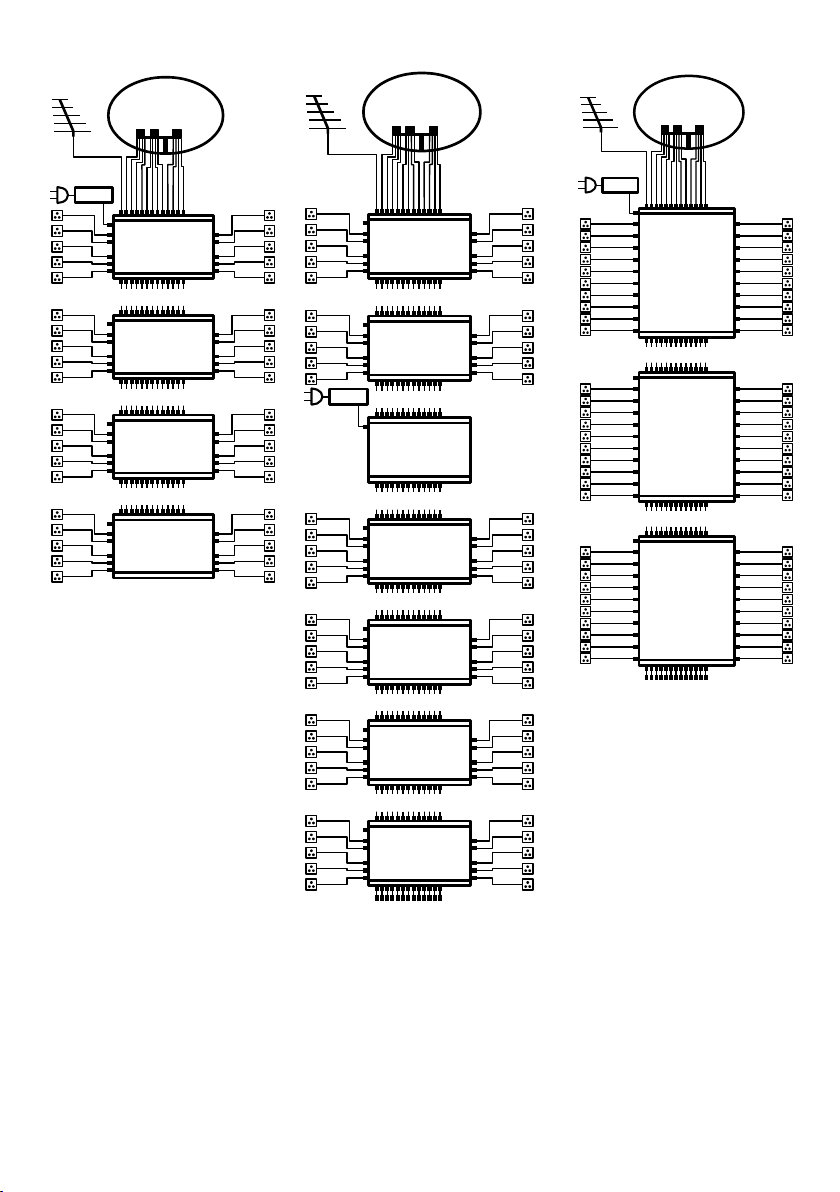
10) Wiring Examples
TERR ANTENNA
3x LNB
(QUATTRO)
MS13/13+10E U-4
MS13/13+10E U-4
13x cable
MS13/10E U-4
13x cable
PA12
MS13/13+10E U-4
13x cable
A13/13EU -4
TERR ANTENNA
3x LNB
(QUATTRO)
13x Fm-Fm quick
MS13/13+10E U-4
MS13/13+10E U-4
13x cable
MS13/13+10E U-4
13x cable
MS13/13+10E U-4
13x cable
MS13/13+10E U-4
13x cable
MS13/13+10E U-4
13x cable
13x D blocked load 75Ω
PA12
MS13/13+20E U-12
MS13/13+20E U-12
MS13/13+20E U-12
TERR ANTENNA
3x LNB
(QUATTRO)
13x cable
13x cable
13x D blocked load 75Ω
PA12
More wiring examples are shown at the manufacturer’s website.
4 of 4
11) ontact
Manufacturer: EMP-Centauri s.r.o.
5. kvetna 690
339 01 Klatovy 4
Czech Republic
tel: +420) 376 323 813 sales)
tel: +420) 376 323 853 tech. support)
www.emp-centauri.cz
This manual suits for next models
5
Other EMP-Centauri Media Converter manuals

-1 User manual")


Popular Media Converter manuals by other brands


H&B
H&B TX-100 Installation and instruction manual

Bolin Technology
Bolin Technology D Series user manual

IFM Electronic
IFM Electronic Efector 400 RN30 Series Device manual

GRASS VALLEY
GRASS VALLEY KUDOSPRO ULC2000 user manual

Linear Technology
Linear Technology DC1523A Demo Manual

Lika
Lika ROTAPULS I28 Series quick start guide

Weidmuller
Weidmuller IE-MC-VL Series Hardware installation guide

Optical Systems Design
Optical Systems Design OSD2139 Series Operator's manual

Tema Telecomunicazioni
Tema Telecomunicazioni AD615/S product manual

KTI Networks
KTI Networks KGC-352 Series installation guide

Gira
Gira 0588 Series operating instructions

Lika
Lika SFA-5000-FD user guide