Empisal 760C User manual

EMPISAL COMPLETE FREE ARM OVER LOCKE
INSTRUCTION MANUAL


1
Safety instructions
Like any other electrical device, a overlock machine can cause serious, even
life-threatening injuries.To avoid this, and in order to work safely:
• Before initial use of your overlock machine, read these operating instructions
thoroughly.
• Keep the operating instructions in a suitable place near the machine. When
passing the appliance on to others, always enclose the operating instructions.
• Always disconnect the power supply when leaving the machine unattended.
This will prevent the risk of accidents if the machine is switched on
accidentally.
• First pull the power plug before changing the bulb or performing maintenance
work on the machine. This will prevent possibly life-threatening electric
shocks.
• Do not remove the plug from the socket by pulling on the cable. Always grip
the plug and not the cable when pulling out the power plug.
• Only use the overlock machine in dry rooms. Don’t use the machine in wet
condition and location.
• In case of any visible damage on the machine, the foot switch or the power
cable: Have the damage repaired by Customer Service before using the
overlock machine again.
• The supply cord cannot be replaced. If the supply cord connected with foot
controller is damaged the foot controller shall be scrapped.
• Never let children or elderly persons handle the machine unsupervised
because they may not properly appreciate the possible dangers. Keep
electrical appliances outside the reach of children.
•Never use the machine if the air vents are blocked keep the air vents of the
machine and the foot controller free form dust, fusel and leftovers
•Change the light bulb only with the same type of bulb 15W.
• Never place anything on the foot controller.
• This appliance can be used by children aged from 8 years and above and
persons with reduced physical, sensory or mental capabilities or lack of
experience and knowledge if they have been given supervision or instruction
concerning use of the appliance in a safe way and understand the hazards
involved.
• Children shall not play with the appliance.
• Cleaning and user maintenance shall not be made by children without
supervision.

2
• Keep your work space tidy. An untidy workplace can lead to accidents.
• Provide adequate lighting when working!
• Do not wear loose clothing or jewellery, as these can be caught in the moving
parts. You should also wear a hair net if you have long hair.
• Avoid abnormal posture. Remain steady and in a well-balanced position at all
times.
• Be alert! Pay attention to what you are doing. Always take a rational approach
to your work. Never work with the overlock machine if you are unable to
concentrate or if you are feeling unwell!
• If accidents occur as a result of handling the machine with insufficient care, or
failure to follow the safety instructions in this manual, then the manufacturer
cannot accept liability.
• Please use for your overlock machine the ZHEJIANG FOUNDER foot
controller, type KD-2902.
Power rating: 220-240V ~ , 50/60Hz
Current rating: 1.0A
Protection Class : II
•If the supply cord that fixed with foot controller is damaged, it must be
replaced by the manufacturer or its service agent or a similar qualified person
in order to avoid a hazard.
• The sound pressure level under normal operating conditions is 78dB (A).
•Do not dispose of electrical appliances as unsorted municipal waste, use
separate collection facilities.
•Contact your local government for information regarding the collection
systems available.
•If electrical appliances are disposed of in landfills or dumps, hazardous
substances can leak into the groundwater and get into the food chain,
damaging your health and well-being.
•When replacing old appliances with new once, the retailer is legally obligated
to take back your old appliance for disposal at least for free of charge.

3
INTRODUCTION
THANK YOU FOR CHOOSING OUR OVERLOCK MACHINE
This overlock machine can stitch dependable seams on all kinds of fabric, both light and heavy,
including cotton, wool, rayon, tricot, jersey, and knits.
You do not need a special table for this portable machine.
We suggest that you read this instruction manual carefully before you start to operate the machine.
FOR YOUR SAFETY
1. Keep your eyes on the needles when operating the overlock machine. Do not touch the
handwheel, the cutter or the needles when the machine is running.
2. Turn off the power switch, and pull out the plug from electric socket in the following cases:
*When you have finished your sewing.
*When you leave the serger temporarily.
*When replacing the parts.
*When cleaning and adjusting the machine.
BEFORE YOU USE
1. Wipe dust and oil off the machine to avoid any stains on the sewing materials.
2. Test sew by using the same sewing materials you intend to sew.
3. Read this instruction manual thoroughly before replacing the cutters and the needles. Follow the
instructions for correct replacements and adjustments.

4
TABLE OF CONTENTS
NAME OF MAIN COMPONENTS...................................................................................................5-6
SETTING UP YOUR MACHINE......................................................................................................7-9
The position of thread pole ..................................................................................................7
Cone holders .......................................................................................................................7
Spool caps ...........................................................................................................................7
Connecting the foot control..................................................................................................8
Controlling sewing speed.....................................................................................................8
Safety switch........................................................................................................................8
ACCESSORIES .................................................................................................................................9
USING THE MACHINE ....................................................................................................................10
Hand wheel........................................................................................................................10
Front cover.........................................................................................................................10
Free arm ............................................................................................................................10
LOOPER THREADING....................................................................................................................11
NEEDLE THREADING......................................................................................................................12
TRIAL SEWING................................................................................................................................ 13
ADJUSTING THREAD TENSIONS............................................................................................. 14-15
Adjusting the needle thread tensions................................................................................. 15
Adjusting the looper thread tensions ................................................................................. 15
MACHINE ADJUSTMENT CHART .................................................................................................. 16
CHANGING THE THREAD.............................................................................................................. 17
BUILT-IN POCKET HANDLE ........................................................................................................... 17
ADJUSTMENT OF STITICH LENGTH............................................................................................. 18
Stitch length setting............................................................................................................ 18
CUTTING WIDTH ............................................................................................................................ 19
The proper cutting width .................................................................................................... 19
Adjust to a wider cutting width ........................................................................................... 19
Adjust to a narrower cutting width...................................................................................... 19
CHANGING THE NEEDLE .............................................................................................................. 20
REPLACING THE BULB.................................................................................................................. 20
REPLACING THE CUTTERS .......................................................................................................... 21
THREE THREAD NARROW AND WIDE OVERLOCK STITCH...................................................... 22
FREE ARM SEWING ....................................................................................................................... 23
CONVERTIBLE PRESSER FOOT................................................................................................... 23
ROLLED AND NARROW EDGE................................................................................................. 24-25
Rolled edge........................................................................................................................ 24
Narrow edge ...................................................................................................................... 24
Rolled hemming................................................................................................................. 25
Narrow hemming ............................................................................................................... 25
DIFFERENTIAL FEED ................................................................................................................ 26-27
Differential feed mechanism .............................................................................................. 26
Adjusting the differential feed............................................................................................. 26
Wavy knits & Gathering ..................................................................................................... 27
Stretching to prevent puckering ......................................................................................... 27
TROUBLE SHOOTING GUIDE........................................................................................................ 28
CLEANING AND LUBRICATING...................................................................................................... 29
SPECIFICATION OF MACHINE ...................................................................................................... 29

5
NAME OF MAIN COMPONENTS
1. Thread pole
2. Lower looper thread tension dial
3. Spool pin
4. Spool holder
5. Handwheel
6. Base
7. Machine socket
8. Power switch
9. Front cover
10. Support bed
11. Free arm
12. Needle plate
13. Left needle thread tension dial
14. Right needle thread tension dial
15. Upper looper thread tension dial
16. Thread guide plate
1
2
3
4
5
6
7
8
9
10
11
12
13
16
14
15
Always disconnect the power supply when leaving the machine unattended. This will prevent the
risk of accidents if the machine is switched on accidentally.

6
1. Upper looper
2. Lower looper
3. Free arm
4. Lower knife
5. Cutting width adjustment knob
6. Presser foot
7. Upper knife
2
3
4
5
6
7
1
7
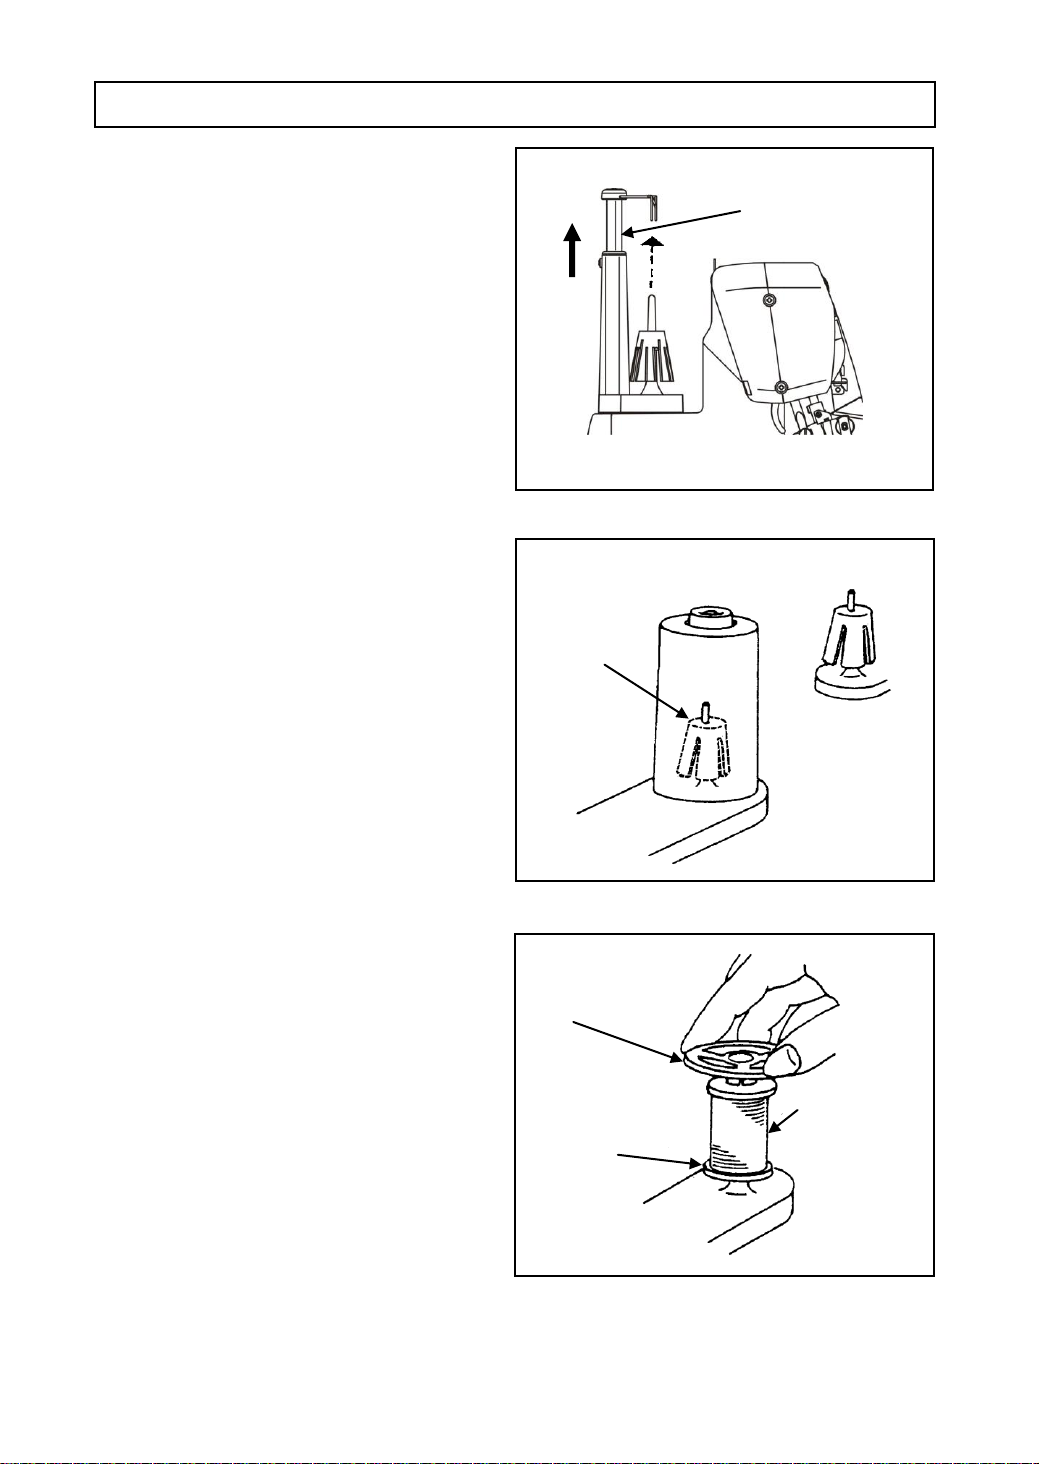
SETTING UP YOUR MACHINE
Set your Overlock machine on a sturdy flat
surface.
[ THE POSITION OF THREAD POLE ]
Pull up thread pole to its highest point before
threading.
Turn the thread pole so the thread guides come
right above the spool pins.
[ CONE HOLDERS ]
Both industrial cones and domestic type thread
spools can be used on this machine.
For large diameter industrial cones use the
cone holders with the large end at the top.
For small diameter cones. use the same cone
holders with the small end at the top.
[ SPOOL CAPS ]
When using domestic type thread spools,
remove the spool holders and place spool caps
over the thread spools.
Normal
Positioning catches
Spool holder
Domestic type
thread spool
Spool cap
Notch
8
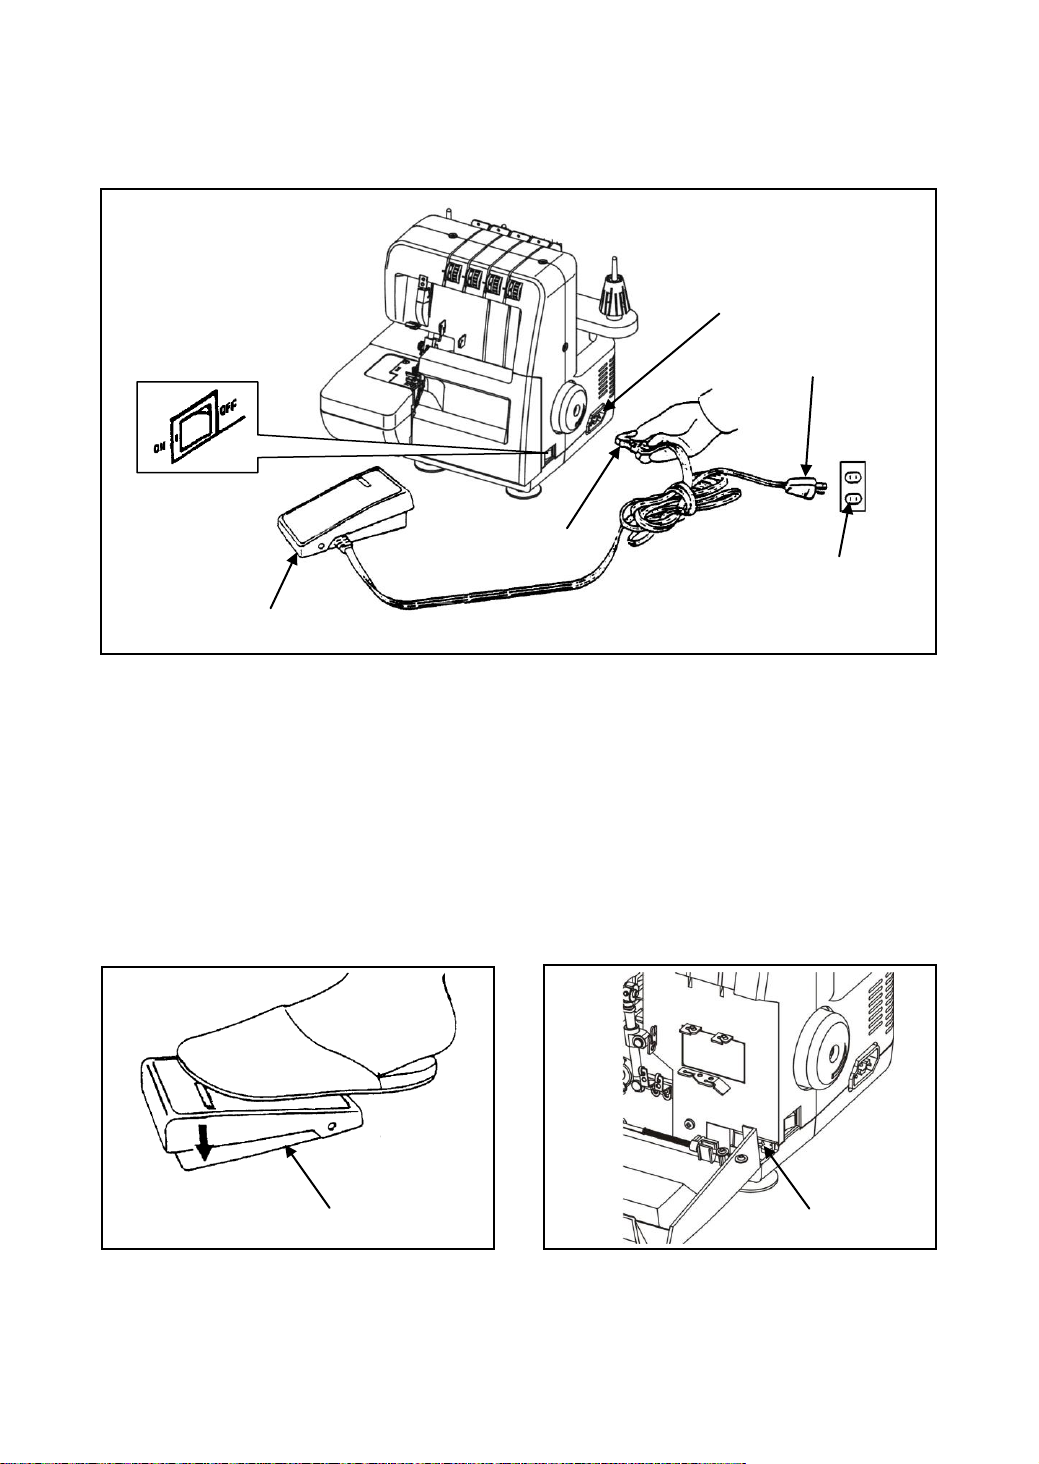
[ CONNECTING THE FOOT CONTROL ]
Push foot control plug into the machine socket and then into main socket.
Turn on the power switch. This power switch controls both the machine power and sewing light.
[ CONTROLLING SEWING SPEED ]
The foot control regulates the sewing speed.
The sewing speed can be adjusted by
increasing or decreasing the pressure on the
foot control.
[ SAFETY SWITCH ]
This machine is equipped with a micro safety
switch.
The machine is automatically cut off from the
motor electricity supply if front cover is open.
Close both free arm and front cover before
you start sewing.
Foot control
Safety switch
Foot control
Power switch
Machine plug
Power supply plug
Power supply
Machine socket

9
ACCESSORIES
Tweezers
Spare upper cutter
Needles
Machine cover
Screwdriver
Brush
Hexagon wrench key
Instruction manual
Spool caps
10
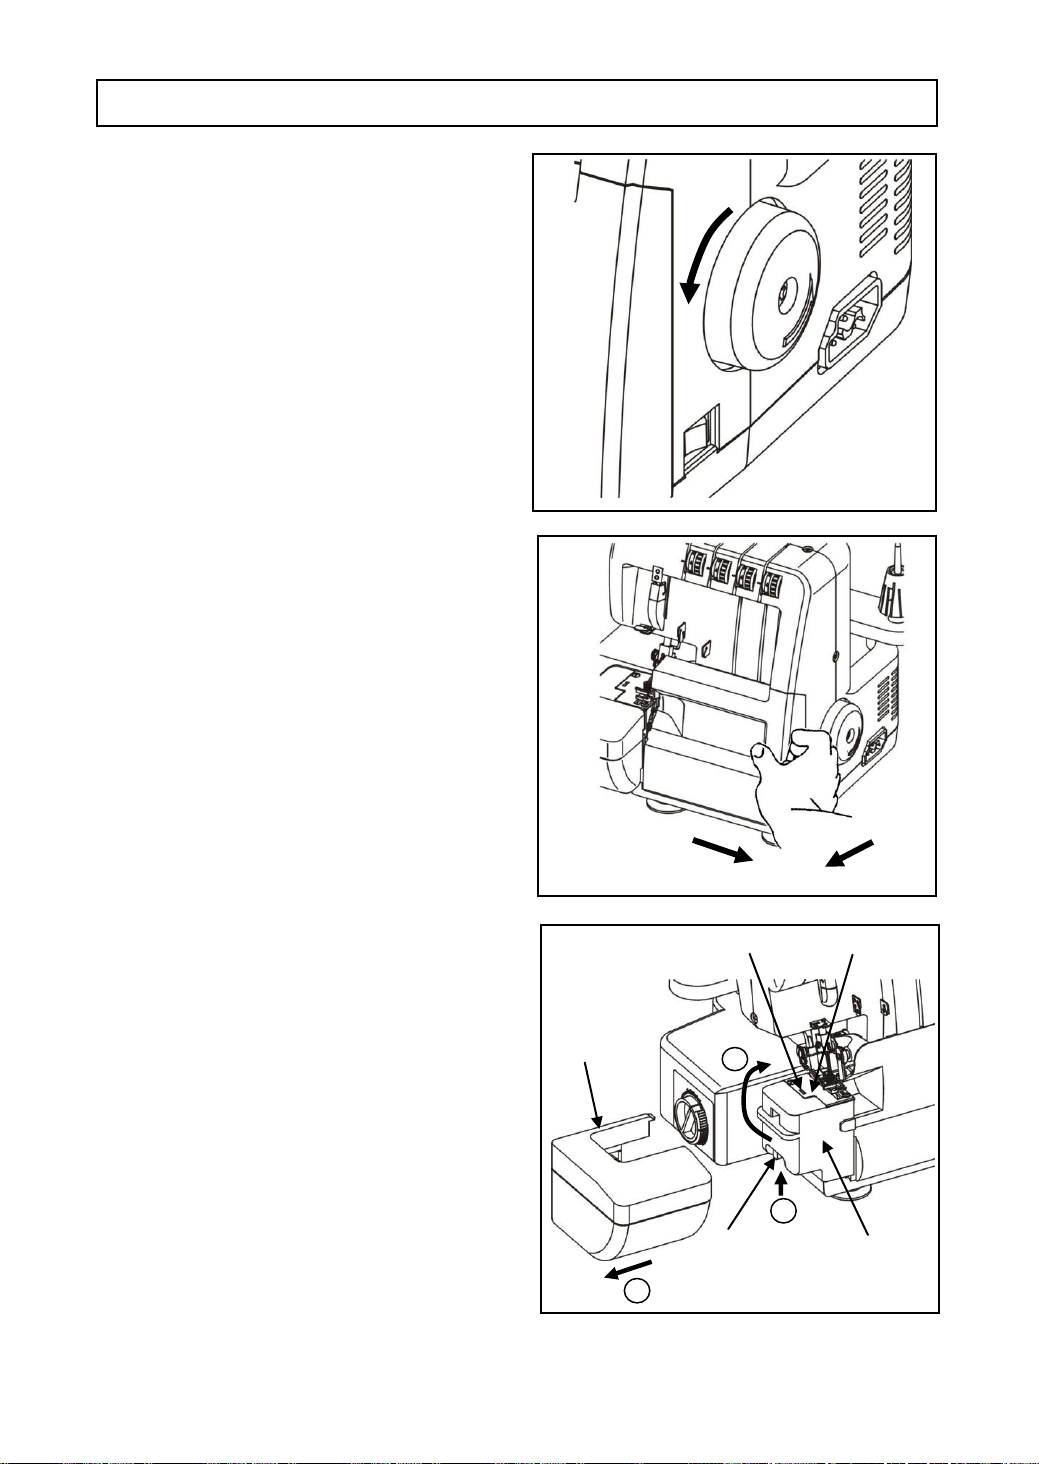
Open the free arm for threading.
1. Remove the support bed as arrow.
2a. Press and pull up the free arm release lever.
2b. Pull up free arm as the arrow shows, then
the hinge will be released from needle plate.
USING THE MACHINE
[ HAND WHEEL ]
Always turn handwheel toward you, i.e. the
same direction as on a household sewing
machine.
[ FRONT COVER ]
To open front cover, slide the hollow to the right
as far as it will go then pull front cover toward
you.
[ FREE ARM ]
○
2
○
1
Free arm
release lever
2a
Hinge
Support bed
Free arm
Needle plate
2b
1

11
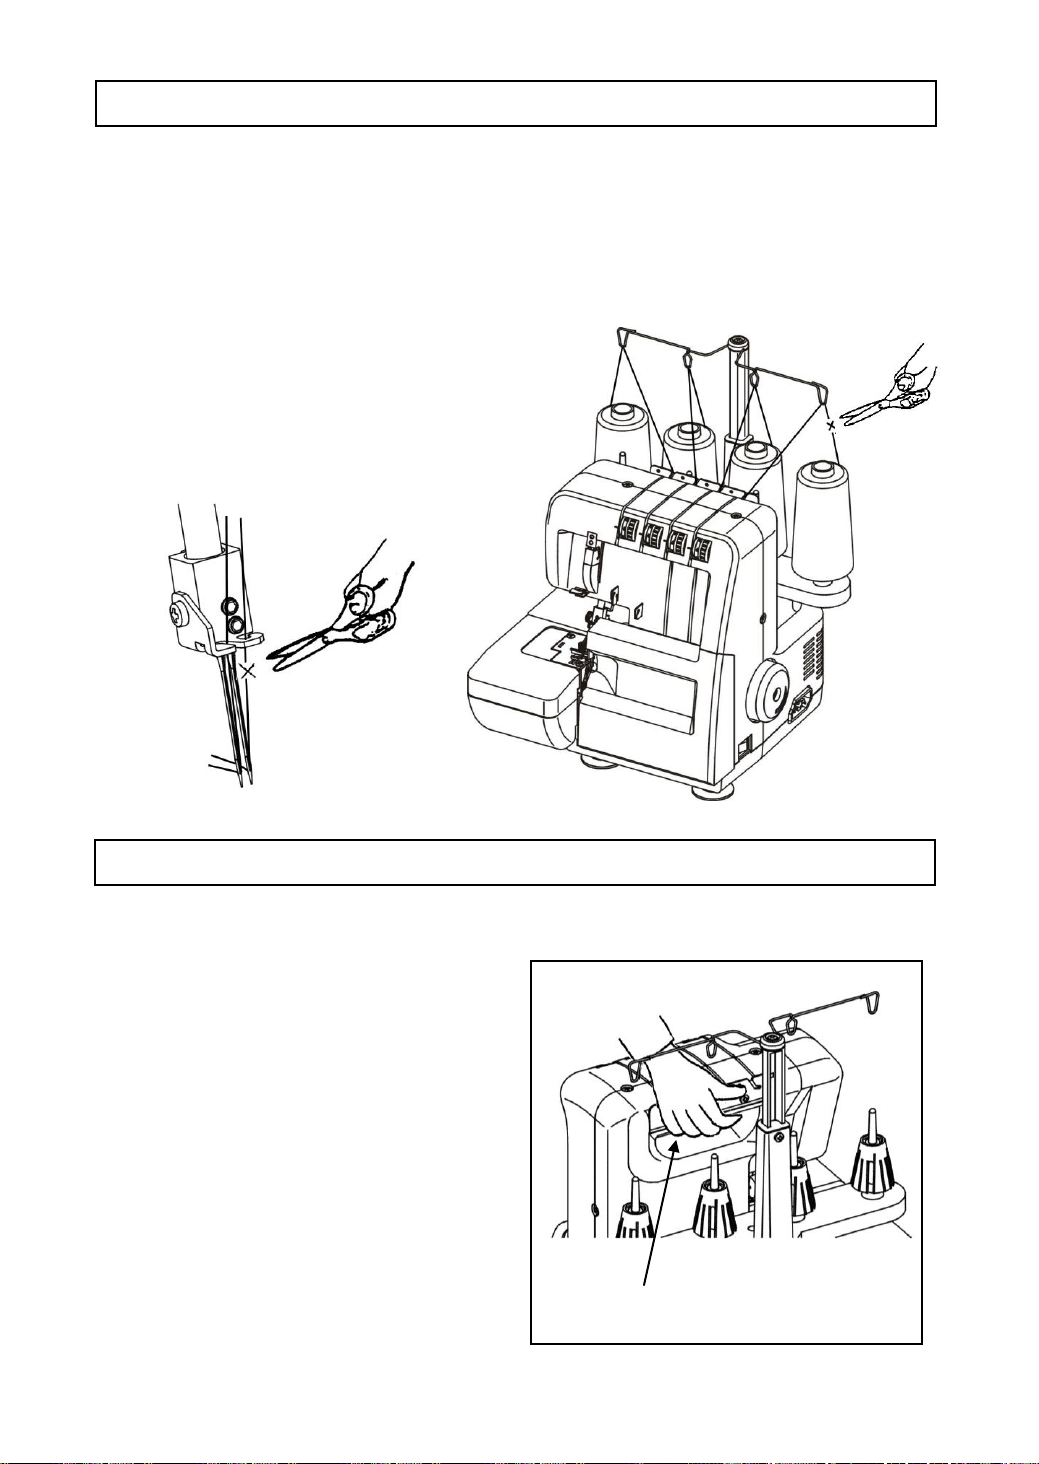
LOOPER THREADING
Warning: Before contriving please adjust main control switch to (OFF).
Correct threading is important otherwise uneven stitches or thread breakage may result.
A convenient threading chart is placed on the front panel inside the front cover.
In addition, each thread guide is colored for
threading indication.
To help in threading, tweezers can be found in
the accessory box.
Threading must be carried out in the following
sequence.
1. FIRST……...Upper looper
2. SECOND…..Lower looper
3. THIRD……...Right needle
4. FINALLY……Left needle
1. Open the front cover and free arm.
2. Turn the handwheel toward you until. the
looper comes to best position for threading.
3. Pass the upper looper thread and lower
looper thread as illustrated.
Important: The thread must lie correctly
between the two discs inside the tension
dials.
4. Pull out the thread end about 10 cm (4") long
from the looper eyes. Raise the presser foot
and place threads under it, then lower the
presser foot.
Upper looper thread Lower looper thread
○
4
○
5
○
6
○
8
○
4
○
9
○
11
○
10
○
3
○
5
○
6
○
7
○
7
○
8
○
4
○
9
○
10
○
11
○
2
8
7
6
5
5
8
5
2
3
4
6
7
Lower looper
Upper looper
○
2
2
○
1
1
3 ○
3
Thread between two discs

12
NEEDLE THREADING
5. Turn the hand wheel toward you until
needles are fully raised.
6. Pass the right and left needle threads as
illustrated.
Important: The thread must lie correctly
between the two discs inside the tension
dials.
Pass through the needle eyes from front to
back as illustrated.
7. Pull out the thread end about 10 cm (4") long
from the needle eyes. Raise the presser foot
and place threads under it, then lower the
presser foot.
Left needle thread Right needle thread
○
3
○
2
2
○
1
1
3
○
4
○
5
○
8
○
4
○
9
○
3
○
7
○
2
8
5
2
3
4
6
7
6
○
6
○
8
○
4
○
9
8
7
○
6
5
4
6
○
4
○
7
○
5
Thread between two discs

13
TRIAL SEWING
When the overlock has been threaded for the
first time or re-threaded because of thread
breakage during sewing, start sewing in the
following manner.
Holding the end of threads between your left
finger tips, turn the handwheel slowly toward
you two or three times and check the thread
chain.
Place fabric for trial sewing under the presser
foot and start sewing slowly.
The fabric will be automatically fed.
Guide the fabric as you serge.
When work is finished, continue sewing to form
about 5 cm (2") long thread chain from the end
of fabric.
Cut the threads with a scissor.
Cloth

14
ADJUSTING THREAD TENSIONS
Thread tensions will vary according to the type and thickness of both thread and fabric.
Adjust the thread tension of the machine accordingly while checking the seam.
Thread tension: Turn dial toward smaller numbers, tension becomes loose.
Turn dial toward larger numbers, tension becomes tight.
B: Right needle thread
tension dial
D: Lower looper thread
tension dial
C: Upper looper thread
tension dial
A: Left needle thread
tension dial
Correct thread tension
Right needle thread
Left needle thread
Lower looper thread
Back side
Upper looper thread
6 mm (0.24”)

15
It is necessary to adjust the thread tension for the seams shown below.
[ ADJUSTING THE NEEDLE THREAD TENSIONS ]
[ ADJUSTING THE LOOPER THREAD TENSIONS ]
The left needle thread tension is too loose.
The right needle thread tension is too loose.
The lower looper thread is tight and/or
the upper looper thread is loose.
The upper looper thread is tight and/or
the lower looper thread is loose.
Loosen the lower looper thread tension
and/or tighten the upper looper thread
tension.
Loosen the upper looper thread tension
and/or tighten the lower looper thread
tension.
Tighten the left needle thread tension.
Tighten the right needle thread tension.
Back side
Front side
Back side
Front side
Front side
Front side
Back side
Back side

16
MACHINE ADJUSTMENT CHART
The best tension for one fabric may not be correct for another.
The required tensions depend upon stiffness and thickness of fabric, thread size and type.
If necessary, readjust referring to the chart below.
Fabrics
Threads
Needle
Stitch length
Standard Setting
Light-weight
.Cotton
.Spun
polyester
.Polyester
continuous
No. 80 - 100
HA × 1
No. 11
130 / 705H
No. 80
2.0 - 3.5 mm
.Standard
2.5 mm
.Georgette
.Organdy
.Lawn
.Voile
.Crepe-de-chine
.Silk
etc.
Medium-weight
.Cotton
.Spun
polyester
.Polyester
continuous
No. 60 - 100
HA × 1
No.11-14
130 / 705H
No. 80 - 90
2.0 - 3.5 mm
.Standard
2.5 mm
.Cotton
.Poplin
.Gingham
.Corduroy
etc.
Heavy-weight
.Cotton
.Spun
polyester
.Polyester
continuous
No. 50 - 80
HA × 1
No.14
130 / 705H
No. 90
2.5 - 4.0 mm
.Standard
3.0 mm
.Denim
.Tweed
.Velour
etc.
17
CHANGING THE THREAD (TYING ON)
It is simple to change the thread in the following
manner.
Cut the thread above the spool pin, and knot
ends of old and new threads together.
Set the tension dials to "O" and raise the
presser foot.
Pull the other end of thread until knots come
under the presser foot. For needle threads, pull
the other ends of threads until knots come to
needle eyes and cut the threads at the both
sides of the knots. Then re-thread the needles.
BUILT-IN POCKET HANDLE
The Built in pocket handle is a convenient way
to carry your machine.
Pocket handle

18
ADJUSTMENT OF STITCH LENGTH
There are nine setting adjustments which can be made from 1.0 to 5.0 mm.
Most overlock work is done with a basic stitch length setting of 2.5-3.5 mm.
[ STITCH LENGTH SETTING ]
Stitches
Stitch length
Regular seaming
Narrow seaming
Rolled edging
Picot edging
2.0 –4.5 mm
3.0 mm (Standard Setting)
1.0 - 2.0 mm
1.0 - 2.0 mm
3.0 - 4.0 mm
Stitch length
adjustment knob (lnner dial)
Table of contents
Other Empisal Sewing Machine manuals

Empisal
Empisal EEMC220 User manual

Empisal
Empisal Heidi 328B User manual

Empisal
Empisal Expression 889 User manual

Empisal
Empisal EEM350 User manual

Empisal
Empisal Dress Maker 270D User manual

Empisal
Empisal 760 User manual

Empisal
Empisal S4D User manual

Empisal
Empisal creations User manual

Empisal
Empisal Designer 800 User manual

Empisal
Empisal Dress Maker 120A User manual


