JUKI MF-7000 Series Quick start guide

R
ENGINEER’S MANUAL
29275609
No.02
2-3 Needle Flat Bed Coverseam Machine
MF-7000Series
2-3 Needle Cylinder Bed Coverseam Machine
MFC-7000Series
From the library of: Diamond Needle Corp

PREFACE
This Engineer’s Manual is written for the technical personnel who are responsible for the service and maintenance
of the machine.
This manual describes “Standard Adjustment” , “Adjustment Procedures” , “Results of Improper Adjutment”,
and other important information which are not covered by the Instruction Manual.
It is advisable to use the relevant Instruction Manual and Parts List together with this Engineer’s Manual when
carrying out the maintenance of these machines.
This manual gives the “Standard adjustment” on the former page under which the most basic adjustment value
and on the latter page the “Results of improper adjutment” under which errors and troubles arise.
From the library of: Diamond Needle Corp

CONTENTS
1. SPECIFICATIONS ....................................................................................................................... 1
2. MOTOR AND BELT..................................................................................................................... 2
3. MODEL NUMBERING SYSTEM ................................................................................................. 3
4. STANDARD ADJUSTMENT ....................................................................................................... 7
(1) MF ............................................................................................................................................................................ 7
1) Timing relation between the needle and the feed .............................................................................................. 7
2) Adjusting the timing relation between the needle bar and looper (synchronization) : Without gauges ........................... 7
3) Returning amount of the looper ......................................................................................................................... 9
4) Height of the needle bar..................................................................................................................................... 9
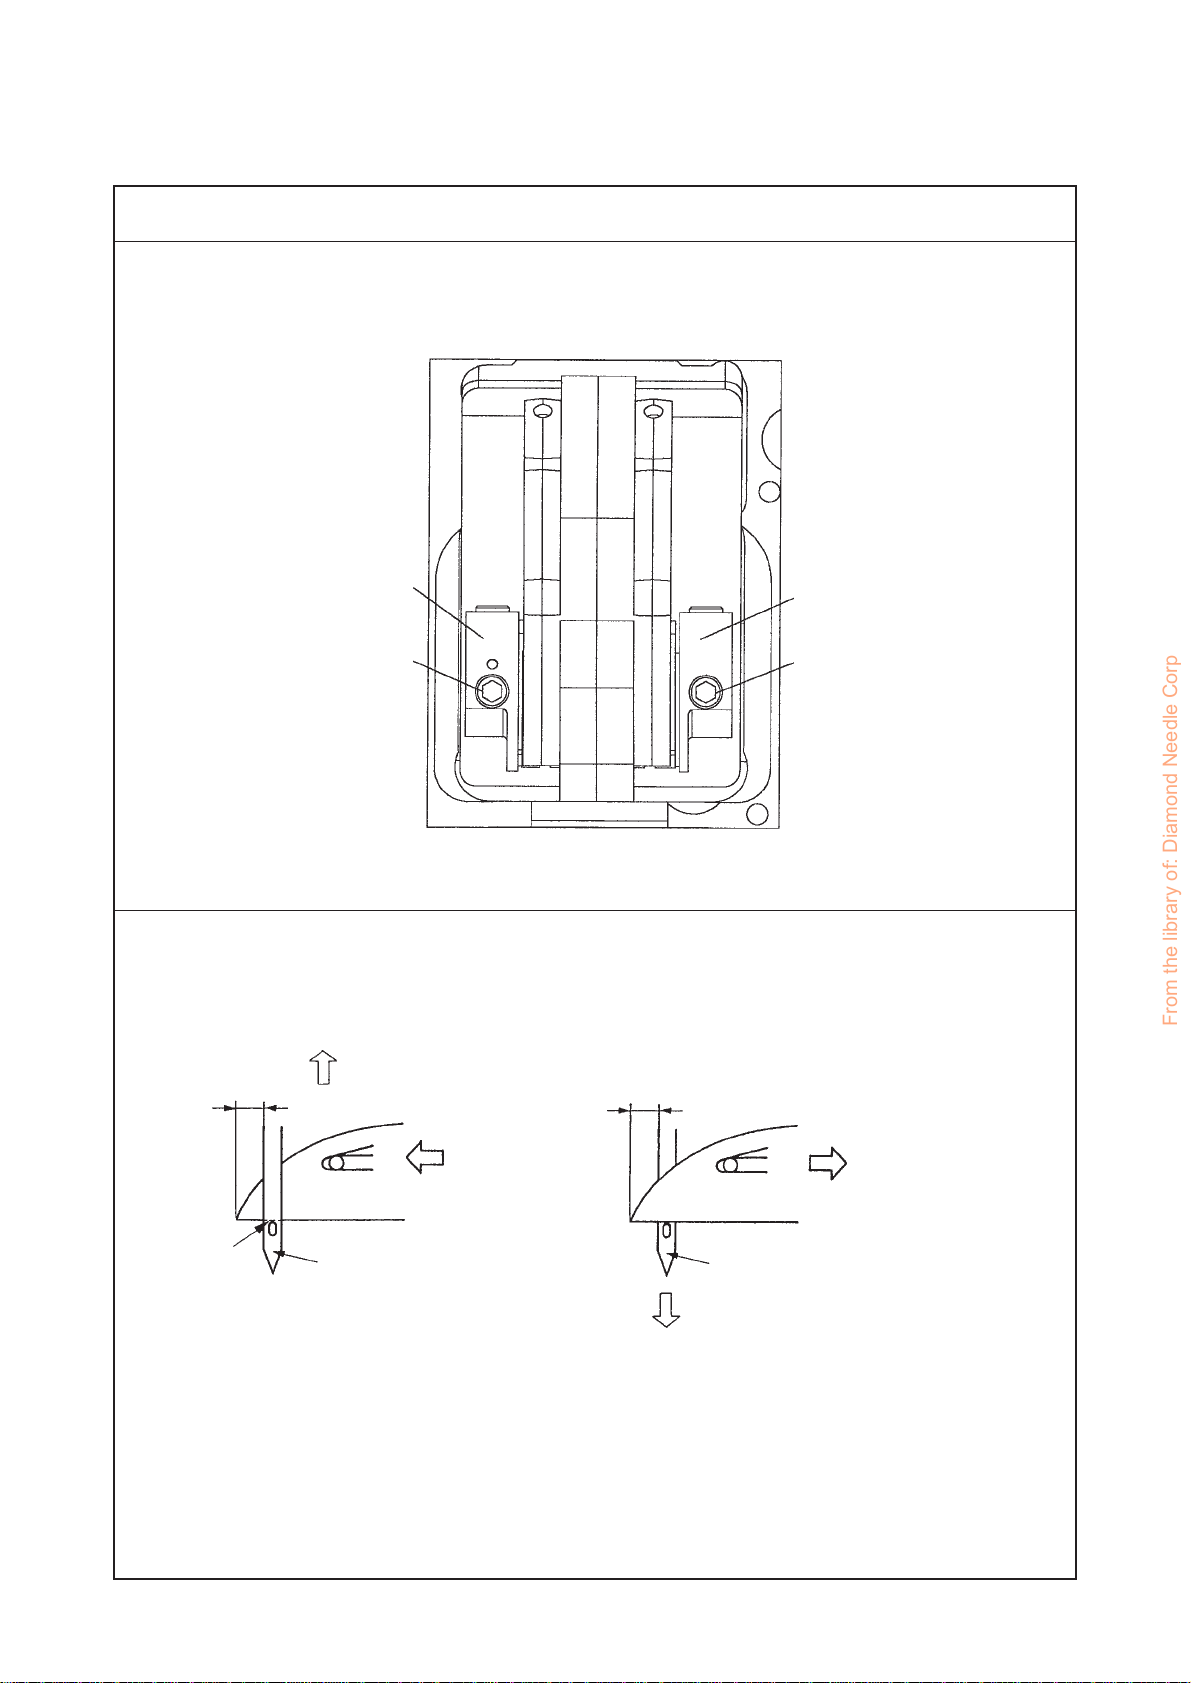
5) Clearance between the looper and needle ...................................................................................................... 11
6) Adjusting amount of the looper-avoid .............................................................................................................. 11
7) Position of the needle guard ............................................................................................................................ 13
8) Position of the feed dog ................................................................................................................................... 15
9) Spreader .......................................................................................................................................................... 17
10) Looper thread cam ........................................................................................................................................... 19
11) Position of the presser bar ............................................................................................................................... 21
12) Position of the needle thread tension release (without thread trimmer)........................................................... 21
13) Position and height of the presser foot ............................................................................................................ 23
14) Position of the thread guide ............................................................................................................................. 23
(2) Thread trimmer device (MF) ................................................................................................................................ 27
1) Adjustment of the thread trimmer device ......................................................................................................... 27
2) Thread tension release (Looper thread trimmer device) .................................................................................. 29
(3) MFC ....................................................................................................................................................................... 31
1) Timing relation between the needle and the feed ............................................................................................ 31
2) Adjusting the timing of the needle bar and looper (Synchronization) : Without gauges................................... 31
3) Returning amount of the looper ....................................................................................................................... 33
4) Height of the needle bar................................................................................................................................... 33
5) Position of the needle guard ............................................................................................................................ 35
6) Clearance between the looper and needle ...................................................................................................... 35
7) Adjusting amount of the looper-avoid .............................................................................................................. 37
8) Position of the feed dog ................................................................................................................................... 39
9) Spreader .......................................................................................................................................................... 41
10) Looper thread cam ........................................................................................................................................... 43
11) Looper thread wrap-up preventing cam (Old type) .......................................................................................... 43
12) Position of the presser bar ............................................................................................................................... 45
13) Position of the needle thread tension release (without thread trimmer)........................................................... 45
14) Position and height of the presser foot ............................................................................................................ 47
15) Position of the thread guide ............................................................................................................................. 47
(4) Thread trimmer device (MFC) ............................................................................................................................. 51
1) Stroke adjustment (common to both elctromagnetic and pneumatic type) ...................................................... 51
2) Adjustment of the right position of movable knife (return)................................................................................ 51
3) Adjustment of stationary knife and looper thread clamp spring ....................................................................... 53
4) Adjustment of the position of movable knife’s pointed end .............................................................................. 53
5) Adjustment of operating speed of thread trimmer (pneumatic type) ................................................................ 55
6) Confirmation of thread trimming....................................................................................................................... 55
7) Adjustment of pneumatic lifter.......................................................................................................................... 57
8) Adjustment of tension release (equipped with thread trimmer)........................................................................ 59
9) Adjustment of proximity switch......................................................................................................................... 59
10) Adjustment of top covering thread trimmer ...................................................................................................... 61
5. ASSEMBLING AND ADJUSTMENT OF FIXED CAM THREAD TAKE-UP ............................. 63
(1) Parts used............................................................................................................................................................. 63
(2) Needle bar cam plate and needle bar fork thread take-up ............................................................................... 65
(3) Needle thread guide and medium thread path base......................................................................................... 65
(4) Spreader thread guide ......................................................................................................................................... 67
1) Parts used ........................................................................................................................................................ 67
2) Assembling and adjustment of spreader thread guide..................................................................................... 67
6. OTHER PRECAUTIONS ........................................................................................................... 68
(1) Points to which Locktite is applied .................................................................................................................... 68
7. TROUBLES AND CORRECTIVE MEASURES......................................................................... 69
8. DRAWING OF TABLE............................................................................................................... 84
(1) Semi-submerged type for MF ............................................................................................................................. 84
(2) Desktop type for MF ............................................................................................................................................ 86
(3) Desktop type for MF with fabric under trimmer ................................................................................................ 87
(4) Desktop type for MFC .......................................................................................................................................... 88
(5) Semi-submerged type for MFC ........................................................................................................................... 89
(6) Semi-submerged down table for MFC ............................................................................................................... 90
(7) Table for MFC with tension roller ....................................................................................................................... 91
From the library of: Diamond Needle Corp

−1−
1. SPECIFICATIONS
MF-7000 Series
MF-7406 MF-7407 MF-7602 MF-7605
Sewing speed 6,500 r.p.m. (Max)
Stitch length 1.6 to 3.2 mm
No. of needle 2 3 2 3
Needle gauge 3.2, 4.0 4.8, 5.6, 6.4 3.2, 4.0 4.8, 5.6, 6.4
Top covering Without With
Diff. feed ratio Gathering stitch 1 : 1.5 Stretching stitch 1 : 0.6
Needle UY128GAS #65 / 025 to #90 / 036
Presser foot lift 8.1 mm
Lubricating oil JUKI specified oil (equivalent to ISO VG32) : Part No. 30149207
MFC-7000 Series
MFC-7406 MFC-7407 MFC-7602 MFC-7605
Sewing speed 6,500 r.p.m. (Max)
Stitch length 1.6 to 3.2 mm
No. of needle 2 3 2 3
Needle gauge 3.2, 4.0, 4.8 5.6, 6.4 3.2, 4.0, 4.8 5.6, 6.4
Top covering Without With
Diff. feed ratio Gathering stitch 1 : 1.5 Stretching stitch 1 : 0.6
Needle UY128GAS #65 / 022 to #90 / 036
Presser foot lift 7 mm
Lubricating oil JUKI specified oil (equivalent to ISO VG32) : Part No. 30149207
From the library of: Diamond Needle Corp

−2−
2. MOTOR AND BELT
MF-7000 Series
1) Use a clutch motor of 1/2 HP (400W).
2) Use an M type V belt.
3) The table above shows the sewing speed obtained by the use of motor pulleys with different diameters
and V belts with different lengths.
4) Note that the effective diameter of the pulley of the machine head is 57.5 mm.
1) Use a clutch motor of 1/2 HP (400W).
2) Use an M type V belt.
3) The table above shows the sewing speed obtained by the use of motor pulleys with different diameters
and V belts with different lengths.
4) Note that the effective diameter of the pulley of the machine head is 49 mm.
MFC-7000 Series
Sewing speed
(r.p.m.)
6500 140 35 120 35
6000 125 35 105 35
5500 110 35 90 34
5000 100 34 85 34
4500 90 34 75 34
4000 80 34 70 34
3500 70 34 60 33
Motor pulley
Outer dia. (mm)
50 Hz 60Hz
V belt (inch) Motor pulley
Outer dia. (mm) V belt (inch)
Sewing speed
(r.p.m.)
6500 145 43 40 120 41 38
6000 135 43 40 110 41 38
5500 120 41 38 100 41 38
5000 110 41 38 90 39 37
4500 95 41 38 80 39 37
4000 85 39 37 70 39 37
3500 75 39 37 60 38 35
Motor pulley
Outer dia. (mm)
50 Hz 60Hz
V belt (inch) Motor pulley
Outer dia. (mm)
V belt (inch)
Fully-submerged
type Fully-submerged
type Semi-submerged
type
Semi-submerged
type
Semi-submerged
type
Semi-submerged
type
Top mount type Top mount type
From the library of: Diamond Needle Corp

−3−
3. MODEL NUMBERING SYSTEM
MF-7000 Series
Stitch type
(Conforms to USA standard)
406 : 2-needle bottom covering stitch
407 : 3-needle bottom covering stitch
602 : 2-needle top and bottom
covering stitch
605 : 3-needle top and bottom coverig
stitch
Model No. code
Flat bed
coverseam
Gauge used
Without mark : For domestic market
U : For general export
T : For JE, JME, Turkey
Sub-class
C02 H01 U03
E12 L01 U06
Needle gauge
32.......3.2 mm
40.......4.0 mm
48.......4.8 mm
56.......5.6 mm
64.......6.4 mm
Devices and attachments
CC1 PL5 TC2
MD1 UT12 TC3
MD2 UT13 TC4
MD6
Shape of the throat
plate stitch tongue
A :Needle thread is
tightened. Suitable
for short stitch
B:Medium stitch
between A and C
C :Needle thread is
loosened. Suitable
for long stitch
Countermeasure
for bulge
D :For collarette and
elastic tape
applications
Model classification Sub-class classification Designation classification
M F - 7 4 0 6 - E 1 2 - B 5 6 / / /
From the library of: Diamond Needle Corp

−4−
Model classification Sub-class classification Designation classification
Stitch type
(Conforms to USA standard)
406 : 2-needle bottom covering stitch
407 : 3-needle bottom covering stitch
602 : 2-needle top and bottom
covering stitch
605 : 3-needle top and bottom
covering stitch
Model No. code
Cylinder bed
coverseam
Gauge used
Without mark : For domestic market
U : For general export
T : For JE, JME, Turkey
Sub-class
C02 H01 K02
E11 H11 U03
E61 H21 U06
H31
Needle gauge
32.......3.2 mm
40.......4.0 mm
48.......4.8 mm
56.......5.6 mm
64.......6.4 mm
Devices and attachments
UT1 PL1
UT2 PL4
UT3
UT4
UT5
Shape of the throat
plate stitch tongue
A : Needle thread is
tightened. Suitable
for short stitch
B: Medium stitch
between A and C
C : Needle thread is
loosened. Suitable
for long stitch
Countermeasure
for bulge
D : For collarette and
elastic tape
applications
MFC-7000 Series
M F C - 7 4 0 6 - H 0 1 - B 5 6 / / /
From the library of: Diamond Needle Corp

−5−
MF-7000 Series
Code Specification Description of sub-class
C02 For collarette Basic style
E12 For elastic tape attaching Fabric under trimmer and metering device (Upper side)
H01 For hemming Baisc style with hem guide
L01 For lap seam Basic style
U03 Universal Differential feed dog 3-row
U06 Universal Differential feed dog 4-row
MFC-7000 Series
Code Specification Description of sub-class
C02 For collarette Basis style
E11
For endless elastic tape attaching
With fabric under trimmer
E61
For endless elastic tape attaching
With fabric under trimmer and cloth puller
H01 For hemming Basic style with hem guide
H11 For hemming With cloth puller
H21 For hemming Left hand fabric under trimmer
H31 For hemming Left hand fabric under trimmer with cloth puller
K02 Covering With adjustable seam guide for medium- to heavy-weight fabrics
U03 Universal Differential feed dog 3-row
U06 Universal Differential feed dog 4-row
Elastic tape cutter (MF-7000 Series)
Code Description Applicable model
TC2 Pneumatic type tape cutter Single action air cylinder knee switch E12, C02
TC3 Solenoid type tape cutter Knee switch E12, C02
TC4 Pneumatic type fast-action tape cutter Double action air cylinder knee switch E12, C02
From the library of: Diamond Needle Corp

−6−
Under-bed thread trimming device
Solenoid type Pneumatic type
Code Applicable model
UT1 MFC7406,7407 ○○ ○
UT2 MFC7602,7605 ○○○
UT3 MFC7406,7407 ○○ ○
UT4 MFC7406,7407 ○○○
UT5 MFC7602,7605 ○○○
UT12 MF7406,7407 ○○
UT13 MF7602,7605 ○○○
Elastic tape metering device
Code Description Applicable model
MD1
Metering device (Upper side) Electric single stage
MF 7406, 7407, 7602, 7605-E12
MD2
Metering device (Upper side) Electric two stage
MF 7406, 7407, 7602, 7605-E12
MD6
Metering device (Upper side) Mechanical type
MF 7406, 7407, 7602, 7605-E12
Under-bed thread trimming device
Code Description Applicable model
CC1
Pneumatic type chain-off thread cutter
Horizontal type MF7602, MF7605
Cloth puller
Code Description Applicable model
PL1 Cloth puller MFC 7406, 7407, 7602, 7605
PL4 Cloth puller Can be installed after machine set-up. MFC 7406, 7407, 7602, 7605
PL5 Cloth puller Can be installed after machine set-up. MF 7406, 7407, 7602, 7605
Thread
trimmer Needle
thread wiper
Top covering
thread
trimmer Auto-lifter Thread
trimmer
Needle
thread wiper
(Mechanical)
Needle
thread wiper
(Pneumatic)
Top covering
thread
trimmer Auto-lifter
From the library of: Diamond Needle Corp

−7−
1) Timing relation between the needle and the feed
First screw Ain operating direction on double eccentric 1of feed drive assembly must be straight
up, when the needle bar is at bottom of stroke.
2) Adjusting the timing relation between the needle bar and looper (synchronization) : Without
gauges
When the blade point of the looper moves to the left in the rear of the needle and to the right in front
of the needle, align the upper end of the eyelet of the left needle with the lower face of the looper so
that the distance between A and B, the side of the left needle to the blade point of the looper, should
be equal.
4. STANDARD ADJUSTMENT
(1) MF
A
1
A
1
Left needle
Move to the right
Align
Looper Looper
Left needle
Move to the left
AB
Standard Adjustment
A=B
From the library of: Diamond Needle Corp

−8−
™Remove top cover, feed cover, gasket and cloth plate.
™Loosen screws Bof sprocket 2.
™Rotate lower main shaft in operating direction counterclockwise,
until the first screw Aon double eccentric 1is straight up.
™Holding pulley to prevent it from turning, rotate handwheel of
upper main shaft until needles are at top of their stroke.
™Adjust the torque of screws Bto 5.2 to 5.4 Nm and tighten the
screws.
™Replace top cover, feed cover, gasket and cloth plate.
Note : Earlier machines have (4) screws.
™Dimension A : Turn handwheel in operating direction until
bottom of looper is even with top of needle eye.
™Dimension B : Continue turning handwheel in operating
direction until bottom of looper is even with top of needle eye
when looper is in front of needle.
™If dimension A is greater than dimension B
1) Loosen Con sprocket 3.
2)Fixing looper, turn pulley and tighten screws Cso that
sprocket 3can turn in operating direction.
Repeat above steps until dimension A = dimension B.
™If dimension A less than dimension B
1) Loosen screws Con sprocket 3.
2)Fixing looper, turn pulley and tighten screws Cso that
sprocket 3can turn in reverse direction.
Repeat above steps until dimension A = dimension B.
C
3
B
2
Adjustment Procedures Results of Improper Adjustment
™Needle breakage
™Looper fails to catch needle
thread.
™If the timing is not correct, skip
stitching may occur.
From the library of: Diamond Needle Corp

−9−
MF
Standard Adjustment
Right needle
Looper
4.4 ±0.1 mm
C0.7 to 1.0 mm
Looper
Align Left needle
3) Returning amount of the looper
When the looper is in the extreme right position,the distance between the blade point of the looper
and the center of the right needle is 4.4 ±0.1 mm.
4) Height of the needle bar
When the looper moves to the left and the blade point of the looper comes out from the left side of the
left needle by 0.7 to 1.0 mm, the lower face of the looper aligns with the upper end of the eyelet of the
left needle.
From the library of: Diamond Needle Corp

−10 −
4
5
Adjustment Procedures Results of Improper Adjustment
™Loosen the needle bar holder screw 5and adjust the height
of the needle bar.
(Caution) After the adjustment, check that the direction of
the needle clamp is correct and the respective
needles enter the center of the holes of the throat
plate.
™If the distance of C is large, skip
stitching and tangling stitch may
occur.
™If the distance of C is small, skip
stitching and tangling stitch may
occur.
™If defective stitch occurs with the
wooly nylon thread, make the
distance C as small as possible.
™Loosen the looper base setscrew 4and adjust the returning
amount of the looper.
(Use a 5/32 inch hexagonal wrench.)
™If the returning amount is large,
skippingstitch andtangling stitch
may occur and the range of the
thickness of the cloth to be sewn
is reduced.
™If the returning amount is small,
skippingstitch andtangling stitch
may occur.
From the library of: Diamond Needle Corp

−11 −
MF
Standard Adjustment
5) Clearance between the looper and needle
Clearance between the blade point of the looper and the grooves of the right/left needles is 0 to 0.05
mm. (Clearance of the middle needle becomes larger a little.)
Top end of looper
Looper
Needle
0 to 0.05 mm
6) Adjusting amount of the looper-avoid
When the needle descends, the top point of the needle touches the back of the looper at the position
of 2/3 from the upper side of the looper.
Needle descends
Back of looper
0 to 0.05 mm
Right needle
1/3
2/3
From the library of: Diamond Needle Corp

−12 −
4
6
7
Adjustment Procedures Results of Improper Adjustment
™Loosen the looper base setscrew 4and adjust by moving the
looper base back and forth.
™If the clearance is too large, the
loop of the needle thread is not
scooped and the back of the
looper hits strongly the top point
of the needle which causes the
damage of the needle point.
™If the clearance is too small,
skipping stitch will occur due to
the damage of the tip of the
looper, the needle breakage,
and the large clearance
between the back of the looper
and the needle.
™Loosen the two screws 6and adjust by rotating the eccentric
pin 7.
™Amount of the avoid increases in the direction of +.
™Amount of the avoid reduces in the direction of –.
(Caution) After the adjustment, check again the clearance
between the blade point of the looper and the
groove of the needle. Then check the contact on
the back of the looper.
™If the amount of the avoid is
large, the clearance of the back
of the looper and the needle
becomes large, and skipping
stitch and tangling stitch will
occur.
™If the amount of the avoid is
small, the needle hits strongly
the back of the looper. This
causes the damage of the
needle point, the needle
breakage and the damage on
the back of the looper.
Old type New type
6
7
From the library of: Diamond Needle Corp

−13 −
MF
Standard Adjustment
7) Position of the needle guard
1Rear needle guard
™The height of the rear needle guard is in the position that the rear needle guard is 0.8 mm above
the top of the needle when the looper moves to the left as shown in the figure.
™The longitudinal position and inclination of the rear needle guard are in the position that when the
right side of the respective needles comes to the blade top of the looper, the top of the needle
slightly touches the rear needle guard.
2Moving needle guard
™When the looper advances, the clearance between the needle and the moving needle guard is
0.05 to 0.13 mm.
0.05 to 0.13 mm
Rear needle
guard Slightly touch
0.8 mm
From the library of: Diamond Needle Corp

−14 −
9
8
!0
!1
!2
Adjustment Procedures Results of Improper Adjustment
™Loosen the screw 8and adjust the height and inclination of
the rear needle guard 9. Loosen the screw !0 and adjust the
longitudinal position of the rear needle guard 9.
(Caution) Check that the rear needle guard does not break
the loop of the needle thread by touching the
groove of the needle.
™Loosen the screw !1 and adjust the clearance between the
moving needle guard !2 and the needle.
(Caution) Check that the needle is never caught between the
moving needle guard and rear needle guard in any
case.
From the library of: Diamond Needle Corp

−15 −
A
A'
B
B'
1.1 mm
MF
Standard Adjustment
8) Position of the feed dog
™The clearance of the left/right sides of the feed dog should be equal in the slots of the throat plate.
™At the maximum travel, the clearance of the main feed dog and differential feed dog is equal to A
= A’, B = B’.
™The height of the feed dog is 1.1 mm at the top of their stroke.
™The tilt of the feed dog is parallel to the throat plate when the needle bar is at the highest position.
From the library of: Diamond Needle Corp

−16 −
!7
!3 !4 !5
!6
!7
!8
Adjustment Procedures Results of Improper Adjustment
Open the cover located at the rear side of the needle entry.
™Adjust the longitudinal position of the main feed dog after
loosening the nut !3 and rotating the eccentric nut !4.
™Adjust the longitudinal position of the differential feed dog after
loosening the nut !5 and rotating the eccentric nut !6.
™If the left/right positions of the
feed dog are incorrect, the left/
right sides and the throat plate
will wear out.
™Heating and abnormal noise will
be produced.
™The feed components will wear
out early. And, the looseness,
bending and abnormal noise will
be produced.
™Adjust the inclination of the feed dog after loosening the screw
!7 and rotating the eccentric shaft inside with a slit-screwdriver
through the hole !8.
™If the position of the feed dog is
high, it causes the return feed,
skip stitching and defective
chain-off.
™If the main feed dog, differential
feed dog and throat plate come
in contact each other, it will
cause the breakage.
™If the position of the feed dog is
low, the stitch length becomes
short when the sewing is
finished.
™If the inclination of the feed dog
is raised toward you, starting of
the workpiece will be affected.
™If the inclination of the feed dog
is lowered toward you, it may
cause the irregular stitching and
puckering.
™Loosen the screw !9 and adjust the height of the main feed
dog @0.
™Loosen the screw @1 and adjust the height of the differential
feed dog @2.
@0
@1
@2
!9
From the library of: Diamond Needle Corp

−17 −
MF
Standard Adjustment
9) Spreader
1Timing
Just when the needle descends 2.5 mm from the
highest point of the needle bar, the spreader
begins to return from its extreme left position.
2Stroke
Return
Highest point
Descend
2.5 ±0.1 mm Direction of cloth feeding
19 ±0.1 mm
3Position of spreader
™The height is 11.5 ±0.5 mm. (4.8 mm or less
needle gauge)
(11.1 ±0.5 mm for 5.6 mm and 6.4 mm
gauges)
™When the spreader is in the extreme left
position, the distance between the center of
the left needle and the top blade of the
spreader is 5.5 ±0.1 mm.
™When the spreader returns to the right, the
clearance between the spreader and the left
needle is 0.3 to 0.5 mm.
4Fixing spreader thread guide
™When the spreader is in the extreme right
position, the top blade of the spreader should
be between left side and middle of the
spreader thread guide groove.
™The height is 0.8 to 1.2 mm from the surface
of the spreader.
5Needle clamp spreader thread guide
™When the needle bar is in the lowest position,
the clearance between the needle clamp
spreader thread guide and the upper face of
the fixing spreader thread guide is 4 ±0.5 mm.
™The center of the hole of the thread guide
aligns with the left side of the fixing spreader
thread guide groove.
5.5 ±0.1 mm
11.5 ±0.5 mm
Left needle
Return
0.3 to
0.5 mm
(11.1 ±0.5 mm throat
plate for 5.6 mm or
more needle gauge)
Spreader
Extreme right
Groove
Top blade should be
between left side and
middle of the groove.
0.8 to
1.2 mm
Show spreader at
extreme right position
when setting height
Fixing spreader
thread guide
Needle clamp spreader
thread guide
4 ±0.5
mm
From the library of: Diamond Needle Corp
This manual suits for next models
9
Table of contents
Other JUKI Sewing Machine manuals

JUKI
JUKI AC-172N-1790AN User guide

JUKI
JUKI MF-7800D Series Quick start guide

JUKI
JUKI MO-613V User manual

JUKI
JUKI AMB-289 Quick start guide

JUKI
JUKI LK-1900BN User manual

JUKI
JUKI NA-11UT Series User manual

JUKI
JUKI DDL 227 User manual

JUKI
JUKI MB-1800B User manual

JUKI
JUKI MF-7200D User manual

JUKI
JUKI LU-2800 Series Quick start guide

JUKI
JUKI MB-373N/BR10 User manual

JUKI
JUKI MS-3580S-1SN User manual

JUKI
JUKI LU-1508N User manual

JUKI
JUKI HZL-K85 User manual

JUKI
JUKI HZL-E71 User manual

JUKI
JUKI TSC-441 User manual

JUKI
JUKI MF-7700D Series Quick start guide

JUKI
JUKI AC-172N-1790AN User manual

JUKI
JUKI MO-6700D Series User manual

JUKI
JUKI AVP-875S User manual