Empisal Heidi 328B User manual

This booklet has been written to help you use and enjoy your
sewing machine. Before you start to use this machine, please
take a few minutes to read this booklet. You will find it will
be time well worth spent in understanding your machine.
.;-, -:ri*\.* \
&q**.s .al:,1*
.rdi.
4*
:.::.
I
it).
i
I
zil '!i .
l
ll..;,*
l '-lI
ft
L
rt
!t
t'
f
;:cffir 5. rll
t

KNOWING YOUR SEWING MACHINE
Nanres of parts
How to connect the machine to
the power supply.
How to use the foot control
Sewing lamp. .
Thread and needle chart . .
Changing the needle.
To select a suitable needle.
Raising or lowering the presser foot . .
Regulating the presser foot pressure
(Patch-O-Matic) . . .
Removing and attaching the presser foot
Removing or attaching the foot holder
Regulating the thread tension
Stitch length dial, reversing button
and dropping the feed dog. . .
The pattern selector.
* Selecting stretch stitch.
Removing the bobbin case and bobbin. .
Winding the bobbin
Threading the bobbin case.
Threading the needle thread
Drawing up the bobbin thread
BASIC SEWING
Straight stitch and zigzag stitch
* Start'ing to sew
* Changing sewing directions .
* Fastening seams
UTILITY STITCHING
Sewing with a twin needle. . . .
Triple stretch st;tch.
* Tr iple stra igh t stretch stitch
' Triple zigzag stretch stitch
Tncot zigzag stitch/ .
Smocking stitch .
Overlock stitch .
Double action stitch.
Double overlock stitch .
45
16
17
18
19
20
20
21
21
6
6
6
7
8
8
I
.9
10
11
12
13
14
14
15
22
23
23
23
24
24
25
26
26
-2-
Sewing buttonholes
Sewing zippers
Hemming
Sewing blind hems
Embroidery
Patterns used to bring the clothes personalised touch
MACHINE CARE AND TROUBLE SHOOTING
How to oil the machine .
Cleaning the feed dog .,..
Cleaning the shuttle race
Free-arm eewing .....,
Trouble shooting:
Causes and remedies
27-28
29
30
31
32
33
34
35
36
37
38-39
)

a
24. 5. 67o
25.
24.
aa
22.
21.
10
1t
12
13
16. 114
*4-
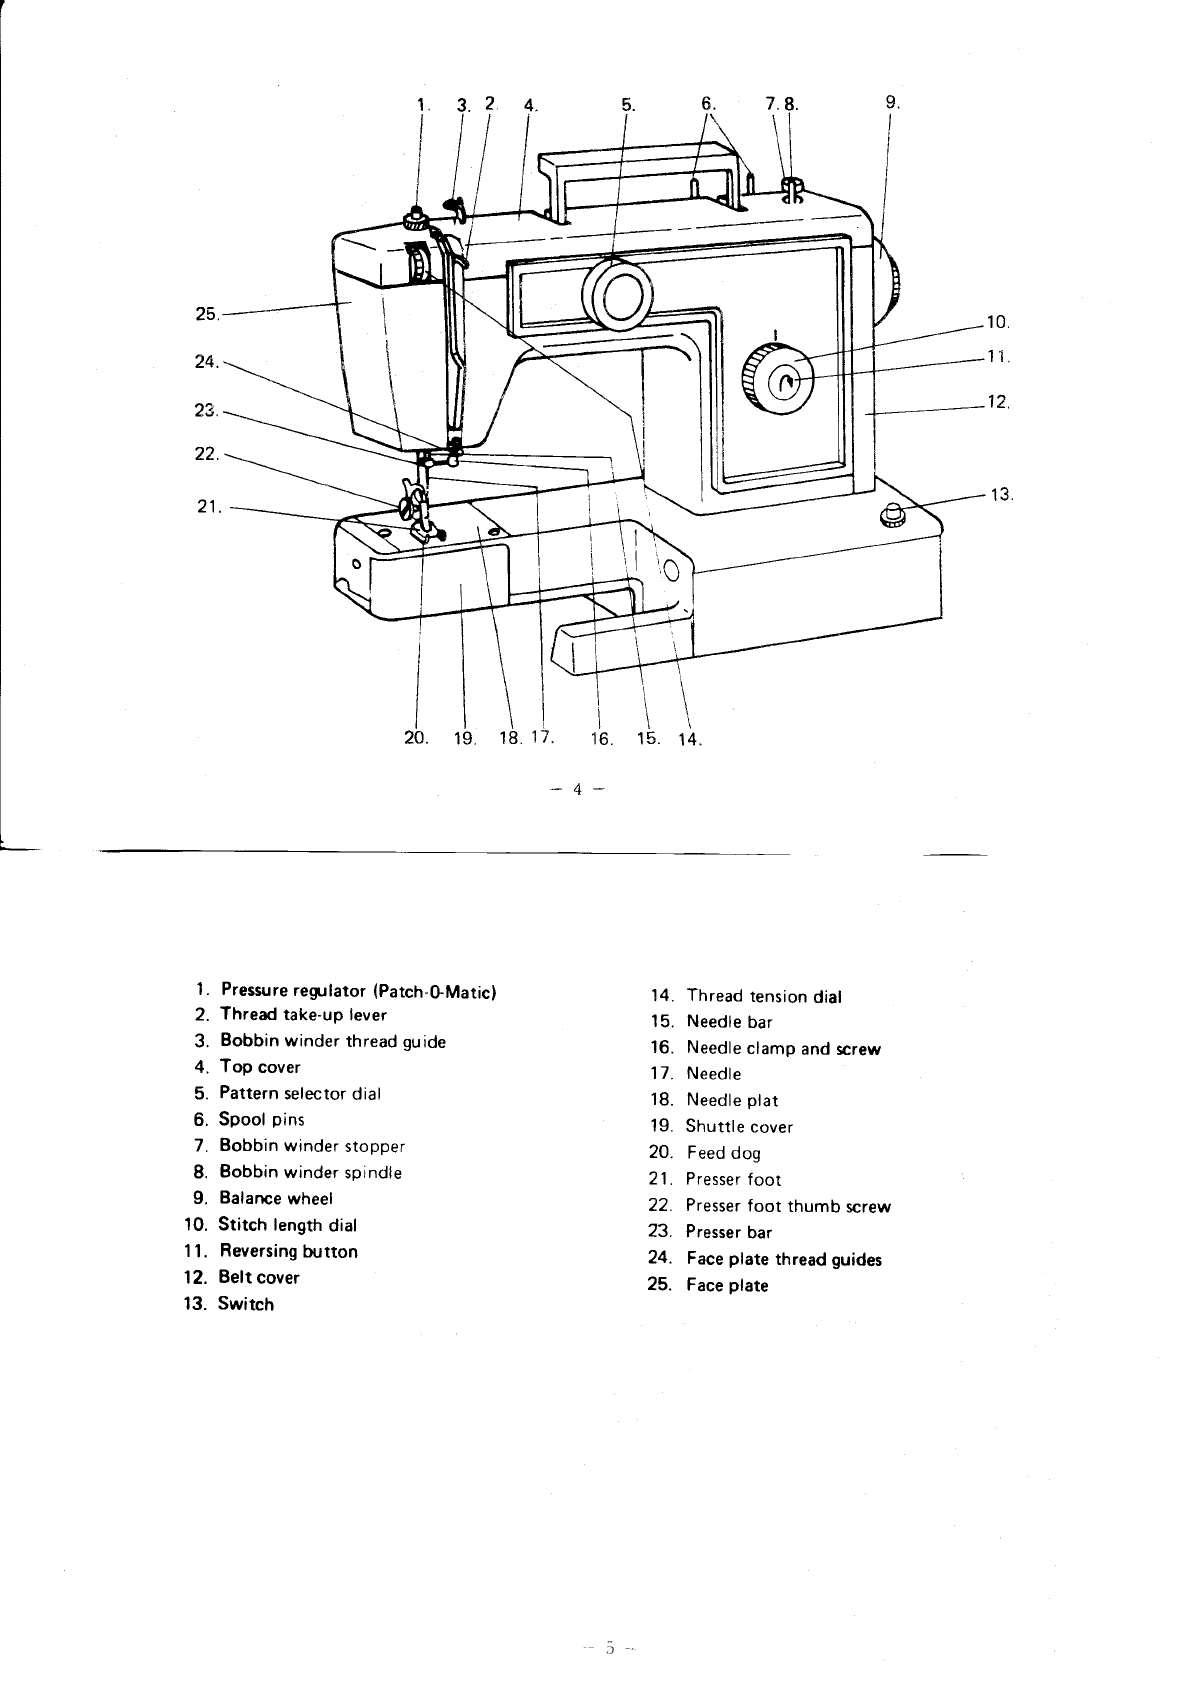
1. Pressure regllator (Patch-GMatic)
2. Thread take-up lever
3. Bobbin winder thread guide
4. Top cover
5. Pattern selector dial
6. Spool pins
7. Bobbin winder stopper
8. Bobbin winder spindle
9. Balance wheel
10. Stitch length dial
1 1. Reversing button
12. Belt cover
13. Switch
14. Thread tension dial
15. Needle bar
16. Needle clamp and screw
'l 7. Needle
18. Needle plat
19. Shuttle cover
20. Feed dog
21. Presser foot
22. Presser foot thumb screw
23. Presser bar
24. Face plate thread guides
25. Face plate
:)
1
1
---

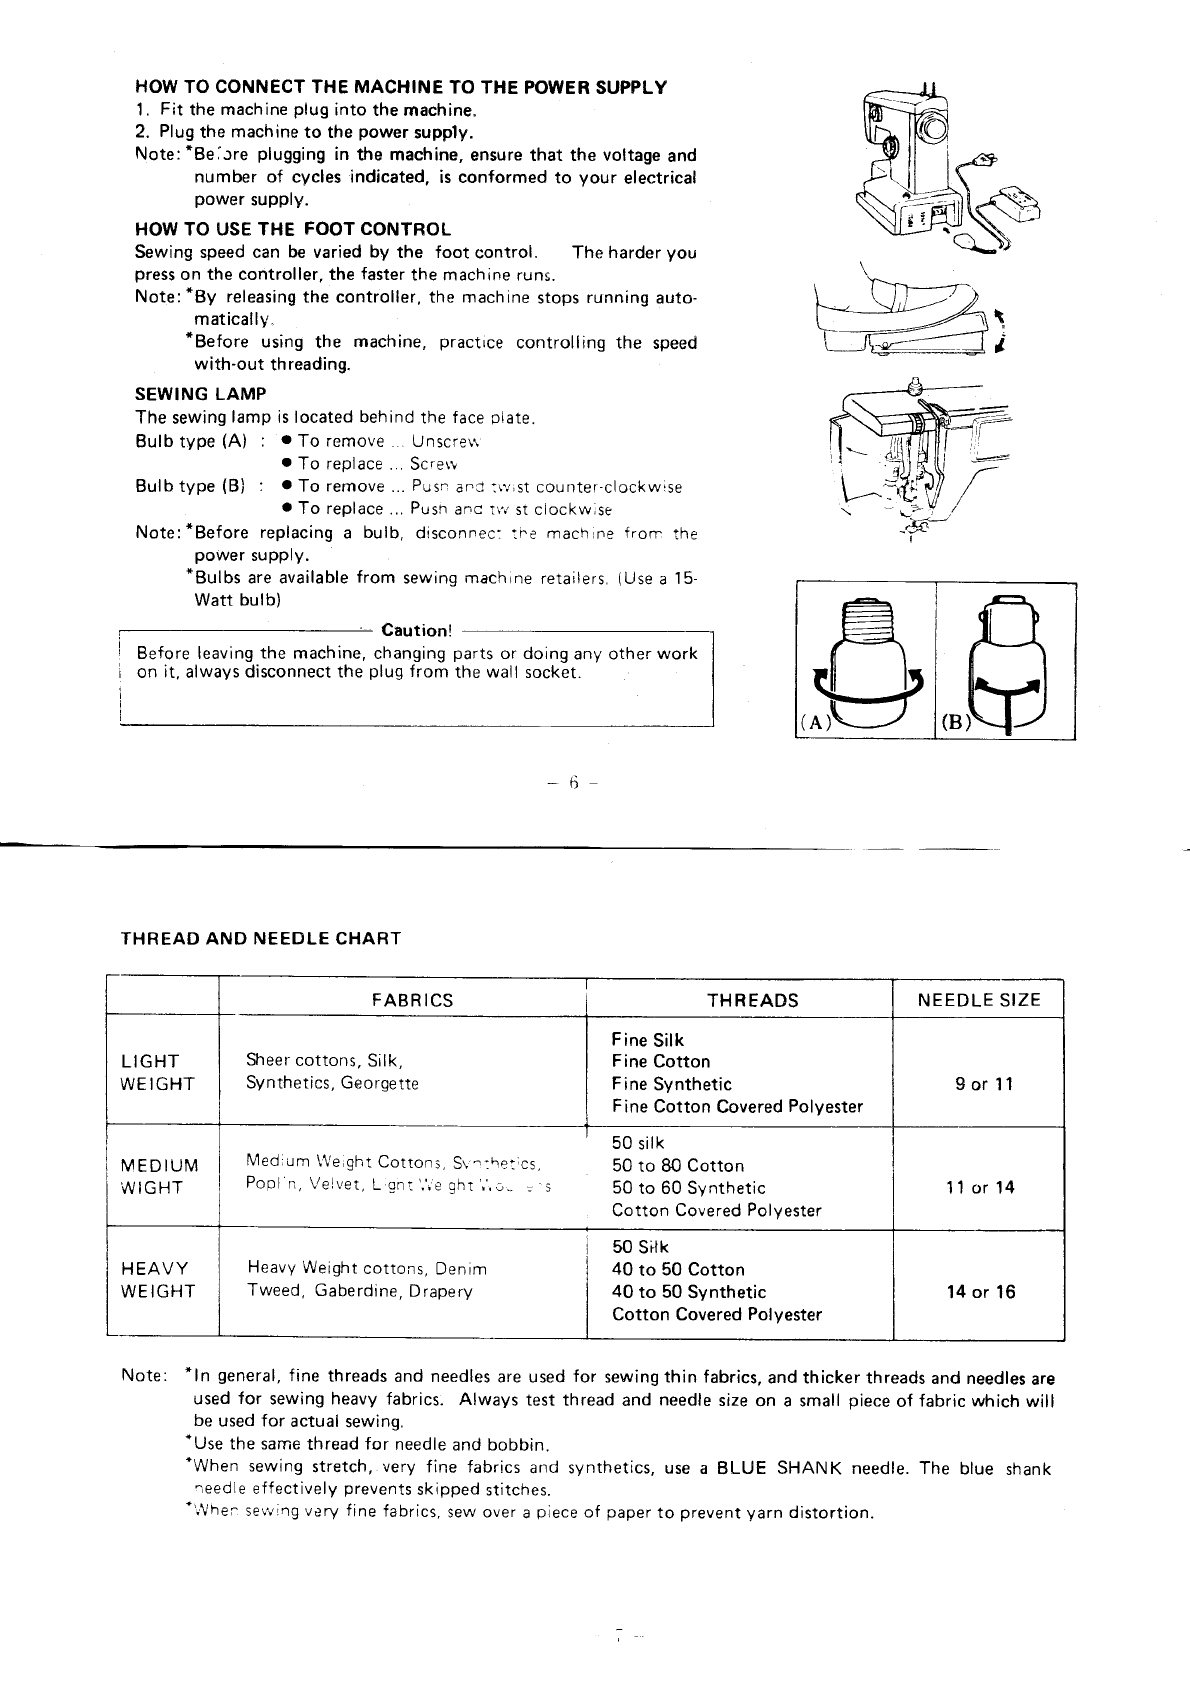
HOW TO CONNECT THE MACHINE TO THE POWER SUPPLY
1. Fit the machine plug into the machine"
2. Plug the machine to the power supply.
Note:*Belcre plugging in the machine, ensure that the voltage and
number of cycles indicated, is conformed to your electrical
power supply.
HOW TO USE THE FOOTCONTROL
Sewing speed can be varied by the foot control. The harder you
press on the controller. the faster the mach ine runs.
Note:*By releasing the controller, the machine stops running auto-
matically.
*Before using the machine, practice controlling the speed
with-out threading.
SEWING LAMP
The sewing lamp is located behind the face plate.
Bulb type (Ai : . To remove Unscren
a To replace ... Sc.ew
Bulb type (Bl : o To remove ... Pusn and :\.,,;st counter-clockwise
a To replace ... Push anc I\i, st ciockwrse
Note:*Before replacing a bulb, disconnec: lne mach ne f ron^ the
power supply.
*Bulbs are available from sewing machine retailers, (Use a 15-
Watt bulb) Caution!
Before leaving the machine, changing parts or doing any other work
on it, always disconnect the plug from the wall socket.
(n (s
I
i
-6
FABR ICS THREADS
Sheer cottons, Silk,
Synthetics, Georgette
NEEDLE SIZE
LIGHT
WEIGHT 9or 11
MEDIUM
WIGHT Med;um \te ght Cottons, Sr'":hetrcs.
Poo :, \/eivet. L gr: ,', e gnt ,', v- s
50 silk
50 to 80 Cotton
50 to 60 Synthetic
Cotton Covered Polyester 'l l clr 14
HEAVY
WEIGHT Heavy Weight cottons, Denim
Tweed, Gaberdine, Drapery
50 sitk
40 to 50 Cotton
40 to 50 Synthetic
Cotton Covered Polyester 14 or 16
THREAD AND NEEDLE CHART
*ln general, fine threads and needles are used for sewing thin fabrics, and thicker threads and needles are
used for sewing heavy fabrics. Always test thread and needle size on a small piece of fabric which will
be used for actual sewing.
*Use the same thread for needle and bobbin.
*When sewing stretch, very fine fabrics and synthetics, use a BLUE SHANK needle. The blue shank
aeedle effectively prevents skipped stitches.
'iVrrer^ seyving very fine fabrics, sew over a piece of paper to prevent yarn distortion.
Note
Fine Silk
Fine Cotton
Fine Synthetic
Fine Cotton Covered Polyester
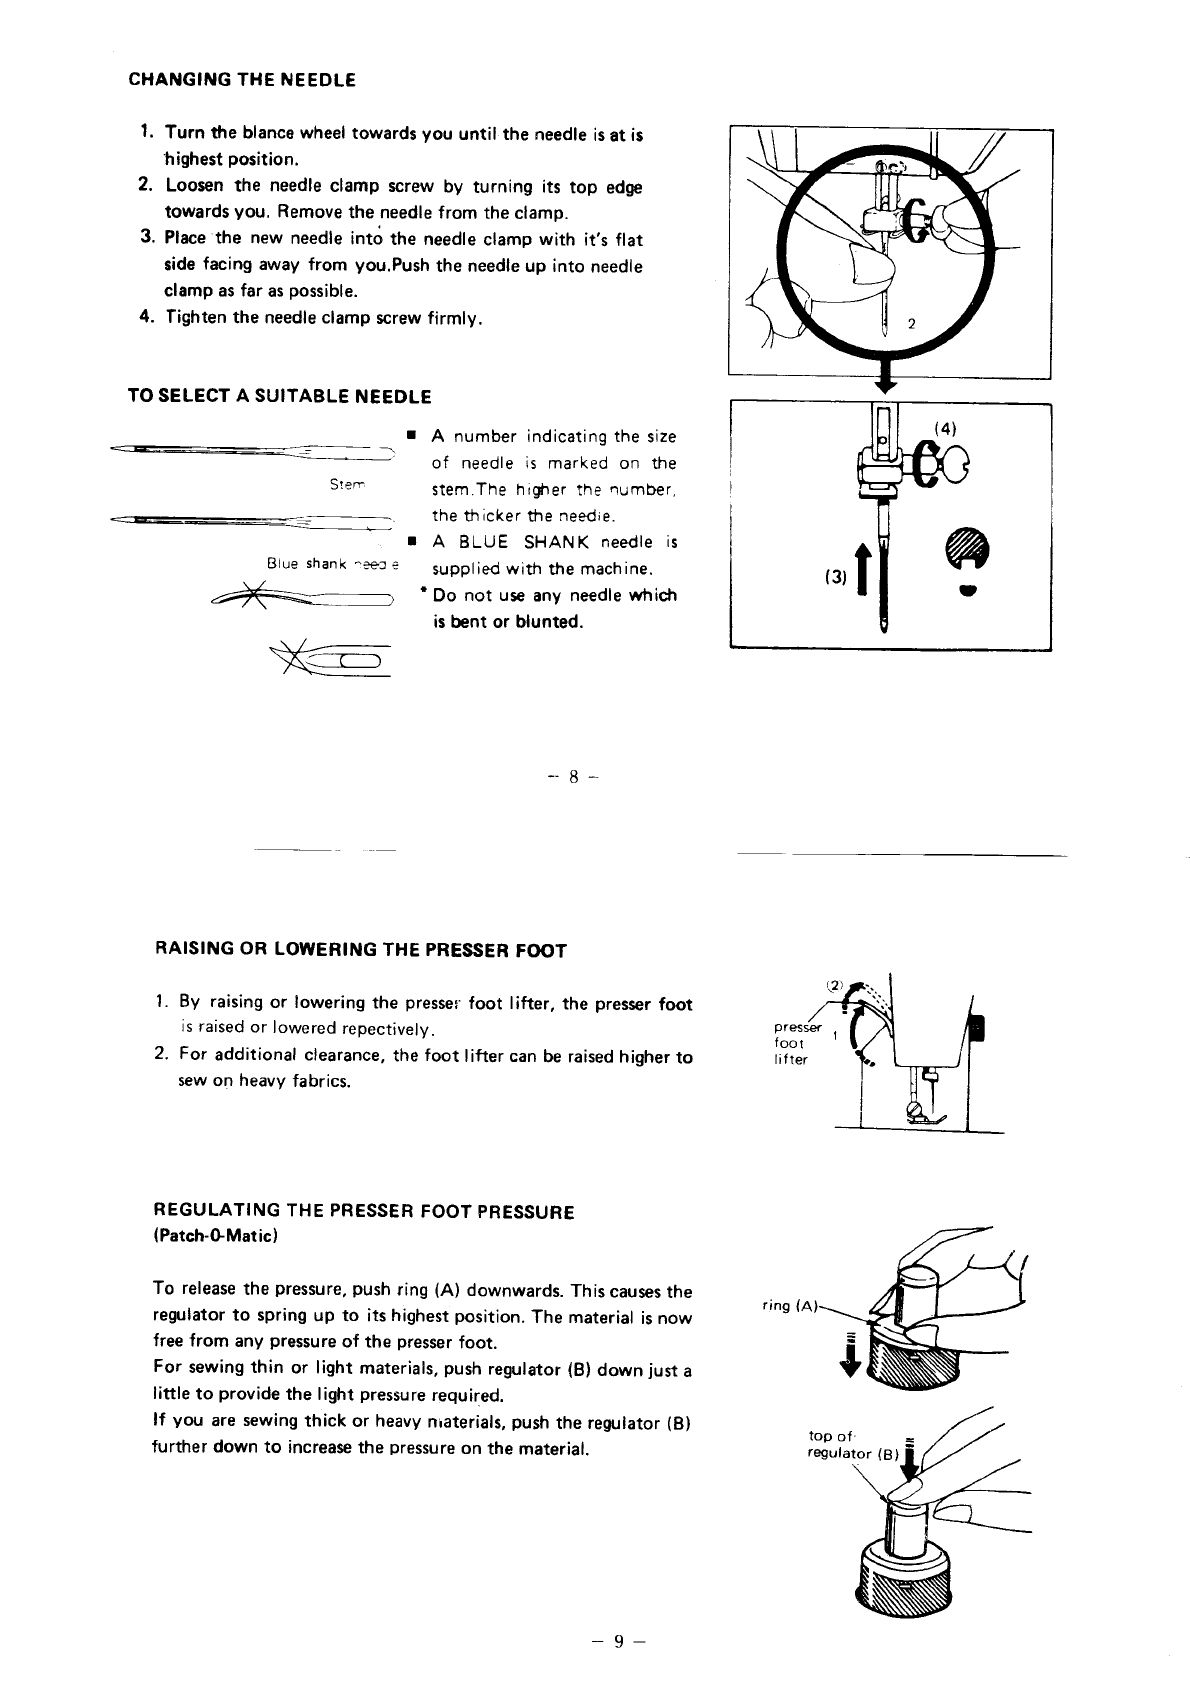
CHANGING THE NEEDLE
l. Turn the blance wheel towards you until the needle is at is
highest position.
2. Loosen the needle clamp screw by turning its top edge
towards you, Remove the needle from the clamp.
3. Place the new needle into the needle clamp with it's flat
side facing away from you.Push the needle up into needle
clamp as far as possible.
4. fighten the needle clamp screw firmly.
TO SELECT A SUITABLE NEEDLE
Stem
Blue shank ^eef, e
! A number indicating the size
of needle is marked on the
stem.The hrgher the number,
the thicker the needie.
I A BLUE SHANK needle is
supplied with the machine.
'Do not use any needle whictr
is bent or blunted.
(4)
(3) t@
!
*8-
RAISING OR LOWERING THE PRESSER FOOT
1. By raising or lowering the presser foot lifter, the presser foot
is raised or lowered repectively.
2. For additional clearance, the foot lifter can be raised higher to
sew on heavy fabrics.
BEGULATING THE PRESSER FOOT PRESSURE
(Patch-GMatic)
To release the pressure. push ring (A) downwards. This causes the
regulator to spring up to its highest position. The material is now
free from any pressure of the presser foot.
For sewing thin or light materials, push regulator (B) down just a
little to provide the light pressure required.
lf you are sewing thick or heavy niaterials, push the regnrlator (B)
further down to increase the pressure on the material.
t2)
p
foot
lifter
ring (.
=
+
top of.
regulator {B }
lEl
-9-
"V-
xa
U

REMOVING AND ATTACHING THE PRESSER Fq)T
To Renrove:
I Turn the balance wheel towards you until the needle is at its highe* potitbn.
Raise the presser foot by lifting the presser foot lifter.
2 BV lifting the lever on the back of the foot holder, the presser footwill drop off
Note: 'Do not force the presser foot to remove it.
To Attach:
1 Place the presser foot so that the pin on the foot lies just under the groove of the
foot holder" Lower the foot holder.
2 When the presser foot lifter is raised you'll find the presser foot is locked in place.
o
I
groove -t
laner -
-10*
REMOVING OR ATTACHING THE FOOT HOLDER
It is not necessary to remove the foot holder unless you use the blind stitch hem guider
or to allow elearance when you clean the feed dog.
To Remove:
Raise the needle to its highest position by turning the balance wheel towards you, and
lift the presser foot.
Remove the foot f rom the foot holder and loosen the foot holder screw with a screw-
driver.
To Attach:
Raise the needle to its highest position by tr.rrning the balance wheel towards you. and
lift the presser foot lifter.
when attaching the foot holder to the presser bar, push it up as far as it will go and
tighten the screw firmly with a screwdriver.
f oot
holder
screw
bar
f oot
holder
screw
-11-
t
foot lder
1l

REGULATING THE THREAD TENSION
Generally, should any tension adiustment be necessary, the adiustment can normally be made by regulating
the upper thread tension dial only. Bobbin thread tension has been adiusted at the fatory and readiustment
is seldom required except for special instances, thread and fabric'
Bobbin thread tension is just right when you can pull the thread from bobbin case easily with a little resistance.
Thread tension may be adjusted by tightening or loosening the thread tension dial'
Properly adiusted thread
tension for straight sewing
The needle thread is too
tight
lirr. ntcrllc tltrcrrl rnd lllt hohhtn lhrcJd
slrorrld filrrlotk rn lhr !([lcr ol lwo lavcrs ol lJhne.
II+ lhrcad lcnsiorr h1
rl()!lng thr drJl to lhc iowt'r nuntber
I rrlrlr'r) th( ncc(ll( (hreJd len\r()n h\
nr,,rrrrg lttr drJl t() lhc hlghtr numhcr
*How to adjust the bobbin
thread tension
o tension
turn screw clockwise.
To decr tenslon
t,rrn screw cOUnter
c lock wrse
Ilrt' hohhrn
lhrcud up-
|c.lr\ ()rl tl!l
rugrprr srrrlutt
r)l th! lJbn! \
I ltc ntt,lir
tltr..rrl rp
llcJt\ ()ll lilL
urt(lr'r\r(lt ()l
tltc lrhrr. '
L()o*n llrc
rrf
Remember the higher the number, the tighter the tension. correctly balanced tensions for one fabric may not
be $itable for another. The required tension depends upon the stiffness of fabric, thickness of the fabric,
numbrs of layers of fabric being sewn, as well as the type of stitch you are making. lt i$ better to test the stitch'
ing on a scrap of the fabric you are using before starting to make a garment.
- I t-
STITCH LENGTH DIAL'REVERSING BUTTOTTI AND DROPPING THE FEED
To change the length of the stitches proceed as follows:
Turn the dial so that the numb€r for the reguired stitch
length is at setting mark. The numbers indicate the ap-
proximate stitch lengths in mm. The lower the number,
the shorter the stitch.
REVERSE STITCH
Press center of the stitch length dial (reversing button) and
hold for reverse stitching. Fabric will immediately start
feeding backwards. Release button and r,rachine will
resume normal forward sewing.
Very useful for fastening ends of seams and darts without
having to tie threads, and for strengthening seams.
DROPPING THE FEED DOG
Embroidering and darning are best carried out with the
feed mechanism disengaged. This is done by setting the
stitch length dial at ffi , which drops the feed and allows
the material to be moved freely under the needle.
The feed starts its normal function again as soon as you
turn the stitch length dial to "O" or beyond it.
t,)
\
The needle thread rs too
loose
0
0
set ti ng
mark
a
iI
I
I
I
I
I
I
slitch lengths
400.5 1
ffi

THE PATTERN SELECTOR
The desired pattern can be sslected by turning the pattern selector dial
patterns shown on the panel respectively, is follorys; The marks on the dial correspond to the
A
B
c
D
E
F
G
c (AM^n,
D(*
5 r{
;lE
o
Cr
=
tr
) straight stitch, middle needle position
) straight stitch, left needle position
I zigzag stitch with variable width
) tricot stitch
) stretch blind stitch
) double action stitch
) reverse blind stitch
I .> [! automatic buttonhole sewing
-. .ss. " +
+
Selecting Stretch Stitch:
When sewing stretch stitch, set the stitch length dial at
"s.s.".
When you release the "S.S." engagement on the dial, the
stretch stitch mechanism will be off automatically.
A ( *,11-r ) triple straight stretch stitch, middle needle
position.
B ( fif ) triple straight stretch stitch, left needle
position.
triple zigzag stretch stitch or ric-rac stitch
smocking stitch
fancy stretch stitch or blanket stitch
double overlock stitch
overlock stitch
turning the pattern selector
Turn the stitch length dial so that
the SS mark is uppermost.
This is a standard adjustment for most types of fabric.
For different types of fabric, adjustment may be necessary.
To shorten the stretch stitches, turn the dial slightly to-
wards "-". To lengthen. turn the dial towards "+".
On most fabrics, these adjustments allow for various
pattern possi bil ities.
IWhen making stretch stitches, the mark " 3 " must always
be within the SS range - (see drawing)l .
=-, ?
)
(
(
Standard adjustment
-t4-
BEMOVING THE BOBBIN CASE AND BOBBIN
l. Raise the presser foot and turn the balance wheel towards
you until the thread take-up lever is at its highest position.
2. Open the shuttle cover
3. Open hinged latch of bobbin case and pull bobbin case out of
machine.
Release the latch and the bobbin will fall out. As long as you
hold the bobbin case latch open, the bobbin cannot drop
out.
l5-
i5,
(J r;t: r r
[+
.SS..

WTNDING THE BOBBIN
1. Release clutch by turning clutch knob
toward you.
2. Draw thread from sPool through
bobbrn winder tension disc as shown.
3. Pull end of thread through hole in
bobbin as shown.
4. Place bobbin onto bobbin winder
shaft with end of thread coming from
the top of the bobbin. Push bobbin
winder shaft to the right until it clicks.
Holding onto end of thread, start
machine. When bobbin is slightlY
f illed, snip off end of thread.
5. Wind thread until winder stops.
Remove bobbin. CliP thread.
6. Tighten clutch knob.
o
'-EG-
:.x
'-.E-
€- o
E.. _ ,r.--
- ei.
@-
@
,! o
_.cD
e
-----
x
- 16-
THREADING THE BOBBIN CASE
Hold the bobbin between the thumb and forefinger of your right
hand and pull off about 15 cm (6 inches).of thread.
l. Hold the bobbin case in your left hand as shown and place
the filled bobbin inside.
2. Pull the thread into the slot in the edge of the bobbin case
3. Now pull the thread under the tension spring and into the
thread eyelet.
To insert the bobbin case and bobbin ......
Ensure that about 15 cm (6 inches) of thread extends
out of bobbin. Hold the bobbin case so that long
finger on case points up. Open the latch of bobbin
case. Slip the bobbin case over the center pin of
hook and press in place until long finger of the
bobbin case enters notch. Release latch and press
down.
I atch
\
_1'7 -
@
O) o
o
o
oo
I\
tn
bobbin case
2
slol
I
3
tension sgring
eyelet
notch
finger
te

THBEADING THE NEEDLE THREAD
Place spool on spool pin as shown, with thread
coming from the back of the spool. Place the
take up lever @ in the highest position.
1. Draw the thread through the thread guides
on the top cover as drawing in O, @.
2. Hold the spool still with right hand, draw the
thread downwards and through the Slot in bet
ween the lace cover, as shown in @.
3. Draw the thread upwards and through the
check-spring guard as in @. The thread will
then slip into the hook of the check spring when
the check spring is released.
4. Release the spool of thread and pass the
thread through take up lever @.
5. Draw the thread downwards and through the
guides @ and 0, and thread the needle from
front to rear @. leave the thread about 1scms
long underneather the presser foot.
2
I
o
@
- 18-
DRAWING UP THE BOBBIN THREAD
'l . Hold the end of the needle thread with your left hand.
2. Turn the balance wheel showly towards you with your right
hand until the needle goes down and comes up. Then stop
the balance wheel when the take-up lever is at its highest
position.
Lightly draw up the needle thread forming a loop with the
bobbin thread.
3. Puil about 15 cm (6 inches) of both threads away from you
under the presser foot.
needle thread
e
needle
t h read
bobbin
't h read
o
-19-
ir
Ir
5
l
2
4
o
I
I

STRAIGHT STITCH AilD ZIGZAG STITCH
Presser foot. . .
Pattern selector .zigzag foot
A{ Cp ) or B (b } (for straight stitch.)
C (l'r\rll* ) (for zigzag stitch)
0.3 -4
Stitch length dial
Starting To Sew
1 Be sure both the threads are drawn back under the presser foot
2. While holding the threads with your left hand. turn the balance
wheel towards you to bring the needle into the fabric where
you wish to start sewing.
3. Lower the presser foot, and gently depress the foot control until
desired sewing speed.
*Sew a few reverse stitches by pushing reverse button for rein-
forcing the cnd of seams.
'Raise the needle to its highest position before turning the
pattern selector dial and stitch width dial.
z igzag foot
-'20 -
Changing Sewing Direetions
l. Stop the machine, and turn the balance wheel toward you to
bring the needle down into the fabric. Baise the presser foot.
2. Pivot the fabric around the needle to change direction as
desired.
3. Lower the presser foot and continue the sewing.
Fsrtening Seamr
1. For fastening the ends of seami. press in the reversing
button and sew several reverse stitches.
2. To remove the fabric. raise the presser foot and draw the
fabric away from you.
3. Cut threads on thread cutter at the rear of presser bar or
with a pair of scissors.
Leave about 15 cm (6 inches) of thread hanging from the
needle eye.
,1
S/
Ithread cutter

Presser foot. . .
Pattern selector zigzag foot
It
(zigzag width
less than " .lt
make)
0.5 to1
Stitch length dial
SEWING WITH A TWIN NEEDLE
Decorative patterns can be made by sewing with a
twin needle and different-colored threads.
1. Set the pattern selector in the range of " ft
otherwise a needle may hit the needle plate.
2. lnsert the twin needle in the same way as a srngle
one (flat side away from you).
Place two spools of threads on the spool pins.
3. Pass both threads through the thread guides as
for single needle stitch ing.
4. Separate the threads on needle bar thread guides and
needle eyes.
Note
ctt
r;,{
iriril
thread guide
{left) '
*Be sure to place the two round felts provided in the accessories over
the spool pins. To turn a corner with a twin needle, you have to take
the needles out of the fabric, otherwise the wvin needle will break or
bend. .).)
-";L--
TRIPLE STRETCH'STITCH
lf you wish to sew stretch fabrics. this is the right stitch to avoid thread breakingl This is also very sitable
for seams that need great strength. e.g. crutch seams orpocket seams.
TRIPLE STRAIGHT STRETCH STITCH TRIPLE ZIGZAG STRETCH STITCH
Presserfoot....
pattern selector .
Stitch lengrth dial
.zigzag foot
.A(ffi)
.s.s.
Presserfoot......
Patternselector...
Stitch lengrth dial . .
.zigzag foot
.t
.S.S.
Note: *Use a BLUE SHANK needte.
The blue tipped shank needle effectively prevents
skipped stitches.
read gu ide
ight)
n1

TRICOT Z!GZAG STITCH
This stitch is very suitable for darning tears. lt can
also be used for reinforcing stretch materials and
sewing on fabric parts.
Presserfoot....
Pattern selector .
Stitch length dial
.zigzag foot
.D( -j:)
.0.3 to 4
SMOCKING STITCH
With a narrow strip of fabric directly under the line
of gathering, stitch over the gathers. The design will
be a series of small diamonds.
When smocking a garment, the stitching should be
done before the piece is sewn into the garment.
Presserfpot....
Pattern selector.
Stitch length dial
.zigzag foot
.D( s )
.S. S.
Note: *Use a BLUE SHANK needle.
The blue shank needle effectiveiv prevents
skipped stitches.
OVERLOCK STICH
With this seam it is possible to prevent raw edges, especially on easily fraying fabrics, with a good-locking and
lasting edge finish.
Presserfoot....
Pattern selector .
Stitch length dial
.zigzag foot
c( s )
.S.S.
Place the fabric under the presser foot so that the stitches are made
over the edge.
Lower the presser foot and start sewing.
Guide the material lightly as shown.
Sew on a piece of waste fabric to check the machine setting.
The overlock stitches are formed correctly when the needle sews
to the right and just misses the fabric edge.
Note: *Use a BLUE SHANK needle.
The blue shank needle effectively prevents skipped sitches.
- 1t
atr
- LJ-

DOUBLE ACTION STITCH
This is a good stitch to use in atraching or binding
elastic fabrics and stretch lace, lingerie stretch knit.
The stitch is decorative as well as useful.
Presserfoot....
Pattern selector .
Stitch length dial
zigzag foot
F( =)
1 to 2.5
DECORATIVE EDGING
Turn the raw edge under 2cm and press. Place the
fabric right side up with the middte of the turnover
under the center of the presser foot, so that the
stitch sews on to the fold and just over the raw edge
underneath.
DOUBLE OVERLOCK STITCH
Use this versatile stitch to insert elastic in garments.
Simply stitch elastic into place. making sure it is
evenly spaced. To do this, mark the correct length
piece into quarters, then match these markings with
center front and side seams.
Presser foot.
Pattern selector.
Stitch length dial
.zigzag foot
F(Ei)
S. S.
-26 -
SEWING BUTTONHOLES
The built-in buttonhole mechanism of this machine makes it poss ble to sew
button holes in a short time without turning the.material.
Presser foot.
Paftern selector
Stitch length dial
buttonhole foot :
fl '[!'[r'E
0.3 to 1Foot
Arrow
(Stan here)
Sleigh
buttonhole foot
dense
st i tches
for light
f abr ics
Raise the foot and the needle to its highest position. Replace the foot with
the transparent buttonhole foot for sewing buttonholes.
Mark the location and the desired length of buttonhole on the fabric using a
pencil or tailor's chalk.
Note: *To find the most suitable *The mark on the stitch
stitch length, it is better length dial shows a range of
to sew a sample buttonhole buttonhole sewing. An
on a piece of waste fabric. adjustment can be made
* When sewing very fine by settlng the mark. as
fabrics and synthetics, de- shown.
crease the pressure of foot
and sew over a piece of
paper to prevent yarn dis-
tortion.
coarse
st i tches
{or heavy
fabr ics
=
-
aa (CONTINUED}

SEWI NG BUTTONHOLES (continued)
1. Set the pattern selector at " [ ". Then pass the needle thread
through the opening in the buttonhole foot and draw both
needle and bobbin threads to the left side. Turn the balance
wheel towards you until the needle comes to the point (1),
2. Lower the foot and sew slowly until the desired length is sewn
then stop the machine at (2).
3. Raise the needle and set the selector at " [! ". Then sew
several stitches of bar tack until the needle is at point {3).
4. Raise the needle and set the selector at " D ", then sew the
right side of h.rttonhole the same length as the left side
of buttonhole. Stop the machine at (4).
5. Raise needle and set the selector at " E ", then sew several
stitches of final bar tack. Stop the machine with the needle
at point (5). To iock threads, set the pattern selector at "B
(zero point of zigzag width)" and sew a few stitches.
6. Cut the buttonhole open carefully using a seam ripper, taking
care not to damage the bar tacks.
Note: *To make a heavier buttonhole, sew twice by repeating the
same procedure.
J
=
5
2
=T
L
J
4
=T*
Et=
=
u
5
- 2s
SEWING ZIPPERS
Presserfoot....
Pattern seleetor .
Stitch length dial
zipper foot
A(6 r
1to4
Raise the foot and the needle to its highest position by turning
the balance wheel towards you. Replace the foot with the zipper
foot.
1. Pin or baste the zipper tape to the fabric and placethework'
piece in position under the foot.
Attach snap on zipper foot so that the needie passes on its
left hand side.
* When starting sewing, both needle and bobbin threads ends
should be Put awaY under the foot.
2. Sew on the right side of the zipper by guiding zipper teeth
as close as possible to the needle drop. Before the foot reaches
the slider on the zipper tape, raise the foot and open the
zipper by keeping the needle in the fabric.
Lower the foot and sew on the remainder of the seam
3. To sew the left side of zipperchange position of foot
to the left side of the needle. Sew on in the same
way as you did on the right side of zipper.
Zipper foot
utapc
Elements
El6ments Fabric
Slider
Slider l-ro. I
Element
Zipper foot
\Needle
Fabric
------'?4
-29-
(
Tape Element
Fig.3

HETTIilIING
Presserfoot....
Pattern selector .
Stitch length dial
hemmer foot
A(C5)
1to4
Raise the foot and the needle to its highest position. Replace the
foot with the hemmer foot.
Fold over the fabric edge by about 3mm (1/8 inches) and place it
under the foot. Secure the folded edge with a few stitches. Take
out the workpiece and draw the hem into the hemmer foot by
pulling on the threads.
Lower the foot and sew the hem.
During sewing, fold the fabric to the left a little and allow it to
run into the hemmer foot.
Make sure that the fabric does not move under the right half of
the foot. The fabric must be fed into the scroll of the hemmer
sufficiently so that the workpiece edge runs freely through the
groove under the foot.
renrmer foot
3mm
-L-
30
SEWING BL!ND HEMS
presserfoot ...
Pattern selector.
Stitch length dial
blind hem foot
E( = )
'l to3
1. Turn up the hem to the desired width and press. (Fig. 1)
2. Fold hem back against the right side of the garment with
top edge of hem extending about 4 mm (1/6 inches) to the
right side of the garment folded. (Fig.2)
3. Place the garment under the foot so that double-fo ded edge
runs along the hemlquide and lower the foot.
Sew slowly for better control, making sure the narrow
zigzag stitches are sewn on the hem edge and wrde zigzag
stitches will just catch one thread of folded edge. (Fig. 3i
4. Unfold the fabric and you will have a blind stitch hem
(Fig. 4)
(Fig.l)
4 mm (1/6")
(Fie. 2)
Guide
adjusting
Folded edge
(Fie. 3)
-31-
m
(Fie. 4)

EMBROIDERY
Remove presser foot
Pattern selector .
Stitch length dial . .
AIQI
#
Place the fabric with embroidery hoop. Set the stitch length
dial at " # ". Lower the presser foot lifter. Hold the embroidery
hocp f irmly with you hand'
While sewing the desired pattern, move the embroidery hoop
slowly and do not allow your fingers to get near the needle.
*Set the needle thread tension a little looser so that the bobbin
thread is not pulled through to the right side of fabric.
*lt is recommended to mark the required embroidery pattern
on the right side of the fabric with a pencil or tailor's chalk.
ernbroidery hoop
.3'.2 --
HOW TO OIL THE MACHINE
The oiling points are marked with arrows in the illustratioru.
Before oiling they should be wiped clean. Apply one or two
drops of a frne quality sewing machine oil. lf the machine is in
constant use. this should be done every two or three days. lf the
machine should not run well after being out of use for a long
period, apply a few drops of oil to the oiling points and run the
machine fast with all covers on for about one rninute. Before
using the machine again oil it in the usual way.
*Do hot forget to sew first on waste fabric, in order to soak up
any excess oil.
-JJ-

CLEANING THE FEED DOG
It is necessary to keep the feed dog teeth always cleaned in order
to ensure smooth sewing.
Remove the needle and the presser foot.
Unscrew the needle plate s€t screws with a screw driver to take
off the needle plate from the machine.
With a brush, clean out dust and lint clogged on the feed dog
teeth.
Ref it the needle plate.
6
34 -
@
CLEANII{G THE SHUTTLE RACE
Unplug the machine from the power suPply"
To rernove shuttle:
Raise needle to its highest position and remove bobbin case.
Turn levers away from shuttle and lift out retaining ring and
shuttle, by grasping center Pin.
Clean the reverse side of feed dog with a small brush. Remove
lint and thread from all parts of shuttle and wipe with a lightly
oiled cloth.
To reassembly:
Hold struttle by center pin and fit carefully back into $uttld
race, forming perfect circle with shuttle driver.
Replre retaining ring polislred side out, making sure the bottom
pin fits into notct . Lock retaining ring by turning levers back into
position. Refit bobbin case with bobbin.
lever
ille driver
lever
retaining ring
shuttle
- 35-
bobbin bobbin case
o

FREE-ARM SEWING
This sewing machine can be used like a flat bed mac[ine, but easily
converts to free arm machine by removing the extension table.
The free arm enables you to sew tubular types of pieces more easily
Just slip the sleeve or pants leg on the free arm as shown above
You will find many uses for this free arm feature such as:
1. Mend elbows and knees of garments more easily.
2. Sew in sleeves more easily. This is especially true when sewinq
smaller garments.
3. Applique, embrorder or hem around edges of cuffs or pants legs.
4. Sewing in elastic casings in skirts or pants at the Waistrlrne.
36-
TROUBLE SHOOTING: CAUSES AND REMEDIES
NEEDLE THREAD BREAKS
CAUSE
Needle not ProPerlY threaded
Thread tension too tight
Something wrong with the needle
Thread is too heavy for needle
Thread check spring is broken
Needle not properly inserted
Needle plate, shuttle or sewing foot damaged
Needle not properly fitted on needle bar
Needle bent or blunt
Needle worn
Needle bent
Needle not properly fitted
Fabric too heavy or too hard
You are pulling on the fabric
BOBBIN THREAD BREAKS
Thread properlV
Loosen tension
Replace needle
Change
Have a new spring fitted
lnsert needle properly
Replace
Wind bobbin correctly
Thread bobbin correctly
Fit needle properly
Replace
Replace
Replace
Fit needle properly
Use needle of correct size
Do not puli
REMEDY
Bobbin thread entangled because of incorrectly wound bobbin
Bobbin thread not under tension spring on bobbin case
STITCHES ARE LEFT OUT
NEEDLE BREAKS
2'7 _
o

TROUBLE SHOOTING: CAUSES AND REMEDIES
THREAD FORMS LOOPS
CAUSE
Thread tension not properly regulated
Needle thread properly threaded and/or bobbin thread
not properly wound
Thread size not suited to fabric
'Threed check spring not working properly
REMEDY
Read instructions for regulating needleand bobbin thread tenrion
Thread machine properly and/or wind bobbin thread correctly
See "Size of needle and thread"
Have spring replaced
SHRINKING OR PUCKERING OF THE SEAM
Tension too tight
Sewing foot pressure too strong Read instructions for regulating needle-and bobbin thread tenrionr
Re'ird instructions for regulating sewing foot pressure
IRREGULAR STITCHES
Needle and bobbin threads of poor guality
Bobbin thread unevenly wound
Mechine needs oiling
Dust and thread in shuttle
Wrong oil used, has now clogped mahine
Drive bclt tension too tight
Use top quality threads
Be-wind bobbin
MACHINE DOES NOT RUN FREELY AND MAKES A NOISE
1. lnser supporter of quilter.
2. Move quilter and adjust stitch distance
Read instructions on how to oil
Read instructions on how to clean *ruttle race
Clean machine carefully and re-oil with top quslity oil
Loosen tension of drive belt
l. Use seam guide when sewing a long seem of
regular distance from edge of material.
2. Set guide in hole on bed, at right of needle plate,
and adjust distance.
3" Run machine with edge of material touching guide. Position cloth
Position cloth guide at an angle to sew a curved
seam.
- 3U-
OUI LTER
l.1nsert supporter of quilter.
2. Move quilter and adiust stitch distance.
SEAM GUIDE
1. Use seam guide when sewing a long seam of regular distance from edge of material.
2. Set guide in hole on bed, at right of needle plate, and adjust distance.
3. Run machine with edge of material touching guide. Position cloth guide at an angle to sew a curved seam
OUIL TER SEAM GUIDE
-ix-
x
/
Table of contents
Other Empisal Sewing Machine manuals

Empisal
Empisal Dress Maker 120A User manual

Empisal
Empisal EES50 User manual

Empisal
Empisal 760 User manual

Empisal
Empisal Dress Maker 270D User manual

Empisal
Empisal em-250 User manual

Empisal
Empisal EES10 User manual

Empisal
Empisal Expression 889 User manual

Empisal
Empisal EEM350 User manual

Empisal
Empisal EEMC220 User manual

Empisal
Empisal creations User manual
Popular Sewing Machine manuals by other brands

Pfaff
Pfaff Creative Vision instructions

artisan
artisan 196 R-2 Instruction manual / spare parts list

Atlanta Attachment Company
Atlanta Attachment Company 1390MB Technical manual

Toyota
Toyota RS2000-2D manual

Mitsubishi Electric
Mitsubishi Electric LAN UNIT Technical manual

Global
Global OS 7700 P Instructions and operating manual