Emson COOKLITE AERO FRYER 9349 User manual

INSTRUCTION MANUAL
H
e
a
r
t
H
e
a
l
t
h
y
A
l
t
e
r
n
a
t
i
v
e
LITTLE OR NO OIL
CRISP&CRUNCHY!
1000 Watts
COOKLITE™ AERO FRYER ITEM NO. 9349/9473
Distributed By EMSON® NY, NY, 10001 ©Copyright 2014 EMSON®
All Rights Reserved. Made In China.

CONTENTS
INTRODUCTION............................................................................................................................... 2
IMPORTANT SAFEGUARDS............................................................................................................. 3
UNPACKING/ASSEMBLY................................................................................................................. 5
PARTS AND FEATURES................................................................................................................... 6
USAGE-BASICS............................................................................................................................... 7
USAGE-PRE-HEATING..................................................................................................................... 7
USAGE-THAWING............................................................................................................................7
SUGGESTED COOKING TIMES.........................................................................................................9
HELPFUL TIPS................................................................................................................................ 13
CLEANING AND CARE.................................................................................................................... 13
12
INTRODUCTION
A healthy way to enjoy all your favorite foods
at home. Prepare ied foods with the absolute
minimum fat content!
Triple Cooking Power
• HALOGEN
directly heats the surface
•CONVECTION
circulates air to speed cooking
•INFRARED HEAT
cooks food from inside out
Prepares crispy fried foods with no oil.
Quickly cooks from frozen, no thawing time needed.
Uses less energy, cooking up to 3 times faster.
Mesh basket & reversible racks for high & low cook
multiple foods at the same time.
2.5L/2.6QT extension ring and tongs included.

3
Before using the electrical appliance, the following basic precautions should always be followed including the
following:
1. Read all instructions.
2. Keep unit out of reach of children.
3. Before use check that the voltage of wall outlet corresponds to the one shown on the rating plate.
4. Do not operate any appliance with a damaged cord or plug or after the appliance malfunctions, or is dropped or damaged
in any manner. Return appliance to the nearest authorized service facility for examination, repair or electrical or mechanical
adjustment.
5. If the supply cord is damaged it must be replaced by the manufacturer or an authorized
service agent or a qualified
technician in order to avoid a hazard.
6. Do not let cord hang over edge of table or hot surface.
7. Do not immerse plug, cord or housing into water due to the risk of electric shock.
8. Close supervision is necessary when your appliance is being used near children.
9. This appliance is not intended for use by persons (including children) with reduced physical, sensory or mental capabilities,
or lack of experience and knowledge, unless they have been given supervision or instruction concerning use of the appliance
by a person responsible for their safety. Children should be supervised to ensure that they do not play with the appliance.
10. Always wear protective, insulated oven mitts or gloves when removing food items or handling the unit.
THE UNIT GETS VERY HOT.
11. Do not touch hot surfaces, use knobs or handles.
12. Always use the handle to remove the lid.
13. Make sure the appliance is clean and dry prior to use.
14. Only place food in the appliance before setting the timer or after pre-heating.
15. Do not place near hot gas or electric burner.
16. The use of accessories not recommended by the manufacturer may cause injuries to persons.
17. Do not operate the appliance for other than its intended use.
18. Do not use outdoors.
19. Do not touch or stare directly into the bulb.
20. Do not move the appliance when in use.
21. Use extreme caution when handling or disposing of hot oils or other hot liquids.
22. Do not place oversized food into the appliance, the lid must be completely closed.
23. Do not place paper, cardboard, plastic or other flammable materials inside the unit.
24. Always turn the unit by moving knob to OFF position before removing the plug from the wall outlet.
IMPORTANT SAFEGUARDS
25. Unplug from main power socket when not in use.
26. Always use the tongs provided when handling rack and mesh basket.
27. Servicing and repair should only be conducted by a qualified technician.
WARNING: CAUTION HOT SURFACES: This appliance generates heat
and steam may escape during use.
Proper precautions must be taken to prevent
the risk of burns, fires, or other injury to persons or damage to property.
CAUTION: This appliance is hot during operation and retains heat for some time after turning off. Always use oven mitts when
handling hot materials and allow metal parts to cool before cleaning.
- Position the appliance so that it is never against a wall or in a corner, against curtains or upholstery.
- When operating the appliance on a work surface keep the surrounding areas clear and free from clutter. Ensure adequate air
space surrounding the appliance for circulation.
- Do not place anything on top of the appliance while it is operating or while it is hot.
- Do not operate this appliance with other major appliances plugged into the same power socket - there is a risk of blowing
the fuse.
- Do not touch the hot appliance surfaces while the unit is on or while cooling.
- All users of this appliance must read and understand this User’s Manual before operating or cleaning this appliance.
- If this appliance begins to malfunction during use, immediately unplug the cord. Do not use or attempt to repair the
malfunctioning appliance.
- Do not leave this appliance unattended during use.
4
FOR HOUSEHOLD USE ONLY.
POLARIZED PLUG
This appliance has a polarized plug (one blade is wider than the other). To reduce the risk of electric shock, this plug will fit
in a polarized outlet only one way. If the plug
does not fit fully into the outlet, reverse the plug. If it still does not fit, contact a
qualified
electrician. Do not attempt to modify the plug in any way.
Do not attempt to repair the appliance, contact a qualified service technician.
A short power supply cord is provided to reduce the hazards resulting from entanglement or tripping over long cord.
Do not use extension cord as it can be pulled on by children causing the unit to tip over.
IMPORTANT SAFEGUARDS
SAVE THESE INSTRUCTIONS
5
UNPACKING - ASSEMBLY
MAIN UNIT (LID, NON-STICK BOWL AND BASE)
EXTENDER RING (1)
REVERSIBLE COOKING RACK (1)
MESH BASKET (1)
TONGS (1)
SPRAYER (1)
PACKAGE CONTENTS:
Unpack the unit and remove all packaging materials.
The extender ring is stored inside the base, under the non-stick bowl.
Before using the unit for the first time, thoroughly wash the non-stick
bowl, plastic base, cooking rack, mesh basket and tongs in hot soapy
water and allow to dry completely.
WARNING: Do not immerse the lid with control knobs, cord, or plug
in water or any other liquid. Do not use abrasive cleansers.
Do not place the lid and base into the dishwasher.
UNPACKING - BEFORE FIRST USE
1. Place the plastic base on a stable heat proof surface. DO NOT place it near edge of countertop or table.
2. Place the non-stick bowl inside the plastic base.
3. Place the reversible cooking rack into the non-stick bowl. Flip for high/low position.
4. If using mesh basket, place on top of the cooking rack.
5. Place the lid on top of the non-stick bowl. The lid should sit on the inner rim of the bowl.
6. If using extender ring, place it on top of the bowl. Then place the lid on.
QUICK ASSEMBLY
(See PARTS+USAGE instructions on pp. 6-9)
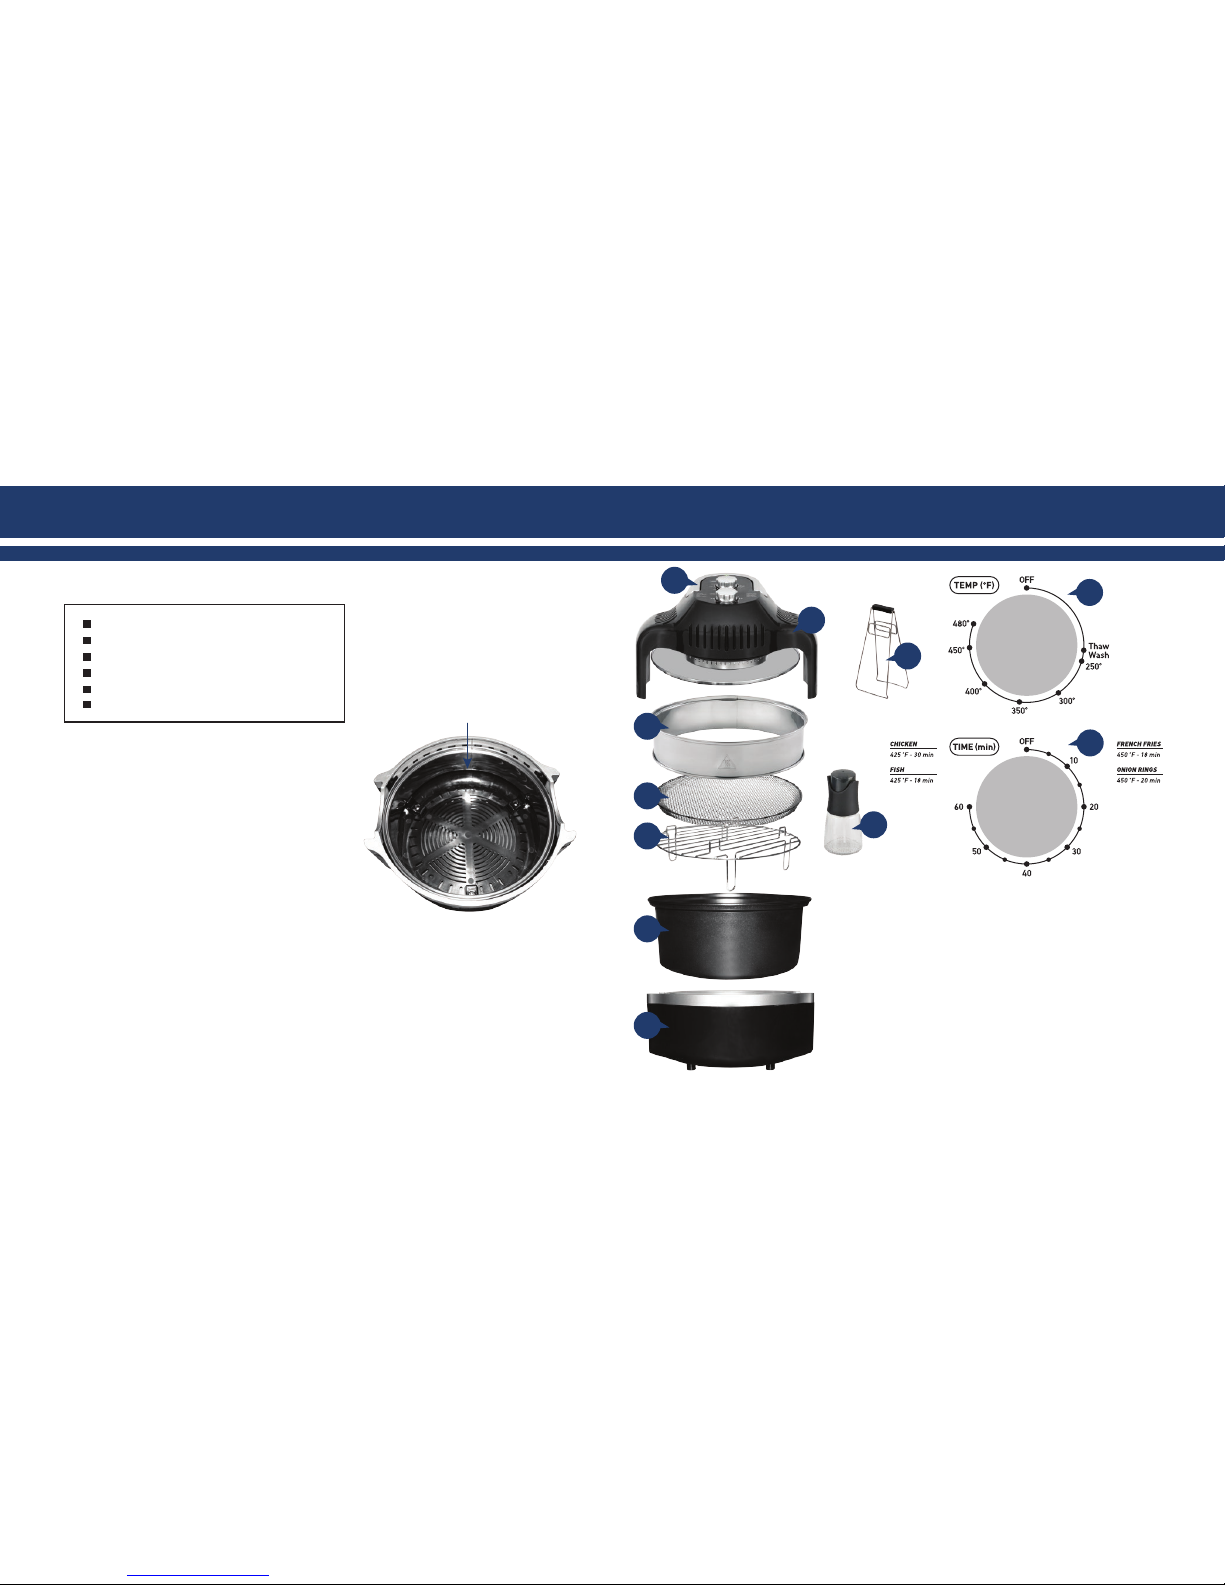
PARTS AND FEATURES
6
1. Lid with Timer and Temperature Controls-features super tight seal
1a-temperature controls
1b-timer controls
2. Safety Handle-automatically turns the unit off when the handle is raised
(shown in ON position)
3. Extender Ring-increases capacity in order to cook larger foods
4. Mesh Basket-perfect for air-frying
5. Reversible Cooking Rack-rack to cook foods, reversible (flip for high or low)
6. Non-stick Bowl-holds food to be cooked
7. Base-holds non-stick bowl
8. Tongs-use to lift hot rack and basket with food from non-stick bowl
9. Sprayer-can be used to lightly spray foods with oil for air-frying
1b
1a
1
2
3
4
5
6
7
8
Remove
Extender Ring
9

7
PRIOR TO USE: IMPORTANT:
- Place the unit on a stable, heat-proof surface and make sure it is not near the edge of the table or countertop.
- Make sure that the power cord is not touching any hot surface.
- Always have enough space around the unit, so there is enough for cover when removed from the unit.
- Make sure you’ve placed the cooking rack/mesh basket inside the non-stick bowl prior to pre-heating and/or cooking.
- Always have the oven mitts ready to remove the lid and cooked food.
-You may use any oven safe pans, plates, tin foil, etc. that can be used inside the conventional oven.
ASSEMBLY-PLACING FOOD IN UNIT:
1. Open the lid and place the reversible cooking rack inside. Flip it to select high or low position.
Refer to Suggested Cooking Times table (pp.9-12) and recipe book for more info.
2. Place food to be cooked directly on rack or Mesh Basket (included). This will allow the hot air to
circulate around the food to be able to cook it faster and more even. When air frying foods like french fries,
onion rings, chicken or fish, use the Mesh Basket. See Diagram on right. Place
the Mesh Basket on top of the
reversible cooking rack. Refer to Suggested Cooking Times table (pp.9-12) and recipe book for more info.
NOTE: Although no oil is necessary to air fry food using this unit, you have an option to use a
Sprayer (included). Just fill it with your choice of oil.Then spray it lightly over the food prior to
cooking (1 to 3 sprays).
3. You can increase the capacity of your fryer when cooking larger foods using the provided
Extender Ring that can be placed on top of the non-stick bowl.
4. Just place the flat part of the extender ring over the bowl’s lip. The extender has
its own lip that will create a perfect seal with the unit’s lid. See Diagrams on right.
5. Close the lid. Do not lower the handle yet. Plug the power cord
into the electrical outlet.
USAGE-BASICS
(Refer to p. 6 for Parts Identification)
EXTENDER RING
Top
(with lip)
Bottom (flat)
SETTING THE TIMER:
7. Set the timer knob to desired time by turning the knob clockwise (from 0 to 60 minutes).
IMPORTANT: When turning the timer controls, DO NOT rotate the knob counterclockwise, as it may damage the timer. If
you have set the timer for longer than required, turn the unit off and wait for the timer to naturally countdown to the
desired time.
USAGE-BASICS
(Refer to p. 6 for Parts Identification)
8
8. Lower the handle until it snaps in, this will turn the unit ON. The handle MUST be flat
down in its stored position for the unit to operate.
IMPORTANT: The handle is a safety feature. To turn the unit off, bring the handle
to its upright position. Once the unit is ON, the halogen lamp and the fan will turn on.
The power (red) and heat (green) lights will illuminate. The halogen lamp along with heat
(green) light will keep cycling on & off to maintain the set temperature. It will go off when
the required heat setting has been reached.
9. If at any time you need to check on the food, simply lift the handle up to turn the unit
off. CAUTION: Before removing the lid always bring the handle to its upright
position. This will activate the safety feature and turn the unit off. The unit will be
very hot. If using extender ring, be extra careful as it will get very hot during cooking
process. It is strongly recommended to use oven mitts when removing the lid.
When done checking-lower the handle until it snaps in.
10. When the timer control reaches the OFF position, the unit will turn off automatically. Remove the lid. Check to make sure
the food is fully cooked.
NOTE: To ensure the food is cooked, use a cooking thermometer or pierce the food with a fork to check
for uncooked juices on meats
and poultry.When cooking vegetables, check for desired tenderness. Moisture may build up inside the unit when cooked food is not
removed soon after timer has gone off. The steam/moisture build-up can be avoided by removing the food as soon as it is cooked.
11. Use the tongs provided to lift out the hot cooking rack with food.
MESH BASKET
TURNING UNIT ON/OFF:
THAWING
Although you can cook from frozen using this unit, we offer you an option to thaw frozen foods. This way it is done in most efficient way
without changing the quality or texture of the food. Thawing time will vary depending on the type of food you are thawing and how frozen it is.
PRE-HEATING
NOTE: Make sure to insert the rack/mesh basket inside the unit prior to pre-heating. If pre-heating is required, set the required
temperature using the temperature dial. Set the time controls to 10 minutes. Once the temperature has been reached, the Halogen
light will turn off. Now you can open the lid and place the food inside.
CAUTION: Before removing the lid always bring the handle to its upright position. This will activate the safety feature and
turn the unit off. The unit will be very hot. If using extender ring, be extra careful as it will get very hot during cooking
process. It is strongly recommended to use oven mitts when removing the lid.
Follow the usage directions on pp. 7-8 for complete instructions. UNIT IS READY TO OPERATE
HANDLE IS DOWN
SETTING THE TEMPERATURE:
6. Set the temperature knob to desired temperature by turning the knob clockwise. Refer to cooking
times/temperature guide for reference (pp. 9-12).
NOTE: The cooking time depends on the size, weight and thickness of the
food to be cooked. Most meats have recommended cooking times, those times should be used as a guide as this unit
cooks faster than conventional ovens, so you may need to allow less time to cook the food.
SPRAYER

9
SUGGESTED COOKING TIMESSUGGESTED COOKING TIMES
10
IMPORTANT: REFER TO THE BELOW COOKING TIMES AS A GUIDE ONLY. TIME MAY VARY ACCORDING
TO THE WEIGHT, SIZE AND THICKNESS OF THE FOOD - ADJUST TO YOUR PREFERENCE.
ALWAYS MAKE SURE TO REFER TO THE INTERNAL FOOD TEMPERATURE GUIDE ON PAGE 13.
CHICKEN
425°F/
350°F
N/A
8 min/
12 min
Sweet & Sour Chicken Bites
with peppers & onions Extender ring. Cook in bowl, remove rack & mesh basket.
Add vegetables after first 8 mins.
425°F/
400°F
N/A
5 min/
10 min
Chicken Lo Main Extender ring. Cook in bowl, remove rack & mesh basket.
Cook vegetables for first 5 mins. Lower temperature, add chicken
for next 10 min.
400°F/
375°F
N/A
5 min/
15 min
Chicken asparagus
Stir fry
Extender ring. Cook in bowl, remove rack & mesh basket.
Cook chicken for first 5 mins. Lower temperature, add vegetables
for next 15 min.
450°F/
375°F
N/A
5 min/
15 min
Chicken Fajitas
(chicken strips)
Extender ring. Cook in bowl, remove rack & mesh basket.
Cook chicken for first 5 mins. Lower temperature, add vegetables
for next 15 min.
450°F/
375°F
N/A
5 min/
20 min
Spanish chicken Extender ring. Cook in bowl, remove rack & mesh basket.
Cook beef for first 5 mins. Lower temperature, add vegetables
for next 20 min.
Extender ring. Mesh Basket; arrange in single layer. Spray mesh
basket & chicken with cooking spray, turn chicken after first 15 min.
425°F
HIGH
30 min
Chicken Pieces, bone in,
breaded (6)
Extender ring. Mesh Basket; arrange in single layer. Spray mesh
basket & chicken with cooking spray, turn chicken after first 10 min.
425°F
HIGH
15 min
Popcorn chicken
Extender ring. Mesh Basket; arrange in single layer. Spray mesh
basket & chicken with cooking spray, turn chicken after first 5 min.
425°F
HIGH
10 min
Chicken tenders
HIGH
Boneless chicken breasts,
breaded
Extender ring. Mesh Basket; arrange in single layer. Spray mesh
basket & wings with cooking spray, turn wings after first 14 min.
Lower temperature for next 14 min.
425°F/
420°F
HIGH
28 min
Extender ring. Mesh Basket; arrange in single layer. Spray mesh
basket & chicken with cooking spray, turn after first 5 min.
Lower temperature for next 15 min.
425°F/
420°F
20 min
Chicken Wings (6 pieces)
400°F/
350°F
N/A
5 min/
20 min
Sausage & peppers Extender ring. Cook in bowl, remove rack & mesh basket.
Add vegetables after first 5 mins.
375°F/
350°F
N/A
25 min/
35-45
min
Spare ribs (2 lbs) Extender ring. Cook in bowl, remove rack & mesh basket. Add
sauce after first 25 mins. Lower temperature for next 35-45 min.
450°F/
375°F
N/A
5 min/
15 min
Beef Fajitas
(skirt steak strips)
Extender ring. Cook in bowl, remove rack & mesh basket.
Cook chicken for first 5 mins. Lower temperature, add vegetables
for next 15 min.
425°F/
350°F
N/A
5 min/
25 min
Beef stew
(beef cubed)
Extender ring. Cook in bowl, remove rack & mesh basket.
Cook beef for first 5 mins. Lower temperature, add vegetables
for next 25 min.
425°F/
400°F
N/A
5 min/
20 min
Frittata (sausage)
6 eggs
Extender ring. Cook in bowl, remove rack & mesh basket.
Cook sausage for first 5 mins. Lower temperature, add eggs
for next 20 min.
BEEF/PORK
Extender ring. Mesh Basket; arrange in single layer. Spray mesh
basket with cooking spray, turn meatballs after first 10 min.
375°F
LOW
20 min
Meatballs
400°F
HIGH
6-7 min
Bacon (5 strips) Extender ring. Mesh Basket; arrange in single layer. Turn bacon
over after first 3 min. Adjust cooking time for less/more crispy.
TYPE OF FOOD NOTES
COOKING
TEMP.
RACK
HEIGHT
COOK
TIME

SUGGESTED COOKING TIMESSUGGESTED COOKING TIMES
NOTE: Although no oil is necessary to air fry or stir fry food using this unit, you have an option to use some oil.
Spray oil lightly over the food prior to cooking.
NOTE: Refer to our Recipe Book (included) on how to prepare additional foods.
1211
Extender ring. Mesh Basket; arrange in single layer. Spray mesh
basket & zucchini with cooking spray, turn after first 8 min.
Lower temperature for next 8 min.
425°F/
400°F
HIGH
16 min
Zucchini sticks
Extender ring. Mesh Basket; arrange in single layer. Spray mesh
basket & eggplant with cooking spray, turn after first 5 min.
425°F
HIGH
15 min
Eggplant (slices)
Extender ring. Mesh Basket; arrange in single layer. Spray mesh
basket & mushrooms with cooking spray, turn after first 8 min.
Lower temperature for next 8 min.
425°F/
400°F
HIGH
16 min
Mushroom caps
VEGETABLES
450°F/
400°F
N/A
10 min/
15 min
Ratatouille Extender ring. Cook in bowl, remove rack & mesh basket.
Cook vegetables for first 10 mins. Lower temperature, add
diced tomatoes for next 15 min.
450°F
HIGH
16 min
Onion Rings - fresh Extender ring. Mesh Basket; arrange in single layer. Spray mesh
basket & onion rings with cooking spray. Turn over after first
8 min.
450°F
HIGH
20 min
French Fries - fresh Extender ring. Mesh Basket; arrange in single layer. Spray mesh
basket & fries with cooking spray. Turn over after first 10 min.
450°F
HIGH
28 min
Potato wedges - fresh Extender ring. Mesh Basket; arrange in single layer. Spray mesh
basket & fries with cooking spray. Turn over after first 14 min.
450°F
HIGH
20 min
Sweet Potato Fries - fresh Extender ring. Mesh Basket; arrange in single layer. Spray mesh
basket & fries with cooking spray. Turn over after first 10 minutes.
DESSERT / BREAD
450°F
HIGH
25 min
Zeppole Extender ring. Mesh Basket; arrange in single layer. Spray mesh
basket with cooking spray.
375°F
N/A
25 min
Corn bread Extender ring. Cook in bowl, remove rack & mesh basket.
Spray sides and bottom of bowl with cooking spray.
375°F
N/A
30 min
Bread pudding Extender ring. Cook in bowl, remove rack & mesh basket.
Spray sides and bottom of bowl with cooking spray.
325°F
N/A
30 min
Brownies Extender ring. Cook in bowl, remove rack & mesh basket.
Spray sides and bottom of bowl with cooking spray.
TYPE OF FOOD NOTES
COOKING
TEMP.
RACK
HEIGHT
COOK
TIME
FISH / SEAFOOD
Extender ring. Mesh Basket; arrange in single layer. Spray mesh
basket & fish with cooking spray, gently turn fish after first 9 min.
425°F
HIGH
18 min
Fish fillets, breaded (2)
425°F
HIGH
16 min
Tilapia fillets (3)
Salmon fillets (3)
Extender ring. Mesh Basket; arrange in single layer. Spray mesh
basket & fish with cooking spray, gently turn fish after first 8 min.
425°F
HIGH
16 min
Extender ring. Mesh Basket; arrange in single layer. Spray mesh
basket & fish with cooking spray, gently turn fish after first 8 min.
Butterfly shrimp 425°F
HIGH
8 min
Extender ring. Mesh Basket; arrange in single layer. Spray mesh
basket & fish with cooking spray.
450°F
HIGH
20 min
Shrimp Egg Rolls
- fresh Extender ring. Mesh Basket; arrange in single layer. Brush egg
rolls with egg wash. Spray mesh basket & egg rolls with cooking
spray. Turn over after first 10 minutes.
450°F
HIGH
8 min
Oysters (shelled)
Extender ring. Mesh Basket; arrange in single layer. Spray mesh
basket & oysters with cooking spray.

HELPFUL TIPS / CLEANING AND CARE
Internal Food Temperatures Guide
When cooking poultry, always cook to the internal
temperature of 170-180ºF. Another sign for
cooked poultry is when the juices run clear. Fish
is done when it looks opaque and flakes easily
with a fork. Shellfish such as shrimp, crab, or
lobster will turn reddish pink on the outside and
opaque on the inside.
You may also refer to the markings on your
meat thermometer.
This is a list of the internal
temperatures that different
foods must reach to kill
bacteria.
These are NOT the
temperatures to use
to cook the food.
ADAPTING RECIPES:
You can try your favorite recipe that is intended for conventional oven or fryer. Keep the cooking temperature the same, just reduce
the cooking time, as it will cook much faster in this unit. You may use a meat thermometer to make sure the food is cooked.
Refer to Internal Food Temperature guide below.
Make sure you turn off and unplug the unit before cleaning it. Always wait until the unit cools down completely. Thoroughly
wash the non-stick bowl, plastic base, extender ring, reversible cooking rack, mesh basket, tongs in hot soapy water and allow
to dry completely.You may also place the non-stick bowl, reversible cooking rack and mesh basket into the dishwasher.
When washing cooking rack and mesh basket, do not soak it in water for long periods of time. Once washed, do not let air dry;
dry the cooking rack and mesh basket thoroughly with cloth or paper towel. This will preserve the surface and will extend the
life of the cooking rack and mesh basket.
WARNING: Do not immerse the lid with control knobs, cord, or plug in water or any other liquid. Do not use abrasive
cleansers. Do not place glass lid and base into the dishwasher.
Once unplugged from the power outlet, the surface of the glass lid can be carefully wiped clean using a damp cloth or sponge.
All parts must be dry before next use. When storing the unit, always make sure ALL parts are DRY, to avoid any moisture
collecting in the lid.
SELF CLEANING OF BOWL
If the food particles seem to be stuck to the bottom and/or sides of the bowl, you can perform a self cleaning.
1. Pour approximately 1 to 2 inches of water into the bowl, add a small amount of mild dishwashing liquid.
2. Place lid on and plug into the electrical outlet.
3. Set temperature control to WASH setting, set timer to 10 minutes.
4. Once the timer goes off, carefully open the lid and wait for the bowl to cool down before emptying the liquid inside.
5. Rinse the bowl in clean warm water to remove the soap residue.
CLEANING AND CARE
13
Beef, Lamb or Veal - Medium Rare
Beef, Lamb or Veal - Medium
Beef, Lamb, Pork or Veal - Well Done
Chicken Breast
Chicken Thighs or Wings
Fish and Shellfish
Ground Beef or Ground Pork
Ground Chicken or Ground Turkey
Pork
145ºF
160ºF
170ºF
170ºF
180ºF
145ºF
160ºF
165ºF
160ºF
This manual suits for next models
1
Table of contents
Other Emson Fryer manuals


