En-Vision America ScripTalk 220-SN User manual

ScripTalk® Printer
User’s Manual
Model 220-SN™
User’s Manual No. 220-SN-001 v1.6
© En-Vision America, Inc.

i
FORWARD
This manual provides installation and operation information for the 220-
SN series printers, manufactured by En-Vision America, Inc.
COPYRIGHTS
This document contains information proprietary to En-Vision America,
Inc.. This document and the information contained within is copyrighted
En-Vision America, Inc. and may not be duplicated in full or in part by
any person without written approval from En-Vision America, Inc. While
every effort has been made to keep the information contained within
current and accurate as of the date of publication, no guarantee is given
or implied that the document is error free or that it is accurate with
regard to any specification. En-Vision America, Inc. reserves the right to
make changes, for the purpose of product improvement, at any time.
TRADEMARKS
220-SN is a service mark of En-Vision America, Inc. Windows and MS-
DOS are registered trademarks of Microsoft Corp. All other marks are
trademarks or registered trademarks of their respective holders.
REPAIR
Before returning any equipment to En-Vision America for warranty or
out-of-warranty repair, contact ScripTalk Printer Technical Support for
troubleshooting assistance.
Phone: 800-890-1180
Email: support@envisionamerica.com
En-Vision America, Inc.
825 4th Street West, Palmetto, FL 34221
www.envisionamerica.com
©Copyright 2017 En-Vision America, Inc.
All rights reserved.

ii

iii

iv
PRECAUTIONS FOR LOCATION AND ENVIRONMENT
Be sure the surface the 220-SN printer is sitting on and the environment
around it satisfy the following characteristics for reliable and safe
operation.
Place the printer on a surface that is flat, level, and free from
vibration
Avoid environments with high temperature and humidity, and
ones where rapid changes to temperature and humidity are
possible
Avoid locations where the printer may be exposed to water, oil,
dust, or direct sunlight
Failure to adhere to the recommendations listed above may result in a
shortened life span for the printer.
POWER SUPPLY
To avoid the risk of malfunction, follow these guidelines for supplying
power to the printer:
Use only the power supply included with the 220-SN printer
(Output: 19V, 2.7A)
Plug the power supply into a grounded power outlet
Avoid plugging the power supply into an outlet shared by or
near a heater, refrigerator, or other large appliance that draws a
large amount of power

v
TABLE OF CONTENTS
1 - INTRODUCTION………………………………………………………………………………..1
1.1 –FEATURES OF THE PRINTER………………………………………………………2
1.2 –UNPACKING…………………………………………………………………………….2
1.2.1 –INCLUDED ACCESSORIES……..……………………………………….3
1.3 –PARTS IDENTIFICATION…………..………………………………………………4
2 –INSTALLATION…………………………………………………………………………………7
2.1 –SITE LOCATION………………………………………………………………………..8
2.2 –MEDIA IDENTIFICATION………………………………………………………….8
2.3 –LOADING LABELS…………………………………………………………………….9
2.4 –CONNECTIONS………………………………………………………………………11
2.4.1 –POWER SUPPLY CONNECTION……………………………………11
2.4.2 –NETWORK CONNECTION……………………………………………12
3 –NETWORK CONFIGURATION…………………………………………………………13
4 –TROUBLESHOOTING……………………………………………………………………..14
4.1 –ERROR SIGNAL TROUBLESHOOTING…………………………………….14
4.2 –TROUBLESHOOTING TABLE…………………………………………………..16
4.3 –NETWORK TROUBLESHOOTING……………………………………………18
4.4 –DEFAULT SETTINGS RESET…………………………………………………….18
4.5 –FACTORY RESET…………………………………………………………………….19
4.6 –PRINT CONFIGURATION……………………………………………………….20
5 –CLEANING………………………………………………………………………………………21
5.1 –CLEANING MATERIALS AND SCHEDULE…………………………………21
5.2 –PARTS TO CLEAN……………………………………………………………………22
6 –SPECIFICATIONS…………………………………………………………………………….23

- 1 -
1 –INTRODUCTION
Thank you for your investment in the ScripTalk Printer Model 220-SN.
This Operators manual contains the basic information about the
installation, setup, configuration, operation, and maintenance of the
printer.
A total of 6 topics are covered herein, and they are organized as follows:
Section 1: Introduction
Section 2: Installation
Section 3: Network Configuration
Section 4: Troubleshooting
Section 5: Cleaning
Section 6: Specifications
It is recommended that you read carefully and become familiar with
each section before installing and maintaining the printer. Refer to the
Table of Contents at the front of this manual to search for the relevant
information needed. All page numbers in this manual consist of a
section number followed by the page number within the stated section.
This section assists you in unpacking the printer from the shipping
container. You will also be guided through a familiarization tour of the
main parts and controls.
The following information is provided herein:
Features of the printer
Unpacking
Parts identification

- 2 -
1.1 –FEATURES OF THE PRINTER
The 220-SN is a 2 inch direct thermal RFID printer, with a 32-bit RISC
CPU, 4 ips print speed, and 4MB of flash memory. The key features of
the 220-SN are:
High Print Resolution with crisp printing quality (203dpi)
Direct Thermal Printing –no wax ribbon needed
Ethernet LAN connectivity
HF RFID
Easy Media Loading –no round media plates required
Tool-less changing of the print head and platen roller for easier
maintenance
Anti-Microbial casing is ideally suited for clinical environments
Safety Top Cover Latch
1.2 –UNPACKING
When unpacking the printer, take note of the following:
The box should stay right-side up. Lift the printer out of the box
carefully.
Remove all packaging from the printer.
Remove the accessory items from their protective containers.
Set the printer on a solid, flat surface. Inspect the siphhing
container and printer for any sign of damage that may have
occurred during shipping. Please note that En-Vision America
shall hold no liability for any damage of any kind sustained
during shipping of the product.
Notes
If the printer has been stored in the cold, allow it to reach room
temperature before turning it on.
Please do not discard the original packaging box and cushioning
material after installing the printer. They may be needed in
future, if the printer needs to be shipped for repairs.

- 3 -
1.2.1 –Included Accessories
After unpacking the printer, verify that you have the following
materials:
* The shape of the power plug may vary, depending on where it was
purchased

- 4 -
1.3 PARTS IDENTIFICATION
Front View
(1) Operator Panel –Consists of two contact buttons and one two-
color (red and green) LED indicator.
(2) Top Cover –Open this cover to load the media and ribbon.
(3) Cover Open/Close Latch –Pull latches on both sides of the
printer forward to open the Top Cover.
(4) Media Ejection Slot –Opening for media output.
(5) VR3 Potentiometer (Offset/Pitch) –!! DO NOT ADJUST !!
(6) POWER Button –Press this button to turn the power ON or
OFF.
(7) FEED/LINE Button –Press this button to select the printer
status (online/offline) or to feed the label media.
(8) ON LINE (POWER) LED Indicator –The LED lights green when
the printer is ready to print and blinks green when the ability to
print paused.

- 5 -
1.3 PARTS IDENTIFICATION (CONT.)
Back View
(9) Top Cover
(10) DC Input Power Terminal –Supplies power to the printer by
inserting the power plug via the power supply adapter.
(11) LAN Interface Terminal –Provides network connectivity via an
RJ-45 Ethernet port.
(12) VR1 Potentiometer (Gap) –!! DO NOT ADJUST !!
(13) VR2 Potentiometer (I-Mark) –!! DO NOT ADJUST !!
(14) USB Interface Terminal –USAGE RESERVED FOR EN-VISION
TECHNICAL SUPPORT. Provides connectivity via USB.

- 6 -
1.3 –PARTS IDENTIFICATION (CONT.)
Internal View with Top Cover Open
(15) Print Head –This component is used to print on the paper
(16) Upper Gap Sensor –Detects the gap of the label in conjunction
with the Lower Gap Sensor (18)
(17) Roll Media Holder –Suspends the roll of labels for smooth
feeding
(18) I-Mark (Paper) Sensor –Under the left Media Guide; detects
the I-Mark (black bar) on the media backing
(19) Platen Roller –Feeds the labels
(20) Media Guide Slide Lever –Push backwards to unlock the Roll
Media Holder slides for width adjustment
(21) Lower Gap Sensor –Detects the gap of the label in conjunction
with the Upper Gap Sensor (16)

- 7 -
2 –INSTALLATION
This section helps you with installing ScripTalk Talking Label media
(10KB) in the 220-SN, as well as adjustment instructions.
The following information is provided:
2.1 - Site Location
2.2 - Media Identification
2.3 - Loading Labels
2.4 - Connections
- 8 -
2.1 –SITE LOCATION
Consider the following when setting up the printer:
Place the printer on a solid flat surface with adequate space.
Make sure there is enough space above the printer to provide
clearance for the top cover to swing open.
Place it away from hazardous materials or dusty environments.
Place it within operational distance of the host computer, within
interface cable specifications.
2.2 –MEDIA IDENTIFICATION
The ScripTalk Printer 220-SN requires specific label stock that can only
be purchased from En-Vision America. If you need more labels, have
your purchasing agent fax a PO to 309-452-3643 for the following:
00210-10K-0250 ScripTalk Labels, 10K, 250/roll
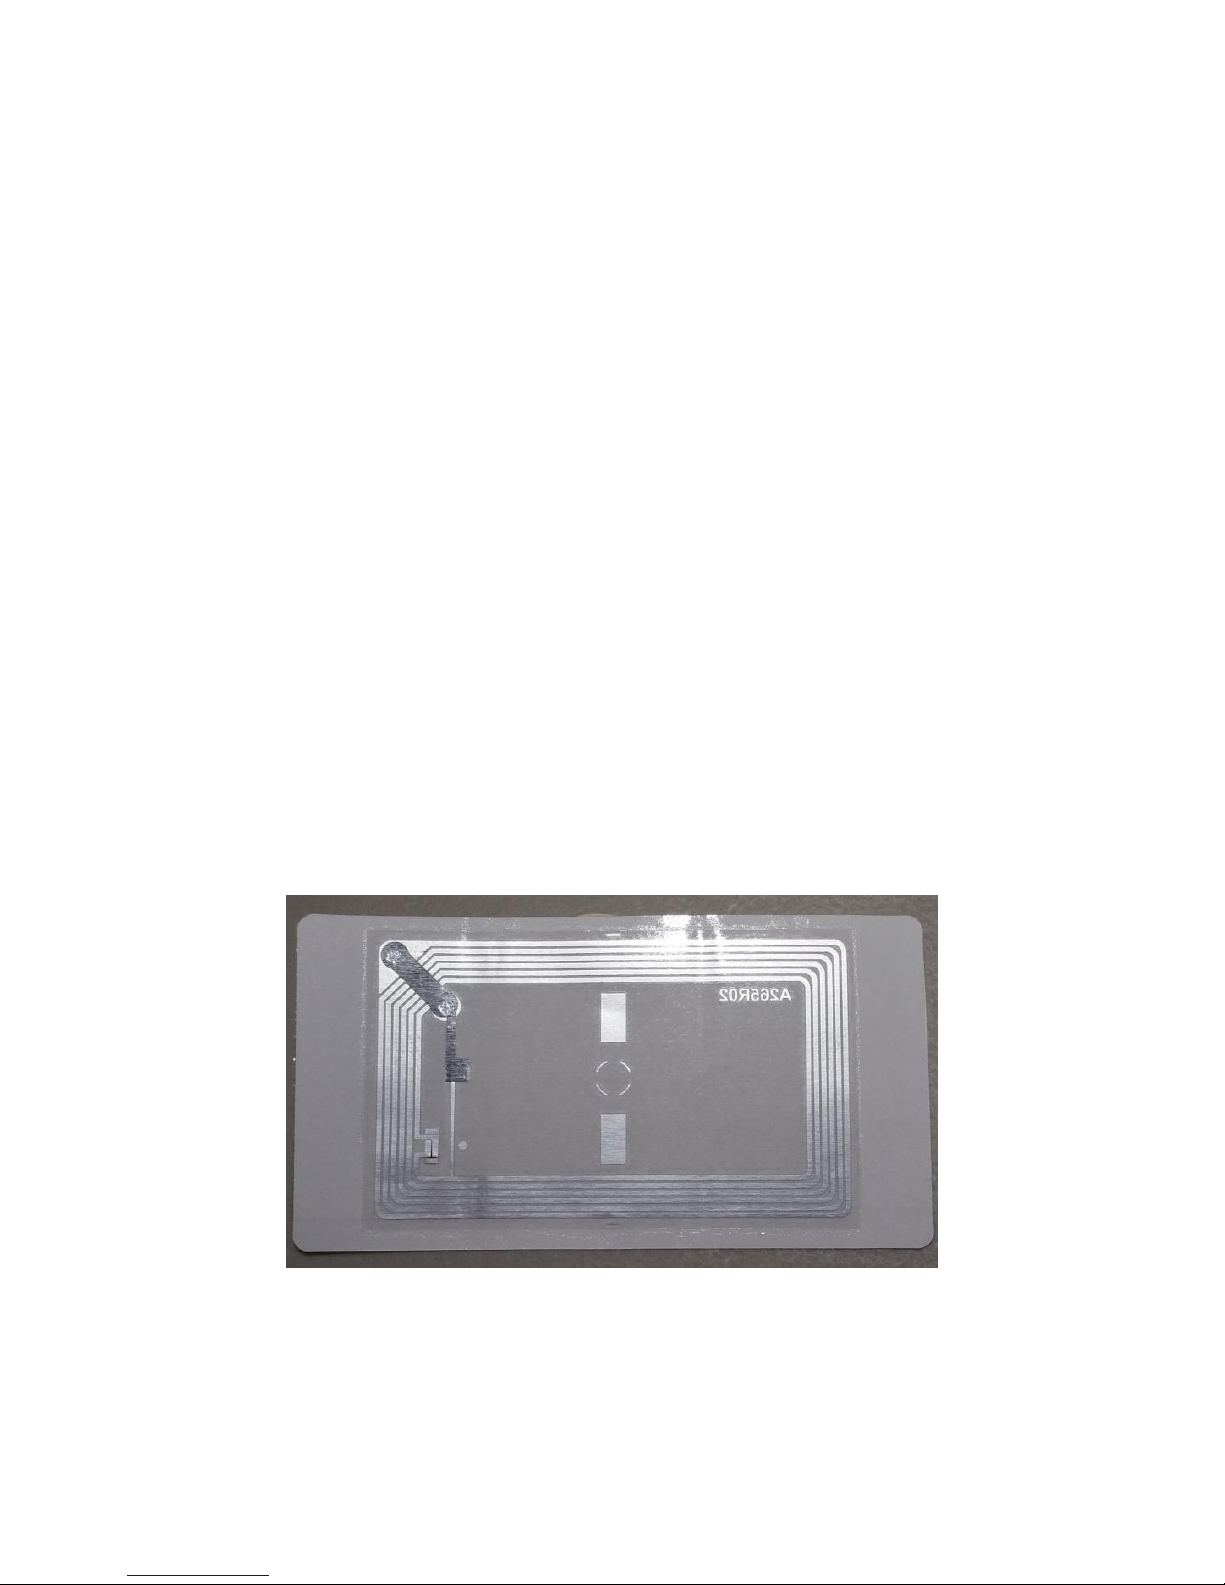
The back of a ScripTalk Label will look similar to the one below. Over
time, some details have varied, but the metallic “race track” antenna
has always been a feature:

- 9 -
2.3 –LOADING LABELS
1. With the power supply off,
pull the cover open/close
latches (1) on both sides of
the printer toward you to
unlock the top cover, and
then open the top cover (2).
Make sure the cover rests
firmly in the upright position
so that it will not fall forward
and injure you.
2. Optional Step: The width of
the media holder should
already be set when you
receive the 220-SN. If the
width seems off:
a. While holding the
media guide slide
lever (1), adjust the
width of the media
holder (2) to match
the media size. Finding the right width may be easier by
moving the media holder to its widest width, placing a
roll of ScripTalk Labels between, then adjusting the
width to the proper setting.

- 10 -
b. Release the media guide slide lever (1) when the proper
width is set.
3. Load the media onto the media
holder so that the labels feed from
the top of the roll.
Note:
The black line on the label backing
will be down.
4. Pass the leading edge of the labels through the media guides
and place it on top of the platen roller.
5. Gently close the top cover until it
clicks into position.

- 11 -
6. After loading the media, turn on the
power with the POWER button. The
ON LINE (POWER) LED indicator will
start SOLID RED, then turn to SOLID
GREEN when the printer is online and
ready.
When ready, press the FEED/LINE button to output one blank
label, allowing it to align the next for printing.
2.4 –Connections
This section explains the Ethernet and Power Supply Connection
procedures.
Note: Use of the USB port is reserved for En-Vision America technicians.
Do not attempt to operate the 220-SN through this connection.
2.4.1 –Power Supply Connection
To supply electrical power to the printer, follow these steps:
1. Connect the included power
cable to the power supply.

- 12 -
2. Plug the 3-prong plug of the
power cable into a grounded
wall outlet or a grounded
surge suppressor strip
(recommended).
3. Plug the 4-pin plug of the
power supply into the
printer’s DC Input Power
Terminal. Be sure to orient
the plug so that the flat side
faces up.
Note:
To remove this spring-loaded
locking plug, be sure to grip
only this plug (not the cord) and pull straight out.
2.4.2 –Network Connection
Connect a Cat5 or faster Ethernet cable between the RJ45 port on the
220-SN and your host PC or network.

- 13 -
3 –NETWORK CONFIGURATION
Your 220-SN comes preconfigured with the following LAN settings:
IP Address Setting: Manual
Local IP Address: 192.168.254.254
Subnet Mask: 255.255.255.0
Gateway Address: 192.168.254.1
IMPORTANT: Once you’ve completed the steps below, you will need to
perform the Reset and Reinitialize routine found in Section 4.4.
To change these settings:
1. Configure a PC’s network adapter for the following:
a. IP address: 192.168.254.*
i. * is any number from 1-253
b. Subnet mask: 255.255.255.0
c. Default gateway: (none needed)
2. Connect the power supply to the 220-SN printer (see Section
2.4.1).
3. Connect an Ethernet cable between the PC and the 220-SN (see
Section 2.4.2).
4. In a browser, go to http://192.168.254.254
5. Go to the Network Configuration page.
6. Enter the network settings for the printer as determined by
your IT Administrator.
7. Click [Set].
8. Power OFF the printer.
9. Connect the printer via Ethernet cable to the host network.
10. Power ON the printer to complete saving the settings.
11. Now perform the Reset and Reinitialize routine found in Section
4.4, then you should be ready to print.

- 14 -
4 –TROUBLESHOOTING
4.1 –Error Signal Troubleshooting
The ON LINE (POWER) indicator lights in different colors and patterns
listed below to alert the user that an error has occurred. [Indicator
sequence (shown from left to right): Off, Solid Red, Solid Green]
Table of contents
Other En-Vision America Printer manuals


Popular Printer manuals by other brands


Epson
Epson Stylus Photo 2100 quick guide

Samsung
Samsung CLX-3305FW Manual Del Usuario

AMT Datasouth
AMT Datasouth documax 3300 user guide

Epson
Epson Stylus Pro 10600 - UltraChrome Ink - Stylus Pro 10600 Print... Product information

Xerox
Xerox DocuPrint N24 Technical instructions

Oce
Oce Arizona 440 GT user manual


