ZKTeco ZKP8012 User manual

User Manual
ZKP8012
Date: January 2023
Doc Version: 1.0
English
Due to the regular upgrades of systems and products, ZKTeco could not guarantee exact
consistency between the actual product and the written information in this manual.

Content
1 Attention.......................................................................................................................................... 1
2 Applications ................................................................................................................................... 2
3 Printer Features ............................................................................................................................ 2
4 Packing List..................................................................................................................................... 3
5 Printer Connection and Paper Roll Loading................................................................. 3
6 Printer Specification................................................................................................................... 4
7 Printer Driver Installation......................................................................................................... 5
8 Basic Function Operation....................................................................................................... 9
8.1 Indicator Light and Printer Status........................................................................... 9
8.2 Printer Operation............................................................................................................. 9
9 Printer Cleaning and Maintenance .................................................................................10

-1-
1 Attention
1. Install your printer on a stable surface and prevent it from any form of
vibration and impact
2. Do not use or store it in areas with high temperatures, humidity, or
pollution levels.
3. Connect the power adapter to a grounded outlet. Do not share the
same plug socket with a large-scale electrical motor or other motors,
which may cause voltage fluctuations in the power supply.
4. Avoid getting water or other conductive materials such as metal, to get
into the interface of the printer. If this happens, disconnect the AC
power cable immediately.
5. Do not print it without paper, or it will damage the rubber roller and the
thermal print head.
6. Unplug your printer before leaving it unused for an extended period of
time.
7. Never disassemble or modify the printer for repair or reconstruction.
8. Make sure that you use the original specified power source.
9. Quality paper roll is recommended for premium printing and product
maintenance.
10. Make sure that the product is turned “OFF” while plugging and
unplugging.
11. This product can only be used in non-tropical climate conditions below
5000 meters above sea level.

-2-
2 Applications
Cash Register and POS System Receipt Printing
Takeaway Ticket Printing System.
Shopping Mall Receipt Printing System.
Hospital Receipt Printing System.
Sports Lottery Printing System.
Bank Bill Printing System.
3 Printer Features
Unique appearance design and acrylic panel design.
Lightweight and compact design.
230mm/s high speed and high-quality printing.
Support wall-mounted and desktop mode.
Adopts UV effect paint coating, scratch-resistant and waterproof
(optional)
Support cash drawer driver.
Built-in data buffers (capable of receiving print data while printing).
Support different density bitmap and NV picture printing (BMP format).
Compatible with ESC/POS printing commands.
Easy paper loading structure and easy to use and maintain.
Suitable for all kinds of commercial retail POS systems.

-3-
4 Packing List
80mm Thermal Receipt Printer
1PC
Power Adapter
(with one Power Cable)
1SET
Data Cable
1PC
User Manual
1PC
80mm Paper Roll
1ROLL
Driver CD
1PC
5 Printer Connection and Paper Roll Loading
1. Connect the adapter cable to the printer power interface.
2. Connect the data cable to the printer port.
3. Connect the cash drawer to the printer.
4. Open the paper roll cover and insert the paper roll.
5. Pull out a small roll of paper and close the paper roll cover. Tear off the
excess paper roll.

-4-
6 Printer Specification
Item
Parameter
Printing method
Direct thermal
Paper width
79.5±0.5mm
Print width
72mm
Paper Roll Diameter
Max 80mm
Column capacity
512 dots/line (Adjustable by command)
Printing speed
230 mm/s
Interface
USB+LAN(USB+RS232,optional)
Line spacing
3.75mm (Adjusted by command)
Column number
Font A:42 columns or 48 columns
Character size
ANK
Font A:1.5*3.0mm (12*24 dots)
Font B:1.1*2.1mm (9*17 dots)
Auto cutter
Partial
Extension character
sheet
PC437 (Std.Europe) / (Katakana) / PC850
(Multilingual) / PC860 (Portugal) / PC863
(Canadian) / PC865 (Nordic) / (West Europe) /
(Greek) / (Hebrew) / (East Europe) / (Iran) /
(WPC1252) / PC866 (Cyrillic#2) / PC852 (Latin2) /
(PC858) / (IranII) / (Latvian) / (Arabic) /
(PT1511251)
Barcode types
UPC-A / UPC-E / JAN13(EAN13) / JAN8(EAN8) /
CODABAR / ITF / CODE39 /CODE93 / CODE128 /
QR CODE / PDF417
Power adapter
Input: AC 100-240V / 50-60 Hz
Output: DC24V/2.5A
Cash drawer
DC 24V/1A
Cutter life
1.0 million cuts
Printer head life
100KM

-5-
7 Printer Driver Installation
1. Insert the CD driver, then click the driver file (ZKP8012 Driver Setup) and
install it. As shown in the figure below, a pop-up window will appear for
you to select the language to use during the installation.
2. Select the language and click the [OK] button, as shown below. Then
click the [Next].
-6-
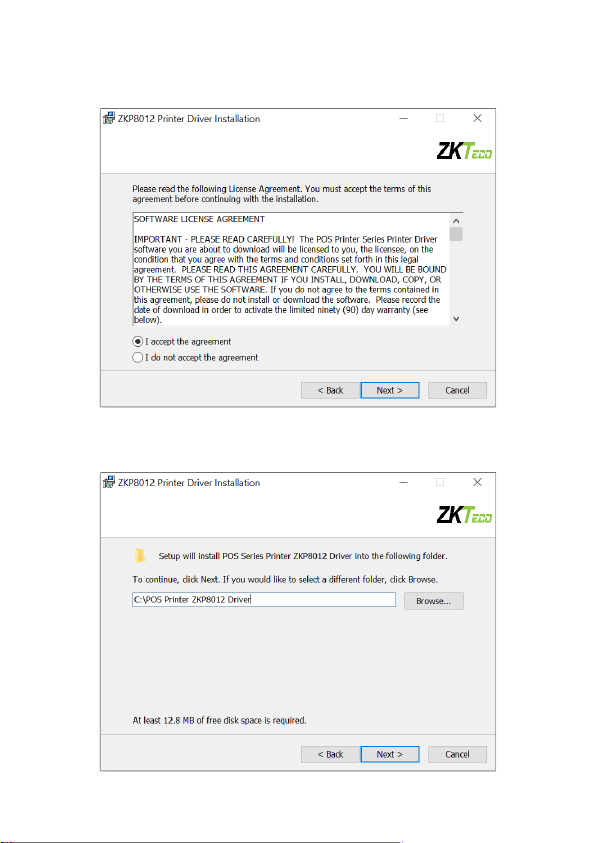
3. Please carefully read the related terms and install it as an agreement as
shown below and click [Next].
4. Click the [Next] button. The default installation folder is as follows, or
you can specify the location where the installation file should be saved.

-7-
5. To install, click the [Install] button, as shown below.
6. After installation, the related interface will appear shown as below;
select your computer’s operating system and printer model, then click
[USB Port Check], if you connect with a USB port, the computer's USB
port will be automatically detected. Click the [Next Step]button and
install it as shown below.
-8-
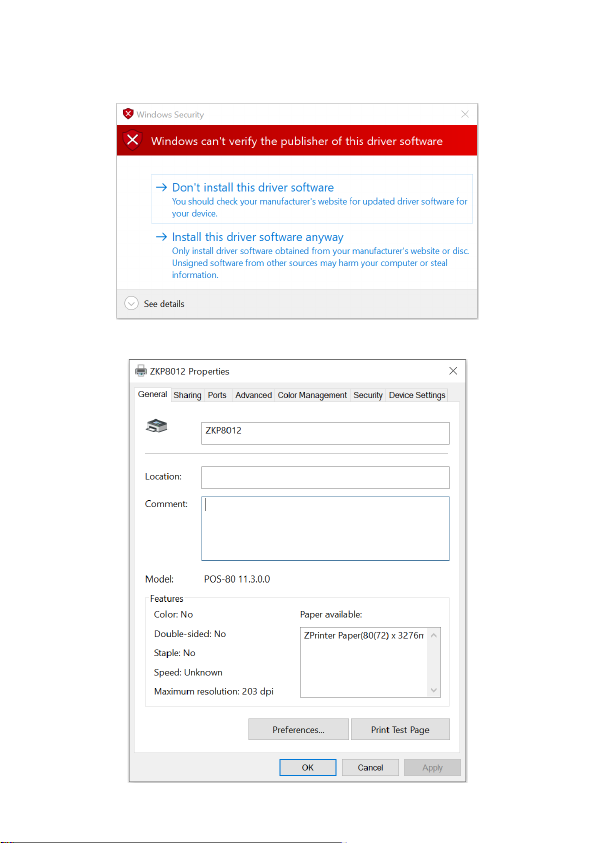
7. Click [Begin Setup] and shown as above figure and select “Install this
driver software anyway”.
8. The driver installation is complete as shown below.

-9-
8 Basic Function Operation
8.1 Indicator Light and Printer Status
The printer includes two LED indications, one for power and the other for
error.
When the power is turned on, the power indicator will illuminate.
When an error occurs, such as running out of paper, an overheated print
head, or a hardware malfunction, the Error light will illuminate.
When the power indicator light is normal, press the [FEED] button to
test the paper feeding function.
8.2 Printer Operation
Turn on: Make sure that the adapter is correctly connected to the
printer, then press the switch to the "1" position, and the printer will turn
on.
Turn off: Press the "O" switch on the other side to turn off the printer.
Paper Feeding: After turning on the printer, press the [FEED] button,
the paper will continue to run until you release the button.
Self-test page printing:When the printer is turned off, press and hold
the [FEED] button. Press and hold [POWER] until the "Error" indication
illuminates, then release the button. A printer self-test page will be
printed.
Hexadecimal mode printing: When the printer is turned off, press and
hold the [FEED] button. Press the [Power] button and the "PAPER
OUT" light on the same time. After the "PAPER OUT" sign turns out for
roughly 3 seconds, release the [FEED] button, and the printer enters
hexadecimal printing mode. Hex Trace mode will be exited if the printer
is restarted.

-10-
9 Printer Cleaning and Maintenance
1. The print head must be cleaned if any of the following issues occur:
Printing content is not clear but thermal paper is fine.
Some columns on the document are unclear.
The paper feed noise is too loud.
2. To clean the printer, do the following:
Turn off the printer, open the printer cover and remove the paper
roll.
If you have just finished printing, you must wait for the print head
to cool down before proceeding.
Use a soft brush or soft cotton cloth soaked with ethanol-immerged
to clean the printer head.
After cleaning, close the cover and test it later.
3. Cautions
Make sure that the power of the printer is turned off during the
maintenance.
Keep your hands or other metal tools away from the surface of the
printer head, and do not use tweezers to scratch the surface of the
printer head and other sensitive parts.
Do not clean printer head with gasoline, acetone and other organic
solvents.

-1-
ZKTeco Industrial Park, No. 32, Industrial Road,
Tangxia Town, Dongguan, China.
Phone : +86 769 - 82109991
Fax : +86 755 - 89602394
www.zkteco.com
Copyright © 2023 ZKTECO CO., LTD. All Rights Reserved.
Table of contents
Other ZKTeco Printer manuals


Popular Printer manuals by other brands

Epson
Epson ActionLaser Plus user manual

Kyocera Mita
Kyocera Mita Ecosys FS-6020 Operation guide

Epson
Epson Stylus Color 740i Start here

Reiner
Reiner speed-i-Marker 940 Short Instruction

Brother
Brother HL-B2000D Quick setup guide

Epson
Epson Stylus Pro 7880 ColorBurst Edition - Stylus Pro 7880... user guide


