ENDEAVOUR ET6795 User manual
ET6795
1,200A Peak CCA Jump Starter | Power Bank
Instruction Manual
Read all safety warnings and instructions. Failure to follow warnings and
instructions may result in electric shock, fire, and / or serious injury.
FOR 12V AUTOMOTIVE BATTERIES ONLY
READ THIS MANUAL CAREFULLY BEFORE USE | SAVE THESE INSTRUCTIONS
VER 1015-30AA

SAFETY WARNINGS
■Use only the 240V adaptor supplied with this unit. Do not modify this adaptor in any way.
■Do not expose this unit to rain or wet conditions. Water entering this unit risks electric
shock. If use in a damp location is unavoidable, use a residual current device (RCD)
protected supply.
■Do not use this unit in explosive atmospheres, for example, in the presence of gases, dust or
ammable liquids.
■Do not allow children to use this unit, especially because the device has large current
discharge characteristics.
JUMP START USAGE
■When using the jump start function, do not allow the positive and negative poles to contact
each other. This may cause sparking and result in a safety hazard, and cause a short circuit
of the unit.
■When using the jump start function, use for 3 seconds only. Allow 1 minute for unit to cool
before attempting a further jump start. Disconnect the cable from the unit immediately
upon engine starting.
BATTERY
■This unit contains a lithium polymer battery. Always comply with transport and safety
regulations in the use and disposal of such batteries.
■Do not open this unit. Opening may break or damage the components, and will void the warranty.
■Do not store in a location where the temperature may exceed 70oC. Charge only in
temperatures between 0oC and 60oC.
1

2
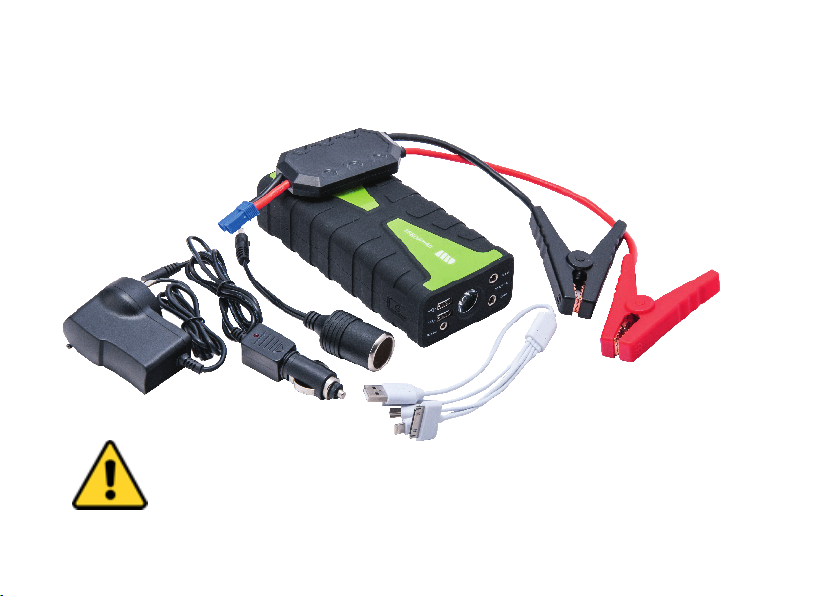
PRODUCT OVERVIEW
1 ON/OFF button
2 USB output
3 DC15V input
4 1W LED light
5 DC12~16V output
6 Battery indicator
7 EC5 output/Dust cover
1 2 3 4 5 6 7
Indicator light
Negative (black)
Manual Activation/
Reset Button
Positive (red)
BATTERY INDICATOR
Press the POWER button to power ON the unit. The BATTERY CAPACITY indicator will light up. If no device is
connected to the unit, it will power o automatically. When charging this unit, the battery indicator lights will
ash indicating the charging level. When all lights are on, the charging process is complete.
VEHICLE JUMP START
In order to avoid damage to this unit, do not attempt to repeatedly start the vehicle.
If the vehicle does not immediately start, you must wait for at least one minute to allow the unit to cool down.
As additional protection, the SMART START cable will also automatically cut the output after a) ve (5) jump
start actions, or b) after one minute. Please refer to the MANUAL ACTIVATION / RESET button section below.
■Use this unit with 12V automotive batteries ONLY, with a CCA rating of 1200CCA or less.
You must NOT attempt to jump start vehicles with a higher battery rating, or dierent voltage.
■Use the supplied SMART START cable ONLY with this ET6795 jump starter. Do NOT connect this
SMART START cable to any other jump starters. Do NOT connect this Smart Start cable to any
battery with a voltage greater than 15V.
■This unit is for emergency jump starts ONLY. Do NOT use as a replacement for the car battery.
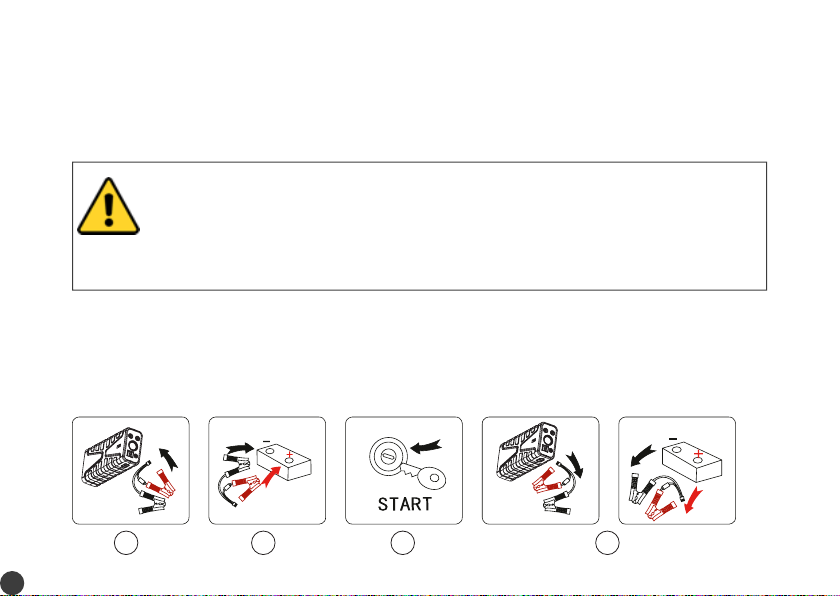
B C D F
3

4
A. Make sure that the jump start unit has two or more power indicator lights on (to ensure it
has sucient charge to jump start the vehicle). If the jump start capacity is too low when
you connect the SMART START cable, the indicator light will ash red. Recharge the unit.
B. Open the DUST COVER and insert the SMART START cable into the EC5 port on your jump start unit.
C. Connect the red alligator clip on the SMART START cable to the red battery positive pole (+)
and the black alligator clip to the black negative battery pole (-).
D. The jump start unit should now be ready to start the car. The green indicator light will light
up solidly. This indicates that the connection is correct, and you may now attempt to turn
your ignition key to start the engine. Do this within 1 minute. Otherwise the SMART START
cable will automatically disconnect and will need to be reset.
E. If the SMART START cable detects a problem, the indicator light will turn RED. Please correct
the problem, and press the RESET button to start again. The problems may be due to:
(a) short circuit, (b) reverse polarity connection, (c) over current, (d) over temperature.
The SMART START cable will also not operate if the battery voltage is less than 3V.
F. After jump starting the vehicle, immediately remove the SMART START cable from the jump starter and
then remove the cable from the car battery.
When the green indicator lights up solidly, the jump starter is active. Do not disconnect the
battery clamps from the battery to avoid risk of electric shock.

MANUAL ACTIVATION / RESET BUTTON
The SMART START cable provides important safety protections. These include short circuit protection,
reverse charging protection and reverse polarity protection. In addition, the SMART CABLE will
automatically disconnect (and indicator light will ash green):
■After ve (5) jump start attempts;
■After no activity for one (1) minute;
Solution: Press the MANUAL ACTIVATION / RESET button to reset the cable. The green light will
light up solid. Refer from (D) above.
■The car battery voltage is less than 3V;
Solution: The jump start unit will not start automatically. Override this protection by pressing the
MANUAL ACTIVATION / RESET button. Refer from (D) above.
■A short circuit or reverse polarity situation is detected
Solution: Resolve the problem rst, then press the MANUAL ACTIVATION / RESET button to reset the cable.
The green indicator light will start ashing. Refer from (D) above.
■Only use the MANUAL ACTIVATION / RESET button when a problem has been detected, and
after you have resolved the issue causing the problem.
■ Pressing the MANUAL ACTIVATION / RESET button will cause the REVERSE POLARITY
protection to be DISABLED until such time as the SMART CABLE is physically disconnected /
reconnected to the jump start unit.
■ In such situation, be very careful NOT to reverse the polarity when this button has been pressed.
Otherwise you may cause damage to the cable and the jump start unit.
5

6
■Only use the MANUAL ACTIVATION / RESET button when a problem has been detected, and
after you have resolved the issue causing the problem.
■ Pressing the MANUAL ACTIVATION / RESET button will cause the REVERSE POLARITY
protection to be DISABLED until such time as the SMART CABLE is physically disconnected /
reconnected to the jump start unit.
■ In such situation, be very careful NOT to reverse the polarity when this button has been pressed.
Otherwise you may cause damage to the cable and the jump start unit.
MOBILE PHONE / TABLET / PC CHARGING
A series of charging adaptors are supplied with this unit. However, we recommend using the charging
cable supplied with your original product. For phones / tablets, plug the USB port of the charging cable
into the USB 5V output port, and the adaptor to your device.
The 12V DC connection can be used for charging 12V devices. The maximum output current is 15A.
RECHARGING THIS UNIT
Press the POWER switch to start charging. This unit should be charged using the a 240V AC (15V / 1A)
adaptor supplied.
Using the 240V AC adaptor, it will take approximately 5 hours to fully charge the unit.
To extend the battery life, it is recommended to fully charge the unit every 3 - 6 months.
LED LIGHTS
Further pressing the power switch will cycle between SOS mode, ashing mode, and then o. Depress the
POWER switch for 3 seconds to directly turn o the LED light.
SPECIFICATIONS
Capacity 16,800mAh
Peak current 1200CCA
Charging DC15V/1A (5 hrs)
USB output USB5V1A + USB5V2.1A
DC output 12V - 16V/15A
Working temperature -20oC to 60oC
Storage temperature -20oC to 60oC

WARRANTY STATEMENT
Endeavour Tools guarantees this unit against defects in material and workmanship for a period of
six (6) months from the date of purchase. This warranty excludes consumable items in the kit.
A. Endeavour Tools warrants the quality of these goods against defects in material and workmanship only.
B. Defective goods shall only be replaced, repaired or purchase price refunded if:
a. The customer noties Endeavour Tools by providing a full report describing the defect in writing
within 7 days of the discovery of the defect; and
b. The notication above provided to Endeavour Tools is prior to the expiry of the warranty period;
c. The customer forwards the defective goods together with proof of purchase from Endeavour Tools or
its authorized distributor at their expense, within 14 days of any request by Endeavour Tools to do so;
d. The goods since the date of delivery to the customer have been properly maintained, stored and
housed and the goods have not been abused or modied or the case opened; and the use of a
defective material.
C. Endeavour Tools may replace or repair the defective good (or part thereof) or refund the purchase
price of the defective good at its option.
D. Endeavour Tools shall not be responsible for any loss or damage arising from or in any way connected
with the use of the goods.
E. To the maximum extent permitted by law, a claim in respect to a defective good shall not be
permitted in the event that the goods have not been installed, used, maintained, or housed in a proper
and workmanlike manner or in accordance with the usual standards or manufacturers specications
or instructions or if the goods have been modied, repaired or altered by any person apart from
Endeavour Tools.
Notwithstanding our warranty terms above, our goods come with guarantees that cannot be excluded under the Australian
Consumer Law. You are entitled to a replacement or refund for a major failure and for compensation for any other
reasonably foreseeable loss or damage. You are also entitled to have the goods repaired or replaced if the goods fail to be of
acceptable quality and the failure does not amount to a major failure.
The benets under our warranty are in addition to other right and remedies under a law in relation to the goods.
© Endeavour Tools Pty Ltd 1015 E&OE
7
Table of contents


