ENERGY SISTEM Combo d5 AV User manual

1/20 energysistem.com
ENGLISH
Introduction 3 .....................................................................................................................................................................
1. SECURITY INSTRUCTIONS 3 ..........................................................................................................................................
Safety Considerations. 4 .................................................................................................................................................
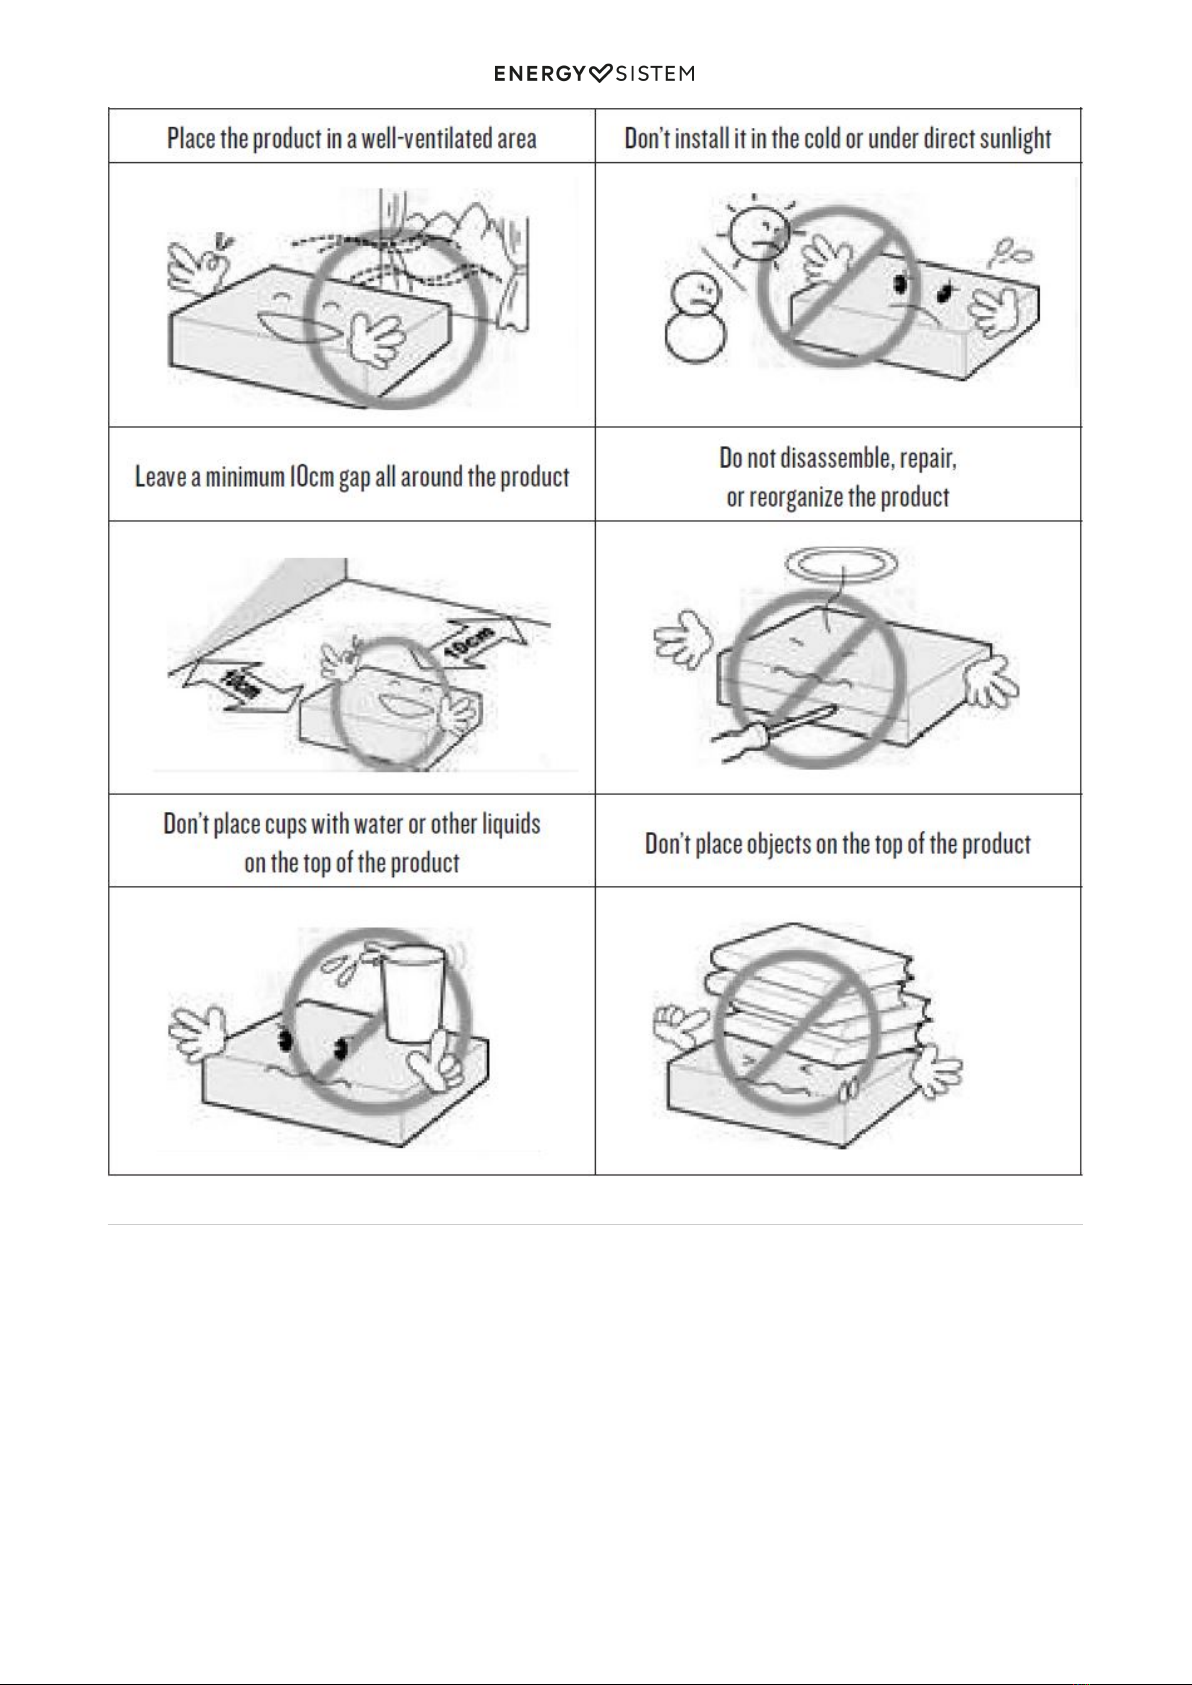
Ventilation 4 ...................................................................................................................................................................
Servicing 4 ......................................................................................................................................................................
Cleaning 4 ......................................................................................................................................................................
d5 AV handling and care 4 .............................................................................................................................................
2 PRODUCT 5 .......................................................................................................................................................................
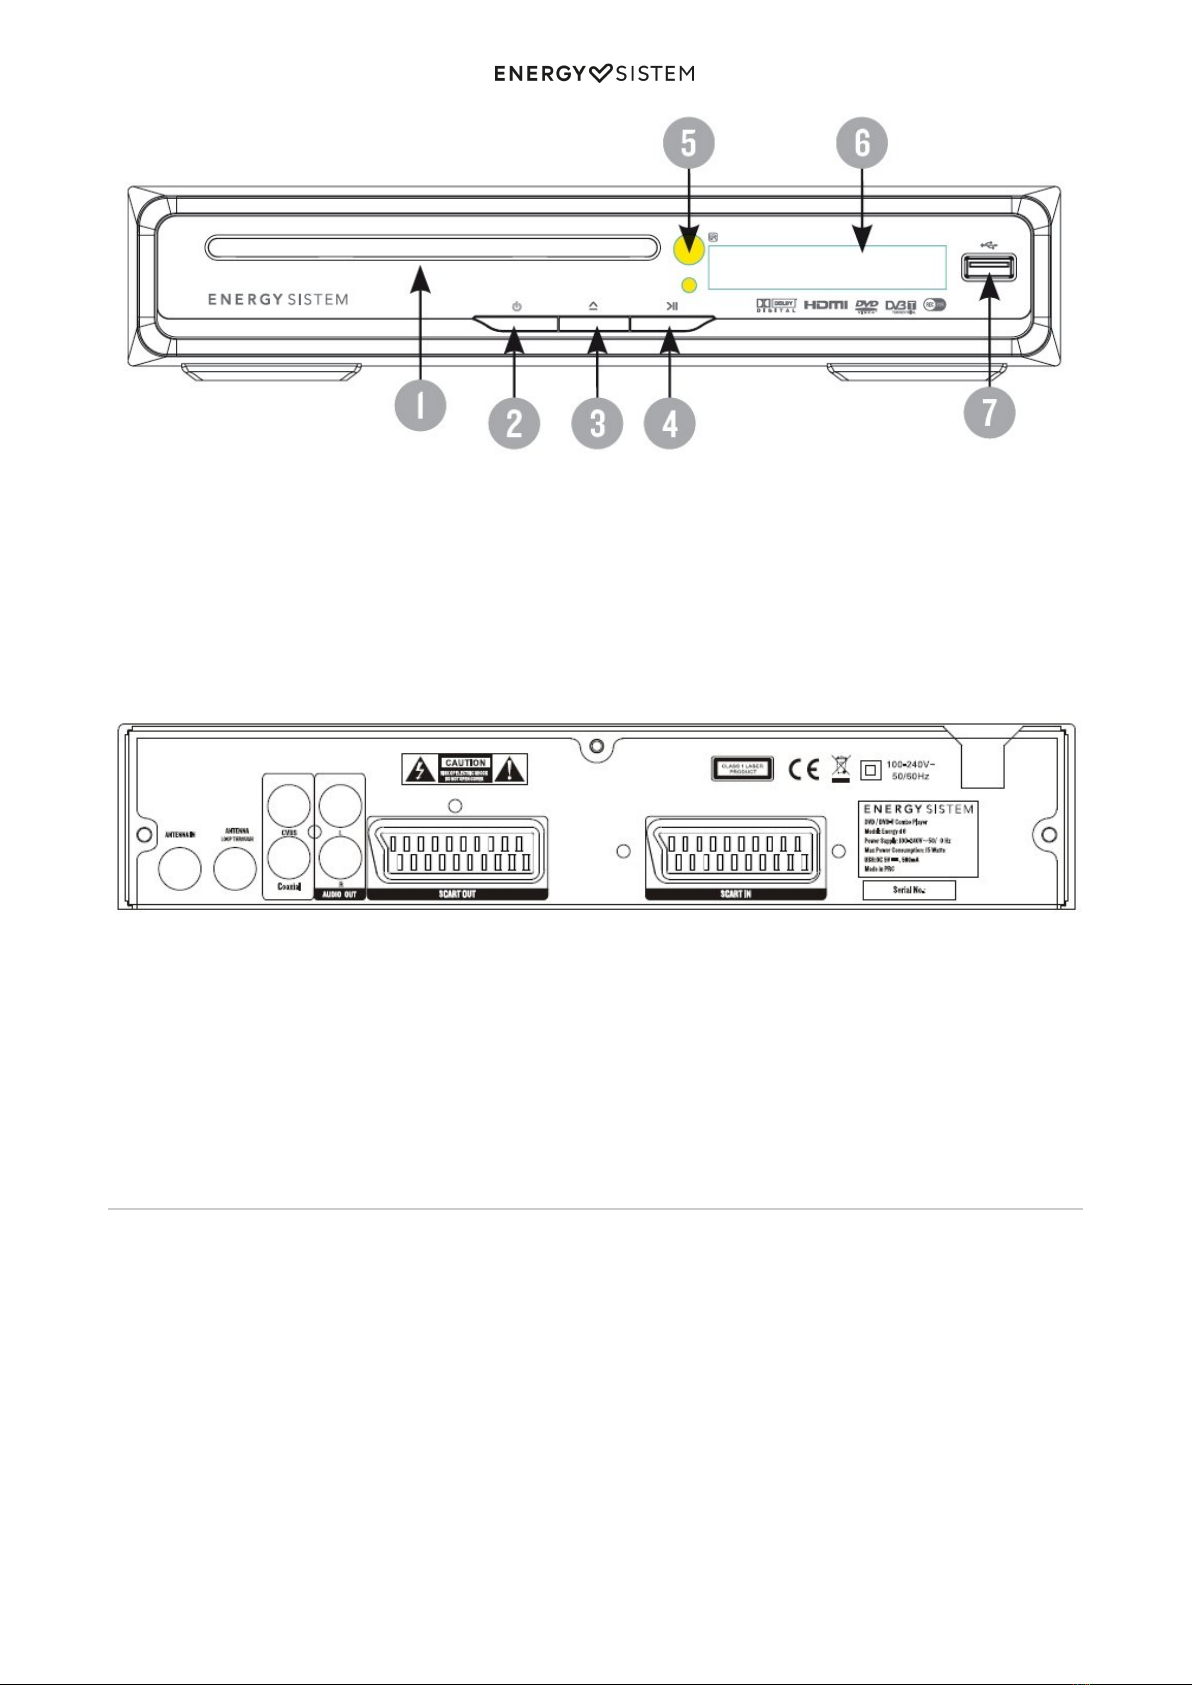
2.1. FRONT PANEL 5 .......................................................................................................................................................
2.2. REAR PANEL 6 .........................................................................................................................................................
3. MANDO A DISTANCIA 6 .................................................................................................................................................
3.1 DESCRIPCIÓN DE LOS BOTONES 6 ............................................................................................................................
3.2. INSTALLING THE BATTERIES 8 .................................................................................................................................
3.3. USING THE REMOTE CONTROL 8 .............................................................................................................................
4. CONNECTIONS 9 .............................................................................................................................................................
4.1 ANTENNA CONNECTION 9 .........................................................................................................................................
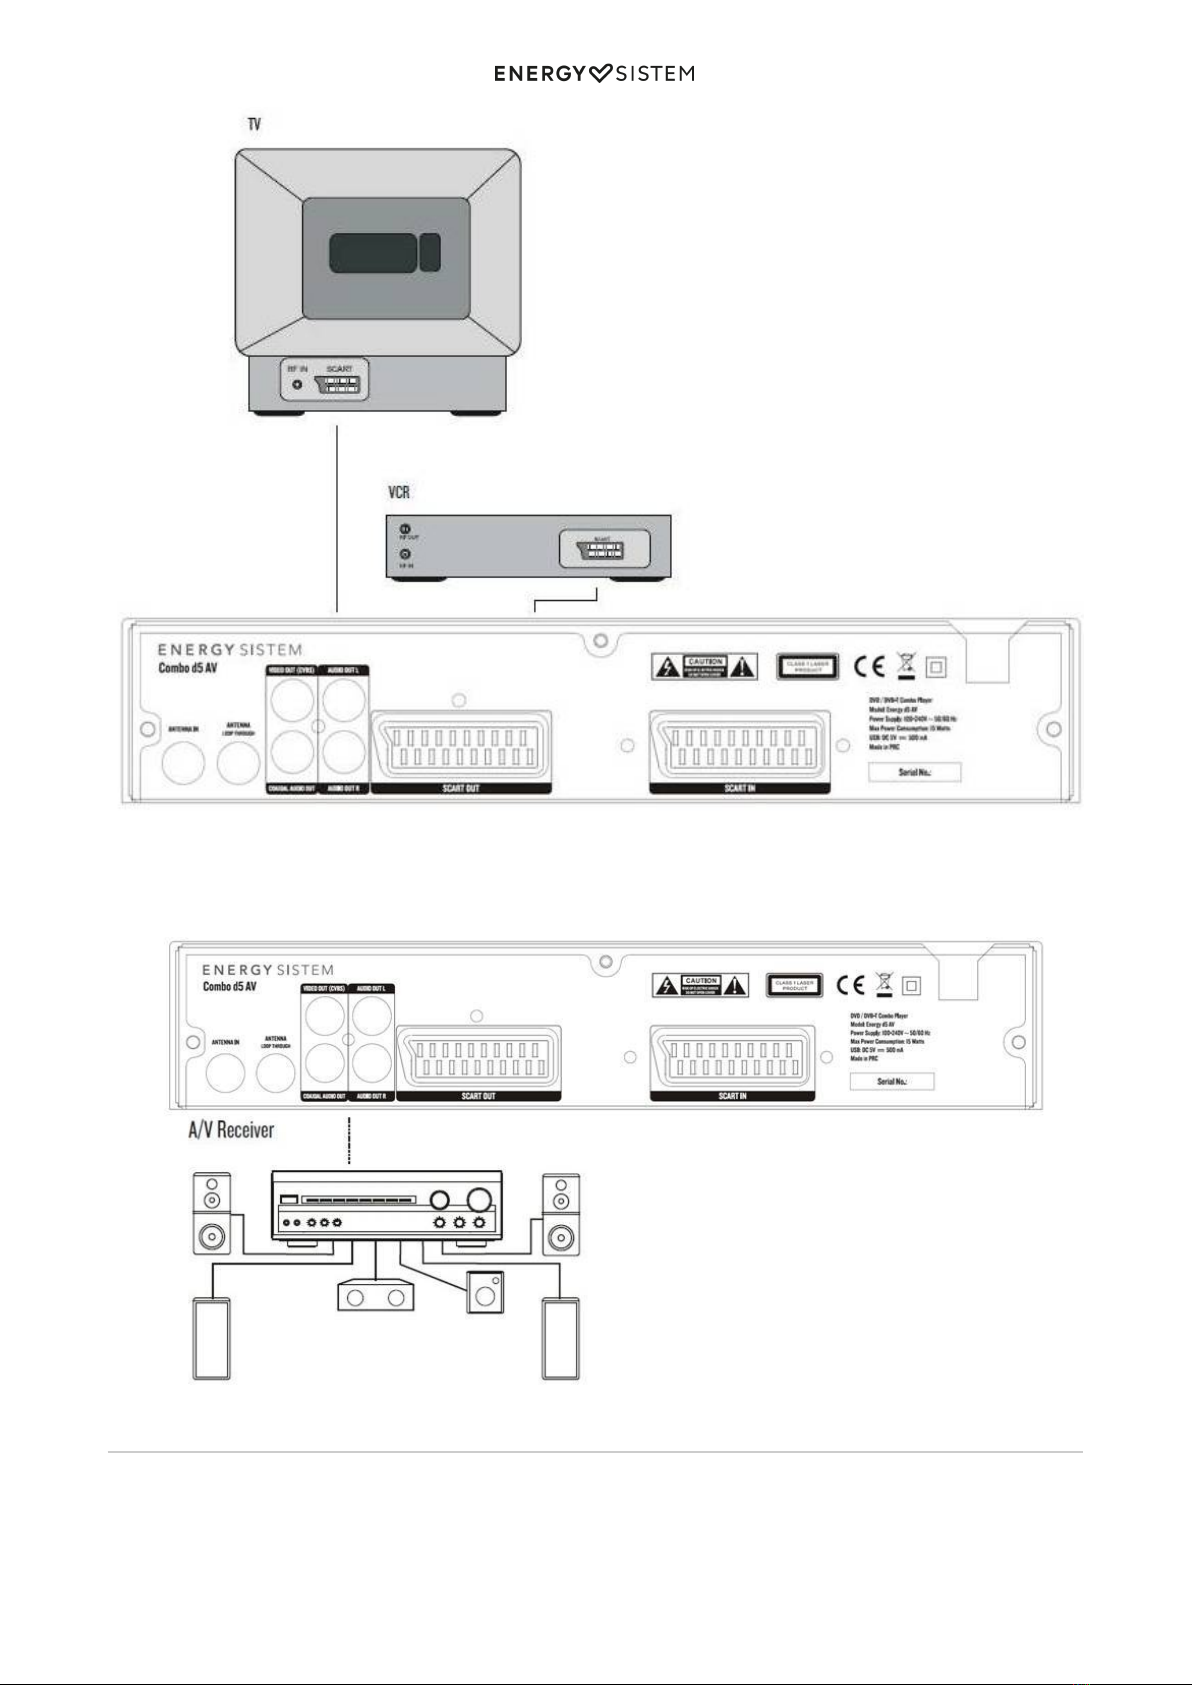
4.2 SCART CONNECTION 9 .............................................................................................................................................
4.3 CONNECTING TO AN A/V RECEIVER WITH DIGITAL INPUT 10 ....................................................................................
5. GETTING STARTED 10 ....................................................................................................................................................
5.1. POWER SUPPLY FOR THE UNIT 10 ...........................................................................................................................
5.2. INSERTING A DISC 11 ..............................................................................................................................................
5.3. INSERTING A USB DEVICE 11 ...................................................................................................................................
5.4. DVB-T FIRST TIME INSTALLATION 11 .......................................................................................................................
6. MAIN MENU 11 ................................................................................................................................................................
6.1. CONFIGURACIÓN DVD 11 ........................................................................................................................................
6.1.1. CONFIGURACIÓN DEL IDIOMA 11 ........................................................................................................................................
6.1.2. CONFIGURACIÓN DEL AUDIO 11 .........................................................................................................................................
6.1.3. CUSTOM SETUP 12 .............................................................................................................................................................
6.2. DVB-T MENU 12 .......................................................................................................................................................
6.2.1. LISTA DE PROGRAMAS 12 ...................................................................................................................................................
6.2.2. Channel Search 12 .............................................................................................................................................................
6.2.3. Parental control 13 .............................................................................................................................................................
6.2.4. System Setting 13 ..............................................................................................................................................................
6.3. SYSTEM SETUP 13 ...................................................................................................................................................
6.3.1. LANGUAGE SETUP 13 .........................................................................................................................................................
6.3.2. CONFIGURACION DE LA PANTALLA 13 ................................................................................................................................
6.3.3. Preferences 14 ...................................................................................................................................................................
6.4. JUEGOS 14 ...............................................................................................................................................................
7. PLAYING DVD / CD / VCD DISCS 14 ..............................................................................................................................
8.PLAYING MP3 / JPEG / WMA / MPEG 4 FILES 16 ..........................................................................................................
13. WARRANTY PROCEDURE 19 ........................................................................................................................................
14. TRADEMARKS 20 ..........................................................................................................................................................
15. DECLARATION OF CONFORMITY 20 ...........................................................................................................................

2/20 energysistem.com

3/20 energysistem.com
Introduction
Energy Sistem® thanks you for buying your new DVD Combo d5 AV, we wish you to enjoy it.
The perfect mix for home entertainment: DVD player plus DVB-T tuner. Play all the usual video, audio and picture
formats from CD/DVD or USB devices.
We suggest you read this user manual to get the most out of your product safely, using all its features.
1. SECURITY INSTRUCTIONS

4/20 energysistem.com
To ensure your safety and the safety of others, please ensure that you read all the safety information before operating
this product.
Keep this information in a safe place for future reference.This symbol indicates that this product incorporates double
insulation between hazardous mains voltage and user accessible parts.
WARNING: To reduce the risk of fire or electric shock, do not expose this apparatus to rain or moisture.
Safety Considerations.
Position the cables so that they cannot be walked on or pinched by items placed on or against them.
Do not use the d5 AV in humid or damp conditions.
Do not allow the d5 AV to get wet.
Do not expose the d5 AV to dripping or splashing.
Do not place water filled objects such as vases on top of the d5 AV.
Do not place naked flame sources, such as candles, on the top of the d5 AV.
Ventilation
The slots and openings on the set top box are for ventilation. Do not cover or block them as it may cause overheating.
NEVER let children push anything into the holes or slots on the case.
Servicing
The d5 doesn't need maintaing.
Treatment for used batteries:
Never dispose batteries in fire o with any other domestic waste.
You must check disposal regulations with your locar authorites.
Cleaning
ALWAYS unplug the d5 AV before you clean it.
Do not use liquid or aerosol cleaners.
Clean the d5 AV with a soft, damp (not wet) cloth.
d5 AV handling and care

5/20 energysistem.com
2 PRODUCT
2.1. FRONT PANEL

6/20 energysistem.com
DISC TRAY.1.
POWER: Used to switch the set top box ON or STANDBY.2.
OPEN/CLOSE button.3.
PLAY/PAUSE button.4.
REMOTE CONTROL SENSOR: Used to receive the signal from the Infrared (IR) remote control.5.
LED display.6.
USB CONNECTOR: Used to attach your external USB hub/card reader/storage device.7.
2.2. REAR PANEL
RF IN: This socket connects to your external aerial.1.
RF LOOPTHROUGH: This socket will bypass the RF signal to either your TV or another video system.2.
CVBS OUT: Composite video.3.
COAXIAL: This socket connects to a S/PDIF RCA socket on your surround sound system.4.
STEREO OUT: Analog stereo (left and right) audio.5.
SCART OUT: This socket connects to your TV.6.
SCART IN: This socket connects to either a VCR or other video system.7.
MAINS CABLE: This is used to connect to your main power supply.8.
3. MANDO A DISTANCIA
3.1 DESCRIPCIÓN DE LOS BOTONES

7/20 energysistem.com
STANDBY: Switch the d5 AV between on and standby mode.1.
REPEAT: Change between repeat options.2.
PROG: Program the playback order.3.
PLAY/PAUSE: Play, Pause or Playback the on course reproduction.4.
STOP: Stop the current recording if exists or stop the playback.5.
FAV/GOTO: Go to time point, title, chapter or file/folder depending on context (USB/DVD).6.
OPEN/CLOSE: Open/close the disc tray.7.
SETUP: Open the setup menu window.8.
VCR. Switch between SCART input and DVD/DVB-T.9.
MENU/TTX: Main menu in DVD mode / Teletext en DVB-T mode.10.
OK/CH LIST: Confirm a selection within a menu. Shows channel list.11.

8/20 energysistem.com
GUIDE: Displays the actual channel schedule.12.
VOL+/-: Change the volume in normal play mode.13.
Zoom: Enlarges the image.14.
TECLAS NUMÉRICAS: SSelect channel numbers or input numbers in menus.15.
AUDIO: Select the available audio track or set the sound mode as LR(stereo), LL(left), RR(right).16.
MUTE: Mute/unmute the sound.17.
SLOW: Fast forward at selectable speeds.18.
ANGLE: Selects a DVD camera angle if available.19.
REV: Fast backward at selectable speeds.20.
FWD: Avance.21.
PREVIOUS: Go to previous chapter/track/file or to the beginning of the currently playing one.22.
NEXT: Go to the next chapter/track/file.23.
TV/RADIO: Switch between TV channels and Radio stations.24.
RECALL: Return to the previous channel.25.
EXIT: Return to the previous screen or menu.26.
SOURCE: Changes between DVD, USB and DVB-T mode.27.
INFO: Display information about the channel being viewed or further information about the program when in28.
normal play mode
CH+/-: Move around the menu screens or change the channels in normal play mode.29.
SUBTITLE: Switch among different available subtitles.30.
NOTE: SUBTITLES/TEXT/AUDIO may not be available for all channels.
3.2. INSTALLING THE BATTERIES
Remove the battery cover from the remote control and put 2xAAA size batteries inside the compartment.
The diagram inside the battery compartment shows the correct way to install the batteries.
Precautions when using batteries
Only use the batteries recommended by the manufacturer.
Ensure the correct polarity when installing the batteries (see compartment). Reversed polarity may damage the
remote control.
Exhausted batteries must be removed to prevent possible battery leakage.
Dispose of batteries properly according to environmental regulations.
3.3. USING THE REMOTE CONTROL
To use the remote control point it towards the front of the digital set top box.
The remote control has a range of up to 5 metres from the set top box at an angle of up to 60 degrees.

9/20 energysistem.com
The remote control will not operate if its path is blocked.
Sunlight or very bright light will decrease the sensitivity of the remote control.
4. CONNECTIONS
Caution: Make sure to check that the voltage of the wall outlet has the same rating than the receiver.
To prevent the risk of electric shock, do not open the cover or the back of the receiver.
When connecting the receiver to other equipment (e.g. TV, VCR and amplifier) make sure to refer to relevant user
manual for instruction. Also, make sure you disconnect all the equipments from the mains supply before the connection.
4.1 ANTENNA CONNECTION
4.2 SCART CONNECTION

10/20 energysistem.com
4.3 CONNECTING TO AN A/V RECEIVER WITH DIGITAL INPUT
5. GETTING STARTED
5.1. POWER SUPPLY FOR THE UNIT
Connect the unit as shown in “CONNECTIONS”.1.
Insert 2 AAA batteries (supplied) into the battery compartment in the remote control, taking care to follow the2.
correct polarity.

11/20 energysistem.com
Connect the power cord to an AC mains outlet. Press the STANDBY button to turn on the unit.3.
Turn on the TV and set to the correct video-in source.4.
To go to standby mode, press the STANDBY button. If the unit is not to be used for a long time, please5.
disconnect the power cord. Note:
The range of the remote control is about 5 meters.
Replace the batteries when the remote control range starts to reduce.
If the remote control is not to be used for a long time, remove the batteries to avoid damage caused by
battery leakage.
5.2. INSERTING A DISC
Press the SOURCE button on the remote control and use the up/down buttons to select the source: DVD-ROM1.
Drive. Press the OK button to confirm.
Press the OPEN/CLOSE button to open the disc tray.2.
Insert a disc, then press the OPEN/CLOSE button again to close the disc tray. The unit will read the disc and start3.
to play it, or it will display a start menu
5.3. INSERTING A USB DEVICE
Insert a USB device into the unit. Press the SOURCE button on the remote control and use the up/down buttons to select
the source: DVD, DVB or USB. Press the OK button to confirm.
5.4. DVB-T FIRST TIME INSTALLATION
When DVB mode is used for the first time, the screen will display the First Time Installation page. This will guide the
user through the initial DVB mode setup.
First, choose “Yes”, then press the OK button. The system will then start the initial setup.
Then select the relevant regional information (country, OSD language and Time Zone. The system will automatically
scan through the channels according to the information you have entered.
Select “Yes” to start the automatic search.
At the end of the search, the system will go to DVB mode in order to view the channels found
6. MAIN MENU
The main menu allows you to access DVD Setup, DVB Menu, System Setting and Game. Press the SETUP button to
access the main menu.
6.1. CONFIGURACIÓN DVD
6.1.1. CONFIGURACIÓN DEL IDIOMA
Menu: To select the disc menu language.
Audio: To select the audio language.
Subtitle: To select the subtitle language.
External Subtitle: To select an alphabet for the MPEG4 subtitle language.
6.1.2. CONFIGURACIÓN DEL AUDIO
Digital Output
OFF – Select this option when no digital output is used.
SPDIF/RAW - Dolby Digital signals are unaltered. Generally, this setting is used with a digital 5.1 channel
amp.
SPDIF/PCM – Dolby Digital and MPEG 2 multi-channel signals are converted to PCM (Pulse Code
Modulation). This setting is suitable for amplifiers or receivers without digital multi-channel sound
decoders.
Downmix
Lt/Rt: Select this option when connected to a Dolby Pro Logic compatible sound device.
Lo/Ro: Select when connected to a standard stereophonic sound playback device such as hi-fi or
headphones.

12/20 energysistem.com
6.1.3. CUSTOM SETUP
Parental Control
Select a level and press OK to confirm. Then enter the default password “6666” and press OK to confirm.
If you forget the password, you can always use the default password “6666”.
Angle Mark
On: Enable the angle mark function. Off: Disable the function.
6.2. DVB-T MENU
In DVB-T mode, press the SETUP button to enter the main menu and select “DVB menu”.
6.2.1. LISTA DE PROGRAMAS
TV Program
The table has three options: Favor, Move and Del.
Favourites
You can use this option to select your favorite channels. Go to the “Favor” box corresponding to the channel
which you want to add to your favorites and press OK. Once a channel is chosen, a symbol (heart) will appear in
the corresponding “Favor” box. To remove a channel from the favorites list, select the channel and press OK.
You can then use the FAVORITE button to access your favorite channels.
Move
This option allows you to change the order of channels on the list. Go to the “Move” box corresponding to the
channel that you want to move. Press OK, then use the up/down buttons to move the channel. Then press OK to
confirm.
Del
You can use this option to delete channels. Go to the “Del” box corresponding to the channel that you want to
delete, then press the OK button. An ‘X’ will appear. This channel will not appear the next time the list is
displayed.
Emisoras de Radio
The list of radio stations is displayed in the same way as the list of TV Channels. Please refer to the previous
section to edit the radio station list.
Ordenar
You can sort channels on the list by Name (channel name), Service ID, Channel No. (number) or LCN (Logic
channel number).
6.2.2. Channel Search
Automatic Search
This option enables the user to search for channels automatically according to the Country and Time Zone
settings. Before starting a search, the system will ask whether existing channels in the program list should be
deleted.
Choose “Yes” to replace the old channels with the new channels.
Choose “No” to add the new channels to the list. When the automatic search is over, DVB mode will close and the unit
will return to the channel display mode. If you press the RETURN/EXIT button to suspend the search, the new channels
will be added to the list and the unit will show the last channel found.
Manual Search
Use manual search to find a particular channel. You must provide the system with the channel number and
confirm with the OK button. The channels found during the manual search will be added to the list but the unit
will not exit the menu automatically.

13/20 energysistem.com
6.2.3. Parental control
Channel Lock
Select Channel Lock to block certain channels. To activate the channel lock (“Yes”), no code is needed. But to
disable the channel lock (“No”), the user must enter the code.
Parental Setting
The Parental Setting can be used together with the Channel lock to lock channels. In order to enter the Parental
Setting page, you must enter the PIN code. This menu enables you to select the channels to be locked. To view
the locked channels, the user must enter the correct PIN code.
Note: the default PIN code is 6666. To change it, return to Main Menu and select “System Setting”, then
enter the System Setting Menu-Preference page and select the “Change PIN” option.
6.2.4. System Setting
Antenna Power
Select this option to set the country for receiving DVB signals.
Country
Seleccione esta opción para elegir el país de recepción de las señales DVB.
Language
The Language submenu has 3 options:
“Audio 1” and “Audio 2”: The user can choose the audio language from “Audio 1”or “Audio 2”.
Subtitle: Select this option to choose the subtitle language.
The Language option only works when the channel offers several languages. Otherwise, the preset language of
that channel will be chosen automatically.
GMT Usage
Select this option to turn GMT usage on/off. When it is “Off”, the Time Zone option will not be available and you
must set the time yourself. When it is “On”, you can select the Time Zone for your location.
Time Zone
Select this option to set your time zone.
Programación
Seleccione esta función para programar la visualización de cadenas. Puedes almacenar hasta 10
programaciones.
6.3. SYSTEM SETUP
6.3.1. LANGUAGE SETUP
OSD: To select the on-screen display language.
6.3.2. CONFIGURACION DE LA PANTALLA
TV Standard
You can select one of the following systems: NTSC, PAL and AUTO (Multi). Select the system that matches your
TV.
Display type.
4:3PS – Select this format to display 4:3 images without distorting the picture. In this case, black bands

14/20 energysistem.com
will appear on left and right of the screen.
4:3LB – Select this format when the unit is connected to a 4:3 TV. Wide-screen images will be shown in
full with black bands at the top and bottom of the screen.
16:9 – Select this format to play wide-screen videos in full-screen mode.
Video Output
Select the video output: CVBS (Composite VIDEO) or RGB (SCART or Component VIDEO).
Brightness
Select one of the following video output picture modes: “Normal”, “Bright” or “Soft”.
Contraste
Select the contrast of the display.
6.3.3. Preferences
UI Style
Four setup menu styles can be selected.
Change PIN
Change the parental control password. The default is “6666”.
Default Type
DVD/DVB/USB/User Select/Last Operating Type: Select the default source when the unit is switched on.
Default
Restore the factory default settings.
System Info
The system information includes the Model, HW (hardware), SW (software) and Date.
6.4. JUEGOS
Three games (Mine, Tetris and Rush Hour) and Calendar.
7. PLAYING DVD / CD / VCD DISCS
Open/Close Press to open the disc tray. Press this button again to close the disc tray. The unit will start playback
automatically.
Note: Load the disc on the tray with printed side facing up.
Play/Pause
Press to start playback. Press this button again to pause playback.
Slow
Press the SLOW button to start forward slow motion play. Each time the Slow button is pressed, the playback
speed will change as follows: 1/2, 1/4, 1/8, 1/16, 1/32. Press the Play/Pause button to return to normal playback.
Note: Slow motion is not available when playing a CD.
Fast forward/backward

15/20 energysistem.com
Press the FF/FB buttons to perform a fast forward or backward search. Press the Play/Pause button to return to
normal playback. Each time these buttons are pressed, the playback speed will change as follows: x2, x4, x8,
x16, x32.
Skip Forward/Backward
When a disc is playing, you can skip backward/forward to the next track or chapter.
For audio CD discs, use the number buttons 0-9 to directly enter the number of the track you want to listen to.
Stop
Press Stop once to interrupt playback. Press Play/Pause to resume playback from the point where the disc was
stopped.
Press Stop twice to stop playback completely. It is now impossible to resume playback from the place where
playback was stopped. Press Play/Pause to start playback from the beginning of the disc.
Menu
Press to display the disc menu. This button has no function when playing an audio CD.
Title Press to display the DVD title menu (the availability of this function depends on the disc).
Zoom
The picture size can be magnified during playback.
When a disc is playing, press the Zoom button. Each time the Zoom button is pressed, the image size will
change as follows: x1 -> x2 -> x4
While an image is magnified, use the arrow keys to pan the image for viewing.
To return to the normal view, press the Zoom button until the message x1 appears.
Angle
Change the viewing angle on a DVD. This button enables you to view a scene from different angles (the
availability of this function depends on the DVD). Press Angle repeatedly to select different viewing angles.
Audio
Select from the audio languages available on the disc. When a disc is playing, press Audio to show the current
audio language. Press repeatedly to select the desired audio language.
Note: You can select the audio output when playing a VCD disc: L/L (Left), R/R (Right), L/R (Mix).
There will be no sound output when DTS audio format is selected.
Subtitle
To select one of the subtitle languages available on the disc)
During playback, you can change the subtitle language or disable the subtitle function.
While a disc is playing, press Subtitle to show the current subtitle language.
Press repeatedly to select the desired subtitle language.
Display
While a disc is playing, press to show playback information available, depending on the disc.
GoTo
Select a specific title/chapter on a DVD or time on a CD/VCD.
Press Left/Right to highlight the title / chapter (DVD) or time (CD/VCD) field or enter the relevant number using
the numeric keypad.
Press OK to confirm. The unit will then start playback from the selected position.

16/20 energysistem.com
Note: Some discs may not allow use of this function. For VCDs, this function is only available if PBC is off.
Program
The contents of the disc can be played in a selected order.
Note: During VCD/SVCD playback, this function is only available when PBC is OFF.
Use the Up/Down buttons to select the title number to the right of the program menu and press
the OK button. Use the Up/Down buttons to select a chapter number and then press OK to confirm
your selection. The selected program number “xx--xx” will be displayed to the left of the program
menu.
Repeat the above step for the next titles/chapters (or tracks in CDs).
Press Play/Pause or OK to start the programmed playback.
Refer to the previous section to program the tracks of your choice.
Select the item and then press Stop to delete it.
Repeat playback
A specific title, chapter or track can be played repeatedly.
Note: During VCD / SVCD playback, repeat playback is only available when PBC is OFF.
REPEAT button:
DVDs: Off > Chapter > Title
CD /VCD/SVCD: Off > Track > All
MP3 / JPEG / WMA files: Off > Track > Folder > All
A-B button:
Press the A-B button to set the start of the section (point A).
Press the A-B button again to set the end of the section (point B). The unit will then immediately begin
replaying the selection (A to B) repeatedly. Press the A-B button again to clear the programmed repeat
playback and return to normal playback.
Note: The A-B repeat function can only be used within the same title or track. If points A and B are
defined in different titles or tracks, A-B repeat is cancelled.
8.PLAYING MP3 / JPEG / WMA / MPEG 4 FILES
Nota: Este dispositivo no es compatible con el formato DIVX3.
Play/Pause
Inicia la reproducción. Pulsa de nuevo para interrumpirla momentáneamente.
Skip
Pasa al archivo anterior/siguiente.
Stop
Detiene la reproducción y visualiza el menú de selección.
Zoom
Efectúa zoom en una imagen durante la reproducción de archivos JPEG or MPEG4.
Inversión y rotación de imágenes (JPEG)
Pulsa los botones direccionales para girar una imagen o darle la vuelta.
Menú de selección
Pulsa Stop para visualizar el menú raíz.1.
Pulsa las teclas de navegación para seleccionar una carpeta o fichero y pulsa Ok para confirmar.2.
Archivos JPEG:
Pulsa el botón Play/Pause para iniciar una presentación de imágenes a partir del archivo JPEG seleccionado. Si lo
desea podrá activar el zoom o girar la imagen. Para seleccionar el modo de transición que desea pulsa de forma

17/20 energysistem.com
repetida el botón ángulo. Durante la reproducción puede pulsar el botón Menú para volver al menú principal o el
botón Stop para visualizar los archivos JPEG en forma de miniaturas.
Note: This unit does not support the DIVX3 format.
Play/Pause
Press to start playback. Press again to pause playback.
Skip
Press to skip to the next/previous track or picture.
Stop
Press to stop playback and display the selection menu (JPEG and movie files).
Note: Press to play from the beginning.
Zoom
Press to zoom in on an image when playing JPEG or MPEG4 files.
Flipping and rotating images (JPEG)
Press the navigation keys to flip or rotate an image.
Selection Menu
Press Stop to display the root menu.1.
Press the navigation keys to select a folder or file and then press the OK button to confirm.2.
JPEG files:
Press Play/Pause to start a slideshow from the JPEG file currently selected. You can then zoom or rotate the
images displayed. Press the ANGLE button repeatedly to select a different transition mode. During playback, you
can press the MENU button to return to the root menu or press the Stop button to display the JPEG files in
thumbnail mode and you can then select “Rotate” or “Slide Show”.
9. DVB-T OPERATION
Press the SOURCE button on the remote control and use the Up/Down buttons to select DVB.
Press the OK button to confirm.
Selecting a Channel
Press CH-/CH+ to go through the channels or press the numeric buttons on the remote control.
In normal playback mode, press the OK button to display the channel list on the screen. You can then select
which channel you want to watch.
Audio
Press the Audio button to choose the audio channel (Audio 1 or Audio 2) and three audio modes: LL, RR and LR.
Subtitles
Press the Subtitle button to choose the subtitle language. The number of available languages depends on the
channel. If no other language can be chosen, only the “off” option will be available.
EPG Page

18/20 energysistem.com
Press the EPG button to enter EPG mode (electronic program guide). Use the Up/Down buttons to choose a
channel and check the program list for the next two sessions. To return to normal viewing of the channel, press
the OK button. To check the complete program list for a day, press the Play button to display it. Press the
Up/Down buttons to obtain detailed information. This information will be shown to the right of the program list.
When you have chosen a program, use the OK button to preset the time for changing channel to make sure that
you do not miss the program.
TV/RADIO
Press the TV/RADIO button to select the TV or radio channels.
10. Solución de Problemas
If you experience problems with this receiver or its installation, in the first instance please read carefully the relevant
sections of this User Manual and this Troubleshooting section.
Problem Possible solution
No Power Check that the power cord is properly connected
Check that the player is switched on. Press the STANDBY button
No picture
Check that the TV is switched on
Check that the correct AV input is selected on the TV (refer to the TV manual for more
details)
Check the video connection between the player and the TV
Check the connection between the unit and the antenna
Poor quality picture
Check the disc for fingerprints and clean with soft cloth, wiping from the center to the
edge
Check that the disc is compatible with the TV format (PAL/NTSC)
Check the antenna cable and the antenna installation (using an amplifier may improve
signal quality)
Black and white picture Check that the disc is compatible with the TV format (PAL/NTSC)
Check that the DVD player is not connected to the TV through the VCR
Picture interference Place the unit as far away as possible from any sources of interference or emission (e.g.
radios, etc.)
Remote control not working
Aim the remote control directly at the sensor on the front of the player.
Remove any obstacles between the remote control and the sensor.
Check the polarity of the batteries.
Replace the batteries if necessary
No sound
Check the audio connections
If using a Hi-Fi amplifier, try another sound source
Clean the disc
The disc may be damaged. Try another one
No audio from digital output
Check the digital connections
Check the audio setup menu to make sure that the digital output is correctly set
Check that the audio format selected is compatible with the player
Disc cannot be played Make sure that the disc is placed correctly in the disc tray
Improper functioning Strong interference may disturb normal operation of this unit. Just reset the player by
disconnecting and reconnecting the power cord
11 Especificaciones

19/20 energysistem.com
12. WARRANTY
Energy Sistem Soyntec S.A. warrants its products to be free from defects in materials and workmanship at the time of
purchase.
The warranty period is 36 months from the date of purchase.
13. WARRANTY PROCEDURE
Visit the Support section at http://support.energysistem.com and select your product to view the FAQ
(Frequently Asked Questions).
The solution to your problem is very likely to have been already published there. You will also be able to
download user manuals, user guides, drivers and updates.
If you cannot find an appropriate solution in the Support section, you may send us your enquiry or warranty

20/20 energysistem.com
service request by email: [email protected]
Alternatively, you may prefer to contact the distributor from which you purchased the product, presenting the
purchase receipt or invoice.
Specifications are subject to change without notice.
© 2009 by Energy Sistem®. All rights reserved.
14. TRADEMARKS
All company, brand and product names are trademarks or registered trademarks of their respective companies.
15. DECLARATION OF CONFORMITY
Nombre del suministrador: Energy Sistem Soyntec S. A.
NIF: A53107488
Address: Pol. Ind. Finestrat – C/ Calpe, 1 – 03509 Finestrat (Alicante)
Tel: 902 388 388
Fax: 902 119 034
We declare under our own exclusive responsibility that the product:
Energy Sistem® Reproductor DVD andDVB-T Tuner Energy™ d5 AV
Manufacturing country:: China
Is in compliance with the essential directives, norms and standards of the European Union 89/336/EEC (EMC Directive).
Table of contents
Other ENERGY SISTEM DVD Player manuals