ENERGY SISTEM TDT SD3 User manual

1/32 energysistem.com
ENGLISH
Introduction 4 .....................................................................................................................................................................
Care and maintenance 4 ...................................................................................................................................................
Main features 4 ...................................................................................................................................................................
Product contents 5 .............................................................................................................................................................
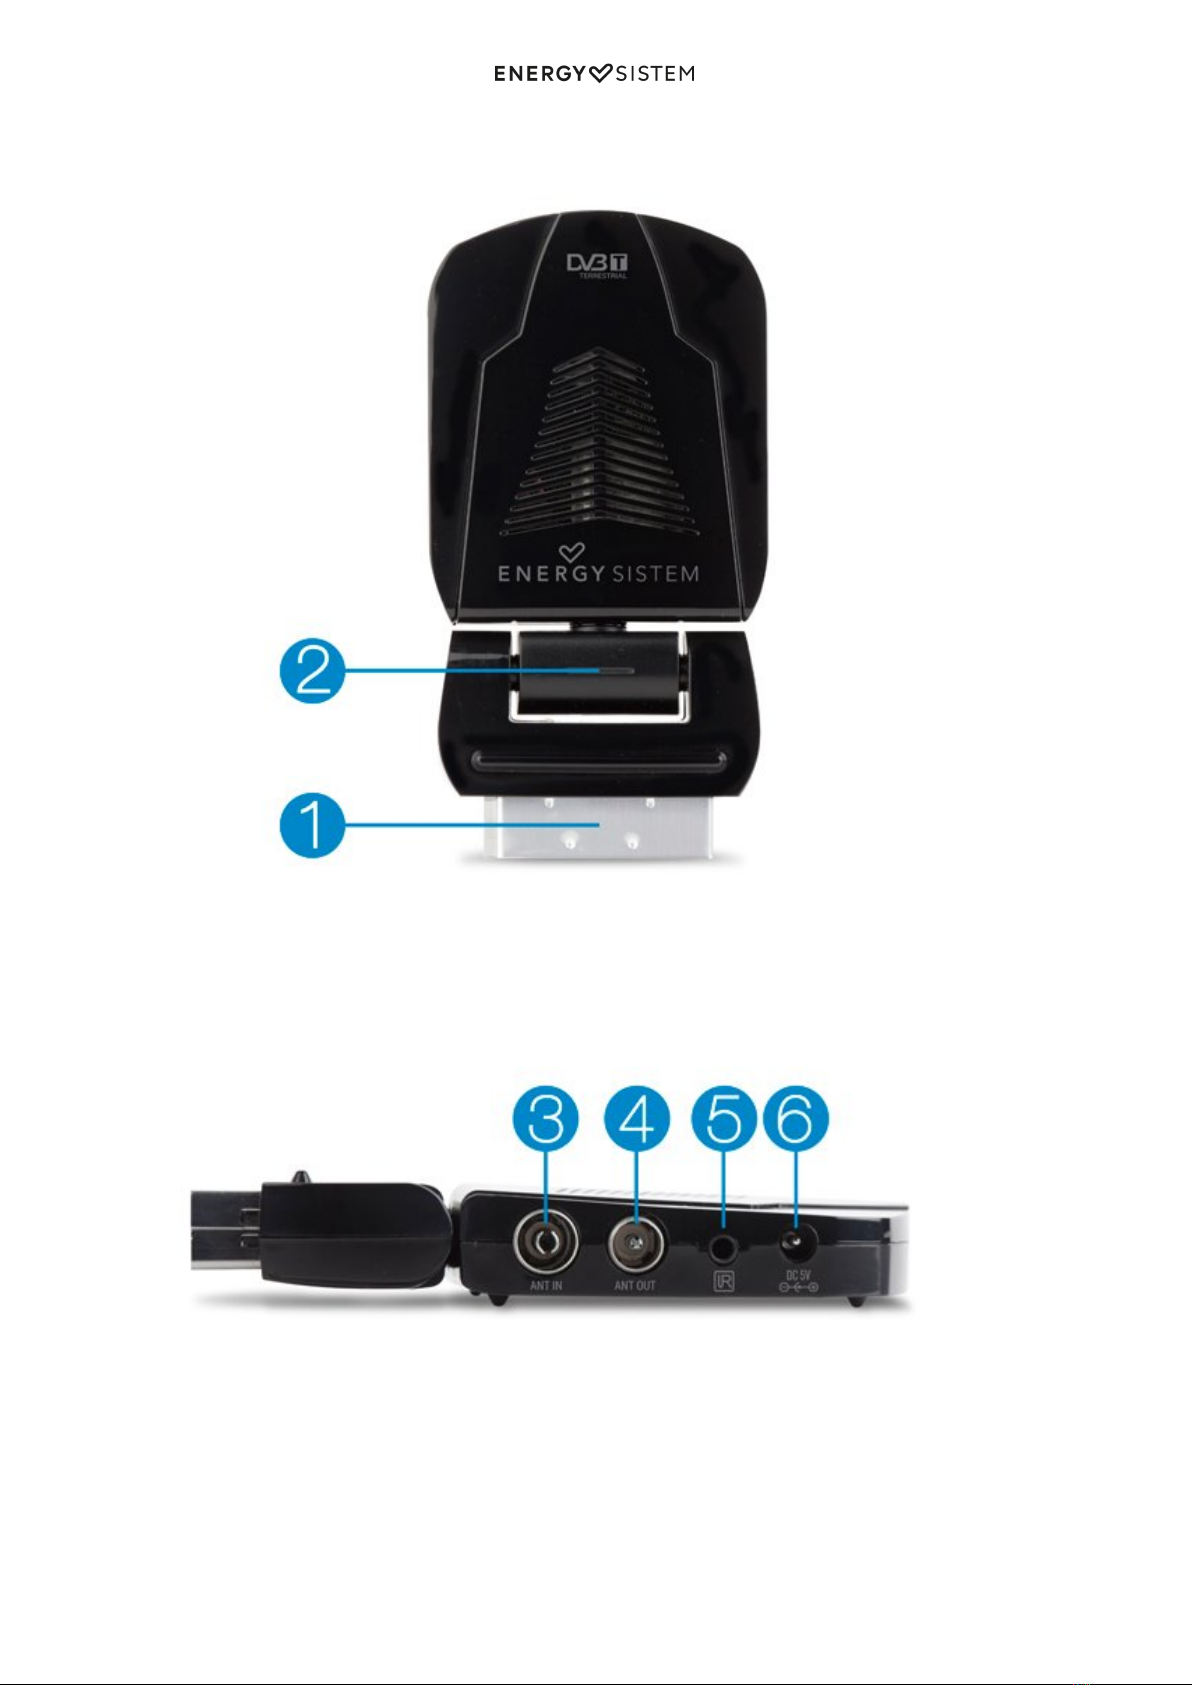
General overview 5 ............................................................................................................................................................
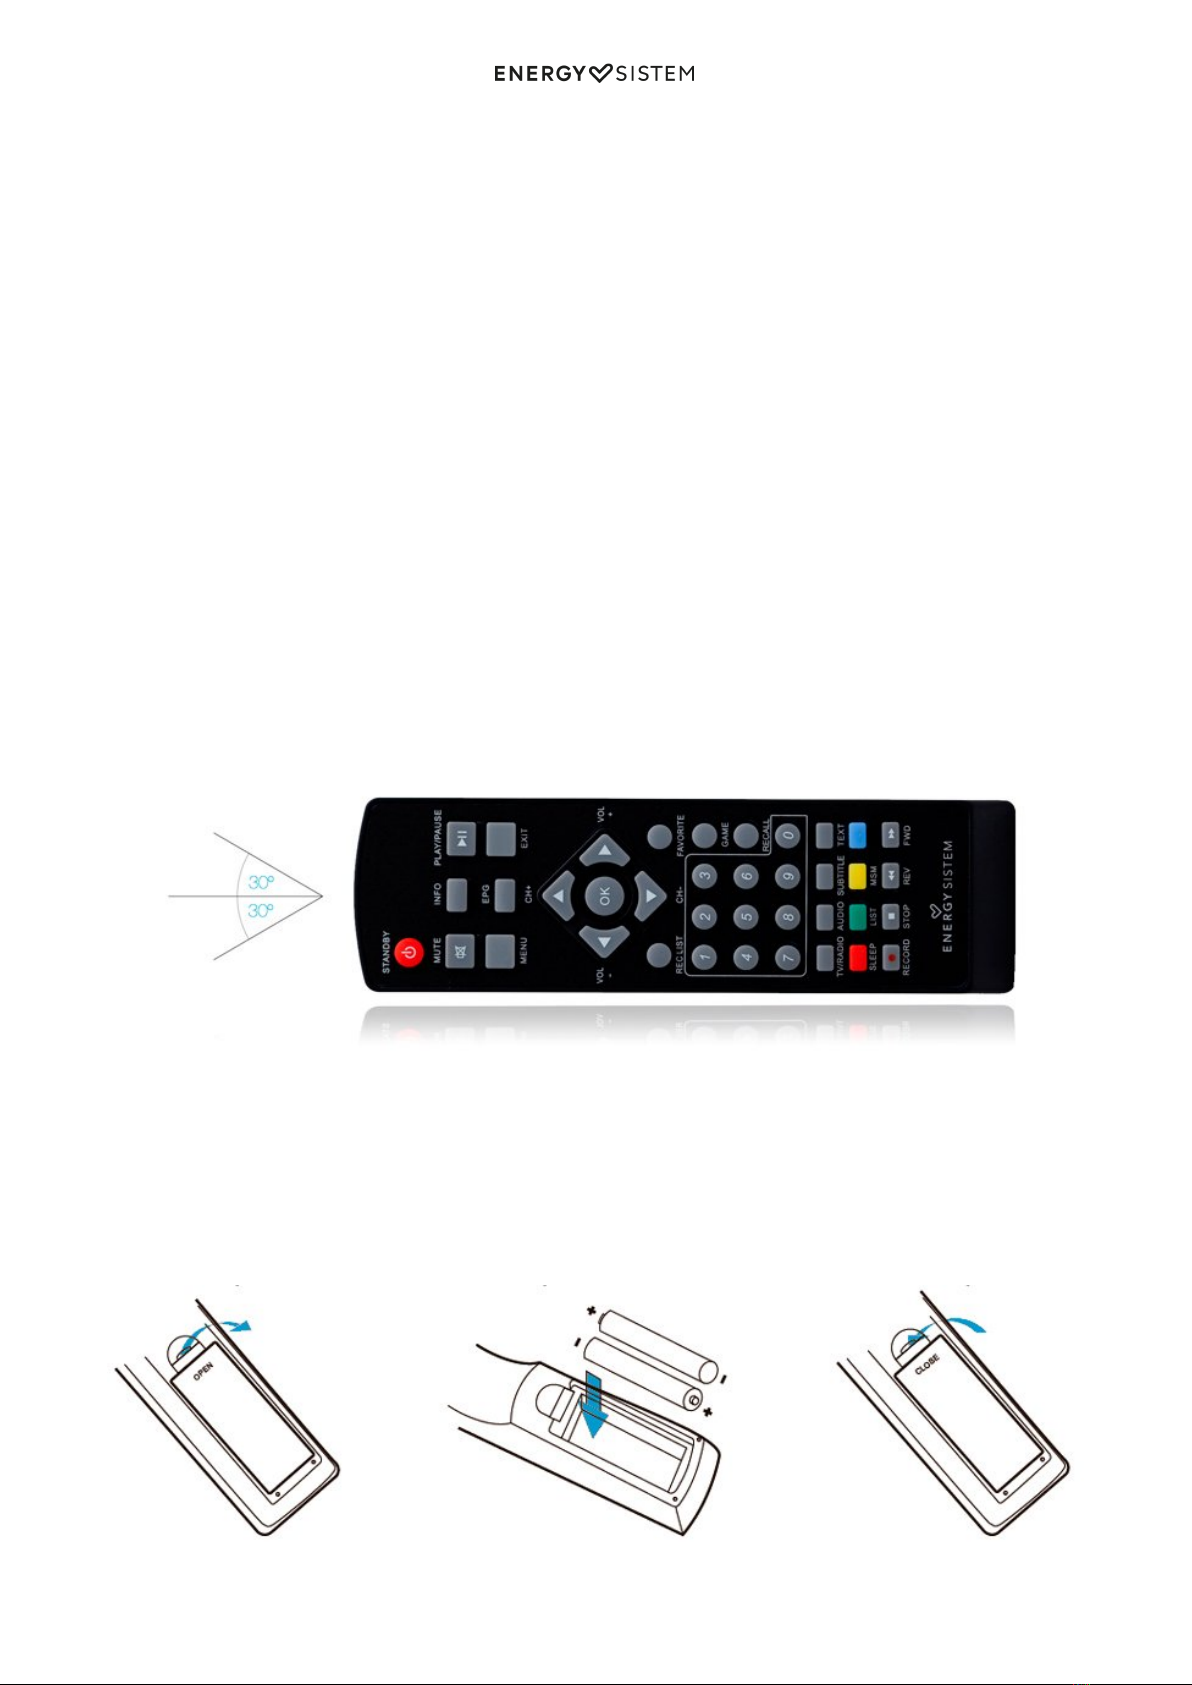
Remote control 7 ............................................................................................................................................................
Connection diagram 10 .....................................................................................................................................................
Connecting your TDT SD3. 10 .........................................................................................................................................
Switch on and off 11 ..........................................................................................................................................................
First use / Start settings 12 ..............................................................................................................................................
Menú principal 13 ...............................................................................................................................................................
TV and Radio 13 ..................................................................................................................................................................
TV channel list. 14 ..........................................................................................................................................................
Note: This function will not be available when the "LCN" (Logical Channel Number) option is enabled in "Settings, Installation,
LCN". 14 .......................................................................................................................................................................................
Important: This function will not be available if the password is on and you have not entered it correctly. 15 ...........................
Electronic Programme Guide (EPG) 15 ...........................................................................................................................
Multimedia 15 .....................................................................................................................................................................
My Album 15 ..................................................................................................................................................................
Zoom 16 .......................................................................................................................................................................................
Rotation 16 ...................................................................................................................................................................................
Presentation 16 ............................................................................................................................................................................
My Music 16 ....................................................................................................................................................................
My films 17 .....................................................................................................................................................................
My Recordings 18 ...........................................................................................................................................................
Recording list 19 ...........................................................................................................................................................................
Recording unit 19 .........................................................................................................................................................................
Recording preferences 20 ............................................................................................................................................................
Accesories 20 ......................................................................................................................................................................
DVB-T operation 20 ............................................................................................................................................................
Information 20 ................................................................................................................................................................
Changing channels 21 ....................................................................................................................................................
Adjust the volume 22 .....................................................................................................................................................
List of channels 22 ..........................................................................................................................................................
Audio options of the channels 22 ...................................................................................................................................
(*) The track and audio channel settings are not always available and will depend on the programme you are watching. 22 ....
Pause 22 .........................................................................................................................................................................
Favourites 22 ..................................................................................................................................................................
Teletext 23 .....................................................................................................................................................................
Subtitles 23 ....................................................................................................................................................................
Electronic Programme Guide 24 .....................................................................................................................................
List of channels 24 ..........................................................................................................................................................
Dynamic channel mosaic display 25 ..............................................................................................................................
Settings 25 ..........................................................................................................................................................................
Installation 26 .................................................................................................................................................................
TV Settings 27 ................................................................................................................................................................
Password and parental control 28 ..................................................................................................................................
System's menu lock 29 ...................................................................................................................................................
Channel lock 29 ..............................................................................................................................................................
Censorship lock 29 .........................................................................................................................................................
Change password 29 ......................................................................................................................................................
Timer (events) 29 ...........................................................................................................................................................
Default settings 30 .........................................................................................................................................................
Software update 30 ........................................................................................................................................................
Troubleshooting 30 ............................................................................................................................................................
Warranty 31 .........................................................................................................................................................................
Warranty Procedure 31 .....................................................................................................................................................

2/32 energysistem.com
Trademarks 31 ....................................................................................................................................................................
Declaration of conformity 32 ............................................................................................................................................

3/32 energysistem.com

4/32 energysistem.com
Introduction
Energy Sistem™ thanks you for buying your new TDT SD3. We hope you will enjoy it.
The next sections will offer you a general overview of your new device and its main features.
Before you start using your TDT SD3 we recommend you to read this manual and familiarize yourself with it. It only
takes a few minutes and it will help you to enjoy your device with maximum performance.
Care and maintenance
Do not expose your SD3 to impacts, dust, direct sunlight, humidity or high temperatures.
Do not use corrosive nor abrasive cleaning products.
Keep the device clean and dust free using a soft, dry cloth. Always disconnect the device from the power supply
before cleaning.
The slots and openings of your TDT SD3 are made for ventilation. Do not cover or block them.
Do not disassemble the device. Any repairs must be carried out by Energy Sistem Technology S.A. qualified
personnel only.
Your TDT SD3 requires no maintenance. Make sure the batteries are disposed safely. Consult the local
authorities about the waste management legislation.
Main features
DVB-T tuner for MPEG-2 system.

5/32 energysistem.com
360° swivel connector to adjust the position and save space when you connect it to your TV without cables
thanks to the SCART connector.
Use it through its USB port to play different video formats: SD (DivX, Xvid, AVI, MPG), audio (MP3, WMA) and
photos (JPEG, BMP, GIF).
Record DVB-T in MPEG-2 format with digital quality through USB devices. Recording manager.
Timeshift function to pause and resume the DVB-T broadcast.
Tune in the radio with digital quality.
Electronic programme guide (EPG) with event information (recording/notification)
Dynamic channels mosaic display function (MSM)
Multilingual OSD menu
Teletext (VBI)
Selectable subtitles between digital channel and teletext.
Channel management: favourites, move, lock, sort and parental control.
Parental control.
Automatic switch off (ECO) and timer (SLEEP).
Games and applications included (Calculator, calendar, connect 5)
Software updated via USB port.
Automatic and manual TV and radio channel search, with storage capacity up to 1000 channels.
OFDM 2K/8K mode.
Bandwidth: 7/8 MHz.
File system: FAT/FAT32.
Efficient energy consumption in standby mode contributing to the sustainability of the environment.
Product contents
TDT SD3
Remote control unit
IR receiver cable
USB Host cable
AC/DC (Europlug) 100-240V AC 50-60Hz DC 5V 1.5A power adapter
Quick guide
General overview

6/32 energysistem.com
SCART connector.1.
360º swivel joint.2.
Antenna input connector. Connect it to the external TV antenna.3.
Antenna output connector. Use it if you need to transfer the antenna signal from your SD3 to another device.4.
IR receiver cable connector for the remote control. This cable receives the signal from your SD3.5.
AC/DC power adapter cable connector.6.

7/32 energysistem.com
USB Host cable connector. Connect your external USB devices to play multimedia content or record from the7.
DVB-T.
Remote control

8/32 energysistem.com
STANDBY: Switch between power on and standby mode.8.
MUTE: Turn sound on or off.9.
MENU: Show main menu10.
CH+/-: It allows you to change the channel. Up and down arrow.11.
VOL+/-: It allows you to adjust the volume. Left and right arrow.12.
RECLIST: It shows you the stored recordings list.13.
NUMBER BUTTONS: Use them to manually enter channels numbers, or numbers in the menu.14.
TV/RADIO: Switch between TV channel selection or radio stations. AUDIO: Select from the audio tracks15.
RED: Sleep. Programmed shut-down/Red selection button. GREEN: List. Channel list. Green selection button.16.

9/32 energysistem.com
RECORD: Manual recording of TV channels. STOP: Stop recording or playing.17.
INFO: Screen information about the channel you are watching. Press several times to show more info/disable.18.
PLAY/PAUSE: Pause/Resume the playback of your TV or the multimedia content (an external storage USB device19.
is required)
EXIT: Return/Exit the menu.20.
EPG: Electronic programme guide.21.
OK: Selection/confirm button.22.
FAVOURITE: Access to favourite channels.23.
GAME: Access to games and applications (Gomoku, Calendar and Calculator)24.
RECALL: Change between current and previous channel.25.
SUBTITLE: Enable or disable the subtitles. TEXT: Access to the teletext in the channels providing this service.26.
YELLOW: MSM. Dynamic channels mosaic/Yellow selection button. BLUE: Blue selection button.27.
REV: Fast rewind when recording or multimedia. Press several times to select the speed. FWD: Fast forward28.
when recording or multimedia. Press several times to select the speed. If the Time Shift function is connected,
use "REV" and "FWD" to move around the DVB-T broadcast. For more information about "Time Shift" go to
"Multimedia" > "My Recordings".
To use the remote control, point it to the front part of the receiver cable. The receiving cable has a sensor with an
adhesive surface on the one end to place it on the front of the television. Before adhering it, and to ensure a secure
installation, make sure the surface is completely smooth, clean it with alcohol and dry it completely. Remove the
protection from the adhesive material and paste it on a point near the centre of your TV.
Make sure the field of vision between the remote control and the receiver is free of obstacles to ensure the best
reception. The remote control has one IR transmitter in the upper part with a range of up to 7 metres from the receiver
at an angle of up to 30º in both directions.
If the remote control range becomes lower, and the field of vision between the remote control and the receiver is free of
obstacles, maybe the batteries are empty. We recommend replacing the batteries.
Battery installation.
Remove the battery compartment cover in the remote control and slide two AA batteries into it. As shown in the
following picture.

10/32 energysistem.com
Recomendaciones acerca de las baterías.
Keep the batteries out of the reach of children.
Do not try to recharge empty batteries. Do not expose to fire, disassemble or short circuit them.
Change the batteries once a year for security reasons.
Change both batteries at the same time. Do not mix battery types.
Remove the batteries if you won't be using the remote control for an extended period.
Dispose of used batteries according to your local environmental laws and guidelines.
Connection diagram
Caution: Check that the voltage in the power outlet is appropriate for the power adaptor of your TDT SD3, that is 110 to
240 V. Disconnect the devices from the energy network before connecting it. Check the information given by the
manufacturer of your TV if necessary.
Optionally, you can extend the antenna signal to another device, as a videorecorder, by connecting another antenna
cable to your SD3 Ant OUT connector.
Connecting your TDT SD3.

11/32 energysistem.com
Switch on and off
To turn on the SD3 press the power button "STANDBY" (8) on the upper left part of your remote control. You will see a
green light in the IR receiver that indicates that it is turned on.

12/32 energysistem.com
In order to turn off the device, (Standby mode) hold the power button "STANDBY" (8). The device will enter the standby
mode and the IR receiver light will turn red. In this mode, your TDT SD3 uses the "Eco Energy" technology that keeps
the device in standby mode with low power consumption.
If you are not using the device for an extended period, we recommend to completely turn off the device, disconnecting
it from the energy network.
First use / Start settings
When first installing or restoring to factory settings, your SD3 will automatically show the settings screen for the initial
setup of the localization, menu language, audio, subtitles, etc. and start the channel search.
Press "UP/DOWN" (11) in your remote control to move around and "LEFT/RIGHT" (12) for the settings.
Press the "RED" button (16) in the lower part of your remote control to start the automatic channel installation. When
finished, the device will save the settings and channels found, and you will enjoy the DVB-T channels or radio stations.

13/32 energysistem.com
Menú principal
While you enjoy your favourite TV and radio channels, press "MENU" (10) to enter the main menu of your SD3.
In this screen you will find the following submenus:
TV
Radio
Multimedia
Applications
Settings
TV and Radio
Receiving the DVB-T broadcast you will find two types of channels, TV and radio. The operation of the Channel list and
the Electronic guide remains identical for both radio and TV. In this section we will explain the operation of the TV
version, that you will be able to apply to the radio version.

14/32 energysistem.com
TV channel list.
In this list you will find the options of organisation, lock and editing the channel list.
You can move between the channel list using the "UP / DOWN" (11) buttons, and move between the tools by pressing
"LEFT / RIGHT" (12) buttons.
Favourites: you can move through the channel list using the "UP/DOWN" (11) buttons and choose your
favourite channels, sorting them in up to 8 different categories pressing in the number buttons <1 to 8> (14) to
include or remove a channel from a favourites category ("News", "Sports", "Cinema", "Music", "Shopping",
"Travel", "Lifestyle", "Documentaries").
Lock: Press the "OK" (22) to enable or disable the selected channel lock. In case you have enabled the password
lock in "Settings, Password, Channel lock" it will ask you for a code each time you select to watch this channel.
Editing: This option allows you to edit the channel name. The maximum length for the character entry is 20.
Press "LEFT/RIGHT" (12) in your remote control to select the edit option. Then press "UP/DOWN" (11) to select1.
the channel you want to edit.
Press "OK" (22) to show the channel's information, press "OK" (22) again to enter the edit mode.2.
Press "UP/DOWN" (11), "LEFT/RIGHT" (12), the number buttons <0-9> (14) and "RED/GREEN" (16) to enter the3.
characters.
Press "OK" (22) to complete editing and return to the channel information screen.4.
Press "RED" (16) to save the changes and return to the channel list, or "EXIT" (29) to exit to discard the changes.5.
Move: It allows you to change the position of the channels in the list.
Note: This function will not be available when the "LCN" (Logical Channel Number) option is enabled in "Settings, Installation,
LCN".
Order: It allows you to sort the channels alphabetically or pay/free.
Note: This function will not be available when the "LCN" (Logical Channel Number) option is enabled in "Settings, Installation,
LCN".
Skip channels:you can skip channels when using the the "CH+/CH-" buttons (11). Press "OK" (22) to turn this
option on/off. Enter the number of channel manually using the number buttons from 0 to 9 (14) to see all
channels.
Delete: removes the selected channel from your channel list permanently. In order to recover it later on, you
will have to make a new channel search.
Press "OK" (22) or the "GREEN" button (16) to choose between removing one or all channels.

15/32 energysistem.com
Important: This function will not be available if the password is on and you have not entered it correctly.
Search: enables to enter a key word to make a channel search.
Press "LEFT/RIGHT" (12) to select the search option.1.
Press "OK" (22) to access the search page.2.
Press "UP / DOWN" (11), "LEFT / RIGHT" (12), the number buttons from <0 to 9> (14) and the "RED /3.
GREEN" button (16) to enter the letters.
Press "OK" (22) to start searching. Once the search is finished, a list of channels that match your search4.
criteria will appear.
Press the "GREEN" (16) or "YELLOW" button (27) to move through the list of search results.5.
Electronic Programme Guide (EPG)
The electronic programme guide enables users to obtain information about the weekly programmes of tv channels.
Press the EPG button (21) on your remote control to access the guide window.
Press "UP / DOWN" (11) to change channels.1.
Press "LEFT / RIGHT" (12) to change the programme or to choose another date.2.
Press "OK" (22) to display the information of the selected programme.3.
Press "EXIT" (20) to return to the previous menu or to exit.4.
Press the "RED" button (16) to enter the list of scheduled events and "OK" (22) para incluir el programa5.
seleccionado. ” to add the selected programme to the list. In case that two events are scheduled at the same
time, a warning message will appear on screen. Otherwise, the event will be added to the “Timer”.
Multimedia
Once the multimedia menu is opened, you will be able to display the images, music and videos saved on your USB
device. In order to access this menu, you will first need to connect your USB device to the USB port of your TDT SD3
using the USB host cable that is included.
Your USB device must have a FAT or FAT37 format in order for your TDT SD3 to recognize it correctly.
My Album
“My Album” menu enables you to display images in JPEG, BMP and GIF formats.

16/32 energysistem.com
Images in the device root folder will be shown as thumbnail view. In case there are no images in this folder, the folder
structure view will be shown and thus, you will be able to choose the folder you prefer. You can access the “folder” view
mode by pressing the "BLUE" button (27) of your remote control. Press "EXIT" (20) to return to the thumbnail view.
You can press the "UP / DOWN" (11) and "LEFT / RIGHT" arrow buttons (12) to change from one thumbnail (images and
folders) to the other. Press "OK" (22) to display the selected image. Press "OK" (22) once again to start the slideshow
mode. The display mode shows all images saved on a folder automatically. Press "INFO" (18) to see all available control
settings.
Zoom
Press the "RED" button (16) to zoom in or out the image. You can choose between 25%, 50%, 100%, 150% and 200%.
When the image has been zoomed to more than 100%, you can move around the screen using the arrow buttons (11)
and (12).
Rotation
Press the "LEFT / RIGHT" arrow buttons (12) to rotate the image clockwise other anticlockwise.
Press the "YELLOW / BLUE" button (27) to mirror the image, flipping it horizontally or vertically.
Presentation
Press "OK" (22) to display the selected image. Press it once again to start the presentation mode.
Press the "RED" button (16) to pause or resume the presentation.
You can listen to background music during the presentation. Press the "GREEN" button (16) to select the audio file.
Press the "YELLOW" button (27) to select the AutoRepeat mode.
Press the "BLUE" button (27) to adjust the range of time between images.
You can change from one image to another manually during the presentation by pressing the corresponding "UP /
DOWN" buttons (11).
My Music
Through this menu, you will be able to listen to your USB stick’s music files in MP3 and WMA formats.
You will be able to see the progress bar and a frequency analyzer on screen while the music is playing.

17/32 energysistem.com
Press the "UP / DOWN" (11) and the "LEFT / RIGHT" arrow buttons (12) to move through folders and files and press "OK"
(22) to select.
Press the "RED" button (16) to pause or resume the music.
Press the "GREEN" button (16) to stop.
Press the "YELLOW" button (27) to select the AutoRepeat mode.
Press the "BLUE button (27) to adjust the speed (x2, x3, x4 or standard) of the fast forward function..
Press the "LEFT / RIGHT" arrow buttons (12) while listening to music to adjust the volume.
My films
Through “My films” menu, you will be able to play the video files in MPEG2, Divx and Xvid formats with standard
resolution (SD) saved on your USB stick. Not all formats nor all video or audio file containers are compatible.

18/32 energysistem.com
Press the "UP / DOWN" (11) and the "LEFT / RIGHT" arrow buttons (12) to move through folders and files and press "OK"
(22) to select folders or play the selected file.
Press "INFO" (18) to see all available control settings.
Press the "RED" button (16) to pause or resume the music.
Press the "GREEN" button (16) to move forward a frame.
Press the "YELLOW / BLUE" button (27) ) to move forward and backward at x2, x4, x8, x16, x32 or standard speed.
My Recordings
Through this menu, you will be able to watch the recorded DVB-T programmes using your USB stick and set the
recording and managing tools for storage units.
Please take into account that the USB unit must have a FAT or FAT32 format in order for your TDT SD3 to recognize it
correctly. It is probable that you will need to format your device through this menu to make it work properly. Use this
function carefully because formatting a device means deleting all saved data.

19/32 energysistem.com
Recording list
This screen shows the list of all recordings saved on the USB storage device. You can access this screen by pressing the
"REC LIST" (13) of your remote control.
Press "UP / DOWN" (11) ) to move through the list or the "LEFT / RIGHT" (12) arrow buttons to change from one page to
the next one.
Press "OK" (22) to play the recording.
Press the "RED" button (16) to delete the recorded programme.
Press "INFO" (18) to change the USB device (in case that you have several storage units connected through a USB hub).
Recording unit
In this menu, you can select the device and the partition in which your TDT SD3 will save the DVB-T recordings.
You will be also able to format partitions or whole USB units. We recommend to choose this option if you are going to
use a storage unit to make recordings. Nevertheless, keep in mind that the formatting will delete all data saved on the

20/32 energysistem.com
disc or partition.
Press the "GREEN" button (16) to format the whole USB unit.
Press the "RED" button (16) to format a partition of the USB storage unit.
Recording preferences
Time Shift capacity: shows the storage capacity for the "Time Shift" function. This function enables to pause
or play in reverse a tv programme and move it forward until you reach the current broadcasting time. This
storage capacity is automatically reserved by the system depending on the storage capacity of the connected
USB and cannot be modified by the user.
Time Shift: sets the mode that activates the "Time Shift:" function:
Pause. You can activate it by pressing the "PLAY / PAUSE" button (19) of your remote control.
Auto. Always on while the file is being played on television.
Off. "Time Shift" off.
One button recording:
On. The recording starts directly when pressing the "RECORD" button (17) on your remote control.
Off. By pressing the "RECORD" button (17) ) on your remote control, you will be able to select the
recording time in 15 minutes intervals. The recording time chosen by the user will be selected by default.
Recording time by default: sets the recording time by default from 15 minutes to 8 hours in intervals of 15
minutes.
Accesories
Gomoku: entertaining five in a row game to put your skill to the test against the device. Press the "UP / DOWN"
(11) and "LEFT / RIGHT" arrow buttons (12) on your remote control to set the game mode and the degree of
difficulty. Press "OK" (22) to start the game. Press the "UP / DOWN" (11) e "LEFT / RIGHT" arrow buttons (12) to
change the position and press "OK" (22) to place the Go pieces.
Calendar: shows the year, month and day.
Calculator: simple calculator for your everyday life.
DVB-T operation
Information
In order to display the information bar, press the "INFO" button (18) when watching/hearing digital tv and radio
programmes.
Table of contents