Enersound TP-600 User manual
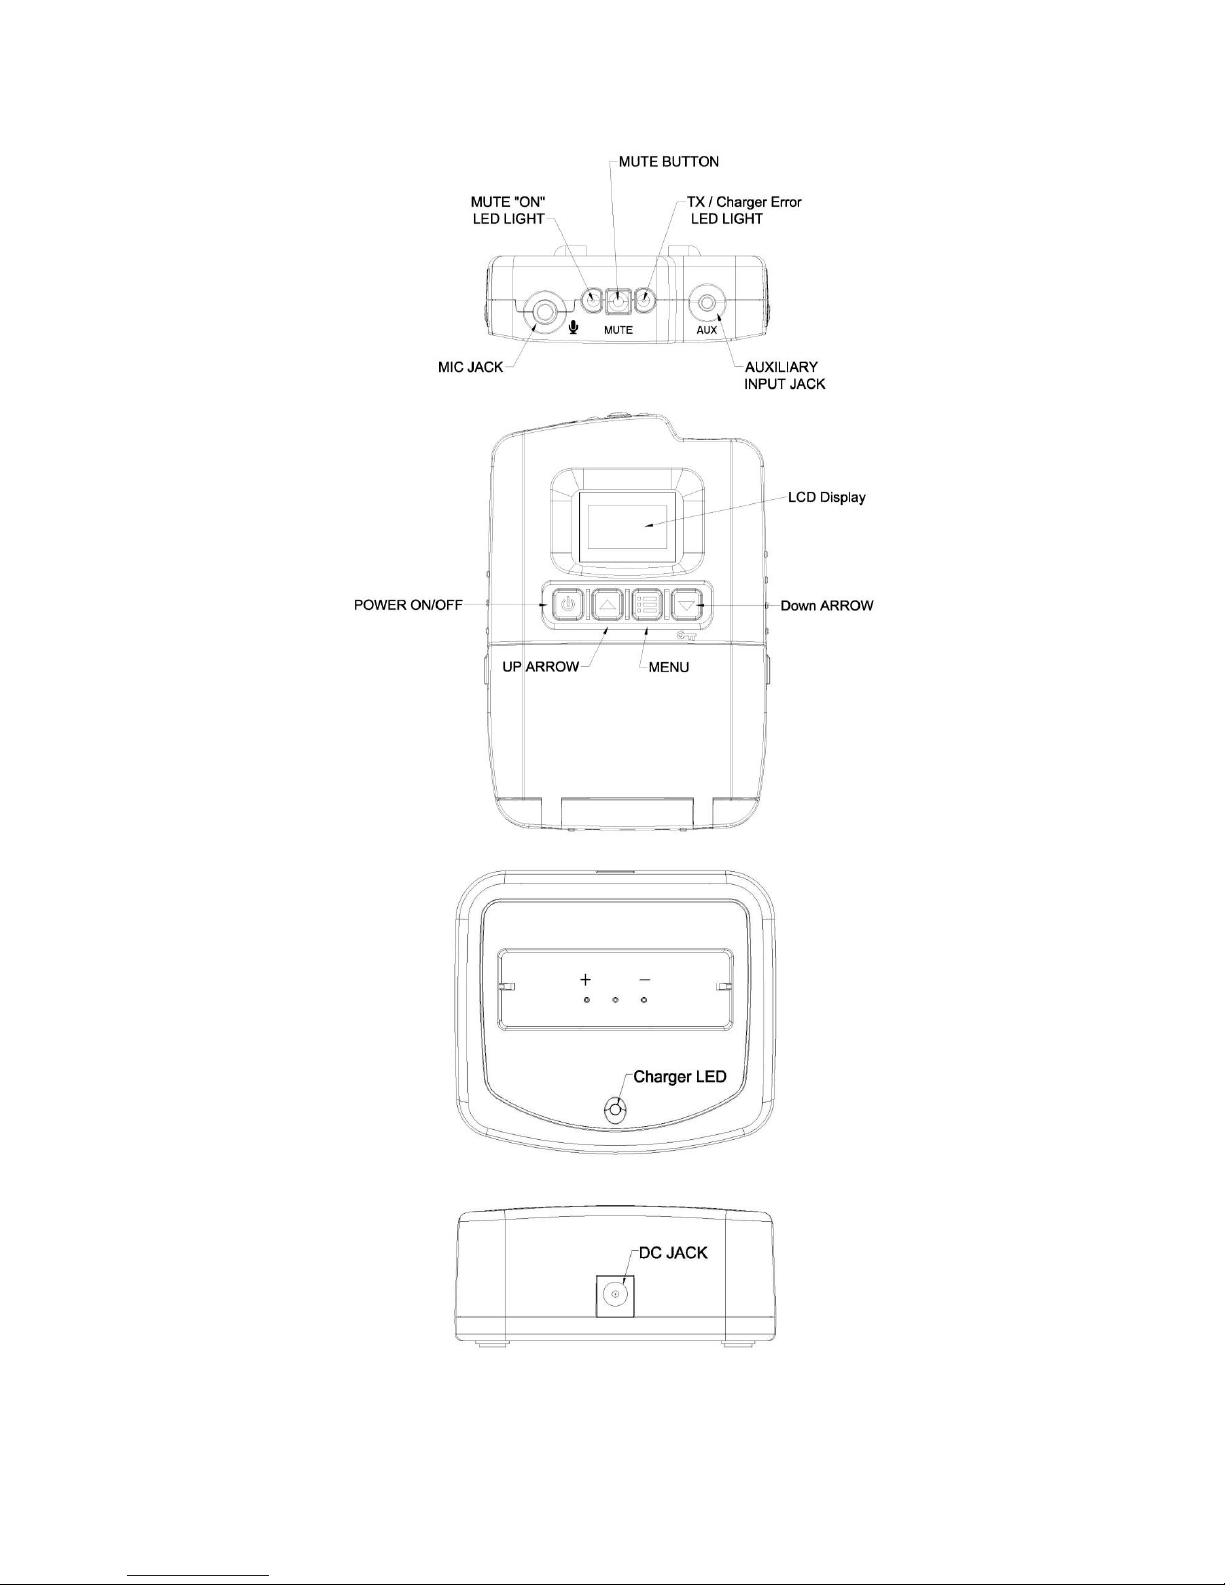
TP-600 FM Transmitter Operating Manual
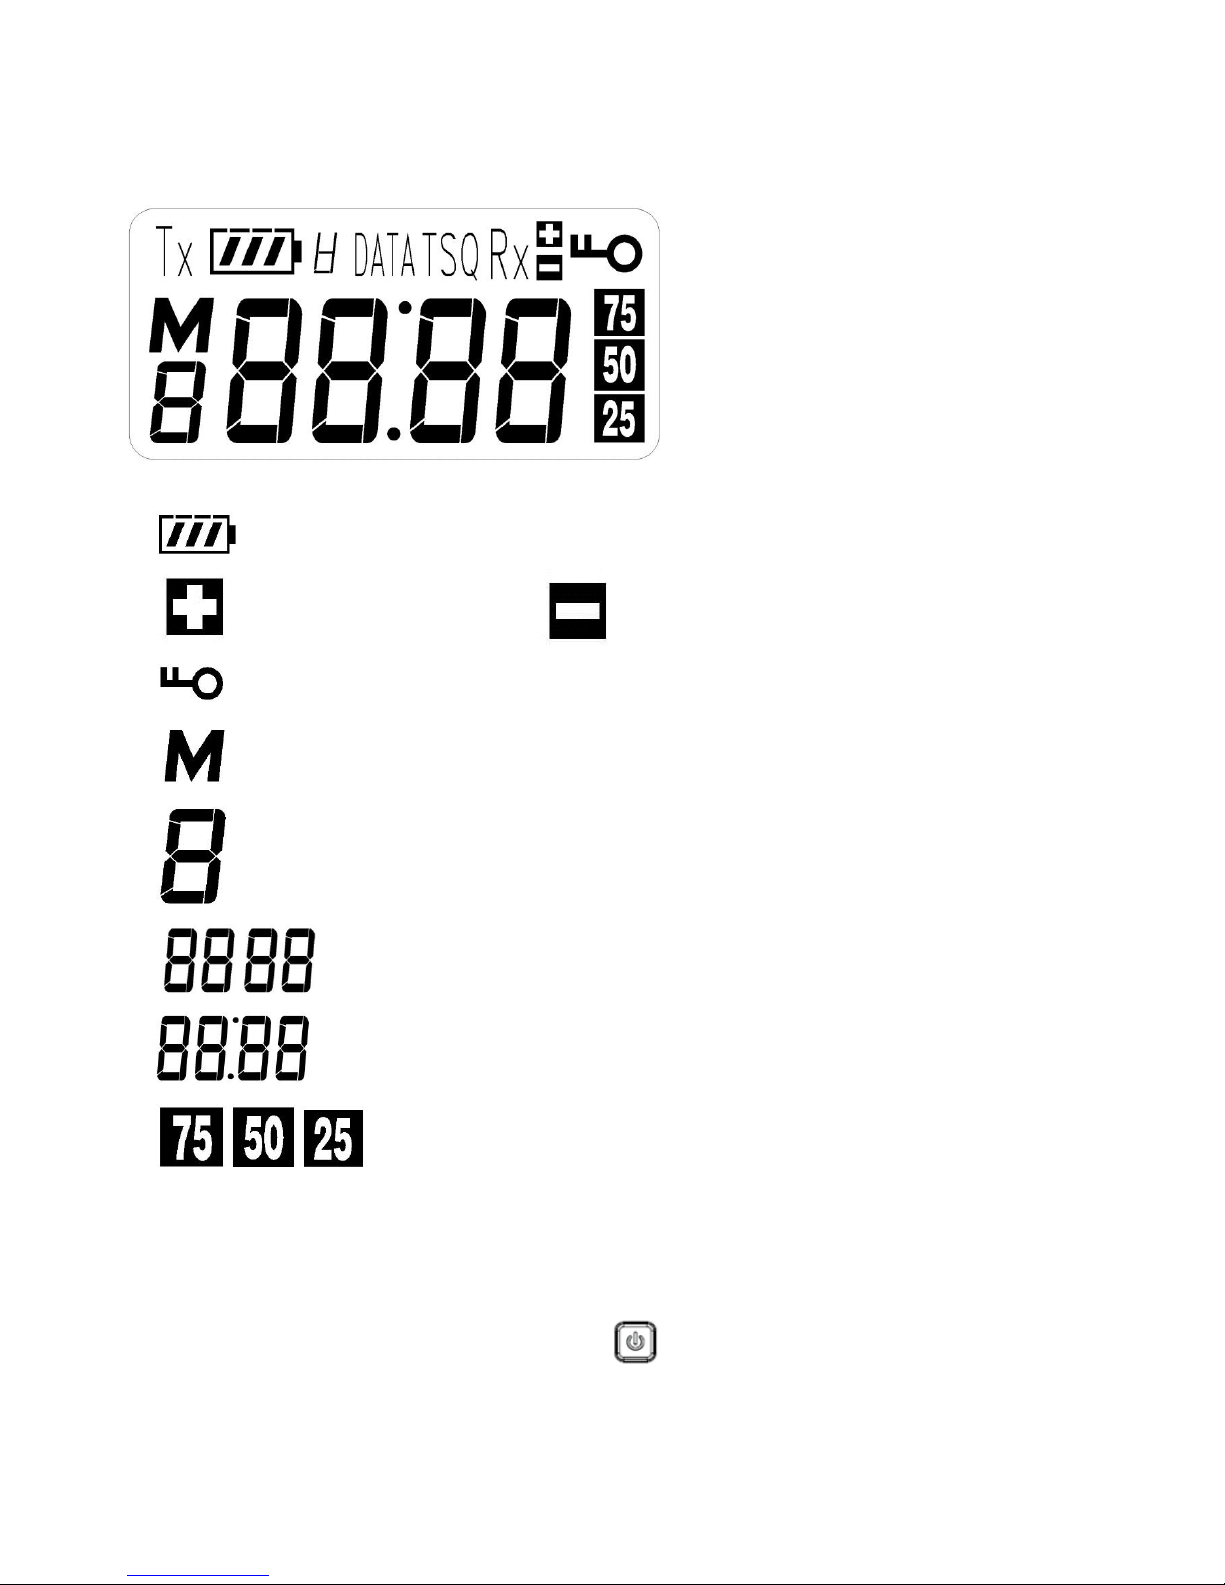
LCD Full Display:
1. : Battery capacity indicator
2. : 2:1 Compression Ratio, :1:1 Compression Ratio
3. : Key Locked Icon
4. : Menu Icon & Microphone Mute Icon (flashing)
5. : Function indicator during Menuoperation
6. : Channel number indicator in standby mode
7. : Channel number indicator in Priority setting mode
8. : FM deviation indicator
General Operation Mode:
1. Power ON/OFF & Transmission: Hold press the [ ] button 3 seconds will turn on the radio, it will
be in standby mode (see LCD display of Fig 1). When plug in the external Microphone, it will turn on
the TX LED & in transmission mode, if remove the Microphone will stop transmission, the TX LED turn
off.

Fig 1
Hold press the [ ] button 3 seconds again will turn off
the device.
(2) MIC MUTE setting: At radio operating mode, press the MIC Mute button once to turn on this function
(see LCD display of Fig 2), the Mute LEDwill be flashing, the External Microphone will be disable. .
Fig 2
Press the MIC Mute button again will turn off this function & mute the Microphone, the LCD Micon will
disappear & turn off the red LED.
(3) Audio Modulation indicator: There are 3 level’s icon (25, 50, 75) to indicate the audio input level, when
level over the 25KHz deviation, the 25icon will on, when level over the 50KHz deviation, the 25, 50
icons will on, when level over the 75KHz deviation, the 25, 50, 75icons will turn on at same time
(see LCD display of Fig 3).
Fig 3
(4) Button Lock function: This function is used to lock all the buttons except the [Mute] and [ ] button
during operating. Hold press [ ] button for 3 seconds to turn on this function, then LCD icon
will on (see LCD display of Fig 4). Press and hold the [ ] button for 3 seconds again, it will turn off

this function & icon disappear.
Fig 4
(5) Transmit Channel setting: At operating mode, press the [ ] or [ ] button to choose the
operating channel (see LCD display of Fig 5), it will turn off transmission about 250ms during the
switching.
Fig 5
(6) Standard Mode Pre-Setting: Hold press the [Menu] button 3 seconds into the setting mode (see
LCD display of Fig 6, the 6Aicon means gainwhich be flashing before adjust), there are 2 function’s
parameter (Major Volume & AUX) to set in this mode.
(6.1) Major Volume: Press the [ ] or [ ] button to increase or decrease the Volume level, there are
32 setting levels, the default level is 16, short press the [ (Menu)] button to store & go to the next
setting (AUX Volume ).
Fig 6
(6.2) AUX Volume: The Fig 7 is LCD display of this mode, the LCD icon 6Awill be flashing before adjust,
press the [ ] or [ ] button to increase or decrease the Volume level, there are 32 setting levels, the
default level is 16, short press the [Menu] button to store & go to the next setting (Advance Setting).

Fig 7
(7) Advance Function: The user doesn’t modify the Advance Settingusually, so it needs to re-confirm
before modification. In AUX Volumemode, press the [Menu] button will go to the Advance Setting
mode, (see LCD display of Fig 8), the display will be flashing in the beginning. Press the [ ] or []
button to choose No(Fig 9) & YES(Fig 10), then press the [Menu] to store & go to the Compress
Ration (1st parameter) setting. There are 4 parameter be able to set in this mode.
Fig 8
Fig 9
Fig 10
(7.1) Compress Ratio: This function is used to choose the suitable compress ratio for input signal, it may
improve the signal to noise ratio to get better performance during operating. The display will be flashing in
the beginning, press the [ ] or [ ] button to choose the compression ratio C 1:1 or 2:1. (see Fig 11 &
Fig 12), then press [Menu] button to store & go to the next setting, the default setting is 1:1.
Fig 11.
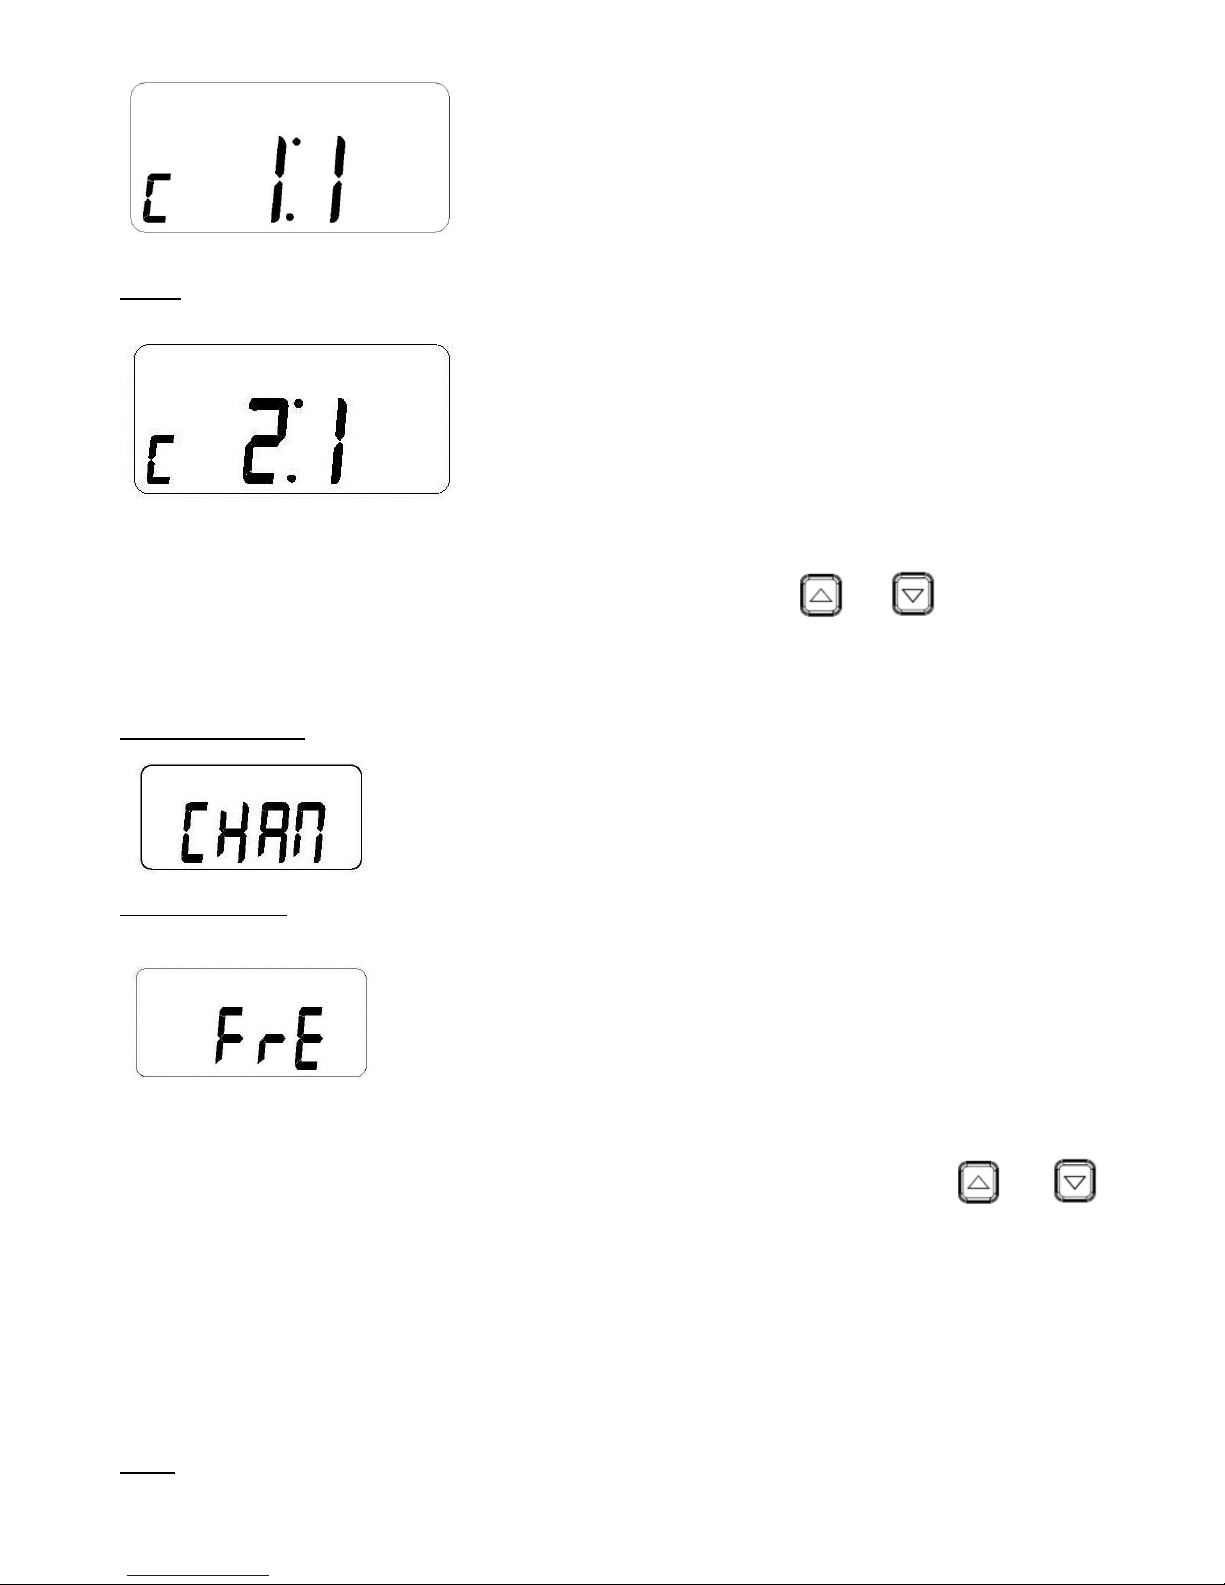
Fig 12.
(7.2) LCD Display mode: There are two different display type (Channel No.& Frequency) for the
operating channel, the display will be flashing in the beginning, press the [ ] or [ ] button to choose
(see LCD display of Fig 13 & Fig 14), then press [Menu] button to store & go to the next setting, the default
setting is Channel No.
Fig 13 (Channel No.)
Fig 14 (Frequency)
(7.3) Battery Type Selector mode: There are two different battery type (Re-chargeable Ni-MH-& Alkaline)
be able to choose in this mode, the display will be flashing in the beginning, press the [ ] or [ ]
button to choose (see Fig 13 & Fig 14), then press [Menu] button to store & go to the next setting, the
default setting isrECH.
PS. When user choose the Alkaline& plug in charging cradle, the radio will cut off the charging
connection automatically, the LCD display will indicate the Error(see Fig 17) & the green LED will be
flashing to warning it.
Fig 15
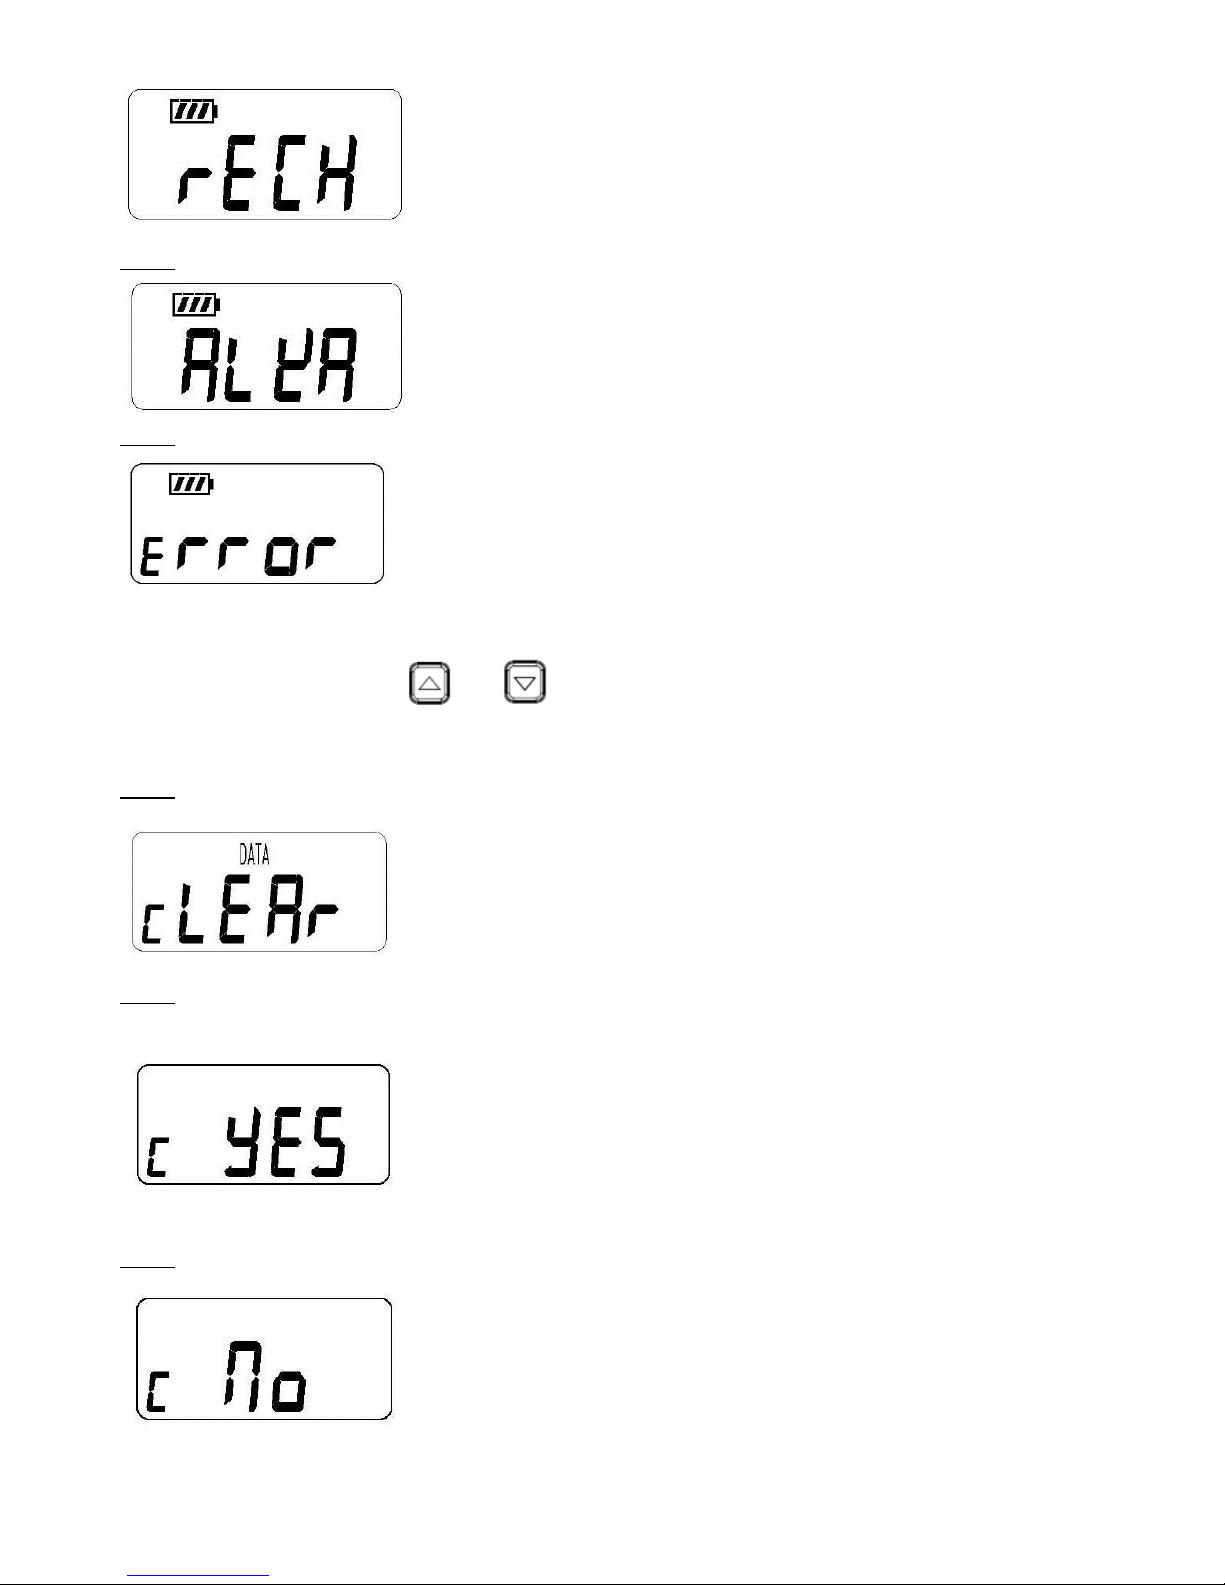
Fig 16
Fig 17
(7.4) Reset to default setting: In Battery Selectormode, press [Menu] button once to the cLEAr data
mode (see fig 18)., Press the [ ] or [ ] button to choose YES(Fig 19) or No(Fig 20). In YES
mode, press the [Menu] will return to the program default channel of the Standardmode.
Fig 18
Fig 19
Fig 20
Noted:
(a) When user press any button, the LCD backlight will turn on automatically, it will turn off after 5
seconds if don’t press button.
(b) In Standard Band Presettingmode, if don’t press button more than 10 seconds, it will go back to
the previous channel w/o store the setting. If press the [Menu] button 3 seconds, it will store the
setting & go back to the Standard Bandmode.
(c) When radio turn off, it will store the operating band.
(d) The Batter Type Selectoris not in the Resetlist
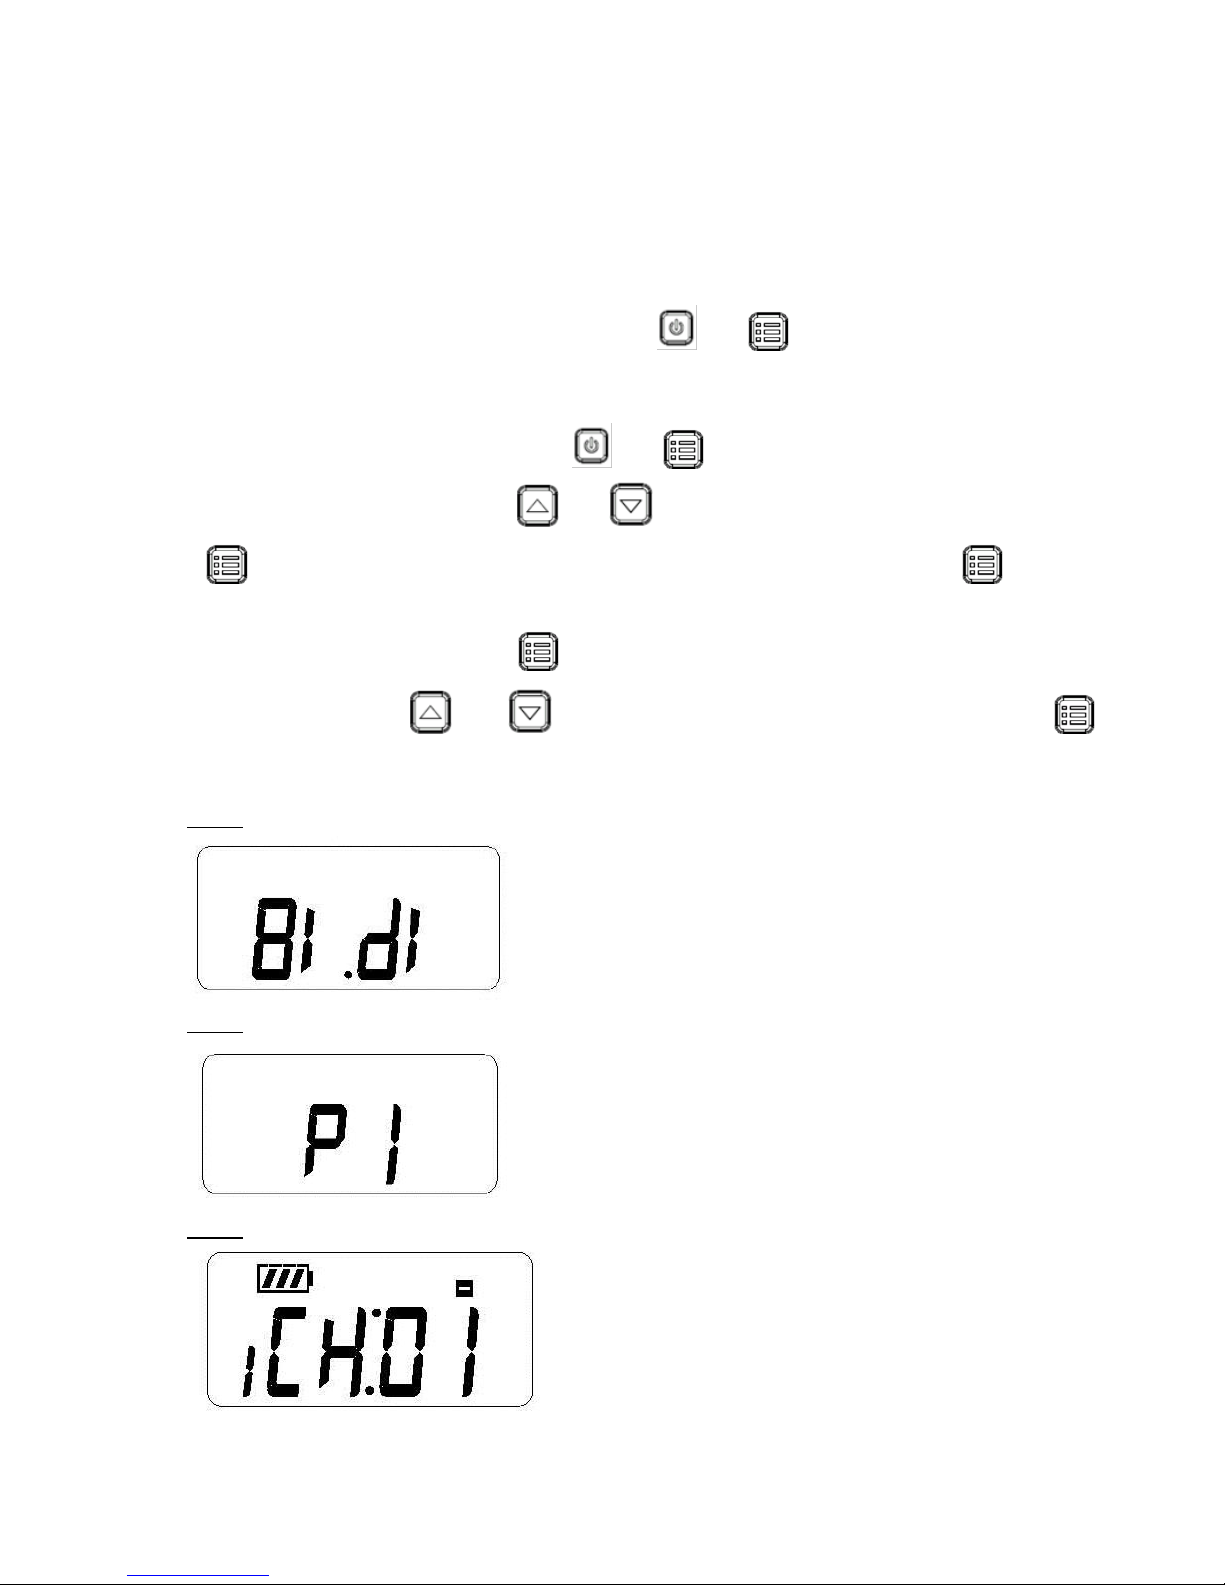
Preset Band: At power off mode, hold press the & button 10 seconds to the Band
selectormode. There are two bands (Standard& Preset) in this system, the operating band will be
switching automatically. The Presetband has two preset channel (P1& P2). At Standardband
mode, turn off the power, then hold press the & button 10 seconds will go to the Preset
band mode (see LCD display Fig 21), press [ ] or [ ] button to choose YES(or no), choose YES
& press button to the P1/P2 select mode, LCD display P1(see Fig 22), then press button to
choose P1 channel setting mode (see LCD display Fig 23).
(1) P1 Channel Setting: Hold press button 3 seconds to the channel modify mode the LCD
display be flashing, press [ ] or [ ] button to choose the preset channel, then press
button to store & go to the next setting.
Fig 21
Fig 22
Fig 23
(1.1) P1 Major Volume Setting: In this setting mode, the LCD display as Fig 6, the icon GAis flashing

before setting, press the [ ] or [ ] button to increase or decrease the Volume level, there
are 32 setting levels, the default level is 16, short press the [ ] button to store & go to the
next setting (AUX Volume ).
(1.2) P1 AUX Volume Setting: In this setting mode, the LCD display as Fig 7, the io GA is flashig
before setting, press the [ ]or [ ] button to increase or decrease the Volume level, there
are settig levels, the default level is 6, short press the Meu utto to store & go to the
next setting (Advance Setting).
(1.3) P1 Advance Function: In this setting mode, the LCD display as Fig 8, the display icon AdSET will
be flashing in the beginning. Press the [ ]or [ ] utto to hoose No Fig & or YES
(Fig 10), then press the [Menu] to store exit or & go to the Compress Ration (1st parameter)
setting. There are 4 parameter be able to set in this mode.
(1.4.1) Compress Ratio: This function is used to choose the suitable compress ratio for input signal, it may
improve the signal to noise ratio to get better performance during operating. The display will be
flashing in the beginning, press the [ ] or [ ] button to choose the compression ratio C 1:1
or 2:1. (see Fig 11 & Fig 12), then press [Menu] button to store & go to the next setting, the
default setting is 1:1.
(1.4.2) LCD Display mode: There are two different display type (Channel No.& Frequency) for the
operating channel, the display will be flashing in the beginning, press the [ ] or [ ] button
to choose (see LCD display of Fig 13 & Fig 14), then press [Menu] button to store & go to the
next setting, the default setting is Channel No.
(1.4.3) Battery Type Selector mode: There are two different battery (AAtype of Re-chargeable &
Alkaline) be able to choose in this mode, the display will be flashing in the beginning, press the
[ ] or [ ] button to choose (see Fig 13 & Fig 14), then press [Menu] button to store & go
to the et settig, the default settig is rECH(Re-chargeable battery).
Noted: The Batter Type Selectoris not in the Resetlist
(1.4.4) Reset to default settig: I Batter Seletor ode, press Meu utto oe to the LEAr
data ode see fig ., Press the [ ] or [ ] utto to hoose YES Fig or No
Fig . I YES ode, press the Meu will return to the program default channel of the
Standard ode.
Noted: (1) In Preset Band Presettingmode, if don’t press button more than 10 seconds, it will go back
to the previous channel w/o store the setting. If press the [Menu] button 3 seconds, it will store
the setting & go back to the Standard Bandmode.

(2) All Advancefunction setting would be used both Standard’& Preset (P1 & P2)band.
(2) P2 Preset: At standard mode & power off status, hold press the & button 10 seconds to
the P1/P2selector mode (see LCD display Fig 20), press [ ] or [ ] button to choose YES(or
no), Press button to the LCD display P1, press [ ] or [ ] button to choose P2then
press button to the P2 channel setting mode (see LCD display Fig 24).
(2.1) P2 Channel Setting: Hold press button 3 seconds to the channel modify mode the LCD
display be flashing (see Fig 25), press [ ] or [ ] button to choose the preset channel, then
press button to store & go to the next setting.
Fig 25
(2.2) Major Volue Settig: I this settig ode, the LCD displa as Fig 6, the io GA is flashig efore
setting, press the [ ] or [] button to increase or decrease the Volume level, there are 32 setting
levels, the default level is 6, short press the ] button to store & go to the next setting (AUX
Volume ).
(2.3) P1 AUX Volume Setting: In this setting mode, the LCD display as Fig 7, lay be flashing, the icon
GA is flashig efore settig, press the [ ] or [ ] button to increase or decrease the Volume
level, there are settig levels, the default level is 6, short press the Meu utto to store & go
back to the P2 channel setting.
(3) Change to Standard Band: At Presetband, if you would like to choose Standardband,
you have to turn off the power, hold press the & utto seods, the LCD display

StAN(see Fig 26), press [ ] or [ ] button to choose YES, then press button to confirm
& go back to standard band.
Fig 26
FCC Warning:
This device complies with part 15 of the FCC Rules. Operation is subject to
the following two conditions: (1) This device may not cause harmful interference,
and (2) this device must accept any interference received, including interference
that may cause undesired operation.
Any Changes or modifications not expressly approved by the party responsible
for compliance could void the user's authority to operate the equipment.
Note: This equipment has been tested and found to comply with the limits
for a Class B digital device, pursuant to part 15 of the FCC Rules.
These limits are designed to provide reasonable protection against
harmful interference in a residential installation. This equipment generates,
uses and can radiate radio frequency energy and, if not installed and used
in accordance with the instructions, may cause harmful interference to radio
communications. However, there is no guarantee that interference will not
occur in a particular installation. If this equipment does cause harmful
interference to radio or television reception, which can be determined by
turning the equipment off and on, the user is encouraged to try to correct
the interference by one or more of the following measures:
—Reorient or relocate the receiving antenna.
—Increase the separation between the equipment and receiver.
—Connect the equipment into an outlet on a circuit different from that to
which the receiver is connected.
—Consult the dealer or an experienced radio/TV technician for help.
ISEDC RSS warning
This device complies with ISEDC license-exempt RSS standard (s). Operation is
subject to the following two conditions: (1) this device may not cause interference,
and (2) this device must accept any interference, including interference that may
cause undesired operation of the device.
Le présent appareil est conforme aux CNR ISEDC applicables aux appareils radio
exempts de licence.
L'exploitation est autorisée aux deux conditions suivantes:
(1) l'appareil ne doit pas produire de brouillage, et
(2) l'utilisateur de l'appareil doit accepter tout brouillage radioélectrique subi, même
si le brouillage est susceptible d'en compromettre le fonctionnement.
Other manuals for TP-600
1
Table of contents
Other Enersound Transmitter manuals


