Enersound TP-600 User manual

1
USER MANUAL
Passion for innovation
Model TP-600
Portable Multi-Channel FM Transmitter
(72-76 Mhz)

2
TP-600 Table of Contents
About this Manual…………………………………………. 3
Package Contents ………………………………………..…3
System Overview …………………………………………… 3
Quick Reference:
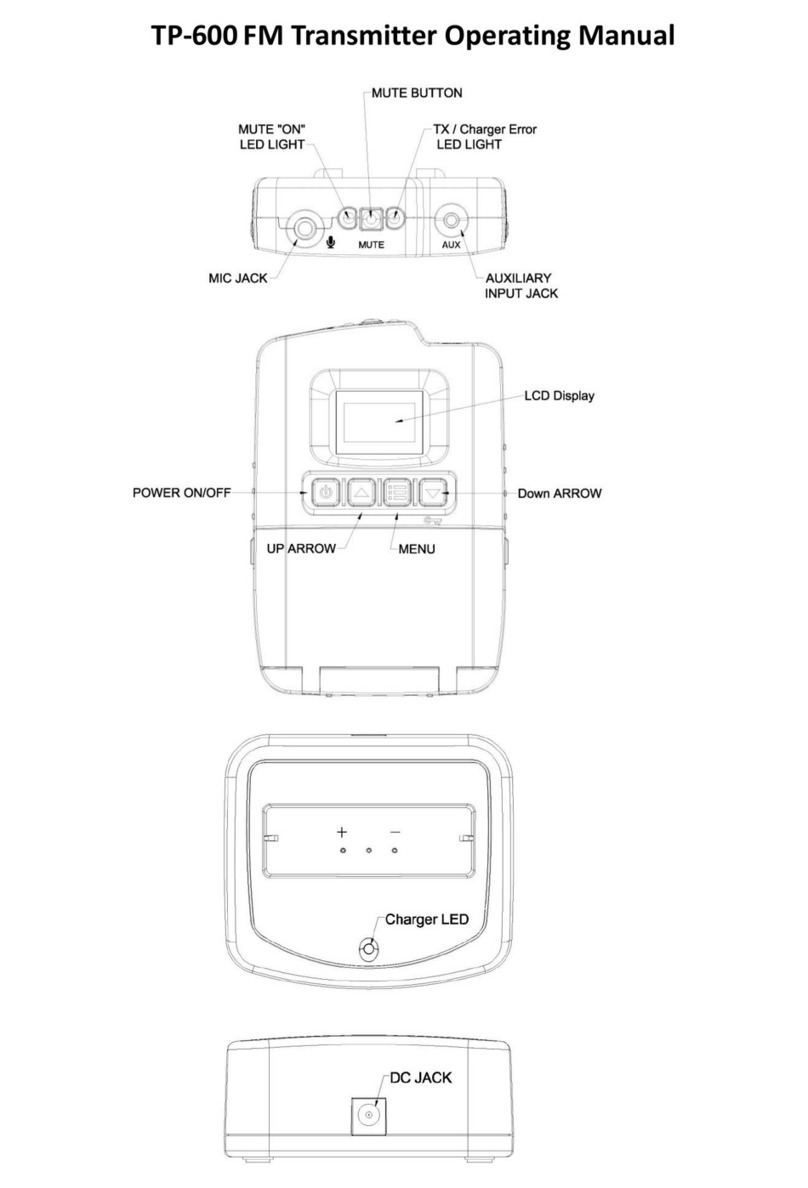
Controls, Displays and Connectors……………….…. 5
Set-up Instructions ………………………………………… 8
General Set-Up Instructions ………………………… 8
Enersound Frequency Chart………………………… 12
Menu Setting Instructions …………………………… 14
Safety Information ……………..………………….…… 26
Trouble Shooting ………………..…………………….…… 29
FCC & IC Statements ……………………………….….……32
Limited Warranty Statement …………………...….…35
TP-600 Optional Accessories ………………….…….…38
Technical Specifications ……………………….…………39

3
About this Manual
Read this user manual carefully before setting up
and operating your TP-600 portable FM transmitter.
Use the product only as described to avoid
accidental injury, damage or hearing impairment.
Also, read safety warnings carefully. Keep this
manual for future reference. If you give this product
to someone else, remember to include this manual.
Package Contents
(1) TP-600 Portable FM Transmitter (72-76 MHz)
(1) User Manual
System Overview
Thank you for choosing the Enersound TP-600 FM
transmitter. This professional 17-channel portable
transmitter, designed for assistive listening and
language interpretation, wirelessly broadcasts a
speaker’s voice, music or audio signal up to 150 ft.
The audience can use an optional Enersound FM
receiver or any other compatible FM receiver
operating within the 72-76 MHz frequency band to
pick up the broadcast. The TP-600 transmitter

4
features 2 audio inputs, including a 3.5 mm locking
jack for headset microphones, and a 2.5 mm jack as
an auxiliary audio input.
The TP 600 features a dedicated MUTE button
conveniently located on the upper side of the unit
that enables the user to silence the microphone and
enable it back.
Its LCD display allows the user to easily program the
various useful functions, such as the microphone and
auxiliary gains, compression ratio, display mode
(frequencies or channel numbers), and battery type.
The TP-600 is powered by either Alkaline or NiMH
rechargeable batteries. It features an on-screen
battery level indicator. When used with NiMH
rechargeable batteries, the optional CHR-600 drop-
in fast charger sold separately, allows to recharge
the batteries without removing them from the
transmitter. Battery life with alkaline batteries is up
to 25 hours and up to 22 hours per charge with NiMH
rechargeable batteries.

5
Quick reference: Controls, Displays and Connectors
Top of Transmitter
Front of Transmitter

6
Optional CHR-600 Drop-in Charger Sold Separately.

7
LCD Display
1. Battery Level Indicator
2. 2:1, 1:1 Compression Ratio
3. Locked Buttons
4. Mute Microphone Indicator (when
flashing) / Microphone Gain Setting Indicator
5. Battery Type Setting Indicator
A= Alkaline r=Rechargeable
Function Indicator during “Menu” Operation
Preset 1 or 2 indicator during Bidirectional Mode
6. Main 4-Digit Display
7. Audio Level / FM Deviation

8
Set-up Instructions
General Set-up Instructions:
•Unpack the transmitter: Remove outer packaging
and plastic cover. Inspect for physical damage and
immediately report any issues.
•Install batteries: Open the battery compartment by
pressing and pulling the two locking tabs located at
each upper side of the battery lid. Install 2 AA
batteries. Use alkaline or NiMH batteries only *. Be
sure to observe proper polarity (+/-). Damage due
to improper battery installation may void the
product warranty. The battery icon on the LCD
display will flash when it is time to replace or
recharge batteries.
*Note: Make sure the transmitter is set for the
correct battery type. When powering on the
transmitter, the LCD display with show for 2 seconds
either “ALkA” or “rECH” indicating the transmitter
setting. In addition, during Standard operation
mode, on the left bottom corner of the LCD display
you will see either an A (Alkaline) or r (rechargeable)
also indicating the transmitter setting. If the setting
does not match the type of battery you installed, go
to Advanced S ettings menu (See page 16) and select

9
the correct battery type. Use “ALkA” for non-
rechargeable alkaline batteries, “rECH”for
rechargeable NiMH batteries only.
If the battery setting is not in the correct option,
battery level indicator may be inaccurate, the unit
may not charge, or alkaline batteries may explode if
placing the unit in the charger. Caution! Never
recharge alkaline batteries.
•Turn the unit on: Press and hold the
“POWER” button for 3 seconds. You can turn it off
also by pressing and holding the “POWER” button
for 3 seconds.
•Connect a microphone: Plug in an Enersound
compatible microphone (sold separately) onto the
“Mic Jack” on top of the transmitter and lightly
screw in the locking nut clockwise.
Warning: Do not tighten the nut excessively. Once
you feel a little resistance, stop screwing.

10
We recommend using the following Enersound
compatible headset microphones: MIC-200SEN,
MIC-400SEN, and MIC-500SEN. Other compatible
microphones are MIC-300SEN and LAV-100SEN.
Check for other Enersound compatible
microphones at the time of purchase.
When using a headset microphone, place the
capsule at the corner of your mouth so that it rests
at about 1 inch away from your face. Do not place
it in front of your mouth!
•You may also plug in an auxiliary audio source, such
as a CD or MP3 player using the “Aux Input” 2.5 mm
stereo jack. If mic and auxiliary sources are used
together, the audio will be combined. If only an

11
auxiliary source is desired, the mic can be muted.
Important: Do not remove the mic from the “Mic
Jack” as the microphone cable also functions as the
transmitting antenna. When the antenna is
correctly plugged in a green TX light will be lit.
•Select channel: Choose the desired channel by
using the UP or DOWN buttons on the
front of the transmitter. If the unit is locked, unlock it
by pressing and holding the DOWN button for 4
seconds.
Depending on the display mode, the screen will show
either the channel number (channel mode) or the
frequency (frequency mode).
If necessary, after selecting the desired channel, you
can lock it by pressing and holding the DOWN button
for 4 seconds.
Note: Make sure the FM receivers are tuned to the
same frequency as the TP-600 transmitter. If you are
using compatible Enersound receivers, the channels
will correspond to the channels on the TP-600
transmitter. If you are using compatible receivers of
other brands, frequencies may differ. Consequently,
we recommend setting the Enersound TP-600

12
transmitter on Frequency Display mode.
To set the transmitter on Frequency Display mode,
press and hold the MENU button for 5 seconds to
access the Settings menu, then access Advanced
Settings. See page 16 for more details.
Enersound Frequency Chart
CH 1
72.1 MHz
CH 10
75.9 MHz
CH 2
72.5 MHz
CH 11
72.2 MHz
CH 3
72.9 MHz
CH 12
72.6 MHz
CH 4
75.7 MHz
CH 13
75.4 MHz
CH 5
74.7 MHz
CH 14
75.8 MHz
CH 6
75.3 MHz
CH 15
72.8 MHz
CH 7
72.3 MHz
CH 16
72.4 MHz
CH 8
72.7 MHz
CH 17
75.6 MHz
CH 9
75.5 MHz

13
•Locking/ Unlocking the transmitter:
This function is used to lock all the buttons except
the MUTE and POWER buttons. Press and hold
the DOWN button for 4 seconds to lock the
transmitter. The icon will appear on the
screen. Press and hold the DOWN button for 4
seconds again to unlock it.
•Muting/ Unmuting the microphone: To mute the
microphone, press and release the MUTE button
located at the top of the transmitter. The red MUTE
light indicator will start flashing and an “M” icon will
flash on the LCD display. To unmute the

14
microphone, press and release the MUTE button
again.
Note: The AUX Audio Input is not affected by the
mic mute.
Menu Setting Instructions:
Press & hold the MENU button for 4 seconds
to access the Settings menu. To move to the next
menu option, press and release the Menu button
once. To modify option value, press the UP or DOWN
buttons. If no button is pressed for 10 seconds, the
transmitter will automatically exit the Settings
menu. To exit the Settings menu, you may also
navigate through all the options by pressing and
releasing the Menu button repeatedly until exiting.

15
•Microphone Gain (Volume):
Press & hold the MENU button for 4 seconds. The
LCD display will start blinking and the first option
MICROPHONE GAIN will be shown.
Press the UP or DOWN button to increase or
decrease the microphone gain (volume) between 0
and 32. The default gain is 16.
•Auxiliary Gain:

16
To move to the next setting, press and release the
MENU button and AUXILIARY GAIN will start blinking.
Press the UP or DOWN button to increase or
decrease the auxiliary gain (volume) between 0 and
32. The default gain is 16.
To move to the next setting, press and release the
MENU button and ADVANCED SETTINGS will start
blinking. To exit without entering Advanced Settings,
press and release the Menu button again.
•Advanced Settings:
To enter Advanced Settings menu, while Advanced
Settings is blinking, press the UP or DOWN buttons
to select YES. Then, press the menu button once.

17
The first Advanced Settings option, Compression
Ratio, will start blinking.
•Compression Ratio:

18
Audio Compression reduces the volume difference
between loud and soft sounds. Press the UP or
DOWN buttons to modify the compression.
1:1 = compression off
2:1 = compression on
•Channel/ Frequency Mode:
You can choose the screen to show either channel
numbers or frequencies. If you are using Enersound
R-120 receivers or other compatible Enersound
receivers, the receiver channels will correspond to

19
the TP-600 transmitter channels. If you are using
compatible receivers of other brands, frequencies
may differ. Consequently, when using receivers from
other manufacturers, we recommend setting the
Enersound TP-600 transmitter to Frequency Display
mode.
While in the Advanced Settings menu, press the
MENU button to navigate through the options until
you reach CHAN/ FRE. When CHAN or FRE is blinking,
press the UP or DOWN buttons to change the
settings to Channel Display Mode (CHAN) or
Frequency Display Mode (FRE). To exit the Menu,
wait for 10 seconds or press the MENU button
several times to navigate through the options.
•Battery Type:

20
It is very important to select the correct battery
type installed in your transmitter. Please see
important note on Page 8 under Install Batteries in
General Set Up Instructions.
While in the Advanced Settings menu, press the
MENU button to navigate through the options until
ALkA or rECH is blinking.
Press the UP or DOWN buttons to select the desired
option Use “ALkA” for non-rechargeable alkaline
batteries, “rECH” for rechargeable NiMH batteries
only.
Note. When the transmitter is set to “ALkA” and the
transmitter is placed on the charger, the LCD
display with indicate “Error” and a green LED light
will start flashing.
Other manuals for TP-600
1
Table of contents
Other Enersound Transmitter manuals
Popular Transmitter manuals by other brands
BBC Bircher
BBC Bircher Swissdoor RFGate 3.1 370046A Original operating instructions

Emerson
Emerson MICRO MOTION 1500 Configuration and user manual

BIOTRONIK
BIOTRONIK DataBridge Technical manual
Hides
Hides HV-320 Quick installation guide
Widex
Widex SCOLA TEACH44 User instructions
Honeywell
Honeywell SmartLine ST700 installation guide
