EnfaSafe SPIRIT 123 User manual
IMPORTANT: PLEASE KEEP FOR FUTURE
REFERENCE. READ CAREFULLY
Instruction Manual
Group 1/2/3
9-36kg
9 months - 12 years

IMPORTANT: READ THESE
INSTRUCTIONS CAREFULLY BEFORE
USE AND KEEP FOR FUTURE
REFERENCE
If these instructions are not followed, the
safety of a child may be severely endangered.
1

CONTENTS
1. Warning
2. Product overview
2.1. Use in the vehicle
2.2. Car seat components
3. Group 1 (9-18kg)
3.1. Adjusting the headrest
3.2. Installing the car seat (with ISOFIX and vehicle belt)
3.3. Securing the child with 5-point harness
4. Group 2 and Group 3 (15-36kg)
4.1. Removing the 5-point harness
4.2. Adjusting the headrest
4.3. Installing the car seat (with ISOFIX)
4.4. Securing the child with vehicle belt
5. Group 3 (22-36kg)
5.1. Removing the backrest
5.2. Installing the booster seat (with ISOFIX)
5.3. Securing the child with vehicle belt
6. Maintenance
6.1. Care for the harness buckle
6.2. Cleaning and removing the covers
..............................................................................................................03-04
................................................................................................05-06
..............................................................................................05
........................................................................................06
................................................................................................07-10
.......................................................................................07
...................................08-09
........................................................09-10
.......................................................................11-14
..........................................................................11-12
.......................................................................................13
..................................................................13
...................................................................14
.............................................................................................15-16
......................................................................................15
...........................................................15
....................................................................16
......................................................................................................17-18
...............................................................................17
....................................................................18
2

1. WARNING
• Please read carefully before installing the child seat in the vehicle.
• This child safety seat is suitable for use as Group 1/2/3 from approx.
• 9 months - 12 years of age (9-36kg).
• Please read these instructions carefully, as incorrect installation could result in
• serious injury. If any injuries should occur as a result of incorrect installation, the
• manufacturer will accept no responsibility.
• This child seat is in accordance with the ECE R44/04 regulations and may be
• installed in the majority of vehicles equipped with approved points, such as ISOFIX
• points, in accordance with ECE regulation 16. However, prior to purchase, the
• child seat should always be tested in your vehicle with the child seated, in order to
• ensure that the model meets your needs.
• Please read these instructions carefully, as incorrect installation may result in
• serious injury. If any injuries should occur as a result of incorrect installation, the
• manufacturer will accept no responsibility.
• Instruction illustrations are for informational purposes only. The child restraint
• system may contain small differences compared to the photographs or diagrams
• in the instruction manual.
• The child must never be left unattended while seated in the safety seat.
• Ensure that the lap section of the harness is worn low down, so that the pelvis is
• firmly engaged.
• The seat cover should not be replaced with any other than the one recommended
• by the manufacturer, because the cover constitutes an integral part of the restraint
• performance.
• Never use the child safety seat without both the cover and pads provided.
• Do not disassemble or modify this child saftey seat or harness, as this may
• seriously compromise the function and safety of this product.
• Child seats or accessories that are damaged or have been used incorrectly must
• be replaced.
• Do not use any load bearing contact points other than those described in the
• instructions and marked in the child restraint.
• Do not leave heavy objects unsecured inside the car, as these may injure the
• child in the event of an accident.
• Protect the child safety seat from direct sunlight, as metal and plastic fittings
• could become hot and can be harmful to the child.
3

• This safety seat is only intended for use in a vehicle.
• You must replace the child restraint system if it is involved in an accident. It may
• have unseen damage and may not protect your child as well as it should.
• You must replace the child restraint system and the safety belts if they become
• worn or damaged. It is not recommended to purchase or use second hand child
• restraint seats as there may be unseen damage and the product safety cannot
• be guaranteed. The manufacturer only guarantees this product with the original
• owner.
• Store this instruction manual with the car seat during use.
4
2. PRODUCT OVERVIEW
2.1. Use in the Vehicle
This child restraint has passed the European Type Approval of ECE-R44/04. It is
suitable for a child from 9kg to 36kg (approx. 9 months to 12 years old).
Group 1 (9-18kg) - suitable from 9 months - 4 years
Group 2/3 (15-36kg) - suitable from 3 years - 12 years
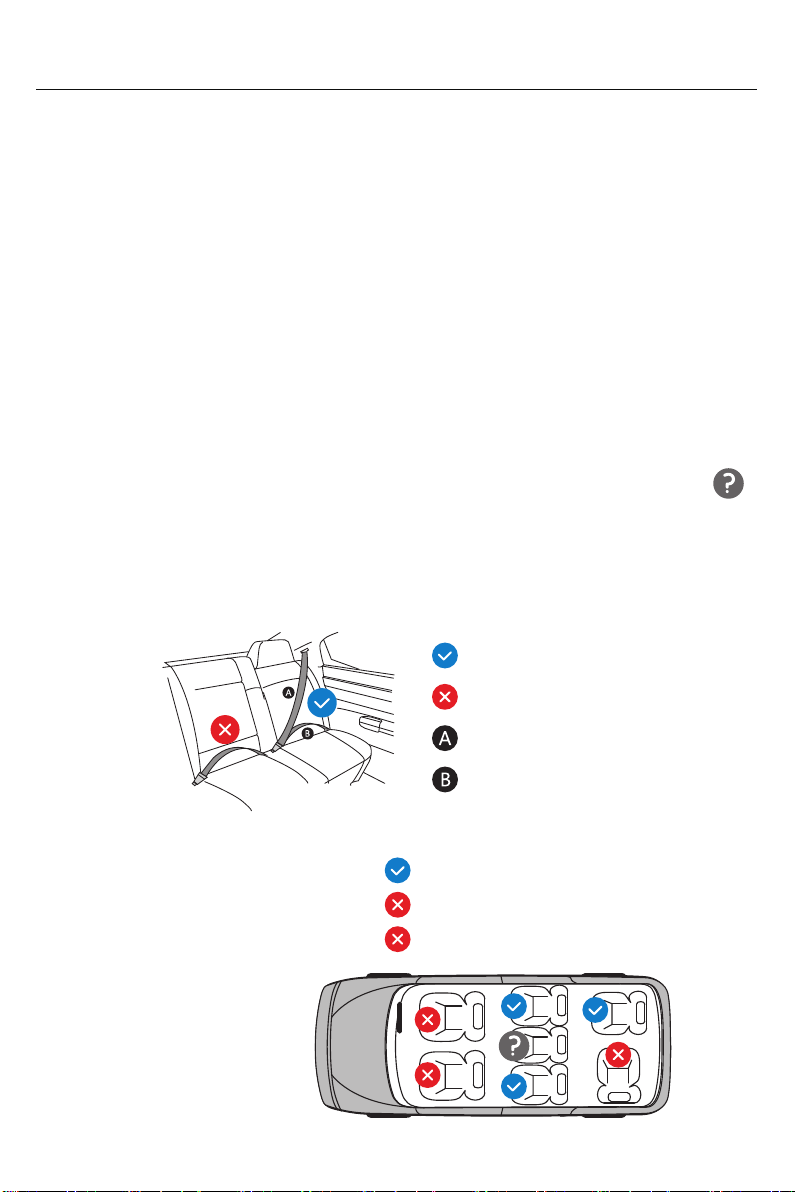
This child car seat is only suitable for vehicles fitted with a 3-point safety belt and
an ISOFIX anchorage system approved to UN/ECE Regulation No. 16 or other
equivalent standards.
If your centre rear passenger seat is only fitted with a 2-point lap belt the
child safety seat must not be used. It is only suitable with a 3 point safety
belt.
We recommend installing the child safety seat on a rear passenger seat.
Never use in front passenger seats equipped with active airbag.
3-point belt
2-point belt
Diagonal belt
Lap belt
You can use your child car seat as follows:
- In the direction of travel
- Against the direction of travel
- With 2-point (vehicle) belt
5

2.2. Car Seat Components
6

3. GROUP 1 (9-18KG)
This child car seat has a 5-point harness which is suitable for children from 9-18kg
(approx. 78-92cm in height). If your child’s height is over 92cm, we suggest using
Group 2/3 (15-36kg) installation.
3.1. Adjusting the headrest
A correctly adjusted headrest ensures optimal protection for your child in the
car seat. When installed by 5-point harness, the headrest must be adjusted so
that the shoulder belts are at the same level as your child’s shoulders.
The shoulder belts are adjusted as follows:
3.1.1. Press the adjusting button and at the same time pull both shoulder belts
towards you. DO NOT pull on the shoulder pads. Loosen the 5-point harness of the
child seat as much as possible.
3.1.2. Pull the headrest height adjuster, lifting the headrest up/down to the
desired position.
Note. the harness must be loosened in order to increase the headrest height.
7
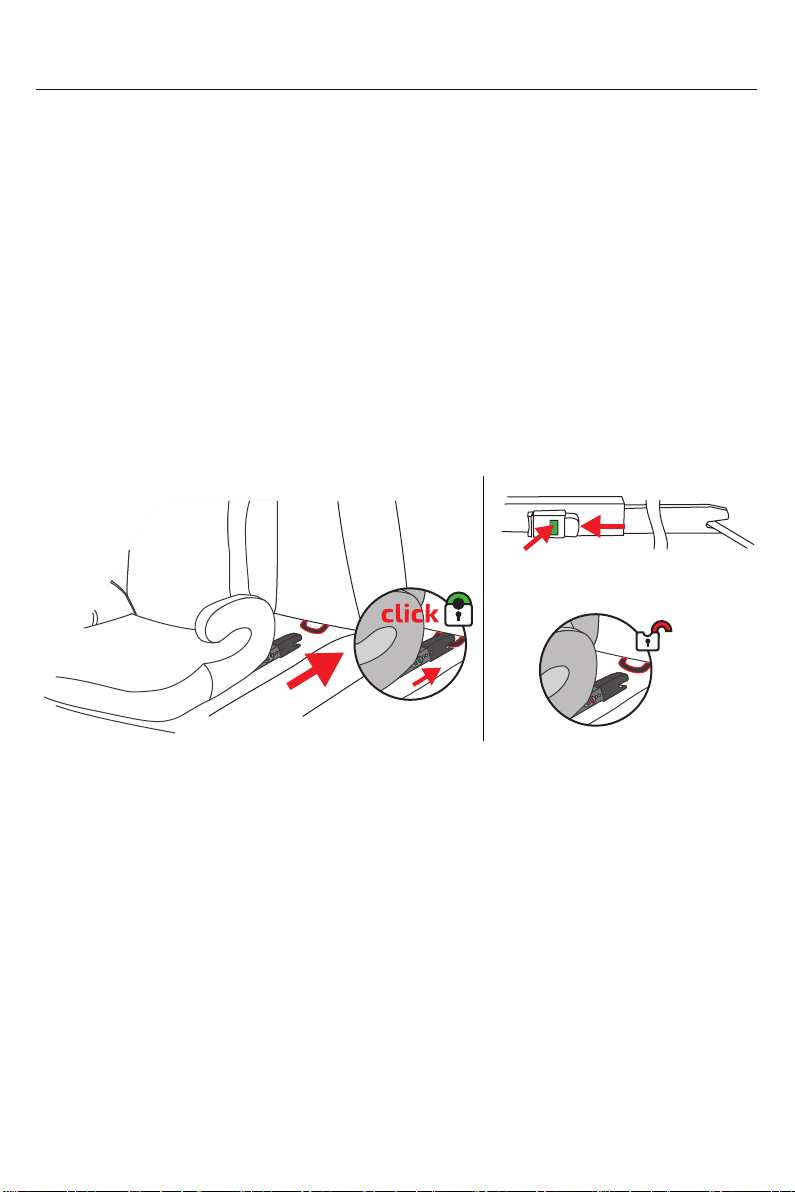
3.2. Installing the car seat (with ISOFIX and vehicle belt)
3.2.1. On each side of the seat, squeeze the ISOFIX button and fully extend the
ISOFIX connectors. Slide the two ISOFIX connectors firmly into the insert guides
until the ISOFIX connectors engage with a “click” noise on both sides. The ISOFIX
button must turn green on both sides.
3.2.2. Push the child seat towards the backrest applying firm, even pressure
on both sides. Make sure it is safely attached and recheck the green safety buttons
to make sure that both are completely green.
Tip: The ISOFIX attachment points are located between the surface and the
backrest of the vehicle seat.
WARNING! The ISOFIX connectors are only correctly engaged if both of the
ISOFIX buttons are green.
8
3.2.3. To remove ISOFIX; push in the secondary release button (1) and squeeze the
ISOFIX button (2) (fig a).
3.2.4. Open buckle and remove the infant cushion. Pull out the vehicle seat belt
and insert the diagonal belt through the upper belt guide. Thread the diagonal belt
under the seat covers and over the arm rest.
3.2.5. Position the lap belt under the arm rest and engage the buckle tongue in the
vehicle seat belt buckle. Flatten the vehicle belts.
3.2.6. Lift up the fabric flap on the seat base. Guide the vehicle lap belt through the
base belt guide (under the fabric flap). Pull on the diagonal belt to tighen the
vehicle belts.
3.2.7. Replace the infant cushion.
12
fig a.

WARNING! Make sure vehicle belts are not twisted and buckle is engaged.
9
3.3. Securing the child with 5-point harness
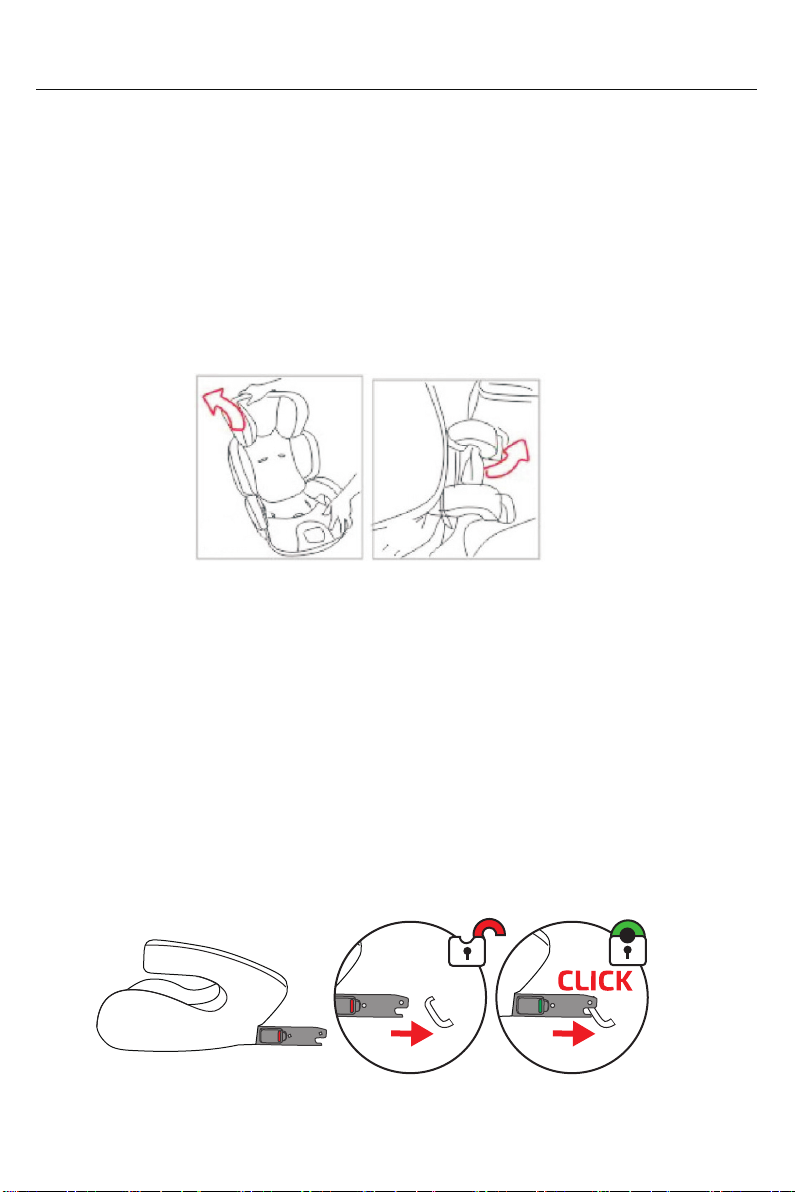
3.3.1. Adjusting the buckle:
Open buckle: Press red button until buckle latches are released from the buckle.
Lock buckle: Guide the two buckle latches together, putting them into the harness
buckle house. A “click” will signal when locked.
Note. The buckle will not lock with one latch only.

3.3.2. Adjusting the harness:
Tighten harness: Pull the adjuster strap until the harness lies flat and close against
your child’s body.
Note. The harness should allow 1 finger width, approx. 1cm at the top of the
shoulders for ideal fit.
Loosen harness: Press the centre adjuster and at the same time pull both shoulder
belts towards you. DO NOT pull on the shoulder pads.
WARNING! Do not add additional items such as blankets or padded clothing.
Bulky items can lead to incorrect harness tightening. In an accident the child
can slip out of the restraint if not properly tightened.
For the safety of your child, before every journey in the car check that...
- The child safety seat is engaged on both sides with the ISOFIX connectors
in the ISOFIX attachment points and that both buttons are green.
- The child seat is firmly installed in the vehicle.
- The belt is not twisted.
- The diagonal belt is only clamped by the lock-off which is located on the
opposite side from the car seat belt buckle.
- The straps of the child safety seat are close to the body without constricting
the child.
- The shoulder belts are correctly adjusted and straps are not twisted.
- The shoulder pads are at the same level as your child’s shoulders.
- The buckle latches are engaged in the harness buckle.
10

4. GROUP 2 AND GROUP 3 (15-36KG)
Use Group 2/3 (15-36kg) installation if your child’s height is over 92cm or their
weight exceeds 15kg.
4.1. Removing the 5-point harness
4.1.1. Adjust headrest to the lowest position.
4.1.2. Loosen the harness; press the centre adjuster and at the same time pull
both shoulder belts towards you. DO NOT pull on the shoulder pads.
4.1.3. At the back side of the child seat, open the cover zip. Unhook the shoulder
belts from the metal yoke and pull them out through the front of the seat. DO NOT
pull on the shoulder pads.
4.1.4. Lift up the base seat cover to gain access to the crotch buckle metal retainer
(it is located behind the crotch belt). Turn the retainer on its side and pass it down
through the hole to the underside of the child seat base.
TIP: Try not to pull up on the buckle during this step as to allow slack for the
retainer harness.
From the underside pass the retainer up through the second hole in the seat base
and pull the buckle away from the child car seat.
11
pass retainer up
pass retainer down

4.1.5. Remove the shoulder belt out from one side of the buckle and pull out
through the seat base to remove.
4.1.6. Thread shoulder pads through the front of the seat to remove.
4.1.7. Redo the zip cover and remove the infant cushion.
4.1.8. Press the centre adjuster to tighten the metal yoke to the base of the seat.
4.1.9. Store the buckle, harness, shoulder pads and infant cushion in a safe place.
4.1.10. To re-attach the 5-point harness and infant cushion, reverse the above
process.
WARNING! Make sure the harness is not twisted.
12

4.2. Adjusting the headrest
When harnessed by a 3-point vehicle belt, the headrest must be adjusted so that
there is a space two fingers wide between the headrest and your child’s shoulders.
Make sure the diagonal seat belt section is on your child's shoulder but not on the
neck.
Pull the headrest height adjuster, lifting the headrest up/down to the desired position.
4.3. Installing the car seat (with ISOFIX)
4.3.1. On each side of the seat, squeeze the ISOFIX button and fully extend the
ISOFIX connectors. Slide the two ISOFIX connectors firmly into the insert guides
until the ISOFIX connectors engage with a “click” noise on both sides. The ISOFIX
button must turn green on both sides.
4.3.2. Push the child seat towards the backrest applying firm, even pressure
on both sides. Make sure it is safely attached and recheck the green safety buttons
to make sure that both are completely green.
WARNING! The ISOFIX connectors are only correctly engaged if both of the
ISOFIX buttons are green.
4.3.3. To remove ISOFIX; squeeze the ISOFIX button and pull back the ISOFIX
connectors.
13

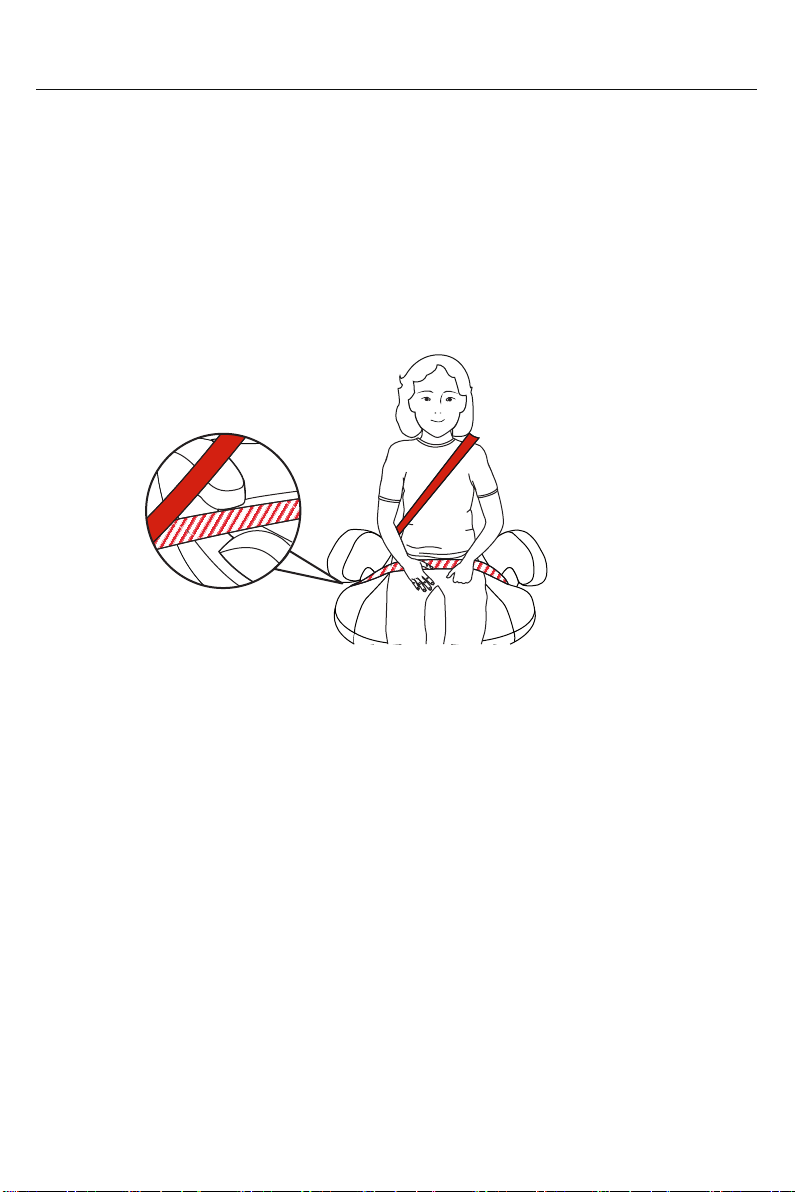
4.4. Securing the child with vehicle belt
4.4.1. Sit your child in the child seat. Adjust headrest to required height
(see section 4.2). Pull out the vehicle seat belt and guide it in front of your child to
the vehicle seat buckle. Engage the buckle tongue into the vehicle seat buckle.
4.4.2. Place the diagonal seat belt section and lap belt section on the side of the
vehicle seat belt buckle under the arm rest.
4.4.3. Place the lap belt section on the other side of the child seat under the arm
rest.
4.4.4. Guide the diagonal seat belt section into the belt holder located on the
headrest and ensure the belt is not twisted.
14
For the safety of your child, before every journey in the car check that...
- The child safety seat is engaged on both sides with the ISOFIX connectors
in the ISOFIX attachment points and that both buttons are green.
- The child seat is firmly installed in the vehicle.
- The lap belt section runs under the arm rests on both sides.
- The diagonal seat belt section on the side of the vehicle seat belt buckle
also runs under the arm rest.
- The diagonal seat belt section runs through the upper belt guide.
- The buckle is engaged and the seat belt is not twisted.
5. GROUP 3 (22-36KG)
If your child’s exceeds is between 22-36kg, you can use the booster seat only
in Group 3.
5.1. Removing the backrest
Hold the seat base with one hand and push against the seat backrest with the
other hand until the backrest detaches from the base.
5.2. Installing the booster seat (with ISOFIX)
5.2.1. On each side of the seat, squeeze the ISOFIX button and fully extend the
ISOFIX connectors. Slide the two ISOFIX connectors firmly into the insert guides
until the ISOFIX connectors engage with a “click” noise on both sides. The ISOFIX
button must turn green on both sides.
5.2.2. Push the child seat towards the backrest applying firm, even pressure
on both sides. Make sure it is safely attached and recheck the green safety buttons
to make sure that both are completely green.
WARNING! The ISOFIX connectors are only correctly engaged if both of the
ISOFIX buttons are green.
15
5.3. Securing the child with vehicle belt
5.3.1. Sit your child on the booster seat. Pull out the vehicle seat belt and guide
it in front of your child to the vehicle seat buckle. Engage the buckle tongue into
the vehicle seat buckle.
5.3.2. Place the diagonal belt section over the arm rest.
5.3.3. Place both lap belt sections under the arm rest.
16
For the safety of your child, before every journey in the car check that...
- The child safety seat is engaged on both sides with the ISOFIX connectors
in the ISOFIX attachment points and that both buttons are green.
- The child seat is firmly installed in the vehicle.
- The lap belt section runs under the arm rests on both sides.
- The diagonal seat belt section on the side of the vehicle seat belt buckle
also runs under the arm rest.
- The diagonal seat belt section runs through the upper belt guide.
- The buckle is engaged and the seat belt is not twisted.

6. MAINTENANCE
7.1. Care for the harness buckle
It is vital for the safety of your child that the harness buckle works correctly.
Malfunctions of the harness buckle are usually caused by accumulations of dirt or
foreign bodies.
Malfunctions as follows:
- The buckle latches are ejected only slowly when the red release button is
pressed.
- The buckle latches will no longer lock home (i.e. they are ejected again if you try
to push them in).
- The buckle latches engage without an audible “click”.
- The buckle latches are difficult to insert (you feel resistance).
- The buckle only opens if extreme force is applied.
Remedy:
Wash out the harness buckle so that it functions properly once again.
Cleaning the harness buckle:
See section 4.1. to remove the harness buckle. Soak the harness buckle in warm
water with washing up liquid for at least and hour. Then rinse thoroughly.
17

6.2. Cleaning and removing the covers
- The covers can be machine washed using mild detergent and at a maximum
temperature of 30° C. Do not iron. Do not dry clean. Do not tumble dry.
- Sponge clean the belts and shoulder/crotch pads with warm water and a mild
detergent. Do not machine wash. Do not iron. Do not dry clean. Do not tumble dry.
- Never clean with abrasive, ammonia based, bleach based or spirit type cleaners.
- Wipe metals and plastics with a damp cloth.
- Ensure the product is fully dry before use or storage.
To remove the covers:
6.2.1. Remove the 5-point harness (see section 4.1.) and store in a safe place.
6.2.2. Hold the seat base with one hand and push against the seat backrest with
the other hand until the backrest detaches from the base.
6.2.3. Unhook the elastic cord on the bottom and undo the zip at the rear of the
backrest. Unhook the elastic loops at the top of the backrest shell (upper belt guides)
and remove the cover.
6.2.4. Undo the velcro cloth at the rear of the base and remove the cover.
6.2.5. Starting at the top pull the headrest cover down and unhook cover from the
headrest shell.
18
EUROACTIVE HK. LTD.
79/ 80 FURZE ROAD, SANDYFORD BUSINESS ESTATE, DUBLIN, D18 C5P9, IRELAND
INTERNATIONAL HOUSE, 12 CONSTANCE STREET, LONDON, E16 2DQ, UNITED KINGDOM
A3/ 3FL, WEST WING TST CENTRE, 66 MODY ROAD, TST EAST, KOWLOON, HONG KONG
MADE IN CHINA
For further assistance with your EnfaSafe car seat,
please do not hesitate to call us on +353 1 2952111 or you can get in touch by email at [email protected]
Table of contents
Other EnfaSafe Car Seat manuals


