EnfaSafe Superia i-Size 360 User manual
IMPORTANT:
RETAIN FOR FUTURE REFERENCE
READ CAREFULLY
Superia i-Size 360
Car Seat
Instruction Manual
ECE R129/03
40 -150 cm


1. CONTENTS
2. COMPONENTS
3. PRODUCT INFORMATION
4. VEHICLE INFORMATION
5. WARNINGS
6. CAR SEAT STAGES
7. ADJUSTING CAR SEAT
7.1. ADJUSTING BUCKLE
7.2. ADJUSTING HARNESS
7.3. ADJUSTING HEADREST
7.4. ADJUSTING RECLINE POSITIONS
7.5. NEWBORN CUSHION INSERT
7.6. ROTATING THE CAR SEAT
7.7. REMOVE AND INSTALL HARNESS
7.8. ISOFIX INSTALLATION
7.9. SUPPORT LEG INSTALLATION
8. INSTALLATION
8.1 SUITABLE FOR CHILDREN 40-105cm / REARWARD FACING
8.2 SUITABLE FOR CHILDREN 76-105cm / FORWARD FACING
8.3 SUITABLE FOR CHILDREN 100-150cm / FORWARD FACING
8.4 SUITABLE FOR CHILDREN 100-150cm /
FORWARD FACING 3-POINT SEAT BELT
9. CLEANING
10. PRODUCT CARE
11. DISPOSAL
02
03
04
05
06
08
09
09
09
10
11
12
12
13
14
15
16
16
17
18
19
20
21
21
1.Contents
2
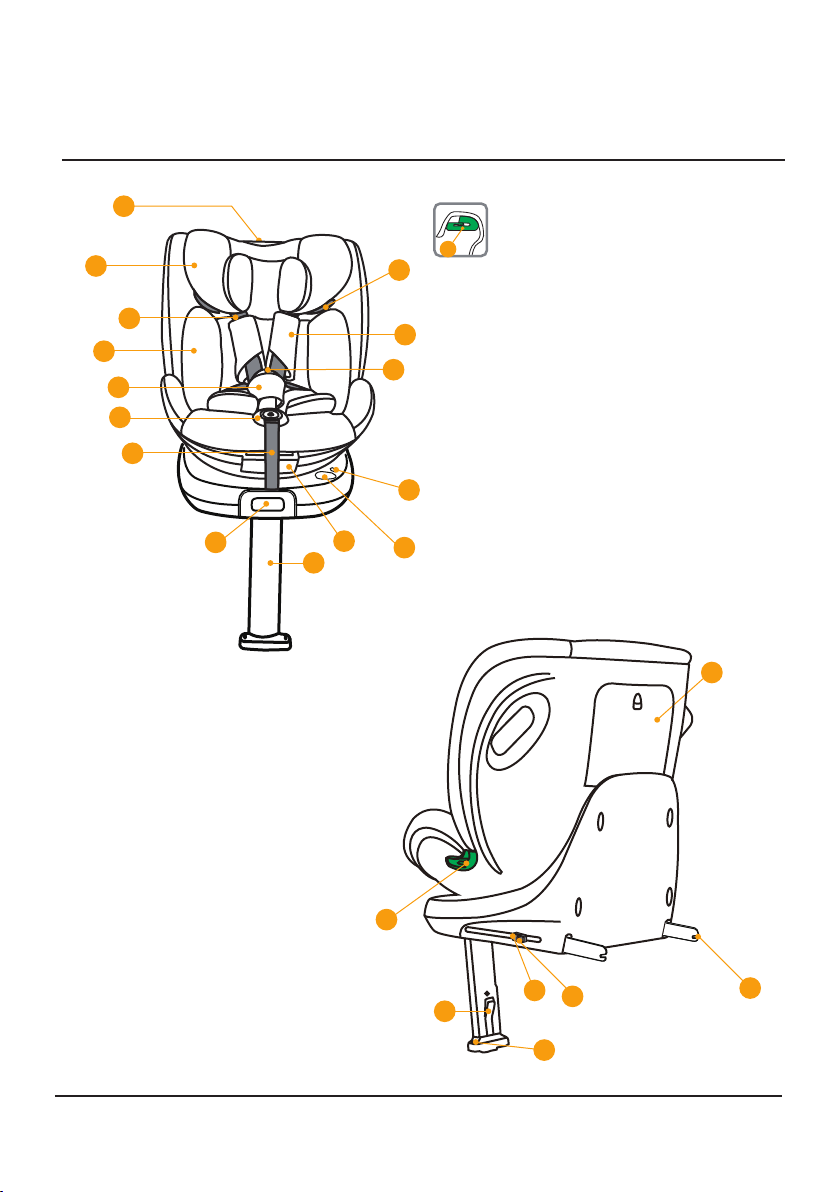
KShoulder pad
LShoulder belt guider
M360° Rotation button
NSupport leg
OSupport leg upper adjustment button
PSupport leg length adjustment button
QIndicator for the Support leg
RISOFIX attachment second lock
SISOFIX attachment indicator
TISOFIX attachment
ULap belt guider
VManual storage
2. Components
3
A
AHandle for the headrest
BHeadrest
CHarness belt
DNewborn cushion
ECover for the buckle
FButton for the 5-points harness system
GHarness Adjustment belt
HIndicator for rotation button
IReclining lever
JBuckle
B
C
D
E
F
G
H
M
N
J
K
L
L
I
0
PST
V
R
Q
U
3. Product Information
4
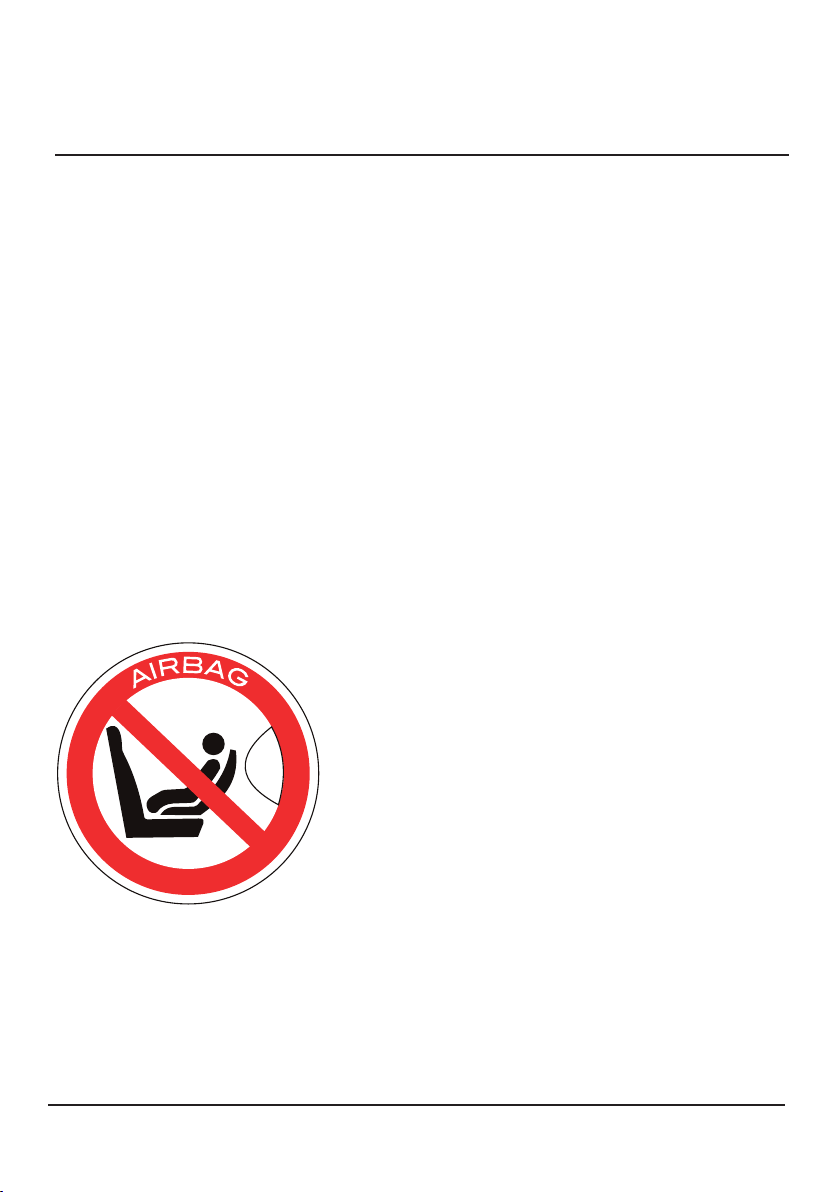
DANGER!
DO NOT USE THE CAR SEAT POSITIONED ON A
PASSENGER SEAT EQUIPPED WITH A FRONT AIRBAG.
The opening of an airbag against the car seat can cause
serious injury, if not lethal, to the child.
Refer to the vehicle instruction manual.
With regards to the use of car seats, check whether the
compatibility with ISOFIX retention systems is indicated in the
vehicle's use and maintenance manual.
This is an approved i-Size 360° rotating car seat according to UN Regulation No. 129, for use in i-Size
compatible vehicle seating positions as indicated by the vehicle manufacturer in the vehicle user's manual.
This car seat has been approved according to European safety standard ECE R129/03 as suitable for infants
from 40-105cm, birth - approx. 4 years (≤18kg) using the ISOFIX attachment and Support leg in rearward
facing mode; from 76-105cm, approx. 15 months to 4 years (≤18kg) using the ISOFIX attachment and
Support leg in forward facing mode; and from 100-150cm, approx. 4years to 12 years using the vehicle
3-point safety belt and ISOFIX attachment in forward facing mode.
IMPORTANT! Do not use in forward facing mode before the child exceeds 15 months of age.
It cannot be used with a two-point or lap belt. DO NOT install this car seat on passenger seats equipped with
a front active airbag. Deactivate the airbag before installing the car seat. Using this car seat on seats
equipped with active front airbags can cause serious injury or death in the event of an accident. If in doubt,
consult either the child restraint manufacturer or the retailer.
NEVER use this device on a vehicle seat equipped with front airbag. IT IS VERY DANGEROUS.

5
4. Vehicle Information
Correct location/suitable
wrong location/unsuitable
The car seat must not be used on the position
where an airbag has been activated (airbags can
be fatal to children). Please read the instructions
carefully to use the child car seat properly.
Car seats ISOFIX attachment
ISOFIX attachment
anchor point locations
Read the car manual rst and check whether the vehicle car seat is equipped with ISOFIX attachment xed anchor
points, and check the size of recommended ISOFIX attachment constraints on the system match the ISOFIX
attachments on this car seat.
When using for a child from 100-150cm this
child restraint system is suitable for seat belt
models equipped with a 3-point retractor that
complies with ECE R16 and does not apply to
models only equipped with 2-point seat belts.
Car Safety Belt—Diagonal Belt
Car Safety Belt—Lap Belt

6
5. Warnings
IMPORTANT! READ CAREFULLY BEFORE USE
AND KEEP FOR FUTURE REFERENCE
The instruction manual should be kept safely with the child restraint system for
its life period. The correct tting of the ISOFIX attachment anchoring systems,
Support Leg and 3-point belt is of vital importance for the safety of your child.
IMPORTANT: DO NOT use in forward facing mode before the child exceeds a
height of 60cm, approx. 15 months of age. This car seat can be used in rearward
facing mode up until the child is of a height of 105cm, approx. 4 years.
WARNING! Never leave your child unattended in the car.
WARNING! Assembly and installation operations must be carried out by adults.
WARNING! Do not leave your child unattended in the car, even for short periods. The interior temperature
can change abruptly and become dangerous for the child inside.
WARNING! In the car, always use the child restraint system. If the car is moving, never remove the child
from the seat.
WARNING! Always secure your child with the car seat harness belt. Make sure that the harness belt is correctly
tensioned to ensure maximum protection for your child.
WARNING! The child MUST be secured in the car seat at all times even on short journeys.
WARNING! DO NOT use this car seat if the vehicle seat is equipped with a front airbags.This can be dangerous.
Deactivate the airbag before installing the car seat.This does not apply to so-called side airbags.
WARNING! Before use of this child restraint system, please read the instruction manual carefully.
The product is a safety product and is only safe when used in accordance with the instruction manual.
WARNING! The product must only be used on a forward facing vehicle seat when tted with the ISOFIX
attachment and Support leg .
WARNING! This car seat has been approved according to European safety standard ECE R129/03 as suitable
for infants from 40-105cm, birth - approx. 4 years (≤18kg) using the ISOFIX attachment and Support leg in
rearward facing mode; from 76-105cm, approx. 15 months to 4 years (≤18kg) using the ISOFIX attachment
and Support leg in forward facing mode; and from 100-150cm, approx. 4years to 12 years using the vehicle
3-point safety belt and ISOFIX attachment in forward facing mode.
WARNING! After an accident the seat may become unsafe due to damage that is not immediately
noticeable. It should therefore be replaced.

5. Warnings
7
WARNING! The safety of the seat can only be guaranteed if it is used by the original owner.
WARNING! We advise you strongly not to use a second-hand product, as you do not know what has
happened to it.
WARNING! Ensure that all luggage and objects likely to cause injury in the event of an accident are
properly secured.
WARNING! The moving parts of the car seat should not be lubricated in any way.
WARNING! The car seat must not be used without the cover. Use ONLY the original cover, as this cover
contributes to the overall safety of the car seat.
WARNING! The car seat must be secured in the vehicle at all times with the ISOFIX attachment, even when
it not on use. An unsecured seat may injure other passengers in the car in an urgent stop.
WARNING! Prevent the car seat from getting stuck in a folding or movable seat, or in the car door.
WARNING! It is absolutely essential to ensure that the car seat is not stuck between rigid objects such as
vehicle doors, seat rails etc. as this could cause damage.
WARNING! DO NOT use a restraint device with damaged or missing parts.
WARNING! DO NOT modify, dismantle or add to any part of the child restraint system or change the way
your vehicle seat belts are made or used.
WARNING! Do not leave the car seat in the car under sun exposure, some parts may have overheated and
harm the child’s delicate skin, check before placing the child in the car seat.
WARNING! Do not peel o the adhesive and sewn labels; this could make the product non-compliant with the law.
WARNING! All important parts of the car seat should be checked regularly to make sure they are
not damaged. All mechanical components must function properly.
WARNING! Your product requires a minimum of cleaning and maintenance. These operations
should only be performed by adults.
WARNING! Do not use the car seat if it has broken or missing parts or if it has been subjected to
violent stresses in an accident. It could have suered structural damage that is not visible
but extremely dangerous.
WARNING! The seat belt is designed to be released quickly in an emergency. IT IS
NOT CHILD PROOF. More inquisitive children may learn to undo the seat belt. Children should be
told never to play with the seat belt or any other part of the car seat.
WARNING! Take regular breaks when traveling so the child can get out of the seat and walk about a bit. It is
not advisable to travel for more than 2 hours at a time without taking a break. This advise is very important
for babies.
WARNING! Make sure that any harnesses are properly fastened (worn low down) and not twisted.
Any lap strap is worn low down, to keep the pelvis is rmly engaged.
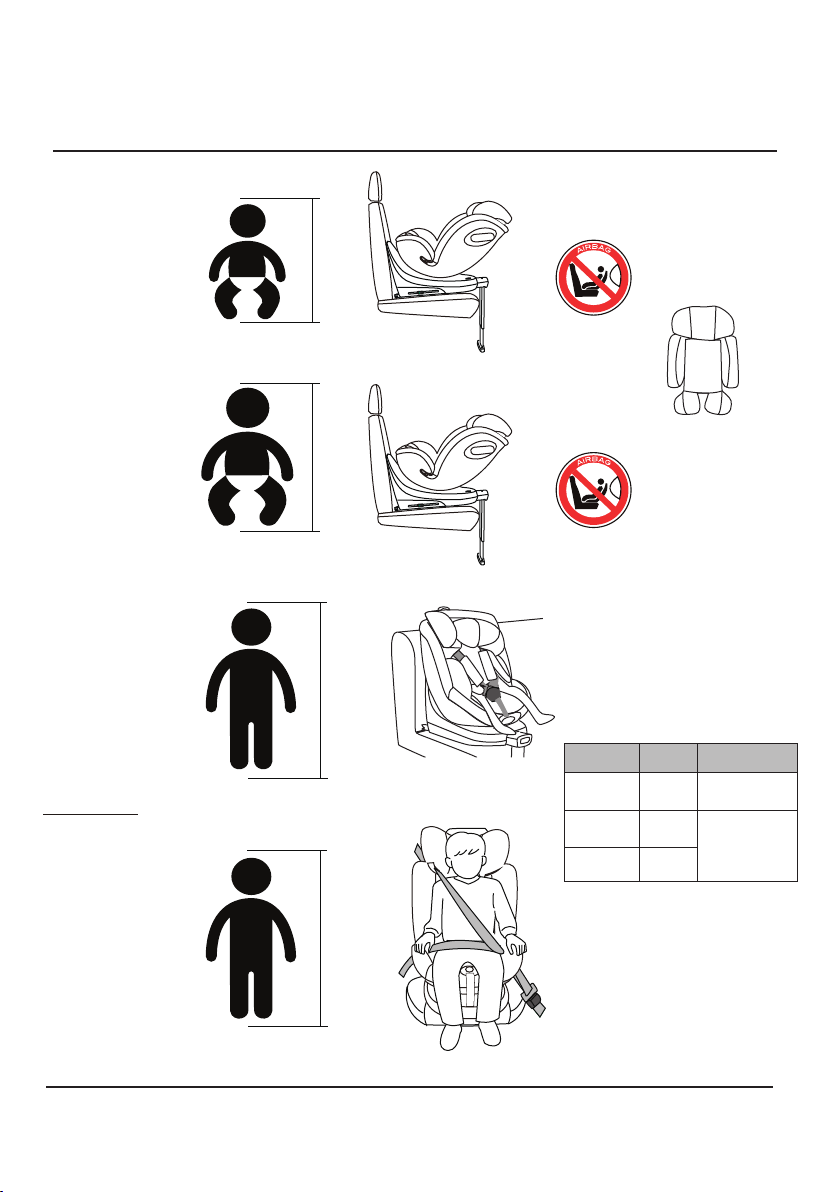
6. Car Seat Stages
8
0 15 months15 months 4 years
40 - 60cm
Newborn cushion
40 - 75cm
60 - 105cm
15 months 4 years
76 - 105cm
4 years 12 years
100 - 150cm
Height
40-105cm ISO/R2 Rearward
Forward
76-105cm ISO/F2X
100-150cm ISO/B2
Size Facing Direction
ISOFIX ATTACHMENTS + SUPPORT LEG
+ 5-POINT SAFETY HARNESS
ISOFIX ATTACHMENT +
3-POINT VEHICLE SEAT BELT

7. Adjusting the Car Seat
7.1. ADJUSTING BUCKLE
Open buckle:
Press red button until buckle latches are released
from the buckle (g. 1, 2).
Lock buckle:
Guide the two buckle latches together (g. 3),
putting them into the harness buckle house
(g. 4). A“click”will signal when locked.
Note.The buckle will
not lock with one
latch only.
1
3
2
4
9
7.2. ADJUSTING HARNESS
Tighten harness:
Join buckle latches and insert into buckle (g. 6). Pull the adjuster strap (G) until the harness lies at and close against
your child’s body (g. 7).
Note.The harness should allow 1 nger width, approx. 1cm at the top of the shoulders for ideal t.
2.3
G
5
6
7 8

7. Adjusting the Car Seat
10
WARNING!
Do not add additional items such as blankets or padded clothing.
Bulky items can lead to incorrect harness tightening.
In an accident the child can slip out of the restraint if not
properly tightened.
7.3. ADJUSTING HEADREST
1. Loosen the harness to allow full movement of
the headrest.
2. Pull the headrest height adjuster (A), lifting the
headrest up/down to the desired position (g. 11).
Loosen harness:
Press the centre harness adjuster (F) and at the same time pull
both shoulder belts forwards (g. 9). DO NOT pull on the
shoulder pads.
IMPORTANT
A correctly adjusted headrest ensures optimal
protection for your child in the safety seat.
When installed by 5-point harness, the headrest must be
adjusted so that the shoulder belts are at the same level as
your child’s shoulders (g. 12).
When installed by 3-point vehicle belt, the headrest must
be adjusted so that there is a space two ngers wide
between the headrest and your child’s shoulders.
Make sure the diagonal seat belt section is on your child's
shoulder but not on the neck (g. 13).
9 10
11
12
13
F
A

7. Adjusting the Car Seat
11
7.4. ADJUSTING RECLINE POSITIONS
Pull the recline lever (I) located at the base of the seat,
and select a position suitable for the childs
size (g. 14).
14
40-105cm 76-150cm
40-105cm
15 16
17
54321
I
76-105cm 18
54321

7. Adjusting the Car Seat
12
7.5. NEWBORN CUSHION INSERT
When the height of the baby is 40-75cm,
the newborn cushion (D) must be used.
Place the new born cushion in the car seat, place the
two shoulder pads on the new born cushion, and
nally cover the buckle cushion.
7.6. ROTATING THE CAR SEAT
1. Press the rotation system button (M) when turning the seat rearward
facing or forward facing (g. 21).
2. When the seat rotates to desired direction, rotation handle will“click”into place.
Gently try to rotate the seat to make sure the seat is locked into position.
IMPORTANT! Before each trip, ensure the child seat is in the correct conguration.
19
20
21
180° 180°
WARNING! Only for use when putting child in or out of the seat.
D
M

7. Adjusting the Car Seat
13
7.7. REMOVE AND INSTALL HARNESS
1. Open the compartment at the rear of the seat
and unhook the shoulder pad straps from the
connecting piece (g. 22, 23).
2. Pull out both the shoulder pads and their two
shoulder belts from the slots (g. 24).
3. Remove the infant cushion (g. 25).
4. Open the buckle and remove the crotch
pad (g. 26).
5. Hide the shoulder belts behind the
backrest (g. 27).
6. Insert the buckle down through the covers.
Pull back the covers and store the buckle in the
seat base. Remove the plastic cover and re-t
it after (g. 28).
7. Flatten and tidy the car seat covers (g. 29).
8. To re-t the harness:
Simply follow the steps in the opposite order.
Note.When retting the shoulder pad straps
they should pass underneath the harness
shoulder straps. Make sure the belt is
not twisted.
22 23
24
26 27
25
28 29

7. Adjusting the Car Seat
14
7.8. ISOFIX INSTALLATION
1. Locate the ISOFIX anchor points on the vehicle (g 30).
2. On each side of the seat, squeeze the
ISOFIX buttons and fully extend the
ISOFIX connectors (g. 31, 32).
3. Slide the two ISOFIX connectors
rmly into the ISOFIX anchor points until
the ISOFIX connectors engage with a
“click”noise on both sides.
The ISOFIX button must turn
green on both sides (g. 33).
CAUTION!
The ISOFIX connectors are
only correctly engaged if
both of the ISOFIX buttons
are green (g. 34).
3. Push the child seat towards the
backrest applying rm, even pressure
on both sides. Make sure it is safely
attached and recheck the green
safety buttons to make sure that
both are completely green (g. 35).
31
32 33
34
TO REMOVE ISOFIX
Squeeze the ISOFIX buttons
and pull back the ISOFIX
connectors (g. 36).
36
30
35

7. Adjusting the Car Seat
15
7.9. SUPPORT LEG INSTALLATION
1. Remove the Support leg (N) from the storage
bin on the base of the car seat. Press the
Support leg upper adjustment button (O) to
extend the top of the Support leg over
the edge of the vehicle car seat until the
indicator is green. (g. 36, 37, 38).
2. Press the length adjust button (P) on the
Support leg, adjust the Support leg so that
it is in full contact with the ground of the
vehicle (display window turns green)
(g. 39, 40).
WARNING! DO NOT use the Support leg for
children of a height of 100 - 150cm. When using the
i-Size car seat as a booster seat the support leg
should be folded back up into the car seat base.
IMPORTANT! When the Support leg touches
the car oor, the Support leg indicator (Q)
MUST be all green (g. 41).
36 37
38 39
40 41
N
O
P
Q
8. Installation
16
8.1 SUITABLE FOR CHILDREN 40-105cm
REARWARD FACING INSTALLATION USING ISOFIX AND SUPPORT LEG
1. Firstly lower the Support Leg from the bottom
storage compartment in the car seat base. Press
upper Support leg adjustment button (O) to release
and set Support leg. (see section 7.9) (g 42).
2. Press the ISOFIX attachment buttons located on
either side of the car seat base and slide them until
the ISOFIX attachment connectors are fully visible
(g 43).
3. Rotate the seat to the rearward facing position by
pushing the rotate button, turn and click in place
(see section 7.6) (g. 44).
4. Install ISOFIX connectors (see section 7.8)(g 45).
IMPORTANT! The indicator on the attachment
buttons (S) will turn green when the ISOFIX
attachment is correctly installed.
To note. The newborn cushion insert MUST be
used for children less than 75cm in height.
5. Set the Support leg (N) to sit rmly on the vehicle
oor, the indicator light (Q) will turn green when
correctly placed. (See section 7.9)(g 46).
6. Rotate seat sideways to t child securely (g. 47).
7. Rotate car seat to rearward facing position (g. 48).
42
44 45
43
WARNING! Check that the ISOFIX
attachments and Support leg are
connected rmly and all indicators are
green before placing the child in the car
seat. The car seat and base should be close
against the backrest of the vehicle seat
with little to no gaps.
76-105cm
46
47 48
N
S

8. Installation
17
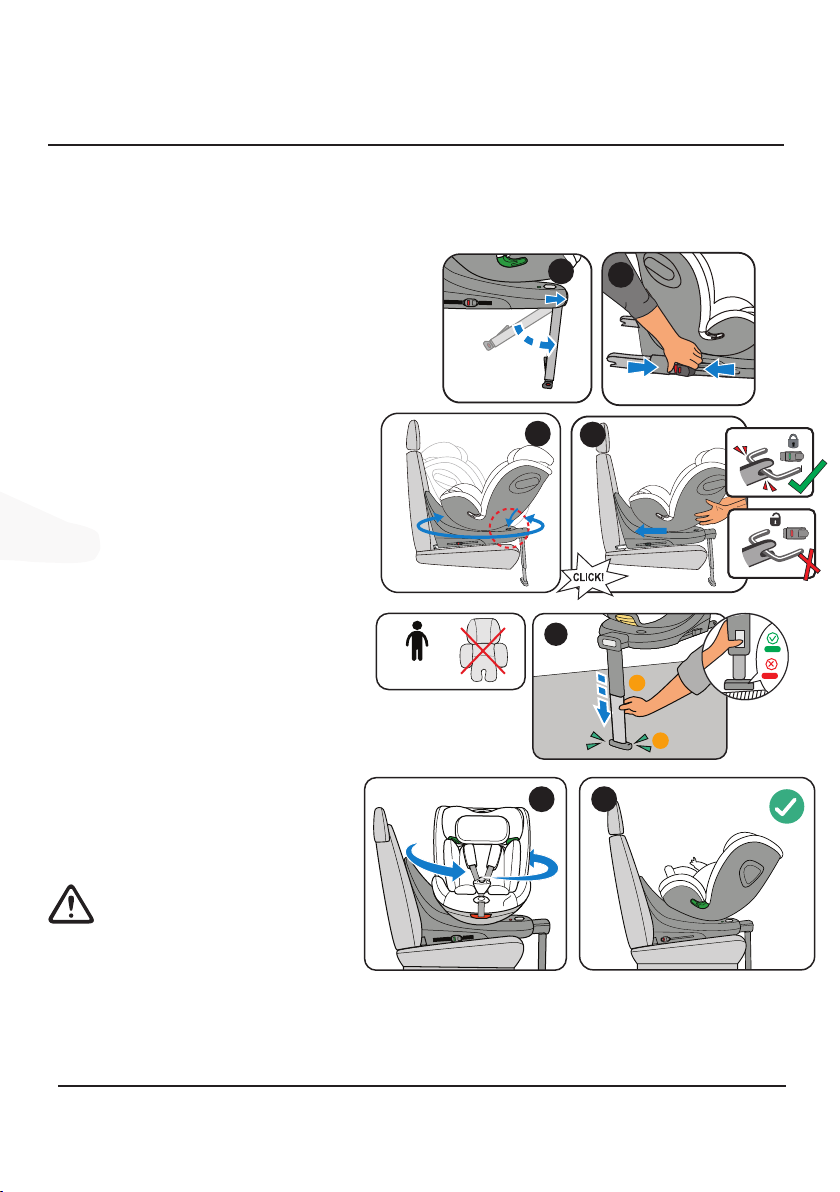
8.2 SUITABLE FOR CHILDREN 76-105cm
FORWARD FACING INSTALLATION USING ISOFIX AND SUPPORT LEG
50 51
52 53
IMPORTANT!
DO NOT use forward facing before the
child’s height is 76cm.
WARNING! Once the car seat is installed,
if another recline position is selected, you
should repeat the car seat installation steps
described below to ensure a proper
installation in this new position.
49
1. Use the infant cushion until
the baby reaches 75cm.
When the baby is 75-105cm
remove the infant cushion (g. 49).
2. Lower Support Leg (N)(see section 7.9)(g. 50).
3. Press upper Support leg button (O) to release
and set Support leg (g. 54).
4. Press the ISOFIX attachment buttons located
on either side of the car seat base and slide
them until the ISOFIX attachment connectors
are fully visible (g 51).
5. Install ISOFIX connectors (see section 7.8)
(g 52, 53).
6. Set the Support leg (N) to sit rmly on the
vehicle oor, the indicator light (Q) will turn
green when correctly placed. (See section
7.9)(g 54).
7. Rotate seat to place child in car seat (g. 55).
8. Rotate car seat to forward facing position
(g. 56).
76-105cm
54
55
56
N
N
S
O

8. Installation
18
8.3 SUITABLE FOR CHILDREN 100-150cm
FORWARD FACING INSTALLATION USING ISOFIX AND 3-POINT SEAT BELT
62
61
63 64
1. Remove the harness when using for children 100-150cm
(see section 7.7).
2. Fold away the Support leg, press the Support leg adjustment
button and pull the Support leg up (see section 7.9).
3. Ensure the seat is forward facing (see section 7.6).
4. Install ISOFIX connectors (see section 7.8) (g 57, 58).
5. Sit your child in the car seat.
Adjust headrest to required height (see section 7.3) (g. 59, 60).
6. Pull out the vehicle seat belt and guide it in front of your
child to the vehicle seat buckle. Engage the buckle
tongue into the vehicle seat buckle (g. 61).
6. Place the diagonal seat belt section and lap belt
section on the side of the vehicle seat belt buckle in
the lower belt guide (g. 62).
7. Place the lap belt section on the other side of the
child seat in the lower belt guide (g. 63).
8. Guide the diagonal seat belt section into
the upper belt guide and ensure it is not
twisted (g. 64).
CAUTION!
The vehicle seat belt must not be positioned in
the lower belt guide.
CAUTION!
The lap belt section must lie as low as possible over
the child’s hips on both sides.
A
57 58
59 60

8. Installation
19
8.4 SUITABLE FOR CHILDREN 100-150cm
FORWARD FACING INSTALLATION USING 3-POINT SEAT BELT ONLY
69
70
66
65
71 72
1. Remove the harness when using for children 100-150cm
(see section 7.7).
2. Fold away the Support leg, press the Support leg
adjustment button and pull the Support leg up (see section 7.9).
3. Ensure seat is forward facing (see section 7.6).
4. Retract the ISOFIX connectors so they are not visible and
push the car seat back so it is against the vehicle seat with
little or no gaps (g 65, 66).
5. Sit your child in the child seat. Adjust headrest to
required height (see section 7.3) (g. 67, 68).
6. Pull out the vehicle seat belt and guide it in front
of your child to the vehicle seat buckle.
Engage the buckle tongue into the vehicle seat
buckle (g. 69).
7. Place the diagonal seat belt section and lap belt
section on the side of the vehicle seat belt buckle in
the lower belt guide (g. 70).
8. Place the lap belt section on the other side of the child
seat in the lower belt guide (g. 71).
9. Guide the diagonal seat belt section into
the upper belt guide and ensure it is not
twisted (g. 72).
CAUTION!
The vehicle seat belt must not be positioned in
the lower belt guide.
CAUTION!
The lap belt section must lie as low as possible
over the child’s hips on both sides.
A
67 68
This manual suits for next models
1
Table of contents
Other EnfaSafe Car Seat manuals


