ENFORCER EV-6600-N2BQ User manual

Note: Model numbers that end with “Q” or that have a round green “Q” sticker signify RoHS-compliant products.
EV-6600-N2BQ (NTSC)
EV-6600-P2BQ (PAL)
12-Inch Mirror Camera
OSD (On-Screen Display)
Manual
Camera is mounted behind a
mirror for discreet monitoring
1/3” Sony Super HAD II CCD
600 TV Lines
2.8mm Lens
12VDC Operation

ENFORCER 12” Mirror Camera
2SECO-LARM U.S.A., Inc.
Table of Contents:
Programmable Features:
Exposure
Manually adjust the shutter speed and
automatic gain control (AGC).
White Balance
Adjust the color temperature and image
color of the picture
Day / Night Mode
Adjust the level that the camera switches
between color and B/W when the ambient
light changes
Picture Adjustment
Adjust the camera’s brightness, contrast,
sharpness, hue, and gain
2D Digital Noise Reduction (2D-NR)
Adjust for less interference on the screen in
an area with low illumination
Digital Wide Dynamic Range (DWDR)
Provide clear images even in circumstances
where backlighting can vary excessively
Highlight Compensation (HLC)
Define target areas and remove spotlights to
make certain objects visible
Backlight Compensation (BLC)
Adjust the exposure to properly display the
subject in front of a bright light source
Privacy
Block out or emphasize a certain portion of
the image
Motion Detection
Detect if there is motion in the scene
DWDR OFF
DWDR ON
2D-NR OFF
2D-NR ON
HLC ON
HLC OFF
BLC OFF
BLC ON
Privacy OFF
Privacy ON
Note: All screen images in this manual are simulated.
Programmable Features...................................2
How to Use the OSD Controller .......................3
Main Setup Menu .............................................3
Menu Diagram..................................................4
Lens .................................................................5
Exposure .........................................................5
White Balance ..................................................6
Backlight
(Backlight/Highlight Compensation)........ 6-7
Day & Night............................................. 7-8
DPC .......................................................... 8
Special .................................................... 8-9
Reset (to factory defaults)........................ 10
Troubleshooting ....................................... 10

ENFORCER 12” Mirror Camera
SECO-LARM U.S.A., Inc. 3SECO-LARM U.S.A., Inc. 33 3
Main Setup Menu:
Menu items can be selected by using the OSD controller.
1. Press in the joystick.
The main SETUP menu will be displayed on
the monitor.
2. Move to and highlight the required function by
moving the joystick up and down.
3. Select the required function by pressing down
on the joystick
4. Change the menu setting by moving the joystick
left and right.
5. After choosing the settings, move the cursor to
EXIT and press down on the joystick. This
saves any changes made to the settings and
exits the OSD programming menu.
NOTE: A sub-menu is available where the menu displays.
How to Use the OSD Controller:
1. Press down on the joystick to open the on-screen display (OSD) menu.
2. Use the joystick to navigate the OSD menu.
3. To select an item, press down on the joystick.
OSD
Controller
SETUP
LENS
MANUAL
EXPOSURE
WHITE BAL.
ATW1
BACKLIGHT
OFF
DAY&NIGHT
AUTO
DPC
SPECIAL
RESET
EXIT

ENFORCER 12” Mirror Camera
4SECO-LARM U.S.A., Inc.
Menu Diagram:
Continued on next page
SETUP MENU
SETTING
SETTING OPTIONS
1) LENS
(see page 5)
MANUAL
Default setting, no options
DC
N/A
VIDEO
N/A
2) EXPOSURE
(see pages 5-6)
SHUTTER
Auto, Flickerless, or 1/60-sec to 1/100,000-sec
BRIGHTNESS
Changes how different levels of brightness are handled
AGC
Automatic Gain Control –OFF/LOW/MIDDLE/HIGH
No option if DAY&NIGHT set to AUTO
DWDR
Digital Wide Dynamic Range –OFF, or adjust the
DWDR level
3) WHITE BAL
(see page 7)
ATW1
Automatic Tracking White balance, mode 1
ATW2
Automatic Tracking White balance, mode 2
AWC→SET
Automatic white balance setting
ANTI. CRL
Anti Color Rolling
MANUAL
For setting the color temperature and the red and blue levels
4) BACKLIGHT
(see page 7)
BLC
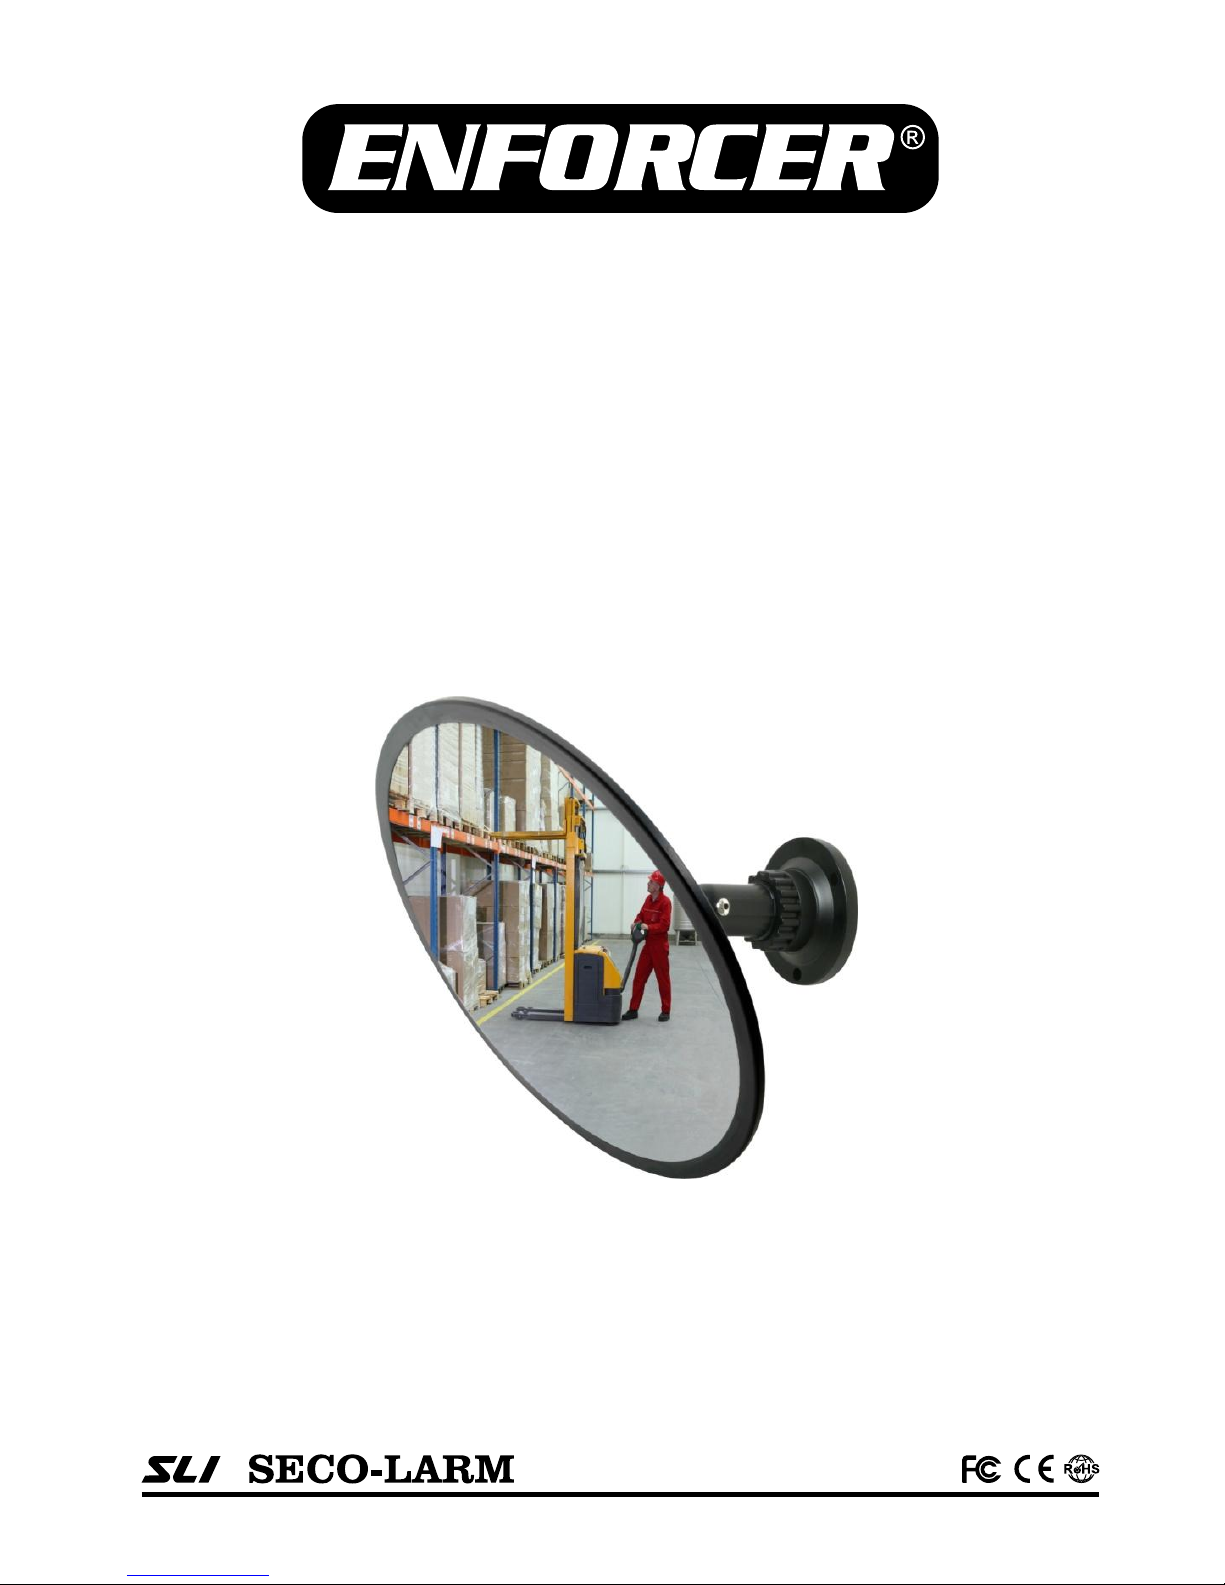
Backlight Compensation –Allows up to 2 areas of the screen to
be set to compensate for excess backlighting.
HLC
Highlight Compensation –Compensates for excessive highlights,
has a programmable mask to set where HLC does not apply.
5) DAY & NIGHT
(see page 8)
AUTO
Sets the level at which the camera switches from day to night or
from night to day mode
B/W
Sets display to always operate in the B/W mode
EXT
N/A
COLOR
Sets the display to always operate in the COLOR mode
6) DPC
Factory use only. Do not use.
7) SPECIAL
(see page 9-11)
CAM TITLE
Allows setting and displaying of an optional name for the camera
MOTION
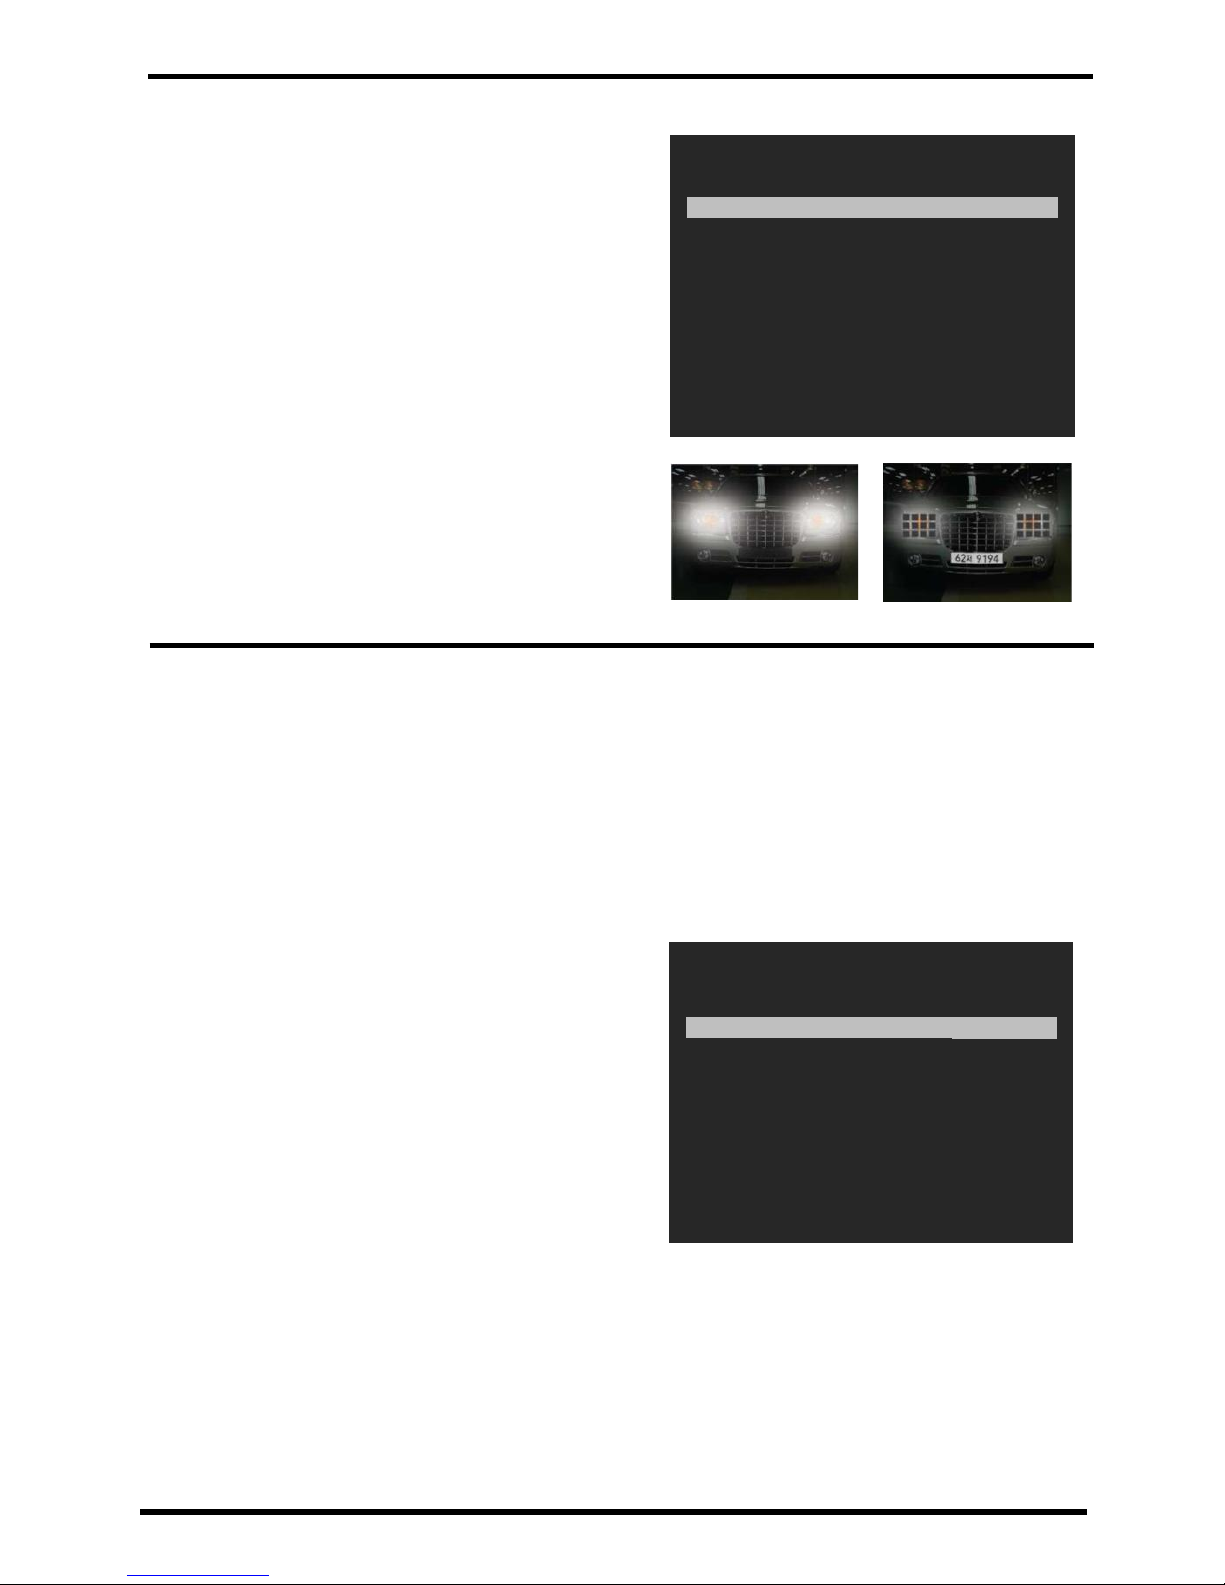
Sets up to 4 separate areas of the screen to flash a grid pattern to
draw attention to motion in the protected area
PRIVACY
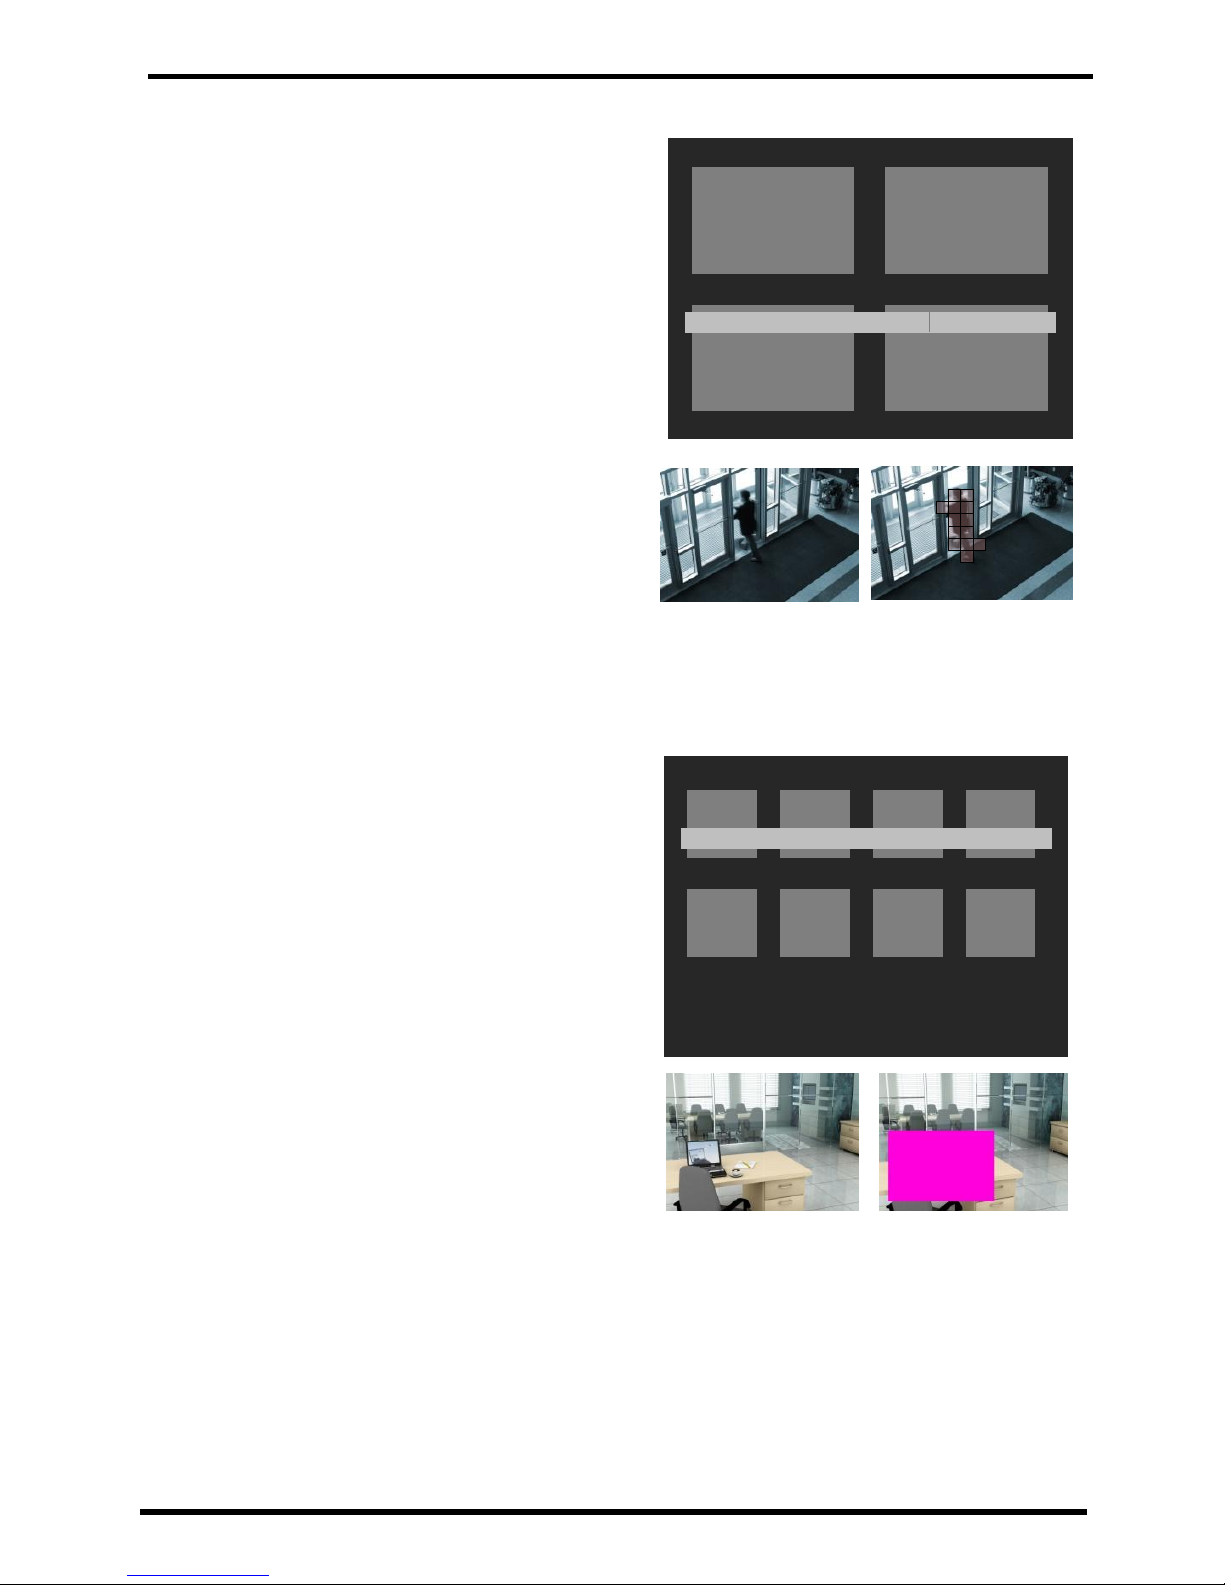
Sets the size, location, and color of up to 8 separate privacy
masks.
PARK. LINE
Enable and adjust a series of on-screen lines and marks.
IMAGE ADJ.
LENS SHAD (Lens Shading Compensation) –Can increase the
brightness at the edge of the screen.
2DNR –Turns Digital Noise Reduction on or off.
MIRROR –Flips the image on the screen horizontally.
FONT COLOR –Changes the color of certain on-screen text.
CONTRAST –Adjusts image contrast.
SHARPNESS –Adjusts image sharpness.
DISPLAY –Allows setting of lightness and color of CRT or LCD,
or according to user preference.
NEG. IMAGE –Displays the color negative of the image.
COMM ADJ.
N/A
LANGUAGE
Choose English, Chinese, Spanish, or Russian.
VERSION
Displays current software version
8) RESET
(see page 12)
FACTORY
Resets all settings except CAMERA ID to default.
RETURN
Exits SETUP menu with or without saving changes.

ENFORCER 12” Mirror Camera
SECO-LARM U.S.A., Inc. 5SECO-LARM U.S.A., Inc. 33 5
Lens:
This setting is not used.
Exposure:
This function is used to manually adjust the shutter speed, brightness, AGC, and DWDR.
1. Select EXPOSURE on the main SETUP menu screen by pressing in the joystick.
2. Select the exposure setting by moving the joystick UP or DOWN.
3. Program the desired exposure setting by moving the joystick LEFT or RIGHT. Press in the
joystick to access a submenu.
4. Select RETURN and press in the joystick to move back one screen.
NOTE: A submenu is available whenappears.
EXPOSURE
SHUTTER
AUTO
BRIGHTNESS
045
AGC
HIGH
DWDR
OFF
RETURN
RET
A. SHUTTER: Sets camera exposure time.
AUTO –Lets the camera automatically
set the shutter speed from 1/60~1/100,000
of a second.
FLK –Reduces onscreen flickering.
Adjustable range: 1/60, 1/250, 1/500, 1/1,000,
1/2,000, 1/4,000, 1/5,000, 1/10,000, or
1/100,000 sec.
B. BRIGHTNESS: Controls the brightness of the image.
Set the brightness level. (Default: 050)
C. AGC: Controls the Auto Gain Control (AGC) setting.
No option if DAY&NIGHT is set to AUTO
AGC can be set to OFF, LOW, MIDDLE, or HIGH. (Default: MIDDLE)
D. DWDR: Adjusts the Digital Wide Dynamic Range (DWDR) of the camera.
Choose OFF or ON and adjust the DWDR level. (Default: 035)

ENFORCER 12” Mirror Camera
6SECO-LARM U.S.A., Inc.
Continued on next page
White Balance (WHITE BAL.):
This function adjusts the camera’s white balance.
1. Select WHITE BAL. on the main SETUP menu screen.
2. Select the desired white balance mode by moving the joystick LEFT or RIGHT. When
appears, press the joystick in to access a submenu.
3. Select RETURN and press in the joystick to move back one screen.
NOTE: A submenu is available whenappears.
SETUP
LENS
MANUAL
EXPOSURE
WHITE BAL.
ATW1
BACKLIGHT
OFF
DAY&NIGHT
AUTO
DPC
SPECIAL
RESET
EXIT
Backlight (Backlight/Highlight Compensation):
This function is used to control the light level to overcome strong back light conditions.
1. Select BACKLIGHT on the main SETUP menu screen.
2. Select the desired backlight mode by moving the joystick LEFT or RIGHT. Press the
joystick in to access a submenu.
3. Select RETURN and press in the joystick to move back one screen.
NOTE: A submenu is available whenappears.
BLC
AREA SEL.
AREA 1
AREA STATE
ON
GAIN
128
HEIGHT
005
WIDTH
004
LEFT/RIGHT
006
TOP/BOTTOM
005
RETURN
RET
A. ATW1 –Automatic Tracking White, mode 1
B. ATW2 –Automatic Tracking White, mode 2
C. AWC→SET – Automatic white balance
setting. Point the camera at a white object
and press enter. The colors will be
balanced based on the object.
D. ANTI. CRL –Anti-Color Rolling.
E. MANUAL –Allows COLOR TEMP (color
temperature) to be set to INDOOR,
OUTDOOR, or MANUAL.
(Default: INDOOR)
NOTE: If the MANUAL setting is chosen, the BLUE and RED levels can be adjusted.
A. BLC: Program the Backlight Compensation (BLC) function to better display an object
in front of a bright light source.
AREA SEL –Select one of two areas
on the screen to adjust for BLC.
AREA STATE –Turn the selected
area ON or OFF. (Default: ON)
GAIN –Set the GAIN level.
(Default: 128)
HEIGHT –Adjust the height of the
selected area. (Default: 005)
WIDTH –Adjust the width of the
selected area. (Default: 004)
LEFT/RIGHT –Adjust the horizontal position of the selected area. (Default: 006)
TOP/BOTTOM –Adjust the vertical position of the selected area. (Default: 005)

ENFORCER 12” Mirror Camera
SECO-LARM U.S.A., Inc. 7SECO-LARM U.S.A., Inc. 33 7
B. HLC: Program the Highlight Compensation
(HLC) function to reduce highlights in the
image.
LEVEL –Adjusts the level of the
highlights. (Default: 200)
MODE –This function is not used.
MASK SKIP –Sets up a mask under
which the HLC settings do not apply.
HLC
LEVEL
200
MODE
ALL DAY
MASK SKIP
ON
RETURN
RET
D&N AUTO
D→N LEVEL
192
D→N DELAY
1 SEC
N→D LEVEL
100
N→D DELAY
1 SEC
RETURN
RET
Backlight, continued
Day & Night:
This function controls how the camera adjusts to color or B/W as the daylight changes.
1. Select DAY&NIGHT on the main SETUP menu screen.
2. Select the desired day & night mode by moving the joystick LEFT or RIGHT. Press the
joystick in to access a submenu.
3. Select RETURN and press in the joystick to move back one screen.
NOTE: A submenu is available whenappears.
Continued on next page
A. AUTO: Determines how and when the
camera shifts between color and B&W
modes.
D→N LEVEL – Sets the light level at
which the camera switches to NIGHT
mode. (Default: 192)
D→N DELAY – Sets 1~30 second
delay before the switch to NIGHT
mode occurs. (Default: 1 sec)
N→D LEVEL – Set the light level at
which the camera switches to DAY
mode. (Default: 160)
N→D Delay – Sets 1~30 second
delay before the switch to DAY mode
occurs. (Default: 1 sec)
HLC OFF
HLC ON

ENFORCER 12” Mirror Camera
8SECO-LARM U.S.A., Inc.
Day & Night, continued
DPC:
Factory use only. Do not use.
Special:
This function allows for setting of the camera name, motion and privacy masks, and
OSD menu language.
1. Select SPECIAL on the main SETUP menu screen by pressing in the joystick.
2. Select the special setting by moving the joystick UP or DOWN.
3. Program the desired exposure setting by moving the joystick LEFT or RIGHT. Press in the
joystick to access a submenu.
4. Select RETURN and press in the joystick to move back one screen.
NOTE: A submenu is available whenappears.
D&N B/W
BURST
OFF
IR SMART
OFF
IR LEVEL
HIGH
RETURN
RET
A. CAM TITLE: Sets a unique, easily-
identified name for the camera.
Use the arrow keys to highlight and
choose letters and numbers for the
CAMERA TITLE.
← → – Move the cursor in the
CAMERA TITLE.
CLR –Clears all text.
POS –Choose where on the screen
the CAMERA TITLE is displayed.
END –Exit the CAM TITLE sub-menu.
B. B/W: Sets the camera into B/W mode.
BURST –Turns the BURST mode ON
or OFF.
IR SMART –Not used.
IR LEVEL –Not used.
C. EXT: Not used
D. COLOR: Sets the camera into color mode.
SPECIAL
CAM TITLE
OFF
MOTION
OFF
PRIVACY
OFF
PARK. LINE
OFF
IMAGE ADJ.
COMM ADJ.
LANGUAGE
ENGLISH
VERSION
12 06 01
RETURN
RET

ENFORCER 12” Mirror Camera
SECO-LARM U.S.A., Inc. 9SECO-LARM U.S.A., Inc. 33 9
MOTION
AREA SEL.
AREA1
AREA STATE
ON
HEIGHT
004
WIDTH
004
LEFT/RIGHT
002
TOP/BOTTOM
002
DEGREE
038
VIEW
ON
RETURN
RET
PRIVACY
AREA SEL.
AREA1
AREA STATE
ON
HEIGHT
032
WIDTH
032
LEFT/RIGHT
020
TOP/BOTTOM
016
COLOR
000
RETURN
RET
C. PRIVACY: Allows setting of up to 8
separate on-screen blocks to act as
privacy masks.
AREA SEL. –Select one of the 8
privacy masks.
AREA STATE –Turns each mask
ON or OFF independently.
HEIGHT –Sets the height of the
mask.
WIDTH –Sets the width of the
mask.
LEFT/RIGHT –Sets the mask’s
horizontal position.
TOP/BOTTOM –Sets the mask’s
vertical position.
COLOR –Choose one of 15 colors
for each privacy mask.
Special, continued
B. MOTION: Allows setting of up to 4 areas
on the screen where flashing occurs to
alert the user of motion in the protected
area.
AREA SEL. –Select one of the 4
motion alarm areas.
AREA STATE –Turns each area
ON or OFF independently.
HEIGHT –Adjust the height of the
selected area
WIDTH –Adjust the width of the
selected area.
LEFT/RIGHT –Adjust the horizontal
position of the selected area
TOP/BOTTOM –Adjust the vertical
position of the selected area.
DEGREE –Adjust the motion
detection sensitivity.
VIEW –Turns motion detection
blocks ON or OFF.
Motion Detection
OFF
Motion Detection
ON
Privacy OFF
Privacy ON

ENFORCER 12” Mirror Camera
10 SECO-LARM U.S.A., Inc.
IMAGE ADJ.
LENS SHAD.
OFF
2DNR
ON
MIRROR
OFF
FONT COLOR
CONTRAST
153
SHARPNESS
011
DISPLAY
CRT
NEG. IMAGE
OFF
RETURN
RET
F. COMM ADJ.: Not used.
G. LANGUAGE: Choose English, Chinese,
Spanish, or Russian.
H. VERSION: Displays the current version
of the camera’s software.
Special, continued
D. PARK. LINE: Enable and adjust a series of on-screen lines and marks.
E. IMAGE ADJ.: Adjusts various aspects of
the on-screen image.
LENS SHAD. –Turns Lens Shading
Compensation ON or OFF, and
adjusts settings.
2D-NR –Turns 2D Digital Noise
Reduction ON or OFF.
MIRROR –Use to display a mirror
image of the display.
FONT COLOR –Select one of 15
colors for the on-screen fonts.
SPECIAL
CAM TITLE
ON
MOTION
OFF
PRIVACY
OFF
PRIVACY
OFF
IMAGE ADJ.
COMM ADJ.
LANGUAGE
ENGLISH
VERSION
10 10 15
RETURN
RET
CONTRAST –Adjust the contrast of the screen.
SHARPNESS –Adjust the sharpness of the image
DISPLAY –Set the display type.
NEG. IMAGE –Use to display the color or B/W negative of the screen display.
Reset:
This function resets all programming options to their factory defaults.
1. Select RESET on the main SETUP menu screen by pressing in the joystick.
2. To reset all programming options except CAM ID, select FACTORY by pressing down on
the joystick.
3. Select RETURN and press in the joystick to move back one screen.
NOTE: CAM ID must be cleared manually.

ENFORCER 12” Mirror Camera
SECO-LARM U.S.A., Inc. 11 SECO-LARM U.S.A., Inc. 33 11
Also Available from SECO-LARM:
Covert PIR Camera
EV-5620-N3WQ
Features:
1/3” Sony Super HAD II CCD
600 TV Lines
3.7mm Pinhole lens
78° Viewing angle
Covertly hidden in a non-functioning PIR housing
Covert Ceiling Mount Camera
EV-6120-N3WQ 480 TV lines
EV-6620-N3WQ 600 TV lines
Features:
1/3” Sony Super HAD II CCD
3.7mm Pinhole lens
78° Viewing angle
Covertly hidden in a smoke detector-style
housing
Covert Wall-Plate Camera
EV-5105-N1SQ
Features:
1/4” Sony Color CCD
600 TV Lines
1.5mm Lens
170° Viewing angle
Fits in a single-gang plate or slimline plate
Weatherproof (IP67)

ENFORCER 12” Mirror Camera
12 SECO-LARM U.S.A., Inc.
EV-6600-x2BQ_OSD.docx
PICSN5
The screen is blank.
Check that the camera is powered up.
Check that the power supply’s polarity is
correct.
Check that the monitor is powered up.
Check that the video cable connecting the
camera to the monitor is connected properly.
The screen image is dim.
Clean the lens using a soft, clean cloth.
Check that the light source is adequate.
Strong backlight is overpowering the
image
Change the DWDR setting (see page 6).
Image has too much digital noise
Change 2D-NR setting (see page 11).
The screen image is distorted.
Change the position of the camera.
Motion detection is not activated
Activate MOTION (see page 10).
Properly define the motion detection area.
Troubleshooting:
IMPORTANT
Users and installers of this product are responsible for ensuring this product complies with all national, state, and local laws and
statutes related to monitoring and recording audio and video signals. SECO-LARM will not be held responsible for the use of this
product in violation of any current laws or statutes.
WARNING
Stop using the camera if you see a malfunction such as smoke or unusual heat, as it could cause fire or electric shock. Do not
open the case of this device, as there are no field serviceable components inside.
FCC COMPLIANCE STATEMENT
Information to the user: This equipment has been tested and found to comply with the limits for a class B digital device, pursuant
to part 15 of the FCC rules. These limits are designed to provide reasonable protection against harmful interference when the
equipment is operated in a commercial environment. This equipment generates, uses, and can radiate radio frequency energy
and, if not installed and used in accordance with the instruction manual, may cause harmful interference to radio communications.
Operation of this equipment in a residential area is likely to cause harmful interference in which case the user will be required to
correct the interference at his or her own expense.
WARRANTY: This SECO-LARM product is warranted against defects in material and workmanship while used in normal service
for a period of one (1) year from the date of sale to the original consumer customer. SECO-LARM’s obligation is limited to the
repair or replacement of any defective part if the unit is returned, transportation prepaid, to SECO-LARM.
This Warranty is void if damage is caused by or attributed to acts of God, physical or electrical misuse or abuse, neglect, repair or
alteration, improper or abnormal usage, or faulty installation, or if for any other reason SECO-LARM determines that such
equipment is not operating properly as a result of causes other than defects in material and workmanship.
The sole obligation of SECO-LARM, and the purchaser’s exclusive remedy, shall be limited to replacement or repair only, at
SECO-LARM’s option. In no event shall SECO-LARM be liable for any special, collateral, incidental, or consequential personal or
property damages of any kind to the purchaser or anyone else.
NOTICE
The information and specifications printed in this manual are current at the time of publication. However, the SECO-LARM policy
is one of continual development and improvement. For this reason, SECO-LARM reserves the right to change specifications
without notice. SECO-LARM is also not responsible for misprints or typographical errors.
Copyright © 2013 SECO-LARM U.S.A., Inc. All rights reserved. This material may not be reproduced or copied, in whole or in
part, without the written permission of SECO-LARM.
SECO-LARM U.S., Inc.
16842 Millikan Avenue, Irvine, CA 92606 Website: www.seco-larm.com
Tel: 800-662-0800 / 949-261-2999 Fax: 949-261-7326 E-mail: sales@seco-larm.com
Other manuals for EV-6600-N2BQ
1
This manual suits for next models
1
Table of contents