Englaon LED24X80 User manual
USER’S MANUAL
24" FHD LED TV DVD COMBO
Model: LED24X80
User’s Manual
Please Read this manual carefully and retain for future reference

IMPORTANT SAFETY INSTRUCTIONS
Safety Information
Read these instructions.
Keep these instructions.
Heed all warnings.
Follow all instructions.
Do not use this apparatus near water.
Clean only with dry cloth.
Do not block any ventilation openings. Install in accordance with the
manufacture’s instructions.
Do not install near any heat sources such as radiators, heat registers, stoves, or
other apparatus (including amplifiers) that produce heat.
Do not defeat the safety purpose of the polarized or grounding plug. A polarized
plug has two blades with one wider than the other. A grounding plug has two
blades and a third grounding prong. The wide blade or the third prong is provided
for your safety. If the provided plug does not fit into your outlet, consult an
electrician for replacement of the obsolete outlet.
Protect the power cord from being walked on or pinched particularly at the plugs,
convenience receptacles, and at the point where they exit from the apparatus.
Only use attachments/accessories specified by the manufacturer.
Use only with the cart, stand, tripod, bracket, or table specified by the
manufacturer, or sold with the apparatus. When a cart or rack is used, use caution
when moving the cart/apparatus combination to avoid injury from tip-over.
Unplug the apparatus during lightning storms or when unused for long periods of
time.
Refer all servicing to qualified personnel. Servicing is required when the
apparatus has been damaged in any way, such as power supply cord or plug is
damaged, liquid has been spilled or objects have fallen into the apparatus has
been exposed to rain or moisture, does not operate normally, or has been
dropped.
CAUTION: These servicing instructions are for use by qualified service personnel
only. To reduce the risk of electric shock, do not perform any servicing other than
that contained in the operating instructions unless you are qualified to do so.
WARNING:To reduce the risk of fire or electric shock, do not expose this apparatus to
rain or moisture. The apparatus shall not be exposed to dripping or splashing and that
objects filled with liquids, such as vases, shall not be placed on apparatus.
WARNING: The mains plug is used as disconnect device, the disconnect device shall
remain readily operable.
- This lightning flash with arrowhead symbol within an equilateral triangle is
intended to alert the user to the presence of non-insulated “dangerous voltage”
within the product’s enclosure that may be of sufficient magnitude to constitute a
risk of electric shock.
- Warning: To reduce the risk of electric shock, do not remove cover (or back) as
there are no user-serviceable parts inside. Refer servicing to qualified personnel.
- The exclamation point within an equilateral triangle is intended to alert the user to
the presence of important operating and maintenance instructions in the literature
accompanying the appliance.
Apparatus with class I construction shall be connected to a mains socket
outlet with a protective earthing connection.
Scan to download the Manual
For support please contact our service department at
service@englaon.com.au

Important Safety Precautions
Do not place the power cord or other cables
across a walkway in case it is trampled on. Do
not overload the power cord or power socket.
When the power plug is used to disconnect and
connect the device, it should easily go into the
power source.
Do not place the LED TV on an unstable
surface.
Do not disassemble the back cover, as it
contains high voltages inside and will cause
electric shock. Only qualified professionals
sho ul d c on du c t in te r na l ad j us tm e nt s,
maintenance, and checks.
The TV set should not be subjected to
water droplets, vapor, or splash. This
equipment should not be placed on objects
filled with liquids. Do not place flame
sources, such as lit candles, on or near the
LED TV. Please, pull out the power plug
and contact after sales support if there are
abnormal objects or water in the TV.
Pull out the power cord and antenna cable
during electrical storms so the L ED TV is not
damaged by electrical surges. Keep all
people away from the antenna cable during
electrical storms.
Important Safety Precautions
When the television receiver is not used for an
extended period of time, it is advisable to disconnect
the AC power cord from the AC outlet.
Please, immediately pull out the AC power
plug from adapter if there is an abnormal
sound or smell or the LED TV has sound but
no picture, and contact after sales support.
The LED TV should be kept free from rain,
moisture and dust to prevent electrical
shock and short circuits. Do not cover the
ventilation openings with table clothes,
curtains, newspapers, etc.
The LE D TV should be kept from high
temperature heating sources or direct
sunlight. Good ventilation is required.
Allow 10 cm. between the LED T V and
other appliances or built-in cabinet walls.
When you wipe the front cabinet, please
make sure the power plug is pulled out and
use a soft, dry, lint-free cloth and handle it
with care. Do not repeatedly wipe the panel,
nor scrape, tap or strike the panel with a hard
object.
Do not wipe the LED TV with any petrol,
chemical or alcohol based solvents as it
will lead to product damage of the panel
and cabinet.

Table of Contents
12
Introduction
Features
Manual
Instructions
Remote Control
Batteries (AAAx 2)
Input terminals used for external equipment connection
One AUDIO L/R output
One RF input
One EARPHONE output
Two HDMI input
Two USB input
One COAXIAL output
One RJ45 input
Column bracket Screws
Base
Overview of remote control
Installing Batteries in the Remote Control
Introduction
Features
Specifications
General Description
Overview of front and side panel
Overview of back panel
External Connection
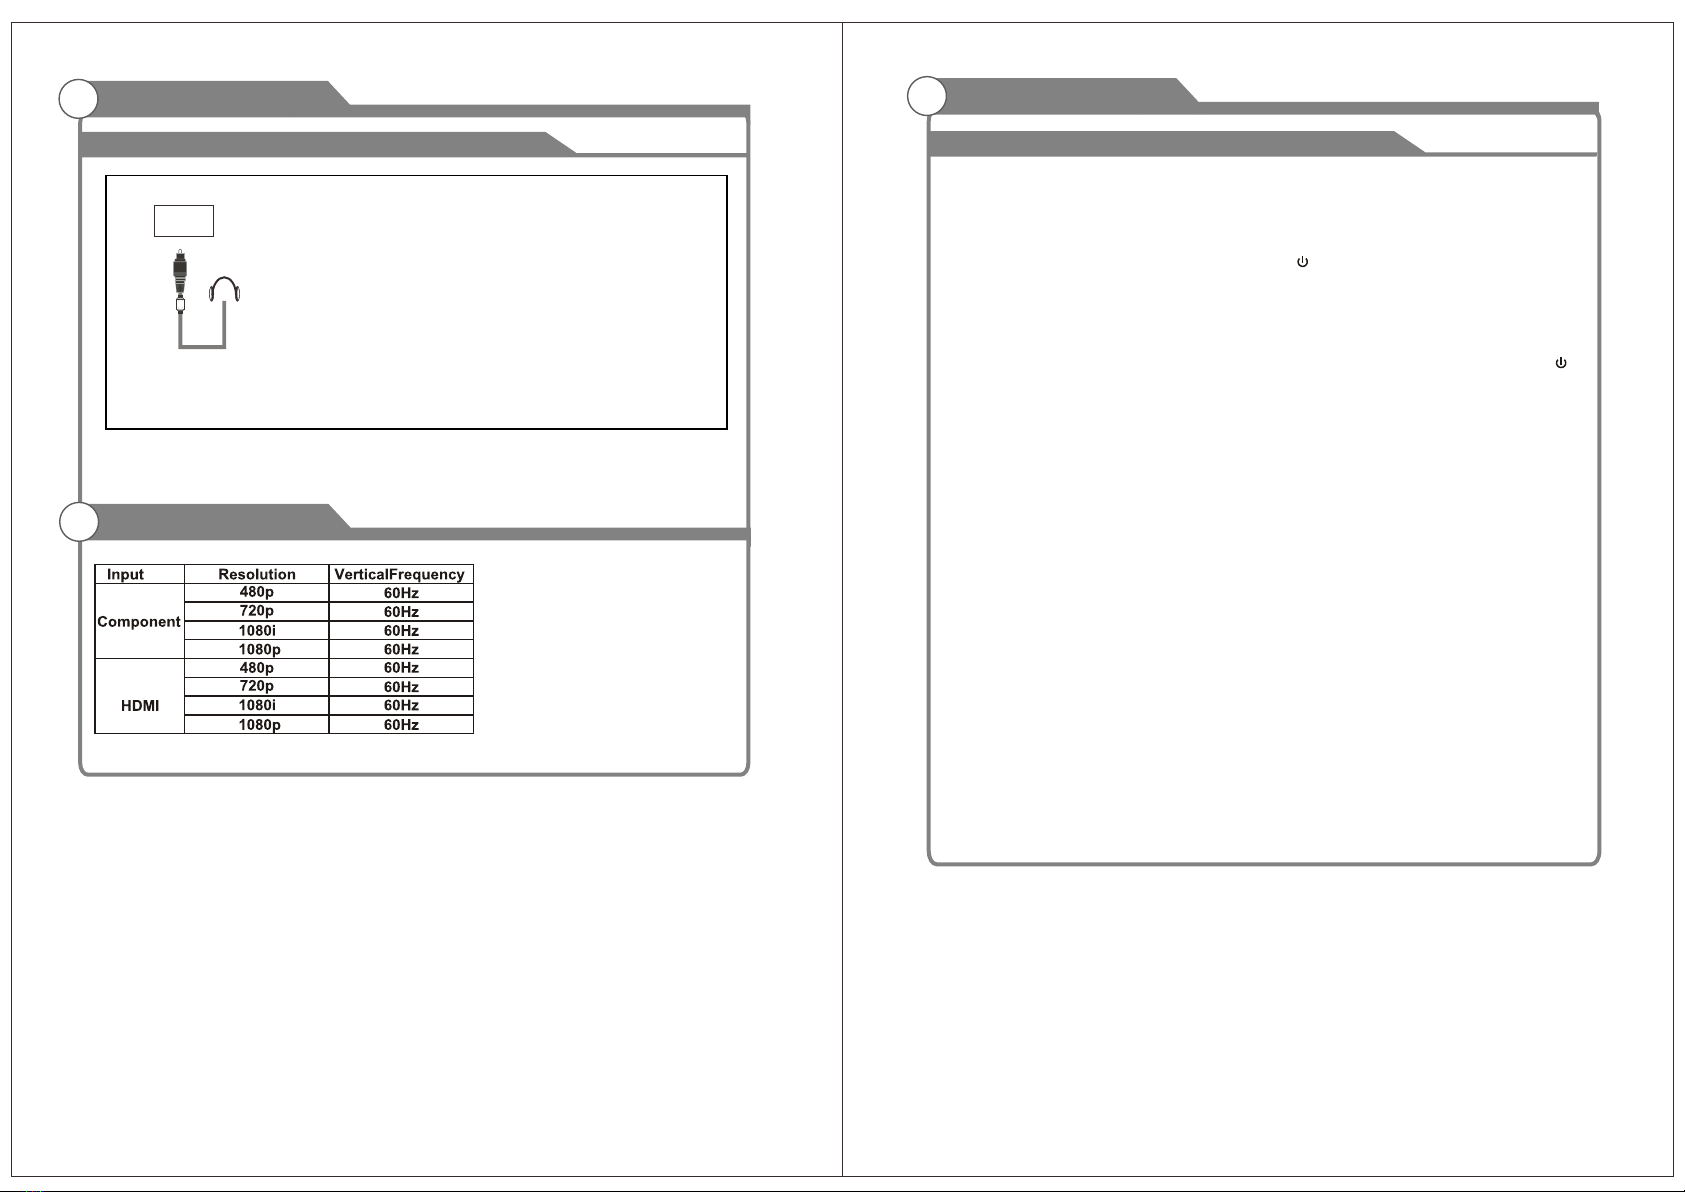
Supporting signals
Basic operation
Turning the TV On and Off
2
3
4
4
10-11
10
12
12
11
5
Accessories
2
Antenna connection
6-8
9
11
Connecting DVD Player/Set-Top Box via HDMI
Connecting EARPHONE
6-8
Assembling Stand Process
13-31
OSD Menu Operations
32-33
DVD
Troubleshooting
34
35
Picture defects and the reason
Hardware Configuration
3

34
Remarks:
Introduction
W arnings
Specifications
PAL/NTSC
antenna socket 75Ω
32W
Color LED display
PAL/DVB-T
48.25MHz‐863.25MHz
o
0C-35C
o
Power supply
1920X1080
Model
Average Power Consumption
The above listed specifications and data are subject to change without prior notice.
Video input Format
Antenna input
DC 12V 4A
LED24X80
CPU
GPU
DDR SIZE
eMMC Flash
ARM Cortex-A55 quad core
Mali G31MP2
1.5 GB
8 GB
Hardware Configuration
Transparent: power on mode.
White: standby mode.
3.7 Kg
SPEAKER
REMOTE CONTROL SENSOR
POWER INDICATOR
Toggles between all the available input
sources
MENU
Press to see an on-screen menu of your
TV's features.
CH+/-
Press to change channels.
In the on-screen menu, use the CH +/-
buttons as up/down arrow buttons.
VOL+/-
Press to increase or decrease the volume.
In the on-screen menu, use the VOL +/-
buttons as left/right arrow buttons.
POWER
Press POWER button to toggle between
normal and standby mode.
SOURCE
CH+
ME NU
CH-
VO L+ VO L-
SO URCE
PO WER
Screw
M4 x 8M M
100 mm
100 mm
With Stand: 541.4 x 125 x 345.7 mm
Without Stand: 541.4 x 47.1 x 318.3mm

1. D C 12V
DC input.
2. R J45
Ethernet connection.
3. C OAXI AL
Coaxial Digital audio output.
4. L/R
Connect to the audio output jacks on your
amplifier/home theater.
5. H DMI2
Connecting for HD M I signal.
Port
Side port
USB2 US B1
EARPHON E
OUT
8 9 10
DC 12V RJ45 COAXIAL
OUT
LRRF
HDMI2 H DMI1
1 2 3 4 5 76
6. H DMI1
Connecting for HD M I signal.
7. R F
Connected to external antenna to receive
the ATV/DTV program in ATV/DTV mode.
8. U SB 2
USB input.
9. E ARP H ONE
Connecting for headphone.
10.USB 1
USB input.
Overview of remote control
General Description
1 2
4
7
8
11
12
15
18
3
5
6
9
13
10
14
16
19
17
20
22 24
23
21
Assembling Stand Process
Instruction:
1.Place the TV unit on a flat and clean table.
2.Fix stand by 2 pcs screws via screw hole B and A.
3.Fix stand by 3 pcs screws via screw hole D and C.
Screw
Screw hole A
Screw hole B
Screw hole C
Screw hole D
Screw
78
Overview of remote control
General Description
1. POWER: Turn the TV on and off.
2. : Search function.
3. Digital Buttons(0-9, -): Directly select channel with digital buttons.
4. SOURCE: Press to open the input source list.
5. NETFLIX: If network connects, press this key to view NETFLIX directly.
6. Google Play: If network connects, press this key to view Google Play directly.
7. YouTube: If network connects, press this key to view YouTube directly.
8. Prime Video: If network connects, press this key to view Prime Video directly.
9. HOME: Display the HOME page.
10. Arrow button ▲▼◄►: Use to select on-screen menu items and change menu values.
11. MENU: Display the main menu or exit the current menu.
12. OK: Confirms selection.
13. BACK: Return to the previous menu.
14. MUTE: Press this button to cut off the sound of the TV set temporarily, press again to
resume.
15. EXIT: Exit the menu.
16. VOL +/- : Press these buttons to adjust the volume.
17. COLOR BUTTONS: It's used in the APPS.
: Open/close in DVD mode.
D.MENU: Quick navigation during Teletext or setup settings / D VD: Video DVD
Menu button.
SETUP: DVD system setup.
D.DISP: Quick navigation during Teletext or setup settings / D VD: DVD Information
button.
Overview of remote control
General Description
18. CH∧/∨: Press these buttons to change channel upward or downward.
19. GUIDE: Select electronic program guide, in DTV mode, it will display all the
information of program in a week when pressing this button.
20. DIGITAL MEDIA PLAYER CONTROL BUTTON: Include backward, forward,
play/pause, stop in USB mode. In DTV mode, press ● button to record the TV program.
Please refer to relevant instructions in the section of multimedia player.
21. LIST: Press to display the channel list.
A-B: Press the A-B button once to set point A. Press the A-B button a second time
to set point B. After setting the program repeat playing from A to B. Pressing the A-
B button a third time will cancel
the repeat.
22. TEXT: Press to select the teletext mode.
REPEAT: DVD: Repetition mode button.
23. AUDIO: Press to select mono, nicam, stereo for ATV channel, audio language for
DTV channel.
24. SUBT: Open or close subtitle.
TITLE: Press this button to return to the title of the disc.
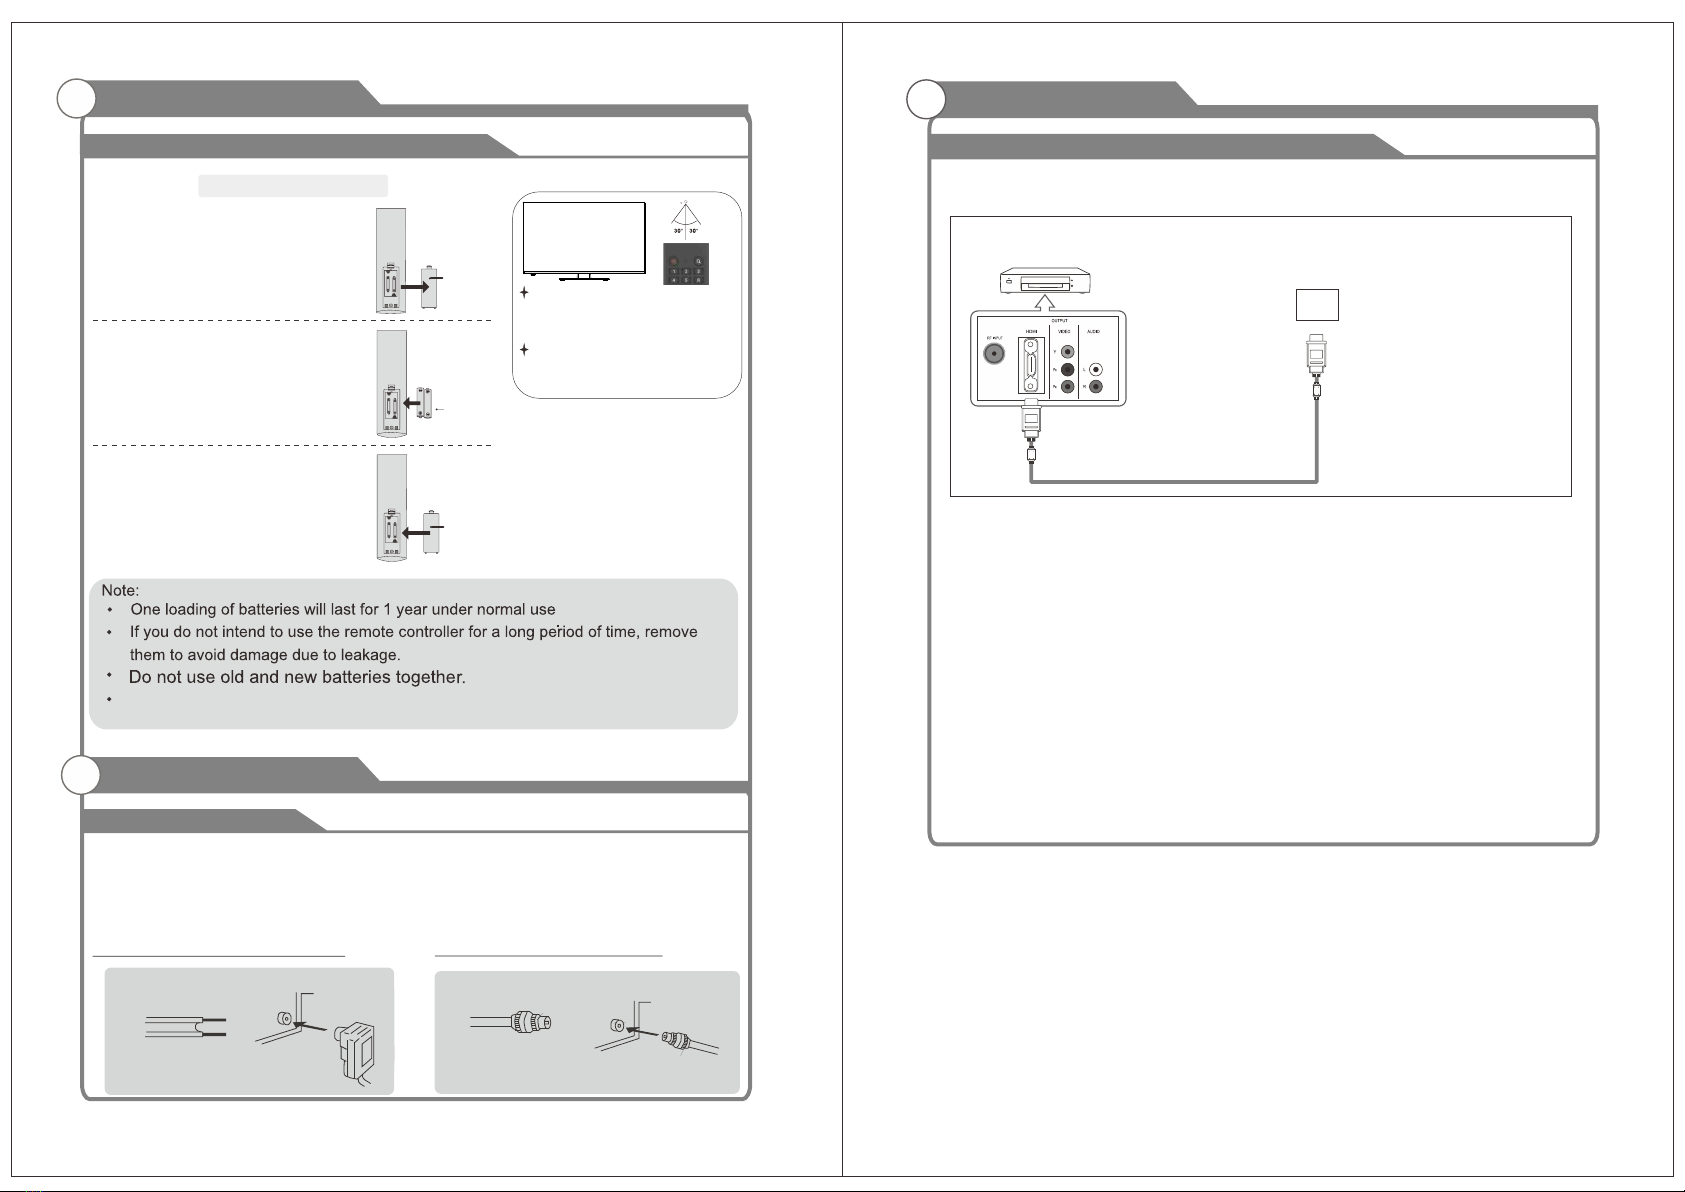
Installing Batteries in the Remote Control
Installing Batteries
1Open the battery compartment
cover on the back side.
2Insert two 1.5V AAA size batteries in
correct polarity. Don´t mix old or used
batteries with new ones.
3Closed the cover.
Point the remote towards the remote
control sensor of the wireless TV and
use it within 7 meters.
Put the used batteries into the recyc-
ling bin since it can negatively affect
the environment.
General Description
Battery
Cover
2xsize AAA 1.5V
Battery
Cover
Antenna connection
Antenna input impedance of this unit is 75ohm. VHF/UHF 75ohm coaxial cable can be
connected to the antenna jack directly, if the antenna cable is 300ohm parallel flat feeder
cable, you need to use the 300ohm/75ohm converter to connect the antenna cable to the
antenna jack. For details Please refer to the following drawing.
Use a 75ohm - 300ohm converter
300ohm coaxial cable
Antenna feeder
ANT IN
75ohm coaxial cable
Antenna cable
Antennas with 300ohm flat twins Leads Antennas with 75ohm Round Leads
External Connection
The battery (battery or batteries or battery pack) shall not be exposed
to excessive heat such as sunshine, fire or the like.
10
9
External Connection
This connection can only be made if there is a HDMI Output connector on the external
device.
What is HDMI?
HDMI, or high-definition multimedia interface, is a next-generation interface that enables
the transmission of digital audio and video signals using a single cable without
compression.
Multimedia interface is a more accurate name for it especially because it allows multiple
channels of digital audio (5.1 channels).
The difference between HDMI and DVI is that the HDMI device is smaller in size, has the
HDCP(High Bandwidth Digital Copy Protection) coding feature installed, and supports
multi-channel digital audio.
Each DVD player/STB has a different back panel configuration.
We recommend the use of cables with a Ferrite Core.
1. Connect an HDMI Cable between the HDMI connector on the TV and the
HDMI connector on the DVD player/Set-Top Box.
Connecting DVD Player/Set-Top Box via HDMI
TV Rear Panel
HDMI Cable (Not supplied)
DVD Player/Set-Top Box
IN
HDMI
External Connection
11 12
Supporting signals
Connecting EARPHONE
1.Plug EARPHONE out connector into EARPHONE out jack on the TV the TV speaker will
be muted.
Phone Out
EARPHON E
OUT
Turning the TV On and Off
Basic Operation
1. Insert the power cord plug into a polarized DC
outlet.
2. Press POWER button on the remote control or
button on the LED TV.
3. Normal picture will be displayed on the screen after 6 seconds. If no signal input,
"No Signal" will be displayed on the screen.
4. If temporary POWER off is required, press POWER button on the remote control or
button on the LED TV.
6. After switching off the device, you should turn on the TV again at least 5 seconds later.
Status indication lamp
Auto power-off
If there is no signal input in any Mode, the TV will automatically accesses the standby
state in about 15 minutes.
Memory before turning TV off
The settings of picture and the preset channels will be memorized at turning off the unit.
When being started up again, the unit will work according to the mode set before being
turned off.
How to turn the TV on or off
5. Press and hold the power button for 6 seconds to completely turn off this device,
after which you may choose to power it off or restart the T V, or you can unhook
the unit's power cord plug.
Transparent: power on mode.
White: standby mode.

13 14
OSD Menu Operations
Press ▲/▼ to select the system language and press OK to confirm the language.
INITIAL SETUP
This function is used for the remote control pair code. After the code is successful, you can
use the Bluetooth remote control to operate the TV.
OSD Menu Operations
Connect your Android phone to your TV, select "Continue" to continue the connection, and
choose "Skip" to skip this step.
Press ▲/▼ to select the wifi to connect, press OK and enter the password to confirm the
connection is successful.
By agreeing to automatically send diagnostic information to Google to improve discriminative
power, choose "YES" to accept.
15 16
OSD Menu Operations
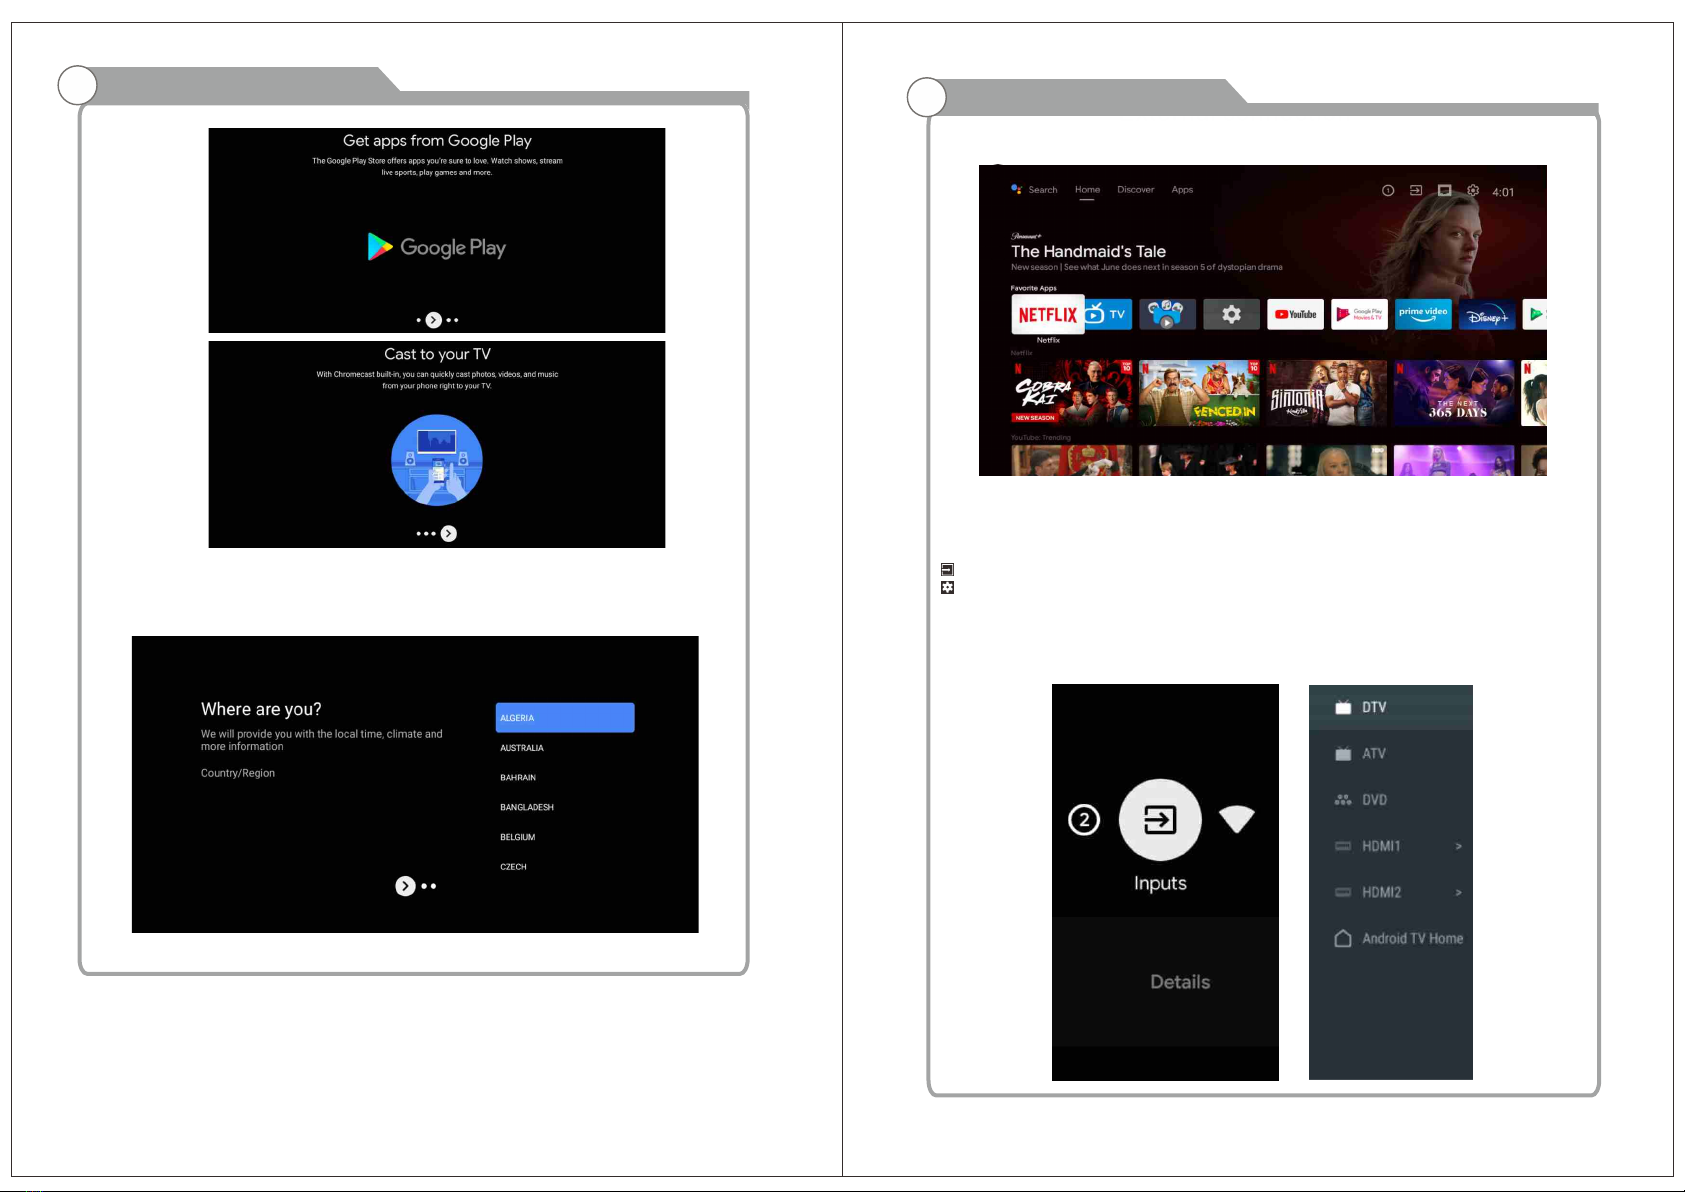
1. Your device is powered by Android TV and press the ► button to select the browsing feature.
2. You can get more apps from Google Play and press the ► button to go to the next screen.
3. Transfer photos and other content to the TV via the built-in chromecast, press OK to
complete the browsing.
Press ▲/▼ to select the country of your deviceand press OK to confirm.
OSD Menu Operations
HOME SCREEN
After completing the wizard Settings, you can watch TV and go to the home screen.
1. Open Google Assistant or start a text search.
2. Among the applications installed on the TV, the icons for the favourite applications are
shown inside
here. (Favourite applications can be added/ deleted/changed its order by users.)
2
1
Inputs: Icon to select an input source.
Settings: Various settings can be configured here. For details on the settings, see the next
explanation.
INPUT SOURCE
In the HOME interface, press ▲/▼/◄/► to select the "Inputs" icon, press OK to open the
input source list, then press up to highlight an input and press OK to switch.

17
OSD Menu Operations
18
Under live TV, press the SOURCE button to display the list of input sources. You can select
the desired source.
NAVIGATING THE ON-SCREEN MENU
1. In the HOME interface, press the ► key to select the icon of the circular settings menu,
press OK to confirm.
2. Press ▲/▼ button to select what you want set.
3. Press OK to enter setting.
OSD Menu Operations
Network
1 Press ▲/▼ button to select what you want set.
2. press OK button to adjust.
3. After finishing your adjustment, press OK button to save and return to the previous menu.
APPS
In this menu, you can set the APP permissions, and read the app lists.
1. Press ▲/▼ button to select what you want set.
2. Press OK button to adjust.
3. After finishing your adjustment, press BACK button to return to the previous menu.
19 20
OSD Menu Operations
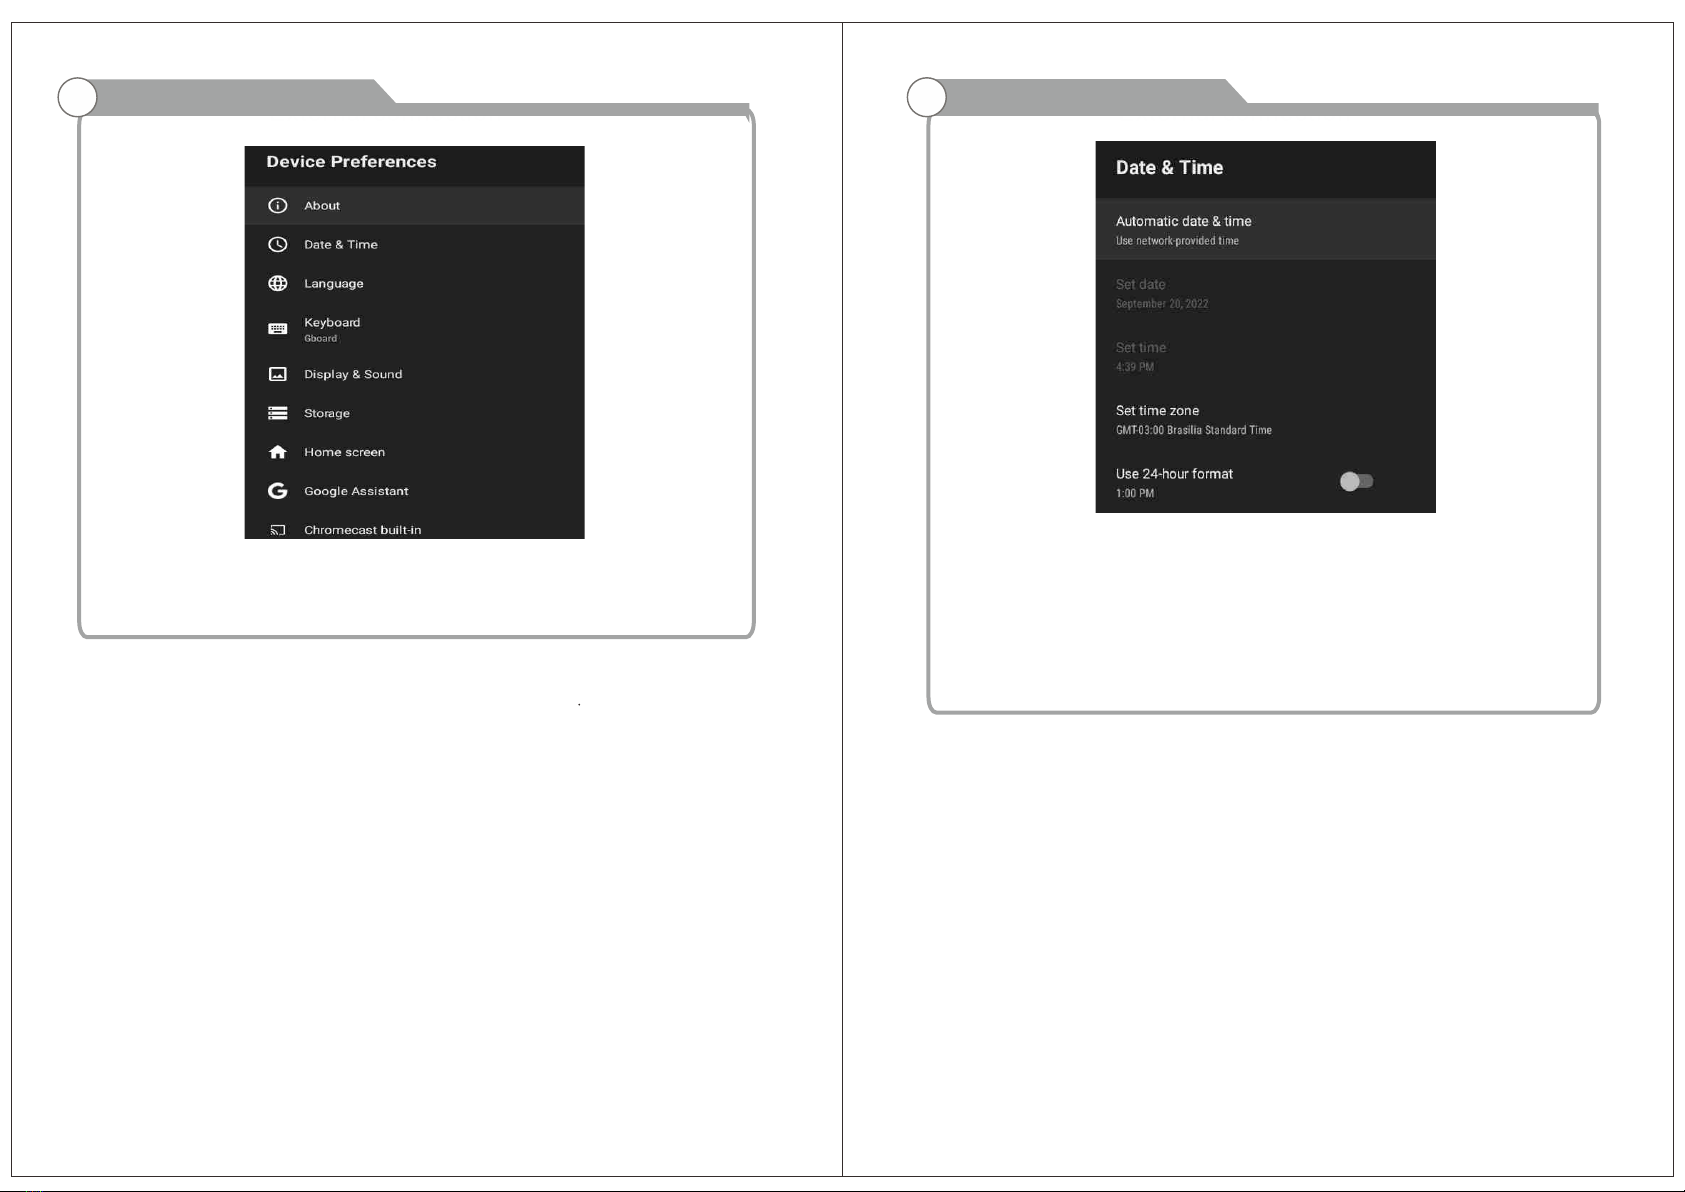
DEVICE PREFERENCES ABOUT
In this menu, you can read the information and settings of TV.
1. Press ▲/▼ button to select what you want set.
2. Press OK button to adjust.
3. After finishing your adjustment, press BACK button to return to the previous menu.
OSD Menu Operations
DATE & TIME
Automatic date & time- Press ▲/▼ button to select the option then press OK button to enter
the sub-menu.(Optional: Use network-provided time, Off)
● Manually adjusting date & time settings will automaticall change the Automatic date &
time to OFF.
Set date- Press ▲/▼ button to select the option then press OK button to enter the sub-menu.
Set time- Press ▲/▼ button to select the option then press OK button to enter the sub-menu.
Set time zone- Press ▲/▼ button to select the option then press OK button to enter the sub-
menu.
Use 24-hour format-Press ▲/▼ button to select the option then press OK button to choose
ON/OFF.

21 22
OSD Menu Operations
LANGUAGE
Language- Press ▲/▼ button to select the optionthen press button to enter the OK select
language.
Current keyboard- Press ▲/▼ button to select the option then press OK button to enter
the sub-menu.
Gboard Settings- Press ▲/▼ button to select the option then press OK button to enter
the sub-menu.
Manage keyboards- Press ▲/▼ button to select the option then press OK button to enter
the sub-menu.
KEYBOARD
OSD Menu Operations
Internal shared storage- Press ▲/▼ button to select the option then press OK button to
enter the sub-menu.
Removable Storage- Press ▲/▼ button to select the option then press OK button to enter
the sub-menu.(Note: Show external devices if available)
STORAGE
HOME SCR EE N
In this menu, you can set channels, apps, open source licenses.
1. Press ▲/▼ button to select what you want set.
2. Press OK button to adjust.
3. After finishing your adjustment, press BACK button return to the previous menu.

23 24
OSD Menu Operations
GOOGLE
In this menu, you can set searchable apps, safe search filter, block offensive words,
open source licenses.
1. Press ▲/▼ button to select what you want set.
2. Press OK button to adjust.
3. After finishiing your adjustment, press BACK button return to the previous menu.
CHROM EC AS T BUI LT-IN
In this menu, you can read the information and settings of Chromecast.
1. Press ▲/▼ button to select what you want set.
2. Press OK button to adjust.
3. After finishing your adjustment, press BACK button return to the previous menu.
OSD Menu Operations
Screen saver- Press ▲/▼ button to select the option then press OK button to enter the
sub-menu.(Optional: Turn screen off, Backdrop, Colors)
When to Start- Press ▲/▼ button to select the option then press OK button to enter the
sub-menu. (Optional: 5 minutes, 15 minutes, 30 minutes, 1 hour, 2 hours.)
Start now- Press ▲/▼ button to select the option then press OK button to enter screen
saver.
SCREE N SAVER
English
ENERGY SAVER
Turn off Display- Press ▲/▼ button to select the option then press OK button to enter the
sub-menu. (Options: 15 minutes, 30 minutes, ....24 hours, Never.)

25
Media Menu Operations
26
LOCATION
Location status- Press ▲/▼ button to select the option then press OK button to enter the
sub-menu. (Optional: Use Wi-Fi to estimate location, Off)
USAGE & DI AG NO ST IC S
Usage & diagnostics- Press ▲/▼ button to select the option then press button OK to choose
ON/OFF.
OSD Menu Operations
ACCES SI BI LI TY
Captions- Press ▲/▼ button to select the option then press OK button to enter the sub-
menu.
High contrast text- Press ▲/▼ button to select the option then press OK button to choose
ON/OFF.
Text to speech- Press ▲/▼ button to select the option then press OK button to enter the
sub-menu.
Accessibility shortcut- Press ▲/▼ button to select the option then press OK button to
choose ON/OFF.
TalkBack- Press ▲/▼ button to select the option then press OK button to enter the sub-
menu.
Switch Access- Press ▲/▼ button to select the option then press OK button to enter the
sub-menu.
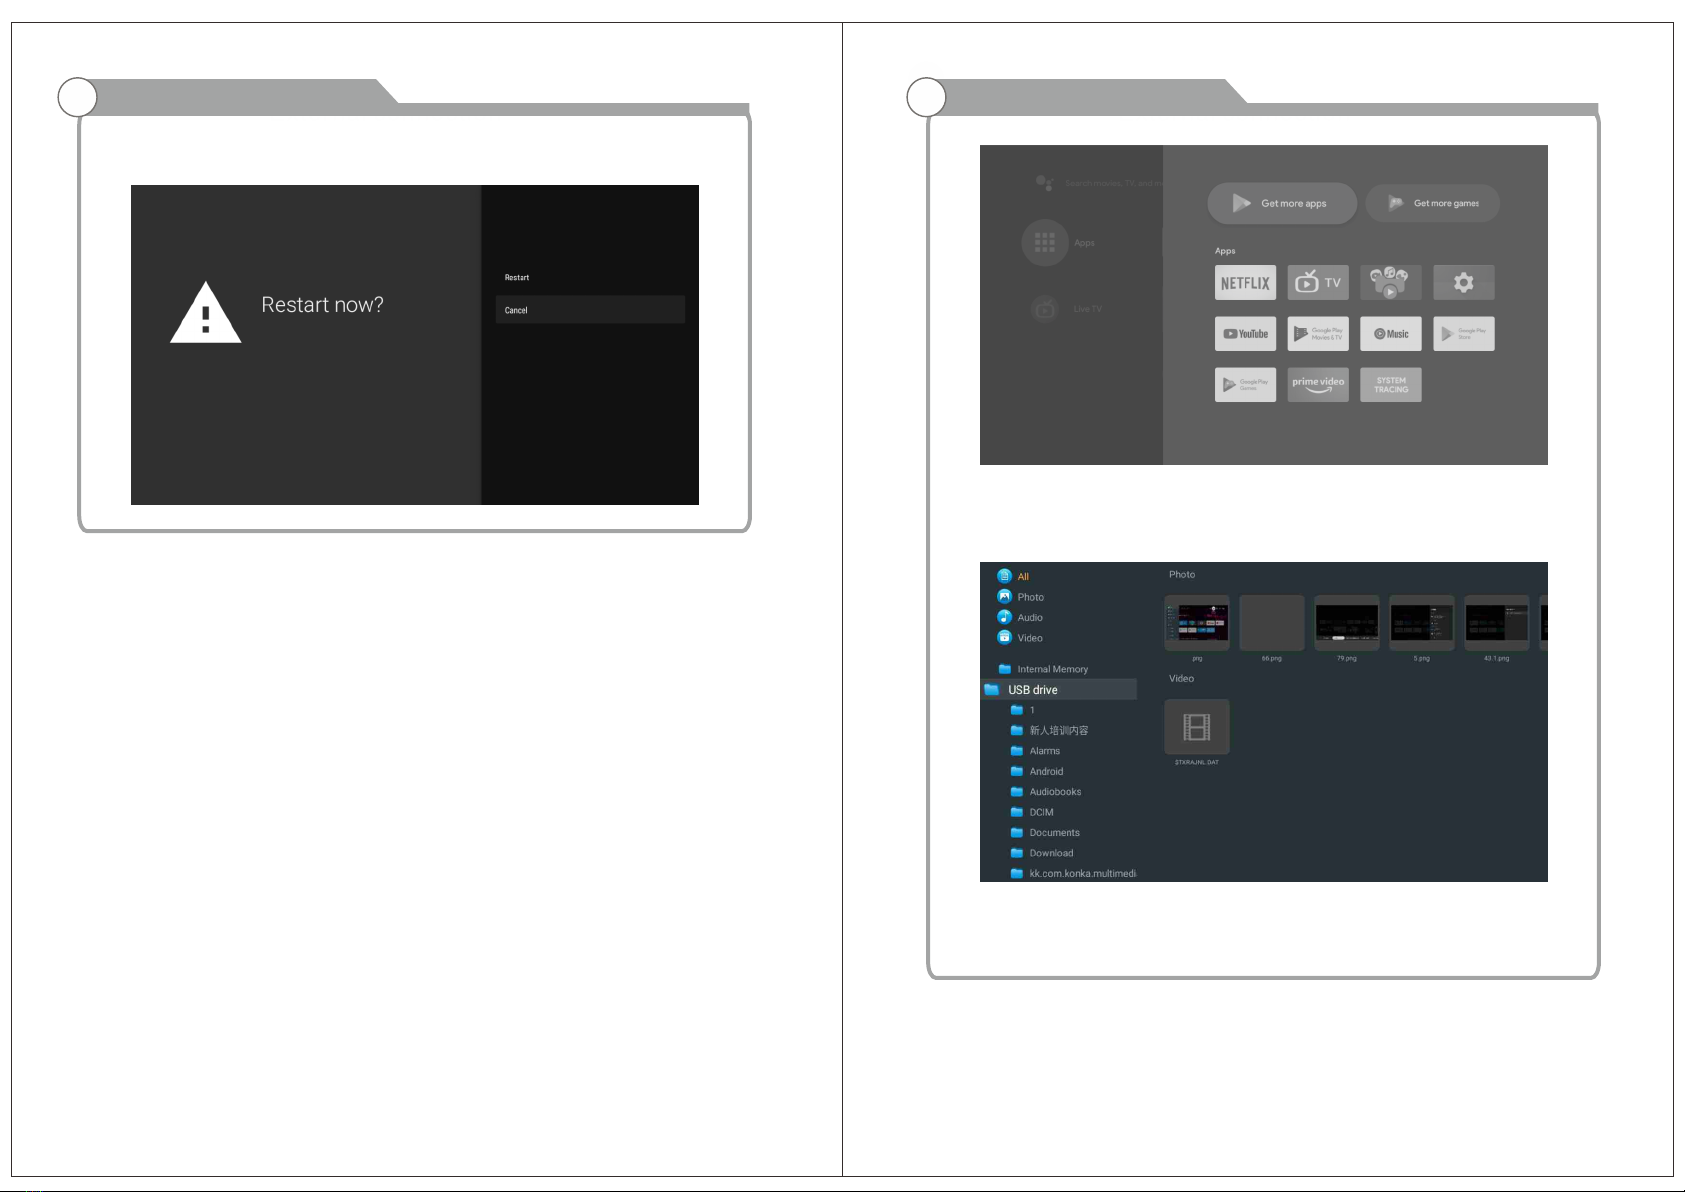
OSD Menu Operations
RESTART
Press O K button to enter the sub-menu.
Restart the TV.
27 28
OSD Menu Operations
ADD AND USE OF MEDIA PLAYE R
1. In the HOME interface, select the + icon in the APP column to add the application, and
click OK.
Press up and down to select the Media Player application, and click to add it OK to the
HOME interface.
2. Focus on the corresponding USB driver and press OK to display video, photo, audio
files.
Press navigation button to select the file.
29 30
OSD Menu Operations
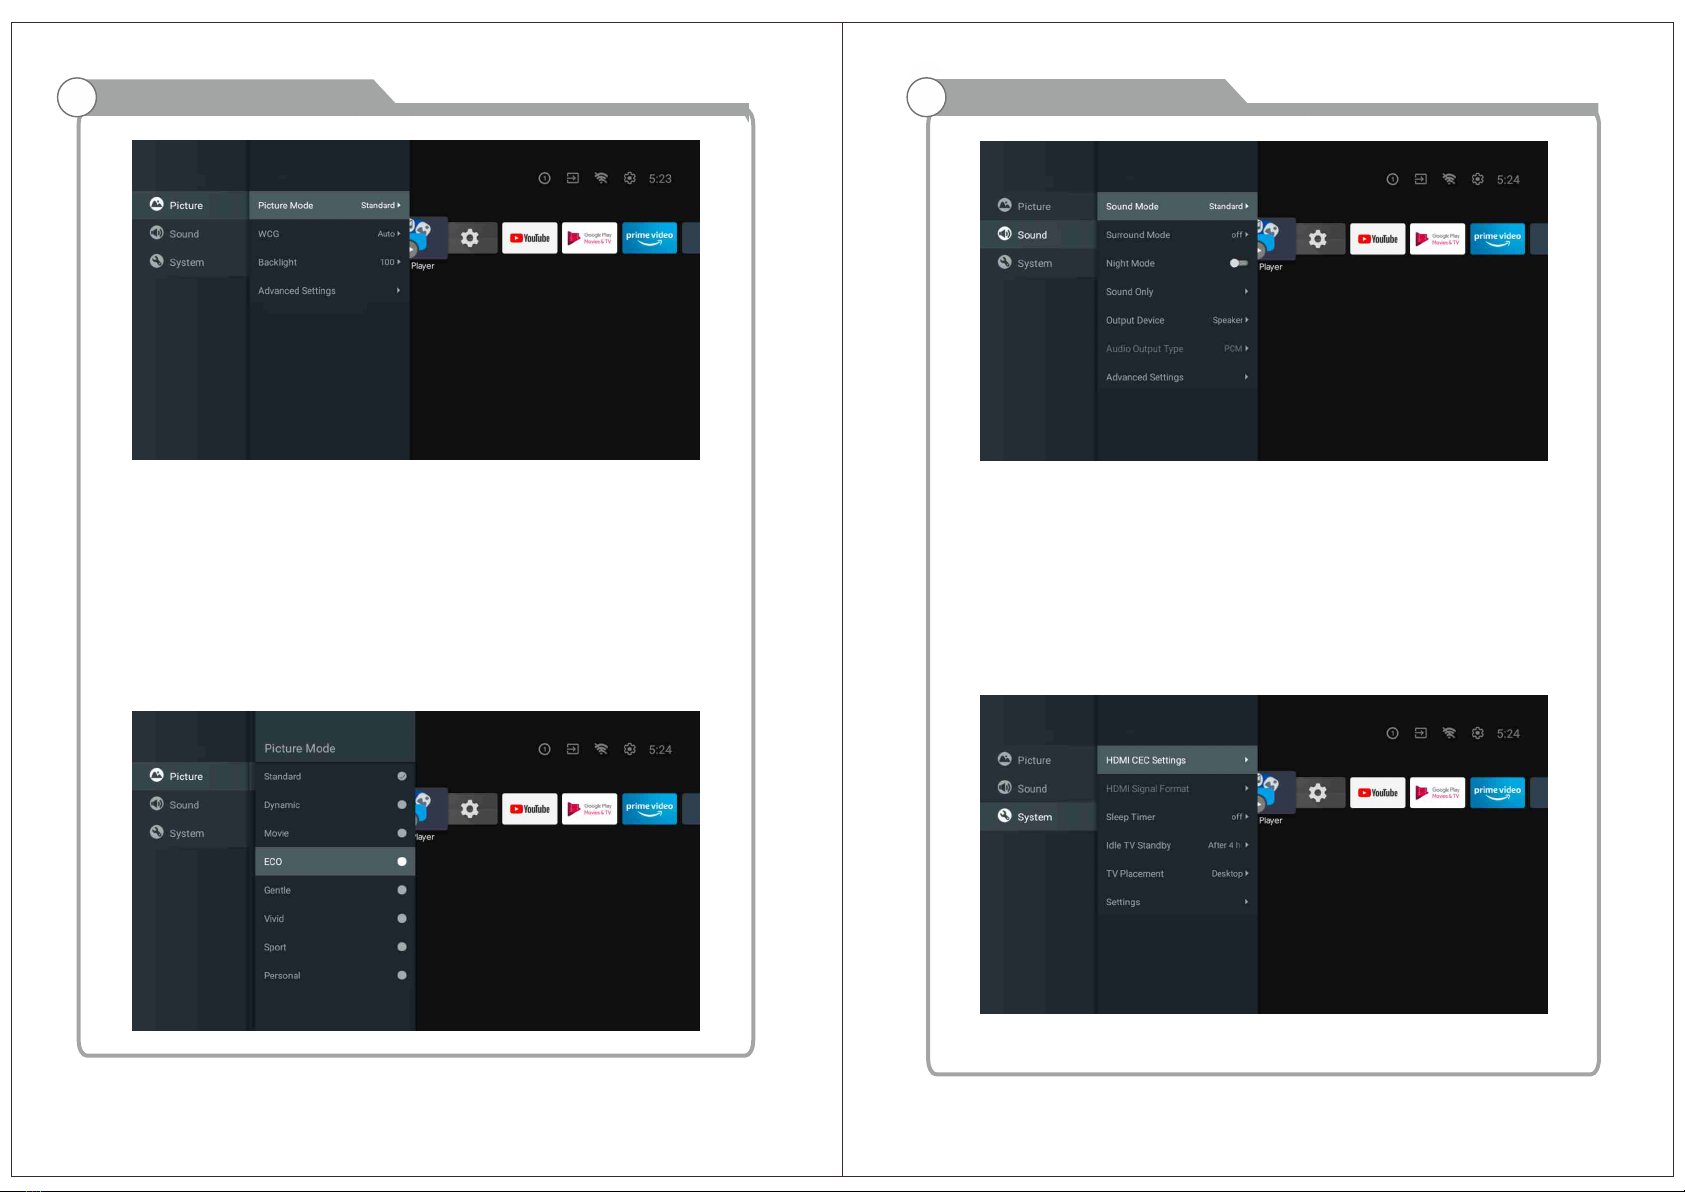
PICTU RE
Picture Mode- Press ▲/▼ button to select the option button to enter the sub-
menu.(Optional: Standard, Dynamic, Movie, Eye Comfort, Gentle, Vivid, Sport,
Personal).
Brightness/Color Saturation/Hue/Contrast/Gamma/Black Level Sharpness-
Press ▲/▼ button to select the option.
Press ◄ to decrease the parameter. Press ► to increase the parameter.
Gamma- Press ▲/▼ button to select the option.
Press ◄ to decrease the parameter.
Press ► to increase the parameter.
ECO
Press MENU key to the main menu, and select Picture.
Press button to ECO option and press OK to select the option.
OSD Menu Operations
SOUND
Press M EN U key to the main menu, and select Sound.
Sound Mode- Press OK to enter the sub-menu, press button to select option and
press O K to select the option.
Pure Sound- Press ▲/▼ button to select the option then press OK button to
choose ON/O FF.
Surround- Press ▲/▼ button to select the option then press OK button to choose
ON/O FF.
Sound Only- Press OK to enter the sub-menu, press OK button to select option.
Output Device- Press ▲/▼ to enter the sub-menu.
Audio Output Type- Press ▲/▼ to enter the sub-menu.
Advanced Settings- Press ▲/▼ to enter the sub-menu.
Press M EN U key to the main menu, and select System.
Press ▲/▼ button to select option and press OK to select the option.
SYSTE M
31 32
OSD Menu Operations
Media
Media Player
Movie
on Media Player menu, move cursor to moive, press [OK] button to enter into
FileSelector menu. Select the file you want to play, press [PLAY/PAUS E] to enter
into full screen play. Press [LEFT]/[RIGHT] button to move cursor, and operate
according to different hint.
Music
In the same way, on Media Player menu, move cursor to Music, press [OK] button
to enter into FileSelector menu. Select the file you want to play,
press [PLAY/PA US E] to enter into full screen play. Press [LEFT]/[RIGHT] button
to move cursor, and operate according to different hint.
Photo
In the same way, on Media Player menu, move cursor to Photo,
press [OK] button to enter into FileSelector menu. Select the file you want to play,
press [PLAY/PA US E] to enter into full screen play. Press [LEFT]/[RIGHT] button
to move cursor, and operate according to different hint.
DVD
SOURC E
Press the “SOURCE” button menu, through the up and down direction keys can be select,
Press the left or right button to select the DVD, and press the Enter button to enter.
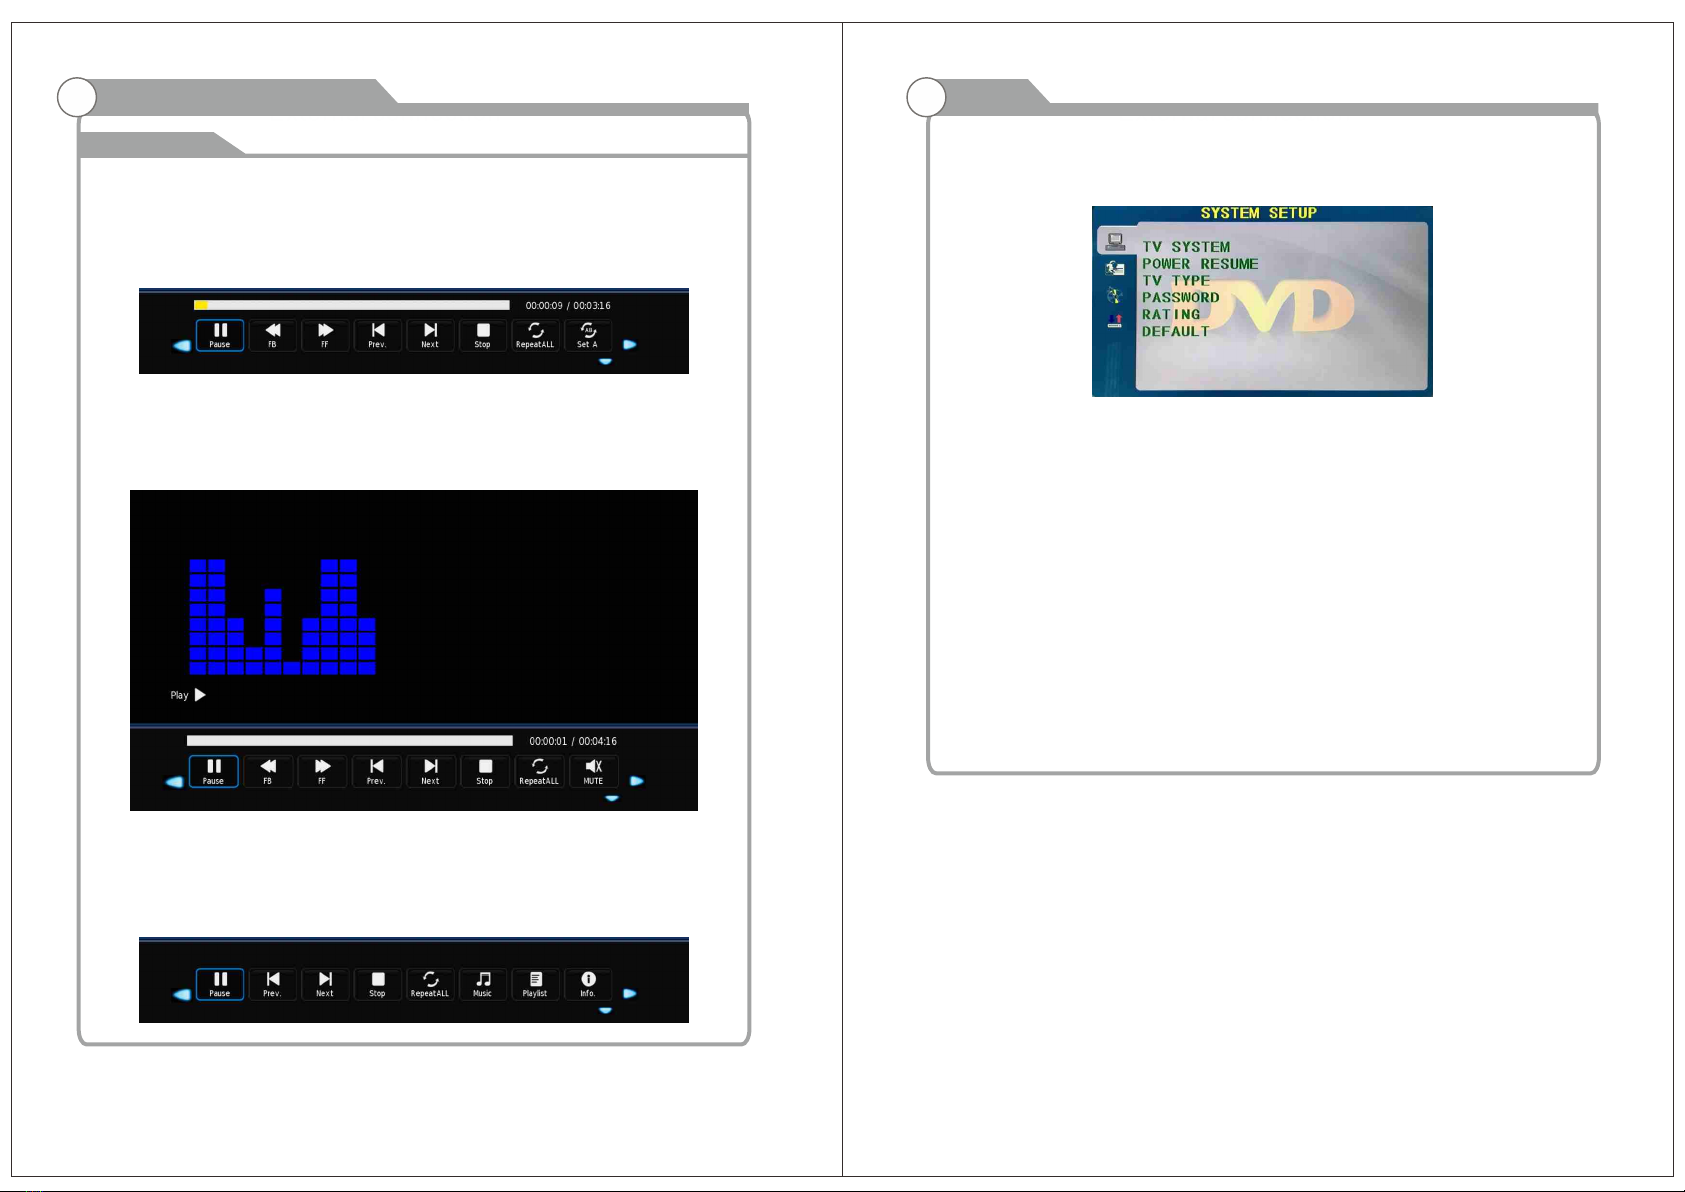
Press the DVD SE TU P button to enter.
TV SYSTE M
Set the options are: N TS C/PAL/AUTO.
POWER RE SU ME
Press the ENT ER function on or off with.
TV TYPE
Set the screen ratio options are: P S(4:3 Pan Scan), Normal/PS(4:3 Letter Box),
and Wide (16:9)the default settings is wide.
PASS WO RD
Enter “0000” to enter.
RATI NG
Level Disc Options.
DEFAULT
This option will return the DVD
to it’s factory default settings.
33 34
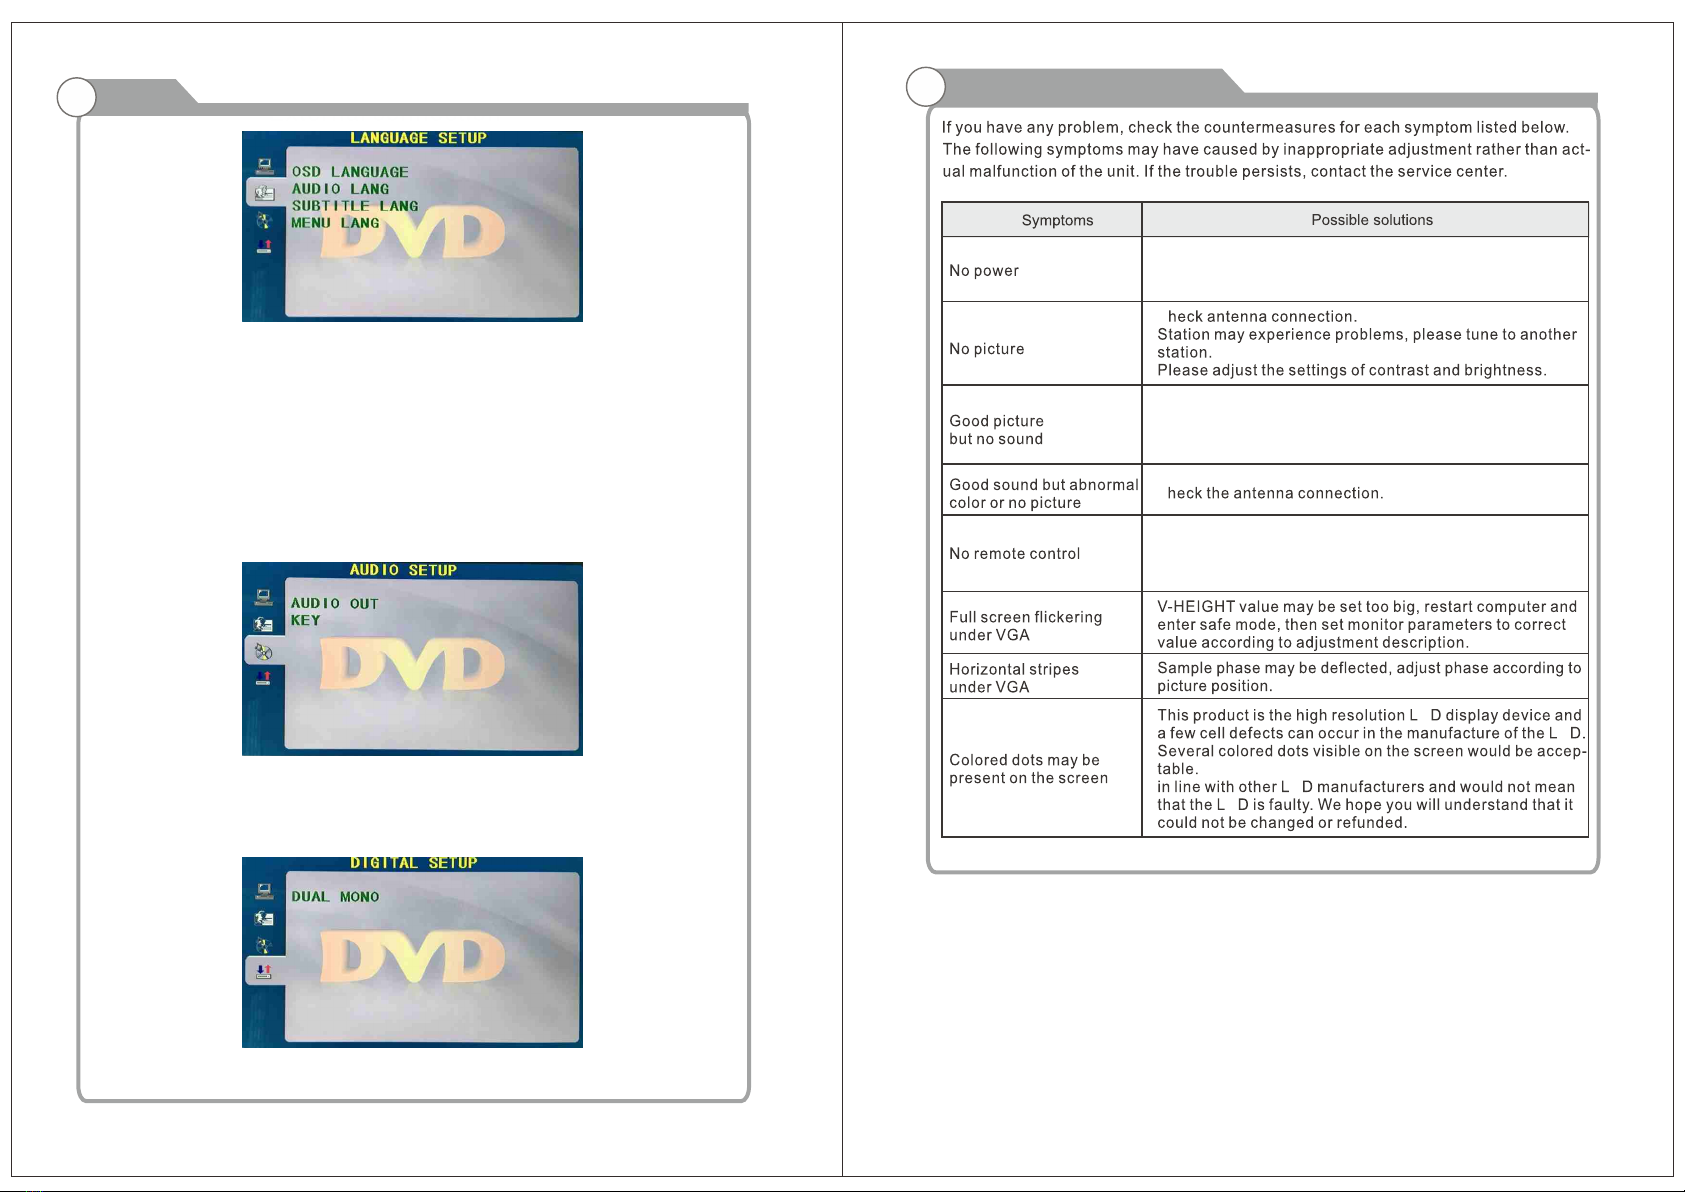
DVD
OSD LANG UA GE
Set the O SD Language options.
AUDIO LA NG
DVD language selection options.
SUBTI TL E LAN G
This player can display D VD subtitle languages if supported by the DV D disc.
when playing DVD’s you can hide the subtitle or choose any of them as the current
subtitle language.
MENU LAN G
Set the M EN U Language options.
AUDIO OU T
Press the "E NT ER" Key enter, through the up and down direction keys can be select.
KEY
Press the "E NT ER" Key enter, through the up and down direction keys can be select.
DUAL MONO
Press the "E NT ER" Key enter, through the up and down direction keys can be select.
Troubleshooting
C
C
E
E
E
E
Disconnect the power cord, wait 60 seconds then
reconnect the power cord and restart the TV.
No support for this function.
Increase the volume.
please check sound settings.
Table of contents
Other Englaon TV DVD Combo manuals


