Goodmans GPTV70WLCD User manual

TV/DVD Player User Guide
•
Before attempting to connect, operate or adjust this product, please save and read
the User Guide completely.
Playable Format:
DVD/DVD R/DVD RW/Audio CD/Kodak Picture CD/JPEG Picture CD
82-193-01030
GPTV70WLCD
CD
MP3 M HZ
KHZ R DS
D

Following items are supplied with this player:
1 x AC mains adaptor.
1 x Car Cord power adaptor.
1 x TV aerial adaptor.
1 x Remote control with battery.
1 x AV cable.
Contents
Manufactured under license from Dolby Lab o ra to ries. “Dolby” and the
double-D symbol are trade marks of Dolby Lab o ra to ries.
This symbol on the product or in the instructions means that your electri-
cal and electronic equipment should be disposed at the end of its life
separately from your household waste. There are separate collection
systems for recycling in the EU.
For more information, please contact the local authority or your retailer
where you purchased the product.

1
Contents
Safety In for ma tion ............................... 2
Important Safety Instruction .................. 3
Precautions .............................................. 4
About This User Guide ........................... 5
1-1 Getting Started .............................. 6
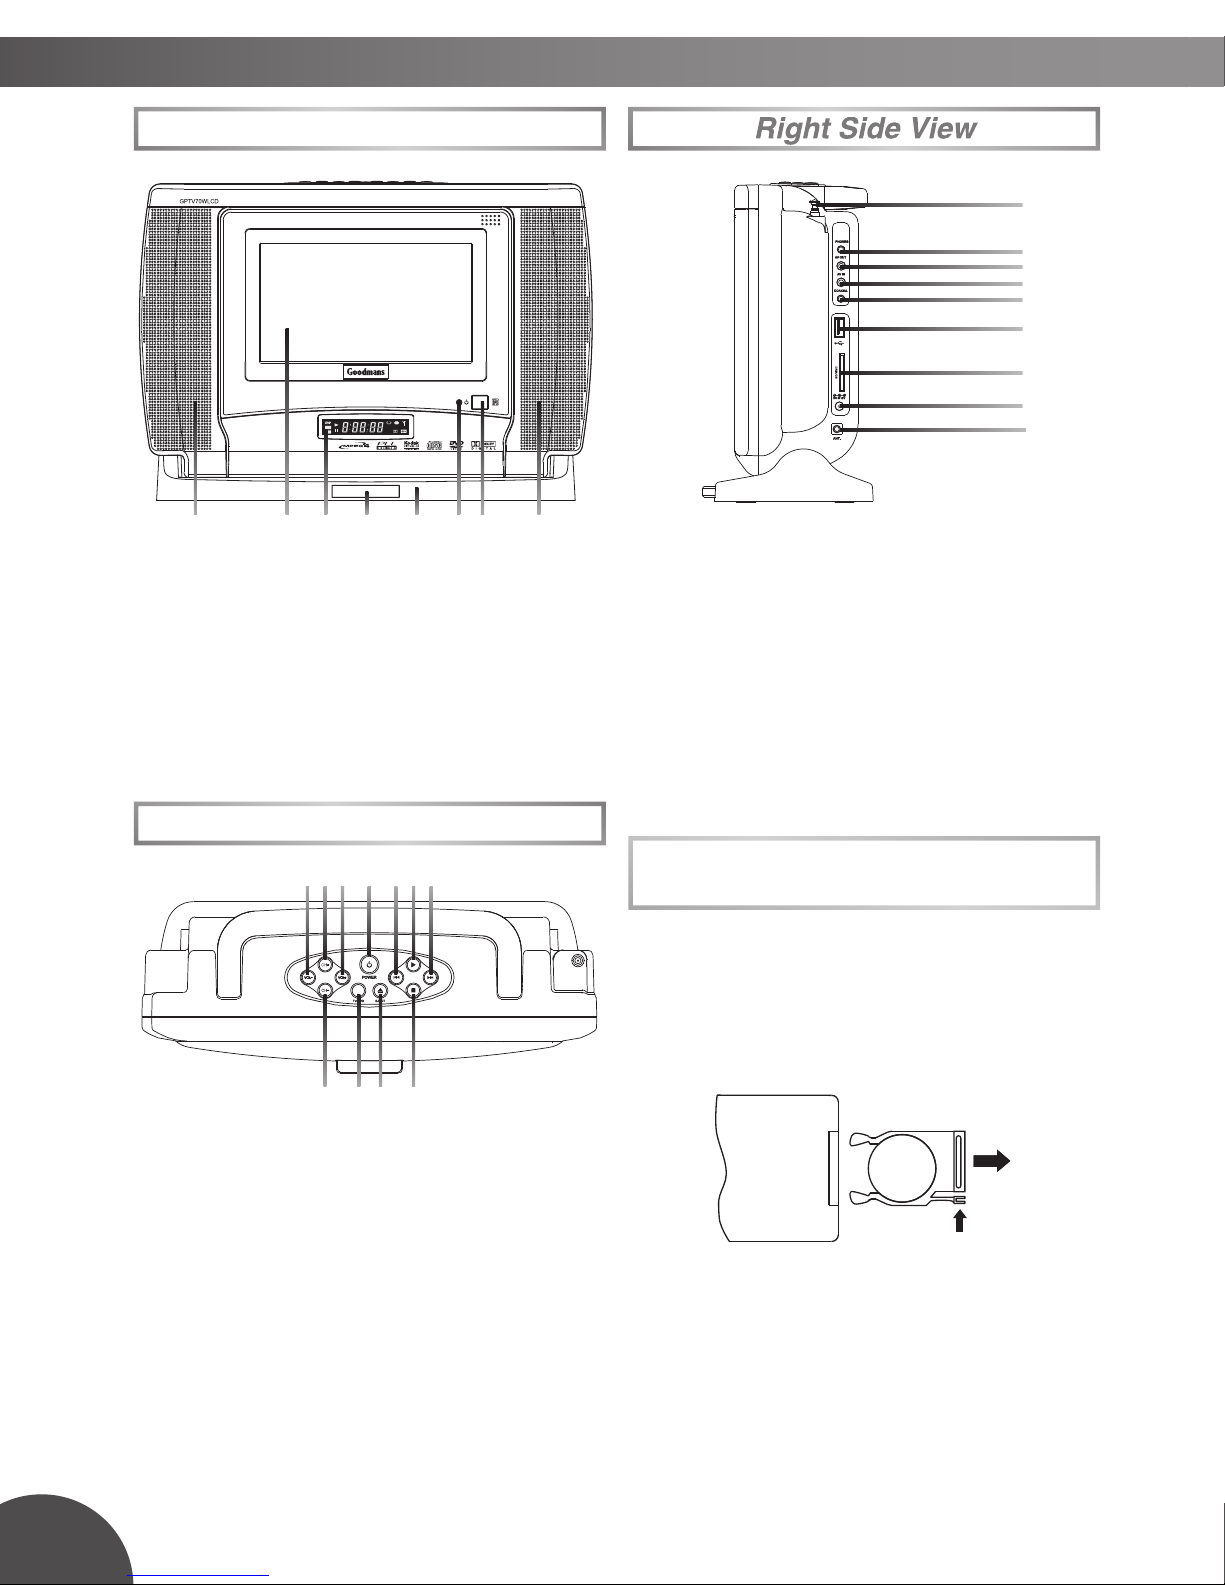
Front View .................................................. 6
Top View .................................................. 6
Right Side View ............................................ 6
Battery Installation for the Remote Control ...... 6
Remote Control .............................................. 7
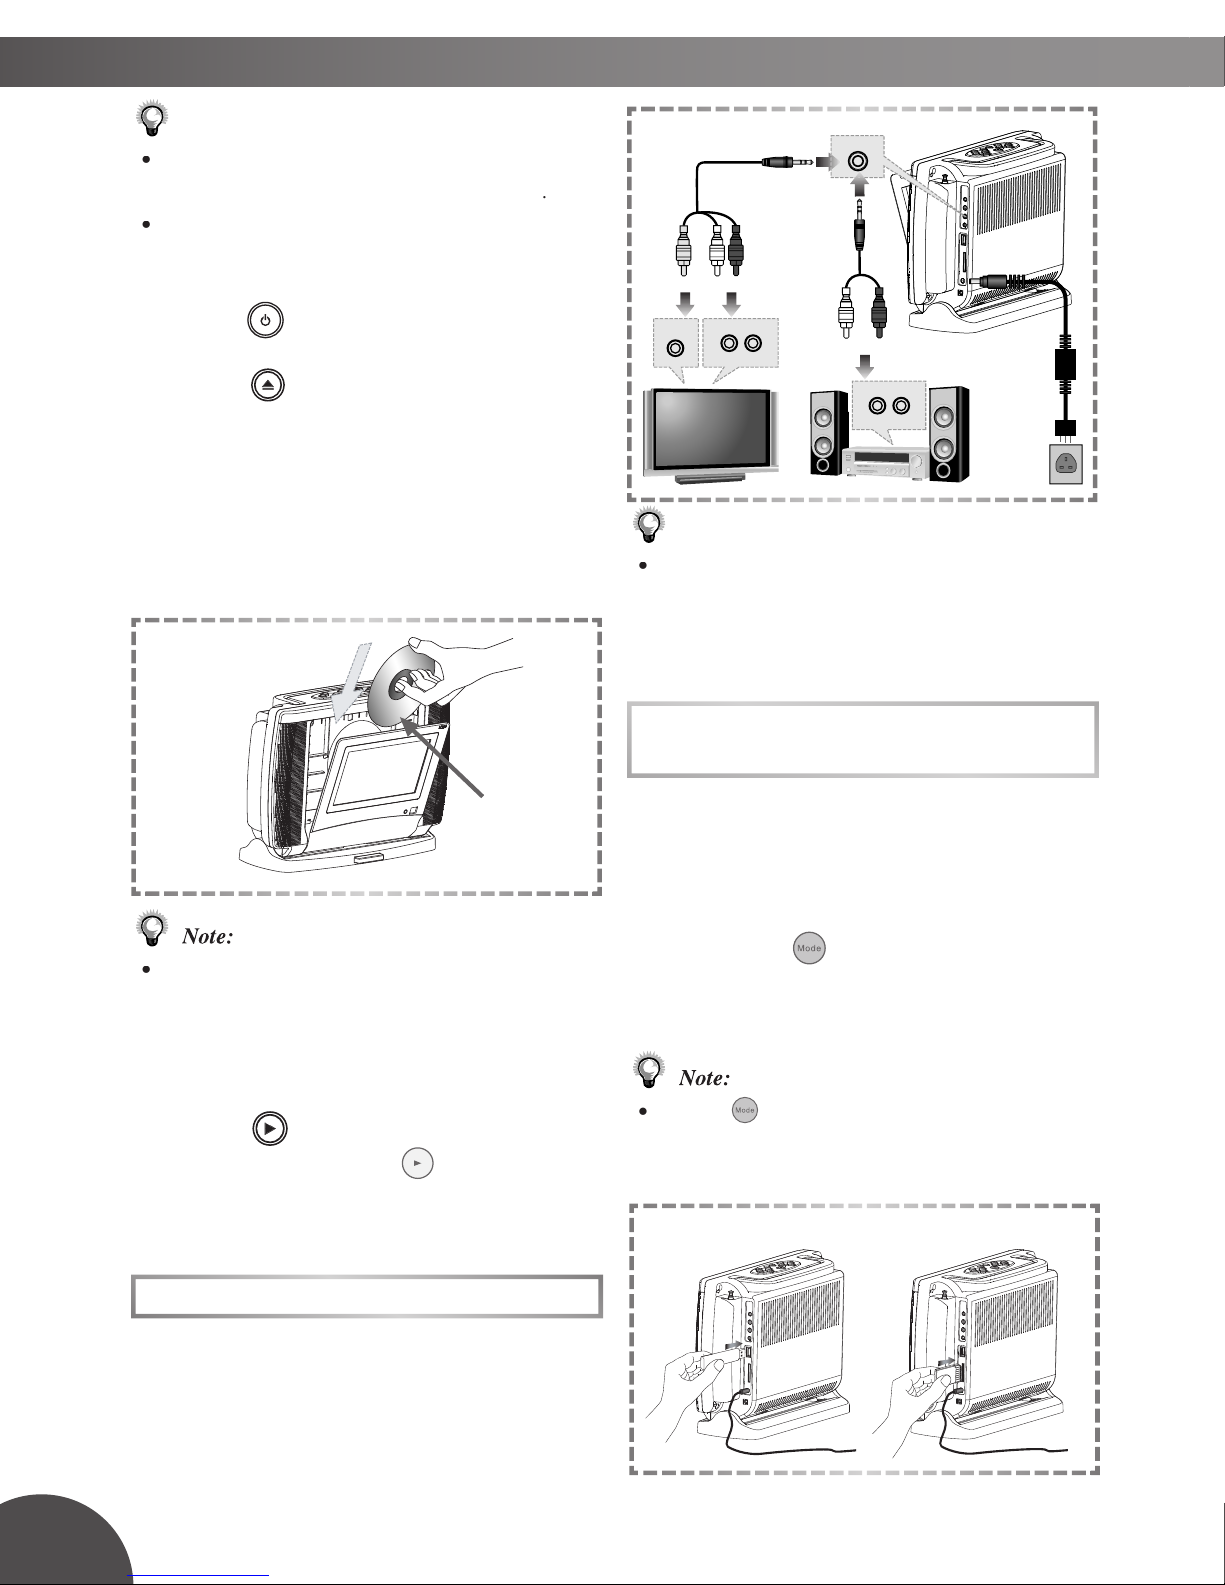
Connect to External Equipment .................... 7
Input from External Equipment ..................... 8
USB Flash Drive and MMC/SD Card Operation
... 8
Receiving TV Signal ................................ 9
How to Use TV Tuner ................................. 9
To Select Preferred Available Channels ..... 10
To Select a Speci c Channel ...................... 10
How to Search FM Redio Channels ......... 10
To Scroll Through Preset Channels ......... 10
2-1 DVD Operation .............................. 11
Basic Playback ....................................... 11
Returning to the Menu Screen .................... 11
Stopping Playback .................................... 11
Pausing Playback ...................................... 11
Frame Advance (Step) ................................. 11
Audio Mute ................................................... 11
Volume Control ........................................ 11
Fast Forward and Backward ..................... 12
Skipping a Chapter Ahead or Back ............ 12
Repeat Viewing ....................................... 12
Repeat Sections Between Two Speci c Points
(A-B Repeats) ...................................... 12
Displaying Scene Information .................. 12
Changing Audio Soundtrack Language ...... 13
Changing Subtitle Languages ...................... 13
Viewing from Different Angles ................... 13
Zooming a Scene During Playback ......... 13
Using a DVD Title Menu .............................. 13
Searching Scenes During Playback ........ 14
Programming DVD Playback .................. 14
2-2 Audio CD Operation ...................... 15
Basic Playback ........................................... 15
Repeat Playback ......................................... 16
Repeat Sections Between Two Speci c Times
(A-B Repeat) .................................... 16
2 Channel Audio Output Adjustment ........ 16
3D Audio Output Adjustment ................ 16
Searching Music During Playback ........... 17
Programming Music Playback .................. 17
2-3 Kodak and JPEG Picture CDs
Operation .............................................. 18
Basic Playback ......................................... 18
Zooming Pictures .................................... 18
Rotating Pictures ..................................... 19
Repea Playback ..................................... 19
Programming Pictures in Title Menu ............ 19
Changing Slideshow Display ................. 19
3 Initial OSD Setting ............................. 20
Major OSD Settings ............................ 20
3-1 Language Setup ............................. 21
OSD Language .......................................... 21
Audio Language ....................................... 21
Subtitle Language .................................. 22
Menu Language .......................................... 22
3-2 Audio Setup .................................... 23
Digital Out ................................................. 23
Downmix .................................................. 23
Night Mode ............................................. 24
3-3 Video Setup .................................... 25
TV Type ................................................. 25
Brightness ............................................... 25
Contrast .................................................. 26
Hue ............................................................ 26
Saturation .................................................. 26
3-4 System Setup .................................... 27
Screen Saver .............................................. 27
Angle Mark ................................................. 27
Default ........................................................... 28
4-1 LCD Setting .................................... 29
Panel Setting ............................................. 29
Invert Setting ............................................ 29
Colour Setting ............................................. 29
Brightness Setting ...................................... 29
5-1 Troubleshooting ........................... 30
5-2 Disc Handling and Maintenance
............................................................. 32

2
Since it is usual for DVD movies to be released
at dif fer ent times in different regions of the world,
all players have region codes and disc can have
an op tion al region code. If you load a disc of a
different region code to your player, you will see
the region code notice on the screen. The disc
will not play, and should be unloaded.
This player is set to Region 2.
(Possible region codes:)
There are 6 regions (also called “locals”). Each
DVD play er and disc will be played in one re-
gion ONLY.
1:
Canada, U.S., U.S. Territories
2:
Japan, Europe, South Africa, Middle East
(including Egypt)
3:
Southeast Asia, East Asia (including Hong
Kong)
4:
Australia, New Zealand, Pacific Islands,
Central America, Mexico, South America,
Car ib be an
5:
Former Soviet Union, Indian Subcontinent,
Africa (also North Korea, Mongolia)
6:
China
Never make or change connections
with the power switched on.
CAUTION:
This unit employs a laser. Due to possible
eye injury, only quali ed service person-
nel should remove the cover or attempt
to service this de vice. Use of controls,
ad just ments, or the per for mance of
procedures other than those spec i fied
herein may result in hazardous radiation
exposure.
NOTE:
This equipment has been tested and found
to comply with the limits for a Class B digital
device pursuant to part 15 of the FCC Rules.
These lim its are designed to provide rea son -
able protection against harmful in ter fer ence
in a residential in stal la tion. This equipment
generates, uses and can radiate radio fre-
quen cy energy and, if not in stalled and used
in accordance with the in struc tions, may cause
harmful interference to radio com mu ni ca tions.
However, there is no guarantee that interfer-
ence will not occur in a par tic u lar in stal la tion.
If this equipment does cause harmful interfer-
ence to radio or television reception, which
can be determined by turn ing the equipment
off and on, the user is encouraged to try to
correct the interference by one or more of the
following measures:
–
Reorient or relocate the receiving an-
ten na.
–
Increase the separation between the equip-
ment and receiver.
–
Connect the equipment into an outlet on a
cir cuit different from that to which the re ceiv er
is connected.
–
Consult the dealer or an experienced ra dio/
TV technician for help.
This product incorporates copyright pro tec tion
tech nol o gy that is protected by method claims
of certain U.S. patents and other intellectual
property rights owned by Macrovision Cor-
poration and other rights owners. Use of
this copyright protection technology must be
authorized by Macrovision Corporation, and
is intended for home and other limited view-
ing uses only unless otherwise au tho rized
by Macrovision Corporation. Reverse en gi -
neer ing or dis as sem bly is prohibited.
CAUTION
VISIBLE AND INVISIBLE LASER RADIA-
TION WHEN OPEN AVOID EX PO SURE
TO BEAM (WARNING LO CATION: INSIDE
ON LASER COVER SHIELD)
Safety Information

3
Important Safety Instruction
1.
Read and keep these instructions.
2. Pay attention to all warnings.
3.
Follow all instructions.
4.
Do not use this apparatus near water.
5.
Clean only with a damp cloth.
6.
Do not block any of the ventilation openings. Install in accordance with the man u fac tur er’s
instructions.
7.
Do not install near any heat sources such as radiators, heat registers, stoves, or other apparatus
(including ampli ers) that produce heat.
8.
Protect the power cord from being walked on or pinched particularly at plug, con ve nience
receptacles, and the point where they exit from the apparatus.
9.
Only use attachments/accessories speci ed by the manufacturer.
10.
Unplug this apparatus during lighting storms or when unused for long periods of time.
11.
Refer all servicing to quali ed service personnel. Servicing is required when the ap pa ra tus has
been damaged in any way; such as when the power-supply cord or plug is damaged, liquid
has been spilled or objects have fallen into the apparatus, the apparatus has been exposed
to rain or moisture, does not operate normally, or has been dropped.
12. Ambient Temperature 0~40°C.
WARNING
: To reduce the risk of re or electric shock, do not expose this apparatus to rain or
moisture.

4
Please read these precautions before op er at ing the unit.
n
Power cord protection
To avoid any malfunctions of the unit, and to protect against electric shock, re or personal injury,
please observe the fol low ing.
l
Hold the plug rmly when con nect ing or dis con nect ing the AC power cord.
l
Keep the AC power cord away from heating appliances.
l
Never put any heavy object on the AC power cord.
l
Do not attempt to repair or reconstruct the AC power cord in any way.
n
Placement
Avoid placing the unit in areas of:
l
Direct sunlight or heating radiators, or closed automobiles
l
High temperature (over 35
C) or high humidity (over 90%)
l
Much dust as the internal parts may be seriously damaged.
n
Non-use periods
When the unit is not being used, turn it off. When left unused for a long period of time, the unit
should be unplugged from the household AC outlet.
n
No ngers or other objects inside
l
Touching internal parts of the unit is dan ger ous, and may cause serious damage to the unit.
Do not attempt to disassemble the unit.
l
Do not put any foreign object on the disc tray.
n
Keep away from water/magnet
l
Keep the unit away from ower vases, tubs, sinks, etc. If liquids are spilled into the unit, serious
damage could occur.
l
Never bring a magnet or magnetized object near the unit.
n
Condensation
Moisture may form on the lens in the following conditions:
l
Immediately after a heater has been turned on
l
In a steamy or very humid room
l
When the unit is suddenly moved from a cold environment to a warm one If moisture forms
inside the unit, it may not operate properly. In this case, turn on the power and wait about one
hour for the moisture to evaporate.
n
If there is noise interference on the TV while a broadcast is being received
Depending on the reception condition of the TV, interference may appear on the TV monitor while
you watch a TV broadcast and the unit is left on. This is not a malfunction of the unit or the TV.
To watch a TV broadcast, turn off the unit.
Precautions

5
About This User Guide
Note: Before attempting to connect, operate or adjust this product, please save and read
this
User Guide
completely.
User Guide completely.User Guide
Thank you
for buying this product. Instructions in this
User Guide
describe mainly the use of the
User Guide describe mainly the use of the User Guide
remote control. Buttons with the same or similar marking on product itself, have the same functions
as those of the remote control. For introduction to the panels, buttons (Remote Control), and various
connections, please refer to the
Quick Guide
.
To turn on the DVD player, press
Power
on the top panel of the player.
To switch the unit to Stand-by mode, press
Power
on the remote control. To resume
to Play mode, press
Power
again.
When turning on the DVD Player, the unit directly enters “TV Tuner” Mode.
If a disc is already placed on the disc tray, the player will start to load the disc right after power
is turned on.
To switch to other modes, please do the following:
If there is no disc placed in the player,
press
Mode
to toggle through different modes.
If there is a disc placed in the player, press
Stop
twice to completely stop DVD playback.
Press
Mode
to toggle through different modes.
When pressing
Stop
once during DVD playback, the player enters a pre-stop status and
memorises the position where the playback is stopped. To start play from where the playback
has been stopped, press
Play
.
Press
Stop
twice to completely stop playback.
If an “
INVALID KEY” appears on the left top corner of the screen, it indicates that the
action is not available.
r
r
r
r
r
1.
2.
r
r
r

6
1-1 Getting Started
Front View
Front View Front View
CD
MP3 MH Z
KHZ RD S
D
1.
LCD Screen
2.
Speakers
3.
Power Indicator
4.
Remote Sensor
5.
LED Display
6.
Remote Control Frame
7.
Base
1.
2.
3.
4.
5.
6.
7.
8.
9.
10.
11.
1.
VOLUME(-) Button
2.
CHANNEL(+) Button
3.
VOLUME(+) Button
4.
POWER Button
5.
PREVIOUS Button
6.
PLAY Button
7.
NEXT Button
8.
CHANNEL(-) Button
9.
TV/DVD Button
10.
EJECT Button
11.
STOP Button
Top View
Top View Top View
1.
2.
3.
4.
5.
6.
7.
8.
9.
1.
ANTENNA
2.
PHONES Socket
3.
AV OUT Socket
4.
AV IN
Socket
5.
COAXIAL Output
Socket
6.
USB
Socket
7.
MMC/SD Card Slot
8.
DC IN
Socket
9.
AERIAL IN (Ant.)
Socket
+
CR2025
OPEN
PUSH
Right Side View
Right Side View Right Side View
Battery Installation for the
Remote Control
Insert the battery and match the (+) and (-)
on battery to the marks inside the battery
compartment. Remove the insulating mylar
strip from the battery compartment before
the remote is used for the rst time.
Service life of battery:
1.
The battery normally lasts for about
one year although this depends on
how often and for what operations the
remote control is used.
2.
Use a 3V lithium battery. (No. CR2025
or equivalent)
REAR OF
REMOTE
CONTROL
3.
4.
7.
6.
5.
2.
2.
1.

7
23.
Search Button
24.
Mute Button
25.
Stop Button
26.
TV Source/Info. Button
27.
Channel(-)/Previous Button
28.
Channel(+)/Next Button
29.
Program Button
30.
Repeat Button
31.
Number Buttons
Connect to External Equipment
1
Connect the unit to the supplied AC
adapter.
Connect the supplied AC adapter to the DC
IN on the right side of the unit.
2
To enjoy a better listening and viewing
quality, connect the unit to external
equipment, such as a TV or an ampli er
with speakers.
1-1 Getting Started
Remote Control
16.
2.
18.
4.
20.
6.
22.
8.
24.
10.
26.
12.
28.
14.
29.
30.
31.
17.
3.
15.
1.
19.
5.
21.
7.
23.
9.
25.
11.
27.
13.
1.
Setup Button
2.
Power Button
3.
Subtitle Button
4.
Zoom Button
5.
Cursor
Button (
)
6.
Menu Button
7.
OK Button
8.
Cursor
Button (
)
9.
Cursor
Button (
)
10.
Return Button
11.
Pause Button
12.
Play Button
13.
Fast Forward Button
14.
Fast Backward Button
15.
LCD Button
16.
Mode Button
17.
Angle Button
18.
Audio Button
19.
Title Button
20.
Volume(+) Button
21.
Cursor
Button (
)
22.
Volume(-) Button
(White) (Red)
Audio
I
n
put
(Yellow)
Video
Input
(White) (Red)
Audio Input
OR OR
Yellow White Red
Yellow White Red
Orange
AV OUT
PHONES
COAXIAL

8
1-1 Getting Started - continued
Note:
•
Before connecting, make sure to turn off the power
on the player and the external equipment
.
•
Make sure the external equipment supports
inputs from the player.
3
Press
Power
button on the top panel.
4
Press
Eject
button on the top panel
to open the disc cover. Pull the cover
forward, if necessary.
5
Gently hold the edge of the disc, then
put it in the disc compartment with the
printed facing the front of the player.
Note:
•
This player will not play 8 cm (3.15 in.) DVD
discs.
6
Close the disc cover.
7
Press
Play
button on the top panel
of the unit or
Play
on the remote
control to play the disc.
Input from External Equipment
It is possible to input images and sounds
from external equipment by connecting the
player to external equipment with Audio
cable or Video cable.
(Yellow)
Video
Output
(White) (Red)
Audio Output
(White) (Red)
Audio Output
OR
Yellow White Red
White Red
AV IN
Printed
Side
Note:
•
Make sure the external equipment to be used has
output connections available for the inputs on
the unit.
USB Flash Drive and MMC/SD
Card Operation
1
Insert a USB Flash Drive to the USB
socket or a MMC/SD card to the card slot
on the right panel of the DVD player.
2
Press the
Mode
button repeatedly
to select USB Mode or MMC/SD Card
Mode.
Note:
•
Press
Mode
repeatedly to toggle through dif-
ferent modes, including “TV TUNER”, “DVD”,
“USB”, “CARD” and “AV IN”.
Insert a USB Flash Drive
Insert a MMC/SD Card

9
1-1 Getting Started - continued
3
A le list appears on the screen, press
Up
/
Down
on the remote control to
select a preferred Picture or Music le.
4
Press
OK
or
Play
.
Note:
•
If the JPEG le size is over 1.0 MB, it may take
more time to read.
Receiving TV Signal
Connecting Option:
For best reception connect your existing
home TV aerial. The inbuilt telescopic
aerial can only be used when located in a
high signal strength area.
Note:
Before connecting your TV aerial to the
aerial input socket you will need to attach the
supplied aerial adaptor.
How to Use TV Tuner
1
Press
Power
on the top panel.
The player directly enters “TV Tuner”
Mode.
The DVD player has a “blue screen” mode
which is used to:
•
replace weak or “noisy” video signals
with a blue screen
•
mute the audio portion which may be
disturbing under such conditions
When you rst turn on the unit, the blue
screen mode will be ON.
Press
Return
on the remote control
whenever you wish to toggle the blue screen
mode from ON to OFF, or vice versa.
2
Press
Search,
a TV tuner window is
shown on the screen.
3
Press
Up
/
Down
to highlight a
preferred option.
4
Press
Left
/
Right
to select a
setting for the highlighted option.
Channel
•
Press
Right
to select the next channel
Right to select the next channel Right
or
Left
to select the previous channel.
Freq:
•
Press
Right
to increase the fre-
quency or press
Left
to decrease
the frequency for the best tuning.
Auto search:
•
Press
Right
and tuner search starts
automatically.
5
To leave the TV tuner window, press
Search
again.
CHANNEL
56
FREQ
415.3MHz
AUTO RESEARCH
PAL
Antenna

10
1-1 Getting Started - continued
To Select Preferred Available Channels
1.
Press
Channel-
/
Channel+
.
Note:
•
This function only works with channels that have
been found already using the auto search.
To Select a Speci c Channel
1.
Press
Number Button(s)
specify the
channel.
How to Search FM Radio Channels
1.
Press
Mode
to select TV Tuner
Mode.
2.
Press
TV
to select FM Radio
source. The LED display indicates FM
source available.
3.
Press
Search,
the radio program
scan starts and will store any found
stations to the preset memories.
Please note in some cases noise (hiss)
can be mistaken for a station and stored
to a preset.
4.
To stop searching, press
Stop
.
To Scroll Through Preset Channels
1.
Press
Channel-
/
Channel+
to cycle through the stations stored to
preset memories after performing the
automatic search.

11
2-1 DVD Operation
Preparations:
Please connect the Portable DVD Player to a source
of Power and connect it to external equipment if
necessary. If external equipment is being used:
•
Turn the external TV ON and select its video input
that is connected to the DVD player’s Video Out.
•
Turn the stereo system on if the DVD player’s
audio output has been connected to it.
•
When “INVALID KEY” appears, it indicates that
the feature is not available.
Basic Playback
1
Press
Power
on the top panel. Press
Mode
button repeatedly until DVD
is shown on the screen.
2
Press
Eject
on the top panel
to open
the disc cover and place a disc.
3
Close the cover. The disc starts playing
automatically. If the disc contains a title
menu, the menu will be displayed on the
screen.
4
To play a title,
press
Up
/
Down
to highlight it
and then press
OK
or
Play
.
Returning to the Menu Screen
1
Press
Menu
or
Return
during
playback.
Note:
•
This function only works when the disc contains
a title menu.
•
If the disc is placed in upside down (and it is a
single sided disc), the player will display “NO
DISC”.
Stopping Playback
1
Press
Stop
once to enter prestop
mode. In prestop status, the disc can
be played play from where the playback
has been stopped by pressing
Play
.
2
To completely stop the disc playback,
press
Stop
again. If the
Play
button is pressed again playback will
commence from the beginning of the
disc.
Pausing Playback
1
Press
Pause
once to pause
playback.
2
To return to normal playback,
press
Play
.
Frame Advance (Step)
1
Press
Pause
. Then for each press
of the
Pause
button,
the disc is
advanced by one frame.
2
To return to normal playback,
press
Play
.
Audio Mute
1
Press
Mute
once.
2
To restore the audio, press
Mute
again.
Volume Control
1
Press
Volume
during playback.

12
2
Press
Right
repeatedly to select the
following options:
REP: [ CHAPTER ]
:
Repeat Chapter
REP: [ TITLE ]
:
Repeat Title
REP: [ OFF ]
:
Repeat Off
Repeat Sections Between Two
Speci c Points (A-B Repeat)
1
Press
Repeat
during playback, a
repeat information box appears on the
screen.
LEFT REP AB RIGHT REP DISC
2
Press
Left
during playback at the
point where section to be repeated is
started (A).
REPEAT A-
is shown on the screen.
3
Press
Left
again at the point where
the section to be repeated ends (B).
REPEAT A-B
is shown on the screen.
4
To return to normal playback, press
Left
again during the repeat playback.
A-B CANCEL
is shown on the screen.
Displaying Scene Information
1
Press
Info.
during playback, an
information display appears on the top
of the screen and shows the information
of Title, Chapter and Time.
2
Press
Info.
again, information relating
to Audio, Subtitle and Angle is shown.
3
To stop displaying scene information,
press
Info.
again.
Fast Forward and Backward
1
Press
Fast Forward
or
Fast
Backward
during playback.
The speed of advance (
FORWARD
x2,
x2,
FORWARD
x4,
x4,
FORWARD
x8 and
x8 and
FORWARD
x20)
x20)
or reverse (
BACKWARD
x2,
x2,
BACKWARD
x4,
BACKWARD
x8 and
x8 and
BACKWARD
x20)
x20)
changes for each press of
Fast Forward
or
Fast
Backward
.
2
To return to normal playback,
press
Play
.
Skipping a Chapter Ahead or Back
Skipping Ahead
1
Press
Next
during play back.
Press
Next
once midway through a chapter,
and playback will start from the next chapter. The
previous chapter is selected each time the button is
pressed.
Skipping Back
1
Press
Prev.
during play back.
Press
Prev.
once midway through a chapter,
and playback will start from the previous chapter. A
chapter is skipped each time the button is pressed.
Repeat Viewing
1
Press
Repeat
during playback, a
repeat information box is shown on the
screen.
LEFT REP AB RIGHT REP DISC
2-1 DVD Operation - continued

13
Changing Audio Soundtrack Language
1
Press
Audio
during play back. An audio
Audio during play back. An audio Audio
display appears at the top of the screen.
2
To change audio soundtrack
languages,
press
Left
repeatedly
until a preferred language is selected.
Note:
•
This operation functions only with discs on which
multiple audio soundtrack languages are recorded.
•
When you turn on or remove the disc, the unit
will playback the language selected at the initial
setting. If you select a language which is not
recorded on the disc, the Portable DVD player
will playback the default language programmed
on the disc.
Changing Subtitle Languages
1
Press
Subtitle
during play back.
2
Press
Subtitle
repeatedly
until the
preferred language is selected.
3
To clear the subtitle display,
press
Subtitle
repeatedly
until
: [ OFF ]
appears on the
screen.
Note:
•
This operation works only with discs on which
multiple subtitle languages are recorded.
•
In some cases, the subtitle language may not
change immediately to the selected one.
•
When you turn on or remove the disc, the DVD
player will playback the subtitle language which
is selected as the initial setting. If you select a
subtitle language which is not recorded on the
disc, the player will playback the default subtitle
language programmed on the disc.
2-1 DVD Operation - continued
Viewing from Different Angles
1
Press
Angle
during play back.
2
Press
Angle
a number of times until
a preferred viewing angle is selected.
Note:
•
This operation works only with discs on which
multiple viewing angles are recorded.
•
The viewing angles are shown on the player’s
display and you can select one from them for
viewing.
Zooming a Scene During Playback
1
Press
Zoom
repeatedly
during
playback to cycle through the following
zoom settings
Zoom 2
,
Zoom 3
,
Zoom
4
,
Zoom 1/2
,
Zoom 1/3 and Zoom
1/4
.
2
To return to normal playback,
press
Zoom
repeatedly
until
ZOOM: [ OFF ]
is shown
.
Using a DVD Title Menu
1
Press
Title
in stop mode. The
available DVD menu appears on the
screen.
2
Press
Up
/
Down
Left
/
Right
to select a preferred option.
3
Press
OK
to con rm and enter the
menu screen of the selected option.
4
To return to the previous menu screen,
press
Title
.

14
2-1 DVD Operation - continued
Searching Scenes During Playback
1
Press
Search
during playback. A
search display appears on the top of
the screen.
TT 02/05 CH 002/006 00:52:06
2
Press
Left
/
Right
to highlight Title
Number, Chapter Number or Time.
3
Press
Number Button(s)
to edit the
Title
Number, Chapter Number or Time.
4
New scene will be played according to
the change.
5
To leave the search mode, press
Search
again.
Programming DVD Playback
1
Press
Program
during playback.
A programme list is shown on the
screen.
2
Press
Up
/
Down
Left
/
Right
to highlight an item.
3
Enter a preferred Title Number or
Chapter Number by pressing
Number
Button(s)
.
Note:
•
Please enter a Title Number before trying to
enter a Chapter Number.
4
To play the programme list, press
Up
/
Down
Left
/
Right
to
highlight “PLAY” and then press
OK
.
5
To clear the programming list, press
Up
/
Down
Left
/
Right
to
highlight “CLEAR” and then press
OK
.
6
To leave the programme list, press
Program
again.
T C T C T C T C
1 – – : – – 5 – – : – – 9 – – : – – 13 – – : – –
2 – – : – – 6 – – : – – 10 – – : – – 14 – – : – –
3 – – : – – 7 – – : – – 11 – – : – – 15 – – : – –
4 – – : – – 8 – – : – – 12 – – : – – 16 – – : – –
PLAY CLEAR
T C T C T C T C
1 – – : – – 5 – – : – – 9 – – : – – 13 – – : – –
2 – – : – – 6 – – : – – 10 – – : – – 14 – – : – –
3 – – : – – 7 – – : – – 11 – – : – – 15 – – : – –
4 – – : – – 8 – – : – – 12 – – : – – 16 – – : – –
PLAY CLEAR
T C T C T C T C
1 0 2 : – – 5 – – : – – 9 – – : – – 13 – – : – –
2 – – : – – 6 – – : – – 10 – – : – – 14 – – : – –
3 – – : – – 7 – – : – – 11 – – : – – 15 – – : – –
4 – – : – – 8 – – : – – 12 – – : – – 16 – – : – –
PLAY CLEAR
T C T C T C T C
1 0 2 : 0 6 5 – – : – – 9 – – : – – 13 – – : – –
2 0 7 : 1 1 6 – – : – – 10 – – : – – 14 – – : – –
3 0 4 : 0 9 7 – – : – – 11 – – : – – 15 – – : – –
4 – – : – – 8 – – : – – 12 – – : – – 16 – – : – –
PLAY CLEAR

15
2-2 Audio CD Operation
Preparations:
Connect your Portable DVD Player to its source of
power, and connect any external equipment to its
outputs if desired. If external equipment is connected:
•
Turn the TV on and select the video input source
that will receive the Player’s video output.
•
Turn the stereo system on if the Player has been
connected to one. Select the stereo system’s input
that will play the audio from the DVD Player.
Basic Playback
1
Press
Power
on the top panel. Press
Mode
to select DVD Mode.
2
Press
Eject
on the top pane
l to open
the disc cover and place an audio CD.
3
Close the cover. Disc playback starts
automatically.
Playing an Audio CD without a Title Menu
4
If the disc contains no title menu, an
information display appears on the top
of the screen.
TRK 2/16 00:02:06
Playing an Audio CD with a Title Menu
4
If the disc contains a title menu, the
menu will be shown on the screen.
5
To select a le folder,
press
Left
to
enter the folder list on the left of the
screen, press
Up
/
Down
to
highlight a folder
and then press
OK
or
Play
.
6
To play a track,
press
Right
to enter
the le list on the right of the screen,
press
Up
/
Down
to highlight a track
and then press
OK
or
Play
.
Note:
•
Some discs may contain both music and picture
le formats. When the player reads the disc,
music les will be the priority to be played. To
select Picture CD mode, press
Right
until
the Picture CD symbol
is selected. Press
OK
or
Play
.
[ ITALIAN OPERA]01––––––
01. 01 ––––––
02. 02 ––––––
03. 03 ––––––
04. 04 ––––––
05. 05 ––––––
06. 06 ––––––
07. 07 ––––––
08. 08 ––––––
09. 09 ––––––
10. 10 ––––––
01. CITY JAZZ
02. CLASSICAL
03. MOVIE OST
04. ITALIAN OPERA
05. MUSICAL
06. US POP
07. UK POP
08. HEAVY METAL
09. SONATA
10. RAP
[ ––– CITY JAZZ]01––––––
01. 01 ––––––
02. 02 ––––––
03. 03 ––––––
04. 04 ––––––
05. 05 ––––––
06. 06 ––––––
07. 07 ––––––
08. 08 ––––––
09. 09 ––––––
10. 10 ––––––
01. CITY JAZZ
02. CLASSICAL
03. MOVIE OST
04. ITALIAN OPERA
05. MUSICAL
06. US POP
07. UK POP
08. HEAVY METAL
09. SONATA
10. RAP
[ ITALIAN OPERA]08––––––
01. 01 ––––––
02. 02 ––––––
03. 03 ––––––
04. 04 ––––––
05. 05 ––––––
06. 06 ––––––
07. 07 ––––––
08. 08 ––––––
09. 09 ––––––
10. 10 ––––––
01. CITY JAZZ
02. CLASSICAL
03. MOVIE OST
04. ITALIAN OPERA
05. MUSICAL
06. US POP
07. UK POP
08. HEAVY METAL
09. SONATA
10. RAP
[JAPAN]001.JPG
001. 001
002. 002
003. 003
004. 004
005. 005
006. 006
007. 007
008. 008
009. 009
010. 010
01. JAPAN
02. CANADA
03. FRANCE
04. BRAZIL
05. EGYPT

16
2
To change audio soundtrack languages,
press
Left
a number of times until a
preferred audio output is selected.
3D Audio Output Adjustment
1
Press
Audio
during play back. A
audio display appears on the top of the
screen.
2
To adjust the 3D sound effect of audio
output,
press
Right
to enter the 3D
Audio Menu.
3
Press
Left
/
Right
to select a
feature.
For Surround (SRND)
•
Press
Up
/
Down
to select an
option and press
OK
to con rm.
For EQ
•
Press
Up
/
Down
to select an
option and press
OK
to con rm.
2-2 Audio CD Operation - continued
Repeat Playback
1
Press
Repeat
during playback, and
a repeat information box appears.
LEFT REP AB RIGHT REP DISC
2
Press
Right
repeatedly to select the
following options:
REP: [ REP 1 ]
:
Repeat Track
REP: [ REP All ]
:
Repeat Disc
REP: [ REP DIR]
:
Repeat Directory (appears
only when there are le directories on the CDs).
REP: [ OFF ]
:
Repeat Off
Repeat Sections Between Two
Speci c Times (A-B Repeat)
1
Press
Repeat
during playback, and
a repeat information box appears on the
screen.
LEFT REP AB RIGHT REP DISC
2
Press
Left
during playback at the
time where the section to be repeated
begins (A).
REPEAT A-
is shown on the screen.
3
Press
Left
again at the time where
the section to be repeated ends (B).
REPEAT A-B
is shown on the screen.
4
To return to normal playback, press
Left
again during the repeat playback.
A-B CANCEL
is shown on the screen.
2 Channel Audio Output Adjustment
1
Press
Audio
during play back. A
audio display is shown on the top of
the screen.
OFF
CONCERT
CHURCH
PASSIVE
WIDE
LIVE
SRND
EQ BAND KEY
EQ BAND KEY
EQ BAND KEY
EQ BAND KEY
STANDARD
CLASSIC
ROCK
JAZZ
POP
USER
SRND
SRND
SRND
SRND
EQ
BAND KEY
BAND KEY
BAND KEY
BAND KEY

17
For BAND
•
A frequency chart will be displayed as a
musical le is played, please note that
no adjustments can be made whilst this
chart is shown.
For KEY
•
Press
Up
/
Down
to select an
option and press
OK
to con rm.
Searching Music During Playback
1
Press
Search
during playback. A
search display appears on the top of
the screen.
TRK 0002/11 00:02:06
2
Press
to highlight Track Number
or Time.
3
Press
Number Button(s)
to edit
Track
Number or Time.
4
Music will be played after editing
according to the change of track or time.
5
To leave the search display, press
Search
again.
2-2 Audio CD Operation - continued
SRND EQ
BAND
KEY
KEY
KEY
KEY
4
2
0
2
4
SRND EQ
BAND
BAND
BAND
BAND
KEY
Programming Music Playback
1
Press
Program
during playback. A
programming list appears on the screen.
2
Press
Up
/
Down
Left
/
Right
to highlight an item.
3
Enter a preferred Track Number by
pressing
Number Button(s)
.
4
To play the programming list, press
Up
/
Down
Left
/
Right
to
highlight “PLAY” and then press
OK
.
5
To clear the programming list, press
Up
/
Down
Left
/
Right
to highlight
Right to highlight Right
“CLEAR” and then press
OK
.
6
To leave the programming list, press
Program
again.
1 – – – – 5 – – – – 9 – – – – 13 – – – –
2 – – – – 6 – – – – 10 – – – – 14 – – – –
3 – – – – 7 – – – – 11 – – – – 15 – – – –
4 – – – – 8 – – – – 12 – – – – 16 – – – –
PLAY CLEAR
1 – – – – 5 – – – – 9 – – – – 13 – – – –
2 – – – – 6 – – – – 10 – – – – 14 – – – –
3 – – – – 7 – – – – 11 – – – – 15 – – – –
4 – – – – 8 – – – – 12 – – – – 16 – – – –
PLAY CLEAR
1 0 0 2 6 5 – – – – 9 – – – – 13 – – – –
2 – – – – 6 – – – – 10 – – – – 14 – – – –
3 – – – – 7 – – – – 11 – – – – 15 – – – –
4 – – – – 8 – – – – 12 – – – – 16 – – – –
PLAY CLEAR
1 0 0 2 6 5 0 0 0 7 9 – – – – 13 – – – –
2 0 1 1 5 6 1 0 0 2 10 – – – – 14 – – – –
3 0 0 7 3 7 – – – – 11 – – – – 15 – – – –
4 0 1 6 9 8 – – – – 12 – – – – 16 – – – –
PLAY CLEAR

18
2-3 Kodak and JPEG Picture CDs Operation
Basic Playback
1
Press
Power
on the top panel. Press
Mode
to select DVD Mode.
2
Press
Eject
on the top pane
l to open
the disc cover and place a picture CD.
3
Close the cover. Disc playback starts
automatically.
Playing a Kodak Picture CD
4
The slideshow begins in full screen mode.
Playing a JPEG Picture CD with a Title Menu
4
If the disc contains a title menu, the
menu will be displayed on the screen.
5
To select a le folder,
press
Left
to enter the folder list on the left of
the screen, press
Up
/
Down
to
highlight a folder
and then press
highlight a folder and then presshighlight a folder
OK
or
Play
.
6
To review a picture le,
press
Right
to enter the le list on the right of the
screen, press
Up
/
Down
to
highlight a le. Picture review is shown
on the left of the screen.
7
To display the selected picture in full
screen, press
OK
. To start the
slideshow from the selected picture,
press
Play
.
8
To return to the title menu from the
slideshow, press
Return
.
Zooming Pictures
1
Press
Zoom
repeatedly during
playback to cycle through the following
zoom settings:
Zoom 2
,
Zoom 3
,
Zoom
4
,
Zoom 1/2
,
Zoom 1/3 and Zoom 1/4
.
2
To return to normal playback,
press
Zoom
repeatedly until
ZOOM: [ OFF ]
appears
.
Note:
•
When the zoomed picture becomes larger than
the screen, press
Up /
Down /
Left
/
Right
pan through the image.
[JAPAN]001.JPG
001. 001
002. 002
003. 003
004. 004
005. 005
006. 006
007. 007
008. 008
009. 009
010. 010
01. JAPAN
02. CANADA
03. FRANCE
04. BRAZIL
05. EGYPT
[CANADA]001.JPG
001. 001
002. 002
003. 003
004. 004
005. 005
006. 006
007. 007
008. 008
009. 009
010. 010
01. JAPAN
02. CANADA
03. FRANCE
04. BRAZIL
05. EGYPT
[CANADA]001.JPG
001. 001
002. 002
003. 003
004. 004
005. 005
006. 006
007. 007
008. 008
009. 009
010. 010
Table of contents
Other Goodmans TV DVD Combo manuals

Goodmans
Goodmans GTVL19W17HVFW User manual

Goodmans
Goodmans GTVL15DVDS User manual

Goodmans
Goodmans GTVC14N14DVD User manual

Goodmans
Goodmans GTVL19W17HVFW User manual

Goodmans
Goodmans GLCD17W2DVD User manual

Goodmans
Goodmans GM700 Series User manual

Goodmans
Goodmans GTV51N16DVD User manual

Goodmans
Goodmans GTVL19W19DVD User manual

Goodmans
Goodmans GTV14T5DVD User manual

Goodmans
Goodmans GTVL15N5DVD User manual