Enji Happy Care User manual
INSTANT FLEXIBLE
DIGITAL THERMOMETER
USER’S MANUAL
*Read instructions carefully before using the Digital
Thermometer.
WARNING
Choking Hazard:
Thermometer cap may be fatal when
swallowed. Do not allow children to use this
device without parental supervision.
Do not use thermometer in ear. Designed for
use in oral, rectaland armpit (axilla) readings
only.
Do not place thermometer near extreme
heat, it may explode.
Use of the Probe Cover may result in a 0.2oF
(0.1oC) discrepancy from actual
temperature.
Remove battery from the device when not in
operation for a long time.
The use of temperature readings for self-
diagnosis is dangerous. Consult your doctor
for the interpretations of the results. Self-
diagnosis may lead to the worsening of the
existing disease conditions.
Do not attempt to get measurements when
the thermometer is wet as inaccurate
readings may result. Do not bite the
thermometer. Doing so may lead to
breakage and/or injury.
Do not attempt to disassemble or repair the
thermometer. Doing so may result in
inaccurate readings.
After each use, disinfect the thermometer
especially in case the device is used by more
than one person.
Do not force the thermometer into the
rectum. Stop insertion and abort the
measurement when pain is present. Failure
to do so may lead to injury.
Do not use thermometer orally after being
used rectally. We advise you to purchase our
Probe Covers for better hygiene when used
by the whole family.
For children who are two years old or
younger, please do not use the devices orally
if the unit has been stored at temperatures
over 41℉~104℉(5℃~40℃), leave it in
41℉~104℉(5℃~40℃) ambient
temperature for about 15 minutes before
using it.
This digital thermometer provides a quick and highly accurate reading of an individual's
body temperature. The digital thermometer is intended to measure the human body’s
temperature in regular mode orally, rectally or under the arm, and the device is reusable
for clinical or home use on people of all ages. To better understand its functions and to
provide years of dependable results, please read all instructions first.
This appliance conforms to the following standards:
ASTM E1112 Standard Specification for Electronic Thermometer for Intermittent
Determination of Patient Temperature, ISO 80601-2-56 Medical electrical equipment —
Part 2-56:Particular requirements for basic safety and essential performance of clinical
thermometers for body temperature measurement, IEC 60601-1-11 Medical electrical
equipment —Part 1-11: General requirements for basic safety and essential performance
–Collateral Standard: Requirements for medical electrical equipment and medical
electrical systems used in the home healthcare environment and complies with the
requirements of IEC 60601-1-2(EMC), AAMI/ANSI ES60601-1(Safety) standards. And the
manufacturer is ISO 13485 certified.
DIRECTIONS
1. Press the On/Off Button next to LCD display. A tone will sound as the screen shows,
followed by last recorded temperature. After showing the self-test temperature, the
thermometer is now in the testing mode.
2. Position the thermometer in desired location (mouth, rectum, or armpit).
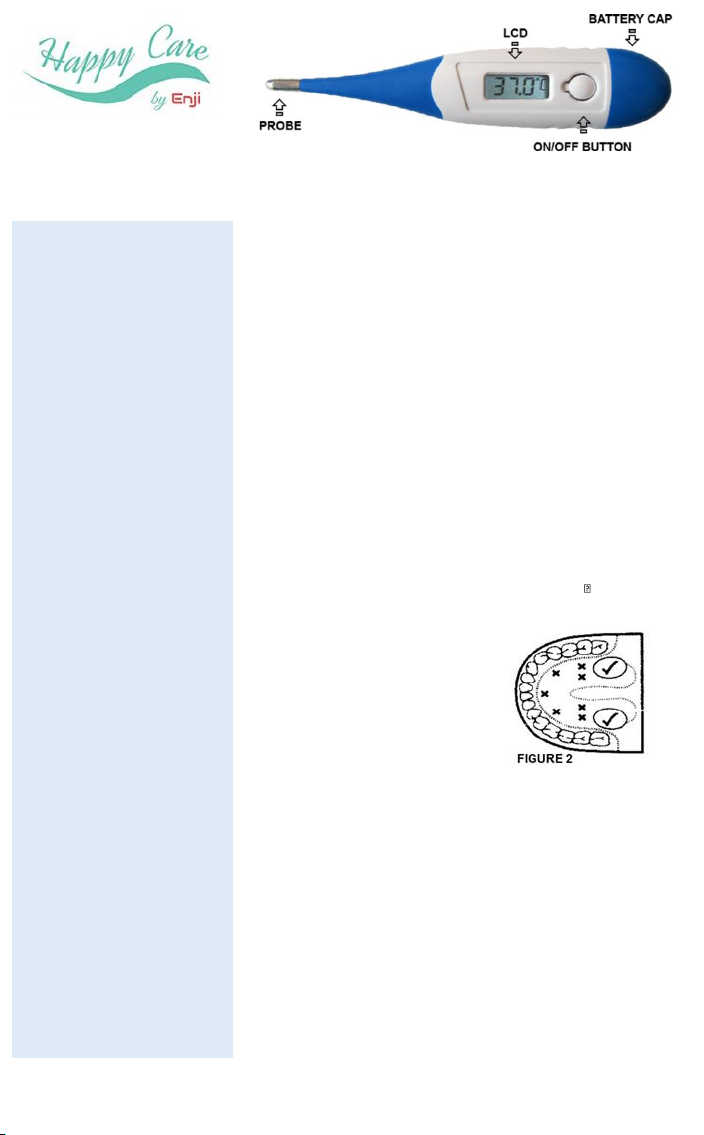
a. Oral Use: Place thermometer under tongue as indicated by “ ” position shown in
Figure 2. Close your mouth and breathe evenly through the nose to prevent the
measurement from being influenced by inhaled/exhaled air. Normal temperature
between 96.3oF and 99.1oF (35.7oC and
37.3oC).
b. Rectal Use: Lubricate probe tip with
petroleum jelly for easy insertion. Gently
insert sensor approximately 1 cm (less than
½”) into rectum. Normal temperature
between 97.2oF and 99.9oF (36.2oC and
37.7oC).
c. Armpit Use: Wipe armpit dry. Place probe in armpit and keep arm pressed firmly at
side. From a medical viewpoint, this method will always provide inaccurate readings, and
should not be used if precise measurements are required. Normal temperature
between 95.4oF and 98.1oF (35.2oC and 36.7oC).
3. The degree sign flashes throughout the testing process. When flashing stops, a soft
alarm will beep. The reading may take from 10 to 30 seconds depending on where the
thermometer is used. The measured reading will appear on the LCD simultaneously. The
minimum measurement time until the signal tone (beep) must be maintained without
exception. The measurement continues even after the buzzing notification. In order to
achieve better body temperature measurement result, it is recommended to keep the
probe in mouth and rectum for 1 minute, or in armpit for about 2 minutes regardless of
the beep sound and at least 30 seconds measurement interval should be maintained.
4. To prolong battery life, press the On/Off Button to turn unit off after testing is
completed. If no action is taken, the unit will automatically shut off after around 10
minutes.
TROUBLE SHOOTING
HOW TO CALIBRATE YOUR THERMOMETER
The thermometer is initially calibrated at the time of manufacturing. If the thermometer
is used according to the manual, periodic readjustment is not required. However, we
recommend conducting a quick calibration to confirm that your unit didn't get damaged
during shipment. A quick way to calibrate your unit is by doing the water test. Dip the
tip of the thermometer into a cup of cold water for a few seconds. Your display should
show 'Lo' (meaning low temperature, not low battery) or a low-temperature reading
number (for example it shows 33 °C or 91°F). Power it OFF then let it sit for two minutes
or three, power it ON, dip the tip into a cup of hot water this time for a few seconds.
Wait for your thermometer to show 'Hi' or a high-temperature reading number on its
LCD display (for example it shows 38 °C or 100 °F). Power it OFF, Leave it at room
temperature for 30 to 45 minutes and start using it, and it will mean that you have
successfully checked your thermometer and that you are good to go! If you find that
your reading is very low and/or not changing the display of the number on the LCD
screen at all, please get in touch with us through email with your Amazon Order ID.
SYMBOL EXPLANATION
CLEANING & DISINFECTION
Wipe the thermometer with a soft clean cloth. For stubborn stains, wipe the
thermometer with a cloth that has been dampened in water or in neutral detergent
solution and then wring thoroughly. Finish by wiping with a soft dry cloth. For
disinfection, 75% Ethanol or Isopropyl alcohol can be used. Observe the following to
prevent damage to the thermometer:
•Do not use benzene, thinner, gasoline or other strong solvents to clean the
thermometer.
•Do not attempt to disinfect the sensing section (tip) of the thermometer by immersing
in alcohol or in hot water (water over 122oF/50oC).
•Do not use ultrasonic washing to clean the thermometer.
oF/oC SWITCHABLE
Temperature readings are available in the Fahrenheit or Celsius scale (oF/oC; located in
the upper right corner of LCD). By default, the thermometer is set to oF. If you want to
switch to oC, turn the unit off, press and hold On/Off Button for approximately 2 seconds
to change the current setting. To go back to oF, power off, and press and hold for 2
seconds again. It will change back to oF.
SPECIFICATIONS
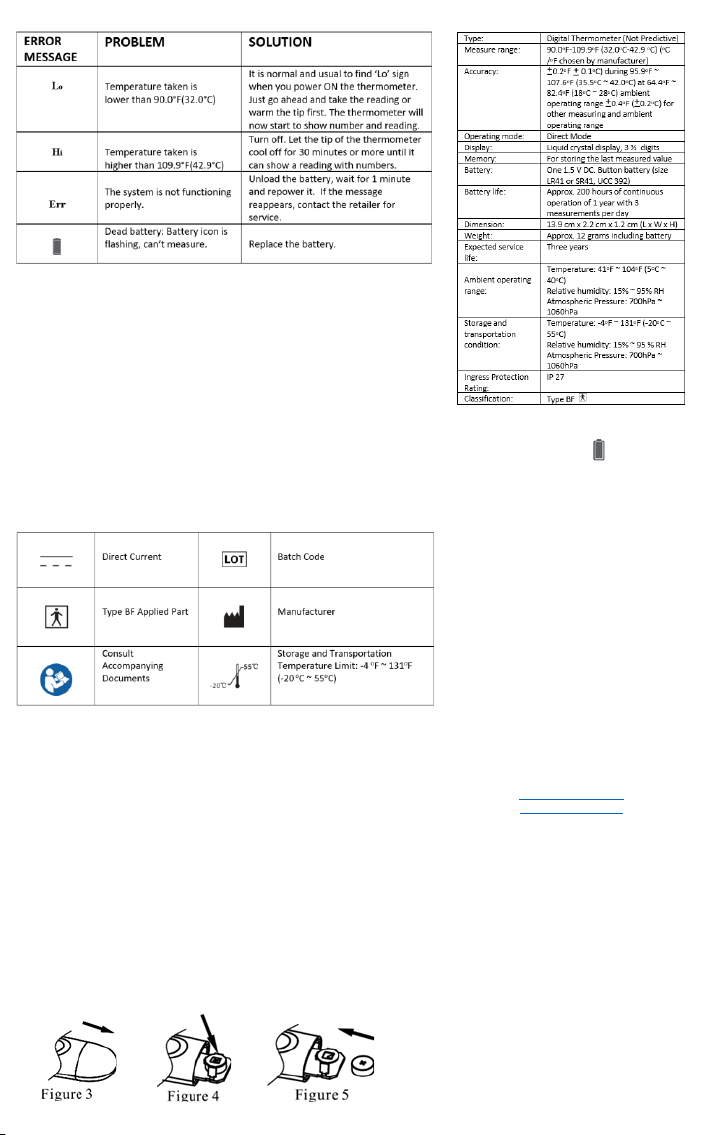
BATTERY REPLACEMENT
1. Replace battery when appears in the
lower right corner of LCD display.
2. Pull battery cover off as shown in Figure 3.
3. Gently pull out plastic circuit board with
battery chamber approximately 1 cm
(slightly less than ½”.) (See Figure 4)
4. Use pointed object such as a pen to
remove old battery. Discard battery
lawfully. Replace with new 1.5 V DC button
type LR41 or SR41, UCC392, or equivalent.
Be sure battery is installed with
“+” polarity facing up. (See Figure 5)
5. Slide battery chamber back into place and
attach cover.
All rights reserved.
HAPPY CARE BY ENJI
www.enji-prime.com
Enji Prime Copyright 2020
Other Enji Thermometer manuals


