EnOcean Dolphin Navigan Wireless Commissioner NWC... User manual
Quick Start Guide
Navigan™ Wireless Commissioner NWC 300 / NWC 300U
© 2016 EnOcean | www.enocean.com Navigan | v1.0 | Aug 2017 | Page 1/ 9
Navigan™ Wireless Commissioner NWC 300 / NWC 300U
TABLE OF CONTENT
1Product Description....................................................................................2
2Requirements.............................................................................................2
3Compatible Products ..................................................................................3
4Steps to Install Navigan .............................................................................3
5Steps to commission an LED controller.......................................................5
6Steps to ConfiGure an LED controller..........................................................9
Observe precautions! Electrostatic sensitive devices!
Patent protected:
WO98/36395, DE 100 25 561, DE 101 50 128,
WO 2004/051591, DE 103 01 678 A1, DE 10309334,
WO 04/109236, WO 05/096482, WO 02/095707,
US 6,747,573, US 7,019,241

Quick Start Guide
Navigan™ Wireless Commissioner NWC 300 / NWC 300U
© 2016 EnOcean | www.enocean.com Navigan | v1.0 | Aug 2017 | Page 2/ 9
1PRODUCT DESCRIPTION
Navigan™ is a PC based software tool to enable wireless commissioning of compatible
products using the EnOcean Alliance RECOM standard.
Navigan™ enables linking sensors and switches to line powered controllers, configuring
controller parameters, and creating backup files of the projects that you have
commissioned.
2REQUIREMENTS
PC with Windows 7, Windows 8 or Windows 10 with one available USB slot (Navigan™
only works on Windows)
Navigan™ Software available from:
www.enocean.com/nwc
Navigan™ Wireless Commissioner
NWC 300 / NWC 300U USB Stick
Quick Start Guide
Navigan™ Wireless Commissioner NWC 300 / NWC 300U
© 2016 EnOcean | www.enocean.com Navigan | v1.0 | Aug 2017 | Page 3/ 9
3COMPATIBLE PRODUCTS
The following products are supported by NWC 300 / NWC 300U:
Controllers: LEDR (0-10V LED Zone Controller with Relay), LEDD (0-10V LED Zone
Controller), EISM (In-line Switch Module)
Sensors: EOSC (Ceiling Occupancy Sensor), EOSW (Wall Occupancy Sensor), ELLS
(Light Level Sensor), EDWS (Door Window Sensor)
Switches: ESRP (Single Rocker Switch), EDRP (Double Rocker Switch), PTM 210
(Pushbutton Switch Module), EKCS (Key Card Switch Module)
Note that not all controllers support all types of sensors and switches.
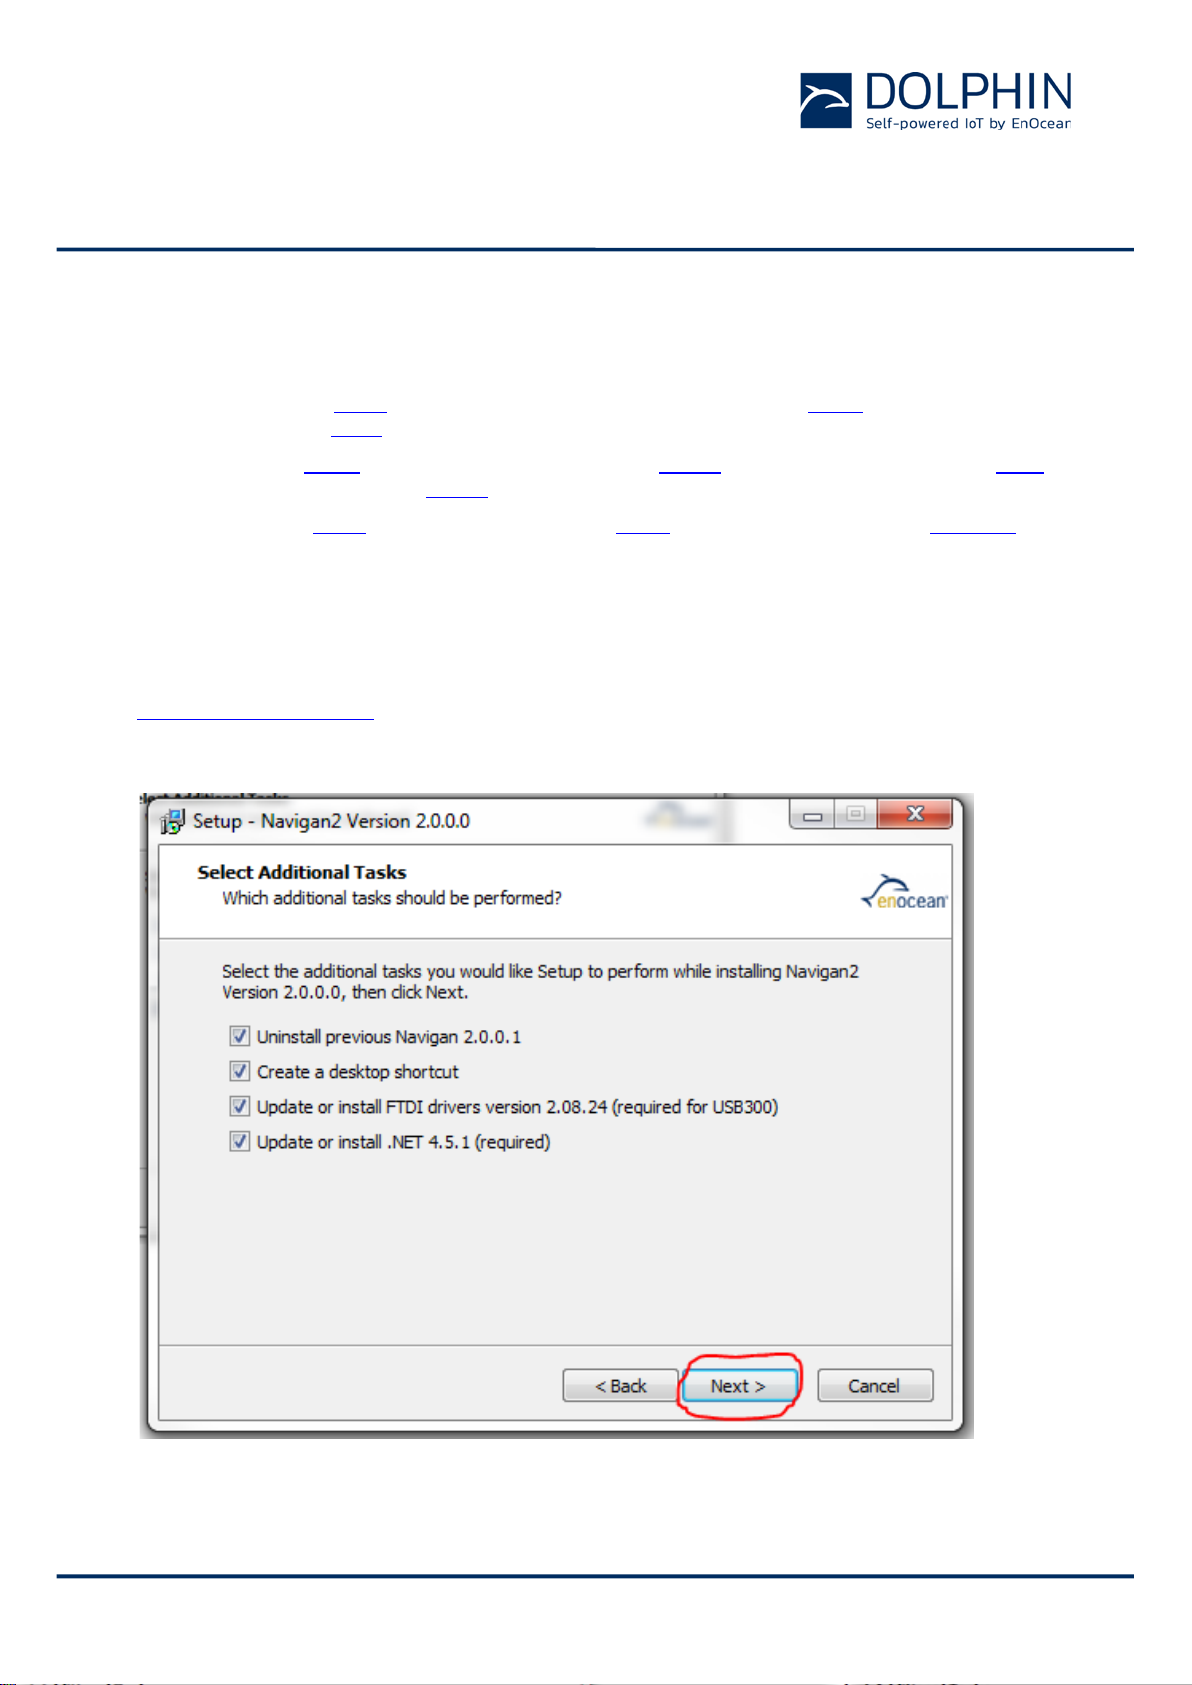
4STEPS TO INSTALL NAVIGAN
Step 1:Download and install the latest Navigan™ software from the following website:
www.enocean.com/nwc

Quick Start Guide
Navigan™ Wireless Commissioner NWC 300 / NWC 300U
© 2016 EnOcean | www.enocean.com Navigan | v1.0 | Aug 2017 | Page 4/ 9
Step 2: Install the controller in the proper location and place your motion sensors exposed
to light in order to charge and have your switches accessible for the next steps.
Step 3: Apply power to the controller as described in the controller installation guide.
Step 4: Insert Navigan™ Wireless Commissioner NWC 300U into an available USB port on
the PC and wait for the driver to install.
Step 5: Start Navigan™ on the PC.
Select this option for
a NEW project.
Select this option for
Existing Projects.
(you already have a
saved navigan file)

Quick Start Guide
Navigan™ Wireless Commissioner NWC 300 / NWC 300U
© 2016 EnOcean | www.enocean.com Navigan | v1.0 | Aug 2017 | Page 5/ 9
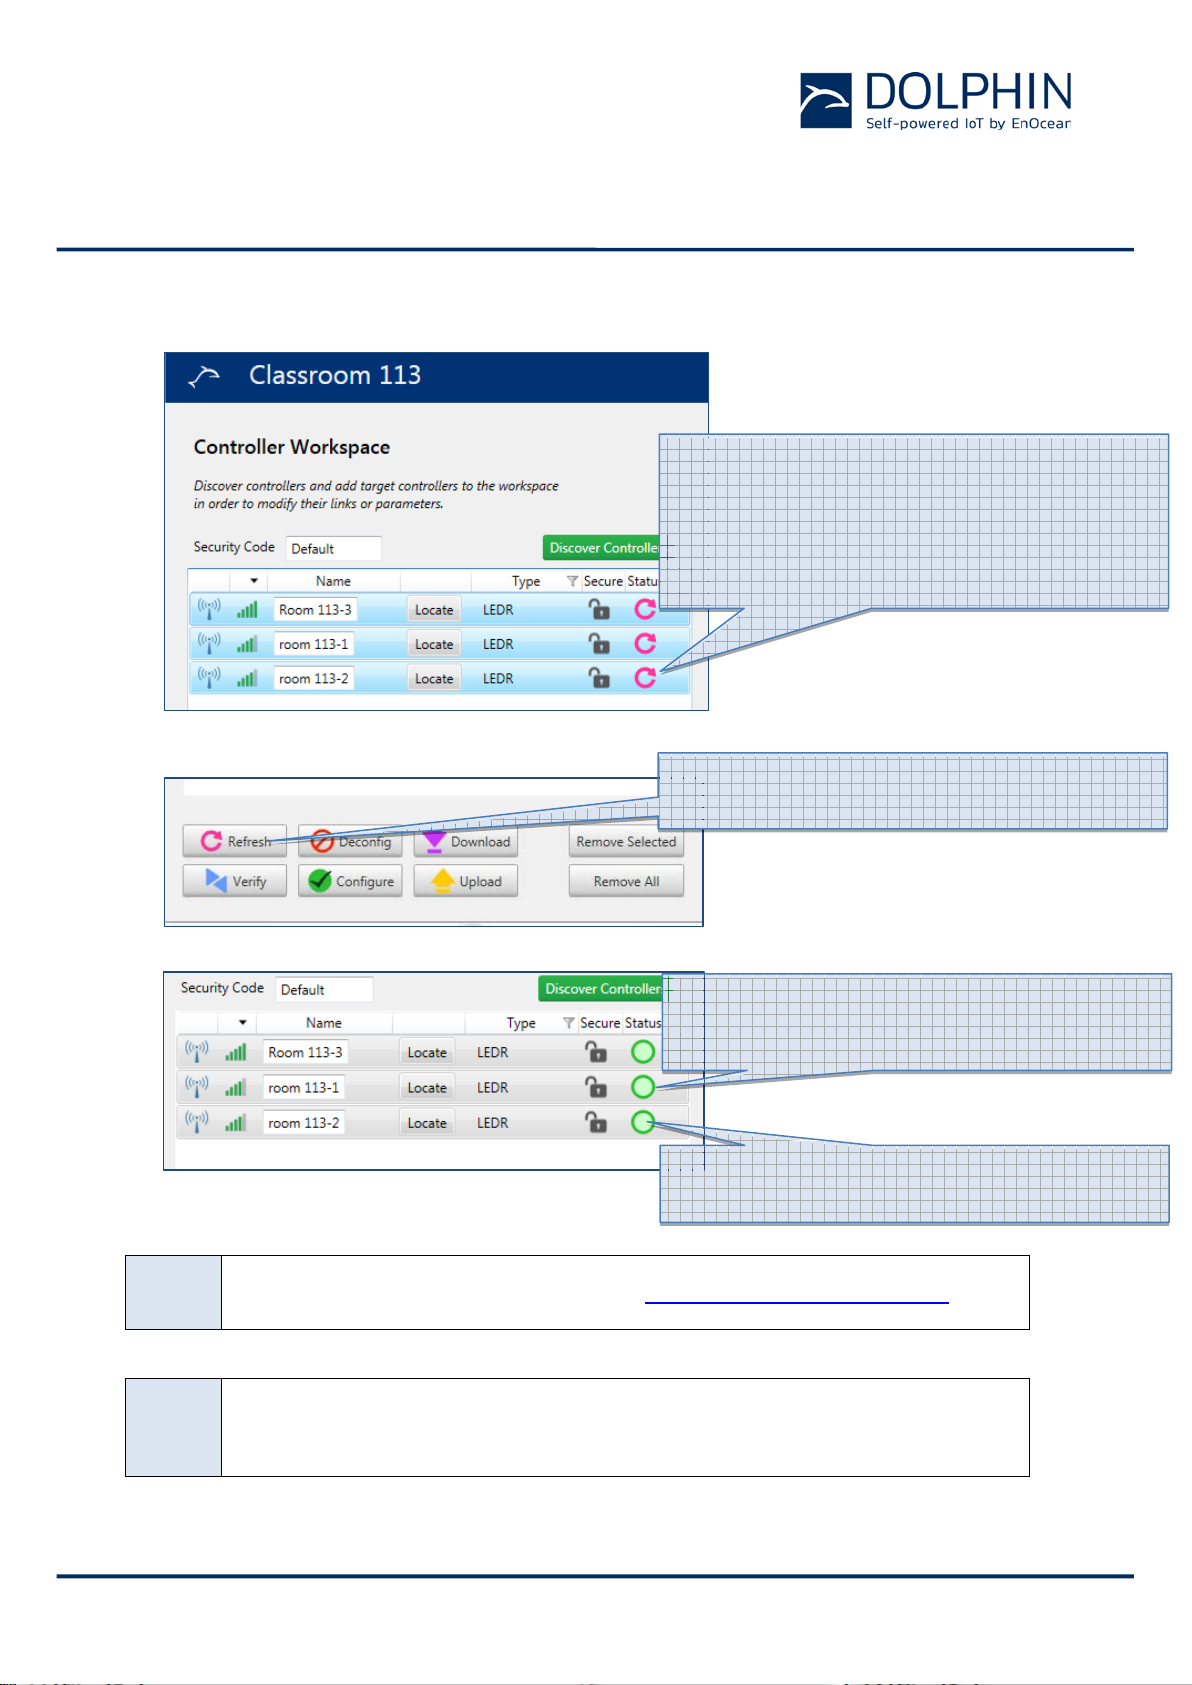
5STEPS TO COMMISSION AN LED CONTROLLER
Step 1: Locate and identify the controller you would like to commission using the “Locate”
function.
Hint
You can Right click on these relays and Name them all at once. Right
Click and then “Rename”
Click
“Discover Controllers”
This bar hides controllers that are physically
further away, helpful for larger projects by
reducing visible devices.
Use the locate button to blink the connected
luminaire(s) associated with this ID. If the
device you are seeking is not in the list, click
“Find More Controllers”
Now that you see where it is, Type in a logical
name for the controller.
When you’ve located and named all the
devices in the room, you need to move them
to the workspace for configuration. Click on
the controller to highlight in a light blue. You
can select more than one by using CTRL-Click,
SHIFT-Click, or CTRL-A to select all.
Once the desired controllers are highlighted
click “Add Devices to Workspace”
Quick Start Guide
Navigan™ Wireless Commissioner NWC 300 / NWC 300U
© 2016 EnOcean | www.enocean.com Navigan | v1.0 | Aug 2017 | Page 6/ 9
Step 2: Download the current configuration from the controller.
Hint 1
For advanced features, see this Video: https://youtu.be/y0_soflZhBU
Hint 2
To see advanced options, RIGHT-Click on the controller. (copy, paste,
rename, set max light level, Top trim the lights)
Now you are back in the workspace, where
controllers are configured.
Click on one of the relays then press CTRL-A
on your keyboard to select all (you can also do
them one at a time)
Press the “Refresh” button to download all
stored values in the controller.
Green circle means it was able to communicate
with the controller and downloaded all
parameters successfully.
Select only ONE Relay to be configured.
(you can copy and paste the settings later)
Quick Start Guide
Navigan™ Wireless Commissioner NWC 300 / NWC 300U
© 2016 EnOcean | www.enocean.com Navigan | v1.0 | Aug 2017 | Page 7/ 9
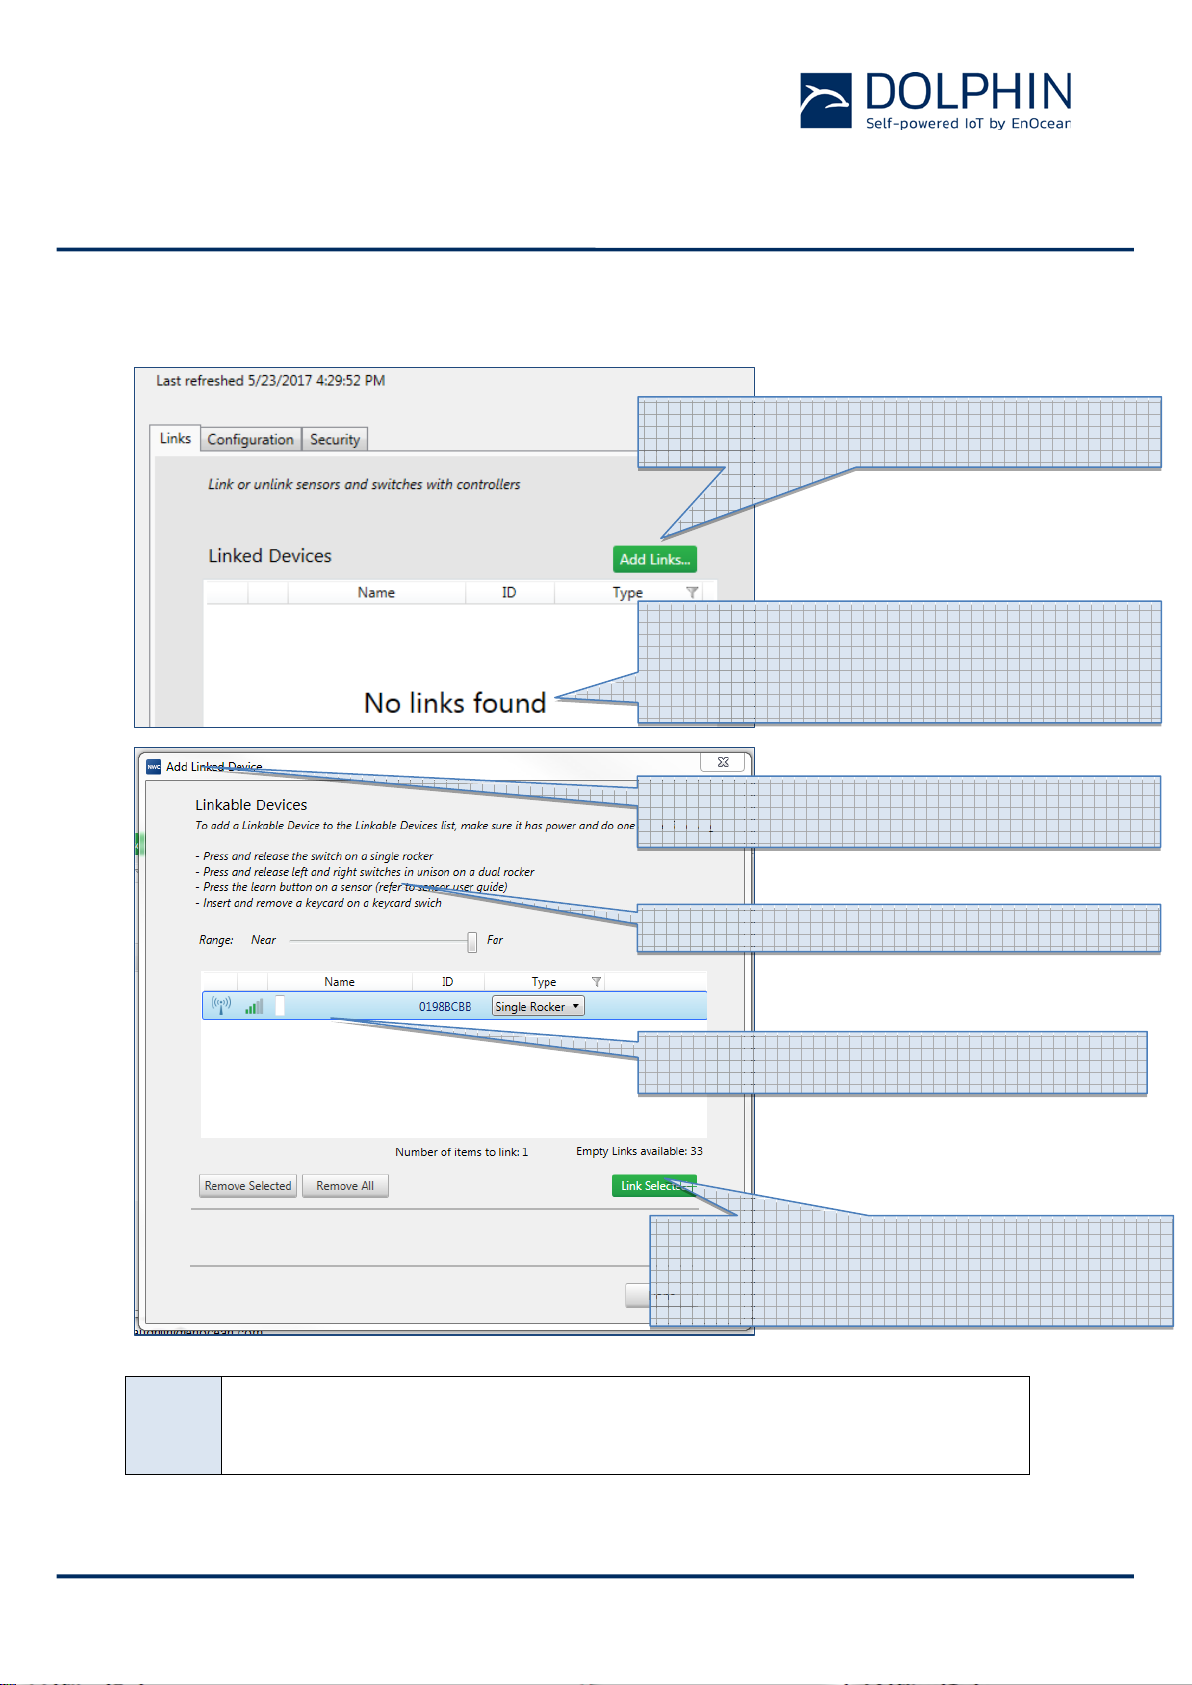
Step 3: Link sensors and/or rockers to the controller and set controller parameters to meet
application needs.
Hint
You’ve finished PAIRING the devices, now go on to configuration to
determine how the controller will respond to various signals.
Have your sensors and switches in hand or
accessible and then Click “Add Links”
“No Links Found” means it is not paired with any
sensors or switches, the controller will not
respond to anything yet. (motion sensors,
switches, etc)
Clicking “Add Links” on the previous screen
brings up this box…
Follow these instructions for each device type.
Type in a logical name for the Switch or
Sensor.
Once you have selected the devices you would
like paired with this controller click “link
selected” only those highlighted in blue will link
to the controller.

Quick Start Guide
Navigan™ Wireless Commissioner NWC 300 / NWC 300U
© 2016 EnOcean | www.enocean.com Navigan | v1.0 | Aug 2017 | Page 8/ 9
Step 4: Validate that the controller properly responds to input from the linked sensors or
rockers according to the configuration.
Hint 1
If the switches and sensors show up in this list they are actively paired
to the controller and will control it. To add more devices to this
controller click on “Add Links” and repeat the process.
int 2
The indicates the software has not heard from that device recently.
It is still paired correctly. Pressing the switch or sensor will remove the
Hint 3
Pressing the learn button on a sensor will flash all controllers it is
actively paired with. This is a good test to make sure you paired them
correctly.
Step 5: Repeat 1 – 4 for each controller you want to commission.
Step 6: Perform a functional validation of the full installation and save your project for
future reference before closing Navigan™.
Click on “Configuration” Tab to move to the next
step.
Quick Start Guide
Navigan™ Wireless Commissioner NWC 300 / NWC 300U
© 2016 EnOcean | www.enocean.com Navigan | v1.0 | Aug 2017 | Page 9/ 9
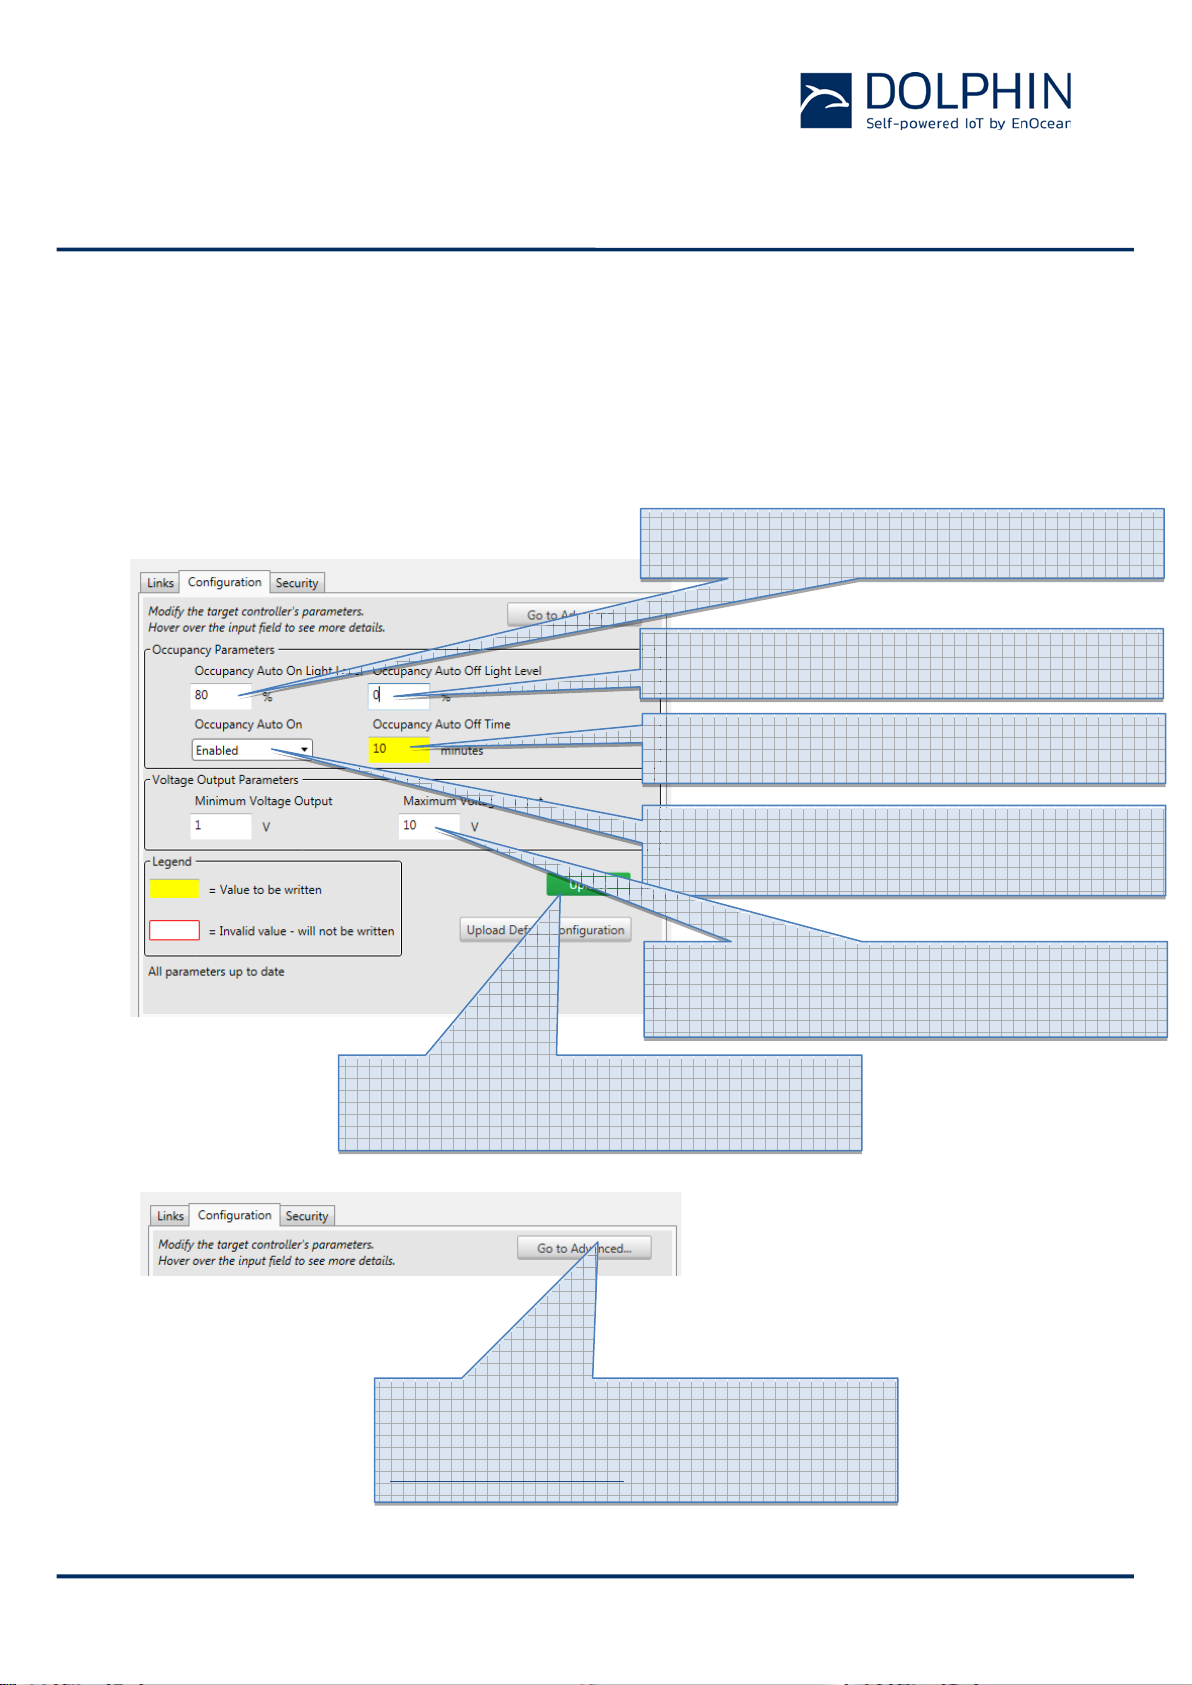
6STEPS TO CONFIGURE AN LED CONTROLLER
Use the configuration Tab and then follow the instructions for each parameter. Holding your
mouse over any box will bring up the list of options and a description.
Your installation will have unique requirements that should be adjusted as needed. Please
speak with your project coordinator to have a clear understanding of your project
requirements.
Brightness level when the sensor turns the
lights ON automatically. 0-100%
Brightness level when the sensor turns the
lights OFF automatically. 0-100%
Time after last motion detected before a motion
sensor turns the lights out. 3-71582 minutes.
What happens when a motion sensor sees
motion and the lights are out… does it Auto ON
or not.
New maximum (and Minimum) output on the 0-
10V line. Used for top trim, task tune, max light
level adjustment.
Uploads Changes to the controller that are
indicated by Yellow highlighting. Yellow items
are not yet part of the controller logic.
For more Advanced parameter adjustment click
“go To Advanced”. Each parameter is explained
inside. For support please email
This manual suits for next models
1
Table of contents


