Conceptronic C150RU User manual

NEDERLANDS
1
Conceptronic C150RU
Gebruiksaanwijzing
Gefeliciteerd met uw nieuwe
Conceptronic 150NWireless USB Adapter
In deze gebruiksaanwijzing vindt u stap-voor-stap instructies voor de installatie van de Conceptronic 150N
Wireless USB Adapter op uw computer.
Als u meer informatie of ondersteuning voor uw product nodig heeft, kunt u het beste naar onze Service &
Support website op www.conceptronic.net gaan en een van de volgende mogelijkheden kiezen:
•FAQ : Database met veel gestelde vragen
•Downloads : Gebruiksaanwijzingen, stuurprogramma's, firmware en overige downloads
•Contact : Contact opnemen met Conceptronic Support
Voor algemene informatie over Conceptronic producten gaat u naar de Conceptronic website op
www.conceptronic.net
De informatie in deze handleiding is gebaseerd op Windows 7 en Windows Vista en kan dus afwijken van
het gebruik op uw computer als deze een ander besturingssysteem heeft.
Voor sommige functie die in deze handleiding worden beschreven, moet u uw draadloze router of access
point handmatig bedienen of instellen. Zie de documentatie van uw draadloze router/access point voor
meer informatie over deze functies.
1. Inhoud verpakking
U vindt de volgende items in de verpakking van de Conceptronic 150NWireless USB Adapter:
•Conceptronic 150NWireless USB Adapter
•Product CD-ROM
•Deze meertalige gebruiksaanwijzing
•Garantiekaart en boekje CE-verklaring

NEDERLANDS
2
2. De onderdelen van de C150RU
Bovenkant Onderkant
Nr. Beschrijving Status Betekenis
1 USB-aansluiting -C150RU op uw computer aansluiten.
2 Ventilatie-openingen - Openingen voor luchtcirculatie.
3 Activiteitlampje Knippert regelmatig De adapter is niet verbonden met een netwerk.
Knippert onregelmatig De adapter is verbonden met een netwerk en
er worden gegevens ontvangen/verzonden.
4 WPS-knop - Indrukken om de WPS-functie te starten.
3. Hardware installeren
Voordat u de stuurprogramma's en de software kunt installeren, moet u de 150NWireless USB Adapter op
uw computer aansluiten.
•Zet uw computer aan.
•Doe de 50NWireless USB Adapter in een USB-aansluiting van uw computer.
Uw computer herkent de nieuwe hardware en de ‘Wizard nieuwe hardware gevonden’ wordt gestart.
•Negeer deze wizard en klik op ‘Annuleren’ om de wizard te sluiten.
U kunt nu verdergaan met het installeren van stuurprogramma's en software zoals beschreven in
hoofdstuk 4.
NB: Wanneer u gebruik maakt van Windows 7, kunt u hoofdstuk 4 overslaan omdat Windows 7 zelf over
de benodigde stuurprogramma's beschikt en deze automatisch installeert. Overigens zijn bij gebruik
van Windows 7 stuurprogramma's de WPS-functionaliteit en het hulpprogramma Conceptronic
Wireless Network Config niet beschikbaar. Als u hoofdstuk 4 overslaat, kunt u ook paragraaf 5.1 t/m
5.4 overslaan en verdergaan met paragraaf 5.5.
3
4
1
2
1

NEDERLANDS
3
4. Stuurprogramma's en software installeren
Nadat u de 150NWireless USB Adapter op uw computer heeft aangesloten, kunt u de Conceptronic
stuurprogramma's en overige software installeren.
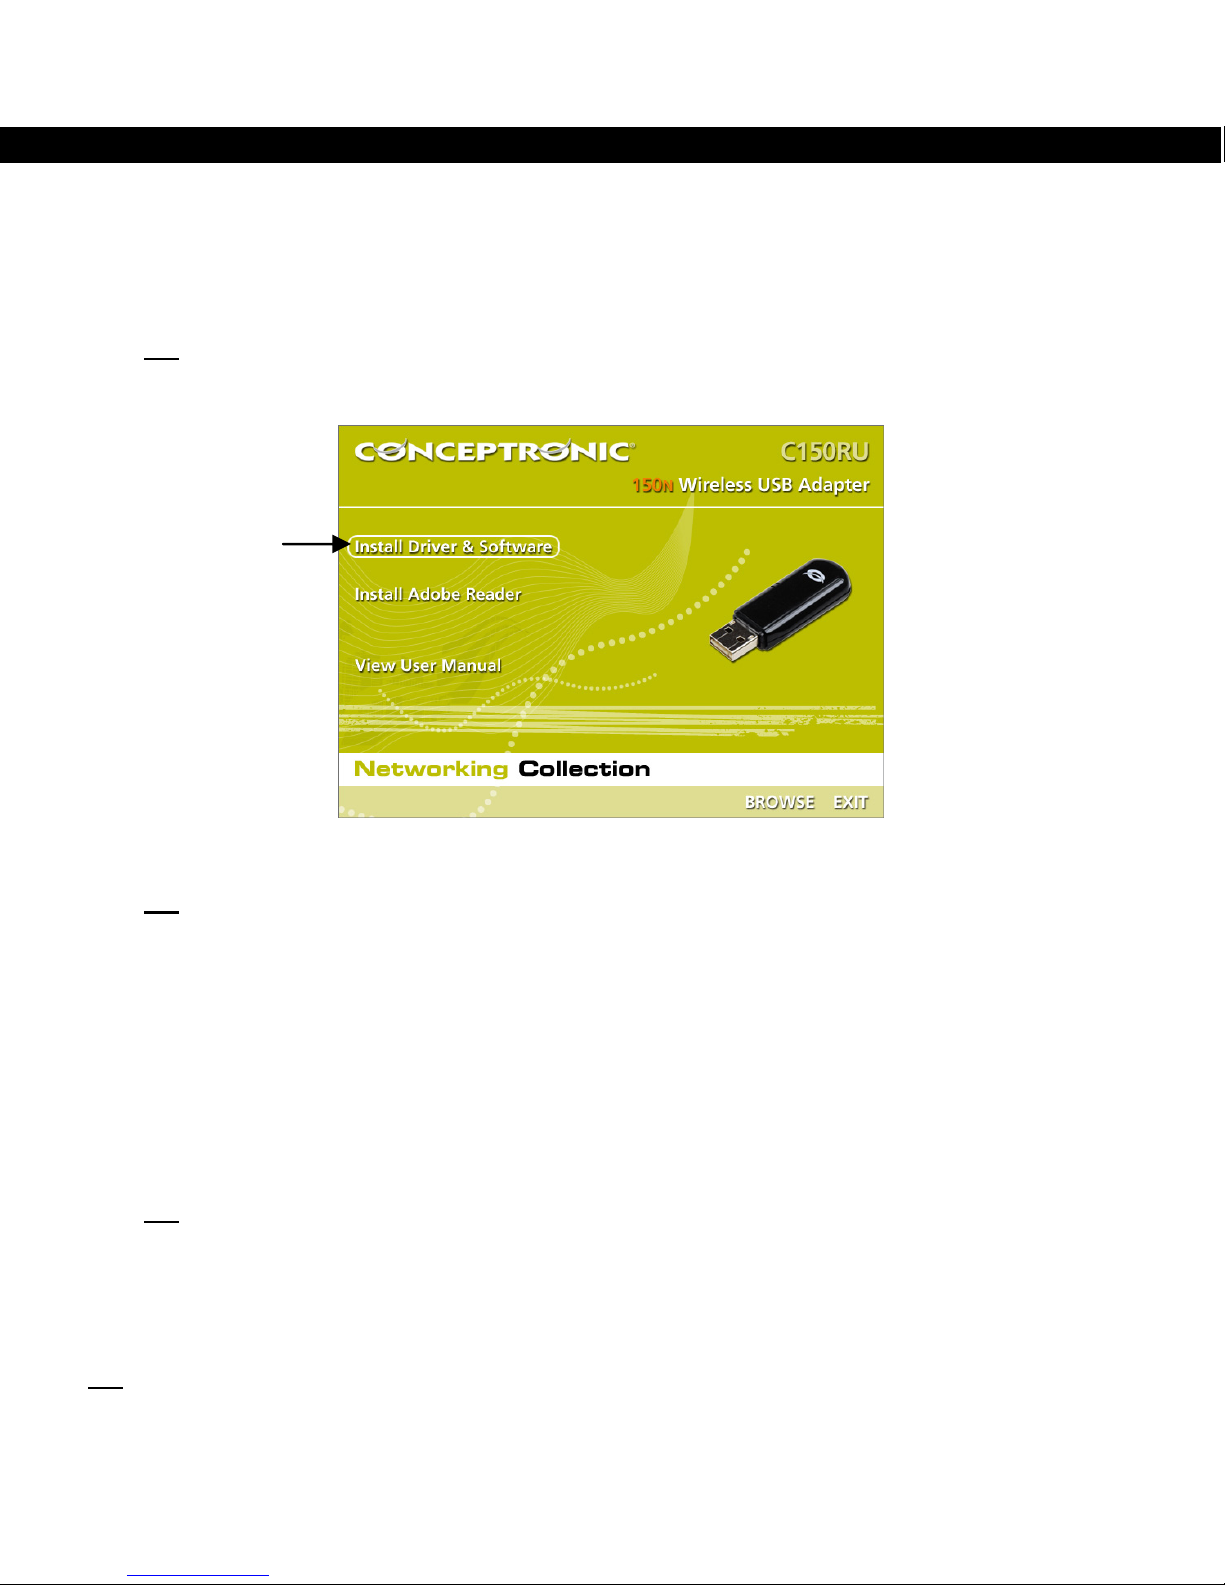
A. Doe de meegeleverde cd in het cd-station van uw computer. Het venster ‘Automatisch afspelen’
wordt op uw scherm weergegeven. Klik op ‘Run Autorun.exe’ (Autorun.exe uitvoeren) om het
autorunmenu te starten.
NB: Als het venster ‘Automatisch afspelen’ niet verschijnt, kunt u het autorunmenu starten door
met de Windows Verkenner naar ‘Deze computer’ te gaan en te dubbelklikken op het
schijfstation waar de cd in zit.
B. Selecteer de keuze ‘Install Drivers & Software’ (Stuurprogramma's en software installeren) in het
autorunmenu. De installatiewizard verschijnt.
NB: Als u een ‘Gebruikersaccountbeheer’ (User Account Control) melding krijgt, moet u deze
accepteren door op ‘Ja’ te klikken.
C. Selecteer de taal die u tijdens de installatie wilt gebruiken en klik op ‘OK’ om door te gaan.
D. Selecteer ‘Install drivers and Conceptronic Wireless Network Config Utility’ (Stuurprogramma’s en
Conceptronic hulpprogramma installeren) als u de Conceptronic configuratiesoftware wilt gebruiken,
of selecteer ‘Install drivers only’ (Alleen stuurprogramma’s installeren) als u het standaard
configuratieprogramma van Microsoft voor draadloze verbindingen wilt gebruiken. Klik op ‘Next’
(Volgende) om door te gaan.
E. Klik op ‘Install’ (Installeren) om het stuurprogramma en de software op uw computer te installeren.
F. Een bevestigingsvenster geeft aan dat u de hardware heeft aangesloten. Klik op ‘OK’ om door te
gaan.
De stuurprogramma's (en eventueel de software) worden nu op uw computer geïnstalleerd.
NB: Als u tijdens de installatie een ‘Windows beveiliging’ (Windows Security) melding krijgt, moet
u deze accepteren door op ‘Dit stuurprogramma toch installeren’ (Install this driver software
anyway) te klikken.
G. Klik na afloop van de installatie op ‘Finish’ (Voltooien) om de installatiewizard te sluiten.
H. Het hulpprogramma Conceptronic Wireless Network Config Utility wordt geopend als u ervoor heeft
gekozen om zowel de stuurprogramma's als de software te installeren.
NB: We raden u aan om na afloop van de installatie van de nieuwe hardware uw computer opnieuw op te
starten.
U kunt nu verdergaan met hoofdstuk 5 om verbinding te maken met een draadloos netwerk.

NEDERLANDS
4
5. Verbinden met een draadloos netwerk
In dit hoofdstuk leest u hoe u verbinding kunt maken met uw draadloze netwerk via de 150NWireless USB
Adapter en het hulpprogramma Conceptronic Wireless Network Config Utility.
NB: De WPS-functionaliteit en het hulpprogramma Conceptronic Wireless Network Config Utility zijn niet
beschikbaar als u ervoor heeft gekozen om de ingebouwde stuurprogramma's van Windows 7 te
gebruiken of in het vorige hoofdstuk bij de installatie van de stuurprogramma's en de software heeft
gekozen voor ‘Install drivers only’ (Alleen stuurprogramma's installeren). In dat geval is paragraaf
5.1 - 5.4 voor u niet van toepassing. U kunt dan verdergaan met paragraaf 5.5 voor informatie hoe u
verbinding kunt maken met uw draadloze netwerk.
5.1 Hulpprogramma Conceptronic Wireless Network Config Utility
Na afloop van de installatie van de stuurprogramma's en de software wordt het hulpprogramma
Conceptronic Wireless Network Config Utility geopend en ziet u de draadloze netwerken in uw omgeving
op het scherm:
Als het hulpprogramma niet wordt geopend, dubbelklikt u in het systeemvak op het pictogram van dit
programma:
U kunt op twee verschillende manieren verbinding maken met uw draadloze netwerk: automatisch met
behulp van de WPS-functie (Wi-Fi Protected Setup) of handmatig met het hulpprogramma Wireless
Network Config.

NEDERLANDS
5
5.2 Automatisch verbinden met behulp van de (virtuele) WPS-knop.
De Conceptronic 150NWireless USB Adapter ondersteunt WPS (Wi-Fi Protected Setup, beveiligde instelling
draadloos netwerk). WPS is een standaard waarmee u uw draadloze netwerk eenvoudig kunt beveiligen.
Met WPS beveiligt u uw draadloze netwerk in slechts enkele eenvoudige stappen zonder dat hiervoor
kennis van de verschillende encryptiemethodes vereist is.
NB: Om de WPS-functie van uw 150NWireless USB Adapter te kunnen gebruiken, moet uw router of
access point eveneens WPS ondersteunen.
-Selecteer in het hulpprogramma de pagina ‘WPS’.
-Start de WPS-configuratie op uw router of access point door op de WPS-knop van het apparaat te
drukken of in de web-interface van het apparaat op de WPS-knop te klikken.
-Druk op de WPS-knop van de 150NWireless USB Adapter (in hoofdstuk 2 ziet u waar de WPS-knop zit) of
klik in het hulpprogramma op de virtuele WPS-knop (met opschrift ‘PBC’).
Als de knop wordt ingedrukt, probeert het hulpprogramma verbinding te maken met uw draadloze
netwerk. Als het hoofdvenster van het hulpprogramma op uw scherm staat, ziet u onderaan dit venster de
WPS-activiteit:
Wanneer de WPS-authenticatie is gelukt, ziet u even de melding ‘Get WPS profile successfully’ (WPS-
profiel verkregen).
-Selecteer het zojuist aangemaakte WPS-profiel in de ‘WPS Profile List’ (WPS profielenlijst) en klik op
‘Connect’ (Verbinden) om draadloos verbinding te maken.
U wordt nu verbonden met uw draadloze netwerk. Het hulpprogramma geeft de signaalsterkte aan in uw
systeemvak:

NEDERLANDS
6
5.3 Automatisch verbinden met de WPS pin-codefunctie.
Als uw router of access point over WPS beschikt maar geen (virtuele) drukknop heeft, kunt u ook een WPS-
verbinding maken met behulp van de pin-codefunctie.
NB: Dit is alleen mogelijk als de WPS pin-codefunctie kan worden ingesteld in de web-interface van uw
draadloze router of access point.
Het hulpprogramma kan werken in de stand ‘Enrollee’ (Aangemeld apparaat) of ‘Registrar’ (Registrerend
apparaat):
-Als voor ‘Enrollee’ wordt gekozen, genereert het hulpprogramma zelf een pin-code die vervolgens in de
WPS-configuratie van uw router of access point moet worden ingegeven.
-Als voor ‘Registrar’ wordt gekozen, moet u een pin-code ingeven in het hulpprogramma. Deze stand is
nodig wanneer uw router of access point een pin-code afgeeft die voor de draadloze verbinding moet
worden gebruikt.
-Activeer de WPS pin-codefunctie op uw router of access point.
-Selecteer de juiste ‘Config Mode’ in het hulpprogramma, zoals aangegeven in de voorgaande
informatie.
-Klik in het hulpprogramma op de ‘PIN’ knop.
U ziet nu de WPS-activiteit onderin het venster:
Wanneer de WPS-autorisatie is gelukt, ziet u even de melding ‘PIN - Get WPS profile successfully’ (PIN
WPS-profiel verkregen).
-Selecteer het zojuist aangemaakte WPS-profiel in de ‘WPS Profile List’ (WPS profielenlijst) en klik op
‘Connect’ (Verbinden) om draadloos verbinding te maken.
U wordt nu verbonden met uw draadloze netwerk. Het hulpprogramma geeft de signaalsterkte aan in uw
systeemvak:

NEDERLANDS
7
5.4 Handmatig verbinding maken met uw draadloze netwerk
Het hulpprogramma toont alle draadloze netwerken die binnen bereik zijn van uw 150NWireless USB
Adapter. Als uw draadloze netwerk niet wordt getoond, kunt u op de knop ‘Rescan’ (Opnieuw scannen)
klikken om opnieuw naar netwerken te zoeken.
-Selecteer in de lijst van draadloze netwerken het netwerk waarmee u verbinding wilt maken.
-Klik op ‘Add to Profile’ (Aan profiel toevoegen).
Het hulpprogramma klapt in en de opties van ‘Add to Profile’ (Aan profiel toevoegen) worden getoond.
NB: Als u tijdelijk verbinding wilt maken met een draadloos netwerk (zoals een hotspot), kunt u ook de
knop ‘Connect’ (Verbinden) gebruiken. Als u in plaats van de knop ‘Add to Profile’ de knop
‘Connect’ gebruikt, wordt de verbindingsinformatie verwijderd wanneer u uw computer opnieuw
opstart.
Netwerk zonder wachtwoordbeveiliging:
Geef een naam in voor uw profiel, zorg ervoor dat de juiste SSID (identificatie van het draadloze netwerk)
is geselecteerd en klik op de knop ‘OK’ om het profiel aan uw profielenlijst toe te voegen.
Het hulpprogramma opent automatisch het venster ‘Profile’ (Profiel). Selecteer het zojuist aangemaakte
profiel en klik op de knop ‘Activate’ (Activeren) om verbinding te maken met het draadloze netwerk.
Het hulpprogramma maakt nu rechtstreeks verbinding met het draadloze netwerk. Wanneer de verbinding
tot stand is gebracht, geeft het hulpprogramma de signaalsterkte aan in uw systeemvak:
NB: Als u verbinding met uw eigen netwerk maakt en het netwerk niet met een wachtwoord beveiligd is,
raden we u aan de wachtwoordbeveiliging van uw netwerk in te schakelen om toegang door
onbevoegden te voorkomen.

NEDERLANDS
8
Netwerk met wachtwoordbeveiliging:
Geef een naam in voor uw profiel, zorg ervoor dat de juiste SSID (identificatie van het draadloze netwerk)
is geselecteerd en klik op de knop ‘Auth.\Encry.’ (Autorisatie/versleuteling).
Controleer of de automatisch vastgestelde beveiligingsmethode klopt met de instellingen van uw
draadloze netwerk en geef de beveiligingssleutel of wachtwoordzin van uw draadloze netwerk in in het
veld ‘WPA Preshared Key’ (Vooraf gedeelde WPA-sleutel).
NB: Op sommige routers en access points vindt u de standaard beveiligingssleutel (encryption key) of
wachtwoordzin (passphrase) op een etiket aan de onderkant van het apparaat.
Klink op de knop ‘OK’ om het profiel aan uw profielenlijst toe te voegen. Het hulpprogramma opent
automatisch het venster ‘Profile’ (Profiel).
Selecteer het zojuist aangemaakte profiel en klik op de knop ‘Activate’ (Activeren) om verbinding te
maken met het draadloze netwerk.
Het hulpprogramma maakt nu rechtstreeks verbinding met het draadloze netwerk. Wanneer de verbinding
tot stand is gebracht, geeft het hulpprogramma de signaalsterkte aan in uw systeemvak:

NEDERLANDS
9
5.5 Als alleen de stuurprogramma's zijn geïnstalleerd, of bij gebruik van Windows 7
Wanneer u ervoor gekozen heeft om de stuurprogramma's/software van Conceptronic niet te installeren
omdat u Windows 7 gebruikt, of alleen de Conceptronic stuurprogramma's heeft geïnstalleerd (dus zonder
de overige software) moet u de normale Windows wizard gebruiken om verbinding te maken met een
draadloos netwerk.
U vindt informatie over de wizards voor draadloze netwerkverbinding op de volgende internetpagina's:
•http://support.microsoft.com/kb/928429
•http://www.microsoft.com/windowsxp/using/networking/setup/wireless.mspx#4
NB: Zonder de Conceptronic stuurprogramma's en software kunt u geen gebruik maken van WPS. Als u de
WPS-functionaliteit wilt gebruiken, moet u de stuurprogramma's en de software (opnieuw)
installeren zoals beschreven in hoofdstuk 4.
Veel plezier met de Conceptronic 150NWireless USB Adapter!

ENGLISH
10
Conceptronic C150RU
User Manual
Congratulations on the purchase of your
Conceptronic 150NWireless USB Adapter
This user manual gives you a step-by-step explanation of how to install and use the Conceptronic 150N
Wireless USB Adapter on your computer.
If you need more information or support for your product, we advise you to visit our Service & Support
website at www.conceptronic.net/support and select one of the following options:
•FAQ : Frequently Asked Questions database
•Downloads : Manuals, Drivers, Firmware and more downloads
•Contact : Contact Conceptronic Support
For general information about Conceptronic products visit the Conceptronic website at
www.conceptronic.net
The information in this manual is based on Windows 7 and Vista, but can differ from your computer when
you are using a different operating system.
Some functions described in this manual will require manual operation or configuration of your wireless
router or access point. Refer to the documentation of your wireless router or access point for more
information regarding these functions.
1. Package contents
The following items are present in the package of the Conceptronic 150NWireless USB Adapter:
•Conceptronic 150NWireless USB Adapter
•Product CD-ROM
•This multi language user manual
•Warranty card & CE declaration booklet

ENGLISH
11
2. The C150RU explained
Top Bottom
Nr Description Status Explanation
1 USB connector -Connect the C150RU to your computer.
2 Ventilation holes - Breathing holes for ventilation.
3 Activity LED Flashing consistently The adapter is not connected to a network.
Flashing randomly The adapter is connected to a network and
sending or receiving data.
4 WPS button - Press to start the WPS function.
3. Hardware installation
Before you can install the drivers & software, you need to connect the 150NWireless USB Adapter to your
computer.
•Turn on your computer.
•Plug the 150NWireless USB Adapter into a free USB port on your computer.
The computer will recognize new hardware and shows the ‘New Hardware Wizard’.
•Ignore this wizard or click on “Cancel” to close this wizard.
You can now proceed with the driver & software installation, described in chapter 4.
Note: When using Windows 7, you may skip chapter 4, since windows 7 will automatically install the
needed native drivers. However, when using these native drivers, the WPS functionality and the
Conceptronic Wireless Network Config Utility are not available. When you choose to skip chapter
4, you can also skip chapter 5.1 ~ 5.4 and continue to chapter 5.5.
3
4
1
2
1

ENGLISH
12
4. Driver & software installation
When the 150NWireless USB Adapter is connected to your computer, you can proceed with installing the
Conceptronic drivers & software.
A. Insert the CD-ROM in the optical drive of your computer. The AutoPlay option will be shown
automatically. Click on “Run Autorun.exe” to start the autorun menu.
Note: If the AutoPlay option is not shown, you can start the autorun menu by browsing to
“Computer” and double clicking on your optical drive.
B. Select the option “Install Driver & Software” from the autorun menu. The installation wizard will
appear.
Note: You might get a “User Account Control” warning message, which you will need to accept by
clicking on “Yes”.
C. Select the language you want to use for the installer and click on “OK” to proceed.
D. Select “Install drivers and Conceptronic Wireless Network Config Utility” if you want to use the
Conceptronic software, or select “Install drivers only” if you want to use the standard Windows
Wireless Configuration utility. Click on “Next” to proceed.
E. Click on “Install” to install the driver and software.
F. A popup verifying that you have connected the hardware will be shown. Click on “OK” to proceed.
The drivers & software (if selected) will be installed on your computer.
Note: During the installation, you might get a “Windows Security” warning message, which you
will need to accept by clicking “Install this driver software anyway”.
G. When the installation is finished, click on “Finish” to close the installation wizard.
H. The Conceptronic Wireless Network Config Utility will be shown if you have selected to install the
drivers and the software.
Note: It is recommended to restart your computer when the new hardware installation has been
completed.
You can now proceed to chapter 5 to connect to a wireless network.

ENGLISH
13
5. Connect to a wireless network
This chapter will explain how you can connect to your wireless network by using the 150NWireless USB
Adapter and the Conceptronic Wireless Network Config Utility.
Note: If you have chosen to use the native drivers of Windows 7, or you have chosen “Install drivers
only” during the installation of the drivers & software in the previous chapter, the WPS
functionality and the Conceptronic Wireless Network Config Utility will not be available.
Therefore, chapter 5.1 ~ 5.4 will not apply for you. Continue to chapter 5.5 for information how
you can connect to your wireless network.
5.1 The Conceptronic Wireless Network Config Utility
When the installation of the drivers & software is completed, the Conceptronic Wireless Network Config
Utility will be shown on your screen, displaying the wireless networks in your area:
If the wireless utility is not shown, double click on the system tray icon of the wireless utility:
Connecting to your wireless network can be done in two different ways: automatically using the Wi-Fi
Protected Setup (WPS) option or manually using the wireless utility.

ENGLISH
14
5.2 Connect automatically using the WPS (Virtual) Push Button
The Conceptronic 150NWireless USB Adapter supports WPS (Wi-Fi Protected Setup). WPS is a standard to
easily secure your wireless network. With WPS you can protect your wireless network with just a few easy
steps without knowledge of different encryption methods.
Note: To use the WPS option of the 150NWireless USB Adapter your router or access point also needs to
support WPS.
-Select the page ”WPS” in the wireless utility.
-Start WPS configuration on your router or access point by either pressing the WPS button on the device
or the soft button in the web interface of the device.
-Press the WPS button on the 150NWireless USB Adapter (refer to chapter 2 to see where the WPS
button is located) or use the virtual WPS Push Button (named “PBC”) in the wireless utility.
The wireless utility will be triggered by the (virtual) WPS button and will try to connect to your wireless
network. If the wireless utility main window is shown on your screen, you can see the WPS activity at the
bottom of the window:
When the WPS Push Button authentication is completed successfully, the message “Get WPS profile
successfully” will be shown shortly.
-Select the newly created WPS profile from the ‘WPS Profile List’ and click on “Connect” to establish
the wireless connection.
You are now connected to your wireless network. The wireless utility will indicate the signal strength in
your system tray:

ENGLISH
15
5.3 Connect automatically using the WPS PIN Code function
When your router or access point is WPS capable, but does not have a (virtual) push button, you can
create a WPS connection using the PIN Code function.
Note: Your wireless router or access point needs to have the WPS PIN Code function in its web interface
in order to use this function.
The wireless utility can work in “Enrollee” or “Registrar” mode:
-When “Enrollee” is selected, the wireless utility will generate a PIN Code which must be entered in the
WPS configuration of your router or access point.
-When “Registrar” mode is selected, you can enter a PIN Code in the wireless utility. This mode is
needed when your router or access point provides a PIN Code which must be used for the wireless
connection.
-Activate the WPS PIN Code function on your router or access point.
-Select the correct “Config Mode” in the wireless utility, according to the information above.
-Click on the “PIN” button in the wireless utility.
You can see the WPS activity at the bottom of the window:
When the WPS PIN Code authentication is completed successfully, the message “PIN – Get WPS profile
successfully” will be shown shortly.
-Select the newly created WPS profile from the ‘WPS Profile List’ and click on “Connect” to establish
the wireless connection.
You are now connected to your wireless network. The wireless utility will indicate the signal strength in
your system tray:

ENGLISH
16
5.4 Connect manually to your wireless network
The wireless utility will automatically show all available wireless networks within the range of your 150N
Wireless USB Adapter. If your wireless network is not shown, click on the “Rescan” button to scan for
available wireless networks.
-Select the network you want to connect to from the list of available wireless networks.
-Click on “Add to Profile”.
The wireless utility will collaps and shows the “Add to Profile” options.
Note: If you want to connect to a temporary wireless network (for example: a hotspot), you can also use
the “Connect” button. When using the “Connect” button instead of the “Add to Profile” button,
the connection information will be deleted when you restart your computer.
Non-password protected network (unsecured):
Enter a name for your profile, verify that the correct SSID (wireless network) is selected and click the
“OK” button to add the profile your profile list.
The Wireless Utility will automatically open the ‘Profile’ window. Select the new created profile and click
the “Activate” button to connect to the wireless network.
The wireless utility will connect to the wireless network directly. When you are connected, the wireless
utility will indicate the signal strength in your system tray:
Note: If you are connecting to your own network and it is unsecured (not protected by a password), we
advise you to enable security on your network to prevent unauthorized access to your network.

ENGLISH
17
Password protected network (secured):
Enter a name for your profile, verify that the correct SSID (wireless network) is selected click on the
“Auth.\Encry.” Button.
Verify if the automatically selected security matches the settings of your wireless networks and enter the
encryption key or passphrase of your wireless network into the “WPA Preshared Key” field.
Note: On some routers or access points, the default encryption key or passphrase is mentioned on a
sticker on the bottom of the device.
Click the “OK” button to add the profile your profile list. The wireless utility will automatically open the
‘Profile’ window.
Select the new created profile and click the “Activate” button to connect to the wireless network.
The wireless utility will connect to the wireless network directly. When you are connected, the wireless
utility will indicate the signal strength in your system tray:

ENGLISH
18
5.5 Driver only or Windows 7 native driver installation
When you have chosen not to install the Conceptronic drivers & software for Windows 7, or you have only
installed the Conceptronic drivers without the software, you need to use the standard Windows wireless
network connection wizard to connect to a wireless network.
You can find connection information for these wireless network connection wizards on the following links:
•http://support.microsoft.com/kb/928429
•http://www.microsoft.com/windowsxp/using/networking/setup/wireless.mspx#4
Note: Without the Conceptronic drivers & software, you cannot use the WPS functionality. If you want
to use the WPS functionality, (re)install the drivers & software as described in chapter 4.
Enjoy the use of the Conceptronic 150NWireless USB Adapter!

ESPAÑOL
19
C150RU de Conceptronic
Manual de usuario
Felicidades por la compra de su
adaptador USB inalámbrico 150Nde Conceptronic
Este manual de usuario le orientará paso a paso sobre cómo instalar y utilizar el adaptador USB
inalámbrico 150N de Conceptronic en su ordenador.
Si necesita más información o soporte técnico acerca de su producto, le recomendamos que visite nuestra
página web de Servicio y Soporte www.conceptronic.net/support y seleccione una de las siguientes
opciones:
•FAQ : Base de datos con las preguntas más frecuentes (FAQ)
•Descargas : Manuales, drivers, firmware y otras descargas
•Contacto : Contactar con el servicio técnico de Conceptronic
Para información general sobre los productos de Conceptronic, visite la página web de Conceptronic
www.conceptronic.net.
La información de este manual está basada en Windows 7 y Vista, y las indicaciones podrían no coincidir
exactamente con su caso si utiliza un sistema operativo diferente.
Algunas funciones descritas en este manual requerirán que configure manualmente su router o punto de
acceso inalámbrico. Consulte la documentación de su router o punto de acceso inalámbrico para más
información acerca de estas funciones.
1. Contenido del paquete
El paquete del adaptador USB inalámbrico 150Nde Conceptronic contiene los elementos siguientes:
•Adaptador USB inalámbrico 150Nde Conceptronic
•CD-ROM del producto
•Este manual de usuario en varios idiomas
•Tarjeta de garantía y folleto de declaración de conformidad CE

ESPAÑOL
20
2. Descripción del C150RU
Parte superior Parte inferior
Nº Descripción Estado Explicación
1Conector USB - Para conectar el C150RU a su ordenador.
2 Orificios de ventilación - Orificios para la ventilación del dispositivo.
3LED de actividad Parpadeo regular El adaptador no está conectado a ninguna red.
Parpadeo irregular El adaptador está conectado a una red y está enviando
o recibiendo datos.
4Botón WPS - Pulse este botón para iniciar la función WPS.
3. Instalación del hardware
Antes de instalar los drivers y el software, debe conectar el adaptador USB inalámbrico 150N a su
ordenador.
•Encienda el ordenador.
•Conecte el adaptador USB inalámbrico 150N a un puerto USB disponible de su ordenador.
Su ordenador detectará el nuevo hardware y mostrará el asistente de instalación de nuevo hardware.
•Ignore este asistente o haga clic en “Cancelar” para cerrarlo.
Ahora puede proceder con la instalación de los drivers y del software, lo cual se describe en el apartado
4.
Nota: Si utiliza Windows 7, puede omitir el apartado 4, ya que Windows 7 instalará los drivers nativos
necesarios. No obstante, al utilizar esos drivers nativos, la funcionalidad WPS y la utilidad de
configuración de red inalámbrica de Conceptronic no estarán disponibles. Si omite el apartado 4,
también puede omitir los apartados 5.1 a5.4 y continuar en el apartado 5.5.
3
4
1
2
1
Table of contents
Languages:
Other Conceptronic Modem manuals
Popular Modem manuals by other brands

TT Systems
TT Systems Modem Mate MPA-100A user guide

SMC Networks
SMC Networks Barricade SMC7904BRB2 Specifications

Aduance
Aduance i-tec user guide

Patton electronics
Patton electronics 1045 user manual

ZyXEL Communications
ZyXEL Communications P-2612HW-F1 - user guide

Motorola
Motorola SBV5121 quick start guide