manuals.online logo
Brands
  1. Home
  2. •
  3. Brands
  4. •
  5. ENSA
  6. •
  7. Lantern
  8. •
  9. ENSA LOL-A16 S Series User manual

ENSA LOL-A16 S Series User manual

This manual suits for next models

1

Other ENSA Lantern manuals

ENSA LEDBT18WS2 User manual

ENSA

ENSA LEDBT18WS2 User manual

ENSA SSL-B Series User manual

ENSA

ENSA SSL-B Series User manual

Popular Lantern manuals by other brands

DS Produkte TRF18P0752-1 instructions

DS Produkte

DS Produkte TRF18P0752-1 instructions

Stahl ECOLUX 6610 Series operating instructions

Stahl

Stahl ECOLUX 6610 Series operating instructions

SNOWJOE SUNJOE 24V-LGT500-CT Operator's manual

SNOWJOE

SNOWJOE SUNJOE 24V-LGT500-CT Operator's manual

PRG VARI LITE VL5 Service manual

PRG

PRG VARI LITE VL5 Service manual

Raytec VARIO2 series installation guide

Raytec

Raytec VARIO2 series installation guide

LUG OFFICE LB LED N/T Installation instruction

LUG

LUG OFFICE LB LED N/T Installation instruction

Draper RLEDL19/B instructions

Draper

Draper RLEDL19/B instructions

Green Lighting TRI-SENSOR GL4612LU Assembly & fitting instructions

Green Lighting

Green Lighting TRI-SENSOR GL4612LU Assembly & fitting instructions

Panasonic EY3741B57 operating instructions

Panasonic

Panasonic EY3741B57 operating instructions

Clas Ohlson LCC8T instruction manual

Clas Ohlson

Clas Ohlson LCC8T instruction manual

Coolon WDN-140 manual

Coolon

Coolon WDN-140 manual

shada 1000436 instruction manual

shada

shada 1000436 instruction manual

BEGA 84 036 Instructions for use

BEGA

BEGA 84 036 Instructions for use

BEGA 33 596 Instructions for use

BEGA

BEGA 33 596 Instructions for use

Dale Tiffany GT701162 Assembly instructions

Dale Tiffany

Dale Tiffany GT701162 Assembly instructions

Wagan Brite Nite Pop-Up USB Lantern user manual

Wagan

Wagan Brite Nite Pop-Up USB Lantern user manual

Eaton Crouse-Hinds Pauluhn DLLA M2 Series Installation & maintenance information

Eaton

Eaton Crouse-Hinds Pauluhn DLLA M2 Series Installation & maintenance information

Lighting Technologies СТ STRIPE 128 HF manual

Lighting Technologies

Lighting Technologies СТ STRIPE 128 HF manual

manuals.online logo
manuals.online logoBrands
  • About & Mission
  • Contact us
  • Privacy Policy
  • Terms and Conditions

Copyright 2025 Manuals.Online. All Rights Reserved.

LOL-A16-xS
INTELLIGENT LED OYSTER LIGHT
INSTRUCTION MANUAL
www.ensalife.com
Thank you for purchasing an LOL-A16-xS Intelligent LED Oyster Light.
The ENSA LED oyster light features a robust weather and vandal resistant housing making it
ideal for outdoor and indoor use. Available in cool and warm white colour temperatures, these
oyster lights utilise the latest LED technology to provide evenly dispersed, low glare lighting with
at least 75lm/W luminous efficacy and up to 30,000 hours rated lifespan.
For installation by a qualified electrician only.
INSTALLATION:
•Rotate the plastic clockwise to open, screw
off the screws on the lampshade to open.
•Insert wire through the holes provided and
connect according to connect-wire diagram.
•Fix the metal bracket base on the ceiling through
the holes on base pan with screws provided.
•Switch on the power to test.
WIRING:
•Connect the two sensor wires together.
•Connect the AC power supply into the “L N” port.
DIP SWITCH SETTINGS
:
SENSOR INFORMATION:
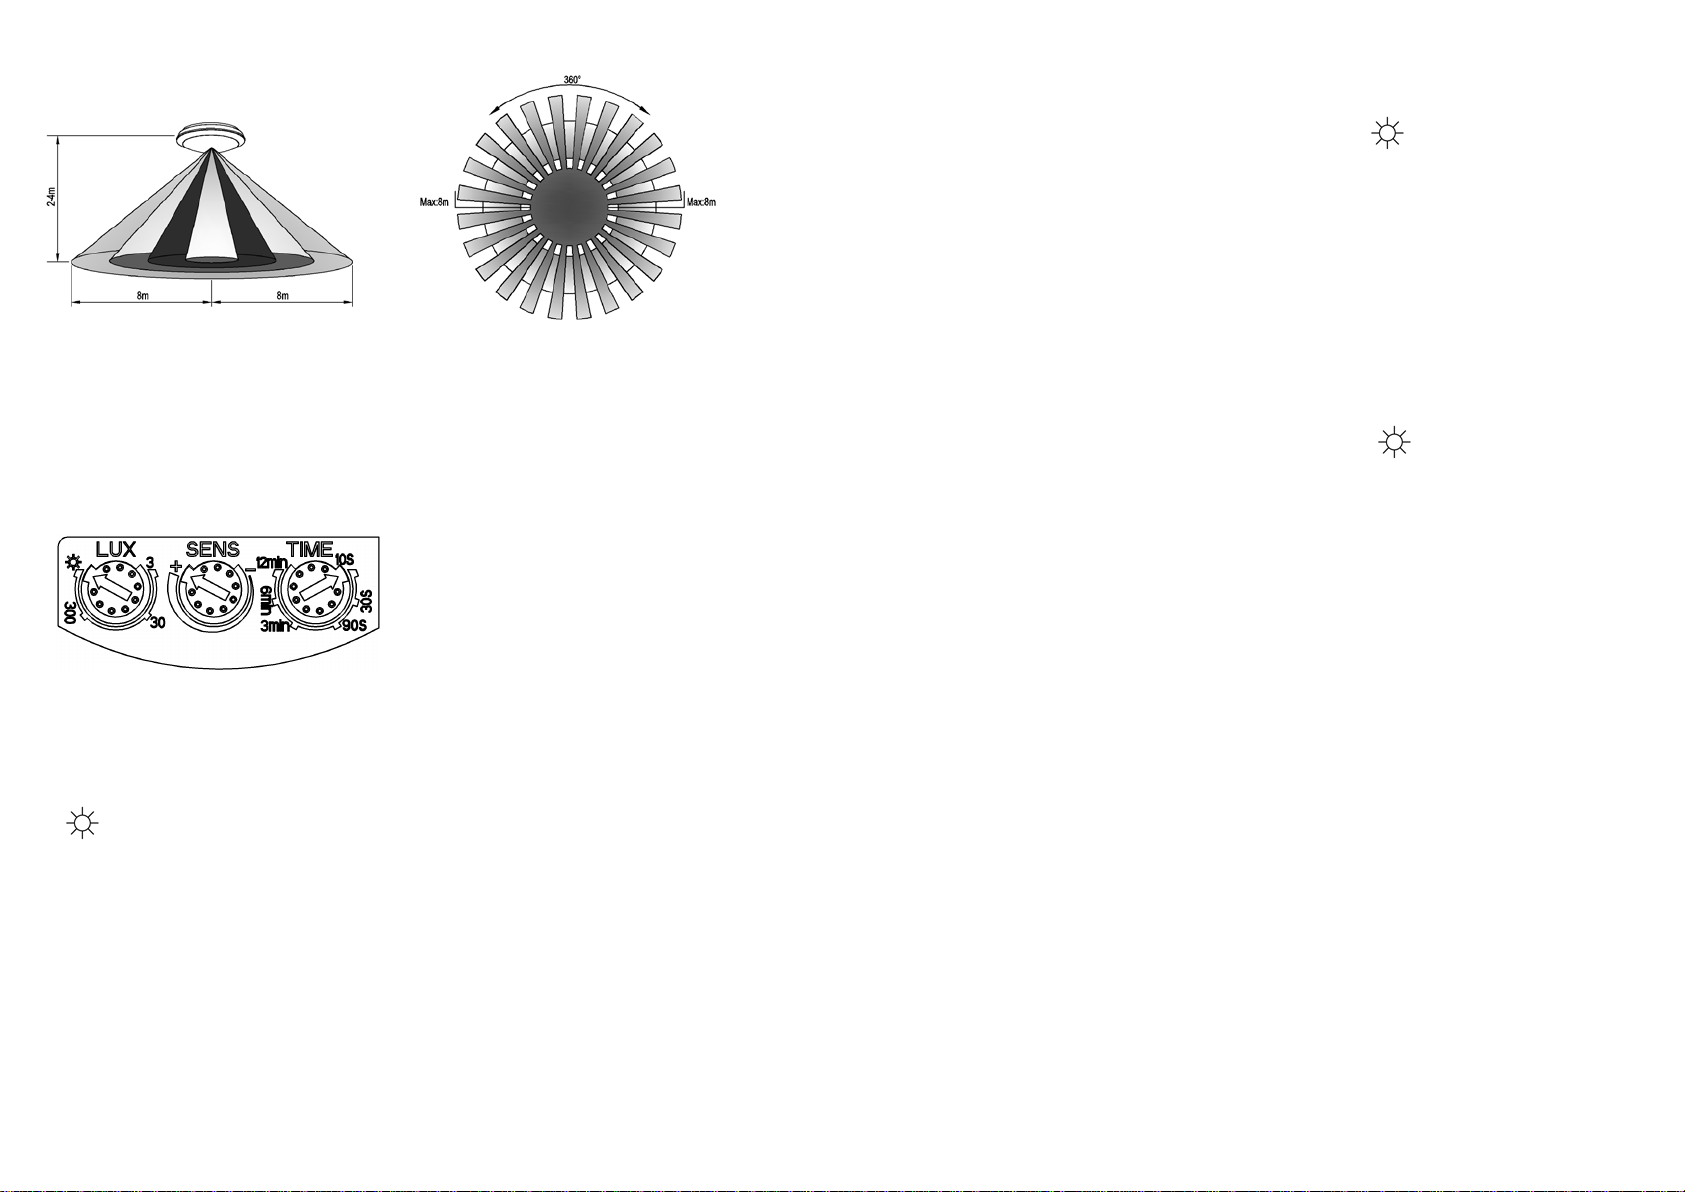
Detection Range – 1 & 2
DIP switches 1 & 2 adjust the
Recommended installation height: 2-4m Maximum detection Area: 8m
SETTINGS:
LUX - Daylight Sensor
This knob adjusts the minimum light (lux) levels required before the light changes to Sensing
Mode. The light level threshold must be reached before motion detection activates the light.
( = 2000 lux)
SENS - Detection Range
This knob adjusts the maximum motion detection range, from 100% (+) to 0% (-).
TIME - On-Time Delay
This knob adjusts the period of time after motion is detected that the light stays on for. After the
On-Time Delay has elapsed, the light returns to Sensing Mode.
TESTING
:
•Turn the LUX knob clockwise to the maximum setting ( ).
•Turn the SENS knob clockwise to the maximum setting (+).
•Turn the TIME knob counter-clockwise to the minimum setting (10s)
•When powered on, the light should turn on. After 10 seconds, the light should turn off
automatically
•When motion is detected, the light should turn back on for 10 seconds.
•Turn the LUX knob anti-clockwise to the minimum setting (3).
•The light should now activately only when the ambient light level is less than 3 lux
(darkness) and motion is detected.
NOTE: When testing in daylight, turn the LUX knob to 2000 lux ( ), otherwise the sensor will
not function properly.
TROUBLESHOOTING
:
•The light isn’t turning on.
oCheck the power supply is properly connected.
oCheck to see whether the motion detector is working by the indicator light.
oIf the indicator light does not activate, check the Daylight Sensor knob settings.
The ambient lux may be too high for the light to turn on.
•Motion detection is weak.
oCheck the front of the sensor to ensure it isn’t obstructed.
oChange the Detection Range knob to 100% to ensure highest sensitivity.
oCheck the installation height. The light should not be installed more than 8m
from the ground.
•On-Time Delay won’t activate.
oCheck the On-Time Delay knob settings to see the required delay time.
oTest by ensuring no movement is in front of the motion sensor for that delay time.